How to Set Up VMware Workstation Server: An Expert Guide
VMware Workstation is a great virtualization product that allows you to run multiple virtual machines on Linux and Windows operating systems installed on physical computers. When multiple users need to work with the same virtual machines, they can install VMware Workstation Server on their computers, copy the original VM, and run VM copies on their computers.
Copying a VM to other computers requires additional disk, CPU and memory resources. If the computers are connected to a single LAN (local area network), this method may be not rational. As an alternative, you can provide remote access to a virtual machine (VM) using traditional remote access protocols such as RDP, SSH, VNC etc. This is a credible idea, and a computer running such VMs that are accessible remotely seems to work as a server. Alternatively, you can log in to the host machine (a machine running a hypervisor such as VMware Workstation), run VMware Workstation and power on VMs manually after power loss or restarting a host machine.
Fortunately, VMware allows you to configure VMware Workstation as a server and share VMs over the network, which is a good option for workgroups.

What Is VMware Workstation Server?
VMware Workstation Server is a mode used in VMware Workstation that allows VMs running on top of the underlying host operating system (OS) to start automatically after host OS loading, and to be accessed via the network with the VMware Workstation interface after sharing them.
In the end of the 2000s, VMware supported a standalone solution which name is VMware Server (formerly known as VMware GSX Server). VMware Server is a free hypervisor that can be installed on Linux and Windows server operating systems, and VMs can be run and accessed remotely by using the VMware client-server model. It is possible to create only one VM snapshot and it is not possible to clone VMs in VMware Server.
VMware Server support was discontinued in 2011, after releasing v2.0 that also provided a WEB interface to manage VMs remotely. As the replacement for VMware Server, VMware released a new Shared VMs feature for VMware Workstation (that is a paid product) and ESXi Free Edition which is a limited alternative of paid ESXi editions.
Read more about VMware vSphere licensing in this blog post. Notice that VMware ESXi is a type 1 hypervisor and VMware Workstation is a type 2 hypervisor.
VMware Workstation with the Shared VM feature is a good solution for workgroups and small companies. If there is a powerful computer, it can be configured as VMware Workstation Server allowing users with less powerful computers with VMware Workstation installed access shared VMs running on VMware Workstation Server. You can take multiple VM snapshots in VMware Workstation used as a server. Let’s find out how to configure VMware Workstation Server and share VMs in detail.
Configuring VMware Workstation Server
First, make sure that VMware Workstation is installed on your Windows or Linux machine. You can find the complete walkthrough of installing VMware Workstation and creating virtual machines in the blog post about building VMware Home Lab.
If you use Windows, check whether the VMware Workstation Server service is running and is set to start up automatically. Otherwise, the message that VMware Workstation Server is not available will be displayed. The name of the appropriate daemon in Linux is vmware-workstation-server.
Linux is a reliable and secure operating system, so using Linux on a server is a good idea. For this reason, we will share a virtual machine in VMware Workstation 15 running on Linux (Ubuntu 18 x64) in the current example. As VMware Workstation is a multiplatform product, the workflow in Windows is similar.
Sharing a Custom VM
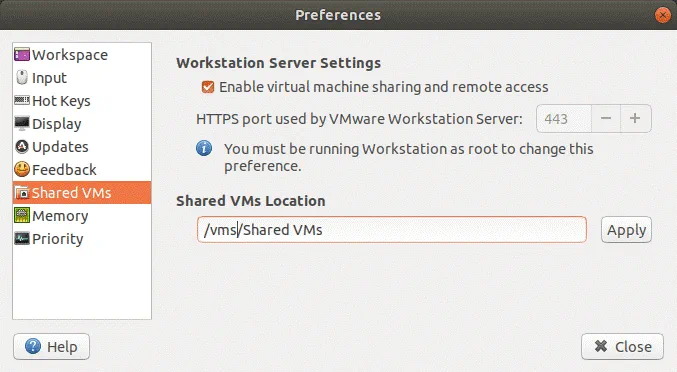
First, set the directory to store shared VMs. Go to Edit > Preferences and select Shared VMs. Tick the Enable virtual machine sharing and remote access checkbox. The HTTPS port used by VMware Workstation Server is 443 by default. You can change the port number only if you have not shared any VMs yet. Let’s set /vms/SharedVMs as the shared VMs location. A separate disk partition is mounted on the /vms/ directory in our example.
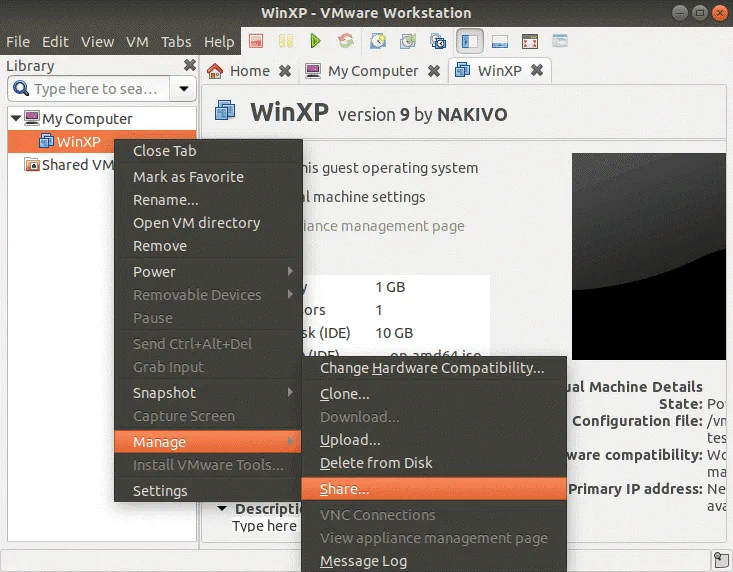
Power off the VM you would like to share if the VM is not powered off. A VM running Windows will be shared in this example. Right click the VM name in the VM library and in the context menu hit Manage > Share.
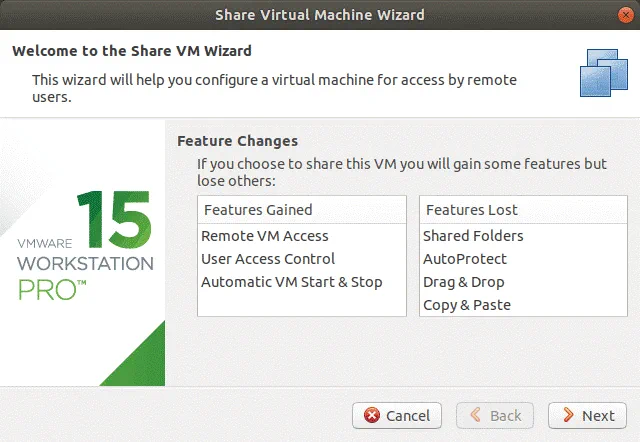
The Share Virtual Machine Wizard will be opened. Be aware that after sharing a VM, features such as Shared Folders, AutoProtect, Drag & Drop, Copy & Paste are lost, and Remote VM Access, User Access Control and Automatic VM Start & Stop are gained for the shared VM. You are notified about this by the first screen of the wizard.
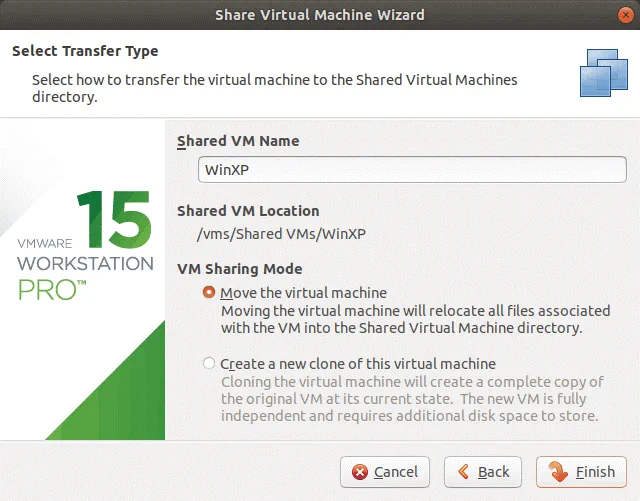
On the second screen of the wizard, enter the shared VM name (WinXP is the name used in this example), check your shared VM location and select one of the two options for VM sharing mode:
- Move the virtual machine.
- Create a new clone of this virtual machine.
Select the first option if you don’t want to save a copy of the VM to be shared. Select the second option to create a full clone from the original VM (the original VM can be used as a backup in some cases). A VM clone will be stored in the shared VMs directory. Changes made in the shared VM will not affect the original VM.
Hit Finish and wait until the VM is prepared to be shared.
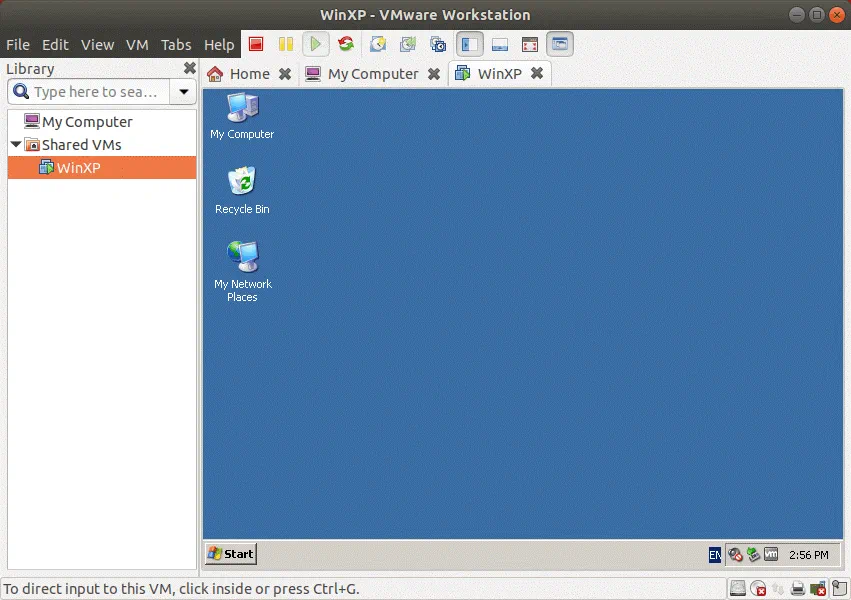
The VM has now been shared. Once a VM is shared, you can see the VM name in the Shared VMs folder of the VM library. This view is displayed on the screenshot below.
Likewise, share the second VM. The second VM is needed to explain how to configure autostart in this example. Let’s use, for instance, a Windows-based VM running a database server as the second VM and configure this VM to start first in the automatic mode.
Managing Autostart
VMware Workstation Server can run in background as a service and allows you to configure VMs to start automatically (after a host machine on which VMware Workstation has been installed is booted, without the need for the user to log in to the operating system manually). Moreover, you can select the boot order for each VM, for example, a VM running the database server should be started first and the VM on which the database client is installed should be started after that with some delay (some time is needed for the database server to be started). Let’s review how to manage autostart for shared VMs in VMware Workstation.
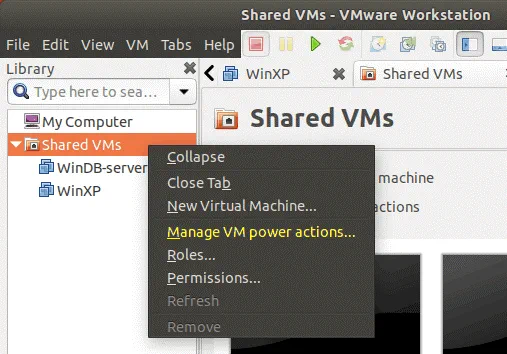
Right click the Shared VMs folder in the VM library and in the context menu, select Manage Power Actions.
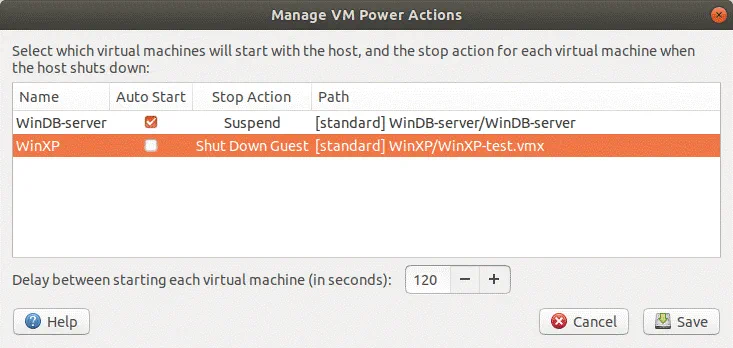
In the opened window, tick the Auto Start checkbox in the appropriate string related to the necessary VM. You can also set the stop action (the action that is performed when you click the Stop button in the VMware Workstation interface). The stop action can have one of the following values: Suspend, Shut Down Guest, Power Off, None. You also see the path of each VM. In the bottom of the window it, is possible to set delays between starting each virtual machine (120 seconds is the default value).
Roles and Permissions
Roles and permissions allow you to create a set of privileges and apply these privileges to the appropriate user for security reasons. You can select a build-in role or create a custom role applying to specific users. For example, one user can have all privileges and another user can have read-only privileges (cannot edit VM settings, create, delete VMs etc.).
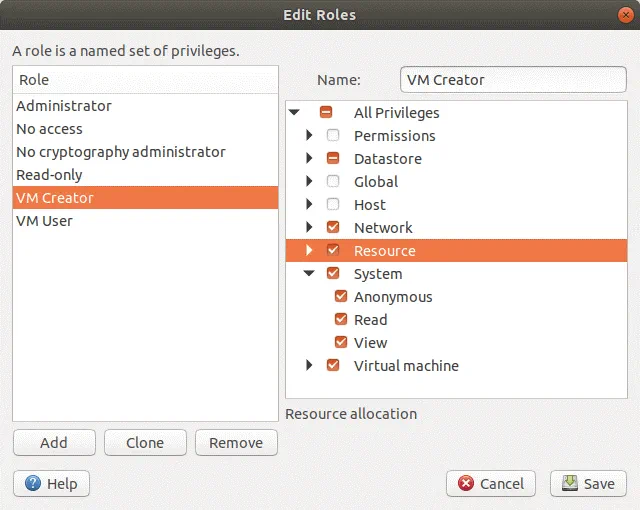
In order to select or edit roles, right click the Shared VMs folder in the VM library and select Roles in the context menu. There are 6 built-in roles available by default: Administrator, No access, No cryptography administrator, Read-only, VM Creator, and VM User. You can create a new custom role from scratch or clone an existing role to a new role and then edit this new role.
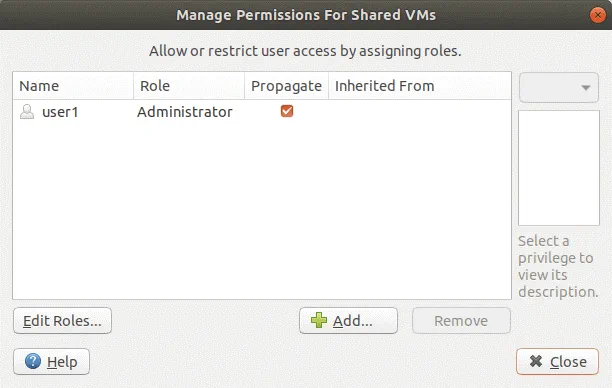
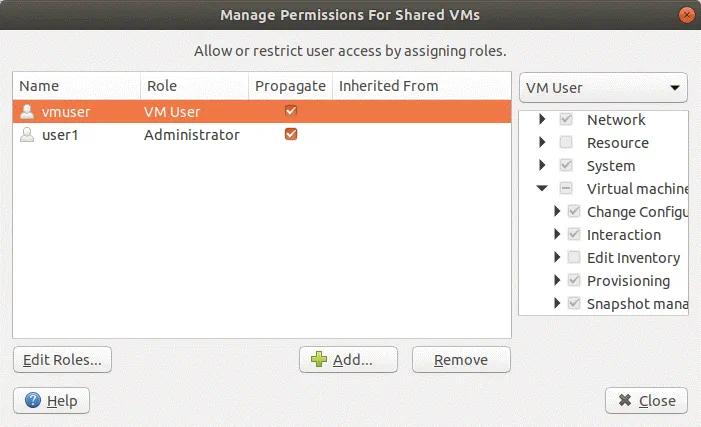
In order to edit user permissions, right click the Shared VMs folder and select Permissions. The name of the regular user used in our Ubuntu system is user1. This user has permissions of the Administrator role in VMware Workstation. Let’s create another user whose name is vmuser, and configure custom permissions for VMware Workstation Server. In the console of Linux on which VMware Workstation Server is configured, run the following command to add the new user (run as root).
adduser vmuser
Set a password and confirm the password for the created user.
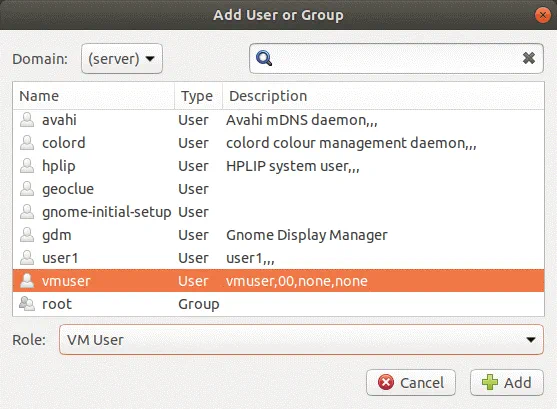
After that, we can add vmuser to the list of users with defined permissions and select the necessary role for this user. Click Add to do this. You can also click Edit Roles and open the window with role settings.
Select vmuser from the list of all users available in the Linux operating system, select role and hit Add. Let’s select the VM user role for user1.
Now that roles and permissions are configured for user1, you can close this window and connect to the Workstation Server from another machine with VMware Workstation installed.
You should know the IP address of the machine on which VMware Workstation Server is configured. It is recommended to use a static IP address on this machine. In Linux, use the ifconfig command to display the IP configuration of network interfaces in the console.
Connecting to a Shared VM
While our VMware Workstation Server is running on the Linux machine, let’s use VMware Workstation installed on a Windows machine to connect to shared VMs residing on the Workstation Server.
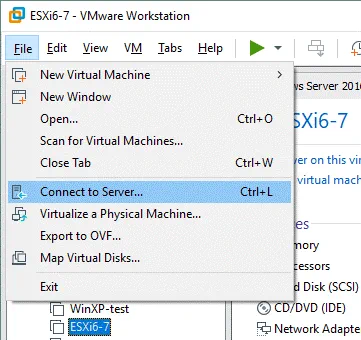
In order to connect to VMware Workstation Server running on the remote machine (a Linux host in this case), open VMware Workstation running on your local machine (a Windows machine in this case) and click File > Connect to Server. This option is also used for connecting to vCenter servers or ESXi hosts.
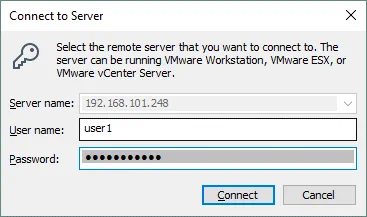
Enter the IP address of your VMware Workstation Server (the Ubuntu Linux machine used in the current example has the 192.168.101.248 IP address). We can use credentials of user1 and vmuser because these Linux users have been configured to access VMware Workstation Server and shared VMs in the interface of VMware Workstation. Let’s log in as user1 that has administrator permissions.
If you get a message about an invalid security certificate, click Connect Anyway.
Once you have connected to the remote VMware Workstation Server by using VMware Workstation installed on your local machine, you can see a new opened tab (the tab is named 192.168.101.248 in this case) with the summary about VMs, tasks, disk, CPU, and memory usage. You can create VMs, change their power state, and edit settings, etc. remotely if your user has the appropriate permissions for doing as much.
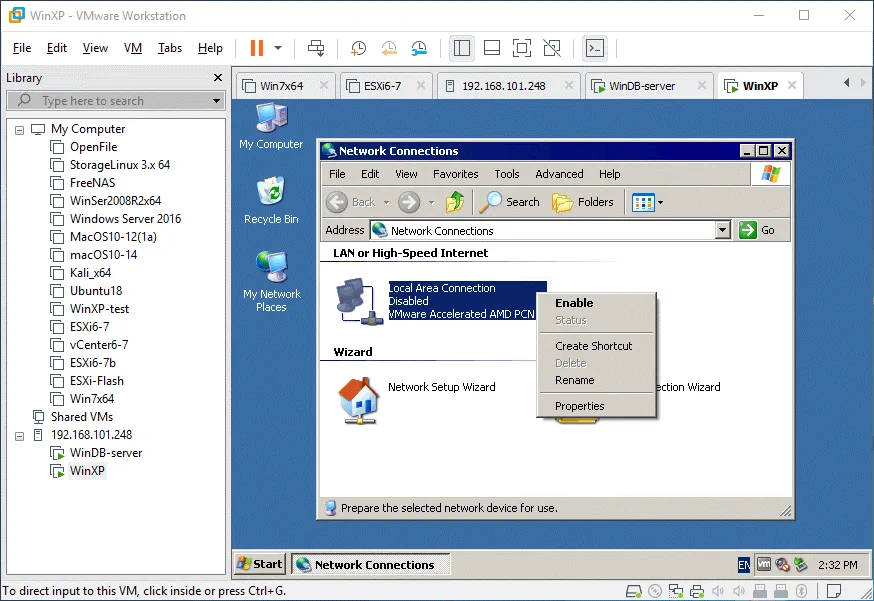
Click the necessary shared VM to see a virtual display of the remote VM. One more advantage of using VMware Workstation, (compared with using traditional remote access protocols) for connecting to remote VMs is the ability to disable a virtual network adapter of the VM without interrupting the opened session used for VM management over the network (see the screenshot below).
VMware WSX
However, not every user has VMware Workstation installed on his/her machine, but it is possible to try installing the alternative web-based interface for managing shared VMs over the network without having VMware Workstation as a client. This solution is called VMware WSX and can be installed on Linux on Windows in addition to VMware Workstation Server. WSX can be downloaded from the VMware web site. The available versions are 1.0.2 and 1.1. Let’s find out how to install VMware WSX 1.1.
Note: if you use the WSX installer v.1.0 on Ubuntu 18, the GUI of the installer may not appear and the process of WSX installation will not be completed. It is better to use WSX 1.1 installer for Linux.
You need the root privileges to install WSX:
sudo -i
Go to the directory where the downloaded WSX installer file is located. In our case, this directory is /vms/
cd /vms/
Check that the installer file is located in this directory and has the appropriate file permissions:
ls -al
You can make the file executable manually:
chmod +x ./VMware-WSX-1.1.0-1158072.x86_64.bundle
Run the installer:
./VMware-WSX-1.1.0-1158072.x86_64.bundle
Note: If the error occurs with the message – Failed to load module “canberra-gtk-module”, try re-installing the module:
apt-get install --reinstall libcanberra-gtk-module
Then run the WSX installer again.
In case of successful execution of the WSX installer, you must see the Window of the installation wizard. Choose a directory for the WSX database and enter the port to use for HTTP access to WSX in the installer window.
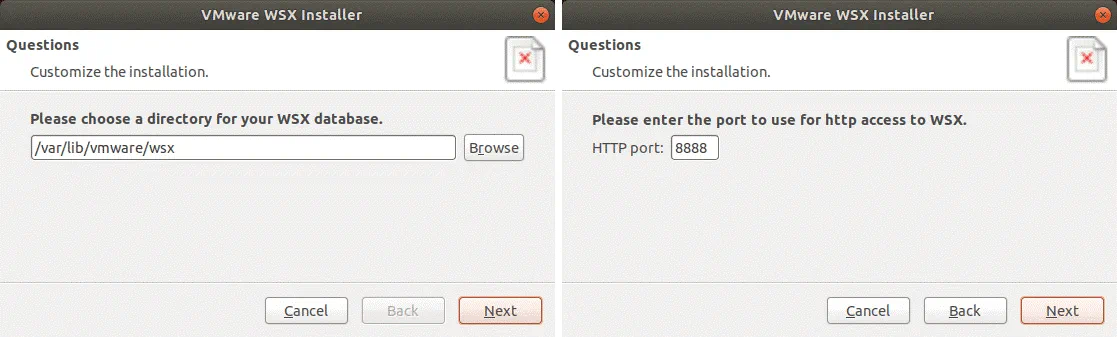
Once the installation of WSX is finished, open a web browser and enter the IP address of your VMware Workstation Server machine and port used for WSX access that you have set during installation (HTTP port 8888 is used by default).
Log in to VMware WSX (you should enter the login and password of the user existing in the operating system on which WSX is running) and you should see the following view in your web browser:

Then select your VMware Workstation Server running shared VMs (Shared VMs localhost, for instance) and try to log in to that Workstation Server as the permitted user (user1 or vmuser in this example).
Note: There is a possibility of getting the error – [Errno 8] _ssl.c:480: EOF occurred in violation of protocol. This is a Python related error – WSX was written on Python 2.6 which doesn’t support TLS v.1 and higher versions, and VMware Workstation 12 and newer Workstation versions require the newest TLS versions. You can try to use WSX with older VMware Workstation versions such as VMware Workstation 11.1.2 and older. Unfortunately, VMware vSphere Client (a standalone application for Windows) cannot be used to connect to VMs shared in VMware Workstation 10 and newer.
Conclusion
The Shared VMs feature was inherited by VMware Workstation from VMware Server which was discontinued. Setting up VMware Workstation Server on Linux or Windows is affordable for small companies and allows you to share VMs over the local area network for common usage. Using shared VMs and VMware Workstation Server helps you to save resources such as CPU, memory and disk space on company computers, even if there is no possibility to deploy vSphere with ESXi servers at the moment.
One more advantage is the possibility for configuring VMs to start in the appropriate order automatically after the host operating system start. In this case, no user interaction is needed to start the VM, comparing to a traditional usage of VMware Workstation. For security reasons, roles and permissions can be configured for users who have to access VMs remotely by using VMware Workstation installed on their machines. VMware Workstation is a powerful and universal hypervisor of the second type that can be used for the majority of users for diverse purposes.