The Ultimate Guide to Office 365 SMTP Settings
Microsoft Office 365 is a cloud solution that is becoming increasingly more popular. The advantage to using Office 365 applications is the possibility they offer to access your applications from different locations and from different devices. One of the most important Office 365 services is Exchange Online. Administrators can create accounts for users and allow those users to send and receive email messages by using Exchange Online servers.
As is largely the case for the most modern email services, users can use the web interface provided by Microsoft in a web browser and use email clients. In order to use an email client for Exchange Online services, Office 365 SMTP settings, POP3 (or IMAP) settings must be configured in the email client. This blog post covers Office 365 SMTP server settings and explains how to configure an email client on two examples.

What Settings Should I Use for an Email Client?
When you use an email client, you should set the configuration for sending and receiving email messages. The following mail protocols are usually used:
SMTP (Simple Mail Transfer Protocol) is an application layer protocol used for email sending. When a client needs to send an email, the client opens a TCP connection to an SMTP server which always listens to the appropriate TCP port (TCP 25 by default). Office 365 SMTP settings must be set in an email client to send an email.
POP3 (Post Office Protocol 3) is a protocol for receiving email messages. Basically, POP3 was developed to delete email messages from a mail server once they are downloaded by an email client. Exchange Online servers is not an exclusion – once you have downloaded an email message in an email client by using a POP3 protocol, you cannot see that message in the web interface of Office 365 Outlook. If you need to access your mail from different devices, using POP3 to receive email on email clients may not be convenient. If you use one computer to send and receive emails, POP3 is a good choice.
IMAP (Internet Message Access Protocol) is an alternative protocol for receiving email messages. When IMAP is used, email messages are stored on a mail server and are not deleted when a user receives email messages. A user can group and categorize received email messages in folders by using an email client installed on a local machine and synchronize this structure with a mail server. You may prefer using IMAP if you need to use email clients on your home and work computer, for example, or if you use both a web interface and an email client.
Microsoft Office 365 Exchange Online supports both POP3 and IMAP protocols for receiving email messages by clients.
Note: 10,000 emails a day is the limit for Office 365 Exchange.
Office 365 SMTP server settings
Server: smtp.office365.com
Alternative server: outlook.office365.com
Port: 587
Encryption: TSL
Authentication: Yes – use your full username and password.
Note: Sending emails also works if TCP 25 is set as a port in connection settings, but using TCP 587 is recommended.
Office 365 POP3 settings
Server: outlook.office365.com
Port: 995
Encryption: TSL
Authentication: Yes – use your full username and password.
Office 365 IMAP settings
Server: outlook.office365.com
Port: 993
Encryption: SSL
Authentication: Yes – use your full username and password.
Configuration Examples
Let’s take a look at how to use Office 365 SMTP settings as well as POP3 and IMAP settings in order to configure an email client in examples. Notice that the full user name (login) must contain domain information (the string after the “@” character), for example, username@domain.com or username@company.onmicrosoft.com
The Office 365 account used to access Exchange Online in this example is:
michaelbose@nakivo.onmicrosoft.com
Please don’t send emails to this mailbox. This is a temporary account used to explain email client configuration (including Office 365 SMTP settings) in this blog post. You can configure any email client that supports mentioned protocols and encryption. Notice that using a proxy server for internet connection is not supported if you wish to use an email client. Microsoft Office Outlook 2016 and Outlook Express are used in our examples to demonstrate email client configuration.
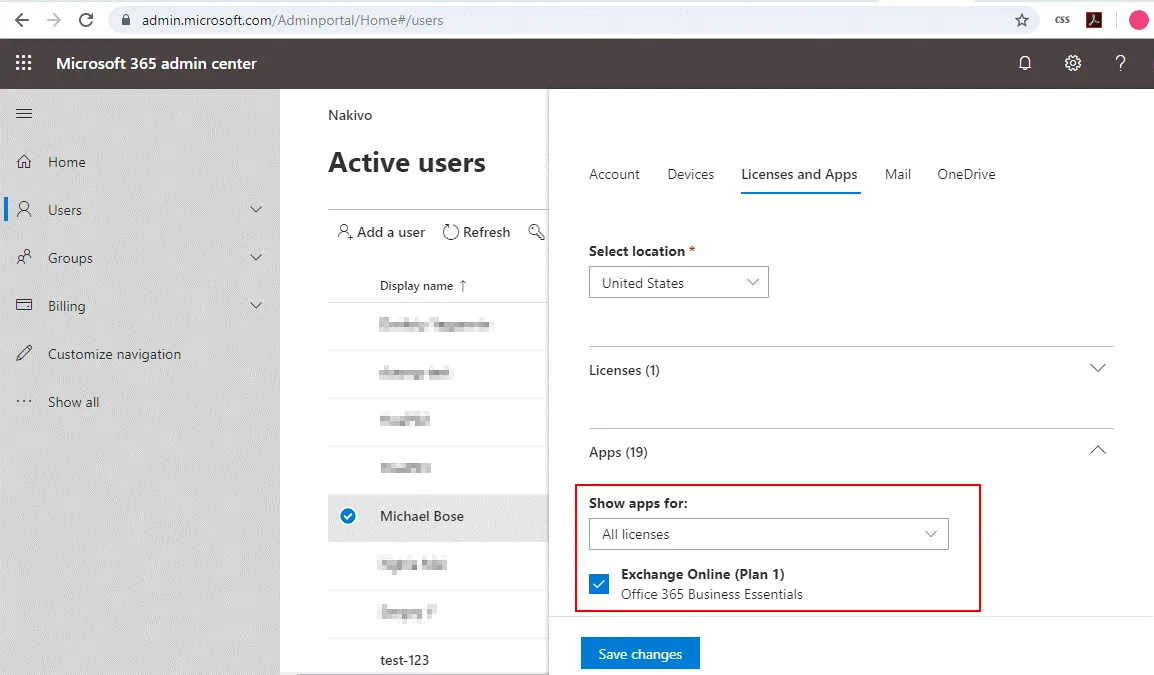
Before going on to configuring an email client for a user, ensure that the necessary user account has the appropriate Office 365 license to use Exchange Online services. You can do this in the Microsoft 365 admin center.
Microsoft Office 2016 Outlook configuration for Exchange Online
We are using Microsoft Office Outlook 2016 installed as a component of Microsoft Office 2016 in this example. Let’s look at how to configure this email client to work with Office 365 Exchange Online and how to use Office 365 SMTP settings for this configuration:
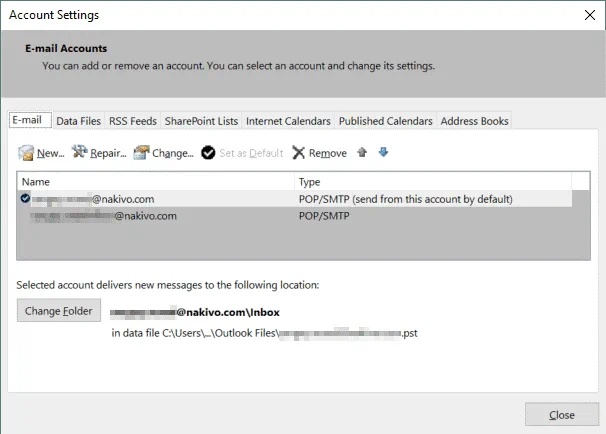
1. Open Microsoft Office Outlook and go to File > Account Settings. Let’s create and configure a new account. Click New to create an account.
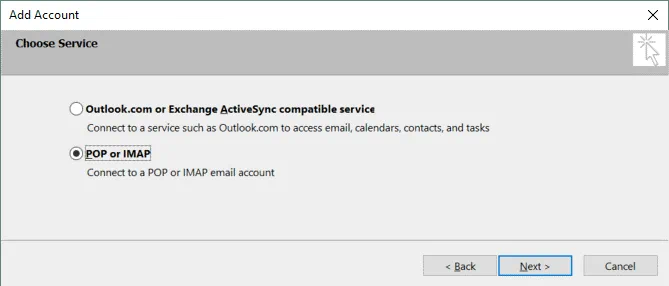
2. The Add Account wizard is opened in a new window. Select POP or IMAP and click Next to continue. First we will learn how to use IMAP and then how to use POP3 for email retrieval.
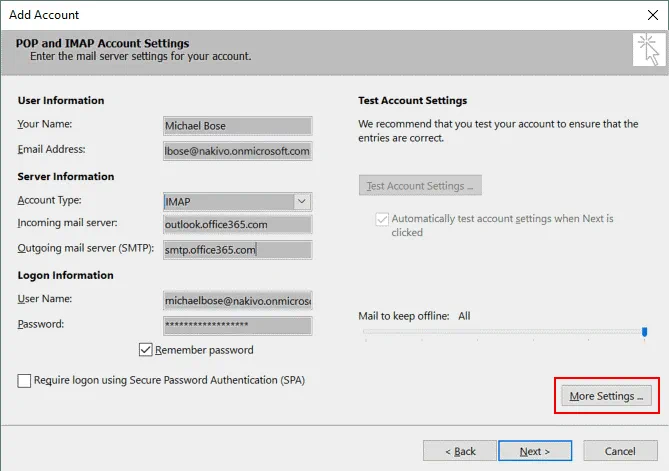
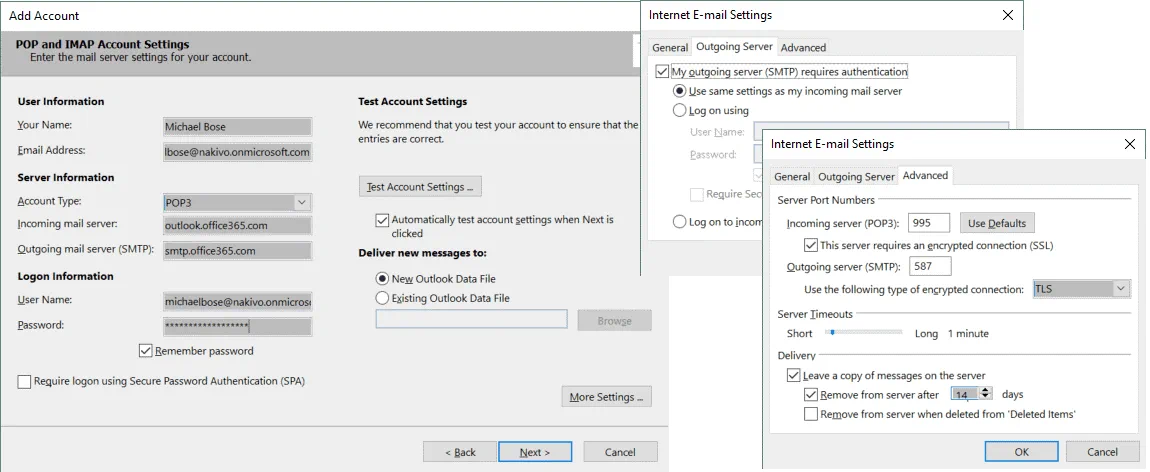
3. In the next window, enter all necessary user information and server information. In our example, we use the settings:
User Information
Your Name: Michael Bose (the name displayed in mail clients)
Email Address: michaelbose@nakivo.onmicrosoft.com (the name of the Office 365 account)
Server Information
Account Type: IMAP
Incoming mail server: outlook.office365.com
Outgoing mail server (SMTP): smtp.office365.com
Logon Information
User Name: michaelbose@nakivo.onmicrosoft.com (the same as the email address)
Password: ************** (your password set in Microsoft Admin Center)
Tick the Remember password checkbox, otherwise you will be prompted to enter your password each time when you send or receive email.
When you have filled all required fields, click the More Settings button.
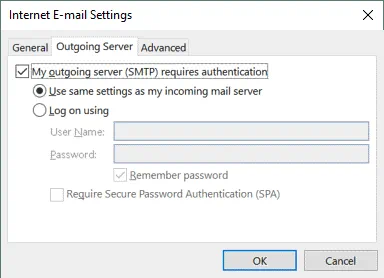
4. The window with three tabs is opened. Go to the Outgoing Server tab and tick the My outgoing server (SMTP) requires authentication checkbox, then select Use same settings as my incoming mail server.
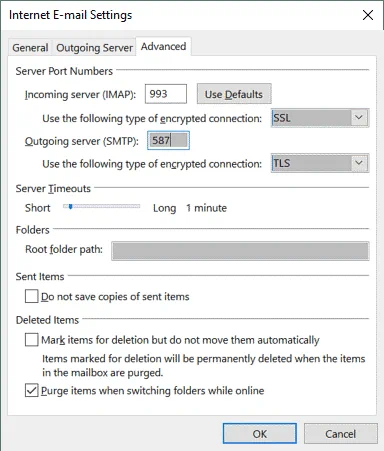
After that, switch to the Advanced tab and set server port numbers and encryption.
Incoming server (IMAP): 993
Use the following type of encrypted connection: SSL
Outgoing server (SMTP): 587
Use the following type of encrypted connection: TLS
Click OK to save settings.
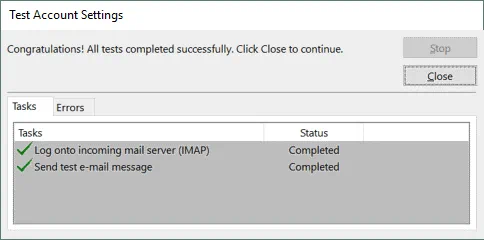
5. Click Test Account Settings in the Add Account window of the wizard. If Office 365 SMTP settings and IMAP settings have been configured correctly, you will see that all tests have been successfully completed as they appear in the screenshot below. Click Close after finishing the test.
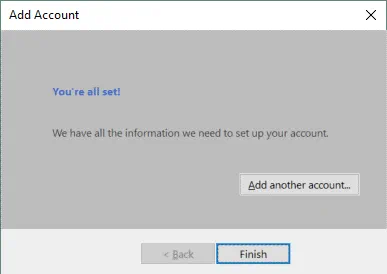
6. The account has been added and configured successfully in Microsoft Office Outlook 2016. Click Finish to close the wizard. Now you can send and receive email messages by using the email client configured to work with Office 365 Exchange Online.
Using POP3 in Outlook 2016
If you want to use POP3 as a protocol to receive email, your configuration must be a little bit different (Office 365 SMTP settings must be the same). The settings required for using POP3 are:
Account type: POP3 (in the Add Account window of the wizard).
Server Port Numbers – Incoming server (POP3): 995 (in the Advanced tab of the Internet E-mail Settings window that is displayed after clicking the More Settings button).
Microsoft Outlook Express configuration for Exchange Online
Outlook Express is a lightweight email client created by Microsoft that can also be configured to work with Microsoft Exchange Online. Let’s view how to create and configure a new account as well as how to use Office 365 SMTP settings, IMAP settings and POP3 settings. SMTP and IMAP protocols will be considered the first to send and receive email, accordingly.
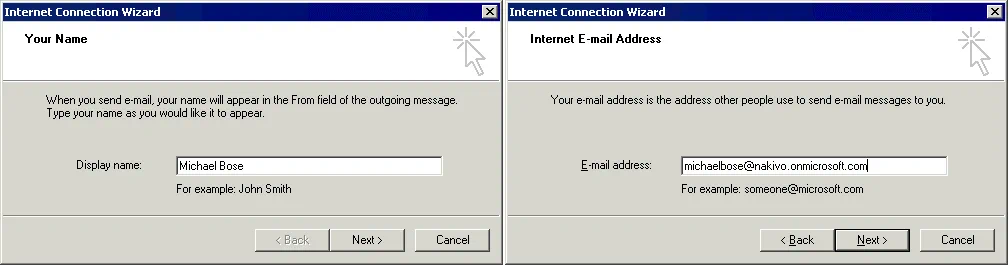
1. Open Outlook Express and go to Tools > Accounts to create a new account or to edit/remove existing accounts. A new account will be created in the current example. Once the wizard window is opened, enter a display name (Michael Bose is used as displayed name in this example). Click Next to continue.
2. Enter your email address from the Microsoft Office 365 Exchange account (michaelbose@nakivo.onmicrosoft.com in this case).
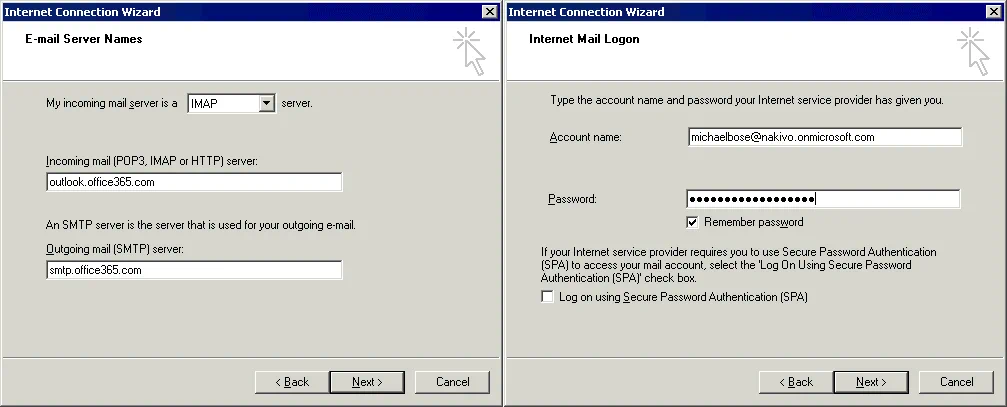
3. Enter email server names. Select IMAP as the incoming server, then enter the server addresses.
Incoming main (POP3, IMAP or HTTP) server: outlook.office365.com
Outgoing mail (SMTP) server: smtp.office365.com
If you need to use POP3 as a protocol to receive email, create a new account and select POP3 at this step.
4. Enter the full account name and password for using Office 365 services. Tick the Remember password checkbox to avoid entering the password each time when sending or receiving email.
Once the account has been added, in the Internet Account window (Tools > Accounts) select your Office 365 account and click Properties to configure advanced settings.
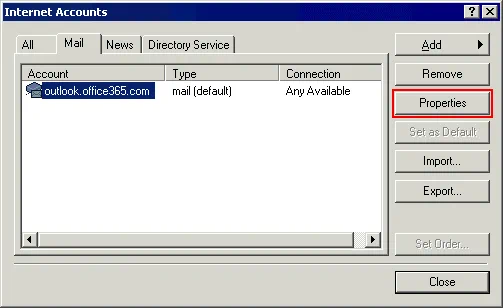
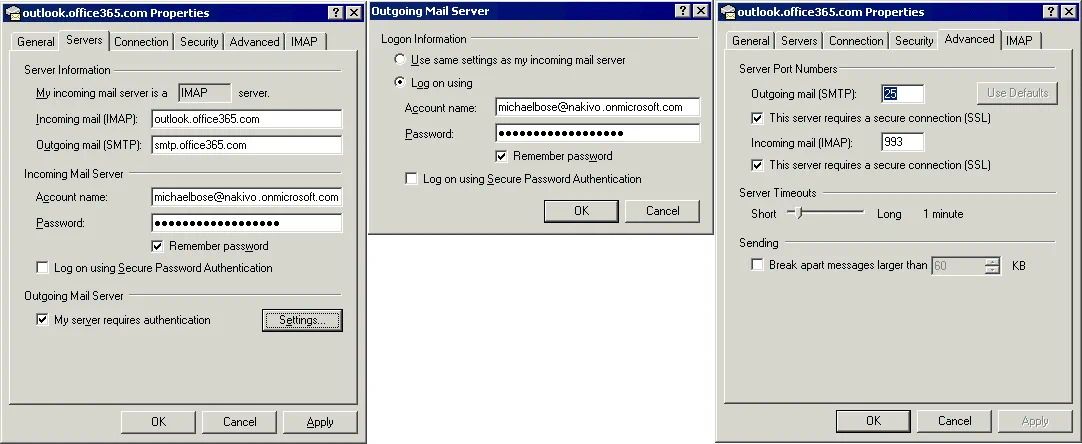
5. In the Properties window, go to the Servers tab and check Office 365 SMTP settings and IMAP settings. Tick the My server requires authentication checkbox and click Settings.
6. In the Outgoing Mail Server settings window, set to Use same settings as my incoming server or enter your account name and password manually.
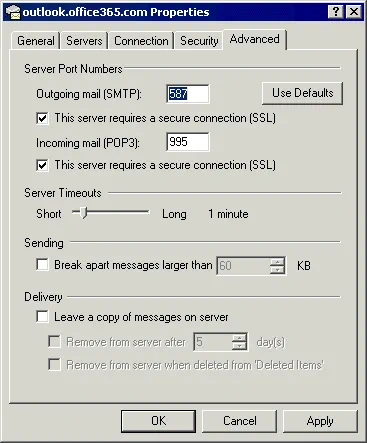
7. Go to the Advanced tab of the Properties window and tick the checkboxes to use a secure connection. Set the 25 or 587 (preferred) port as Office 365 SMTP server settings and 993 port in the incoming mail (IMAP) settings. Hit OK to save changes.
POP3 settings
POP3 Settings for Outlook Express can be configured similarly (POP3 must be selected as the protocol used by the incoming server in step 3 when creating an account in Outlook Express). In the account properties, go to the Advanced tab, enable a secure connection for the POP3 server and set the 995 port. Preserve Office 365 SMTP server settings the same.
Conclusion
If you use email clients on different computers, or use an email client and a web interface simultaneously, consider using IMAP. If you send and receive email by using only one email client installed on one device, you can use POP3. Examples of configuring Outlook 2016 and Outlook Express email clients have been explained in the blog post. Similarly, you can configure other email clients to use Office 365 Exchange mail services. Use the same Office 365 SMTP settings and the same POP3/IMAP settings for other email clients. Read also how to connect Office 365 Exchange Online Services to PowerShell.