How to Build a vSphere 7.0 Home Lab: Complete Walkthrough
Following the recent release of VMware vSphere 7, many of us are looking forward to trying vSphere 7 and checking how the new and updated features work. However, not everyone has a few available computers at hand to install ESXi on them. A better idea is to check vSphere 7 in a test environment before making a decision whether to upgrade your current vSphere version to vSphere 7.0. In this case, you can deploy a VMware home lab on one of the existing computers without erasing any data. This blog post explains how to create a vSphere 7 home lab by using your existing hardware with VMware Workstation installed.

Explanation of the Idea
The idea is to install VMware Workstation on an existing computer, install ESXi on two Workstation VMs and deploy vCenter as a nested virtual machine on the first ESXi host. Then you can create additional nested VMs on an ESXi host and test vSphere 7 features. You can install VMware Workstation on Linux or Windows. If you use macOS, you can install VMware Fusion Pro, which is the analog of VMware Workstation. Read more about VMware Workstation in these blog posts:
You can install VMware Workstation as a regular application on a computer without uninstalling the existing Linux or Windows operating system. Thus, you can use your VMware vSphere 7 home lab without interrupting your usual tasks. Of course, performance of your computer will be significantly degraded for running tasks – such as editing documents, pictures, video, copying files, and so on – when running virtual machines used for a vSphere 7 home lab.
Requirements and Recommendations
You can use your existing computer if it meets the minimum requirements:
- A computer must have a compatible x86-64 CPU.
- A CPU (central processor unit) with 4 cores or more that is compatible with ESXi 7.0.
- 32 GB of RAM. If you have a laptop with 16 GB of RAM, your VMware home lab will be too slow and it will be a challenge to run a nested VM on a virtual ESXi host (that is running as a VMware Workstation VM).
- 100 GB of free disk space. It is recommended that you use SSD. If you don’t have SSD, use high-performance hard disk drives (HDD) (for example, WD Gold, , Black). Deploying ESXi VMs on different disk drives increases performance.
It is recommended that you use a desktop computer. However, if you have only a laptop SSD, you can increase performance by connecting an external USB 3.0 HDD enclosure with a hard disk drive (7200 RPM, 3.5”) and run VMs on different HDDs.
Configuration of Our vSphere 7 Home Lab
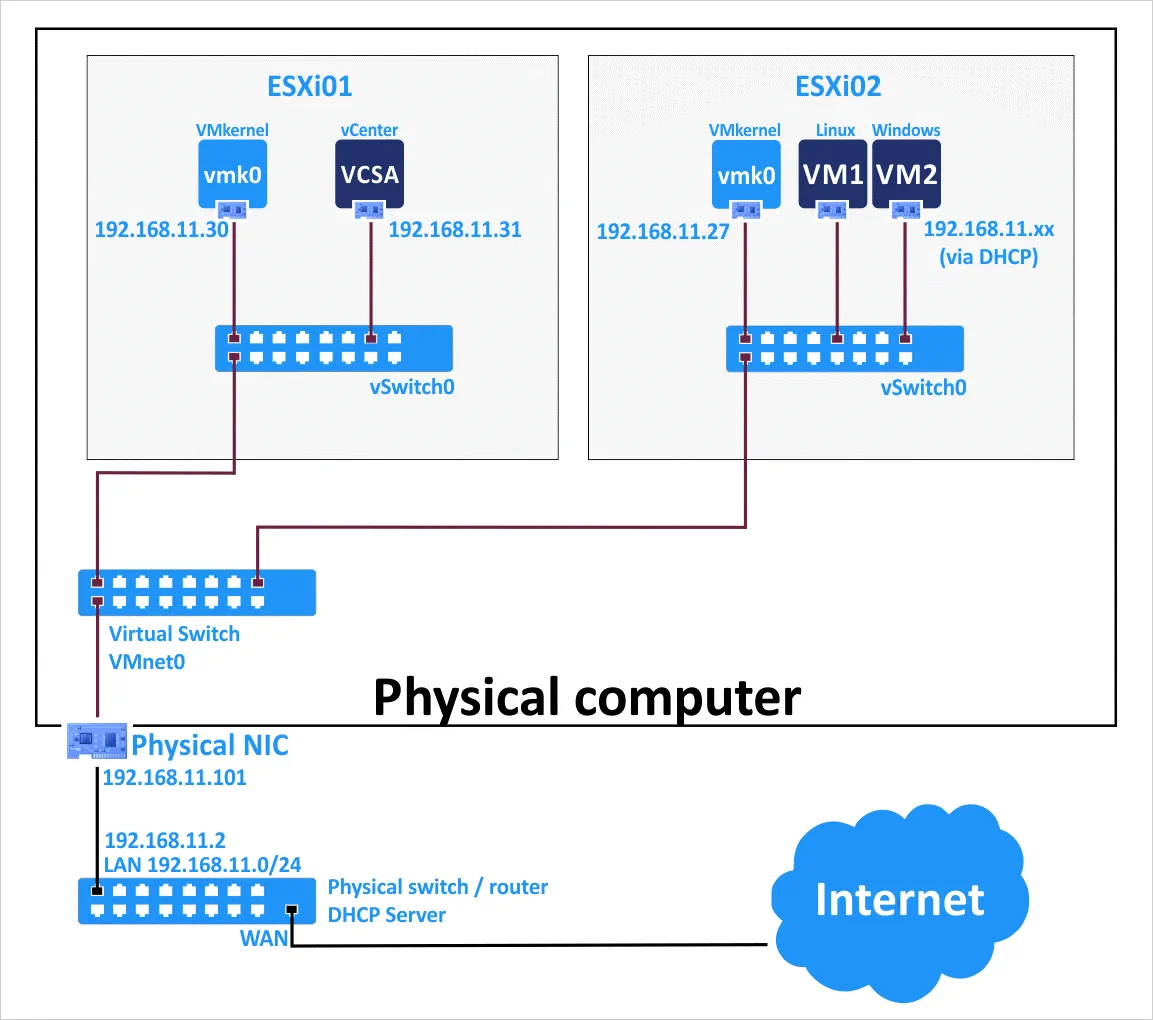
Let’s look at the configuration used in our vSphere 7 home lab that is being deployed in this blog post. We’ll be using VMware Workstation 15 installed on a Windows 10 machine. Then we will create two virtual machines on VMware Workstation and install ESXi 7 on these two VMs. VMware vCenter 7 is installed as a vCenter Server Appliance (VCSA) on a nested VM residing in the first ESXi host. Virtual network adapters of VMware Workstation VMs are connected in the bridged mode to the same physical network that is connected to the host (physical machine) on which VMware Workstation is installed (192.168.11.0/24). Nested VMs created on ESXi VMs are connected to the same network (192.168.11.0/24). This configuration is simple, and later you can create more complex configuration, add more virtual network adapters to ESXi VMs and create separate VM networks, vMotion networks, and so on.
The advantage of using the bridged network connection for VMware Workstation VMs for a vSphere 7 home lab is that you can use two laptops or desktop computers, install VMware Workstation on them, deploy one ESXi VM on each physical machine and connect all machines to the same network. Virtual machines running on different physical machines can communicate with each other over the network in this case. A physical machine, virtual machines (ESXi) and nested VMs are connected to the gateway (192.168.11.2) and can access external networks and the internet. VMnet0 is the standard name of the bridged network in VMware Workstation. Use a virtual network editor to create and edit networks in VMware Workstation.
IP addresses used in our vSphere 7 home lab
The address of the physical network: 192.168.11.0/24
The IP address of the physical router/DNS server/DHCP server: 192.168.11.2
The IP address of the physical machine on which VMware Workstation 15 is installed: 192.168.11.101
ESXi01
VM name: ESXi+vC
Hostname: ESXi-30
IP address: 192.168.11.30
ESXi02
VM name: ESXi-27
Hostname: ESXi-27
IP address: 192.168.11.27
vCenter (a nested VM)
VM name: vCenter7
Hostname: vCenter7
IP address: 192.168.11.31
The components of our vSphere 7 home lab are shown on the diagram below. Read about VMware vSwitch to learn how VMware virtual networks work.
Creating the First VM
Now we let’s go to the practical part and create a virtual machine on VMware Workstation for installing ESXi 7 on this VM. The VM will be the first ESXi host in our VMware home lab.
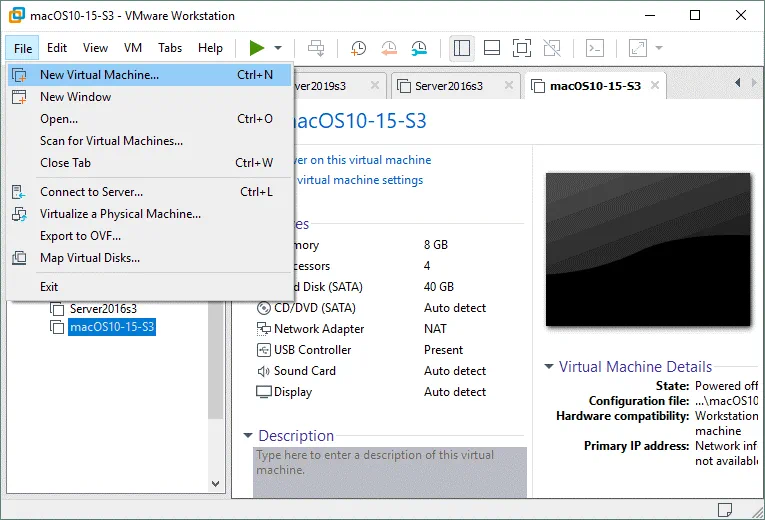
Open VMware Workstation, click File > New Virtual Machine (Ctrl+N).
A new virtual machine wizard opens.
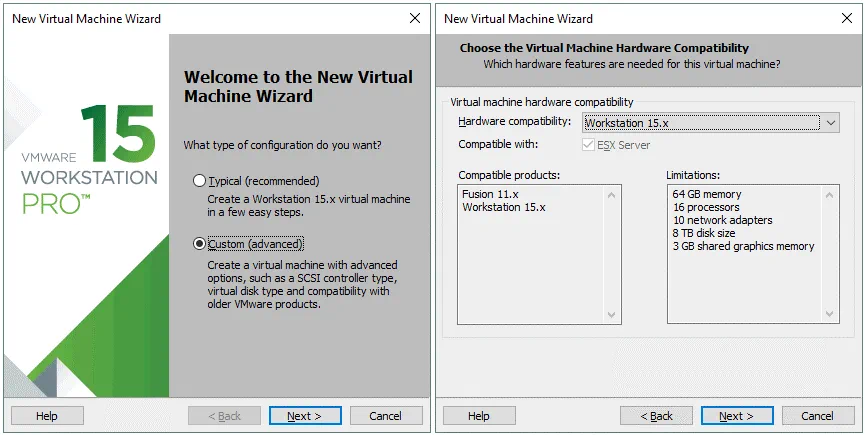
What type of configuration do you want? Select Custom. Click Next at each step of the wizard to continue.
Choose the Virtual Machine Hardware Compatibility. Select the newest hardware compatibility version if you are not planning to migrate a VM and run the VM on a host with an older VMware Workstation version.
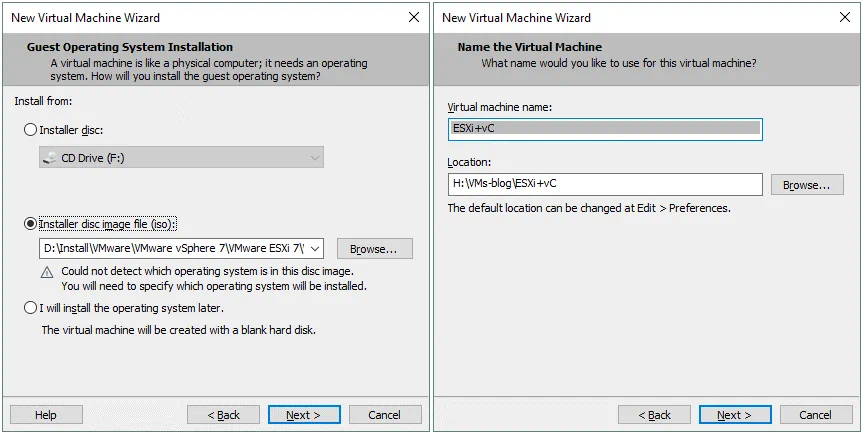
Guest Operating System Installation. Select Installer disc image file (iso) and define the path to the ESXi 7 ISO installation image. You can download the ESXi 7 ISO installation image from the VMware website.
Name the Virtual Machine. Enter the virtual machine name, for example, ESXi+vC. Set the location on your disk to store VM files. We select H:\VMs-blog\ESXi+vC\ to store the VM files.
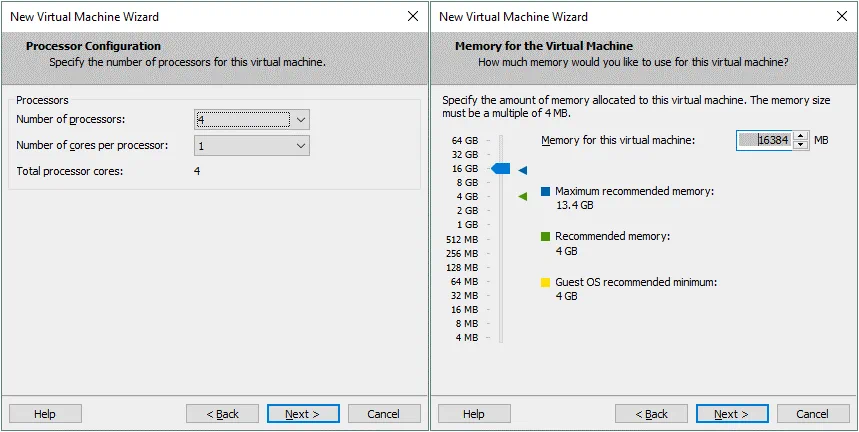
Processor Configuration. Specify 4 or more processors for this virtual machine.
Memory for the Virtual Machine. Select 16 GB of memory or more for this virtual machine because later a nested vCenter VM should be deployed on this ESXi VM.
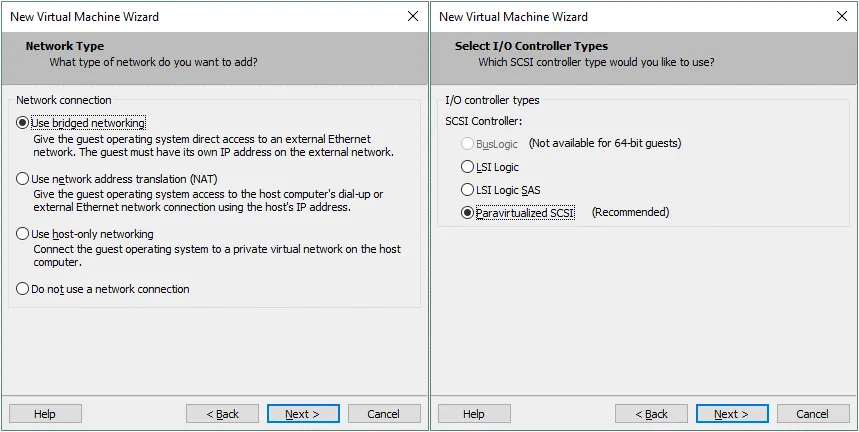
Network Type. Select the first option – Use bridged networking.
Select I/O Controller Types. Select Paravirtualized SCSI for the ESXi VM.
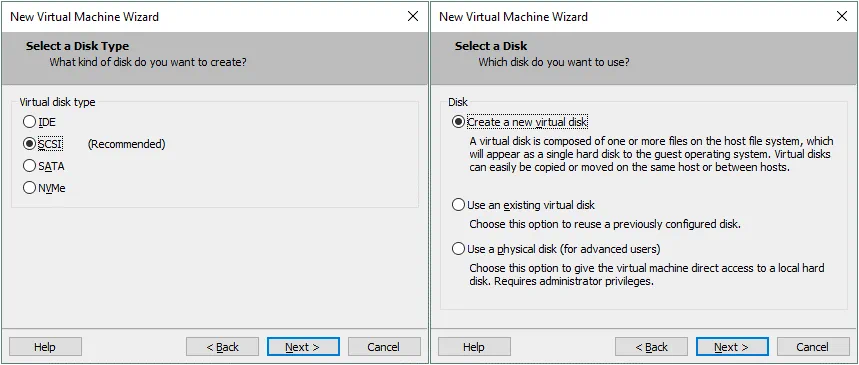
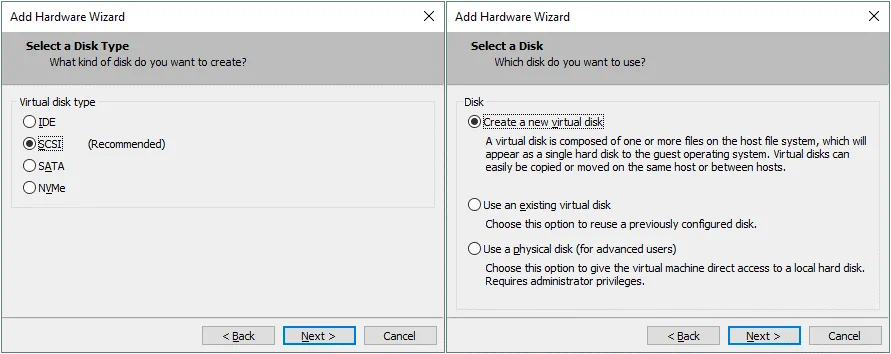
Select a Disk Type. Select SCSI because it is recommended that you use SCSI disks for ESXi.
Select a Disk. Click Create a new virtual disk that we will configure in the next steps.
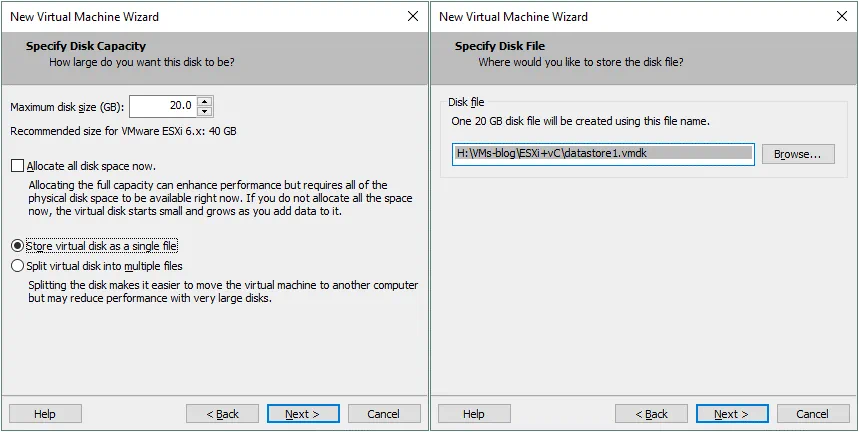
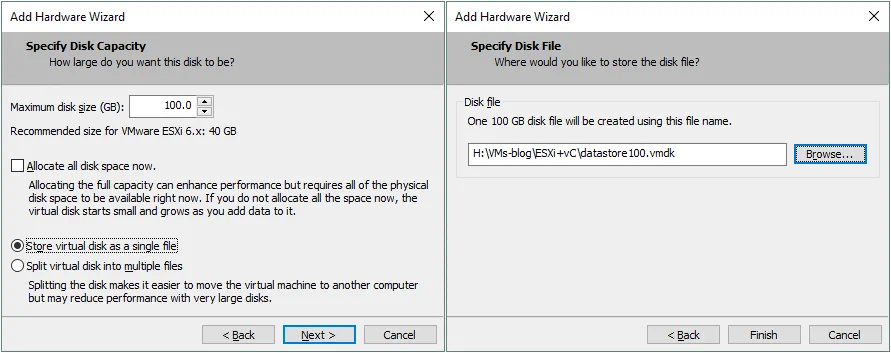
Specify Disk Capacity. Set the maximum disk size to 20 GB. This virtual disk will be used to install ESXi 7. Later we will create a second larger disk to store files of nested VMs. Select Store virtual disk as a single file. Don’t select Allocate all disk space now if you don’t have a disk that works as a thick provisioned virtual disk.
Specify Disk File. Define a path and a virtual disk file name. We store this virtual disk file as H:\VMs-blog\ESXi+vC\datastore1.vmdk in this case. This is the directory where other VM files are stored. It is convenient to store virtual disk files in one directory with other VM files.
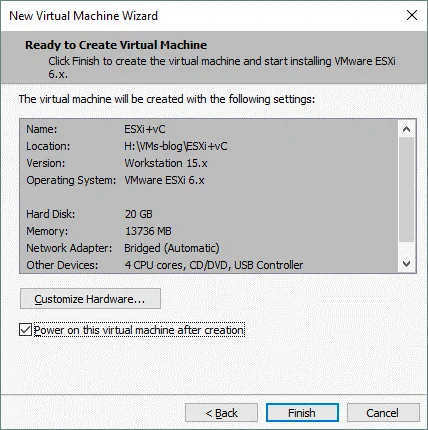
Ready to Create Virtual Machine. Check the configuration summary for your new virtual machine and if everything is correct, hit Finish. We can deselect the Power on this virtual machine after creation checkbox because we are going to create the second virtual disk that will be used as a datastore to store files of nested VMs.
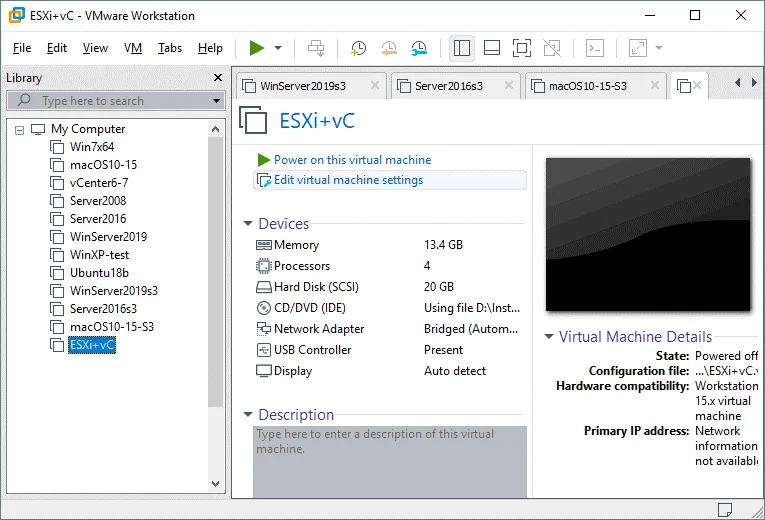
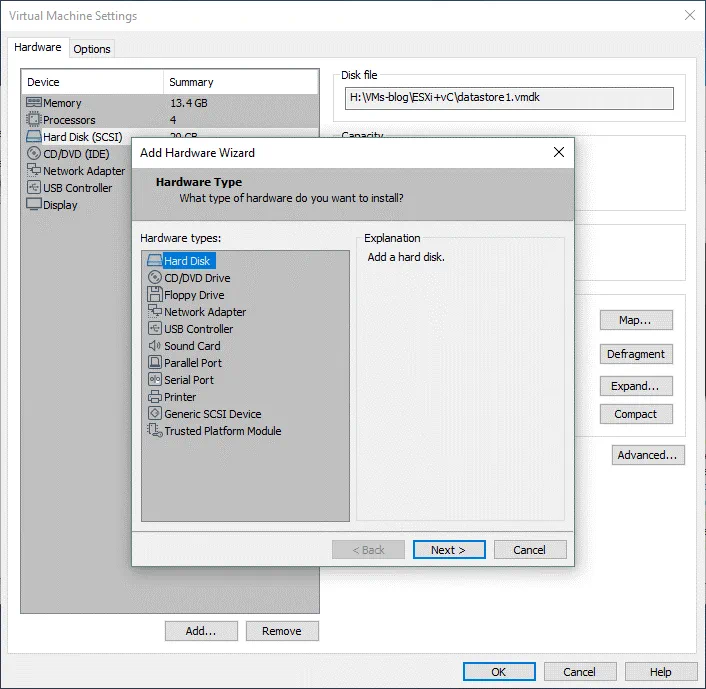
A virtual machine for installing ESXi 7 is now created. Click Edit virtual machine settings.
In the Hardware tab, click the Add button and select Hard Disk in the Add Hardware Wizard window. Hit Next at each step of the wizard to continue.
Select a Disk Type. Select SCSI, similarly as you have selected for the first virtual disk creation.
Select a Disk. Click Create a new virtual disk.
Specify Disk Capacity. Set 100 GB as the maximum disk size and select Store virtual disk as a single file. Don’t select the Allocate all disk space now checkbox.
Specify disk File. Set the directory where you store the ESXi VM files as a directory to store this virtual disk file. You can set a custom file name for the VMDK file. In our example we store the second virtual disk for this ESXi VM as H:\VMs-blog\ESXi+vC\datastore100.vmdk
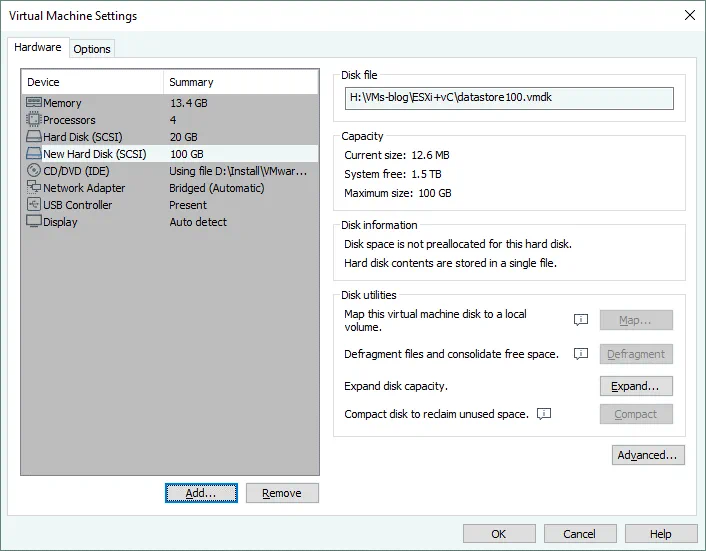
Now you can see the second virtual disk in the list of the virtual devices used by the virtual machine. Hit OK to save settings for this VM and go to the main VMware Workstation window.
Edit the VMX file of this virtual machine and check the model of the virtual network adapter. This VMX file is located in the directory that is configured to store your virtual machine files (H:\VMs-blog\ESXi+vC\ in our case). If your VM is configured to use the e1000 virtual network adapter, ESXi 7.0 cannot recognize this legacy adapter model.
Find the line in the VMX file:
ethernet0.virtualDev = "e1000"
Edit this line and set the VM to use vmxnet3 as a network adapter:
ethernet0.virtualDev = "vmxnet3"

Save changes in the VMX file and quit the text editor.
Power on the virtual machine to install ESXi 7 and deploy the first ESXi host as a VM.
Read how to install ESXi 7 here in the section 3.1. Installing the first ESXi host.
If the ESXi 7.0 installer says that you have an old processor that is not supported any more, try to use a CPU Identification Mask and mask the CPUID in VMware Workstation for the ESXi VM. The CPU vendor for the masked configuration must be the same (Intel or AMD).
The CPUID format generally is:
cpuid.<leaf>.<register> = xxxx:xxxx:xxxx:xxxx:xxxx:xxxx:xxxx:xxxx
An example of CPUID options set in the VMX configuration file of a virtual machine:
cpuid.0.ebx="0111:0101:0110:1110:0110:0101:0100:0111"
cpuid.0.edx="0100:1001:0110:0101:0110:1110:0110:1001"
cpuid.0.ecx="0110:1100:0110:0101:0111:0100:0110:1110"
cpuid.1.eax="0000:0000:0000:0001:0000:0110:0111:0001"
Let the ESXi 7 installer see the CPUID of the supported processor. Read the documentation to find the suitable CPUID masks for your case. After installing ESXi 7 on a VM you can disable CPUID settings for a VM.
After installing and configuring ESXi 7, we create a new datastore on a 100-GB virtual disk, which we have created earlier. See how to create a new datastore here in the section 3.3. Creating a datastore.
When the configuration of the ESXi host is finished, you can connect to the ESXi direct console by using VMware Workstation.
Click File > Connect to Server.
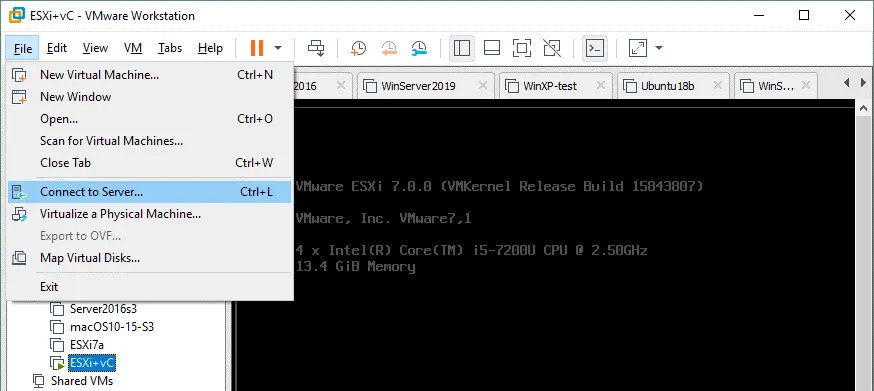
Enter the IP address of the first ESXi 7 VM in the vSphere 7 home lab (192.168.11.30), username (root) and password.
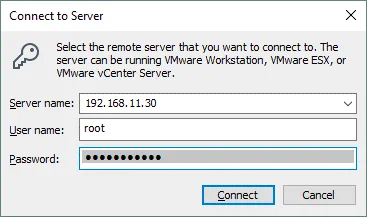
If a certificate warning is displayed, hit Connect Anyway to continue.
Your ESXi 7 home lab is ready, but continue to read this blog post to finish and have a working configuration of the whole vSphere 7 home lab.
Install vCenter as explained in the section 4. Deploying vCenter Server of this blog post.

After installing vCenter you can connect to the ESXi host (192.168.11.30) and to vCenter (192.168.11.31) in VMware Workstation by using the Connect to Server option in the File menu.
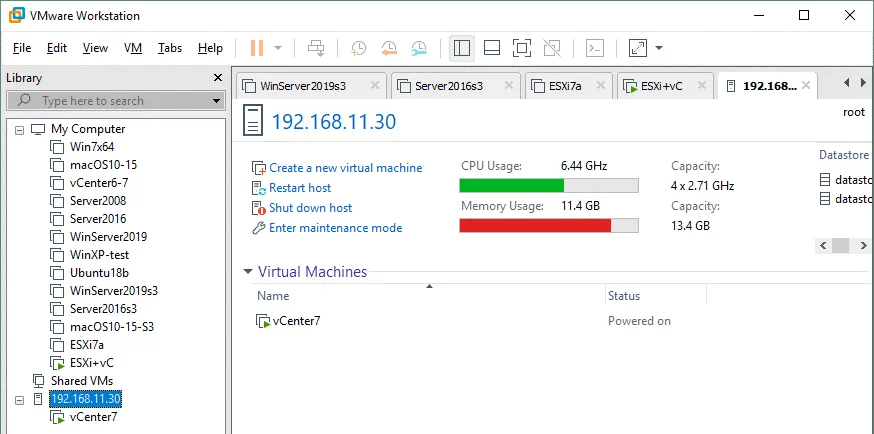
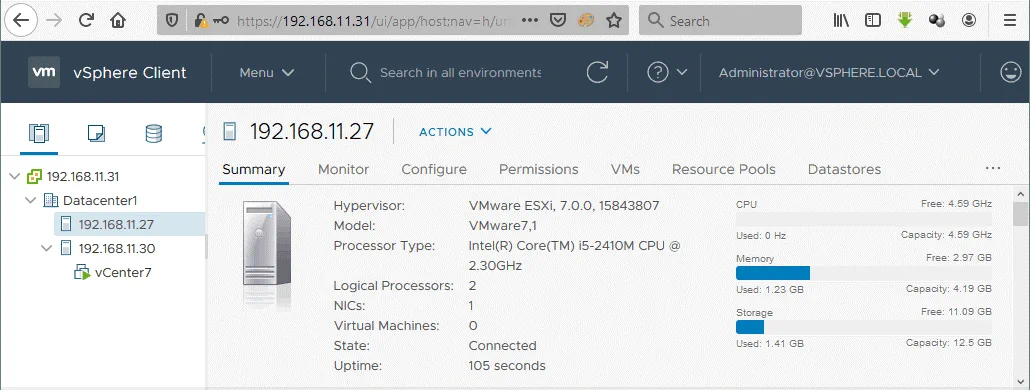
The first ESXi host (192.168.11.30) and a nested vCenter VM (192.168.11.31) are installed and configured. Now create the second VM in VMware Workstation and install the second ESXi 7 host (192.168.11.27) on the virtual machine. The installation process is similar to the installation process of the first ESXi host used in our vSphere 7 home lab. After that you can create nested VMs on both ESXi hosts and migrate VMs from one host to another. Enter the IP address of vCenter in a web browser, log into VMware vSphere Client, and manage your vSphere 7 environment in your vSphere 7 home lab.
You can create additional Host-Only or NAT networks in VMware Workstation and configure separate vMotion and VM networks on your virtual ESXi 7 hosts as explained in the blog post about VMware home lab for version 6. The main prerequisite for this is that all your ESXi VMs must run on VMware Workstation on the same physical machine.
Read also how to upgrade ESXi 6.x to ESXi 7.0 and read the blog post about using VMware server at home.
Conclusion
Deploying a vSphere 7 home lab is affordable for users and computer enthusiasts. You need to have a computer that has the appropriate performance level with VMware Workstation installed. ESXi hosts are installed on VMs running on VMware Workstation and vCenter (vCenter Server Appliance) is deployed as a nested VM on one of the virtual ESXi hosts.
The wide range of network options provided by VMware Workstation allows you to use different network configurations in your vSphere 7 home lab. Trying vSphere 7 and provided features in VMware home labs allows you to make the right decision when it comes to deploying vSphere 7 on real servers.
Consider deploying VMware backup and replication software to avoid data loss in case of failures. Install NAKIVO Backup & Replication in your environment on Linux, Windows, or as a virtual appliance and back up virtual and physical machines.