Deploying Hyper-V VDI: A How-To Guide
In any modern business environment, the ability to access services whenever and wherever they are needed is extremely important. In recent years, virtualization technology has become increasingly advanced, with various functionalities being introduced on a regular basis. As a result, traditional PC infrastructure has been gradually replaced with virtual desktop infrastructure (VDI) which allows you to run and manage multiple virtual machine-based desktops from any device or location. Microsoft has also introduced its own VDI solution which enables access and management of remote desktops and operating systems.
After going through the entire deployment process, you get access to enterprise-level desktop virtualization, which can provide you with flexibility, efficiency, scalability, security and many more benefits. Read further to learn more about the Hyper-V VDI environment and how you can protect all your virtual desktops with a single data-protection solution – NAKIVO Backup & Replication.

What Is Hyper-V VDI?
Hyper-V VDI is a centralized desktop delivery solution which enables running virtual desktop instances, including client operating systems (OSes), data, and applications in a server-based virtual machine (VM) in the data center.
To enable Hyper-V VDI, you need two Windows server roles: Hyper-V, which creates and manages VMs, and Remote Desktop Services (RDS), which enables and manages communication between a user and a virtual desktop over the network. With the help of a Remote Desktop Protocol, the user’s input is sent to a remote application and the application’s output is then displayed on the user’s local device.
Thus, a Hyper-V VDI environment can be considered an alternative to traditional PC-based infrastructure. In this case, real physical computers are replaced with virtual desktops. Each user gets access to a dedicated VM that runs a separate OS (such as Windows, Windows Server, and Linux). Some users may be given administrator rights, which allows them to install or delete desktop applications, change system settings, install system updates, etc.
How Hyper-V VDI Works
It is extremely difficult to control a large organization with thousands of employees performing thousands of tasks at the same time—even more so if this organization has multiple branches all over the world. As a result, your infrastructure can become exposed to multiple potential threats and dangers. Many organizations decide to deploy the VDI solution in order to address some of their existing desktop management challenges and potential vulnerabilities.
Thus, Hyper-V VDI can help you in the following cases:
- If you would like to deliver secure desktops to unmanaged devices, such as when employees work remotely from home.
- If you are seeking to centrally manage and maintain all remote desktop instances, such as offshore or outsourcing branch offices.
- If you work in a highly-regulated industry and need to ensure that strict security requirements can be met.
- If you need to create a standardized desktop for task workers, who generally perform an established set of tasks.
- If you wish to have access to your workstation at any time and from any device, such as when traveling abroad for a business trip.
To better understand why some business owners choose to build a VDI environment, you need to understand how it works. In a nutshell, the Microsoft VDI technology entails the following:
- Every end user can access their virtual desktop, which is stored on a centralized server, from any device.
- An administrator can grant/deny users access to specific applications from a central management console.
- An administrator can easily identify when licensing is going to expire and determine whether any of your desktop instances requires updates.
- A selected virtual desktop can be maintained and supported by an administrator from a centralized server without having to disrupt the production environment.
- Every end user is assigned a specific VM with dedicated resources. All VMs run in isolation from one another, meaning that they cannot affect one another’s performance and get hold of private data.
- All data is stored on a physical server in the data center, meaning that if a virtual desktop fails, you can still retrieve the required information from a remote server.
- Support and maintenance within the VDI environment is much easier compared to that within a traditional PC infrastructure in that an administrator can easily detect any issues and solve them from a centralized server. This is especially convenient for large enterprises which run multiple datacenters in different locations.
- An end user can connect to their virtual desktop using a thin client, zero client, or thick client, as well as laptops or docking stations, tablets or phones. Note that the device should be connected to a corporate network in order to perform any I/O operations.
- VDI deployment can be scaled up and down on an as-needed basis. Due to the fact that virtual desktop instances are VM-based, expanding your Hyper-V VDI environment is as easy as creating new VMs.
Hyper-V VDI Components
In order to build a Hyper-V VDI environment using a Hyper-V virtualization platform, you should have the following Remote Desktop Services enabled:
- Remote Desktop Virtualization Host, which is a server with the Hyper-V role enabled. The hypervisor helps you host VMs and install desktop OSs on top of them. This way, you can provision each end user with their own workstation.
- Remote Desktop Session Host, which allows multiple end users to access Windows desktops and applications using RemoteApp or the Remote Desktop Connection client.
- Remote Desktop Connection Broker, which enables connection between end users and specific virtual desktops. Remote Desktop Connection Broker can identify whether a user is allowed to connect to a desktop instance and access certain VM data and applications.
- Remote Desktop Gateway, which provides public users with a secure network to connect to Windows desktops and applications.
- Remote Desktop Web Access, which enables users to access virtual desktops and applications through a web page.
- Remote Desktop Licensing, which allows you to manage RD licensing within your Hyper-V VDI environment and ensure that each user and device has an RDS Client Access License (CAL).
Benefits of Deploying Hyper-V VDI
As you can see, Hyper-V VDI is a great option for business owners looking to simplify management over their current production workloads. However, there are even more reasons why you should deploy the Microsoft VDI environment, which we will discuss in detail below:
The benefits of deploying Hyper-V VDI include:
- By consolidating multiple desktop instances on top of a single platform, you can easily manage and control all endpoints.
- IT administrators can easily maintain and provision all available desktops from a centralized server without affecting production environment and users’ productivity.
- With Hyper-V VDI, you can have an easy remote access to your workstation from anywhere in the world.
- All data is stored in a central server, meaning that hardware failures would hardly cause any disruption in your environment. Moreover, if you have a data protection solution installed, it becomes much faster and easier to back up all data from a single location.
- Cost-efficiency. VDI allows you to save money, time, and effort. When compared to a traditional PC infrastructure, a Hyper-V VDI environment requires less hardware resources to support its performance, and it consumes less power thanks to the minimal number of physical servers. Moreover, the entire Hyper-V VDI environment can be supported and maintained by a single IT administrator from a central management console.
How to Deploy Hyper-V VDI
The entire setup process is complex enough to make some business owners abandon the idea of building a Hyper-V VDI environment entirely. Below, I am going to describe the step-by-step process of deploying Hyper-V VDI in Windows Server 2012.
Step 1: Install Remote Desktop Role Services
This section describes which Remote Desktop role services should be installed for Hyper-V VDI deployment.
- Open Server Manager, click Manage, and select Add Roles and Features.
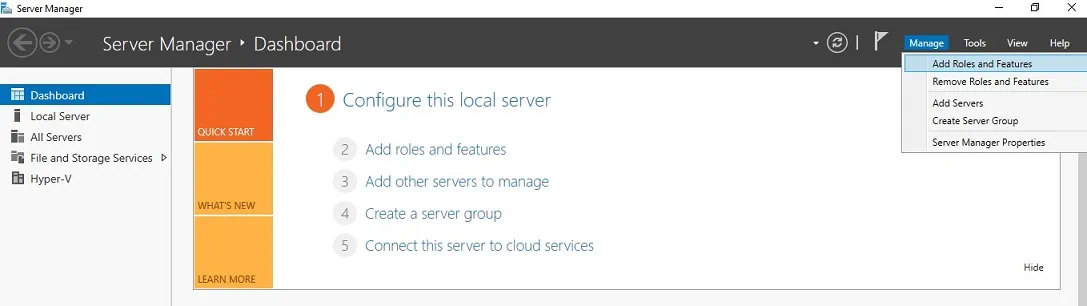
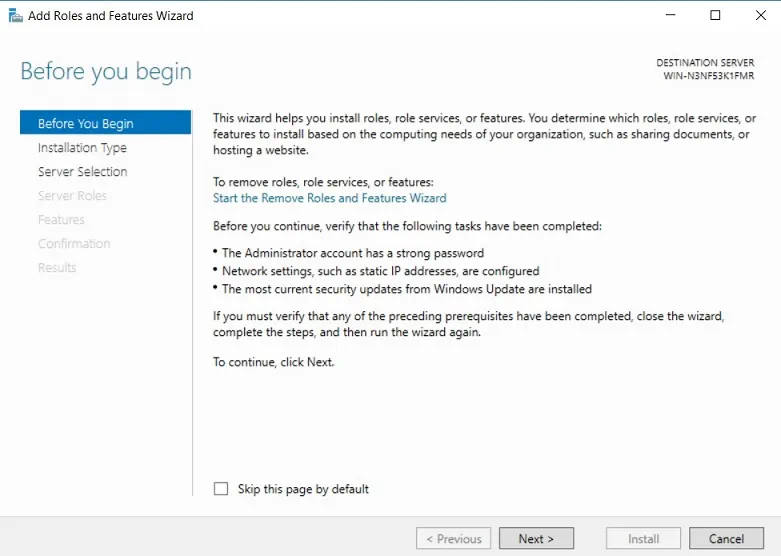
- The Before You Begin section should open, which describes what you can do using this wizard.
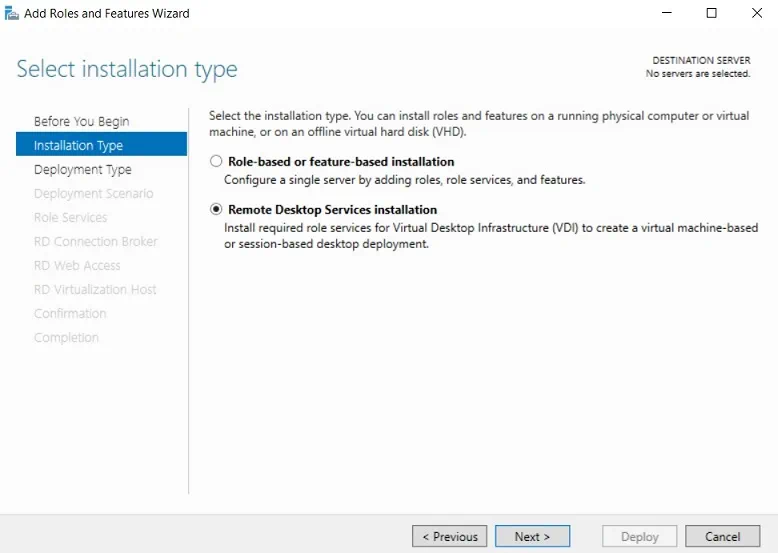
- In the Installation Type section, click Remote Desktop Services Installation.
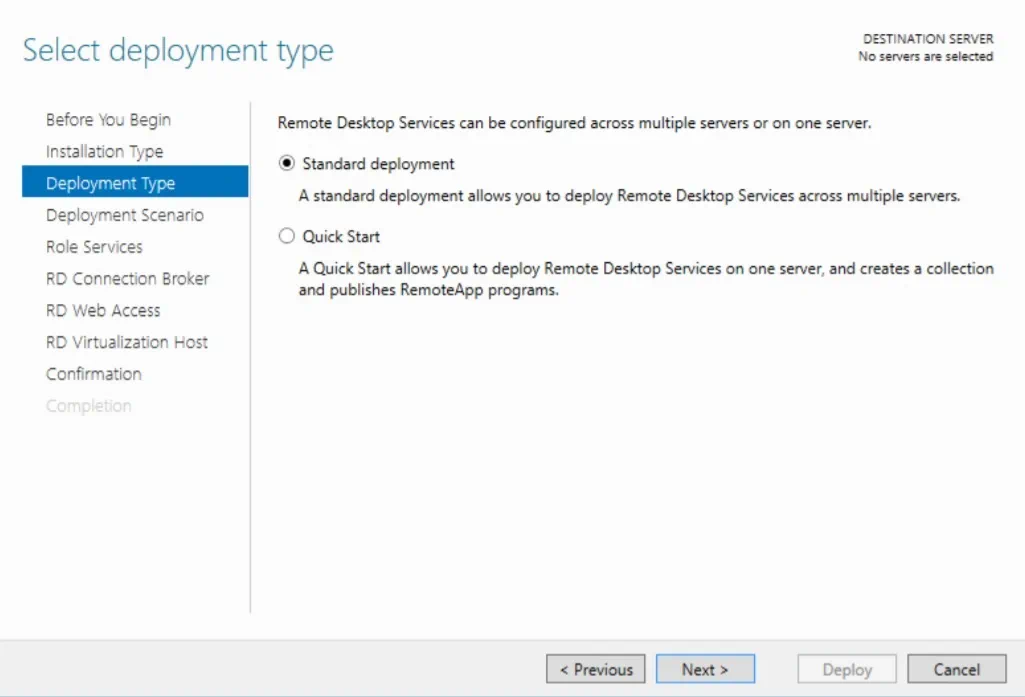
- In the Deployment Type section, click Standard deployment, which enables deployment of Remote Desktop Services across multiple servers.
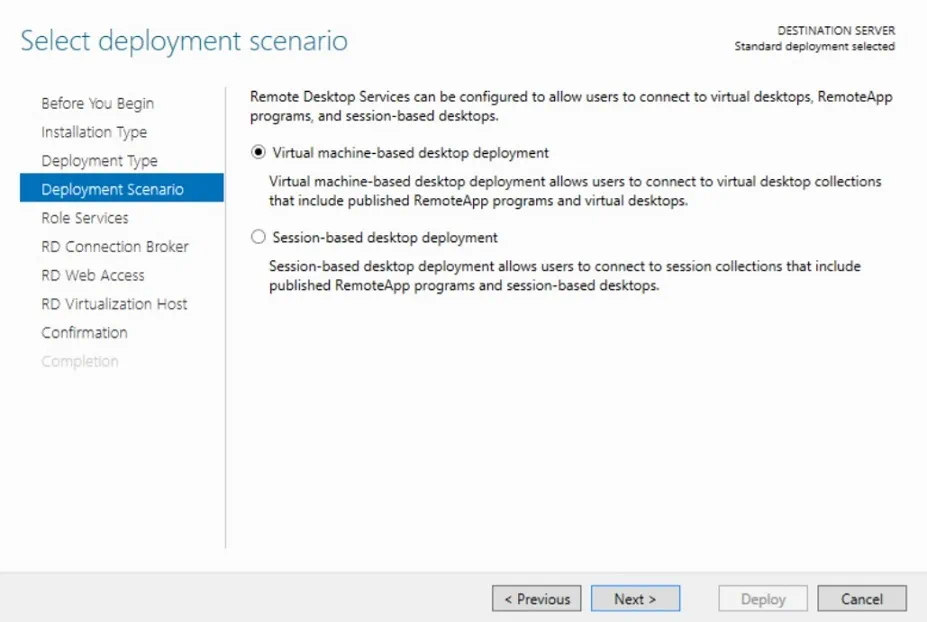
- In the Deployment Scenario section, click Virtual machine-based desktop deployment in order to enable connection to virtual desktop collections.
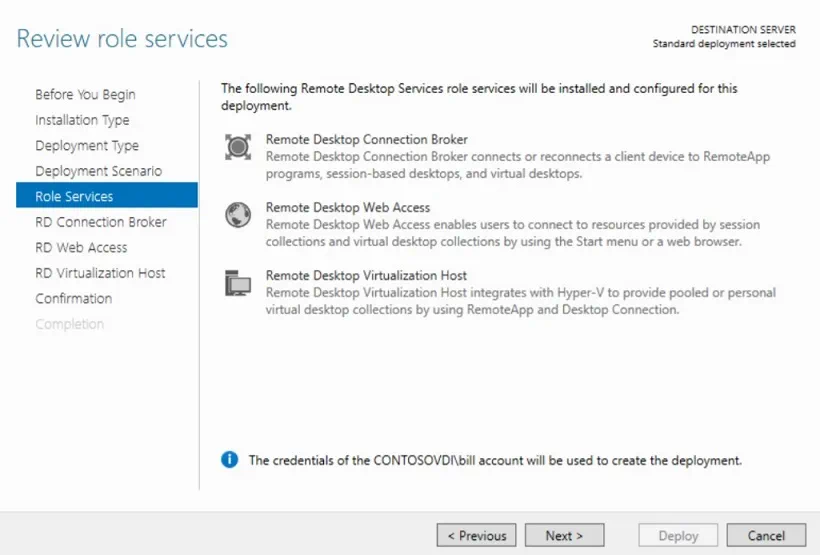
- In the Role Services section, you can see the list of RDS role services to be installed for this VDI deployment. Click Next.
- In the RD Connection Broker section, look through the list of servers available in the server pool and choose the server where the RD Connection Broker will be installed.
- In the RD Web Access section, choose the server from the server pool where the RD Web Access role service will be installed.
- In the RD Virtualization Host section, choose the server from the server pool where the RD Virtualization Host role service will be installed.
- In the Confirmation section, verify that everything is correct. Check the box Restart the destination server automatically if required and click Deploy.
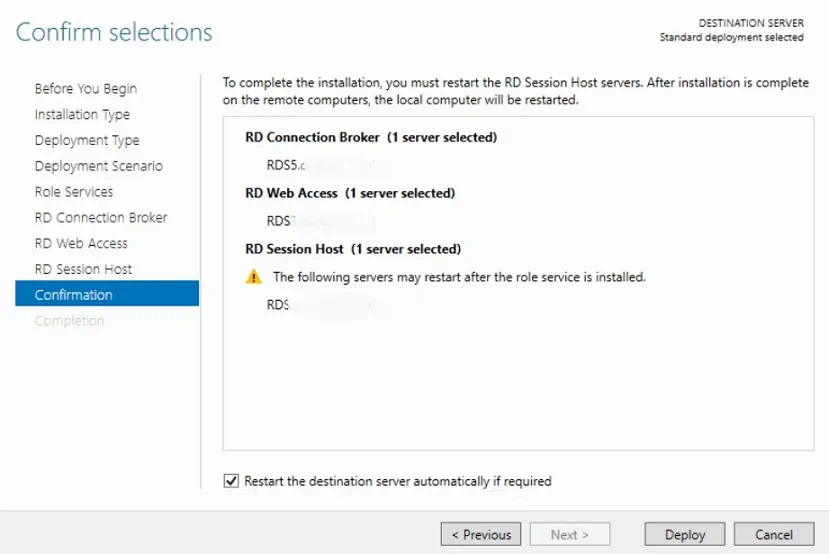
- In the Completion section, you can monitor the process of installing RDS role services. After the installation operation is complete, the local server should restart automatically.
- As a result, you should have the RD Connection Broker, RD Web Access, and RD Virtualization Host installed.
Step 2: Create a pool of managed virtual desktops
The next step is to create a virtual desktop collection, which allows you to build a single platform for running Windows desktops and applications, providing users with access to their personal workstations. Virtual desktop collections can be one of two types: pooled virtual desktop collections, and personal virtual desktop collections. In a pooled desktop collection, multiple users can simultaneously access a shared pool of resources, while in a personal collection session, users should be assigned their personal desktop from within the pool.
Now let’s discover how to create a pooled virtual desktop collection. For this purpose, you should take the following steps:
- Open Server Manager, select Remote Desktop Services, click Collections, then go to Tasks, and choose Create Virtual Desktop Collection. The Create Collection wizard should open.
- In the Before You Begin section, read what this wizard allows you to do, and check if your system meets all the requirements.
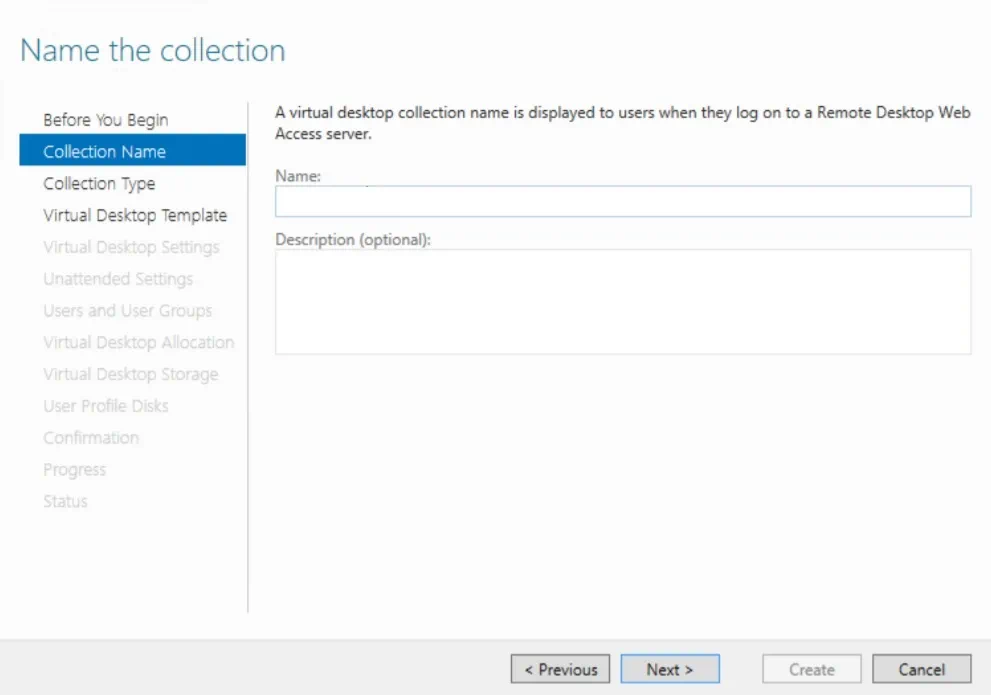
- In the Collection Name section, insert the name of your virtual desktop collection.
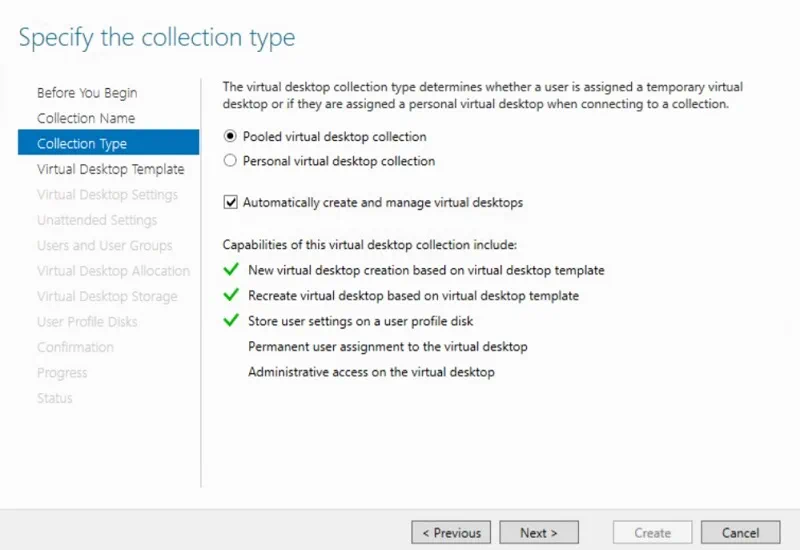
- In the Collection Type section, click Pooled virtual desktop collection and check the corresponding box to automatically create and manage virtual desktops.
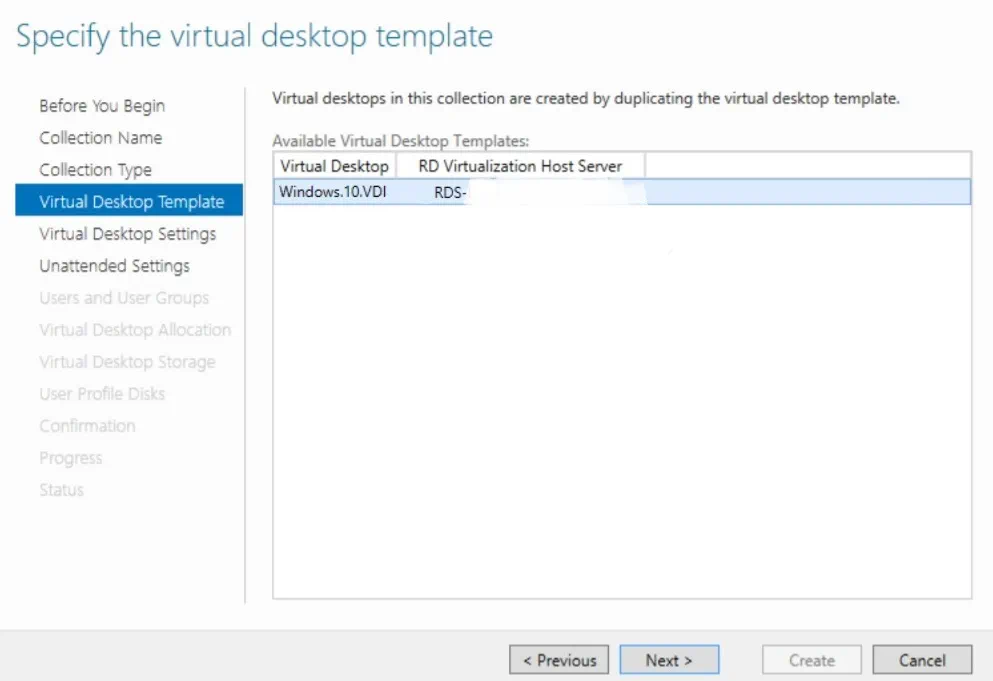
- In the Virtual Desktop Template section, select one of the available virtual desktop templates. Note that you should create a VM template beforehand using the Sysprep tool as this template is set to be used as a blueprint for creating virtual desktops.
- In the Virtual Desktop Settings section, select Provide unattended installation settings.
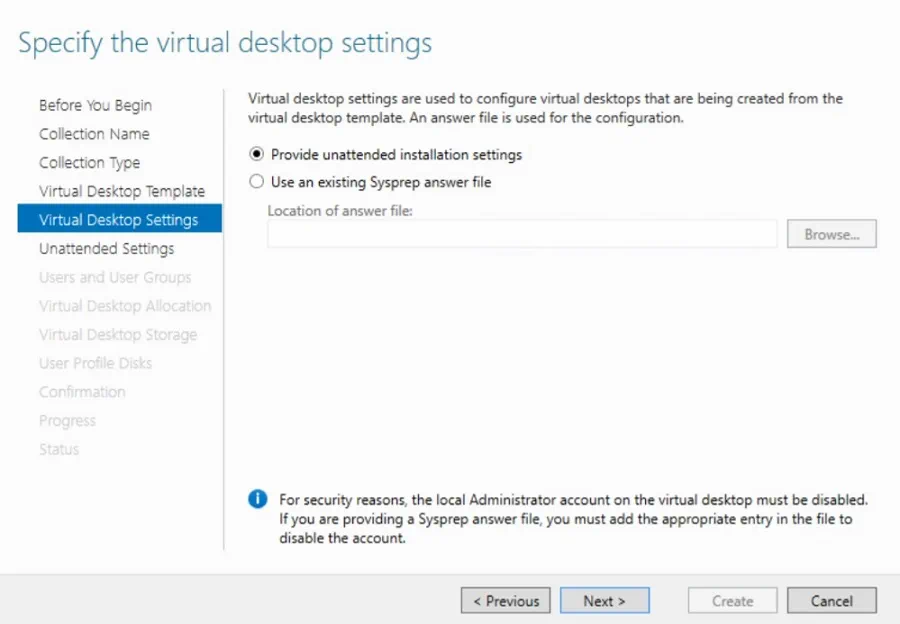
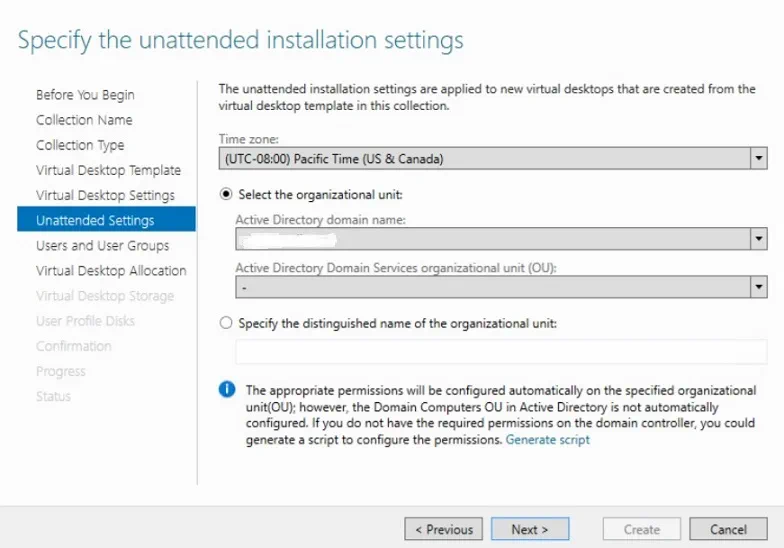
- In the Unattended Settings section, you can configure the time zone, and check the Select the organizational unit box.
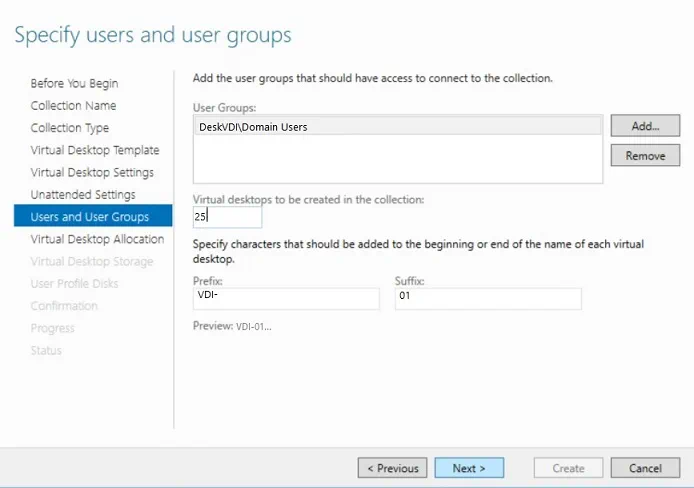
- In the Users and User Groups section, you can add the user groups that should have access to connect to the desktop collection. Then, you must specify how many virtual desktops should be created in this collection. After that, assign a prefix and suffix to the name of each virtual desktop.
- In the Virtual Desktop Allocation section, decide how many virtual desktops should be created on each RD Virtualization Host server by entering the number in the New Virtual Desktops column.
- In the Virtual Desktop Storage section, click Store on each RD Virtualization Host server before checking the Automatically roll back the virtual desktop when the user logs off box.
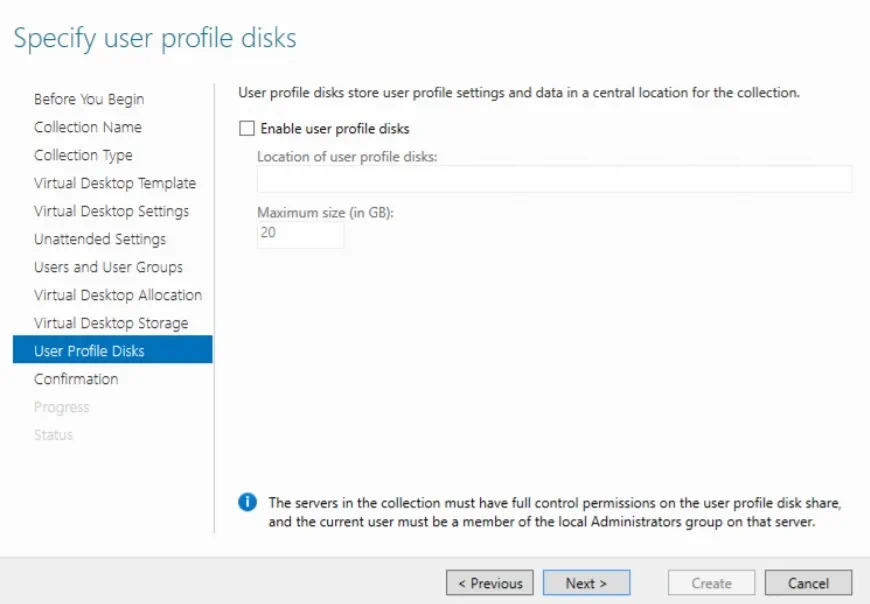
- In the User Profile Disks section, you can enable user profile disks which can store user profile settings and data. Here, you should specify the location of user profile disks and specify their maximum size in gigabytes.
- In the Confirmation section, verify the changes that you wish to adopt and click Create.
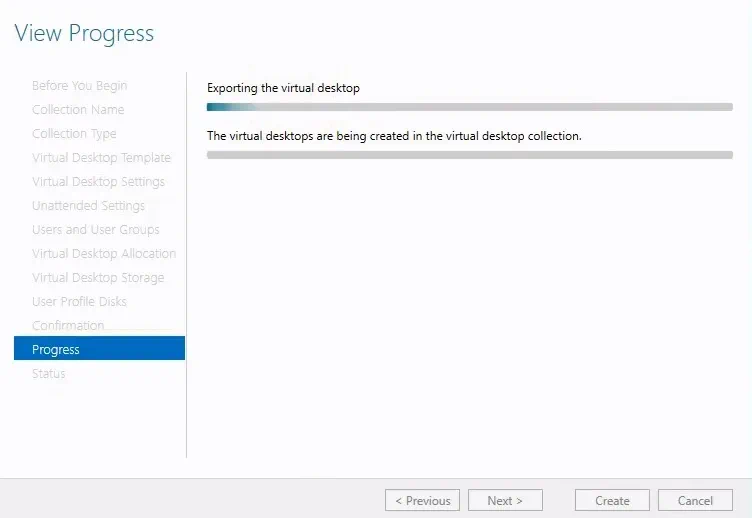
- In the Progress section, you can monitor the process of creating a virtual desktop collection. Click Close.
- Check the status of the virtual desktop collection by entering the Collection section. After that, right-click the VDI collection and select Task Status details. This way, you can see that the virtual desktop has been successfully created.
Step 3: Deploy the Hyper-V VDI environment
This is the final step in building a Hyper-V VDI environment. Here, you should add RD Gateway servers, RD Connection Brokers, RD Web Access, RD Licensing, and RD Virtualization Hosts to create a highly-available Hyper-V VDI environment.
For this purpose, you should do the following:
- Open Server Manager.
- In the DEPLOYMENT SERVERS section, select TASKS.
- Select Add RD Gateway Servers. Following the prompts, making the necessary adjustments.
Go through all of the options (Add RD Virtualization Host Servers, Add RD Web Access Servers, and Add RD Licensing Servers) and configure them as required. Visit Windows IT Pro Center to learn more about Hyper-V VDI deployment and configuration.
Wrapping Up
Data is considered to be the main asset of many modern organizations, which in turn makes security their highest priority. In VDI environments, all data is stored in the production data center, making it easy for IT administrators to monitor the entire infrastructure, detect any malicious activity, and easily recover critical data and applications, even if one of the virtual desktops fails. However, the fact that all data is stored in a single location doesn’t eliminate system vulnerabilities altogether. In fact, the VDI environment becomes more greatly exposed to other threats and dangers.
If you are considering deploying the Hyper-V VDI environment, your primary concern should be ensuring its protection. Standard measures include securing the physical endpoint, enabling software firewalls, and installing anti-malware products. However, all these approaches are still insufficiently effective for protecting the entire Hyper-V VDI environment. For this purpose, consider installing a full-fledged data protection solution that includes a rich set of data protection options and exclusive features.
NAKIVO Backup & Replication is a reliable and powerful backup and recovery solution, which allows you to protect VMware, Hyper-V, Nutanix, AWS EC2 and Microsoft 365 environments.