A Full Overview of VMware Virtual Machine Performance Problems
Hardware and software issues sometimes lead to poor VM performance. This may diminish the convenience and agility of your virtual environment. Read this blog post to learn about the methods to improve VMware VM performance when faced with slow VMs. Discover the most common issues that lead to VM performance degradation and learn about possible fixes.

Reasons to Improve VM Performance
Let’s look at the main reasons to perform diagnostics and improve VM performance:
- Virtual machine performance is slower than the performance of an identical VM on another host.
- Applications run slower than they should. But when you migrate a VM to another host, the performance of applications is normal.
- Applications take a lot of time to launch.
- Running applications are not responding.
- CPU, memory, or disk usage is 100%.
CPU and Memory
Insufficient hardware resources are among the most popular reasons for slow VM performance. If you don’t provide enough CPU resources for a VM, software inside the VM might run slowly with lags. To fix this, set a VM to use more CPU cores or add more virtual processors. Also, consider upgrading the hardware of your host machine if you have an old processor with a low number of cores, cache, and low frequency.
When you set the amount of RAM for a virtual machine, make sure that this amount of RAM is enough for the VM. At the same time, there must be enough RAM for a host machine. If you don’t provide enough memory for a VM, the guest OS (operating system) uses a swap file intensively, and overall VM performance is slow. If you provide a big amount of memory for a VM and don’t leave enough memory for the host OS, then the host OS uses a swap file. This leads to the degradation of OS and application performance. Moreover, VM performance degrades as well in this case. Don’t assign too much memory to a VM, and, at the same time, leave some for the host. Always provide the host with enough memory.
Read system requirements for your operating system and applications. Let’s consider an example. Your host machine has 8 GB of memory and runs ESXi 7.0 or Windows 10 with VMware Workstation. A Windows Server 2019 VM is running on this host machine. If you provision 4 GB of RAM for a Windows Server 2019 VM, 4 GB of RAM is left for the host OS. That is enough for proper work of both host OS and guest OS (without running additional applications that consume resources). The ratio is 1:2 (4 GB/8 GB), and 1/2-1=-0.5 is the current MEM overcommit avg value. If you provide 2 GB of RAM for a VM running Windows Server 2019, in this case, VM performance would be slow. If you provide 6 GB of RAM for a Windows Server 2019 VM, the amount of memory for the host machine is not enough, and, as a result, both physical and virtual machines are slow.
If you run heavy applications such as databases on virtual machines, adjust VM configuration and add more CPU and memory resources accordingly.
Memory overcommitment is a situation when total resource allocation exceeds capacity. If you have a host with 8 GB of RAM and run five VMs configured to use 2 GB of RAM each, all VMs and the host machine can show low performance because the memory is overcommitted (if all VMs are using memory intensively). If some VMs are running, but they are lightly loaded, memory is primarily used by the VMs that are heavily loaded because ESXi improves memory utilization. Memory overcommitment makes sense in test environments.
Also, check memory ballooning and configuration of this feature to reclaim unused memory from VMs for efficient utilization of physical memory. Sometimes, this feature can affect VM performance when the VM needs to use a disk for a swap.
CPU overcommitment. VMware provides techniques for rational resource usage, allowing you to provision more virtual processors for VMs than there are physical CPU cores on the host. The CPU overcommitment parameter is the ratio of the number of virtual processors assigned to VMs to the number of physical CPU cores on the host. If the value is 3:1 – there should be no reason to worry. If the value is 5:1, VM performance degrades. If the CPU overcommitment value is 6:1 or greater, VM performance is slow, and that may cause many problems.
How to resolve CPU and memory issues?
Consider upgrading hardware and adding more RAM to the physical machine on which you run virtual machines. Try to have enough memory to prevent host and guest operating systems from using swap files. Avoid memory overcommitment.
Sometimes CPU power management features can cause low VM performance. Try disabling them.
Check free CPU and memory resources on the host.
On ESXi, run this command in the command line to check whether your server is overloaded:
esxtop

Check the load average parameter.
1.0 – means that the CPU is fully utilized
0.5 – means that the CPU is half utilized (50%)
2.0 – means that the CPU is twice overloaded, and you must take measures
Press these keys to change the view: c – CPU metrics (is displayed by default), m – memory, n – network, d – disk. Press space to update displayed values (the values are updated automatically every 5 seconds). Press h for help and q to quit.
Check the MEM overcommit avg parameter to examine memory usage on ESXi. The MEM overcommit avg value is as follows: the ratio of the requested memory to the available memory minus 1. The recommended value of this parameter is 0 or less.
If you use VMware Workstation installed on Linux or Windows to run VMs, use standard system monitoring tools available on your OS.
Check CPU/memory usage on the guest OS. Some applications may not be working properly and consume all CPU (CPU core) resources. Check running processes and find the one that loads the CPU. Check the temperature of physical processors on the host because overly high temperature (more than 80 °C) causes performance issues and constitutes a risk for a processor (a processor might get damaged).
Upgrade hardware – install a more powerful CPU or more processors on the host. Check VM configuration. If the number of virtual processors for VMs is more than needed, reduce the number of virtual processors for VMs to free up resources for the host.
In VMware vSphere, you can use a DRS cluster (Distributed Resource Scheduler) to migrate VMs from an overloaded ESXi host to an ESXi host that has free hardware resources.
Disk Issues
Low performance of a storage system causes low performance of virtual machines that store virtual disks on this storage system. Storage latency is critical for VM performance. Try to use SSD (Solid State Drive) disks to store virtual machines. If you cannot use SSD disks, use HDD (Hard Disk Drive) with 7200 RPM or 10000 RPM. Hard disk drives with 5400 RPM provide extra low performance. Using disks with SAS interface is preferred.
If you use VMware Workstation, you can store VMs on external SATA (eSata) or USB 3.0 disks taking into account the above recommendations. Don’t disconnect an external disk until you power off a virtual machine.
In production environments, use non-growable or preallocated thick disks. Eager-zeroed thick provisioned disks are faster for first write operations.
If you use an HDD to store VMs, perform defragmentation of this physical disk drive or array, and perform defragmentation of a virtual disk in virtual machine settings. Use partitions to reduce disk fragmentation. Install an operating system on one partition, store files used by applications (for example, a database) on another partition.
Check whether the firmware of an HBA (Host Bus Adapter) is up to date. Update firmware of your HBA on a server.
Check disk health. Perform diagnostics of the disk and file system. If the disk is corrupted, replace the disk immediately.
Check interface (SAS, SATA) cords.
Disk encryption reduces performance due to overheads. Move VM files to non-encrypted storage if encryption is not critical for the VM, or turn off disk encryption.
Use independent (hardware) RAID controllers that provide higher performance and reliability.
Make sure that there is free space on a disk inside a VM. Insufficient disk space causes performance degrading because an operating system and applications cannot write temporary files.
You can migrate your VM to another disk or disk array that is not overloaded. In VMware vSphere, consider using DRS and Storage DRS. Reduce the number of running VMs on the same LUN or datastore.
Snapshots
Virtual disk snapshots reduce virtual disk performance. Each snapshot produces an additional delta VMDK file of a virtual disk. The copy-on-write mechanism is used. Each delta VMDK contains data differences (change log) compared to a parent VMDK file, and a VM reads all this data when interacting with a VM disk. As a result, data is read from multiple virtual disk files on the same physical disk, and this reduces VM performance. For the same reason, don’t use split VMDK files for VMs in VMware Workstation (this option is created for old file systems that don’t support files larger than 4 GB). Disk overload increases as the number of snapshots grows. Snapshots are usually used for temporary purposes (for example, when you copy data during a backup job or install or test an application inside a VM). Delete or commit snapshots as soon as possible.
In VMware Workstation, you should shut down a VM, close VMware Workstation, and run a command in which you define the path to the existing main VMDK file and the path to a new virtual disk file:
"C:\Program Files (x86)\username\VMware Workstation\vmware-vdiskmanager.exe" -r
"D:\VMs\VM-folder\vm-name.vmdk" -t 0 "D:\VMs\VM-folder\NewDisk.vmdk"
Then reconfigure the VM to use a new virtual disk or create a new VM, and set to use the new consolidated virtual disk.
On ESXi, run this command to remove snapshots:
vmware-cmd path_to_vmx_file removesnapshots
or
vim-cmd vmsvc/snapshot.removeall VMID
You can view the VMID with this command:
vim-cmd vmsvc/getallvms
Merge split VMDK files if they are used. Do this on the Windows machine on which VMware Workstation is installed with the command:
"C:\Program Files (x86)\VMware\VMware Workstation\vmware-vdiskmanager.exe" -r splitdisk.vmdk -t 0 mergeddisk.vmdk
Store performance sensitive data on a faster disk.
VMware Tools
Make sure that VMware Tools are installed on the guest OS. VMware Tools is a set of drivers and utilities used to improve VM performance and user experience. Graphics performance is increased after installing VMware Tools. The mouse is synchronized and works without lags. With VMware Tools, you can use a VM in the full-screen mode with higher performance. Check whether VMware Tools are installed.
In Windows, click the VMware Tools icon in the Tray near the clock, or go to C:\Program Files\VMware\VMware Tools\ (this is a default directory) and run the command:
VMwareToolboxCmd.exe -v
In Linux, run the command in the console:
vmware-toolbox-cmd -v
Check the version of VMware Tools on VM guests by reading VM logs in the ESXi command line:
grep toolbox /vmfs/volumes/datastore/vm_name/vmware.log
or
grep build- /vmfs/volumes/datastore/vm_name/vmware.log
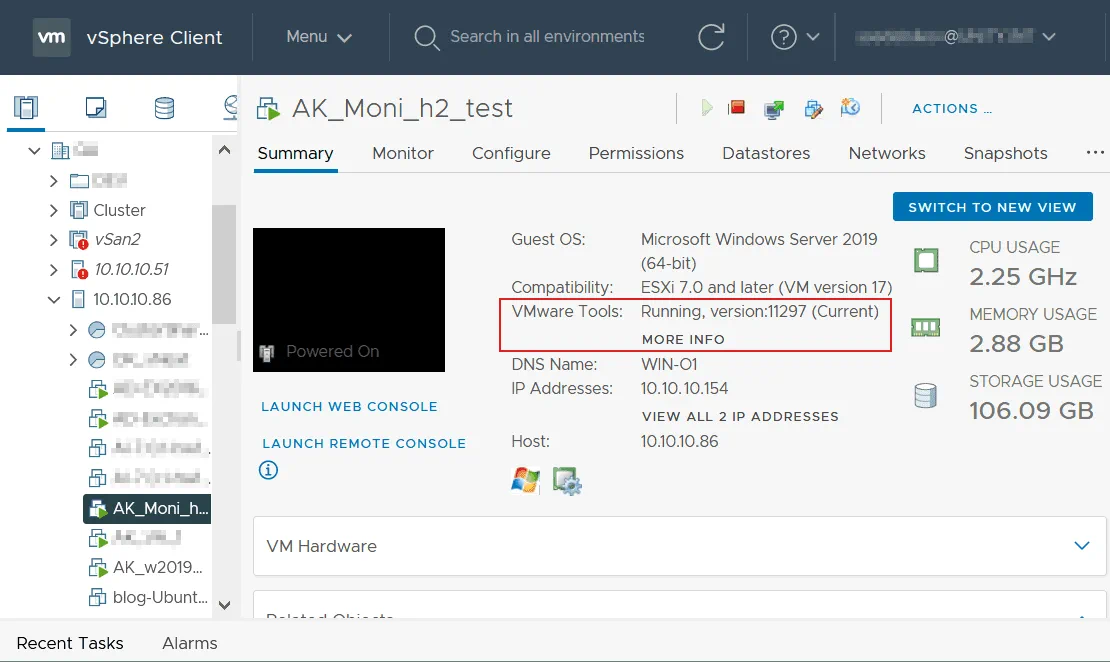
In VMware vSphere Client, check whether VMware Tools are installed on the guest OS running on the VM. Information about VMware Tools is displayed in the Summary tab for a VM (the status and version).
Network Issues
If your ESXi host is connected to storage such as SAN (Storage Area Network) or NAS (Network Attached Storage), make sure that the network speed is enough and the network is not overloaded.
You should use separate ESXi management network, vMotion network, and storage network in vSphere for high performance.
Configure NIC Teaming (link aggregation) on ESXi hosts that use virtual switches.
If your existing network bandwidth is not enough to meet requirements, consider a network upgrade. For example, set up 5-Gbit or 10-Gbit network adapters, switches, and routers instead of existing 1-Gbit equipment.
Antivirus
Make sure that antivirus software on the host is not scanning virtual disk files as scanning these files can degrade VM performance. You can exclude VMDK files in VM directories from antivirus scanning.
Check the health of the operating system running on the host OS and guest OS. Make sure there are no viruses or other malware or ransomware.
Consider using special antivirus solutions that work with VMware vShield on ESXi hosts instead of installing antivirus software on each guest OS of VMs. This approach allows you to achieve better performance and is rational for large virtual environments. If you use vShield, configure this software properly because incorrect configuration can degrade VM performance.
Hyper-V Related Issues
If you use VMware Workstation 15.5 or newer that supports running VMware VMs when the Hyper-V feature is installed on a Windows host, VM performance of VMware virtual machines can be slower. When the Hyper-V role is installed, Hyper-V uses CPU virtualization features such as Intel VT-x or AMD-V directly, which are not available for VMware Workstation with Virtual Machine Monitor (VMM) that must run in a privileged mode. The VMM of VMware Workstation runs in the user mode or ULM mode (instead of the privileged mode) for compatibility reasons, as VMM cannot access hardware virtualization features of the CPU when they are used by Hyper-V. In this case, VMM uses Microsoft’s WHP APIs that act as an additional layer between VMM and CPU and reduces VMware VM performance.
Uninstall Hyper-V and related features such as Virtualization Based Security from a host Windows machine. After that, VMM of VMware Workstation runs in the privileged mode and works with CPU virtualization features directly with high performance. This solution will help fix VMware virtual machine slow performance.
VM Performance Monitoring
VM performance monitoring is a widely used method to detect overloads and related performance issues. VM performance monitoring helps you troubleshoot the cause. Remember to monitor VM performance on the host level but not inside a guest OS. A guest operating system is not aware of virtualization features, such as dynamic resource allocation, and might display incorrect data. VMware provides counters on the host level. These counters provide correct information and are used for VM performance monitoring. Knowing about how performance information is collected inside VMs, VMware developed virtual machine specific counter libraries that allow you to see correct information about VM performance by using the Perfmon utility in Windows guests. VMware Tools must be installed on a guest OS for VM performance monitoring.
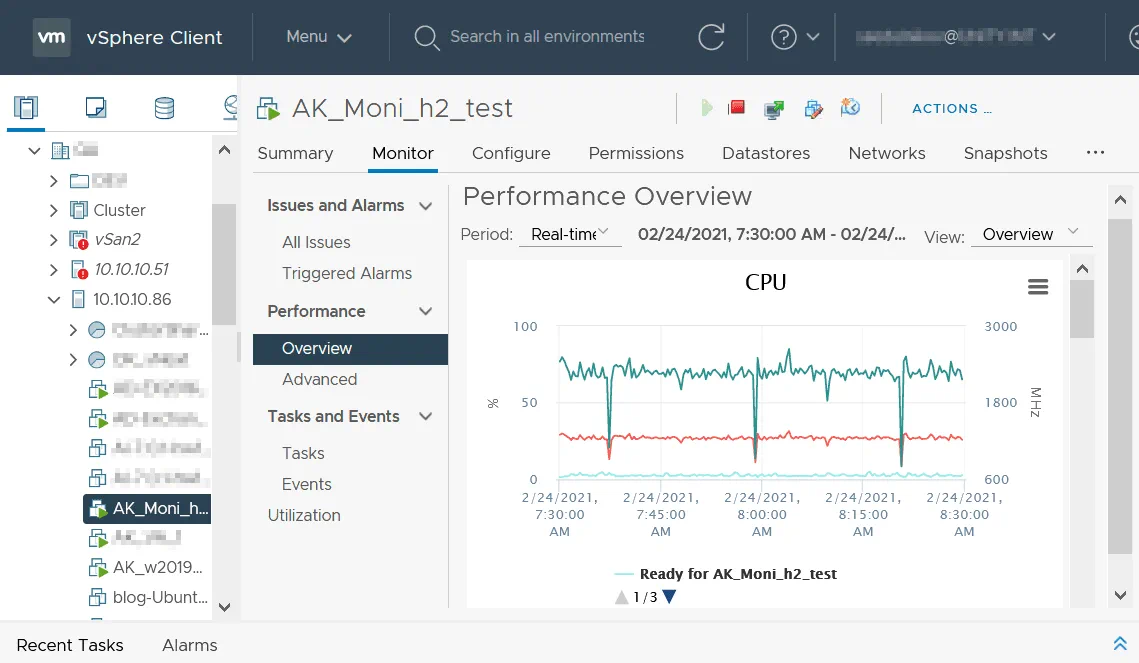
To check consumed hardware resources in VMware vSphere Client, select a virtual machine, open the Monitor tab, and then select Performance > Overview or Performance > Advanced to view charts and other information. On the Overview page, you can view utilization of CPU, memory, network, and storage (free space, used space, and input/output performance) in real-time and for the previous day, week, month, year, or a custom interval. Select these options in two drop-down menus on this page (Period and View).
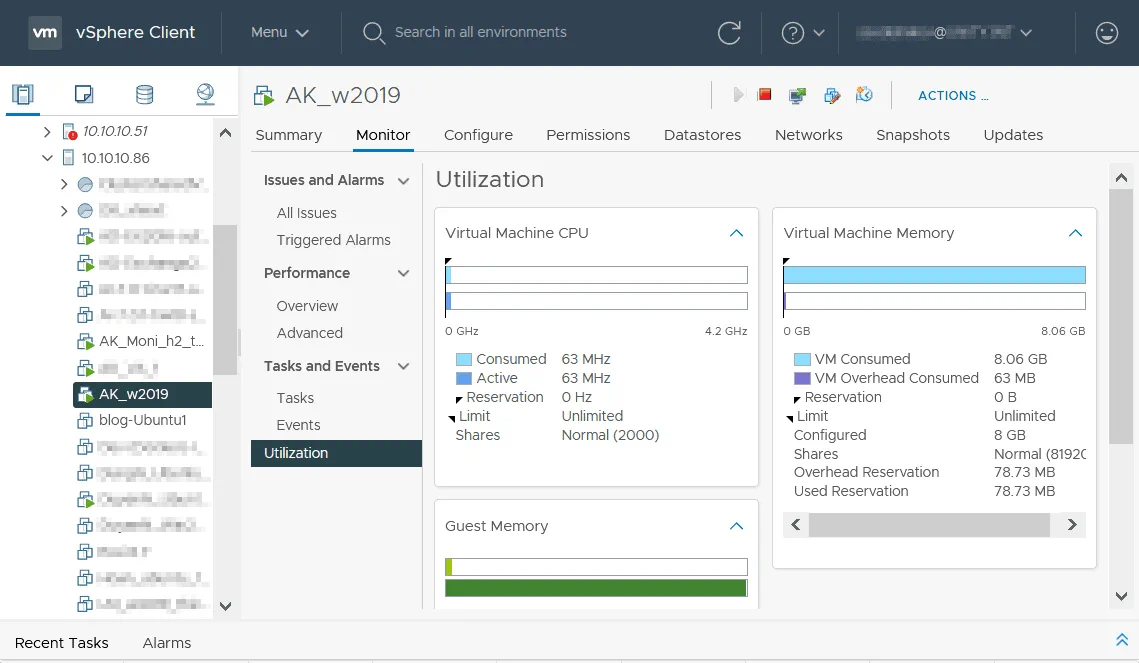
Click Utilization in the Monitor tab to see additional information about utilization of virtual machine CPU, virtual machine memory, and guest memory.
Similarly, you can select an ESXi host or cluster in vSphere Client and monitor used and available resources in real time and for the selected period.
Conclusion
This blog post explained the main points that require your attention when talking about VM performance issues and recommendations that help improve virtual machine performance. You should have hardware that provides enough performance, avoid memory overcommitment, and configure software properly. Use VM performance monitoring to detect why VM performance is slow.
Disk damage is the most dangerous issue that causes slow VM performance because, in addition to poor virtual machine performance, you can also lose data. To avoid data loss, perform VMware data backup regularly. Use NAKIVO Backup & Replication for VMware backup – the universal data protection solution that supports VMware vSphere 7.0 and provides many useful features to improve backup speed and reliability.