Top 20 Tips on How to Improve VM Performance in Hyper-V
Every system is prone to errors and failures once in a while, and users are constantly looking for ways to improve performance with their virtual infrastructure. In this blog post, we are going to discuss how performance issues can affect your Hyper-V environment and in what ways you can improve you virtual machine (VM) performance.
In this blog post, we have compiled a list of 20 tweaks which can be used to optimize and improve VM performance in a Hyper-V environment. Read further to also find out how Hyper-V virtualization technology works, which issues are most likely to affect Hyper-V VM performance, and how NAKIVO Backup & Replication can help you protect your virtual environment.

How Hyper-V Works
Hyper-V is virtualization software developed by Microsoft which allows you to create and run a virtualized version of a computer, referred to as a virtual machine (VM). A single Hyper-V host can run multiple VMs at the same time in isolation from one another. Moreover, all of the VMs share hardware resources of a single host server, including memory, processors, as well as storage and networking devices. This way, hardware resources can be efficiently used and easily allocated to the VMs that need them most.
Hyper-V is available as a server role on Windows Server and Windows (2008 and later) or as a free standalone product (Hyper-V Server), which has limited functionality and a command-line interface only.
If you are interested in learning more, read our blog post on how to install Hyper-V Server on your computer.
Common Hyper-V Issues
Even though Hyper-V is a very advanced server virtualization platform, it can still experience some performance issues. The following system components are most likely to fail and result in VM performance issues:
- Processor (e.g. overloading logical or virtual processors, CPU lags)
- Memory (e.g. memory overcommitment, running out of RAM, failure to start VMs)
- Network (e.g. network-bound hosts and VMs, imbalance of networking resources)
- Storage (e.g. disk latency, waste of physical storage space, slow I/O throughput)
These are the hardware components which should be closely monitored and attended to if any unusual activity has been detected.
Most of the issues occur as a result of improper usage of available resources. A Hyper-V host has a limited amount of hardware and software resources which it can use and share among the VMs running on top of it. Therefore, it is critical to pay close attention to how many VMs are running on the Hyper-V host at the same time, how they consume available resources, and whether they are over-provisioned or under-provisioned. All of these factors combined can affect how effective and reliable VM performance would be.
A key aspect of optimizing and monitoring performance is to understand the actual amount of workload in your virtual infrastructure and how many resources would be required to provision such a workload. This way, you can identify potential risks and bottlenecks which might negatively affect your VM performance. The basic advice on improving Hyper-V performance is to avoid creating and running too many VMs on a single host, and to minimize unnecessary resource consumption within your virtual environment.
20 Ways to Improve VM Performance in a Hyper-V Environment
In the following section, we are going to discuss how a number of simple configurations can help you improve VM performance in your Hyper-V environment.
Thus, to improve VM performance, you can do the following:
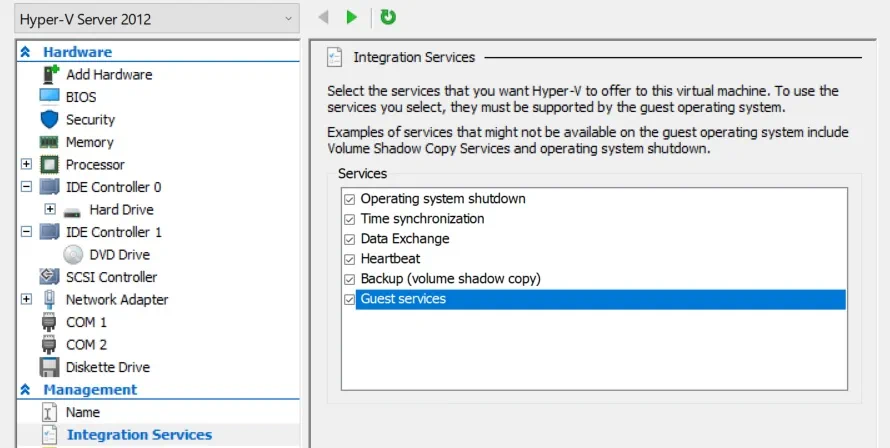
1. Enable Hyper-V Integration Services
Hyper-V Integration Services represent a suite of special drivers and utilities designed to improve the performance of guest operating systems (OSes) running inside a Hyper-V VM. To achieve optimal results, it is recommended that you enable Hyper-V Integration Services on both the Hyper-V host and all guest OSs. Note that all Hyper-V Integration Services (except for Guest Services) are available by default on the newer Windows OSs. However, if your VM is running Linux or older versions of Windows OS, it is better to check whether the Integration Services are automatically enabled on those guest OSs. If not, they should be installed manually.
2. Use fixed VHD files
Fixed-size disks and dynamically-expanding disks have been designed to serve specific purposes. When creating a new virtual hard disk, you are asked to select which type of virtual hard disk you wish to have. To make the right choice, you should first consider how it would be used in your virtual environment. Fixed-size disks provide better performance and are recommended for servers running applications with high levels of disk activity. Dynamically-expanding disks provide better use of physical storage space and are recommended for servers running applications that are not very resource-intensive.
Fixed-size disk space is allocated when the virtual hard disk file is created and it doesn’t change when data is added or removed. Dynamically-expanding disk space is allocated on an as-needed basis and its size changes once the data is added or removed.
Thus, dynamically expanding disks should be used in test and deployment environments, whereas fixed-size disks work better in production environments.
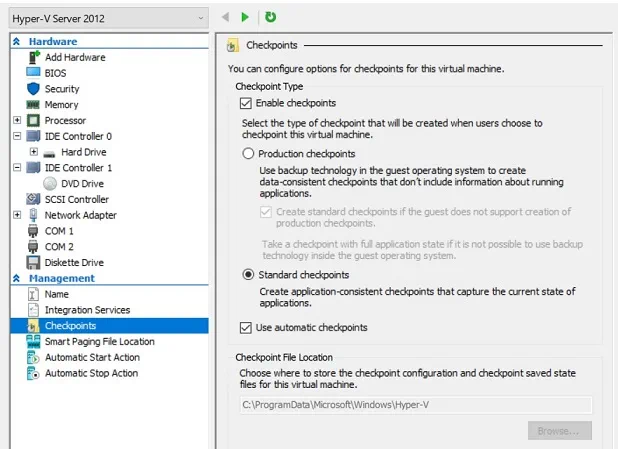
3. Don’t use Hyper-V snapshots as a backup alternative
Hyper-V snapshots (also known as Hyper-V checkpoints) should never be used as backups, as they have proven to be most effective in test and development environments. For example, you would like to install patches and updates in your system, but are unsure how it might affect your virtual infrastructure. In this case, taking Hyper-V snapshots allows you to test things out and roll back in case of failure.
Unlike backups, Hyper-V snapshots are stored in a production datastore along with VM hard disks, which makes them dependent on the VM. If the VM is damaged or deleted, Hyper-V snapshots will be lost as well. A backup is a more reliable data protection option because it acts as a consistent and independent VM copy which can be easily moved and stored in a remote location.
4. Configure the size of paging files
Pagefile.sys is the Windows paging file used for managing virtual memory and dealing with memory shortages. When the system starts running low on physical memory, you can get access to additional RAM through the use of page files. Even though it may seem like a good idea, using a page file can sometimes affect VM performance. Therefore, it is recommended that you increase the size of the Windows paging file and set its minimum and maximum values to be 3 times higher than the amount of RAM you’ve got.
5. Do not create too many virtual network switches
You may be tempted to create multiple virtual network switches that would be used for various purposes. In reality, using too many virtual switches in a single network can cause processing overhead. To improve VM performance, it is recommended that you create only one virtual network switch and use it in various cases. Read our blog post to learn how Hyper-V Network Virtualization works and which components should be included in an effective virtual network infrastructure.
6. Avoid management OS overloading
A management OS is meant for running VMs, backup software, and anti-malware. That’s it! Anything that doesn’t match these criteria should be running on your VMs. Also, avoid creating too many VMs on the same Hyper-V host if you are not planning to use all of them. If you find that some of your VMs are no longer used and have no practical function in your virtual environment, it is better to delete them so that they are no longer consuming available hardware resources and overloading your Hyper-V host.
7. Close unnecessary applications
When working with multiple VMs at the same time, it can be difficult to monitor every single application you open. However, if you leave them running for too long, they start consuming available system resources, which eventually affects the overall VM performance. Be ready to close Virtual Machine Connection Window, Hyper-V Manager, and any other application window if you have completed the task and you don’t need them anymore. This is a simple yet effective way to improve VM performance.
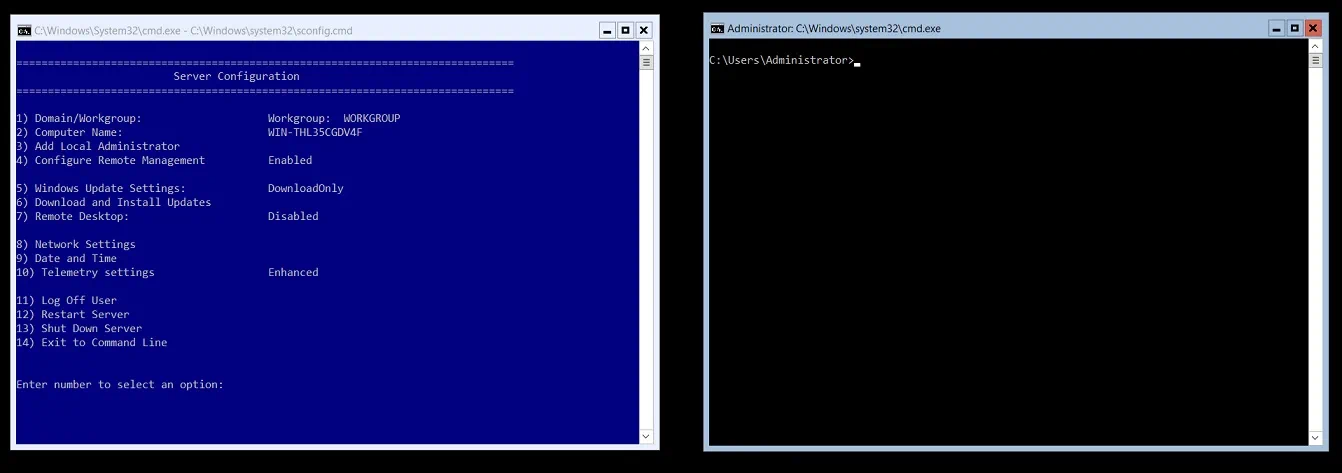
8. Install Hyper-V on Windows Server Core
One of the most universally-accepted pieces of advice on this list is to install Hyper-V on Windows Server Core due to the many benefits that it can provide. When compared to Windows Server with GUI experience, it becomes clear that Windows Server Core has a smaller footprint and attack surface. As a result, fewer hardware resources are consumed and the entire system has fewer vulnerabilities. Those saved resources can now be used for provisioning VMs running in the system, which can significantly improve VM performance in a Hyper-V environment.
9. Determine a performance baseline
A performance baseline is the level of performance that your system displays in standard conditions. It is recommended that you set a performance baseline beforehand. This way, you can identify whether anything has changed in resource consumption, monitor the overall VM performance, and promptly respond to any system errors and failures that might have been detected.
10. Allocate resources effectively
Decide how you want to use your Hyper-V environment, how many VMs you intend to create, and for which purposes those VMs are going to be run. After that, you should determine how many hardware and software resources are available to you and how you can effectively allocate them to achieve the maximum VM performance. Moreover, after creating VMs and assigning available resources to them, you should carefully monitor the workload of each VM and eliminate the possibility of overprovisioning or underprovisioning, if there is any.
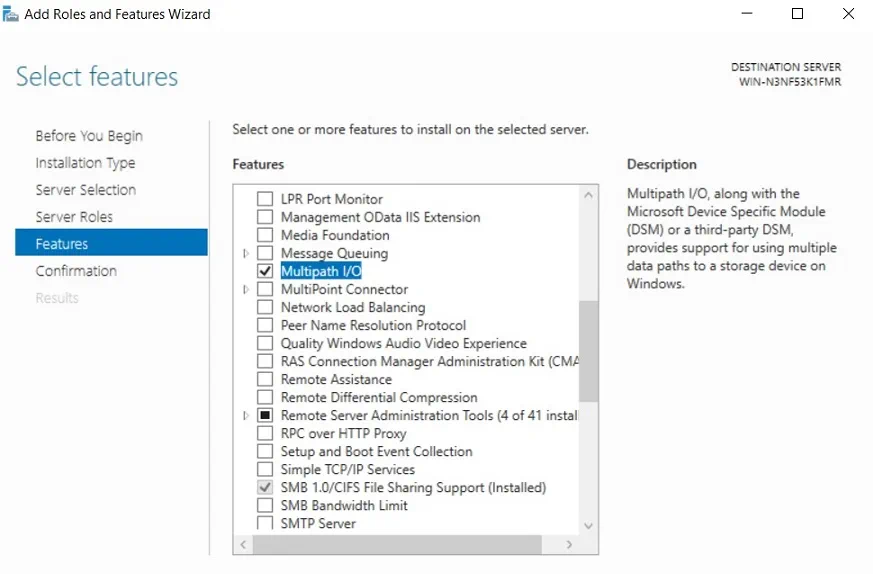
11. Enable Multipath I/O
Multipath I/O (MPIO) can provide a number of redundant data paths between storage devices and the server, which can, as a result, improve load balancing and ensure high availability of your Hyper-V environment. It is recommended that you enable this feature in your production environment, especially if you are working with large amounts of data. If a connection failure has occurred, MPIO uses an alternate path to ensure that data can still be transferred.
12. Use Dynamic Memory
Dynamic Memory allows you to add more memory resources to a VM when the guest OS is actively running and needs more RAM. On the other hand, if the guest OS is offline and doesn’t require a lot of resources to support VM performance, Hyper-V can reclaim unused resources and assign them to other running VMs. Moreover, you can configure Dynamic Memory by assigning a specific amount of maximum and minimum RAM available to this particular VM.
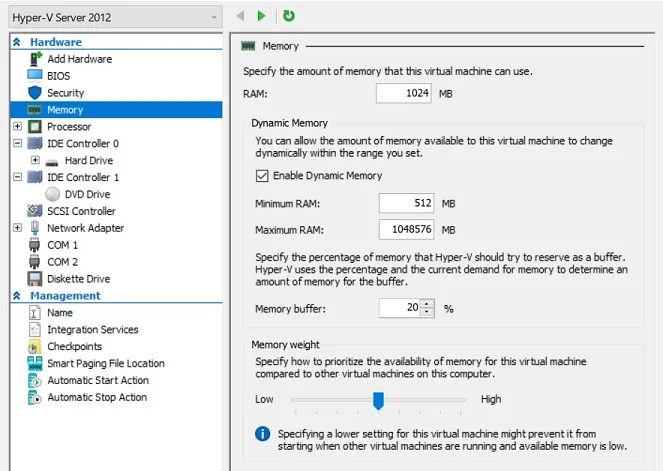
Note that after enabling Hyper-V Dynamic Memory, it is recommended that you change default memory settings and configure Dynamic Memory values for each VM based on its current workload. For more information and recommendations, read our blog post on Hyper-V Dynamic Memory best practices.
13. Enable VLAN tagging
VLANs can be used to enable network communications through the available network adapters. By adding special VLAN tags, you can identify which packet belongs to which virtual LAN and make network management within your system easier.
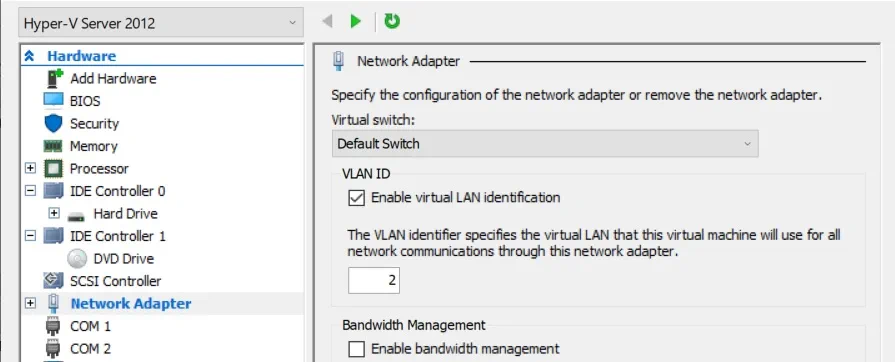
VLAN tagging is a helpful feature because it allows you to group multiple users into the same VLAN and carefully monitor their performance. Moreover, VLAN tagging can improve the security of your virtual environment as you can specify which users are allowed to access specific networks.
14. Defragment virtual hard disks
Fragmentation occurs when the contents of a single file are stored in different sectors on the disk. As a result, storage space is poorly used and VM performance is affected. To prevent such issues from occurring and improve VM performance, it is recommended that you defrag virtual hard disks. This operation permits reorganizing available files and applications, identifying the amount of unused disk space, and saving available resources from overconsumption.
15. Ensure that your hardware is certified
To guarantee that your virtual infrastructure can function without lags and interrupts, you should use hardware and software components which have been certified by Microsoft and are fully supported in a Hyper-V environment. To verify that a selected hardware or software component is actually certified and can be used in your environment, visit the Microsoft Windows Server Catalog and locate the required information.
16. Use RAID 10 volumes
RAID (redundant array of independent disks) is an approach to storing your data in different areas on several hard disks, which can improve data redundancy and fault-tolerance of your storage. RAID 10 is a combination of RAID 1 (disk mirroring) and RAID 0 (disk stripping) which can provide the benefits of both array types. This requires a minimum of 4 disks to build RAID 10, which eventually allows you to securely protect data and easily retrieve it in case of a drive failure.
17. Deploy 64-bit guest OSs and Generation 2 VMs
In many cases, it is recommended that you choose a 64-bit guest OS over a 32-bit one because it can provide additional memory space. Thus, if you want to increase the overall memory speed and improve VM performance, it is better to deploy a 64-bit OS, although not obligatory.
Moreover, it is recommended that you create Generation 2 VMs because they have been designed to be hypervisor-aware and, unlike Generation 1 VMs, they do not rely on emulated or synthetic hardware. Generation 2 VMs can ensure a higher level of security using Secure Boot and Trusted Platform Module, provide you with more boot options, and, as a result, considerably improve your VM performance.
18. Properly configure your anti-virus
If you have decided to build a Hyper-V environment, it is also critical that you take care of its security. For this purpose, you can install an anti-virus or any other anti-malware software, which searches for and detects any malicious activities within your infrastructure as well as prevents them from infecting your entire system.
However, if not properly configured, an anti-virus runs the risk of interfering with critical processes and operations running in your system. Thus, you need to change default configurations of you anti-virus and exclude specific files and applications from regular virus scans.
The file types which should not be included in regular virus scans are: .vhd, .vhdx, .avhd, .avhdx, .vsv, .iso, .rct, .vmcx, .vmrs. However, if you want to guarantee safety of a specific Hyper-V VM, it is recommended that you install an anti-virus on the selected VM and run vulnerability scans within it.
19. Organize busy VMs into separate volumes
If you place several VMs running a large workload in the same storage volume, this can affect current I/O operations and undermine VM performance in general. In order to avoid this issue, it is recommended that you keep busy VMs in separate volumes so that they have enough space for storing virtual hard disks and VM configuration files, as well as enough hardware resources to run their large workloads.
20. Automate tasks with PowerShell cmdlets
The main benefit of using PowerShell cmdlets is that they allow you to automate specific tasks, thus providing you with more flexibility when managing Hyper-V environments. Even though common Hyper-V management tools (Hyper-V Manager or SCVMM) include a GUI, they still have limited capabilities when it comes to managing Hyper-V hosts and VMs.
Some virtualization features can only be enabled and configured using PowerShell. Thus, you should not underestimate the power of PowerShell cmdlets. Once you have figured out how to work with these scripts, you can take your VM performance to a whole new level and transform the way you manage your Hyper-V environment.