Office 365 Spam Filter: Setup and Configuration
At the very least, spam emails are a nuisance. However, these unsolicited messages are also a genuine menace when they contain malicious attachments or malware. Luckily, organizations using Microsoft 365 can safeguard their mailboxes by automatically separating junk email from legitimate communication.
Exchange Online Protection (EOP) is the primary security tool for Microsoft 365 subscriptions. Security administrators use EOP to create policies and filters against malware, spam and other email threats. Note that previously, admins could access EOP from the Exchange admin center. Today, EOP is part of the Microsoft 365 Defender portal for advanced protection and control, and you can get EOP as part of Exchange Online or as a standalone service.
This blog explains how Office 365 email filtering works and details the technologies included in EOP. Read on to learn how to correctly configure your inbound and outbound spam filter policies in EOP.
How Does Spam Filter Work?
Microsoft’s spam filtering with Exchange Online Protection (EOP) relies on previously identified spam and phishing threats as well as collected user feedback from Outlook.com to detect junk email. The identified junk email is automatically classified and separated from legitimate inbound messages. The O365 spam filter prevents inboxes from getting filled up with useless emails and ensures smooth communication across and beyond an organization’s network.
The below technologies make up the anti-spam settings in EOP:
- Spam (content) filtering: You can configure anti-spam policies in EOP so that inbound messages are classified based on the following verdicts:
- Spam
- High confidence spam
- Bulk email
- Phishing email
- High confidence phishing email
The anti-spam policy allows you to define the actions for each verdict and configure the corresponding notifications settings.
- Outbound spam filtering: You can also configure outbound spam filtering in EOP to prevent users at your organizations from sending spam intentionally or unintentionally by limiting outbound messages and monitoring spam within the content.
- Connection filtering: You can configure filtering based on IP addresses to identify good and bad email sources in an inbound email connection. Specify IP addresses or ranges for the IP Allow List and IP Block List and benefit from the safe list maintained by Microsoft.
- Spoof intelligence: For anti-spoofing protection, configure anti-phishing policies in EOP. Other anti-spoofing methods in EOP include email authentication and spoof intelligence insight.
How to Configure Office 365 Spam Filter Policy
In Microsoft 365 environments, an anti-spam policy includes two elements to be configured:
- Spam filter policy: Defines the actions and notification options related to the spam filtering verdicts.
- Spam filter rule: Refers to the priority of the spam filter policy in addition to the recipients to whom the policy applies.
Note: When you create a new anti-spam policy, you are creating a spam filter rule and the associated spam filter policy. If you delete a policy, both elements are also deleted.
Organizations that use Microsoft 365 have a built-in Default anti-spam policy that can be viewed and modified from the Microsoft 365 Defender portal. This policy has the lowest priority value and doesn’t deliver effective protection against spam.
For this reason, Microsoft recommends that security admins configure their custom spam filter settings based on the needs of their environments. To simplify configuration, Microsoft 365 Defender provides two built-in security levels, Standard and Strict, each with its preset settings detailed below.
Creating the inbound anti-spam policy in Microsoft 365 Defender
You can create a custom inbound anti-spam policy and the corresponding spam filter rule by following the steps below:
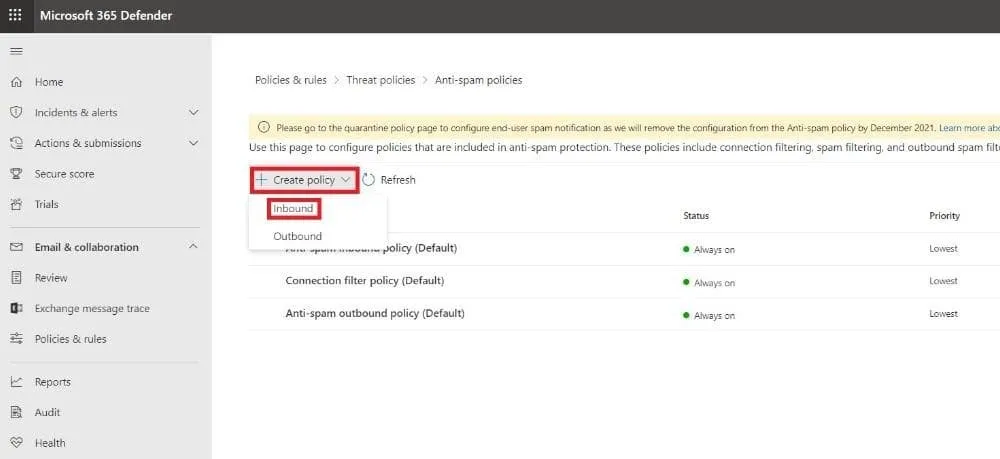
- Access the Anti-spam policies page by entering https://security.microsoft.com/antispam in your browser.
Note: You can also go to the anti-spam policies page by using https://security.microsoft.com, then clicking Email & Collaboration > Policies & Rules > Threat policies > Anti-spam under Policies.
- Click + Create policy and choose Inbound from the dropdown list.
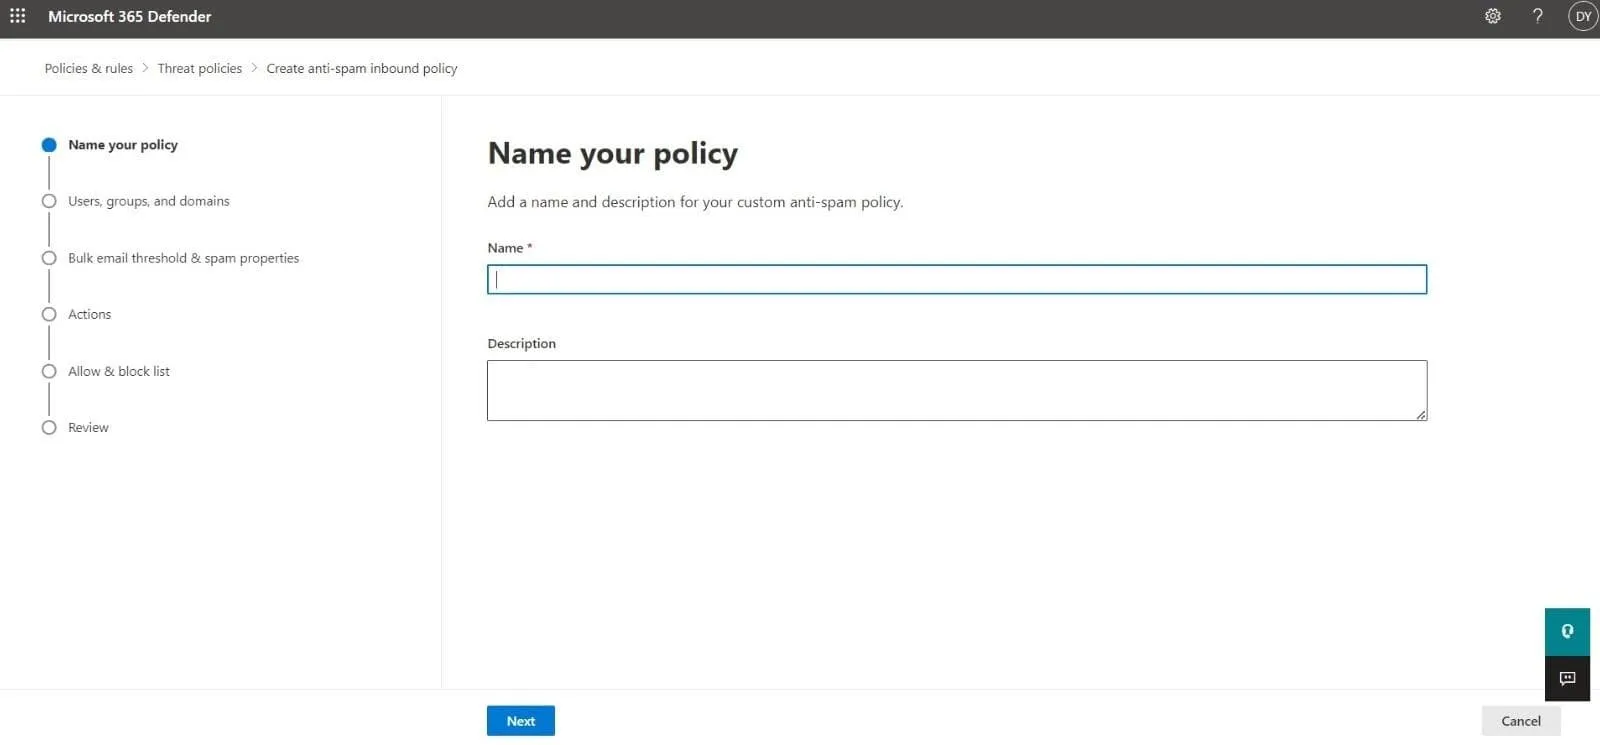
- The first page of the policy creation wizard is the Name your policy page. Define the following settings:
- Name: Add a descriptive and unique name for your policy.
- Description: Enter a fitting description (optional).
Click Next to continue.
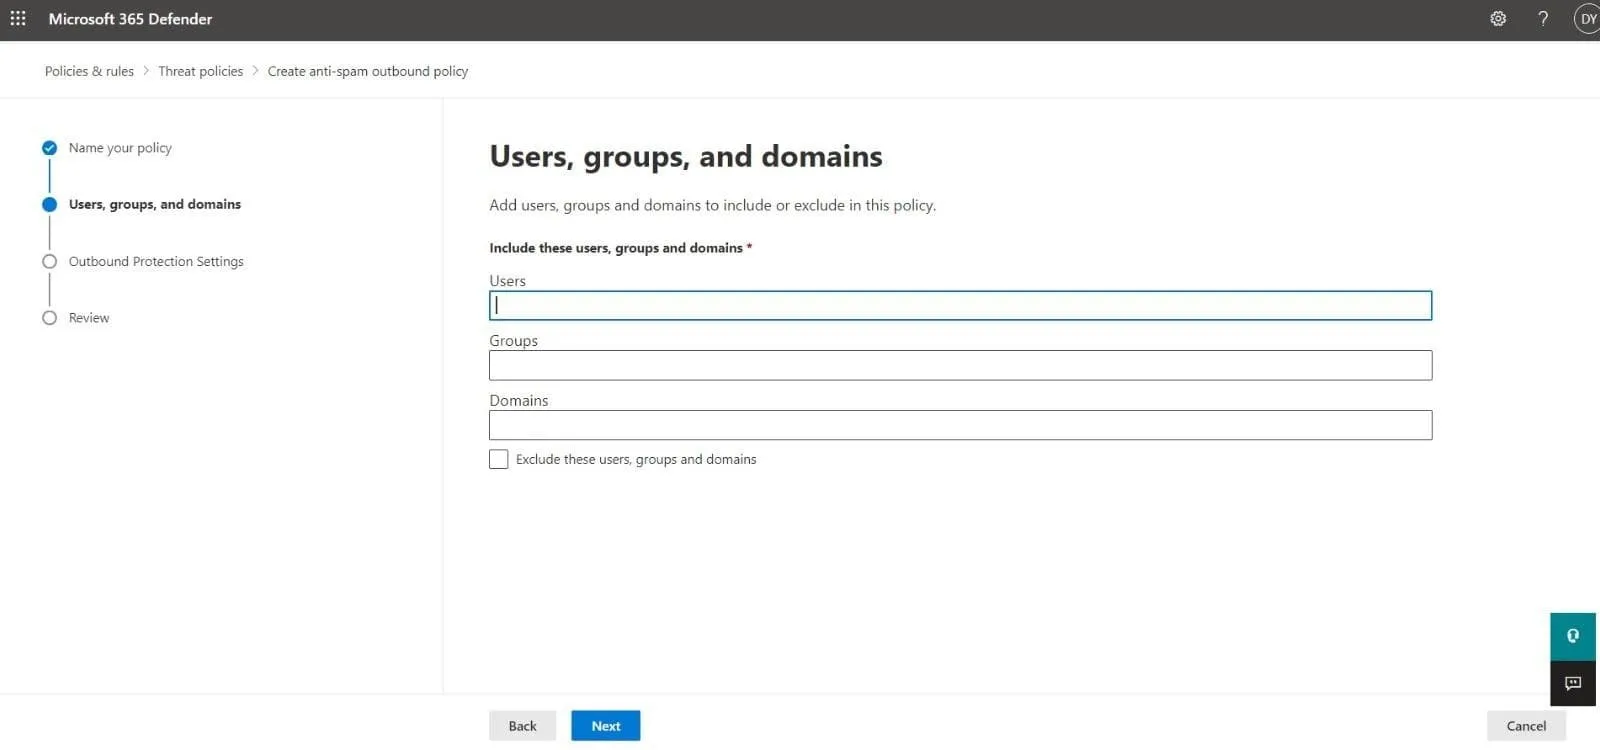
- On the Users, groups, and domains page, add the internal recipients affected by the spam filter policy:
- Users: mail users, contacts or mailboxes within your organization
- Groups: Microsoft 365 groups, mail-enabled security groups or distribution groups
- Domains: recipients in the accepted domains in your company
Type a value in each box and select the one you need from the displayed results. You can remove a value by clicking x next to it. You can also select the checkbox next to Exclude these users, groups, and domains to add recipients to be excluded from the policy you are creating.
Note: Add an asterisk (*) in any box to view all available values.
Click Next to continue.
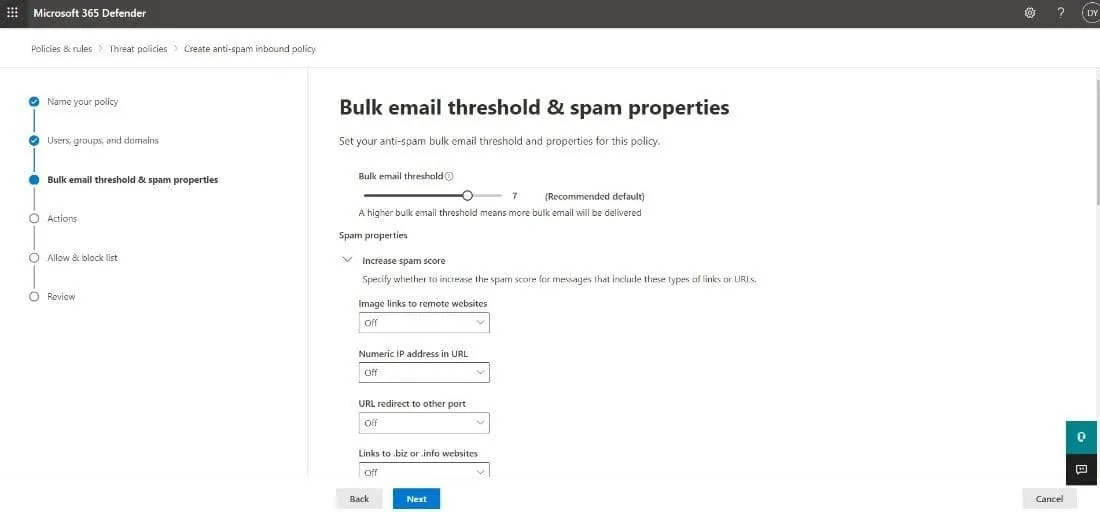
- The third page is Bulk email threshold & spam properties. Configure the following settings:
- Bulk email threshold: Set the Bulk Complaint Level (BCL) of messages that can trigger an action for the Bulk spam filtering verdict. The higher the number, the more bulk emails will get through to your inbox and vice versa. You can configure this value the way you see fit; however, Microsoft has the preset settings below:
| Default | Standard | Strict | |
| Bulk email threshold value | 7 | 6 | 4 |
- Increase spam score and Mark as spam: Part of the Advanced Spam Filter (ASF) settings, this option is turned off by default.
- Contains specific languages: This is off by default. When you select On from the dropdown, a box appears, and you can add the mailing language that you consider as spam.
- From these countries: This is also turned off by default. If you want to set emails as spam from specific countries, simply choose On from the dropdown and add the countries.
- Test mode: Also part of the ASF setting, this option is turned off by default.
Note: ASF is a more aggressive method for filtering spam emails. Microsoft recommends keeping the default values Off, as you may get a large number of false positives, which cannot be reported as such with the ASF setting turned on.
Click Next to continue to the next step.
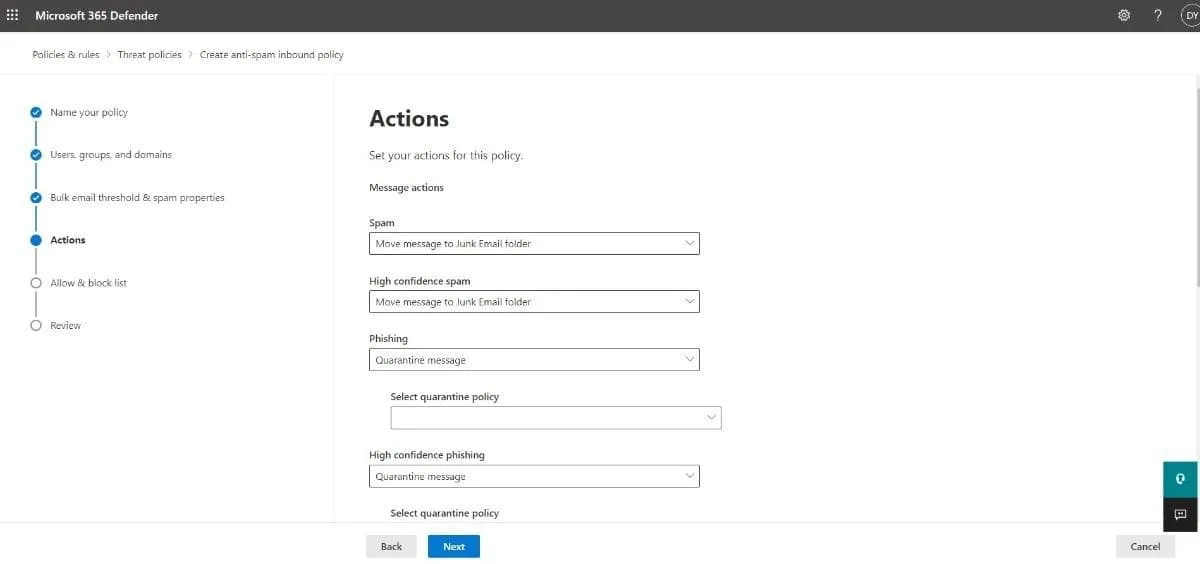
- The Actions page is where you choose what happens to messages based on the spam filtering verdicts they receive. Before configuring the settings here, it is important to understand what each action means:
- Move message to Junk Email folder: The email is delivered to the mailbox and then moved to the junk folder.
- Add X-header: This adds an X-header to the message before it is delivered to the mailbox. You can choose the name of the X-header field in the Add this X-header text box.
- Prepend subject line with text: The email is delivered to the mailbox then moved to Junk Email but you can add a text to the beginning of the subject line. Enter the text in the Prefix subject line with this text box.
- Redirect message to email address: This forwards the email to other recipients instead of the intended user. You can specify the new recipient(s) in the Redirect to this email address box.
- Delete message: The email and all its attachments are deleted automatically.
- Quarantine message: The message is sent to quarantine. You can choose how long the email should remain there using the Retain spam in quarantine for this many days box. When you select this action, you should also set the quarantine policy in the Select quarantine policy box that appears.
- No action: As the name suggests, no action is taken and the message is delivered normally.
| Default | Standard | Strict | |
| Spam | Move message to Junk Email folder | Move message to Junk Email folder | Quarantine message |
| High confidence spam | Quarantine message | Quarantine message | Quarantine message |
| Phishing | Quarantine message | Quarantine message | Quarantine message |
| High confidence phishing | Quarantine message | Quarantine message | Quarantine message |
| Bulk | Move message to Junk Email folder | Move message to Junk Email folder | Quarantine message |
| Retain spam in quarantine for this many days | 15 days | 30 days | 30 days |
- Safety tips: The tips are enabled by default. You can disable them by deselecting the checkbox.
- Zero-hour auto purge (ZAP): ZAP finds and takes action on emails sent to Exchange Online mailboxes. This feature and its corresponding settings are turned on by default.
Click Next to continue.
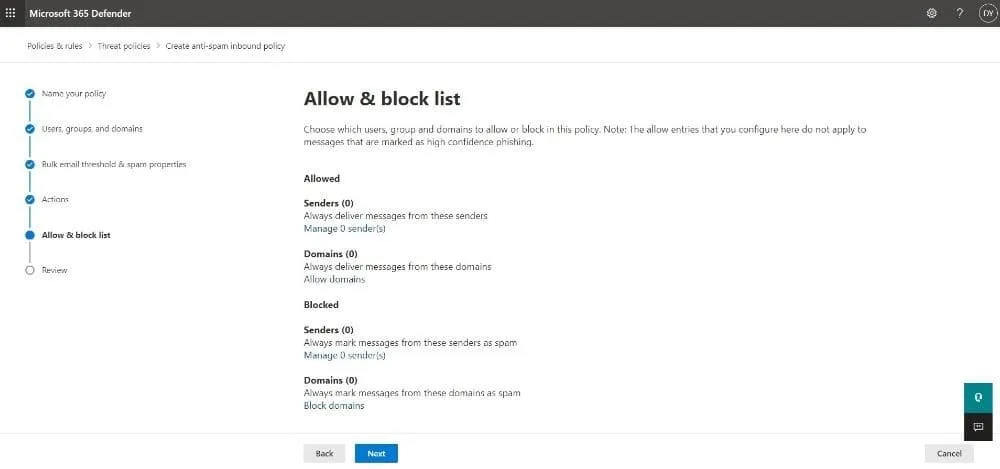
- The Allow & block list page allows you to specify which email addresses or domains can bypass spam filtering. In addition, you can add blocked senders and domains. Configure the lists here by following the steps below:
- Allowed:
- To manage Senders, click Manage (n) sender(s). Select +Add senders in the flyout that appears and add the sender’s email address. Finally, click Add senders.
- Click Allow domains to customize the domains. In the new tab, choose +Add domains then enter the domain. Once done, click Add domains.
- Blocked: The process of adding blocked senders and/or domains is basically the same as the one above.
Click Next to continue.
- On the Review page, you can go over all the settings you chose. You can either Edit a specific section or simply click Back to revert to previous pages. Finally, select Create then click Done on the confirmation page.
Creating the outbound anti-spam policy in Microsoft 365 Defender
Whether a user in your organization is sending spam emails deliberately or accidentally, EOP has controls in place for outbound spam to protect recipients:
- Segregation of outbound email traffic: EOP scans every outbound message. When an email is determined as spam, it is delivered from a less reputable, secondary IP address pool known as the high-risk delivery pool.
- Disabling accounts that send too much spam or too many emails in a short timeframe: All accounts are monitored so they would not exceed a specific email limit. When that threshold is reached, the account gets disabled.
- Monitoring source IP address reputation: Microsoft 365 scans numerous third-party IP block lists and generates an alert if your organization is using an IP address found in any of those lists.
Now that you know how EOP controls outbound spam, you can create custom outbound anti-spam policies:
- Access the Anti-spam policies page by entering https://security.microsoft.com/antispam in your browser.
Note: You can also go to the anti-spam policies page by using https://security.microsoft.com, then clicking Email & Collaboration > Policies & Rules > Threat policies > Anti-spam under Policies.
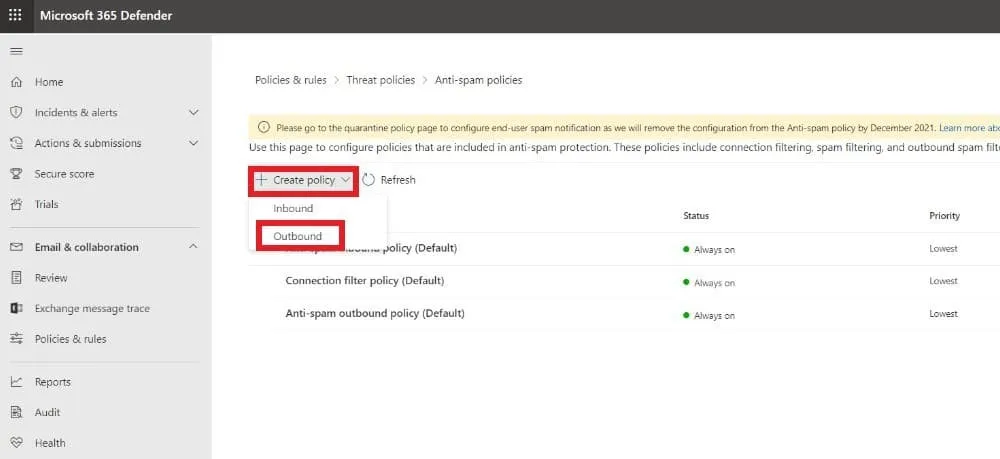
- Click + Create policy and choose Outbound from the dropdown list.
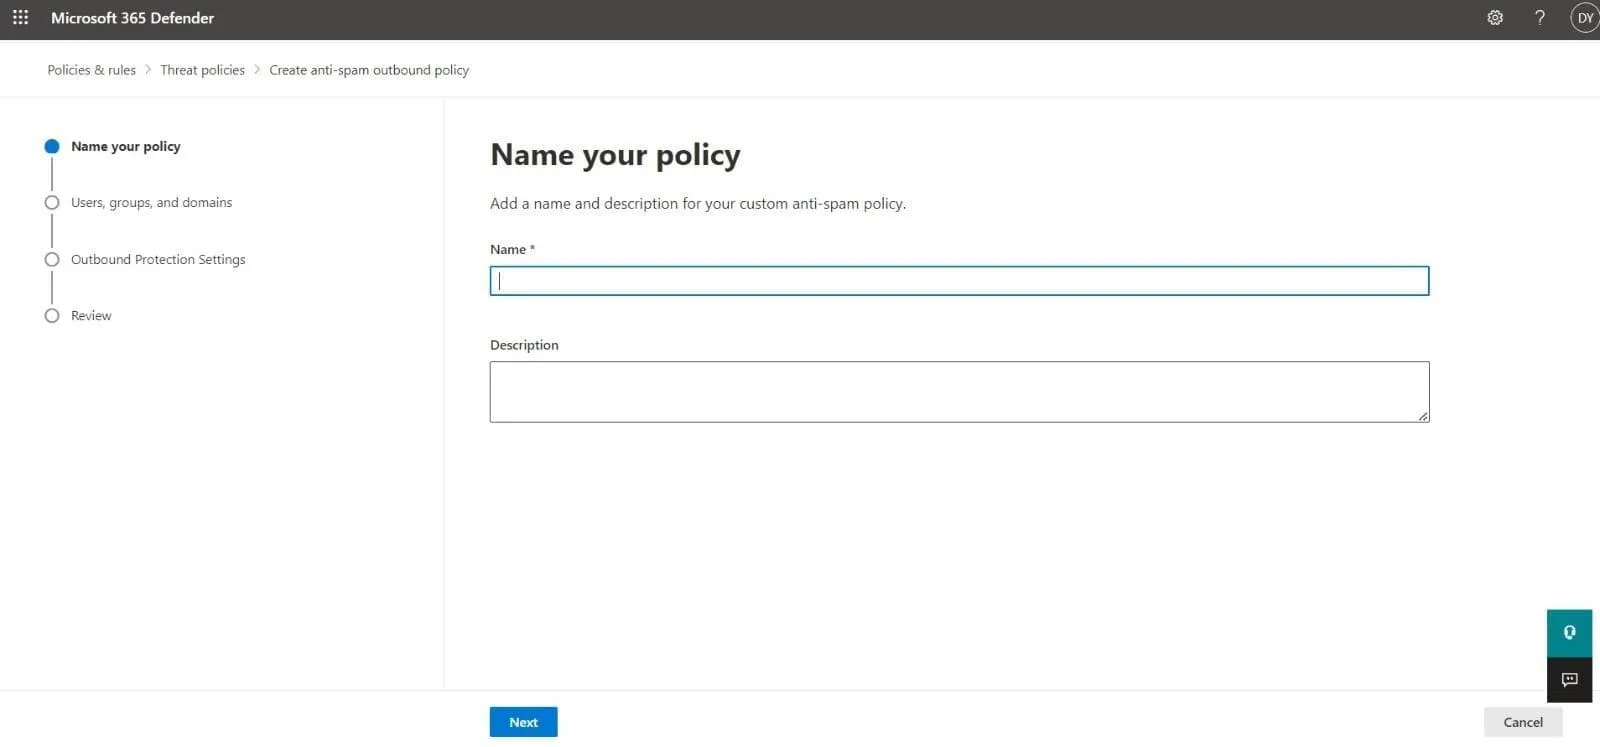
- The first page of the policy creation wizard is the Name your policy page. Define the following settings:
- Name: Add a descriptive and unique name for your policy.
- Description: Enter a fitting description (optional).
Click Next once you are done.
- This is the Users, groups, and domains page where you need to add the internal recipients affected by the outbound spam filter policy:
- Users: These are the mail users, contacts or mailboxes within your organization.
- Groups: Microsoft 365 groups, mail-enabled security groups or distribution groups.
- Domains: This will include all recipients under the accepted domains in your company.
Type a value in each box and select the one you need from the displayed results. You can remove a value by clicking on X next to it. You can also select the checkbox next to Exclude these users, groups, and domains to add recipients that are exceptions to the policy you are creating.
Note: Add an asterisk (*) in any box to view all available values.
Click Next to continue.

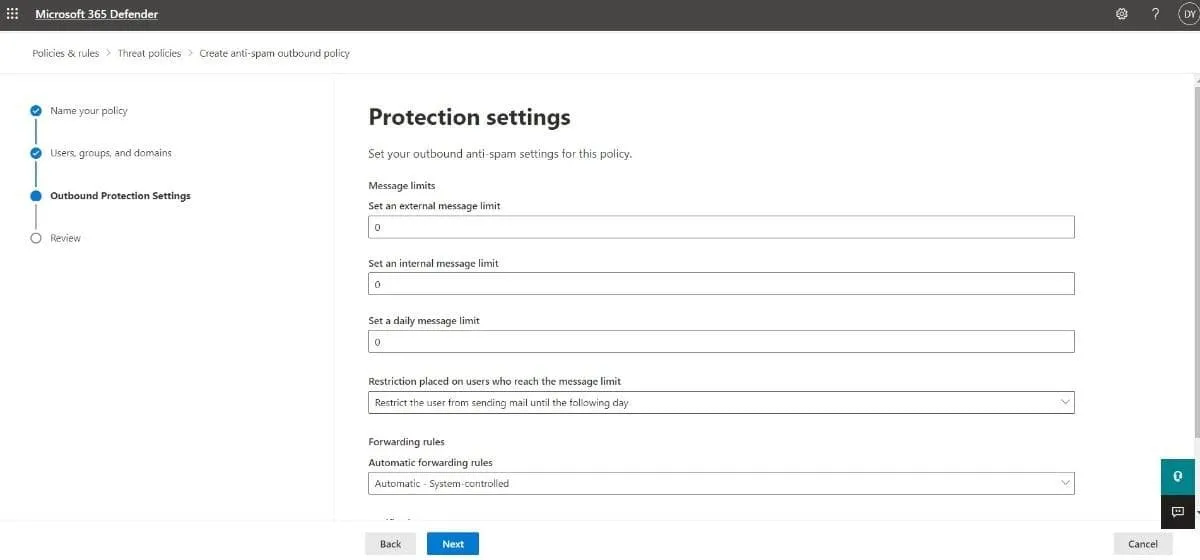
- On the Protection settings page, configure the following settings:
- Message limits: Customize the limits of outbound emails in Exchange Online mailboxes. Type in the value or use the arrows in each of the boxes described below. The value can range from 0 (default) to 10,000.
- Set an external message limit refers to the maximum number of external recipients in one hour.
- Set an internal message limit is the maximum number of internal recipients in one hour.
- Set a daily message limit is the maximum number of all (external and internal) recipients per day.
- Restriction placed on users who reach the message limit: Define the action if a user exceeds the message limits you previously set.
- Restrict the user from sending mail until the following day: Users will be prohibited from sending additional messages for 24 hours. Security admins cannot remove this restriction. Notifications are sent to the blocked user and the admins.
- Restrict the user from sending mail: With this option, users will be added to the Restricted users list. They will be unable to send any messages until an admin manually removes them from the list.
- No action, alert only: Users are not restricted but notifications are sent.
- Forwarding rules: Manage automatic email forwarding by choosing one of the options from the dropdown list:
- Automatic – System-controlled: By default, the outbound spam is filtered to control external email forwarding.
- Off – Forwarding is disabled: Automatic external email forwarding is disabled.
- On – Forwarding is enabled: Automatic external email forwarding is enabled.
- Notifications: Specify additional users who will receive notifications regarding outbound spam emails:
- Send a copy of suspicious outbound that exceeds these limits to these users and groups: Enable this setting by selecting the checkbox next to it. Once done, a text box will appear in which you can add the email addresses of recipients to include in the Bcc field of suspicious messages.
- Notify these users and groups if a sender is blocked due to sending outbound spam: When you select this checkbox, you can add the email addresses of recipients you want to notify in case a user gets blocked for sending spam messages.
Click Next to continue.
- On the Review page, you can go over all the settings you chose. You can either Edit a specific section or simply click Back to go back to previous pages. Finally, select Create and click Done on the confirmation page.
How to Configure Connection Filtering
Connection filtering in EOP is used to identify which email servers are good and bad via their IP addresses. In Microsoft 365 Defender, anti-spam policies include a default connection filter policy which helps reduce the number of spam messages that land in your mailbox by blocking them from the source.
The default connection filter policy has three primary components:
- IP Allow List: By adding source email servers to this list, all incoming messages from these servers do not go through spam filtering and are delivered directly to the mailbox. You can specify servers using IP addresses or IP address ranges.
- IP Block List: By adding source email servers to this list, all incoming messages from these servers are automatically blocked and rejected. You can add servers using IP addresses or IP address ranges.
- Safe list: This is an “allow list” managed by Microsoft and you cannot edit it yourself. All incoming messages from source email servers found here skip spam filtering. It is important to note that you can disable this list if needed.
Modifying the default connection filter policy in Microsoft 365 Defender
While you cannot create a new connection filter policy, you can configure the default one by following the steps below:
- Access the Anti-spam policies page by entering https://security.microsoft.com/antispam in your browser.
Note: You can also go to the anti-spam policies page by using https://security.microsoft.com, then clicking Email & Collaboration > Policies & Rules > Threat policies > Anti-spam under Policies.
- Click Connection filter policy (Default).
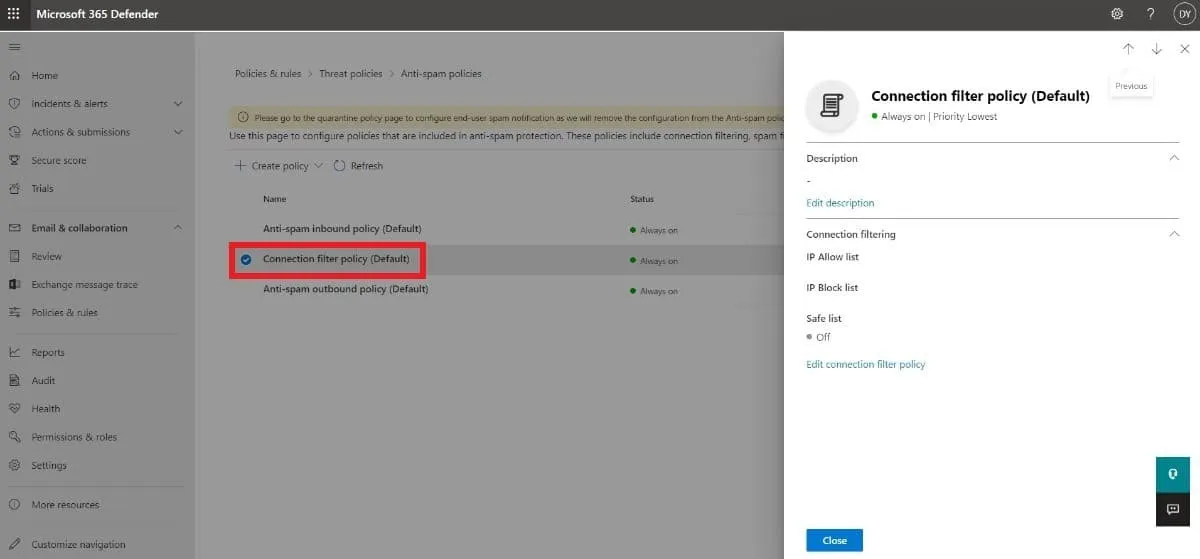
- In this flyout, you can configure the settings below to block senders in Office 365:
- Description: Click Edit description to add an optional descriptive text for the policy. Hit Save once you are done.
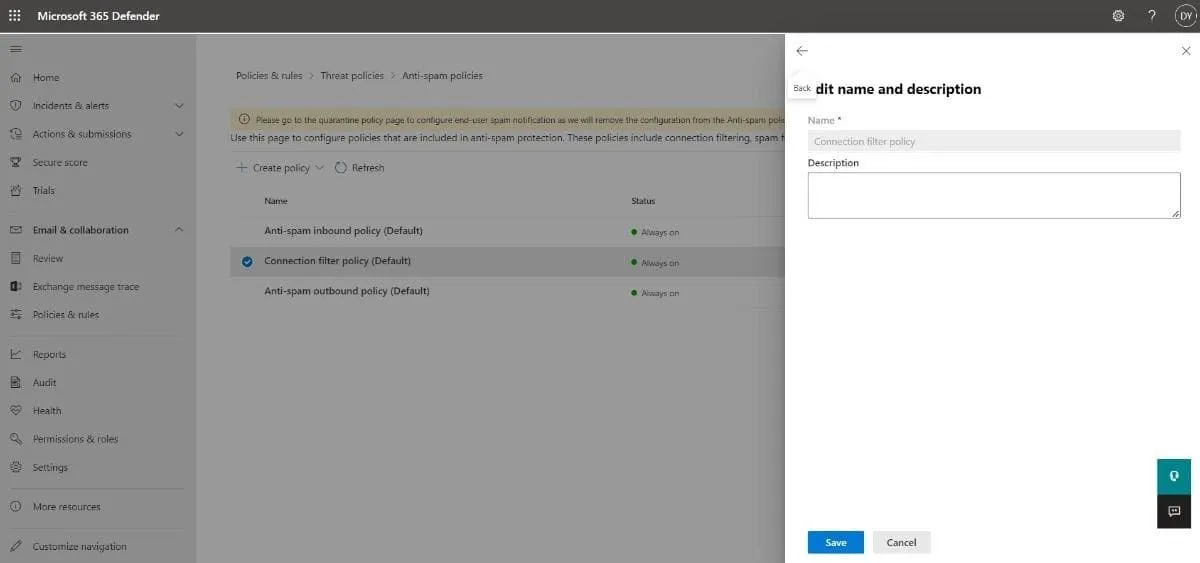
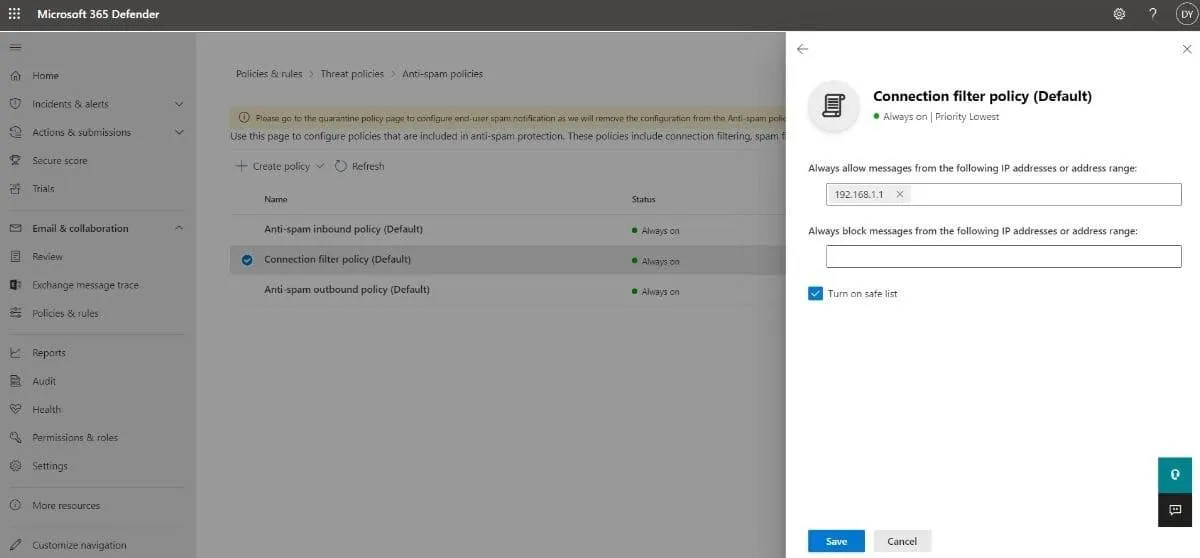
- Connection filtering: Click Edit connection filter policy to customize the following settings:
- Always allow messages from the following IP addresses or address range: This is where you can add a single IP, an IP range or a CIDR IP to the IP Allow List.
- Always block messages from the following IP addresses or address range: This is where you can add a single IP, an IP range or a CIDR IP to the IP Block List.
- Turn on safe list: Enable the safe list by selecting the checkbox or keep it disabled (default).
Click Save once you are done.
How to Remove Custom Anti-Spam Policies
While you cannot delete a default policy, you can easily remove a custom anti-spam policy by following these steps:
- Access the Anti-spam policies page by entering https://security.microsoft.com/antispam in your browser.
Note: You can also go to the anti-spam policies page by using https://security.microsoft.com, then clicking Email & Collaboration > Policies & Rules > Threat policies > Anti-spam under Policies.
- Click the policy you want to remove.
- In the flyout, select Delete policy, then click Yes in the confirmation pop-up that appears.
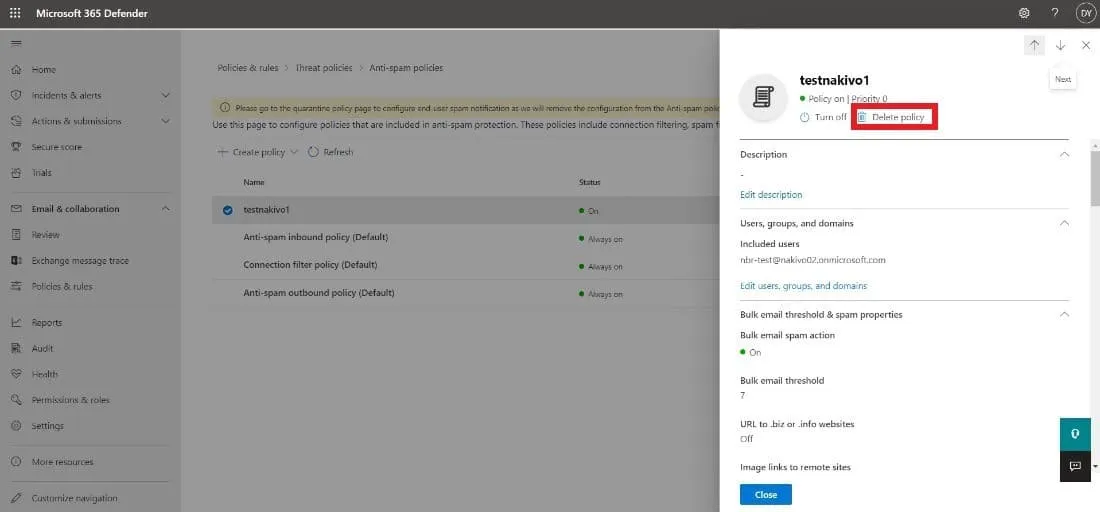
Note: When you delete a custom anti-spam policy, the corresponding anti-spam rule is also removed.
Managing Errors in Spam Filtering
Since no system is perfect, good emails can sometimes be defined as spam (false positive) and at the same time, some spam messages can pass through the filtering policy and reach your mailbox (false negative). You can implement the Office 365 spam filter best practices to reduce these occurrences as much as possible:
- Make sure you have the proper bulk email settings: Check that the bulk complaint level (BCL) you previously set in your custom anti-spam policies is suitable for your organization. You can adjust the BCL based on the number of bulk emails you send and receive.
- Review the anti-spam message headers: These can help you understand why an email was falsely marked as spam or skipped filtering without getting noticed.
- Implement email authentication: If you have your own email domain, you can configure your DNS to help prevent spam and spoofing. Try using all available authentication methods (SPF, DKIM and DMARC) to get the best results.
- Point your MX record to Microsoft 365: Microsoft recommends that you should have your messages delivered to Microsoft 365 first to ensure optimal protection with EOP.
Conclusion
If left unchecked, spam can easily become a threat to business continuity. This is why Microsoft made sure to provide its users with advanced spam filtering tools through Exchange Online Protection (EOP). You now know how to create and configure anti-spam policies for your organization and limit the amount of spam that reaches your mailboxes.
While spam filtering does a great job in safeguarding mailboxes from spam emails, sophisticated attacks such as phishing and ransomware require additional safety measures. You can ensure optimal protection for your entire Office 365 environment by having a comprehensive backup solution. NAKIVO Backup & Replication provides Exchange Online backups in addition to instant data recovery and ransomware protection.
A complete data protection solution like NAKIVO Backup & Replication includes all the tools you need to protect Microsoft 365 user data. Get the Free Edition today!