Detailed Walkthrough: Install Ubuntu 20.04 on Hyper-V with Enhanced Session
Using the Enhanced session mode in Microsoft Hyper-V Manager is a more convenient way of managing VMs than the basic session mode in VMConnect. The Enhanced session mode uses Remote Desktop Protocol (RDP) to allow you to attach host machine resources (drives, USB devices, printers, etc.) to VMs. When using this mode, certain actions become available to you like the ability to resize a VM screen, copy-pasting text from a host to a guest, and the other way, etc.
Enabling Enhanced session mode is simple on Windows running as the guest OS on Hyper-V, as Windows comes with the Remote Desktop feature. However, for Linux distributions running as guest operating systems on Hyper-V, remote desktop is not preconfigured. Ubuntu 20.04 LTS, which is quite popular these days, is often deployed on Hyper-V VMs, in particular, when you can’t install Linux as the host OS. Read on to learn how to use Hyper-V in the enhanced session mode to run Ubuntu on Windows.

Creating and Configuring a VM
Let’s look at how to create and configure an Ubuntu 20.04 VM from scratch in Hyper-V. In this blog post, I’m using Windows 10 Pro version 20H2 with Hyper-V installed. The hostname of my Windows 10 host machine is home-pc. You have to enable Hyper-V before you can run the Ubuntu VM. If you don’t have Hyper-V installed on your Windows host, read how to install Hyper-V on Windows 10 and Windows Server 2019.
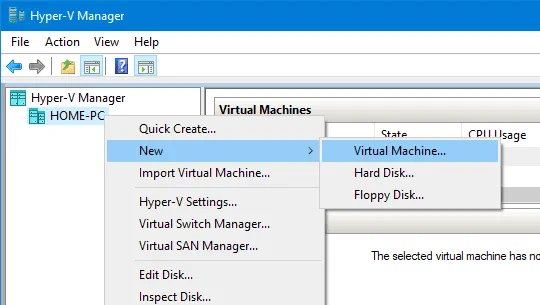
In order to create a new VM in Hyper-V, open Hyper-V Manager, right-click your host machine name and, in the context menu, click New > Virtual Machine.
The New Virtual Machine Wizard opens. You can skip the Before You Begin step.
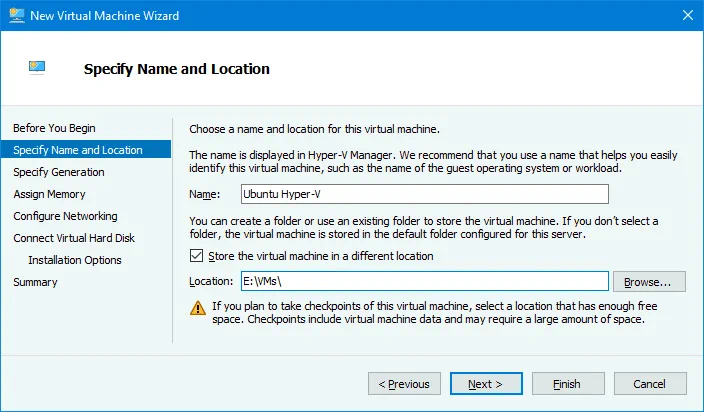
Specify Name and Location. Enter a virtual machine name, for example, Ubuntu Hyper-V. Select the Store the virtual machine in a different location checkbox, and select the folder where you want to store VM files, for example, E:\VMs\. Hit Next at each step of the wizard to continue.
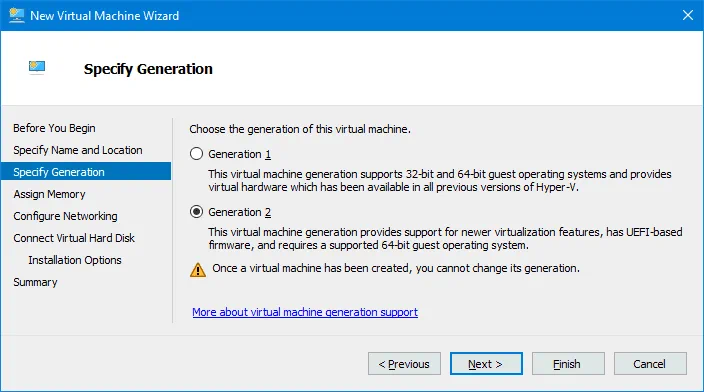
Specify Generation. Select the generation of the new VM. It is better to select Generation 2 because more features are available and limits are higher. Generation 2 VMs use UEFI. Read more about Hyper-V Generation 1 and Generation 2 VMs.
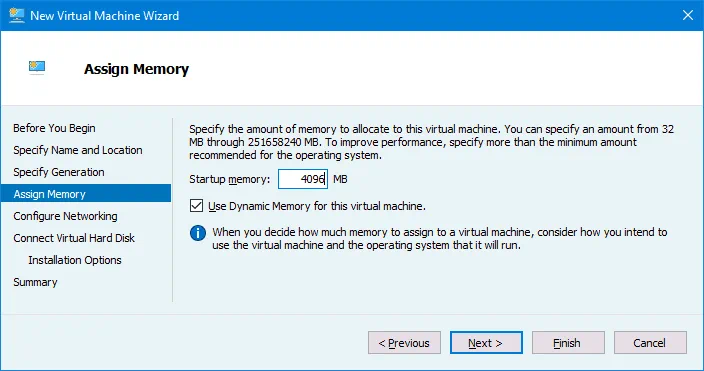
Assign Memory. Specify the amount of memory available to the VM. I select 4096 MB, which is enough to run Ubuntu without performing heavy tasks. Select the checkbox to Use Dynamic Memory for this virtual machine. The more memory you assign to the VM, the more convenient the work. Don’t assign all the memory of your computer to the VM; leave memory for the host operating system. If you run other VMs simultaneously with this Linux VM, remember that other VMs also need memory.
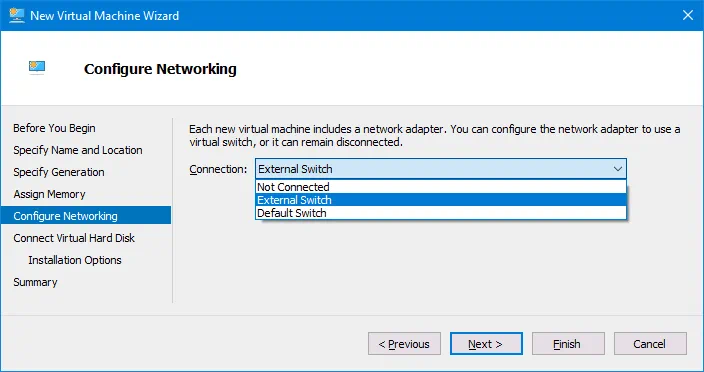
Configure Networking. Select a virtual switch to which the virtual network adapter of the VM will be connected. If you have not created any virtual switches, you can do it later and edit the VM configuration.
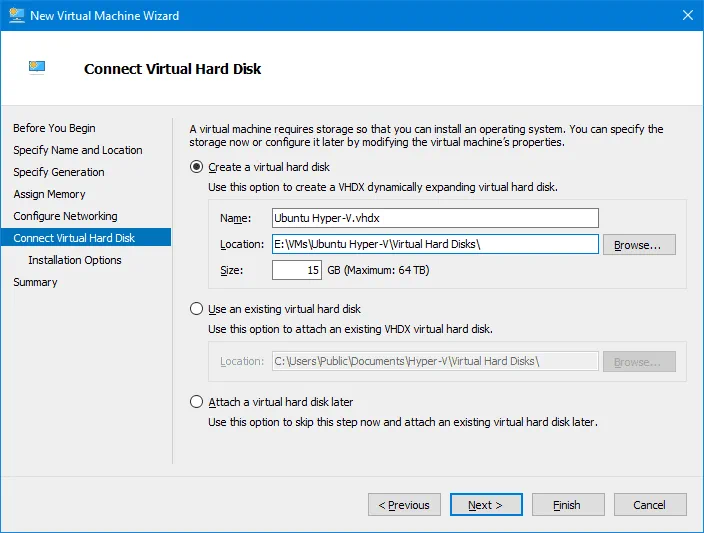
Connect Virtual Hard Disk. Click Create a virtual hard disk. Enter the virtual disk name, for example, Ubuntu Hyper-V.vhdx. Define the location of the virtual disk file. You should select the location in your directory used to store Hyper-V VMs. In my case, the selected directory is E:\VMs\Ubuntu Hyper-V\Virtual Hard Disks\. Set the virtual disk size. I select 15 GB for my Ubuntu 20.04 VM used for testing purposes.
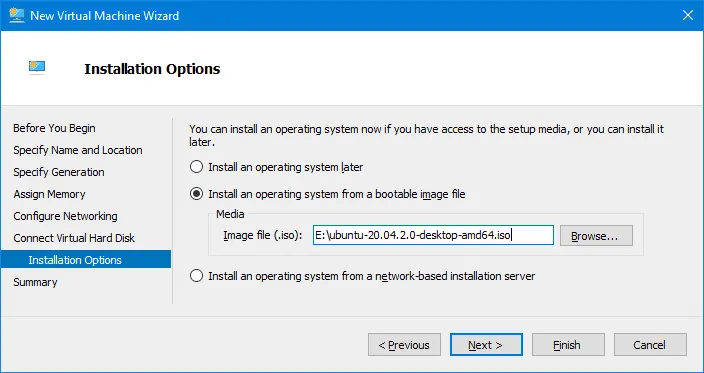
Installation Options. Select Install an operating system from a bootable image file. Click Browse and select the location of the Ubuntu 20.04 ISO installation image. The Ubuntu version I’m going to install is 20.04.2. You can download the installation image from the official Ubuntu website.
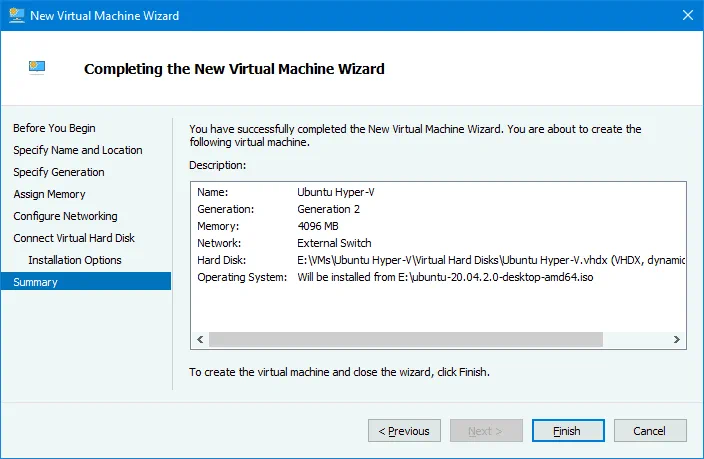
Summary. Check configuration summary, and click Finish to finish the new VM creation.
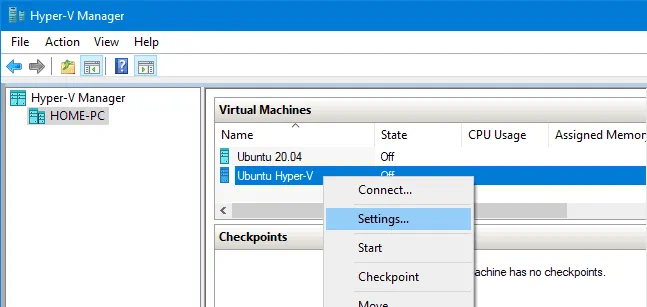
Open the settings of the Ubuntu Hyper-V virtual machine that you have already created. Right-click the Ubuntu Hyper-V VM in Hyper-V Manager and, in the context menu, hit Settings.
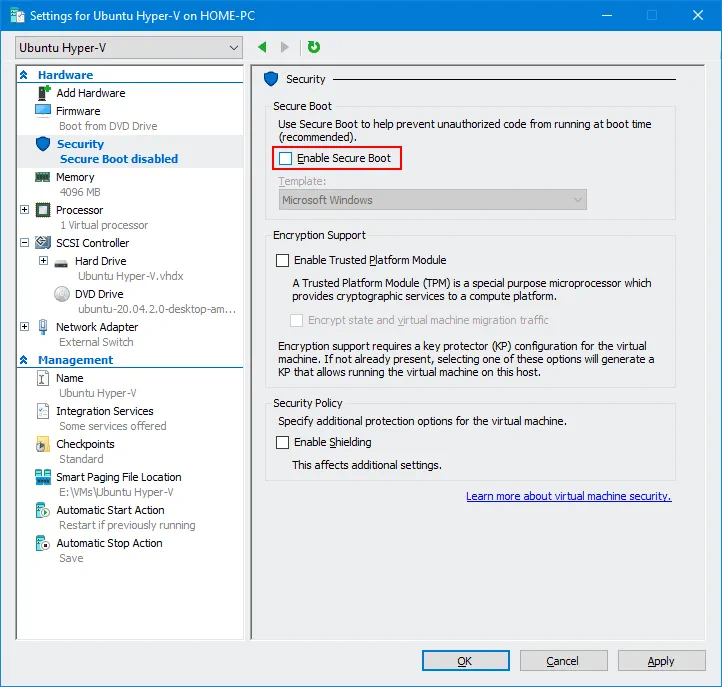
In the navigation pane, select Security in the Hardware section, and deselect the Enable Secure Boot checkbox. Secure boot is not needed for this virtual machine. You can check and edit other VM settings if needed. Click OK to save settings and close this window.
Installing Ubuntu 20.04 on a VM
Once the new virtual machine has been created, you should install Ubuntu 20.04 as a guest operating system on this VM. Power on the VM, the Ubuntu 20.04 installer should boot from the attached ISO installation image. The installation process of Ubuntu Linux is explained in details in the blog post about installing Linux on Hyper-V.
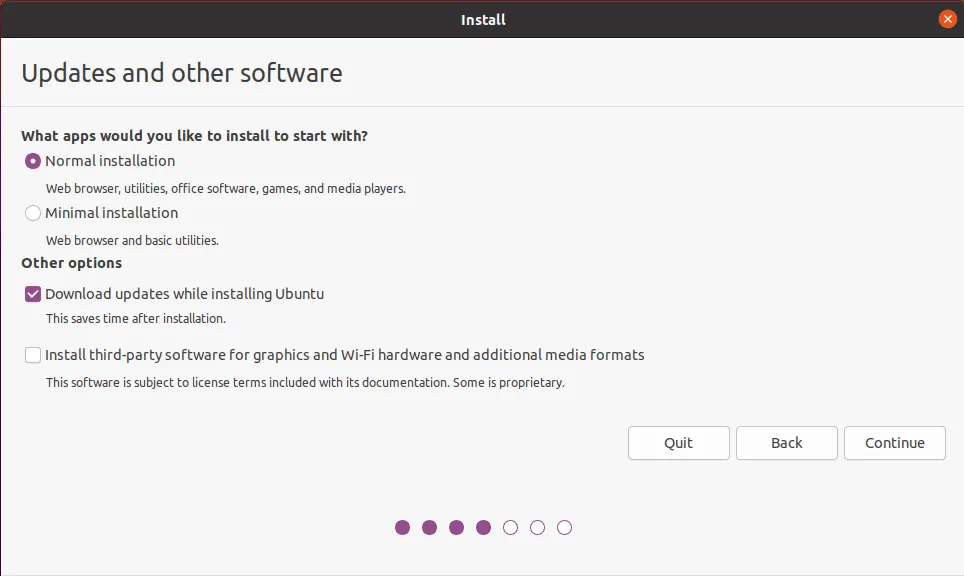
I’ll focus on two installations steps only. In this example, I select Normal installation with the option to Download updates while installing Ubuntu 20.04.
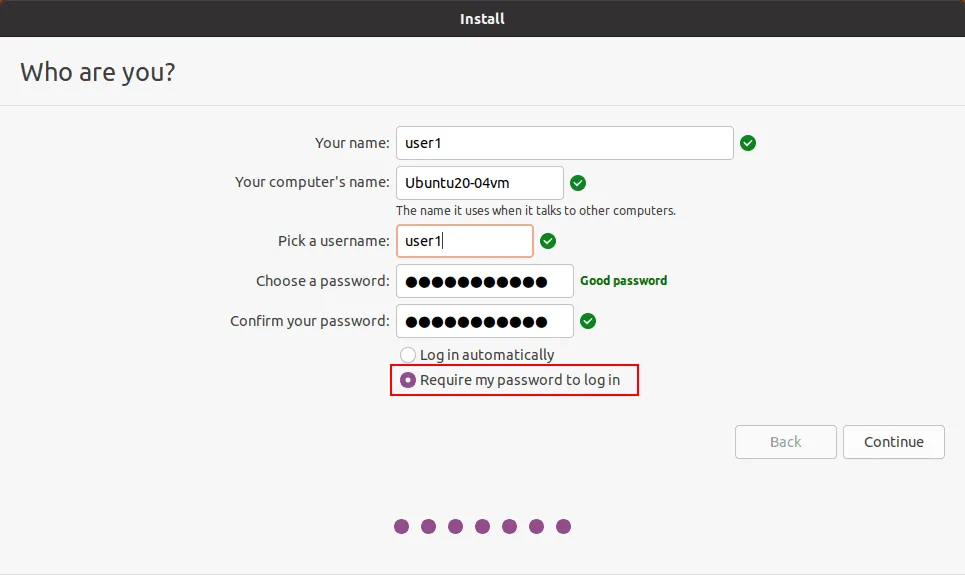
The important option that you should select is require the password to log in on the “Who are you?” step of the installation. Using the enhanced session mode for the Ubuntu VM in Hyper-V is not available if the Log in automatically option is selected.
Ubuntu Hyper-V integration services are part of the Linux distribution, and you don’t need to install the downloaded package provided by Microsoft manually.
Post Installation Configuration in Ubuntu
There are important things to do after installing Ubuntu 20.0. You have to download and run the script to configure Ubuntu 20.04 installed on a Hyper-V VM as a guest OS to make the enhanced session mode work.
Open the console (terminal) in Ubuntu 20.04.
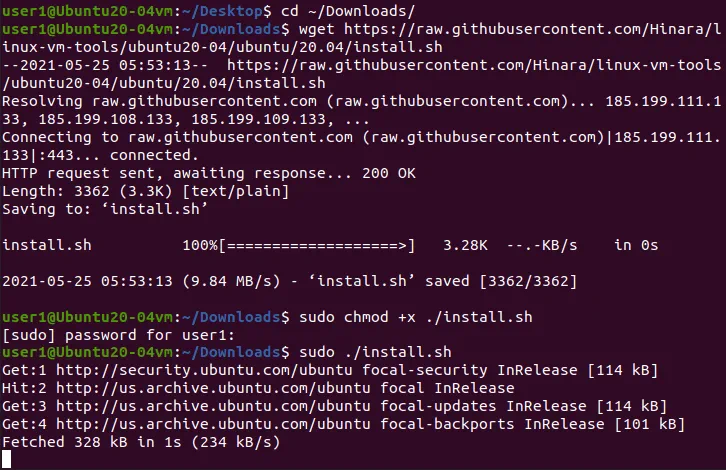
Go to the Downloads directory:
cd ~/Downloads/
Download the updated script for Ubuntu 20.04:
wget https://raw.githubusercontent.com/Hinara/linux-vm-tools/ubuntu20-04/ubuntu/20.04/install.sh
Add execution permissions to the downloaded install.sh script file:
sudo chmod +x install.sh
Run the script with the root privileges:
sudo ./install.sh
When execution of the script is finished, you are prompted to reboot Ubuntu 20.04 and run the script again after reboot.
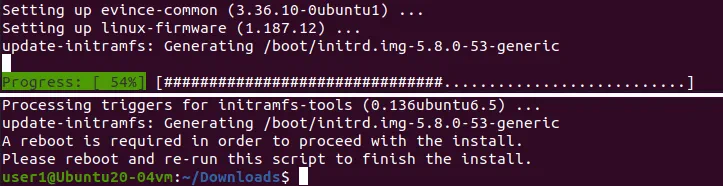
Reboot the Linux machine:
init 6
After reboot, open the terminal, go to the directory where the script is located, and run the script once again:
cd ~/Downloads/
sudo ./install.sh
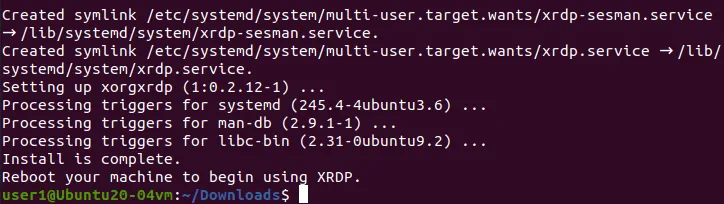
Reboot your Ubuntu virtual machine when execution of the script is finished.
Configuration on the Host Windows Machine Running Hyper-V
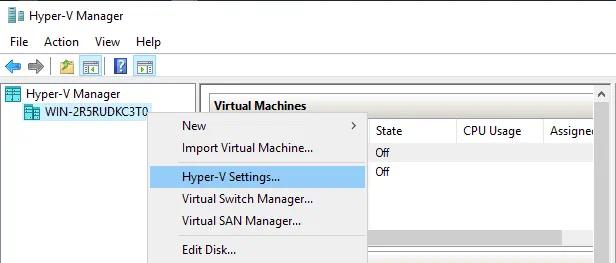
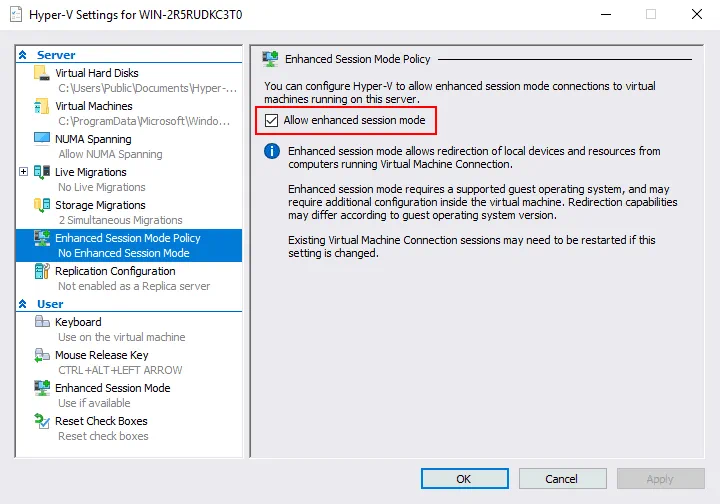
You have to allow the enhanced session mode in general Hyper-V settings. Otherwise, the enhanced session mode icon will be inactive in the VM window. Open Hyper-V Manager, right-click the name of your host Windows machine on which Hyper-V is installed, and, in the context menu, click Hyper-V Settings.
Select the Enhanced Session Mode Policy in the navigation pane, and then select the Allow enhanced session mode checkbox. Hit OK to save Hyper-V settings and close the window.
Now you should set Hyper-V to enable the enhanced session mode using the HvSocket for the “Ubuntu Hyper-V” VM on which Ubuntu 20.04 is installed.
Run this command in PowerShell (as administrator) on the host Windows machine running Hyper-V:
Set-VM -VMName <your_vm_name> -EnhancedSessionTransportType HvSocket
Use double quotas if the VM name contains spaces. In my case the command is:
Set-VM -VMName “Ubuntu Hyper-V” -EnhancedSessionTransportType HvSocket

You may see the following error:
Set-VM : A parameter cannot be found that matches parameter name ‘EnhancedSessionTransportType’.
At line:1 char:30
+ Set-VM -VMName “Ubuntu20-04” -EnhancedSessionTransportType HvSocket
+ ~~~~~~~~~~~~~~~~~~~~~~~~~~~~~
+ CategoryInfo : InvalidArgument: (:) [Set-VM], ParameterBindingException
+ FullyQualifiedErrorId : NamedParameterNotFound,Microsoft.HyperV.PowerShell.Commands.SetVM
This error can occur if you use the old version of PowerShell, which doesn’t support new cmdlets and parameters.

In this case, follow this recommendation: Try to update your host Windows operating system to Windows Server 2019, Windows 10 1803, or newer. If you cannot update the operating system, update Windows PowerShell to a newer version that includes the needed cmdlets and features.
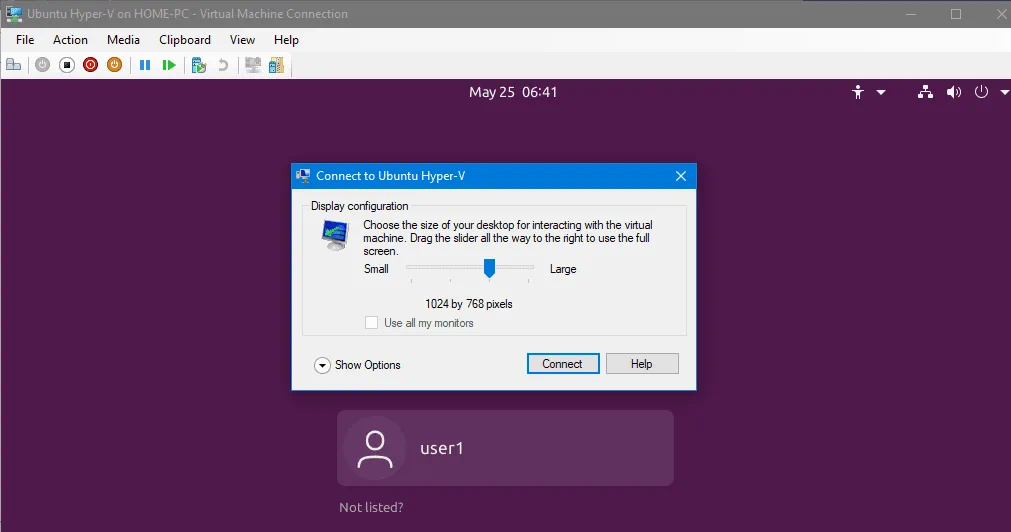
You may need to reboot the Hyper-V host (don’t forget to run the last command to enable the enhanced session mode for Ubuntu 20.04 for Hyper-V in PowerShell). Stop and start the Linux VM. When Ubuntu is booted, you should see a window with VM display configuration and other options of the enhanced session mode. Click Show options, and select the needed resources in the Local resources tab to connect the host resources to the guest OS (Ubuntu 20.04 in our case) of the VM. It is recommended that you uncheck printers for the first time to reduce the probability of issues.
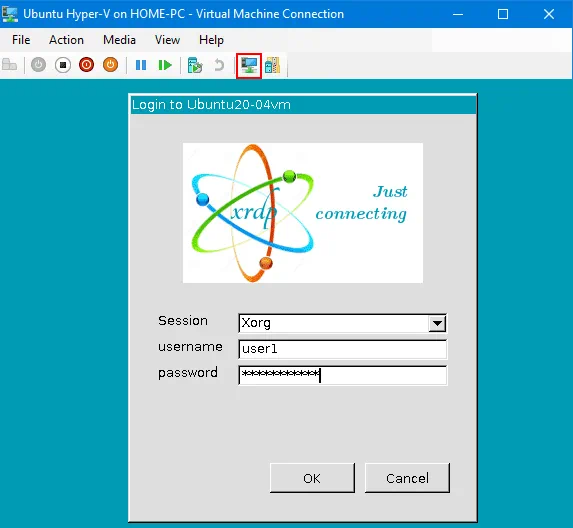
Enter the username and password of your Ubuntu user in the Xorg login window. Notice that the enhanced session mode button is now active in the virtual machine window.
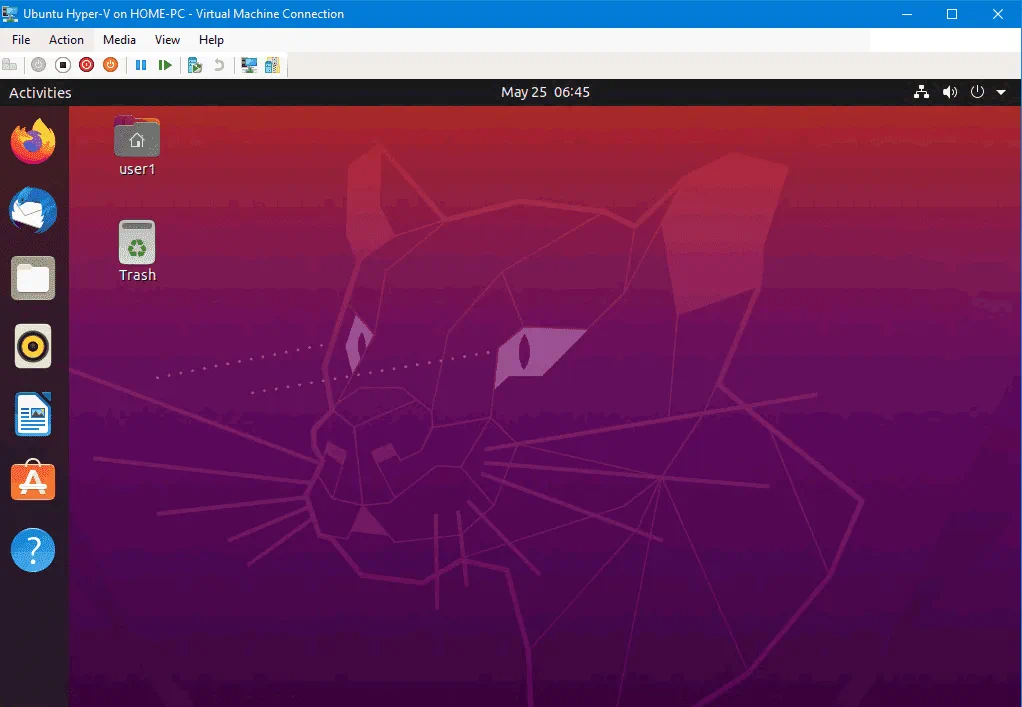
Now you should see the GUI (graphical user interface) and Desktop of Ubuntu 20.04. Try to use the shared clipboard and other sharing features, and changing screen resolution in the VM.
If you see a black screen after entering your credentials, the reason can be the following: A user has been already logged in to the desktop session of Ubuntu. Log out the user and end that session. Then try to connect to Ubuntu by using the enhanced session mode and Xrdp in Hyper-V. You can reboot the Ubuntu VM and connect to Ubuntu with the enhanced session mode.
If the enhanced session option is not available for your Ubuntu 20.04 guest in Hyper-V, try to edit the xrdp.ini configuration file located in /etc/xrdp. You should edit the file with root privileges. Edit two lines in the xrdp.ini file.
Change these parameters:
port=3389 to port=vsock://-1:3389
use_vsock=true to use_vsock=false
This issue should be fixed for Ubuntu 20.04.1.
Read also the blog post about configuring RDP on Linux to learn more about manual configuration.
Conclusion
Ubuntu Linux is a great operating system that is convenient, reliable, and widely used around the world. If you use Windows that is installed on your computer as a host OS, you can run Ubuntu on a Hyper-V VM. This blog post has explained how to enable the enhanced session mode for a virtual machine running Ubuntu 20.04 in Hyper-V. Windows 10 20H2 is used in this tutorial as the host machine. You can perform the same configuration on Windows Server 2019. The enhanced session mode provides you with additional features to work with the VM more conveniently. The main point of configuration is running the configuration script in the Ubuntu guest.
If you use Hyper-V VMs, don’t forget to perform Hyper-V backup to protect data of your virtual machines. Download the Free Edition of NAKIVO Backup & Replication, and back up VMs on your Hyper-V hosts.