VMware vSphere Resources: HotAdd/HotPlug Explained
In a VMware vSphere environment, provisioned resources may not be enough for the required performance level when you have a powerful application running on a VM. In this case, the optimal solution is to add more processor and memory resources to the virtual machine.
When critical applications are running on the VM, you cannot afford to shut down the VM and face downtime. For this scenario, the Hot Add feature from VMware vSphere comes in handy. Due to the flexibility provided by virtualization from VMware, you can add virtual hardware CPU and RAM memory to a running VM. Here we will explain how to enable VMware Hot Add, use cases, configuration, and limitations of this feature.

What Is VMware Hot Add?
VMware Hot Add is a feature that allows you to add virtual devices to a virtual machine while the VM is running. By default, you can add virtual devices such as a virtual hard disk (not IDE), network adapters, and USB devices while a VM is powered on. VMware Hot Add makes it possible to add a virtual CPU (central processing unit) and RAM (random access memory) on the fly. With VMware Hot Add enabled, there is no need to shut down a VM to add virtual devices.
VMware Hot Add vs Hot Plug
You can notice that the CPU Hot Add feature is sometimes referred to as CPU hot plug. The same logic applies to memory hot add and memory hot plug. These two terms refer to the same thing and are interchangeable.
Note: Don’t confuse VMware dynamic memory and VMware hot add memory because these features are different. VMware dynamic memory is a technique for efficient VMware memory management for virtual machines. This name is not official for this feature, but users mention it as the advanced analog of Hyper-V’s dynamic memory. VMware memory management techniques include transparent page sharing, memory ballooning, memory compression, and memory swapping.
Requirements and Limitations
There are requirements and limitations for adding VMware vCPUs (virtual CPUs) and memory to running VMs:
- The guest operating system (OS) must support device hot add.
- Virtual machine hardware compatibility (virtual hardware version) is 7 or higher.
- VMware Tools should be installed on the guest OS.
- Fault Tolerance must not be enabled for the VM.
- The virtual machine must be powered off to enable the Hot Add feature.
- A VMware vSphere Advanced, Enterprise, or Enterprise Plus license must be used. VMware vSphere Enterprise Plus supports both CPU hot add and memory hot add. Refer to the VMware licensing guide to check available functionality for other editions and guest OSs.
Take into account the licensing limitations of the guest OS and applications installed on the VM before adding vCPUs. You may need to buy additional licenses to run the software on a higher number of processors.
Guest operating systems that support Hot Add are Windows Server 2003 and newer, and Linux using kernel 3.8 and above. The top Windows Server editions support both CPU and memory hot add. Some lower Windows Server editions support memory hot add only.
| Guest OS | License/Edition | Memory hot add | CPU hotplug |
| Windows Server 2003 32-bit/64-bit | Standard, Enterprise | Yes | No |
| Windows Server 2008 32-bit | Standard, Enterprise, Datacenter | Yes | No |
| Windows Server 2008 64-bit | Standard, Enterprise | Yes | No |
| Windows Server 2008 64-bit | Datacenter | Yes | Yes |
| Windows Server 2008 R2 | Standard, Enterprise | Yes | No |
| Windows Server 2008 R2 | Datacenter | Yes | Yes |
| Windows Server 2012 | Standard, Datacenter | Yes | Yes |
| Windows Server 2012 R2 | Standard, Datacenter | Yes | Yes |
| Windows Server 2016 | Standard, Datacenter | Yes | Yes |
| Windows Server 2019 | Standard, Datacenter | Yes | Yes |
VMware Hot Add Pros and Cons
VMware Hot Add is a useful feature in many cases. Note, however, that there are downsides to using this feature when hot adding is not really required. VMware Hot Add is disabled by default for different reasons. Let’s find out why.
VMware vCPU Hot Add and vNUMA
When you enable VMware Hot Add, vNUMA is automatically disabled for the VM. By default, vNUMA is enabled for all VMs that have 8 vCPUs or more to improve performance. Let’s take a closer look at the concept of NUMA and vNUMA.
What is NUMA?
NUMA (non-uniform memory access) is the architecture for multi-processor systems that allows CPUs to share memory locally. Time to access memory by a CPU depends on the location of memory on the motherboard. Each processor has a priority to use “its own” local memory rather than using the memory installed into the slots near another processor. In other words, NUMA is a method that determines how one processor interacts with the memory modules of another processor. NUMA systems are platforms with more than one system bus where each processor can access all the memory on the motherboard. A processor with memory installed into slots near this processor is called a NUMA node.

If NUMA is disabled or, for example, you have two processors and memory is installed into the slots of only one of those processors, you may see performance degradation and other hardware issues. If you don’t have enough memory modules to fill all the slots on a motherboard with two processors, try to distribute memory modules across memory slots of the first and second processors.
NUMA helps system processes running in a NUMA-aware operating system to be distributed rationally. It allows each process to access memory areas that are the closest to the processors utilized by these processes.
What is vNUMA?
Virtual NUMA (vNUMA) is an optimization method in VMware vSphere. It ensures large VMs perform optimally by taking into account the NUMA topology and avoiding memory-bandwidth bottlenecks. A physical NUMA topology is exposed to a guest operating system with vNUMA. As a result, the virtual NUMA topology is based on the NUMA topology of the underlying physical hardware used by the ESXi host. Virtual CPUs of the VM can schedule access to memory located on the same NUMA nodes.
vNUMA is available for virtual machines using virtual hardware 8 or higher. When you create a virtual machine, you can select the number of processors and the number of processor cores. The number of CPU sockets is calculated automatically. If the number of vCPUs used by a VM is higher than the number of cores on each NUMA node, then a vNUMA topology is changed and optimized for use by a guest OS. The guest OS can use multiple NUMA nodes in this case. This VM is called a wide or large virtual machine.
What happens when vNUMA is disabled?
When Hot Add is enabled and vNUMA is disabled, a virtual machine is not aware of the underlying NUMA nodes on the ESXi host and increases accessing memory on remote NUMA nodes. A guest OS’s CPU/memory scheduling is not optimal. As a result, VM performance degrades. Performance degradation is noticeable for wide VMs with increasing threads by an application. For example, if you enable Hot Add on a VM whose guest OS used two NUMA nodes, this guest OS can detect only one NUMA node after that because the optimized vNUMA topology is not created.
Enable VMware Hot Add only if you expect to use this feature during VM operation. Otherwise, it is better to disable Hot Add for VMs that span more than one NUMA node. If you are not sure that you need to hot add CPU and memory, you can provision more CPU and memory resources to the VM from the start.
VMware Hot Add limitations
Hot remove is not possible
When the Hot Add/hot plug feature is enabled, it is impossible to hot remove CPU and memory resources. After you hot add vCPU and memory to a VM, applications consume these added resources. That’s why applications don’t support options such as pulling away memory and CPU capacity that is already in use. For this reason, the only possible way to decrease CPU and memory resources for a VM is to shut down the VM and edit the settings of the powered-off VM.
Memory scalability limitations
The maximum amount of hot add memory is x16 the initial amount of memory provisioned for the VM. For example, if a VM has 4 GB of RAM, this amount can be increased up to 64 GB.
You also have a limitation on VMs that have 3 GB of RAM (exactly 3072 MB) or less. You may get an error or a guest OS (64-bit Linux and 32-bit Windows) cannot determine the added memory. The solution is to shut down the VM, increase the amount of memory to more than 3072 MB. Then you can power on the VM and use VMware memory Hot Add.
How to Configure VMware Hot Add
There are multiple methods to enable VMware vCPUs Hot Add and VMware memory Hot Add. You can use the graphical user interface or the command line user interface.
Enabling Hot Add in vCenter
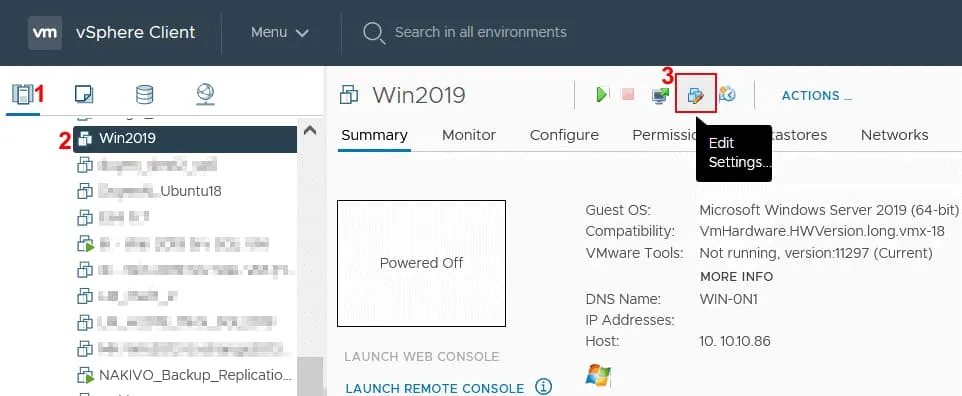
In order to enable the VMware Hot Add option by using vCenter, log in to VMware vSphere Client and do the following:
- Go to Hosts and Clusters.
- Select the needed virtual machine in the navigation pane. The VM must be powered off.
- Click the Edit Settings icon. As an alternative, you can right-click the VM name and in the menu that opens, hit Edit Settings.
Do the following to enable CPU hot add:
- In the Edit Settings window, expand the CPU settings.
- In the CPU Hot Plug line, select the Enable CPU Hot Add checkbox.
Do the following to enable memory hot add:
- In the Edit Settings window, expand the memory settings.
- In the Memory Hot Plug line, select the Enable checkbox.
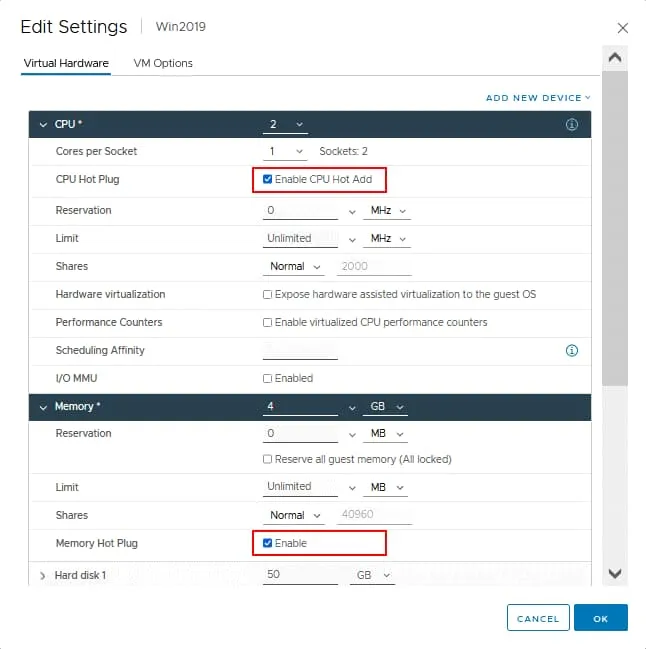
- Click OK to save VM settings and close the window.
Now you can start the VM and hot add VMware vCPUs and memory to the VM.
Enabling VMware Hot Add in PowerCLI
VMware PowerCLI is the powerful command line tool for VMware vSphere management. Let’s look at how to enable VMware Hot Add in PowerCLI.
- Connect to your vCenter or ESXi host by using the following command and entering the appropriate IP address (192.168.101.205 in this example) or hostname:
Connect-VIServer 192.168.101.205
- Enter the credentials when prompted.
- List VMs on the ESXi host to which you have connected.
Get-VM
- Make sure the VM for which you want to enable Hot Add is powered off.
- Run these commands to enable memory hot add and CPU hot add for the selected virtual machine.
$VM = Get-VM Windows-VM
$spec = New-Object VMware.Vim.VirtualMachineConfigSpec
$spec.memoryHotAddEnabled = $true
$spec.cpuHotAddEnabled = $true
$VM.ExtensionData.ReconfigVM_Task($spec)
Where:
Windows-VM is the name of the needed virtual machine
$spec.memoryHotAddEnabled = $true is the command to enable memory hot add
$spec.cpuHotAddEnabled = $true is the command to enable CPU hot add - Check on which VMs CPU hot add and memory hot add features are enabled:
Get-VM | Get-View | Select Name, `
@{N=”CpuHotAddEnabled”;E={$_.Config.CpuHotAddEnabled}}, `
@{N=”CpuHotRemoveEnabled”;E={$_.Config.CpuHotRemoveEnabled}}, `
@{N=”MemoryHotAddEnabled”;E={$_.Config.MemoryHotAddEnabled}}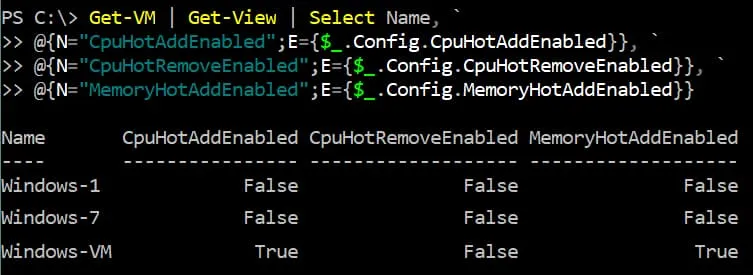
Enabling Hot Add in a VM configuration file
Another method to enable VMware Hot Add is using the ESXi command line interface and editing the VMX configuration file of the virtual machine. Open the ESXi shell or connect to the ESXi host via SSH. Then run the following commands in the command line to enable Hot Add:
- Go to the VM directory:
cd /vmfs/volumes/datastore10a/Windows-VM/
- Make sure the VM is powered off.
- Open the virtual machine VMX configuration file in a text editor:
vi Windows-VM.vmx - Add this line to the configuration file to enable vCPU Hot Add:
vcpu.hotadd = “TRUE” - Add this line to the configuration file to enable memory Hot Add:
mem.hotadd = “TRUE” - Save the VMX configuration file and exit the text editor.
You can disable hot plug capabilities in a VM for devices such as network adapters, disk controllers, etc. (which are enabled by default).
devices.hotplug = “false”
This setting doesn’t affect CPU hotplug and hot add memory VMware configuration for the VM.
Editing VMX configuration in VMware vSphere Client
You can also edit the VMX configuration in VMware vSphere Client:
- Select the needed VM in VMware vSphere Client.
- Shut down the VM if the VM is running.
- Click Edit Settings.
- Select the VM Options tab in the VM Settings window.
- Click Advanced to expand options and click Edit Configuration.
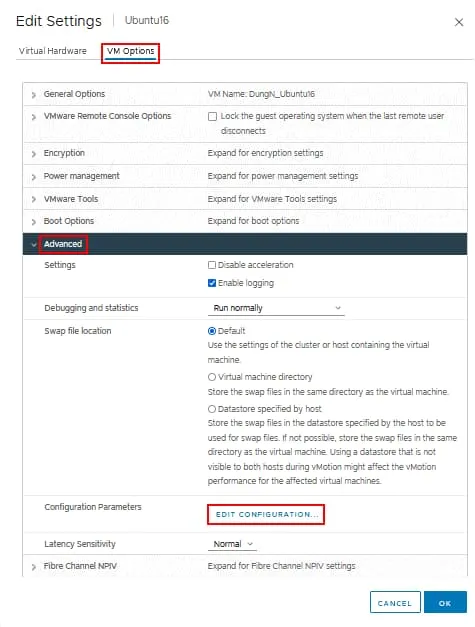
- Click Add Configuration Params in the Configuration Parameters window.
- In the Add New Configuration Params section enter the values to enable VMware Hot Add memory and VMware vCPUs accordingly.
Name: mem.hotadd Value: TRUE
Name: vcpu.hotadd Value: TRUE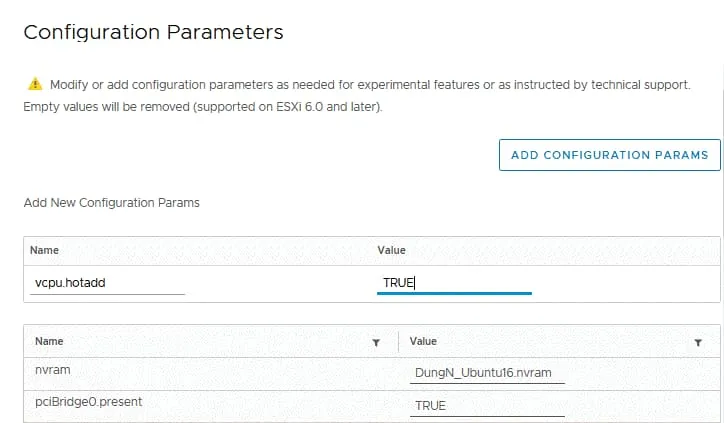
- Hit OK to save settings and close the window.
Conclusion
Enable VMware Hot Add only when you expect to use this feature for adding virtual processors and memory to a running VM. If you enable VMware Hot Add but you don’t use this feature, performance can degrade for large VMs, as the topology with multiple NUMA nodes won’t be used. Use VMware VM monitoring to monitor VM performance and resource usage in vSphere. This approach helps you identify whether a VM needs the Hot Add feature to be enabled.