How to Fix VMware vCenter Installation Issues
Installing vCenter Server is essential for any VMware virtual environment with multiple ESXi hosts for centralized management. A VMware home lab can be a starting point. However, during vCenter installation, errors may occur. This troubleshooting guide covers some of the most common issues you may encounter and how to fix them.

The Supplied System Name Is Not Valid
If you’re setting up a VMware home lab without a local DNS server in your network, you can get this error message at stage 2 of vCenter deployment.
Issue: The supplied System Name is not valid.
Solution: If the supplied system name is an FQDN, make sure the DNS forward lookup results in at least one valid IP address in the system. If the supplied system name is an IP address, then it should be one of the valid IP addresses in the system.

The reason for this error is that vCenter needs a configured DNS server with A and PTR records for resolving host names to IP addresses and inversely. This is not the same DNS server that is defined for connecting outside your local network (to the internet, for example) in this case. You may need to redeploy the OVA template after this error is displayed.
In the VMware lab setup for home deployed for this post, the following host names are used:
- The virtual network interface of the host machine used for connecting to a VMnet8 (NAT network) – 192.168.101.1 as localdns.localdomain
- The virtual network interface of the virtual gateway used for VMs behind the NAT: 192.168.101.2 as localdns2.localdomain (a virtual DHCP server distributes this IP as a primary DNS server for DHCP clients)
- The network interface of vCenter Server running as a VM: 192.168.101.103 as vCenter8.localdomain
If you don’t have a DNS server, you can edit the hosts file on your VM running vCenter and on the physical machine on which VMware Workstation is installed. This solution is helpful the first time for a VMware lab setup for home when you don’t have available resources for running a separate VM as a DNS server or for deploying a DNS server on your physical machine. Of course, it is better to configure a fully functioning DNS server in the local area network of a production environment to deploy VMware vSphere.
Let’s edit the hosts file on the physical machine. For Windows, edit C:\Windows\System32\drivers\etc\hosts with a text editor executed as Administrator. If VMware Workstation is installed on Linux, edit the /etc/hosts file. The following strings are added in this case on the host machine:
192.168.101.103 vcenter8.localdomain
192.168.101.103 vcenter8
192.168.101.1 localdns
192.168.101.1 localdns.localdomain
192.168.101.2 localdns2
192.168.101.2 localdns2.localdomain
In order to fix The supplied System Name is not valid issue on the VM running vCenter Server Appliance, try the following:
- Open the Direct Console User Interface (DCUI) of the vCenter Server Appliance in VMware Workstation.
- Press CTRL+ALT+F3 to enter the console. Log in to the console as the root user (use the password you have specified during deploying vCenter from the OVA template).
- Enable shell by entering the command:
shell.set --enabled true - Enter shell by using the command:
shell - Open the hosts file in a text editor:
vim /etc/hosts
- Check if the following strings are present in the hosts file of VCSA:
192.168.101.103 vcenter8.localdomain vcenter8
192.168.101.1 localdns localdns.localdomain
192.168.101.2. localdns2 localdns2.localdomain
Add these lines if needed and save changes (:wq).
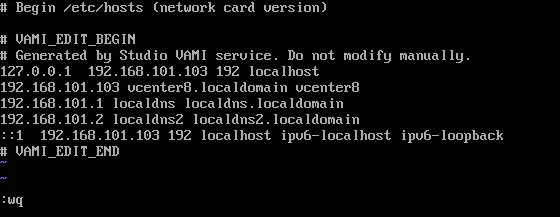
- If these strings are missing, add them.
- Try to ping the IP address of the virtual DNS server specified in the network configuration of the VM running VCSA:
ping localdns2
503 Service Unavailable
The 503 Service Unavailable error may occur after rebooting vCenter Server. When you enter the address of your vCenter for accessing VMware vSphere Client in the address bar of your browser (for example, https://192.168.101.103), you see the following error message:
503 Service Unavailable (Failed to connect to endpoint: [N7Vmacore4Http20NamedPipeServiceSpecE:0x000055ea10bcc9c0] _serverNamespace = / action = Allow _pipeName =/var/run/vmware/vpxd-webserver-pipe)
This error can occur if some vCenter services have not started yet. Verify that the appropriate services are running by going to the web page for vCenter appliance management. In this example, the following address should be used:
https://192.168.101.103:5480/ui/services
- VMware vCenter Server and VMware vSphere Web client services must be started.
- Select the needed service that is not running and hit Start or Restart.
- You may need to wait for a few minutes. Also, check other services if necessary.
- When the necessary services are running, try to reconnect to your VMware vSphere Client.
Error: Unable to Get Deployment Status
Problem: The “Unable to get deployment status” error occurs at Stage 2 of vCenter deployment.
Solution: One of the reasons for this error can be insufficient space on the partition used for installation.
- You can extend the partition, add more space or change the installation destination.
- You can point the export directory to /storage/core
- The optimal approach may involve restarting the vCenter installation without the need for a complete reinstallation after resolving the issue or starting the required service.
- After completing Stage 1, close the installer and access the VAMI interface on the newly deployed vCSA at https://vCenter-IP:5480/configure/
- Perform Stage 2 from your browser and designate an adequately sized export directory, such as /storage/updatemgr/
- It appears that the installer uses a “v2” configuration https://vCenter-IP:5480/configurev2/ where the export directory cannot be configured.
vCenter Stage 2 Failed Without Any Errors
Issue: vCenter Server installation fails at Stage 2. vCenter re-deployment fails. There are no errors in the graphical user interface that can point to the issue.
Solution:
- Access the appliance through SSH or the console using the root account and the password specified during the setup process. A good starting point is examining the logs under /var/log/firstboot. Use the command
ls -ltto view the most recently written logs. Most services generate two logs: one ending with _stdout.log containing service log messages, and another ending with _stderr.log containing error messages. - Identify a service that has written to a _stderr.log, for example, it can be scafirstboot.py_10507_stderr.log. Examine the log to determine the root cause. Look for lines like the following:
ssl.SSLCertVerificationError: [SSL: CERTIFICATE_VERIFY_FAILED] certificate verify failed: certificate is not yet valid
- This error suggests an issue with the certificate’s validity dates, specifically the start date (a certificate has a start date and end date). Often, this indicates a problem with NTP (Network Time Protocol). If you have configured NTP for vCenter but not for the ESXi host where you deployed vCenter, you may encounter this error.
- If DNS is not the issue, consider checking NTP settings or investigating potential problems with certificates, or a combination of both.
You can also try to run the vCenter installer from another VM residing on the same ESXi host (where VCSA is deployed) to avoid the NTP issue.
VCSA Installation Stuck at 80%
Issue: vCenter Server Appliance stuck at 80% of Stage 1 with Waiting for RPM installation to start.
Solution: Try the following actions to resolve the issue:
- Check NTP settings for VCSA, on the ESXi host where the VCSA is deployed and on your machine from which you run the installer. You may need to specify a local NTP server.
- Check that DNS records for your vCenter exist and are resolved before entering FQDN in the appropriate vCenter installation screen.
- Check the vSphere license on the ESXi host where you deploy VCSA (not the free ESXi license).
You may need to restart the vCenter installation process after fixing the cause of the issue.
Conclusion
The common reasons for VMware vCenter installation errors are incorrect DNS settings, NTP configuration, SSL and certificate errors, issues when connecting to a database, firewall settings, and insufficient hardware resources.
Follow the installation guide for VMware vSphere and vCenter Server attentively to avoid errors. If errors occur, use the tips in this guide to fix vCenter installation issues. Checking the installation logs located in /var/log on the vCenter Server Appliance can provide valuable information about the root cause of the problem.