6 Ways to Move a VMware VM from One EXSi Host to Another
When you have more than one ESXi host in your environment, you may need to migrate virtual machines from one host to another. The reason can be rational resource usage or insufficient computing resources on one of the hosts. Learn about the methods available to you to migrate virtual machines in VMware vSphere with and without vCenter.
We use the environment configured in the VMware home lab deployed in the previous blog post to explain the VM migration workflow:
- ESXi01 – 192.168.101.101 (datastore10a, datastore40)
- ESXi02 – 192.168.101.102 (datastore40-2)
- vCenter8 – 192.168.101.103

VMware VM Migration Between Hosts with vMotion
The most convenient and effective method to migrate virtual machines to another ESXi host is using vCenter and the vMotion feature. Make sure that both VMs running ESXi hosts and a vCenter VM are operational. Open VMware vSphere Client in your web browser to access your vCenter Server.
VMware provides the vMotion feature for performing VM migration between hosts and datastores. Storage vMotion is used when a VM migrates from one storage to another. vMotion allows you to migrate VMs even if the VMs are running. You can test this great enterprise-level feature in your own ESXi home lab. Try to ping your nested Linux VM during the migration process to check that there is no downtime.
Right-click the VM running on the first ESXi host (ESXi01 – 192.168.101.101) and click Migrate in the Actions menu.

The Migrate wizard opens:
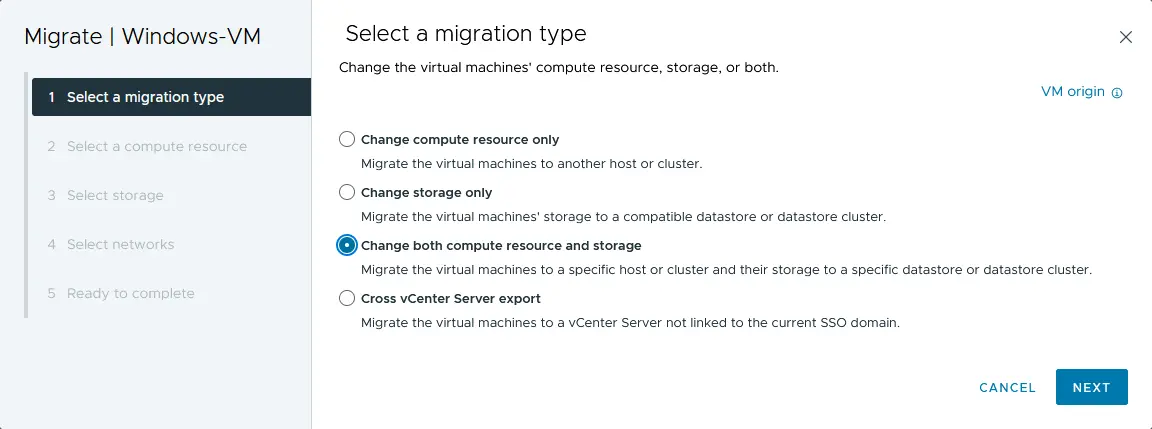
- Select a migration type. At this step, you can select one of the three options:
- Change the compute resource only. Select this option if a VM is located on a shared datastore connected to multiple ESXi hosts.
- Change storage only. Select this option if you want to remove the VM from one directly attached datastore to another. Both directly attached datastores are connected to the same ESXi host in this case.
- Change both compute resource and storage. Select this option if you want to migrate a VM from one host to another. Thus, both hosts may use different datastores.
- Cross vCenter Server export. Use to migrate VMs to a vCenter Server that is a member of another SSO domain.
The third option is suitable in the case reproduced in the current VMware home lab. Both ESXi hosts have their own 40-GB datastores. The running VM will be migrated from one host to another (ESXi01 > ESXi02) and from one 40-GB datastore to another (datastore40 > datastore40-2).
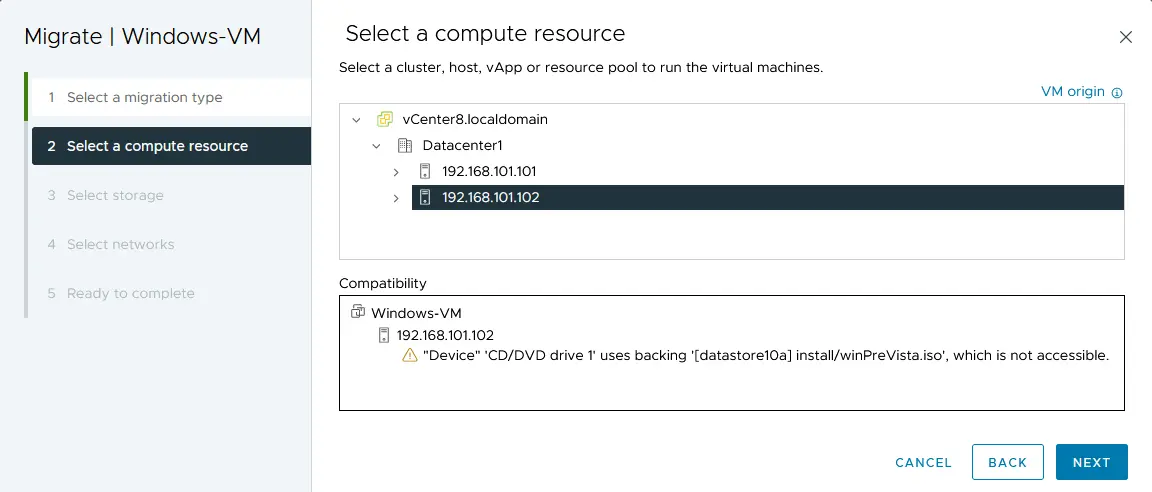
- Select a compute resource. This option allows you to define an ESXi host, as well as which CPU and memory resources will be used to run a VM. Select vCenter8 > Datacenter01 > 192.168.101.102 (the IP address of ESXi02, which is the second host in this VMware test environment).
- Select storage. At this stage, you should select the destination storage for the virtual machine migration. Select the virtual disk format: the same as the source (thin provisioning in this case). Select the datastore (datastore40-2 in our example).
- Select networks. Select destination networks for the virtual machine migration. VM Network is selected for this purpose in our example.
- Select vMotion priority. You can set vMotion to high priority (recommended) or normal priority. Set to high priority.
- Ready to complete. Check your VM migration parameters and hit Finish to start the migration.
Wait until the VM migration process is completed. You can open the Recent Tasks bar at the bottom of the VMware vSphere Client web interface to check the task’s progress. After the VM migration task is completed successfully, your VM will begin running on the second ESXi host (see the screenshot below).
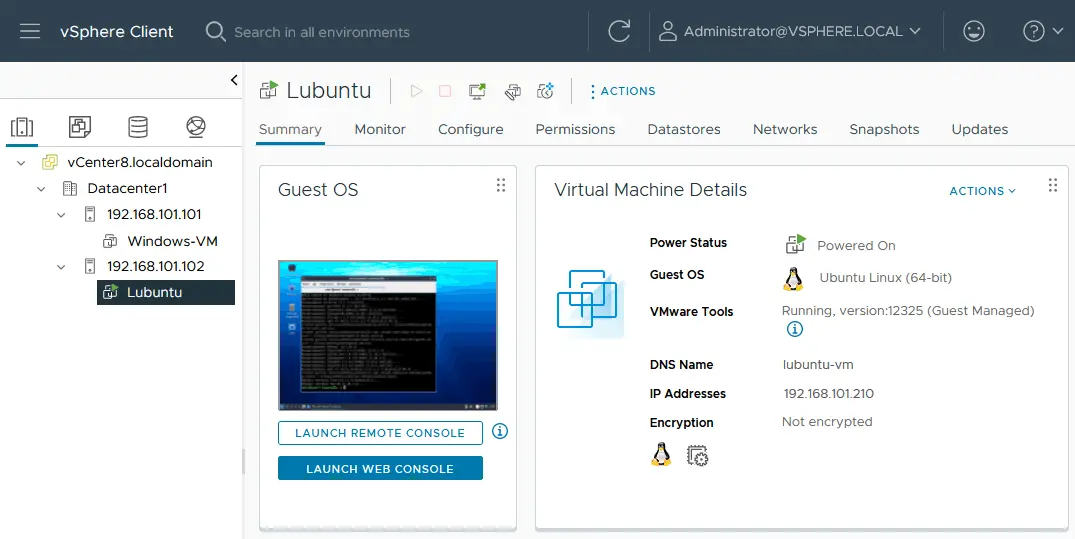
You can see a preview of the Lubuntu VM desktop where the console was opened in order to check the network and install VMware Tools before migration. The virtual machine’s running state is preserved.
How to Move VM to Another Host Without vMotion?
There are situations when vMotion and Storage vMotion cannot be used because vCenter is not installed or the VMware vSphere Essentials license doesn’t allow you to use Storage vMotion. In this case, you can proceed with cold VMware migration of VMs without vCenter.
Let’s migrate a Windows VM from the first ESXi host (ESXi01) to the second one (ESXi02) without using a shared datastore. Do the following to copy VM from one ESXi host to another without vCenter Server:
- Log in to VMware Host Client on the source ESXi host where the source VM is stored (ESXi01) by using a web browser.
- Click Storage in the Navigator pane, click a datastore where VM files are stored and hit the Datastore browser button.
- Browse the directory of a VM that you want to migrate to another ESXi host (Windows-VM on datastore10a in this example).
- Download .vmdk, –flat.vmdk and .vmx files of the source VM on ESXi01. Select a .vmdk file of the VM in a datastore browser and click Download. Save .vmdk and –flat.vmdk files (virtual disk descriptor and virtual disk raw data file) to your computer. Repeat this action for other virtual disks if your VM has multiple virtual disks. Similarly, download the .vmx VM configuration file.
NOTE: Both .vmdk and –flat.vmdk files are displayed as a single .vmdk file in a datastore browser. You can use an SSH client to view files and an SFTP client such as WinSCP to download VM files from an ESXi datastore as an alternative. The downloaded –flat.vmdk file is downloaded as a thick provisioned file. Ensure you have enough disk space to save virtual disk files.

- Log in to VMware Host Client on the second (destination) ESXi host, the host to where you want to migrate virtual machine (ESXi02 in this example).
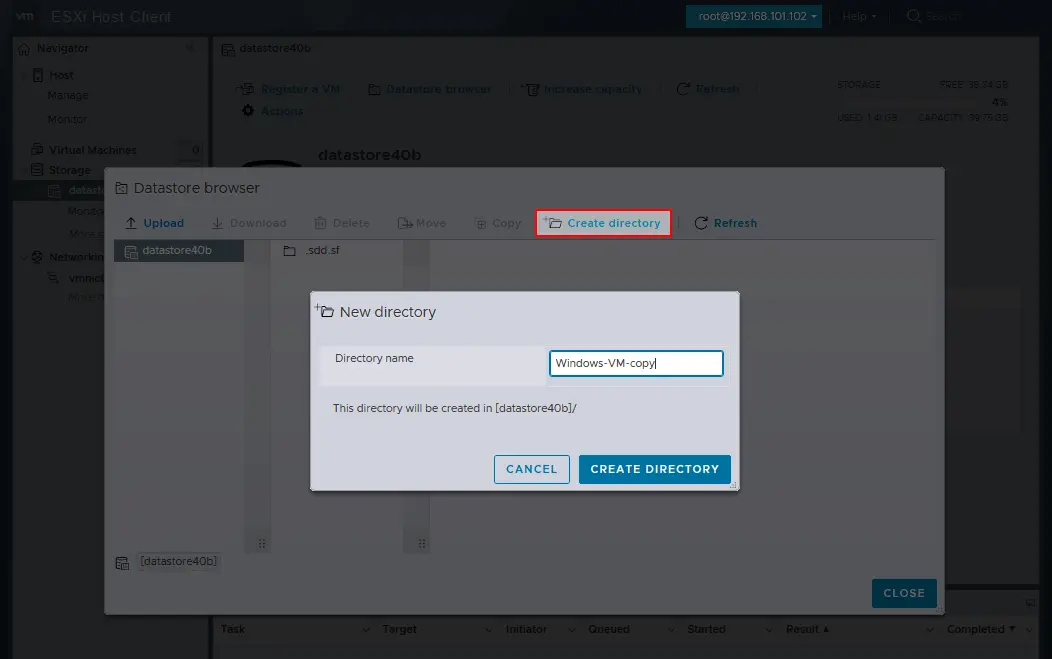
- Click Storage in the Navigator pane, select the datastore where you want to place the VM after the migration (datastore40b) and open the datastore browser.
- Click Create directory in the datastore browser window, enter the name of the VM directory, for example, Windows-VM-copy, and hit Create Directory in the appropriate window.
- Once the directory has been created, click Upload and select the .vmdk, –flat.vmdk and .vmx files of the VM that you have downloaded from ESXi01 before. Wait until the files are uploaded to the datastore of ESXi02.

- The uploaded virtual disks are saved in a thick virtual disk format in this case. Follow the next steps to convert a virtual disk to the thin provisioned format to save storage space.
- Connect to the destination ESXi host (ESXi02) in an SSH client. You can use PuTTY in Windows and log in as root. SSH access must be enabled on an ESXi host.
- Go to the directory of the VM you have created on the ESXi02 datastore as the destination directory for VM migration.
cd /vmfs/volumes/datastore40b/Windows-VM-copy/ - Run the command to convert a thick provisioned virtual disk into a thin provisioned virtual disk:
vmkfstools -i sourcename.vmdk -d thin targetname.vmdkIn our case, the exact command is:
vmkfstools -i Windows-VM.vmdk -d thin Windows-VM-thin.vmdk - Rename the original thick virtual disk (later, you can delete this disk after you ensure that everything works fine after conversion) with the command:
vmkfstools -E targetname.vmdk sourcename.vmdkIn this example, the command is:
vmkfstools -E Windows-VM.vmdk Windows-VM-thick.vmdkNOTE: This command renames both virtual disk descriptor and virtual disk data files (.vmdk and –flat.vmdk).
- Rename the new thin provisioned virtual disk written after conversion to match the name of the original virtual disk:
vmkfstools -E Windows-VM-thin.vmdk Windows-VM.vmdk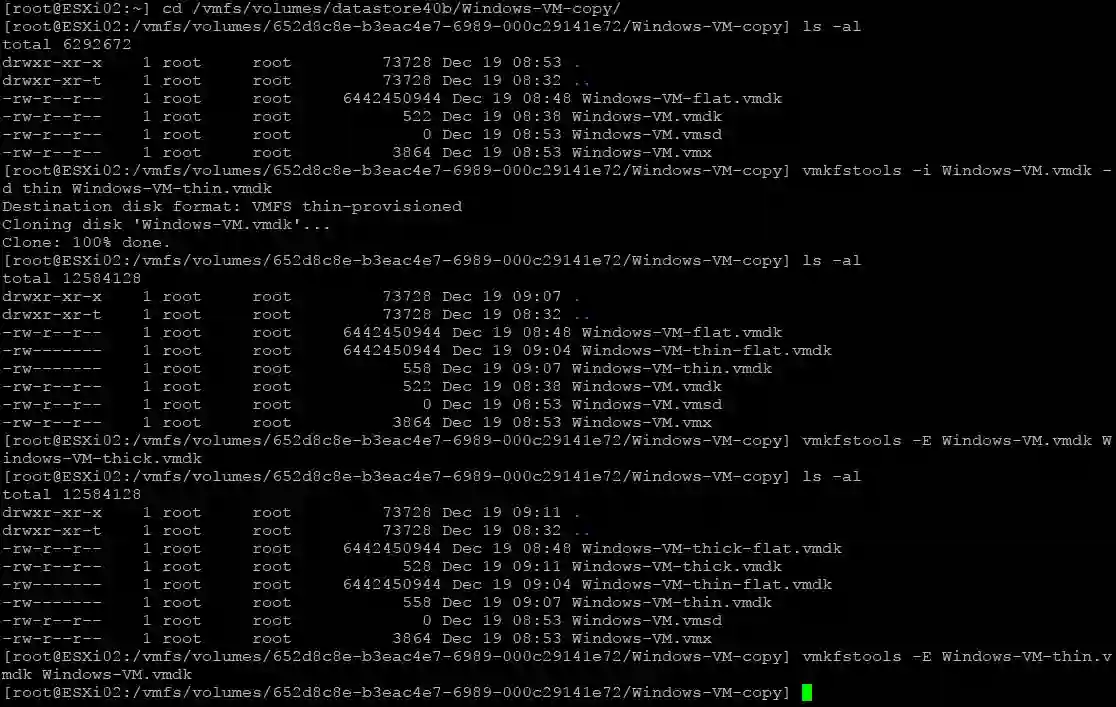
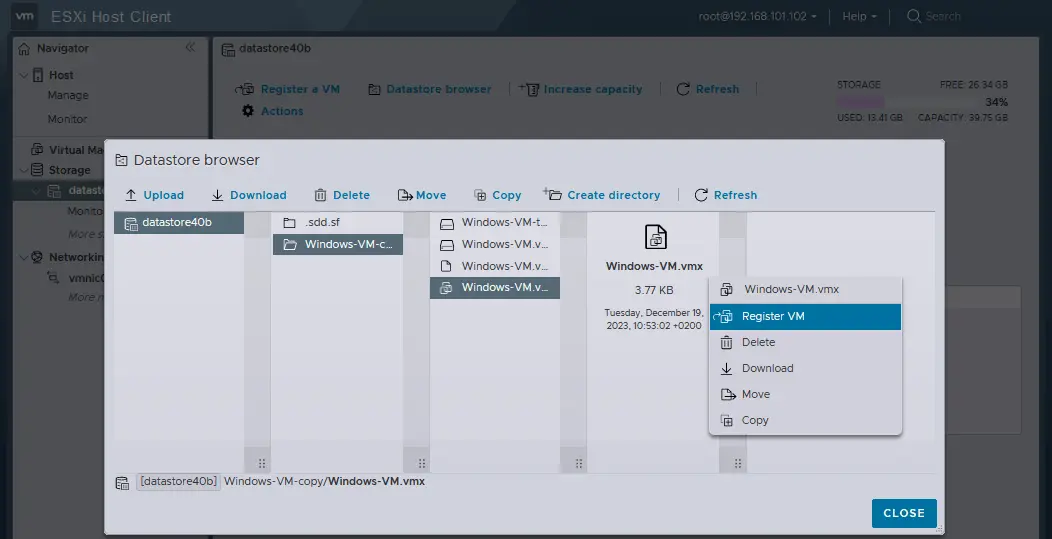
- In the datastore browser of ESXi02, go to the directory of the copied VM (Windows-VM-copy) and select the VM configuration .vmx file.
- Right-click the .vmx file and hit Register VM in the context menu to register the cloned VM on the destination ESXi host (ESXi02).
- Start the VM created after migration.
- If everything works correctly, delete the thick provisioned virtual disk files preserved after converting a virtual disk from thick to thin format (Windows-VM-thick-flat.vmdk and the corresponding .vmdk file).
If the disk size wasn’t reduced after conversion, you can reclaim free space when using thin provisioned virtual disks.
VMware migration using shared storage
Shared storage must be connected to all ESXi hosts participating in VM migration using this method.
There can be two scenarios of VMware migration: copying (cloning) a VM or moving a VM.
- To copy a VM:
- Create a new VM folder on a shared datastore.
- Copy the files of the source VM to that newly created folder.
- Register a VM copy on the destination ESXi host connected to the shared datastore.
- To move a VM:
- Unregister a VM on the source (first) ESXi host.
- Register a VM on the destination (second) ESXi host.
How to Move a VM by Manually Exporting / Importing a VM Template
You can export VMs to templates and import these templates to create a VM on another ESXi host to migrate virtual machines or clone them. This method allows you to perform cold VM migration (for VMs that are powered off). You can copy or move VMware VM to another host without vCenter and with vCenter using templates.
VM migration using templates without vCenter
Perform the following steps to migrate VM to another host without vCenter:
- Go to Virtual Machines in the Navigator of the VMware Host Client on the source ESXi host (ESXi01).
- Right-click the VM and hit Export in the context menu.
- Check the selected files (you can use the default selection without .nvram) and click Export.

- Wait until the files are downloaded in a web browser. In this example, we have downloaded three files of the exported VM:
- Windows-VM.mf
- Windows-VM.ovf
- Windows-VM-1.vmdk
- In VMware Host Client of the destination ESXi host (ESXi02), go to Virtual Machines in Navigator and click Create / Register VM.

- Select Deploy a virtual machine from an OVF or OVA file in the first step of the New virtual machine wizard. Click Next at each step of the wizard to continue.
- Enter the unique VM name on the destination ESXi host, for example, Windows-VM-clone, and select the .ovf (or .ova) and .vmdk files exported as an OVF template before.

- Select storage. Select a datastore on a destination ESXi host to store the VM you migrate.
- Define the deployment options. Select a network for VM connection, thin or thick provisioning of virtual disks, and whether to power on the VM automatically after deployment.
- Ready to complete. Verify your settings and hit Finish.
- Wait until the VM is imported from a template. You should see the message: VM_name successfully imported.
If you see an error, such as A required disk image was missing, and the import process fails, ensure that both .ovf and .vmdk files have been selected. If selecting all required files doesn’t help, try the following actions:
- Copy the .vmdk file(s) exported with an .ovf template to the datastore of the destination ESXi host.
- Create a new VM with the same configuration as the source VM and select to use an existing virtual disk in the VM creation wizard.
- Select the exported virtual disk(s) copied to the destination datastore in step 1.
VM migration using templates in vCenter
Similarly, you can export VMs to OVF templates and import these templates as new VMs in vCenter with VMware vSphere Client.
- Right-click a VM and click Template > Export OVF template in the context menu.
- Enter a template name and select the needed options in the opened window. Hit OK.
- Download the template files.

Then, deploy an OVF template to a VM to migrate virtual machine.
- Right-click the destination ESXi host in the Hosts and Clusters view of the vSphere Client and hit Deploy OVF Template.
- Finish the wizard to complete VM migration.

The alternative to an OVF template in vSphere is converting a VM to a VMware VM template. Read more about how to use VMware VM templates.
How to Migrate VM to Another Host with VMware PowerCLI?
In PowerCLI, you can use the Move-VM cmdlet to migrate virtual machines from one ESXi host to another. Below are the steps to do this:
- Launch the PowerCLI console or PowerShell with the VMware PowerCLI module loaded.
- Connect to the vCenter Server or directly to the source ESXi host using the
Connect-VIServercmdlet. Replace <vCenter_or_ESXi_Host> with the appropriate server address:Connect-VIServer -Server <vCenter_or_ESXi_Host> -User <Username> -Password <Password> - Retrieve information about the virtual machine you want to migrate using the Get-VM cmdlet:
$vm = Get-VM -Name "VM_Name" - Select Destination ESXi Host. Identify the destination ESXi host where you want to move the virtual machine.
$destinationHost = Get-VMHost -Name "Destination_ESXi_Host" - Move Virtual Machine. Use the Move-VM cmdlet to initiate the migration. Specify the virtual machine ($vm) and the destination host ($destinationHost).
Move-VM -VM $vm -Destination $destinationHost - Monitor the migration progress by checking the task status using the
Get-Taskcmdlet.Get-Task | Where-Object {$_.Entity -eq $vm} | Sort-Object StartTime -Descending | Select-Object -First 1 - Optionally, disconnect from the vCenter Server or ESXi host if no further tasks are required.
Disconnect-VIServer -Server * -Confirm:$false
Example
See a complete example that can be used as a PowerShell script to migrate VMs between ESXi hosts:
# Connect to the source vCenter Server or ESXi host
Connect-VIServer -Server 192.168.101.103 -User administrator@vsphere.local -Password Your_Password111
# Retrieve information about the virtual machine
$vm = Get-VM -Name "Windows-VM"
# Identify the destination ESXi host
$destinationHost = Get-VMHost -Name "192.168.101.102"
# Move the virtual machine to the destination host
Move-VM -VM $vm -Destination $destinationHost
# Monitor migration progress
Get-Task | Where-Object {$_.Entity -eq $vm} | Sort-Object StartTime -Descending | Select-Object -First 1
# Disconnect from the source vCenter Server or ESXi host
Disconnect-VIServer -Server * -Confirm:$false
Ensure that you have the necessary permissions to perform the migration and replace placeholders such as <Source_vCenter_or_ESXi_Host>, <Username>, <Password>, <VM_Name> and <Destination_ESXi_Host> in the commands above with your actual values. Adjust the script based on your environment and requirements.
How to Migrate a VM to Another Host with VMware Converter
VMware vCenter Converter Standalone is a tool that allows you to convert physical machines, VMs from other hypervisors, and VMs from earlier versions of VMware vSphere to virtual machines for use in vSphere environments. While this tool is not designed specifically for live migrations, the converter can be used to perform a cold migration of a VM between ESXi hosts (a source VM must be powered off during migration).
To migrate a VM with VMware Converter:
- Prepare all needed components:
- Download VMware vCenter Converter Standalone from the VMware website and install it on a machine that can access both the source and destination ESXi hosts.
- Ensure that you have administrative access to both the source and destination ESXi hosts.
- Make sure there is proper network connectivity between the machine running VMware Converter and both the source and destination ESXi hosts.
- Launch the VMware Converter application on the machine where it’s installed.
- Click Convert machine.
- Select the source type. In this case, select Powered Off and VMware Infrastructure virtual machine as the source. Enter the IP address or hostname of the source ESXi host (for example, 192.168.101.101) and provide the credentials to connect.

- Select Source Virtual Machine. Choose the virtual machine that you want to migrate from the list of available VMs on the source ESXi host.
- Select the destination type. Select VMware Infrastructure virtual machine as the destination. Enter the IP address or hostname of the destination ESXi host (for example, 192.168.101.102), and provide the credentials to connect.
- Configure Destination Virtual Machine. Specify the name and location of the destination virtual machine on the destination ESXi host.
- Select the destination location. Select a datastore on the destination ESXi host and virtual machine hardware version. You can review and configure additional options such as the data center, cluster, resource pool, and datastore for the destination VM.
- Options. Configure conversion options such as disk type, network settings, and customization options if needed.
- Ready to Complete. Review the summary of your selections and click Finish to start the conversion process.
- Monitor the progress of the conversion in the Converter Standalone interface. The tool will shut down the source VM, copy its disks, and then create a new VM on the destination host.
- Once the conversion is complete, verify that the VM has been successfully created on the destination ESXi host.
Read more about using VMware Converter.
How to Migrate a VM to Another Host with NAKIVO Backup & Replication
You can copy a VM from one ESXi host to another by using a VM data protection solution and VM replication. NAKIVO Backup & Replication allows you to migrate virtual machines using this scenario. The VM replication feature helps to do this effectively, even for running VMs.
This method of VM migration can be used in both cases:
- ESXi hosts are managed by vCenter
- Standalone ESXi hosts are not managed by vCenter
Requirements:
- All standalone ESXi hosts must be added to the NAKIVO Inventory.
- If ESXi hosts are managed by vCenter, vCenter Server must be added to Inventory.

To migrate virtual machines with NAKIVO Backup & Replication, do the following.
- In the web interface of the NAKIVO solution, go to Jobs > + (Add a new job) and click VMware vSphere replication job.

- In the New Replication Job Wizard for VMware vSphere that opens, select the source VM on the source ESXi host. In this example, Windows-VM on ESXi01 is selected.

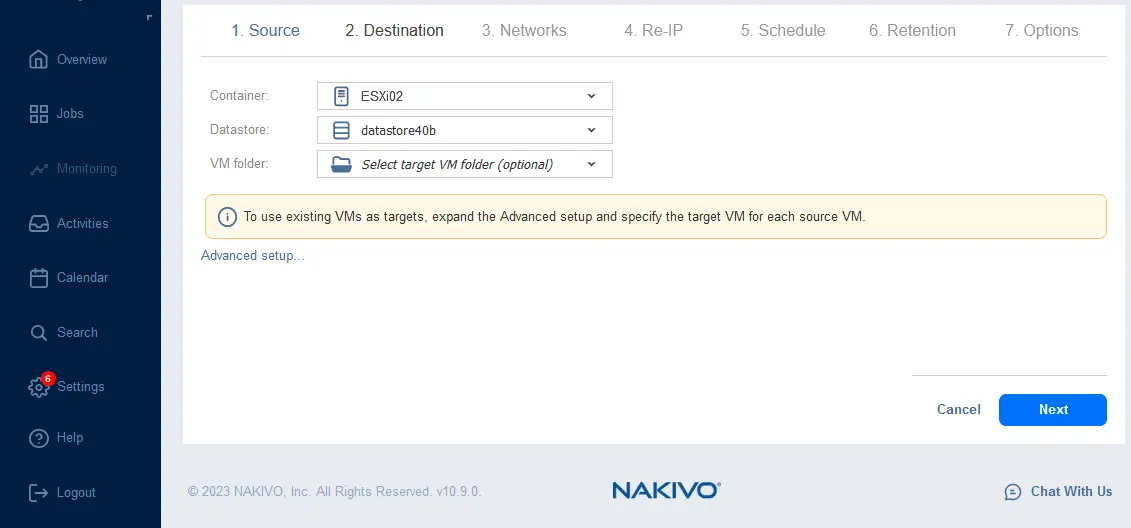
- Select the destination ESXi host, datastore, and VM folder.
- Complete the VM replication wizard and wait until a VM replica is created in the destination location.
This way you have migrated a live VM to a different host. You can set up incremental replication with NAKIVO Backup & Replication and use the replica for VM failover in case your production VMs are not available. NAKIVO Backup & Replication is a complete data protection solution that provides backup, DR orchestration and automation, real-time replication, and ransomware recovery with one solution installation and from a single pane of glass.