How to Run ESXi from a USB Flash Drive
Many of us know that ESXi can be installed not only from a CD disc, but also from a bootable USB flash drive. What’s more, a USB flash drive can be used not only as installation media – ESXi can also be installed on a USB flash drive or SD flash card and booted from these removable devices (you’ve probably noticed that some servers have a card reader and slot for SD flash cards in addition to USB ports).
The pros and cons of this approach, requirements for installing ESXi on USB flash drives, and features of the installation process are covered in the this blog post.

Advantages and Disadvantages
There are advantages and disadvantages that you should know before making a decision to run ESXi from a USB flash drive.
- Cost savings. Disks with SAS interface are not exactly low in price. If you want to install ESXi on a standalone disk or disk array, you should expect to encounter additional costs. Using a USB flash drive to run ESXi can save you from buying additional disks.
- Ease of maintenance when you need to replace disks used for a datastore. You can replace the datastore disks without reinstalling ESXi since ESXi is installed on a USB flash drive (SD card). In cases when ESXi is installed on a disk that is used also as a datastore, you may need to re-install ESXi on a new disk or clone the installed ESXi system to a new disk.
- Upgrades and installations can be done much easier. Clone your USB flash, and upgrade ESXi. If something goes wrong, just replace the USB flash drive to the flash drive with the previously installed ESXi version that works properly (without spending time to roll back to the previous version). Even if you need to re-install ESXi on your USB flash drive, you don’t need to copy datastore data. Hence, less time and effort is needed to do this.
- ESXi boot time is longer when ESXi is installed on a USB device or flash card. Due to the fact that ESXi is loaded completely into a computer’s RAM, the input/output is not reduced during regular ESXi operation. A flash drive/card is used only for loading ESXi and saving configuration files when it is necessary. This type of flash usage is not too intensive, allowing the flash drive be in use for quite a long time in this mode of read\write operations. Boot time can be critical for ESXi servers running in a High Availability cluster where even one additional minute spent on ESXi loading can be critical in the production environment.
Requirements
If you are sure that you want to run ESXi from a USB flash drive or an SD flash card, you should keep in mind the system requirements:
- Minimum 1-GB USB flash drive or an SD (Secure Digital) flash card (an 8-GB or larger flash drive/card is recommended).
- A host or VM with 4GB of RAM. More than 8 GB of RAM is recommended for running ESXi and virtual machines.
- A flash card/drive should be supported by ESXi.
Other requirements are the same as those in place for standard ESXi installation.
Storing Log Files
Log files are important for diagnostics, should some issues or failures arise. Be aware that when you install ESXi on a diskless server, logs are not saved by default after a server reboot. If you are going to send a support bundle to VMware, logs are required. The details about different types of ESXi logs and how to save them are explained later in this blog post under the section about ESXi installation.
The Process of Installing ESXi on a USB Flash Drive
Before installing ESXi on a USB flash drive on your physical server, you can practice installing ESXi on a USB flash drive on a VMware Workstation VM using the USB Pass-through feature. Create a new VM as shown in the blog post about VMware Home Lab. The general ESXi installation is covered in this blog post. Refer to these two blog posts to see a detailed walkthrough with screenshots. Today’s tutorial has an emphasis on installing ESXi on USB devices. Let’s explore installing ESXi 6.7 on a USB flash drive on an example of a VM running on VMware Workstation. It is quite similar to the installation algorithm for a physical server, so you can skip some actions related to VMware Workstation. If you don’t have VMware Workstation, use VMware Player.
The general algorithm to run ESXi from a USB flash drive on a physical server:
- Insert an empty USB Flash drive / SD flash card
- Insert an ESXi installation media (CD or USB flash drive)
- Boot from the ESXi installation media
- Partition the empty USB flash drive, format the partitions and install ESXi
- Reboot the server, and in UEFI/BIOS, select the USB flash Drive or SD card inserted into the card reader as the first boot device.
- Use your ESXi server.
Let’s install and run ESXi on a USB flash drive step by step:
1. Insert a USB flash drive into a USB port on your physical server or a computer running VMware Workstation. Notice that some motherboards used for servers have a built-in USB port or a slot for inserting SD cards (a built-in card reader). The advantage of using SD cards is having the ability to turn on/off read-only mode for the flash card with the physical switcher on the card.
2. Create a VM in VMware Workstation (File > New virtual machine). A VM must have a USB controller and a virtual CD/DVD drive (they are created by default). In the new VM creation wizard, define the necessary parameters.
a) Select the installer ISO disk image of your VMware ESXi distribution.
b) Select VMware ESXi 6.x as a guest operating system.
c) Set the virtual machine name.
d) Set two processors in the processor configuration.
e) Set 8192 MB (or more) of VM memory in the memory settings.
f) Select the necessary network mode, for example, NAT.
g) Use the recommended value in the I/O controller type settings.
h) Select the recommended disk type.
i) Create a new virtual disk, for example, a 20-GB disk (this step is necessary in the New VM creation wizard – you cannot skip this step).
j) You can remove this virtual disk and use only your USB flash drive for ESXi installation. Edit virtual machine settings, select the virtual disk created before and click Remove.
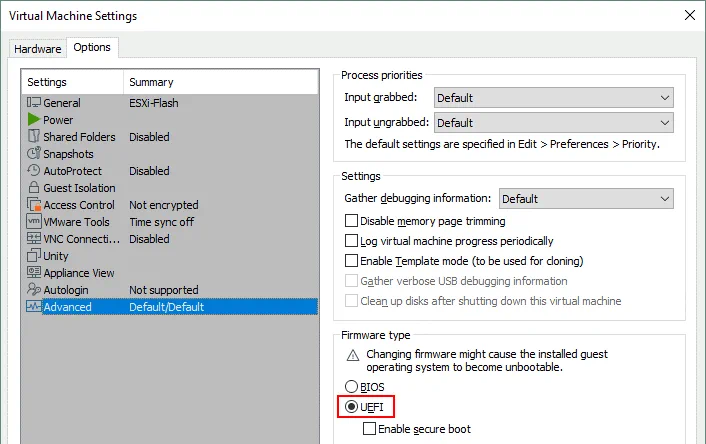
k) Make sure that UEFI is selected as the firmware type in the advanced VM options (VM > Settings > Options > Advanced).
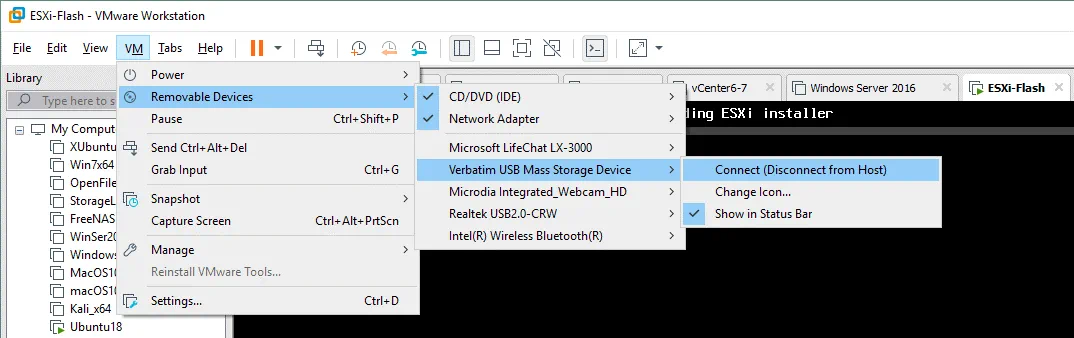
3. Power on the VM and boot from the ESXi installer ISO image. You can press F2 right after powering on the VM, and in the virtual UEFI/BIOS of the VM, select the boot device. Make sure that the USB flash drive is connected to your VM. In order to connect the USB flash drive to a virtual machine, go to VM > Removable devices > Your Flash Drive Name > Connect (Disconnect from Host).
4. Install ESXi.
a) Press Enter on the Welcome screen to continue
b) Press F11 to accept the license agreement
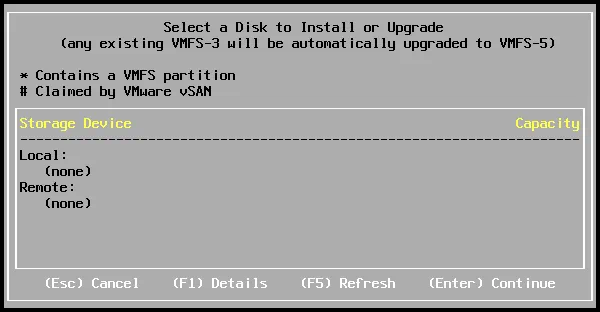
c) Select a disk to install or upgrade ESXi. This is a very important step. If your USB flash drive is recognized, select this drive as the storage device to install ESXi and press Enter to continue installation.
Often a USB flash storage device is not recognized by the ESXi 6.7 installer.
This is because VMware has changed the USB drivers for ESXi 6.5 comparing to ESXi 6.0. The new vmkusb driver was released and it is used by default for all USB host controllers and USB devices instead of legacy USB drivers such as xhci, ehci-hcd, usb-uhci, usb, usb-storage. In this case, perform the following operations to use the legacy USB drivers by the ESXi installer and recognize your USB storage device:
Reboot the virtual machine or physical server running ESXi (a machine to which a USB flash drive is connected).
There is a 5-second delay when booting from ESXi installation media. Press Shift+O to enter additional boot options manually.

By default, the following boot parameters are entered:
cdromBoot runweasel
You should add the preferVMklinux=TRUE parameter to this string and press Enter.
![]()
Repeat all explained steps (a, b, c) before you go on to selecting a disk to install ESXi.
Now your USB flash drive should be displayed. Select the USB storage device to install ESXi and hit Enter to continue.

d) Select a keyboard layout, for example, US Default.
e) Enter a root password
f) Hit F11 to confirm the ESXi installation and wait until ESXi is installed.
g) Remove the installation media, then press Enter and reboot the ESXi machine (a VM) after finishing installation. You can untick the Connect at power on checkbox for a virtual CD/DVD drive in the hardware options of VM settings.
5. After booting ESXi installed on the USB flash drive, enable the ESXi console (the command line interface can be enabled in Troubleshooting > Enable ESXi Shell) if you have manually selected a USB driver during ESXi installation (otherwise, skip this step).
Press Alt+F1 to enter the ESXi console, enter the root login and password.
Run three commands to make the USB settings persistent:
esxcli system settings kernel set -s preferVmklinux -v FALSE
esxcli system module set --enabled=false -m vmkusb
reboot
After that, your ESXi host should be able to locate USB devices properly.
Features of Installing ESXi on a USB Flash Drive
When ESXi is installed on a standalone hard disk drive (HDD), solid state drive (SSD) or RAID (Redundant Array of Independent Disks) storage, a standard set of disk partitions is created by the ESXi installer on a destination disk drive/array. Starting from ESXi 4.x, the GPT (GUID Partition Table) is used instead of the MBR (Master Boot Record) partition scheme. The point is that ESXi determines when a USB flash drive/card is used as the destination for installation and a partition used for storing logs is not created on the USB flash drive/card. This is because the log data is being written intensively and regularly, and the USB flash drive is not intended for extremely intensive data writing, and is not as enduring as a hard disk drive. During loading, ESXi creates a RAM disk in the computer’s memory and stores system files needed for ESXi operation on that RAM disk. When ESXi is restarted or shut down, all data stored on the RAM disk is deleted (system configuration is saved to the disk where ESXi was installed if necessary).
If you run ESXi from a USB flash drive, a temporary directory is created on the RAM disk, log files are written to that directory, and after rebooting or shutting down the server, the logs are deleted. Let’s explore how ESXi creates partitions in different cases.
Installing ESXi on a 1-GB drive
If you install ESXi on a 1-GB USB flash drive, the following partitions are created.

1. The smallest partition with the boot loader.
5. The image of the hypervisor operating system. All files needed for functioning of the ESXi hypervisor are stored in this fixed-size partition.
6. The alternative hypervisor operating system image is stored on this partition. This boot bank is needed in case of unsuccessful ESXi update or upgrade, allowing you to roll back to a previous ESXi version that was working correctly. After updating/upgrading, ESXi doesn’t remove the data of the previous operating system image and preserves the old image in the partition #6. You can press Shift+R during ESXi boot and select the ESXi version to load.
7. The partition to store a core dump in case of PSOD (Purple Screen of Death).
8. The partition that contains disk images with VMware Tools and floppy images.
Partitions #5 and #6 contain the hypervisor operating system image that is a compressed s.v00 file which is uncompressed during ESXi boot. The / (root), /etc, /lib and other system directories are located only in RAM. When ESXi is planned to shut down or reboot, the system settings changes are saved into the state.tgz file. We examined editing this file in the blog post about changing the ESXi root password.
Installing ESXi on an 8-GB drive (or bigger)
If the destination hard disk drive used for installing ESXi has a capacity equal to 8 GB or more, then additional partitions are created on the destination disk.

2. The scratch partition for storing log files.
3. All remaining disk space is used as the datastore to store VM files and other files.
9. The second partition is used to store a core dump in case of PSOD. This partition has been created since ESXi 5.5 because the capacity of memory installed in the servers is growing and 110 MB may be less than a size of the modern ESXi server core dump (a core dump may not fit in 110 MB).
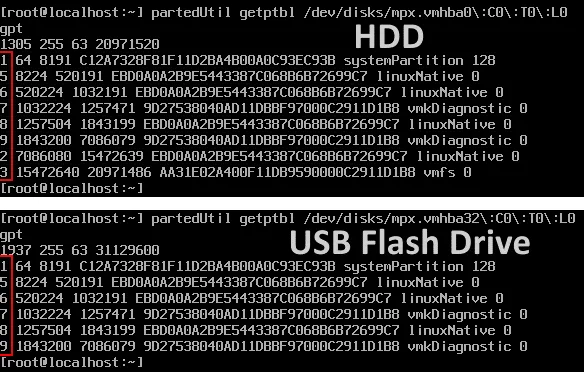
If ESXi is installed on a USB flash drive or SD card whose size is 8 GB or more, partitions #2 and #3 are not created. The Scratch directory used to store logs is linked to the /tmp/scratch directory that is located on the RAM drive. Let’s check the partitions on the ESXi servers installed on a 10-GB hard disk drive and 16-GB USB flash drive. Both of our ESXi VMs are running on VMware Workstation. Press Alt+F1 to open the console in ESXi and run the command:
partedUtil getptbl /dev/disks/mpx.vmhba0\ :C0\ :T0\ :L0
The output is displayed on the screenshot below. On the upper image, you can see all 8 partitions used by ESXi that are created on the 10-GB virtual hard disk. On the lower image, you can see only 6 partitions created by the ESXi installer on the 16-GB USB flash drive.
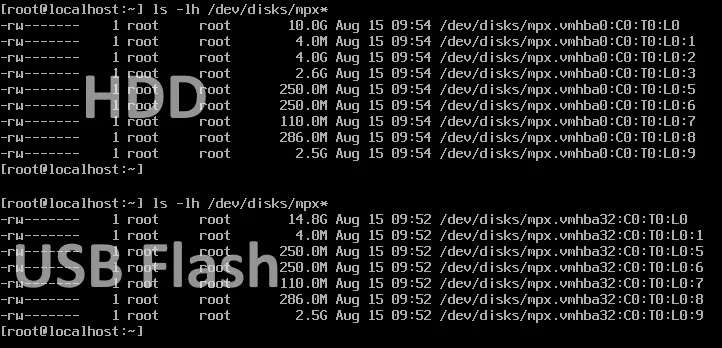
You can also check the size of each partition.
ls -lh /dev/disks/mpx*
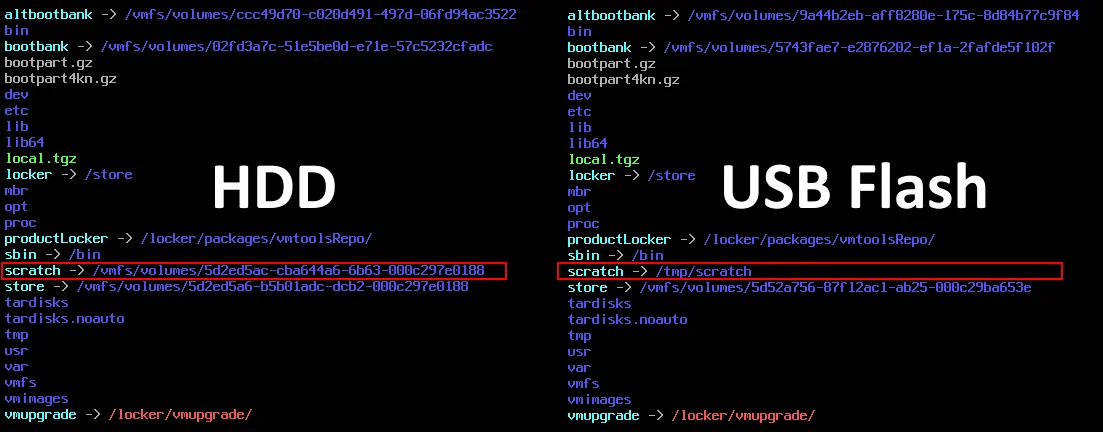
If you list the content of the / directory on each considered ESXi server, you will see that the scratch directory of ESXi installed on the HDD is linked to the appropriate disk partition. The scratch directory of ESXi installed on a USB flash drive is linked to a temporary /tmp/scratch directory that is located on the RAM drive (on a diskless server/VM).
ls -lh /
If you attach a new hard disk drive, solid state drive or RAID to your ESXi server installed on a USB flash drive, the scratch directory will use the newly attached persistent drive. Let’s reproduce this situation for our virtual machine running ESXi installed on the USB flash drive that doesn’t have any hard disks in its configuration.
Go to VM > Settings and click Add in the Hardware tab, then select Hard Disk. Add a 20-GB virtual hard disk.
Then open the web interface of VMware Host Client, initialize the disk and create a new VMFS datastore on that disk.
Reboot your ESXi host to make changes take effect and check the content of the / directory in the console:
ls -lh /
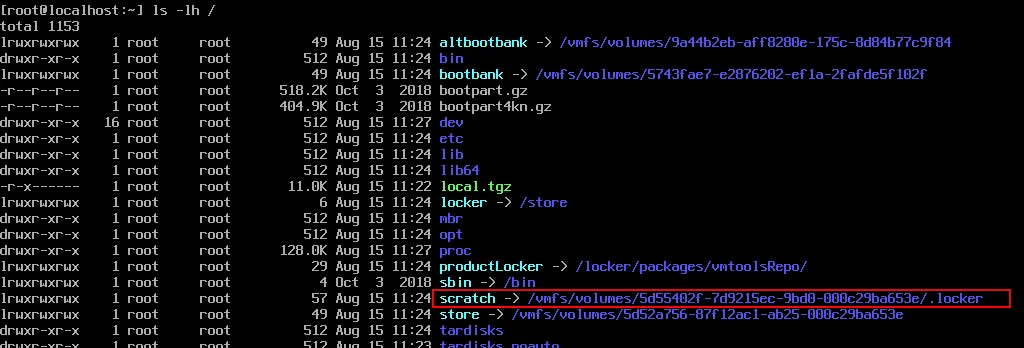
Now your logs are saved to your persistent storage.
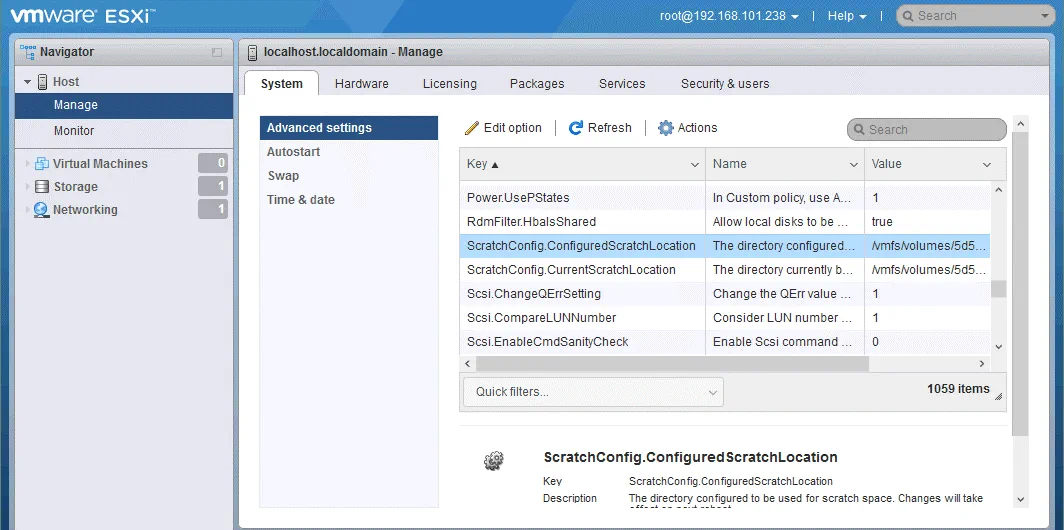
You can edit the syslog settings manually in VMware Host Client. In order to do this, go to Host > Manage > System > Advanced settings and select:
ScratchConfig.CurrentScratchLocation
Click Edit and set the path to the directory used for storing log files, for example:
/vmfs/volumes/5d55402f-7d9215ec-9bd0-000c29ba653e/.locker
Where the hash in the address is the partition (volume) identifier (ID).
If your diskless ESXi host is booted from a USB flash drive, and you don’t want to install hard disks into the server (for example, if you use shared storage such as SAN or NAS connected via iSCSI to your ESXi server), you can configure a Syslog server in your network and store system logs on that persistent storage. It is possible to configure VMware vSphere Syslog Collector.
Core dump
Core dump, much like ESXi system logs, contains important information that is needed for fixing errors and can be provided to the support team for resolving complex issues. For an ESXi host running without enabling vSAN, for every 1TB of DRAM (dynamic random access memory), the coredump partition should have 2.5 GB of available space. If you use an ESXi server that has more than 512 GB of RAM and is used as the vSAN node, the core dump may be bigger than the size of the standard 2.5-GB partition (#9) used to store a core dump, and the core dump will not fit in this partition. In this case, the coredump partition size should be increased; alternatively, the ESXi host should be re-configured to use a coredump partition on another disk drive, or configured to use ESXi Dump Collector to store vmkernel coredumps on another host in the network.
vSAN traces
If vSAN is enabled for an ESXi host, there is one more type of logs called vSAN traces (which are not a part of syslogs). Like syslogs, vSAN traces are stored in a temporary directory on the RAM disk if ESXi is installed on a USB flash drive/SD card (for a diskless server), and are deleted after shutting down or rebooting the ESXi server.
You can check the directory to which vSAN trace logs are saved with the command:
esxcli vsan trace get
How to Back Up ESXi Installed on a USB Flash Drive
As mentioned in the beginning of this blog post, the ease of cloning ESXi installed on a USB flash drive or SD card is the advantage of this type of ESXi deployment. Let’s see how to clone a USB flash drive that contains ESXi on a practical example. You should shut down your ESXi server for cloning the USB flash drive on which ESXi is installed.
Cloning a USB flash drive with ESXi to an image
Connect your USB flash drive on which ESXi is installed to a Linux machine (an Ubuntu VM is used in this example).
Verify the name of your USB device attached to the Linux machine by using any of these commands:
dmesg | grep -i usb
dmesg | grep -i 'attached'
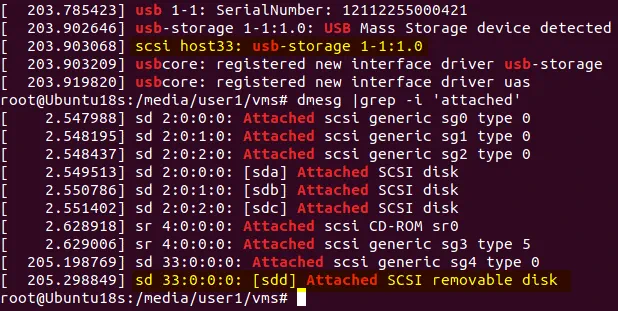
/dev/sdd/ is our USB flash drive in this case. In your case, the name of the USB device may be different.
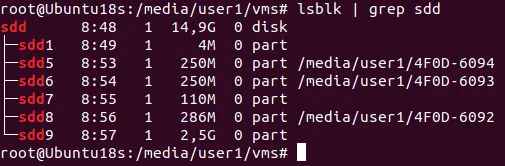
You can list your attached block devices with the lsblk command. Let’s list partitions used by ESXi on our USB flash drive to make sure that the correct device is selected before cloning:
lsblk | grep sdd
It is also possible to use fdisk for this purpose:
fdisk -l /dev/sdd
Now, once you know all necessary input parameters, clone the USB flash to the image file by using the low-level dd utility. The name of the image file is esxi-flash.img and this file is located in our current directory.
Warning! Be careful when working with the dd utility because a mistake can cause irreversible data loss after which data cannot be restored.
dd if=/dev/sdd of=./esxi-flash.img bs=4M status=progress
Where:
if – an input file
of – an output file
bs=4M – a block size (4 MB)
status=progress – a status used to display the progress bar
Erasing a USB flash drive
Let’s erase the USB flash drive and try to recover the ESXi hypervisor on that flash drive from the image. In order to completely erase all data on the USB flash drive, you should fill the entire capacity of the USB storage device with zeroes. It can be also done with the dd utility and the /dev/zero pseudo device whose output is an infinitive stream of zeroes. You can also use this method to erase your USB flash drive when you don’t want to use this flash drive for running ESXi anymore. If you don’t need to erase this USB flash drive because you have another free USB flash device (for example), you can skip this step.
dd if=/dev/zero of=/dev/sdd status=progress
Wait for a few minutes until data on your device is erased.
Now you should see no partitions on your USB flash drive.
fdisk -l /dev/sdd
Recovering/Cloning ESXi on a USB flash drive from the image
Let’s restore ESXi to an empty USB flash drive from the ESXi image file prepared previously by using the dd utility. Use the image as the input file, and the name of your USB flash drive as the output file (/dev/sdd is the name of the needed USB device in the current example).
dd if=./esxi-flash.img of=/dev/sdd bs=4M status=progress
As usual, you can check partitions with fdisk:
fdisk -l /dev/sdd
Once the process of writing data from the image to the USB flash drive is complete, connect the USB flash drive to your machine on which ESXi should run, and power on the machine. Congratulations! Now you know how to back up and restore ESXi installed on a USB flash drive.
Conclusion
Installing ESXi on USB flash drives/cards can be considered as a VMware ESXi-supported alternative to the traditional installation of ESXi on hard disk drives but it can be less reliable when compared to using RAID storage with HDDs or SSDs.
The ESXi boot time from a USB flash device is longer than from an SSD or HDD which may be critical for High Availability clusters. If you are sure that you can run ESXi from a USB device without any concerns, don’t forget to configure saving system logs, core dumps and vSAN traces to persistent storage to be able to perform diagnostics and contact VMware support. If you run ESXi from USB flash drives in your environment, consider cloning a USB flash drive from which ESXi is booted. Such a clone can be used as an ESXi backup.