How to Use VirtualBox: Quick Overview
When using a traditional you need to install the operating system on a physical machine for evaluating software that cannot be installed on your current operating system. Oracle VirtualBox is what you need in this case, instead of reinstalling software on your physical machine. VirtualBox is designed to run virtual machines on your physical machine without reinstalling your OS that is running on a physical machine. One more VirtualBox advantage is that this product can be installed for free.
A virtual machine (VM) works much like a physical one. An OS and applications installed inside a VM “think” that they are running on a regular physical machine since emulated hardware is used for running VMs on VirtualBox. Virtual machines are isolated from each other and from the host operating system. Thus, you can perform your tests in isolated virtual machines without any concerns of damaging your host operating system or other virtual machines. Today’s blog post explores how to use VirtualBox and contains the following sections:
- How to set up VirtualBox?
- Enabling CPU virtualization feature
- Downloading the VirtualBox installer
- Running the installer and defining the installation options
- Deploying a new VM
- Creating a virtual machine
- Installing a guest OS
- Shared folders and clipboard
- Making a VM copy
- Using snapshots
- How to use VirtualBox for recording video inside the VM
Operating Systems Supported by VirtualBox
VirtualBox supports a long list of host and guest operating systems. A host OS is the operating system installed on a physical machine, on which VirtualBox is installed. A guest OS is an operating system installed on a virtual machine running inside VirtualBox. VirtualBox can be installed on Windows, Linux, macOS, Solaris, and FreeBSD. On VirtualBox you can run VMs with Windows, Linux, macOS, Solaris, FreeBSD, Novell Netware, and other operating systems.
How to Set Up VirtualBox?
Let’s explore how to set up VirtualBox on Windows. The process of VirtualBox installation is not difficult and is similar for all supported operating systems.
Enable CPU virtualization features
First, you need to enable hardware virtualization features on your CPU (Central Processor Unit) such as Intel VT-X or AMD-V in UEFI/BIOS of your physical computer. Otherwise, if you run 64-bit guest operating systems, you can get the error: VT-x is not available. If Hyper-V is installed on your Windows machine, uninstall Hyper-V before installing VirtualBox (otherwise Hyper-V will block hardware virtualization extensions needed by VirtualBox to run VMs). The majority of modern processors support hardware virtualization.
Download the VirtualBox installer
Go to the official web site to download the VirtualBox installer for your operating system (Windows in this case). If you are looking for how to set up VirtualBox on mac, download the OS X installer. At the moment of writing this blog post, the latest VirtualBox version is 6.0.8. You can also download older versions, for example, version 5.2. VirtualBox 5.2 supports 32-bit hosts while VirtualBox 6.0 doesn’t. In the current example, you can see how to set up VirtualBox on an example of VirtualBox 5.2. In the next blog post, the VirtualBox upgrade process will be explained.

Run the installer and define the installation options
- Run the VirtualBox installer. The installation wizard that has a GUI (graphical user interface) should appear.
- Select the manner in which you want features to be installed, clicking on the installation directory and installed components—you can leave the default values. Then tick the checkboxes near shortcut options and file associations.
- Confirm installation of VirtualBox network interfaces (click Yes).
- On the Ready to Install Screen, hit Install to start the installation process.
- After finishing installation, you can tick the checkbox for starting VirtualBox after installation.
Deploying a New VM
Once you have installed VirtualBox, open the application. You can see the graphical user interface of VirtualBox which is unified for all supported host operating systems. You can also use the command line interface and VBoxManage if needed. In the current example VirtualBox is set up on Windows 10. Imagine that you need to evaluate Windows Server 2019 before making a decision – to buy or not to buy. Let’s look at how to use VirtualBox for running Windows Server 2019 on a virtual machine.
Download the ISO image of Windows Server 2019 installer from the Microsoft’s site. Rename the downloaded ISO file to WinServer2019.iso for more convenience.
Creating a Virtual Machine
Click Machine > New or hit the icon with the blue star to create a new virtual machine in VirtualBox GUI.

Define the new VM options.
Name: WinServer2019.
Type: Microsoft Windows.
Version: Windows 2016 (64-bit). This parameter defines the reasonable default amount of virtual memory, virtual disk size; a set of emulated hardware (devices that are supported by the selected OS version, drivers for which are included); as well as a set of system features such as EFI, PAE (physical address extension), I/O APIC (input/output advanced programmable interrupt controllers). If you are using the latest version of VirtualBox, Windows 2019 is available in the list of OS versions.
Memory size: Set memory for the VM. 8 GB of RAM should be enough for Windows Server 2019 for the beginning. You can add more memory later, after installing the guest OS (a VM must be powered off to change the amount of memory).
Hard Disk: Create a virtual hard disk now.
Click the Create button.

Creating a Virtual Hard Disk
Set the following parameters:
The name and file location for the virtual disk. Try not to use a system partition for storing virtual disks if possible.
The file size of the virtual disk. Select 50 GB for Windows Server 2019.
Hard disk file type. VirtualBox supports a lot of virtual disk formats:
- VDI (VirtualBox Disk Image) is a native VirtualBox format. Select this virtual disk type if you don’t plan to migrate a VM to other platforms such as VMware of Hyper-V.
- VHD (Virtual Hard Disk) is a Hyper-V format.
- VMDK (Virtual Machine Disk) is the VMware virtual disk format.
- HDD is the Parallels Hard Disk.
- QCOW (QEMU Copy-On-Write).
- QED (QEMU enhanced disk).
Let’s select VDI in the current example.
Storage on physical hard disk: Dynamically allocated or fixed size (the analog of thin and thick provisioning in VMware). Select the dynamically allocated option if you want to save disk space, as in this case, the size of your virtual disk is near zero right after creation, and grows after writing data to the virtual disk before reaching the maximum allocated size.
Click Create to finish VM creation.
Virtual machine Tuning. Tune your virtual machine by going to Machine > Settings. The following sections are in this window.
General. You can edit the VM name, enable shared clipboard, drag & drop, write the VM description, and enable virtual disk encryption.
System. Disable a virtual floppy drive in the Motherboard tab. In the System tab, you can add more processors for the VM, configure acceleration, and select one of the two emulated chipsets.

Display. In the Screen tab, it is possible to set the video memory, monitor count, and scale factor as well as enabling 2D and 3D acceleration. The Remote Display tab allows you to manage your guest OS by connecting to the VirtualBox VM desktop remotely with RDP (Remote Desktop Protocol). Capturing video is configured in the Video Capture tab.
Storage. Add and remove virtual hard disks, virtual DVD drives, and disk controllers if needed. Select your DVD drive (it should be empty until this moment) and insert the virtual ISO DVD disc into the drive. Click the disc icon and select “Choose virtual optical disc file.” Browse your WinServer2019.iso file and open it. Now your ISO disc is displayed in the list of storage devices.
Audio. Audio can be enabled or disabled; the host audio driver, audio controller and extended features can be selected.
Network. Virtual network adapters are configured in this section. The maximum number of virtual network adapters per VM is four. A virtual network adapter can use a variety of different network modes: Not attached, NAT, NAT Network, Bridged Adapter, Internal Network, Host-only Adapter, Generic Driver, among which the NAT network mode is used by default.
When the NAT mode is selected, your VM is connected to the virtual router and can access the host, the network to which the host is connected and external networks that can be accessed by the host. If you deploy a single VM, which is not needed to be seen as a regular machine in your physical network, you can select the NAT mode for VM networking. If you want your VM to be fully representative in your physical network, use the Bridged mode.
The model of the emulated virtual network adapter is selected from the drop-down menu. You may set the MAC address manually if necessary. Configure Port Forwarding for accessing VMs that use the NAT network mode from the physical network your host machine is connected to (if necessary). If you use the bridged networking, you don’t need to configure port forwarding.
Serial Ports. Enable Serial ports if for some particular reason you need COM ports to be enabled on a VM.
USB. USB options for a VM are configured in this section.
Shared Folders. Shared folders are used for file exchange between host OS and guest OS.
User interface. Customize the elements of GUI if you wish.
Click OK to apply the edited VM configuration.
Installing a guest OS
Now you can start the VM. Hit Machine > Start > Normal Start.
Normal Start. Opens a VM window and displays the video output of the VM in that window similarly as the output of the physical machine is displayed on a monitor. When you close the VM window, VirtualBox asks you what to do:
- Save the machine state. The VM is hibernated (a VM is on pause). Start the VM to continue VM operation from the saved state.
- Send the shutdown signal. The VM is shutting down correctly, similarly as you would shut down the machine from the operating system.
- Power Off the machine. This option is the equivalent of unplugging the power cable from the physical computer.
Headless Start. A VM is started, but the Window with the video output of the VM is not appeared. You can connect to the VM for managing it by using a remote desktop protocol (including VRDP – VirtualBox Remote Display Protocol that is backward compatible with Microsoft RDP), SSH etc.
Detachable start. This is the combination of the normal start and headless start. When you close the VirtualBox VM window, one more option is available – Continue running in the background. You can close the VirtualBox VM window without interrupting the VM.

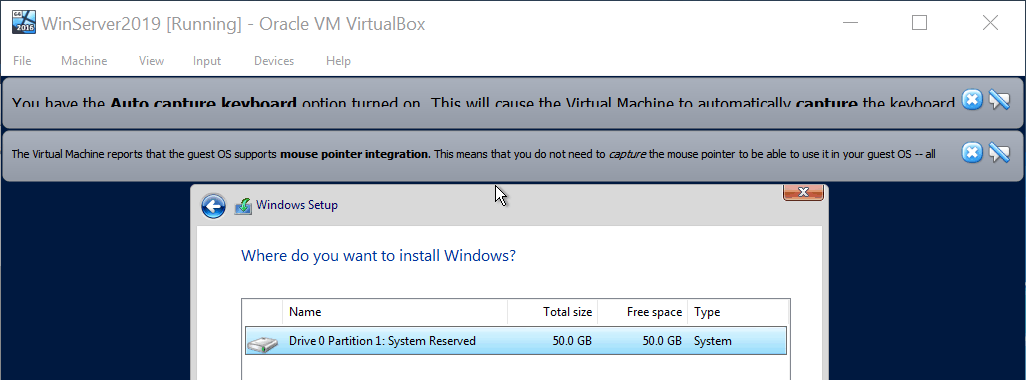
The OS installer is now booting from the ISO image inserted to a virtual DVD drive. This process is displayed in the new VirtualBox VM window. If you know how to set up Windows 10 on VirtualBox, or on a physical machine, the installation process of Windows Server 2019 in a GUI mode shouldn’t cause any problems.
Select suitable options for the Windows installation wizard:
- Windows Server 2019 Datacenter Evaluation (Desktop experience).
- Custom: Install Windows only (advanced).
Create a new partition (or partitions) on your 50-GB virtual hard disk.
The VM automatically restarts a few times during Windows Server 2019 installation.
Set the Windows administrator password to finish Windows Server 2019 setup on VirtualBox.
After loading, Windows asks you to press Ctrl+Alt+Delete to unlock. Click Input > Keyboard > Insert Ctrl+Alt+Del in the VirtualBox VM window.

Once you have logged in your Windows system, install VirtualBox Guest Additions. Guest Additions are a set of drivers and system utilities for supported guest operating systems that optimize the guest OS performance and usability, in addition to providing closer interaction between host and guest operating systems. Features such as mouse pointer integration, enhanced video mode support, shared folders, shared clipboard, and time synchronization can be enabled after installing VirtualBox Guest Additions on a guest OS. The ISO file with Guest Additions is located in the VirtualBox installation directory.
In the VirtualBox VM window, click Devices > Insert Guest Additions CD image. The virtual ISO disc is now inserted to the virtual DVD drive of your Windows VM.

Open the contents of the disc and run the VBoxWindowsAdditions-amd64.exe file. After the installation wizard opens, follow the tips of the wizard recommendations, clicking Next on each step to continue. In the end of installation, reboot the virtual machine.

Shared Folders and Clipboard
In order to configure shared folders, go to Machine > Settings and select the Shared Folders section. Hit the Add Share icon (a folder with a green plus), then enter the path of the folder you want shared on your host machine, and define the folder name. You can make a shared folder read-only and enable auto mount. In the current example, C:\Virtual\VirtualBox\shared_folder01 is used as a shared folder and the auto-mount option is enabled. Hit OK twice to apply changes.

Power on the VM on which Windows Server 2019 has been installed. Open File Explorer, in the Network section select VBOXSVR, after which you can see the recently created shared folder whose network path is \\VBOXSVR\shared_folder01. For more convenience, right click the shared folder and in the context menu, select Map network drive to mount . Select any free letter, for example Z: to finish.

Now the shared folder is shown as a disk Z: in your list of disks in This PC (My Computer). If you enabled the auto-mount option when configuring a shared folder, you don’t need to map a network drive manually, as it has already been mounted automatically (the first free disk letter is used for the disk mapping in this case). Now your shared folder is ready to copy files between the host and guest operating systems.
Shared Clipboard is a useful feature that allows you to copy a fragment of text, image, multiple files etc. on a guest OS and paste these items on a host OS (and vice versa), much as you can do inside your host OS between multiple applications.
Drag & Drop allows you to copy files and folders from guest OS windows to host OS windows (and inversely), much like you can do between two windows of Windows File Explorer.
In order to enable Shared Clipboard and Drag & Drop in VirtualBox, open VM settings, and in the General section, go to the Advanced tab. Select the Bidirectional option for shared clipboard and Drag & Drop features.

Making a VM Copy
One of the advantages of VMs is the ease of copying virtual machines and making machine clones. You can clone a VM by using built-in VirtualBox options and manually.
Go to Machine > Clone for using a built-in cloning tool.
Select the Expert mode.
Enter the new machine name (by default the “clone” word is appended to the original VM name). Choose the clone type (full clone or linked clone), snapshot options (current machine state or everything). In the case of VM cloning, unique identifiers of the operating system and virtual disks are changed.
If you select Full clone, a full copy of the source VM (including all virtual disk files) is created. All VM files are copied independently to the destination folder. A source VM is not needed for VM-clone operating.
If the Linked clone option is selected, all files of the source VM are not copied. A new VM is created, a snapshot of the parent virtual disk of the source VM is taken for creating differencing disks.

Reinitialize the MAC address of all network cards. Select this option if the MAC address on a source VM and VM clone must be different (for preventing network conflicts).
Copying a VM folder with all VM files can be considered manual backup of the virtual machine. Unique identifiers and other VM components remain the same, as the VM copy is an exact copy of a source VM. You can open a folder of the virtual machine by clicking Machine > Show in folder in the main VirtualBox window.
Using Snapshots
Snapshots allow you to save the working state of a VM and roll back to that state later after changes have been made in a VM. Using snapshots is recommended for testing, for example, when you need to install some applications and see how they work without any risk of harming the entire system. If applications work incorrectly or you need to try another version of software, just revert the VM state by using a snapshot that has been already created. This approach is convenient and helps you save a lot of time. Using snapshots is not, however, equal to making backups.
How to use VirtualBox for taking VM snapshots? Select your VM, click Machine Tools and select Snapshots to open a section with snapshot options. Hit the Take icon to create a new snapshot, then enter a snapshot name and description.

After taking a snapshot, a new differencing virtual disk will be created in the Snapshots subfolder of your VM folder. The file format is the same as for your original virtual disk (VDI in this case). All new changes made inside a VM after creating a snapshot are written to that differencing virtual disk. If you create a second snapshot, the second differencing virtual disk is created, and so on.
When you need to restore the virtual machine state from the snapshot, right click the snapshot name and in the context menu, select Restore. Check the box if you need to create a snapshot of the current virtual machine state. The VM must be in the powered off state. If the snapshot is not needed any more, it can be deleted.
When a snapshot located before the current VM state is being deleted, it is deleted by merging a differencing disk related to the snapshot with the parent virtual disk or differencing disk. If your current VM state is represented by a snapshot in the middle of the snapshot chain, deleting a snapshot in the end of the snapshot chain causes deletion of the differencing virtual disk file related to that snapshot without merging. Now you know how to set up VirtualBox, run and manage VMs as well as use VM snapshots.
Recording Video
This section tells you how to use VirtualBox for recording a video about everything that can be seen in the user interface of the virtual machine. When using physical machines, you cannot install software for recording a video of operating system installation, or console usage in the operating systems without GUI. VirtualBox helps you resolve this issue and has a built-in feature for video recording of everything you see in the virtual monitor (VirtualBox VM window).
In order to record a video, open Machine > Settings, go to the Video Capture tab, enable video capture and configure parameters of video recording (see the screenshot below).

Conclusion
VirtualBox is a powerful virtualization solution that can be used for running distinct operating systems mentioned in a long list of supported OSs. You can set up VirtualBox on mac, Windows, Linux, Solaris and FreeBSD. Today’s blog post explained how to set up VirtualBox and how to use VirtualBox on Windows 10, using as an example the installing Windows Server 2019 as a guest OS. VirtualBox is free, and its user interface is convenient and standardized for all supported host operating systems. Use VirtualBox for running software developed for different operating systems on your single physical machine simultaneously without the need to install multiple operating systems on a physical machine, and reboot to change the OS. Use VirtualBox for testing deployments that require multiple machines which must interact via network – VirtualBox provides a high range of virtual networking modes. VirtualBox is a powerful multiplatform alternative to Hyper-V. Read also about VirtualBox vs Hyper-V and VirtualBox vs VMware comparisons to learn more about virtualization solutions. Try installing VirtualBox, and wait for new blog posts about this useful product.