How to Expand Disk Partitions in Linux VMs
Insufficient virtual disk space can lead to issues, including poor performance. For example, you set up a virtual disk, create partitions, and install a guest OS on one of those partitions. Then you find that you have insufficient disk space. In this case, you should extend the disk size.
VMware provides flexible configuration options for virtual hardware like CPUs, memory, and disks, allowing you to extend the size of an existing virtual disk. Note that a partition should be resized manually because unallocated disk space is added after extending a virtual disk. Read on to learn about the different methods for resizing partitions in different settings.

Prerequisites
Ensure that the following conditions are met before you resize a virtual disk and the partitions on that disk:
- Virtual disk size can be increased while a virtual machine is running. However, you may need to reboot a VM for the operating system to detect the resized disk.
- To be resized, a virtual disk must not have snapshots. If your virtual machine has snapshots, delete (consolidate) them before you resize a virtual disk and adjust disk partition size.
- It is recommended that you back up your VM before doing operations with disks. Changing disk partition size may be risky if you make a mistake during the configuration process.
Extend Disk Partitions in Linux Ubuntu
In this section, we explain how to extend partitions in Linux after expanding virtual disks on an example of Ubuntu. You can use this workflow on Ubuntu 18, 19, 20, 22, and newer versions. There are different methods to adjust disk partition size and extend Linux partitions. You can use the command line tools or tools with the graphical user interface. First, we will expand a virtual disk of a Linux VM on an ESXi server. We will do that in the ESXi command line, but you also can use VMware vSphere Client or VMware Host Client.
Resizing a virtual disk in the ESXi command line
First, enable ESXi shell and Bash Console in the Direct Console User Interface (DCUI) of ESXi or in VMware Host Client. Then connect to ESXi shell via SSH or open ESXi shell directly on an ESXi host.
- Go to the directory where the needed virtual disk of your virtual machine is located:
cd /vmfs/volumes/datastore2/Ubuntu19/ - Check the content of the directory and the size of the files:
ls -al
We have a thin provisioned virtual disk Ubuntu19.vmdk whose maximum size is 20 GB, and the current virtual disk size is about 5.6 GB (the total size of files stored on a virtual disk). The file size is displayed in bytes in the command line.
- Run the command to expand the virtual disk from 20 GB to 30 GB. Enter the virtual disk target size that you want to have – not the size of the increment you want to add to the virtual disk. In our example, we increase the size of our 10-GB virtual disk to 30 GB by using the command like below:
vmkfstools -X 30G Ubuntu19.vmdkSelect a vmdk disk file, not -flat.vmdk. Enter the needed disk size and virtual disk file according to your needs and configuration. G means gigabytes, M – megabytes, K – kilobytes, T – terabytes, etc. If you want to have an eager-zeroed thick disk after increasing the size, use a command like this one:
vmkfstools -X 30G -d eagerzeroedthick vm-disk-name.vmdk. - Grow 100% done – this output means that the virtual disk was expanded successfully. Check the new size of the virtual disk:
ls -alAs you see in the output, the size of the virtual disk has been increased.

Extending a Linux partition with the Disks utility
New versions of Ubuntu have a built-in Disks utility with a user-friendly graphical user interface (GUI), which supports changing disk partition size with a few clicks:
- Power on the virtual machine after extending your virtual disk, and boot Ubuntu Linux that is installed on the virtual machine.
- Click Dash > Utility > Disks, or type Disks in the Dash menu. Choose the appropriate item once the Disks utility icon is found and displayed.
After resizing a virtual disk, Linux partitions are not extended automatically, and you see the unallocated (unpartitioned) space on the disk. In our example, we installed Ubuntu by using the default partitioning scheme, where we have one big / (root) partition on a disk.

- Let’s expand the / (root) partition on the virtual disk on which Ubuntu is installed directly from this installed instance of Ubuntu in the Disks utility. Select the first partition that is mounted to the / directory in Linux, click the settings icon, and in the context menu, click Resize.
If you have multiple partitions, you can change the size of those partitions in the Disks utility.

- In the Resize Volume window, enter new parameters, such as partition size, free space following, or difference. As an alternative, move the slider from the current size to the desired size. Then click the Resize button.

- Enter your password for modifying partition settings and changing disk partition size.
Now, the partition is extended on the virtual disk whose size has been increased.

If you use Linux other than Ubuntu, and your Linux version doesn’t have the Disks utility to adjust disk partition size, use parted which is available on all Linux distributions.
Using parted to extend Linux partitions
Parted is a command-line utility to manage disk partitions in Linux. Parted is pre-installed in Ubuntu. However, if this utility is not installed on your Linux, install this utility manually from software repositories (with root permissions).
- On Debian and Ubuntu systems:
sudo apt-get install parted - On RHEL (Red Hat Enterprise Linux), CentOS, and Fedora:
yum install parted - On Fedora 22+ versions:
dnf install parted - On OpenSUSE:
zypper install parted
Unmounting partitions
Perform the following steps to adjust disk partition size in Linux:
- Unmount partitions before doing operations with partitions in Parted. Operations with unmounted partitions can harm the data on the disk. Use the umount command to unmount a partition, for example:
umount /dev/sdb1 - Check whether a partition is mounted with one of these commands:
mountdf -hcat /proc/mounts
Preparing to extend a system partition
If you need to resize a system partition that is used by the installed operating system, boot from a live CD/DVD/USB flash drive because you cannot unmount the partition that is in use by the operating system. You can use the Ubuntu installation media for this purpose. This workflow applies to VMs on ESXi hosts and machines with VMware Workstation.
- Select the ISO file of the Ubuntu installation media in the configuration of a virtual CD/DVD drive of the VM.
- In the following screenshot, see the VM settings with CD/DVD drive configuration of a VM in VMware vSphere Client.

- Start the virtual machine.
- Click the VM screen, and press F2 once the VM is powered on to enter the virtual BIOS of the VM. Do it promptly because you only have about one second to press F2.
NOTE: When you select the installation disk, the virtual CD/DVD ROM is selected as the first boot device inside the VM. After finishing the installation of the guest OS, the virtual hard disk drive on which the guest OS is installed is automatically set as the first boot device of the VM. If you want to boot from a virtual CD/DVD drive, select the appropriate first boot device in the BIOS settings of the VM.

- Select the Boot tab in BIOS. Select a boot device, and press + and – to edit the order of boot devices. Select the CD/DVD drive of a VM as the first boot device. Save changes and exit (go to the Exit tab).

- Boot from the Ubuntu live installation media and select the Try Ubuntu option.
Changing disk partition size
Be aware that once you run a command in Parted, changes are written to the disk immediately. Confirmation questions appear when you run commands to make changes with disk partitions.
- Open the terminal, and run Parted with root permissions:
sudo parted - /dev/sda is the disk that opens by default. As our Ubuntu VM has only one virtual disk, opening /dev/sda is the right option.
- To select another disk such as /dev/sdb, use the command:
select /dev/sdbIn this way, you can select /dev/sdb for operations with partitions on that drive. We use /dev/sda in this example.
- List all existing Linux partitions on the selected disk.
printRemember the number of the needed partition (1 in our case).

- You can list all partitions on all connected disks:
print all - Check free (unpartitioned) disk space on the selected disk:
print freeOur unused disk space is between 21.5 GB and 32.2 GB because we increased the disk size, but the disk partition was not increased automatically.

Let’s fix this situation and extend the existing disk partition.
- Enter the command in parted to resize the partition:
resizepart - Enter the number of the needed partition whose size you want to increase. My partition on /dev/sda has the number 1 in this example.
Partition number? 1
- Enter the end size for the partition (in our case, the partition starts at 1049 KB and must end at 32.2 GB). If you don’t enter units, megabytes is used by default.
End? 32.2GB
- Warning: Shrinking a partition can cause data loss, are you sure you want to continue?
Yes/No? y
Changes should now be written to the disk.
- Verify that changes have been written to the disk.
print
The size of the partition has been increased successfully.
Using GParted on Live CD
GParted is an alternative edition of parted with the GUI. This utility is free, just like parted. If you boot from a Live CD with GParted, you can resize partitions on different Linux distributions, including Linux distributions without a disk partitioning utility that resizes partitions on the fly. You can also resize partitions on which Linux is installed when it is not possible to resize these partitions from the OS because the OS mounts and uses them for regular operation.
- Download the ISO bootable image from the official website.
- Insert the bootable ISO image of GParted into a virtual CD/DVD drive of a virtual machine whose disk you are resizing.
- Boot from this ISO image (we explained how to boot from the ISO image in the previous section).
- In the boot menu, select GParted Live (Default settings), and press Enter.

Then you have to select some options.
- Configuring console data
You can leave the default value (Don’t touch keymap), and hit OK to continue.
- Which language do you prefer?
Select your language. I select 33 (US English). Press Enter to keep the default value and continue, or type the needed option number, then press Enter.
- Which mode do you prefer?
Select 0 (Continue to start X to use GParted automatically).

- Now you see the GUI of GParted. The interface of GParted is user-friendly. Select the needed disk in the top right corner (/dev/sda in our case). Partitions of the selected disk are displayed with information about them.

- Select the needed partition, click Partition > Resize/Move (or right-click the needed partition to open this menu). The partition we want to resize (expand) is /dev/sda1. We have 10 GB of unallocated disk space after increasing the size of the virtual disk from 20 GB to 30 GB.

- In the opened window, enter a new disk size in megabytes or use the mouse to adjust disk partition size. Click Resize/Move after you set the correct new configuration.

- Click Edit > Apply All Operations to apply the changes. In GParted changes are not written to the disk immediately. You must apply configuration changes to write them.

- Now the partition size is increased to the maximum possible size on the expanded virtual disk of the VMware VM. Shut down the VM, eject the ISO image with GParted, start your VM, and boot from the virtual hard disk drive that you have expanded and that contains the partition whose size was increased.
- You can check the size of partitions after booting your Linux with the df -h command. In the following screenshot, see the /dev/sda1 partition size before resizing and after resizing.

Using LVM
If your Linux installed on a VM uses LVM to manage disk volumes, you have at least two options for disk management if you want to increase the size of a virtual disk:
- Increase the size of an existing virtual disk. Create a new partition (a partition type must be Linux LVM with the ID of 8e) on an extended disk, add this partition to an existing volume group, and extend the logical volume with the new partition. If MBR is used, the maximum number of primary partitions is four.
- Add a new virtual disk, create a partition on the new virtual disk, add this partition to an existing volume group, and expand the volume group by using a new LVM partition on a new virtual disk.
Using VMware vCenter Converter
One more way to extend partitions and adjust disk partition size on VMware VMs with Linux installed as a guest operating system is using VMware vCenter Converter Standalone, which is a free tool. There are some prerequisites:
- The converter must be installed on a Windows machine.
- There must be a network connection between the converter components, the Linux VM, and the ESXi host or vCenter Server.
- SSH access must be configured on a Linux virtual machine.
Perform the following steps to extend partitions on a Linux VM with the VMware converter:
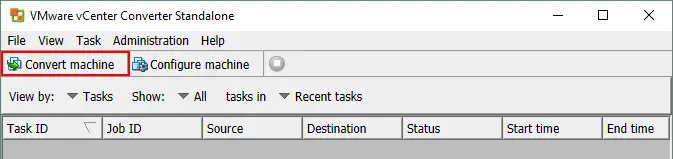
- Start VMware Converter Standalone on a Windows machine and click Convert machine. You can use any machine connected to the source Linux VM and an ESXi host where the VM must be placed.
- In the Source System step of the wizard, select Powered on as the source type and select Remote Linux machine in the drop-down menu. When using a VMware converter to extend partitions on a Linux VM, the converter connects to the guest OS of this VM, similarly as when connecting to any other physical Linux machine.
- Enter the user name and password used on the Linux machine. This user must have permissions for remote access to the Linux machine via SSH and use sudo on that Linux machine. You can view source details and hit Next to continue.
Sometimes, errors can occur when connecting to a remote Linux machine in a VMware converter. In the section below, you can find the most common errors and their solutions.

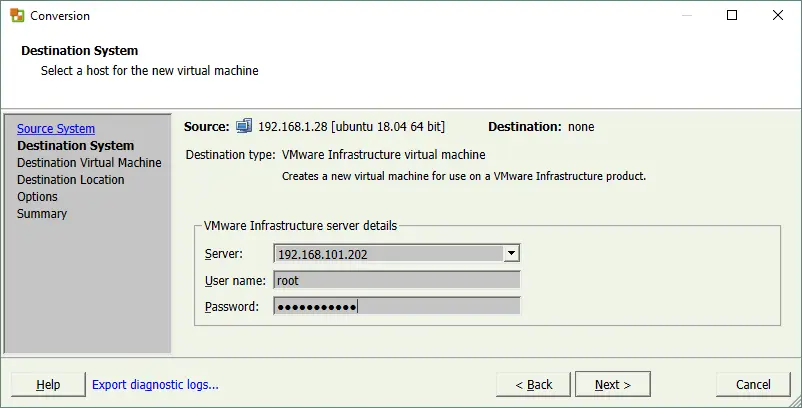
- Select the destination system that can be the same ESXi host when the source Linux VM is located. Alternatively, you can select another ESXi host to store a VM with extended virtual disks and partitions after converting. Enter the IP address or hostname of an ESXi host and its root credentials. You can also use vCenter administrative credentials.
- Enter a name for the destination VM, for example, Linux03. In the section below, you can see VMs residing on the selected ESXi host.

- Select the destination location for the converted VM. Select an ESXi host, select a datastore connected to this host, and define the VM hardware version.

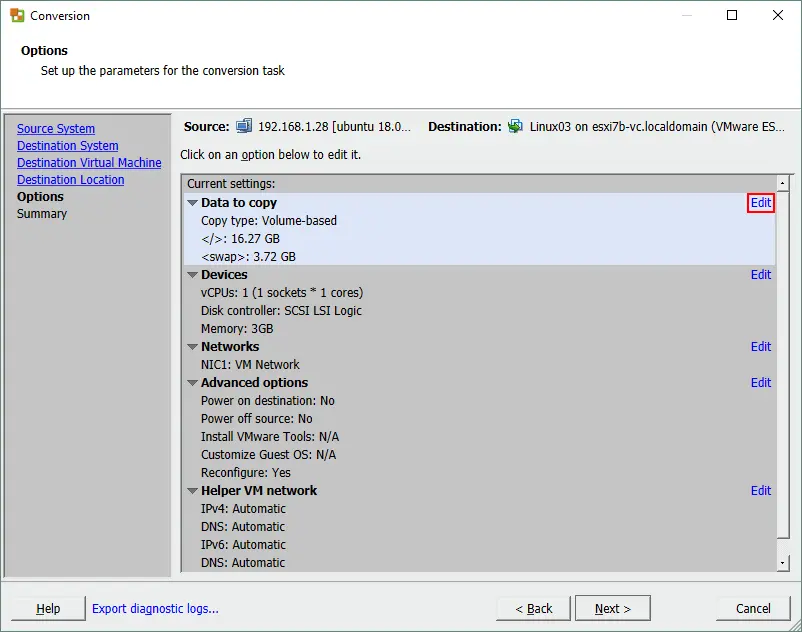
- Configure options and set up the parameters for the conversion task. Click Edit in the Data to Copy section. This section contains settings to adjust disk partition size.
- Make sure that Select volumes to copy is selected in the drop-down menu. Below you can see virtual disks and partitions for the current VM with their current size. Click Advanced to open the view for changing disk partition size.
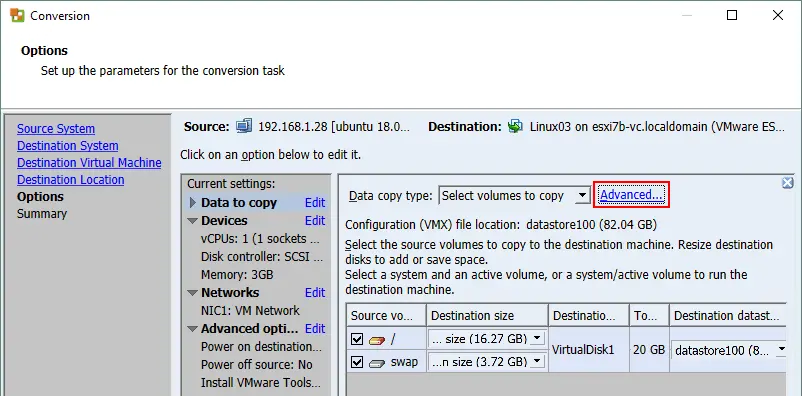
- Select the Destination layout tab once the Advanced view has been selected. Select thin or thick provisioning virtual disk type.

- Click the drop-down menu for the needed partition and click <Type size in GB>. Enter the new partition size. The virtual disk size will be increased automatically after you extend partitions.

- Click Edit in the Advanced options and deselect the Reconfigure destination virtual machine checkbox. As we convert Linux that has already been installed on a VMware VM, there is no need to reconfigure the VM. You need to reconfigure a VM when converting a physical Linux machine to a virtual machine to adjust system settings for the virtual devices of the converted VM.

- Read the summary and review the conversion parameters. Click Finish to start the conversion process.

- Wait until the VM conversion process is finished.
- Start a converted VM and check whether changing disk partition size was done successfully. In case of a successful result, configure security SSH and sudo settings back to the state as they were before conversion. You can delete the source VM.
Common errors when using VMware vCenter Converter
Sometimes, errors can occur when connecting to a remote Linux machine in a VMware converter.
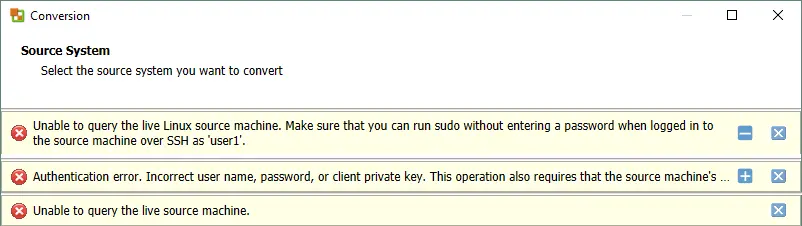
Error 1
Unable to query the live Linux source machine. Make sure that you can run sudo without entering a password when logged in to the source machine over SSH as ‘user1’.
Solution:
- Edit the sudo configuration in the /etc/sudoers file:
sudo vim /etc/sudoersor
visudo - Add the following line to allow user1 to use sudo without entering a password. Use your user name instead of user1.
user1 ALL=(ALL) NOPASSWD:ALL
- Save changes to the file.
Error 2
Authentication error. Incorrect user name, password, or client private key. This operation also requires that the source machine’s SSH daemon configuration allows remote root login.
Solution:
- To resolve this issue, edit the SSH server configuration file and allow root login via SSH. Use vim or another text editor.
sudo vim /etc/ssh/sshd_config - Edit (add or uncomment) the PermitRootLogin line and set yes:
PermitRootLogin yes
- Save changes to the file (press Esc, type :wq and press Enter in vim) and exit.
- Restart the sshd daemon (service):
sudo service sshd restart
Don’t forget to revert the changes of these configuration files (/etc/ssh/sshd_config and /etc/sudoers) after finishing converting and expanding partitions on the Linux VM for security reasons.
The errors described above might occur for the following reasons:
Reason 1
The directories are mounted multiple times as mount points.
Solution:
Multi-mounted directories (mounted more than one time) can cause issues. Unmount the redundant mount points to fix this problem.
Reason 2
This issue can occur if the default partition layout was used when installing Linux.
Solution:
Try using manual partitioning when installing Linux if you plan to use the VMware converter for that Linux machine.
Reason 3
Misconfiguration of VMware vCenter Converter.
Solution:
- Check the xml configuration files of the VMware Converter installed on your Windows machine:
%ALLUSERSPROFILE%\Application Data\VMware\VMware vCenter Converter Standalone\
- If you edited agent, server, or worker xml files, restart the appropriate services in Windows to activate the configuration changes.
Conclusion
You can use parted in most Linux distributions, the Disks utility is available in modern Ubuntu distributions. If you need to extend partitions that are used by the installed Linux operating system, boot from Live CD with GParted, which is the universal tool for changing disk partition size. VMware vCenter Converter can be also helpful in some cases for Linux VMs.
Before performing operations with virtual disks of virtual machines and disk partitions, it is recommended that you back up these virtual machines to avoid data loss. NAKIVO Backup & Replication is a universal data protection solution that supports VMware vSphere VM backup.