How to Replicate, Restore, and Fail over Using Hyper-V Nested Virtualization on Azure
Disaster recovery presumes the presence of at least one secondary site that is referred to as a disaster recovery site. A remote datacenter can be considered as a disaster recovery site (DR site). However, a hot DR site comes with its own high costs. What should you do if you don’t have a remote datacenter as the DR site, but you might need to recover your environment in a very short time?
At present, you can use cloud environments from the top vendors as a disaster recovery site, store backups and VM replicas there, and run your virtual machines (VMs) in the cloud if disaster strikes. You are required to have VM replicas if you want to perform VM failover in a short period of time, and migrate workloads of the primary site to the DR site in case of failure. Hyper-V virtual machines is not an exception.
This blog post explains how to failover Hyper-V VMs to Azure by using NAKIVO Backup & Replication.

About Azure and Hyper-V
Hyper-V is a type of hypervisor that was developed by Microsoft for running virtual machines. A Hyper-V role can be deployed only on Windows machines and is positioned as an alternative to VMware and VirtualBox hardware virtualization solutions. There is also a standalone edition of Hyper-V Server.
Azure is a public cloud created by Microsoft. Azure provides diverse services such as Azure virtual machines, Azure Active Directory, container services, databases, storage services, web services, etc. Microsoft uses the Hyper-V virtualization platform to run Azure virtual machines in Azure Cloud. Azure VMs inherited a lot of features from Hyper-V VMs such as virtual hardware, virtual disk format, etc.
However, Hyper-V virtual machines and Azure virtual machines have differences when it comes to their VM format. Azure VMs have specific VM sizes that can be considered as presets providing the appropriate performance (processor, memory, storage, input/output values). The maximum size of a virtual disk that can be attached to an Azure VM is 1 TB. Only virtual disks of the VHD format are supported by Azure VMs and only Generation 1 VMs can be deployed in Azure.
How to Replicate a Hyper-V VM to Azure
Due to the differences between Hyper-V VMs and Azure VMs, you cannot simply replicate a Hyper-V VM to Azure and then run the Azure virtual machine as the VM replica. Fortunately, there is a solution that allows you to resolve this issue. Microsoft presented the new Hyper-V Nested Virtualization feature with the release of Windows Server 2016 that can help in this situation. Using the Azure nested virtualization capability allows you to run a VM inside a VM – a Windows Server virtual machine can be deployed in Azure and run nested VMs of the Hyper-V format. This environment allows you to replicate your local Hyper-V VMs to Azure.
The algorithm of Hyper-V VM failover to Azure is the following:
- Deploy an Azure VM running Windows Server 2016 or Windows Server 2019 in Azure Cloud.
- Install the Hyper-V role on that Windows Server VM running in Azure.
- Configure network for your nested VM running on the virtual Hyper-V host in Azure.
- Replicate a VM from your physical (on premise) Hyper-V host to a virtual Hyper-V host running as a VM in Azure.
- Fail over to a nested VM replica running on a Hyper-V host in Azure in case of disaster.
Today’s blog post explains how to create a Hyper-V replica in Azure and how to perform failover to that nested VM of the Hyper-V format residing in Azure . Hopefully, the detailed step-by-step walk-through with screenshots will help you better understand the workflow.
Demonstration Environment
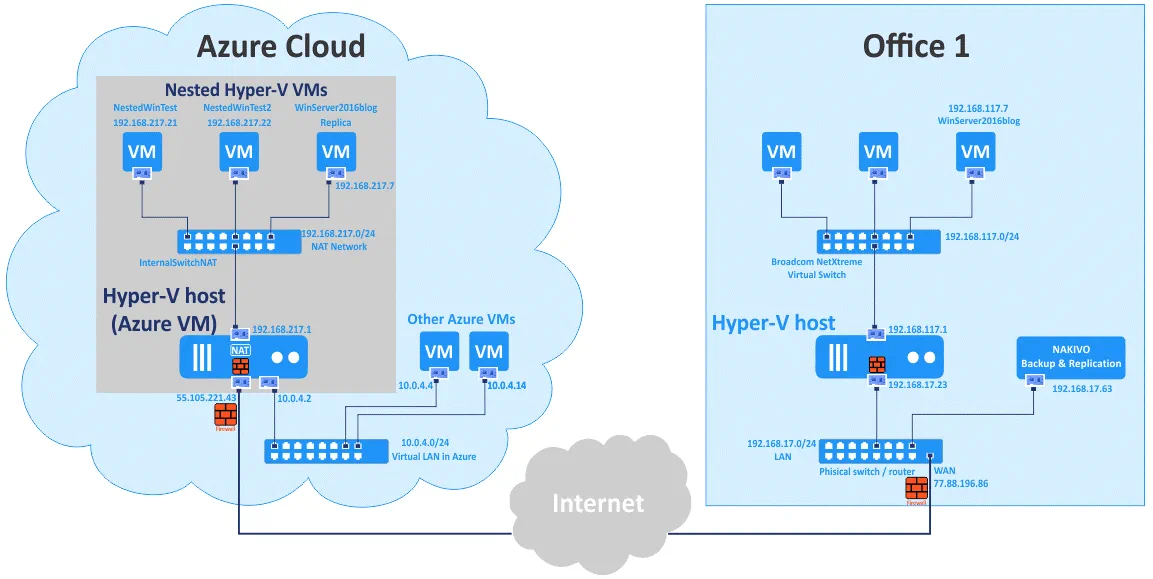
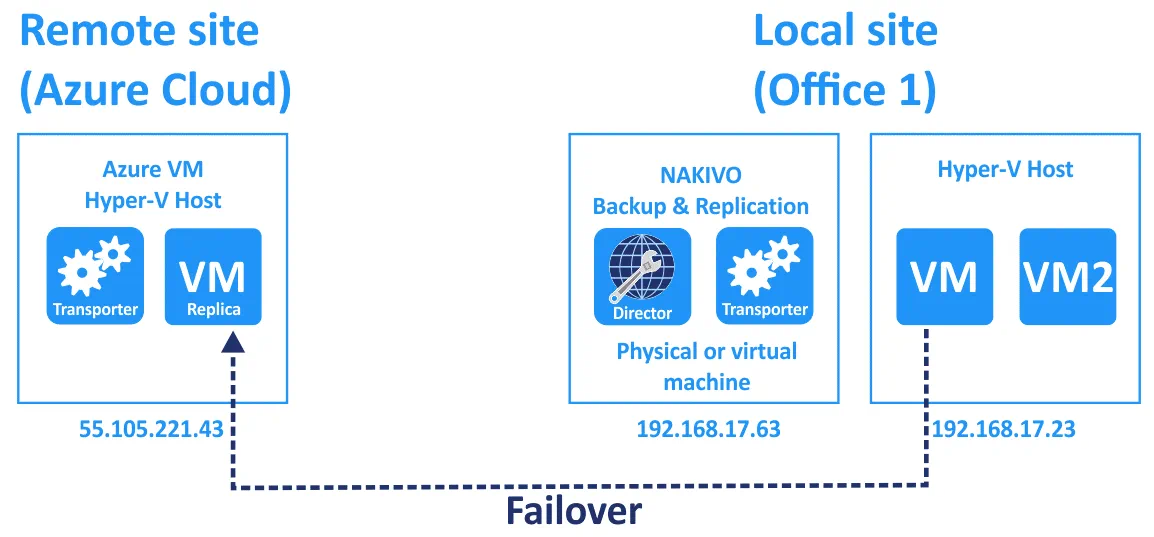
In the example shown in this blog post, there is one local site (a datacenter in Office 1) and one disaster recovery site (the virtual Hyper-V environment deployed in Azure Cloud).
The environment of Office 1
- One physical router with a built in switch. A firewall is present on this router. The WAN IP address of this router is 77.88.196.86 and the LAN IP address is 192.168.17.1. The address of the LAN (local area network) is 192.168.17.0/24.
- A machine (physical or virtual) with NAKIVO Backup & Replication installed (a full solution that consists of the Director and Transporter). The IP address is 192.168.17.63.
- A Hyper-V host running on a physical server. The IP address is 192.168.17.23. The Hyper-V host and machine running NAKIVO Backup & Replication are connected to the same network (192.168.17.0/24). This Hyper-V host is added to the Inventory of NAKIVO Backup & Replication and is protected.
- The Hyper-V host has a virtual network adapter that is connected to a virtual switch (192.168.117.0/24). The IP address of this virtual network adapter on the Hyper-V server is 192.168.117.1.
- VMs running on the Hyper-V host (192.168.17.23) are connected to the virtual switch and are connected to the network (192.168.117.0/24). The Hyper-V VM called WinServer2016blog is running on this Hyper-V host and will be replicated to Azure. As you can see, Windows Server 2016 is installed on this VM.
Azure Cloud environment
- There is the Azure VM running Windows Server 2016. A Hyper-V role is enabled on this machine. The external IP address of this Hyper-V server running in Azure is 55.105.221.43. This IP address is used for connecting to the Hyper-V host from Internet. The Azure firewall is configured to allow only connections from external IP addresses of Office 1. There is also Windows Firewall on Windows Server 2016 running Hyper-V in Azure and this firewall is configured similarly while allowing connections from a Hyper-V host to nested VMs and inversely.
- A virtual switch on the Hyper-V host is configured for connecting nested VMs to the network behind the virtual NAT device. The name of this network is NAT Network and the name of the virtual switch is InternalSwitchNAT. The IP address of the virtual NAT device connected to this virtual switch is 192.168.217.1, and the network address is 192.168.217.0/24.
- Nested VMs are connected to the NAT network (192.168.217.0/24) and can access the internet. Two test VMs are created on the Hyper-V host in Azure and then a replica of the WinServer2016blog VM running on the Hyper-V host in the Office 1 is created on the Hyper-V host running in Azure Cloud.
- The Windows Server 2016 VM running Hyper-V in Azure is also connected to a virtual local area network used for connecting Azure VMs with each other. The address of this network is 10.0.4.0/24.
- Internet connection is needed for connecting from Office 1 to Azure including the Hyper-V environment deployed in Azure Cloud.
You can see all mentioned elements on the scheme below.
The Workflow of Failover to a Nested Hyper-V VM in Azure
Let’s take a look at how to configure your environment including a local environment in Office 1 and remote environment in Azure Cloud according to the scheme revealed above. It is presumed that a Hyper-V server is already installed and configured in your primary datacenter (Office 1), NAKIVO Backup & Replication is also installed on a physical or virtual machine, and at least one Hyper-V VM is running on the primary datacenter (Office 1). In our example, the name of the original Hyper-V VM is WinServer2016blog.
Creating a new Azure VM
Create a VM running Windows Server 2016 in Azure. This VM will be used to install the Hyper-V server and run nested Hyper-V VMs. Open your web browser and go to the Microsoft Azure web site. Sign into Microsoft Azure by using your account. You should have the appropriate subscription to use Azure Cloud services. On the https://portal.azure.com/ page, select Virtual machines in the web interface.
")
On the Virtual machines page (Home > Virtual Machine), click Add to create a virtual machine.
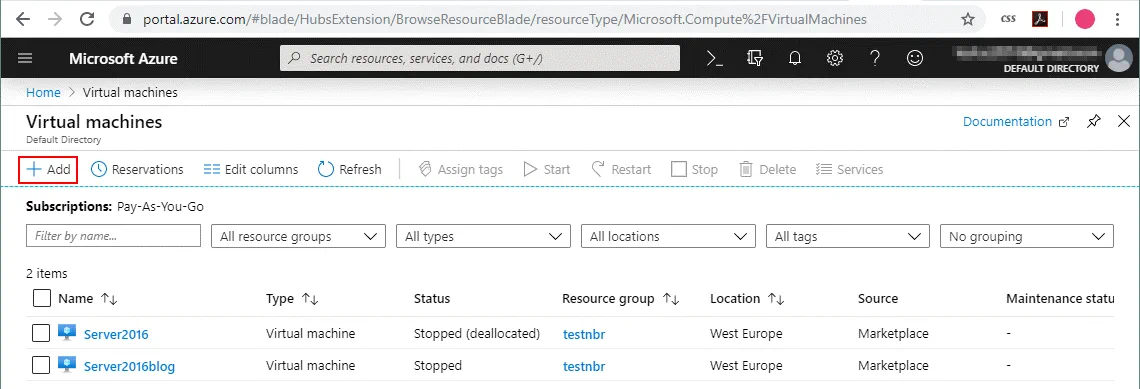
The VM creation page contains a multiple tabs and each tab contains a couple of sections.
Basics
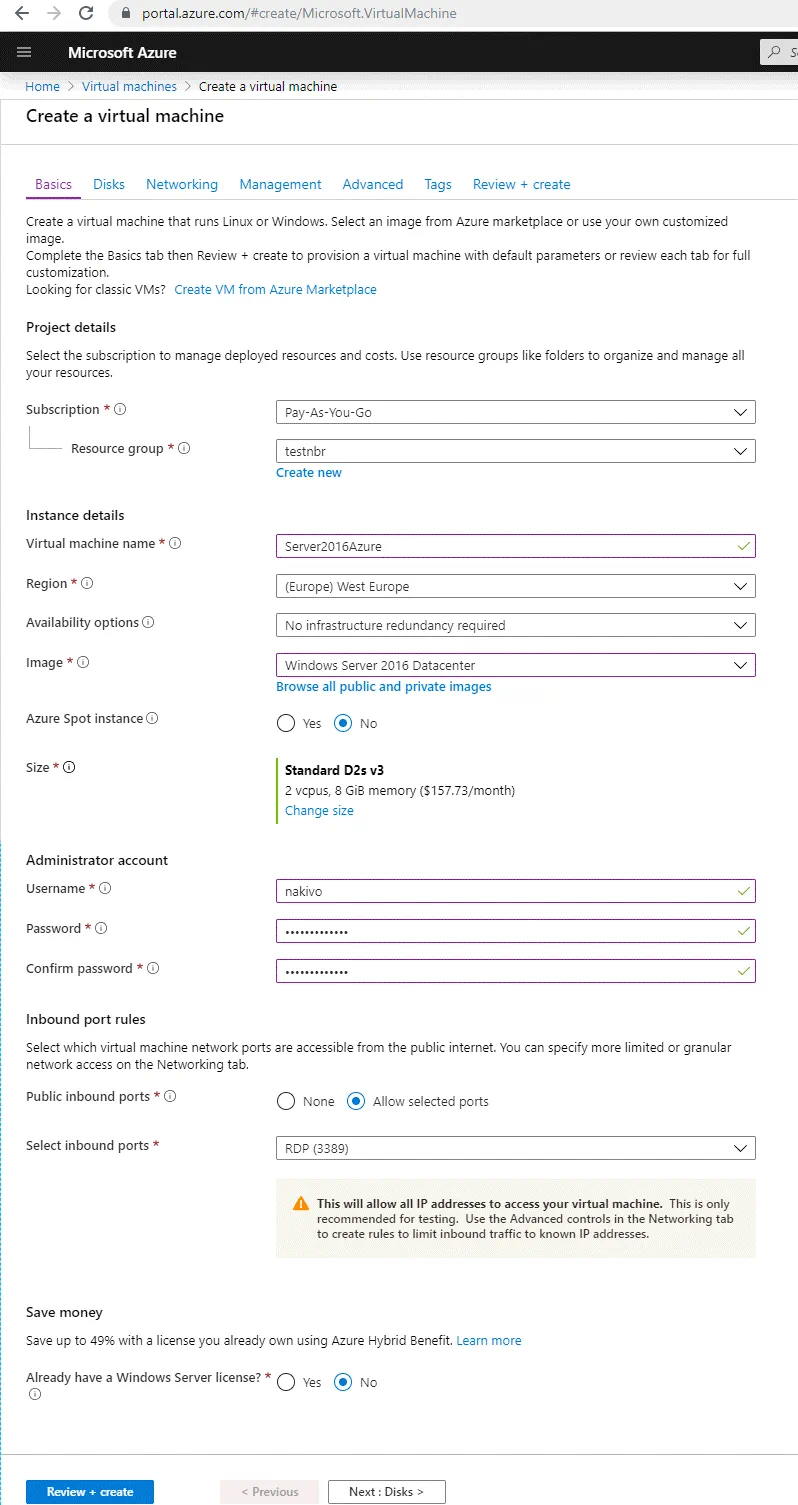
On the Basics tab of the wizard set the following parameters:
Project details
Subscription: Pay-As-You-Go (select the subscription that is available for you).
Resource group. Select your existing resource group or create a new resource group. In this example, testnbr is the name of the resource group.
Instance details
Virtual machine name: Server2016Azure.
Region: (Europe) West Europe. Select the necessary region (for example, a region that is the nearest to your region).
Availability options: No infrastructure redundancy required (you can leave this default option).
Image: Windows Server 2016 Datacenter (Windows Server 2016 is preferred because supports more Hyper-V features than Windows Server 2012 R2 Datacenter).
Azure Spot instance: No.
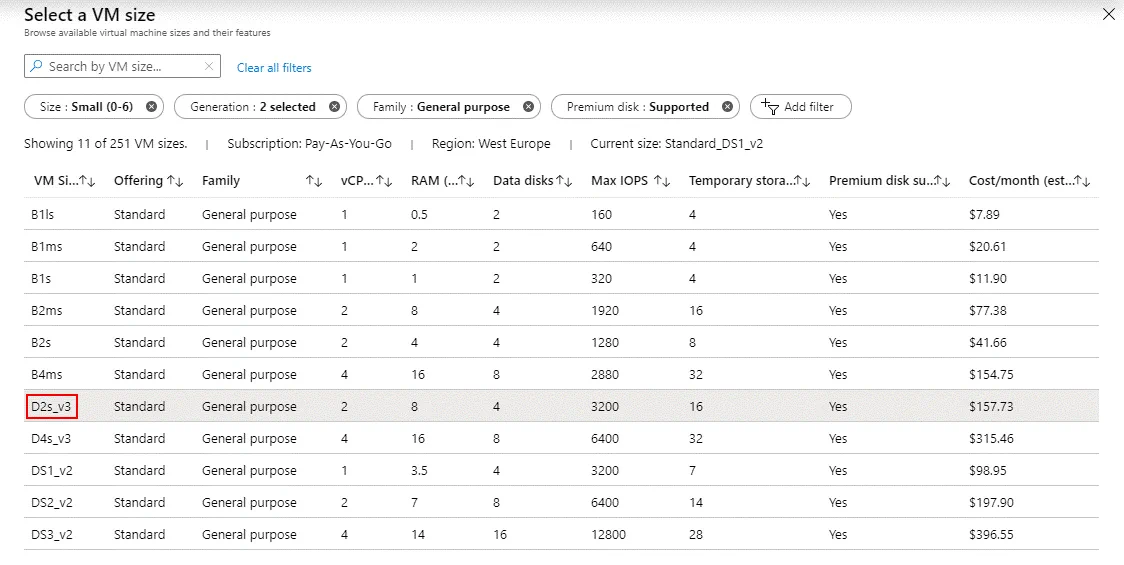
Size: D2s_v3 is used in this example. You can select another VM size that supports running Hyper-V Server. All v3 series of Azure VMs support nested virtualization. Keep in mind that VM performance must be sufficient to run all necessary Hyper-V VMs after failover to the Hyper-V host running in Azure.
Administrator account
Username: nakivo (you can enter your custom user name)
Password: ************* (set a strong password)
Confirm password: *************
Inbound port rules
You can select inbound ports which must be opened in order to access the Azure virtual machine from the public Internet. Let’s leave the RDP port opened when managing this VM remotely. RDP uses port TCP 3389 for inbound connections. When you finish configuring the VM, you can disable network access via RDP (Remote Desktop Protocol). Later, you can configure the firewall in Azure more granularly and allow inbound connections to custom ports from custom IP addresses or networks.
Public inbound ports: Allow selected ports
Select inbound ports: RDP (3389)
Save money
Select whether or not you already have a Windows Server license, as this can help to reduce costs.
No is selected by default.
You can see these settings on the screenshot below.
When you select a VM size, you can see the name of the VM, the number of virtual processors (vCPUs), the amount of memory (RAM), maximum IOPS value (input/output operations per second), the size of temporary storage, premium disk support and cost per month.
Click Next when you are ready to continue and switch to the next step of the wizard.
Disks
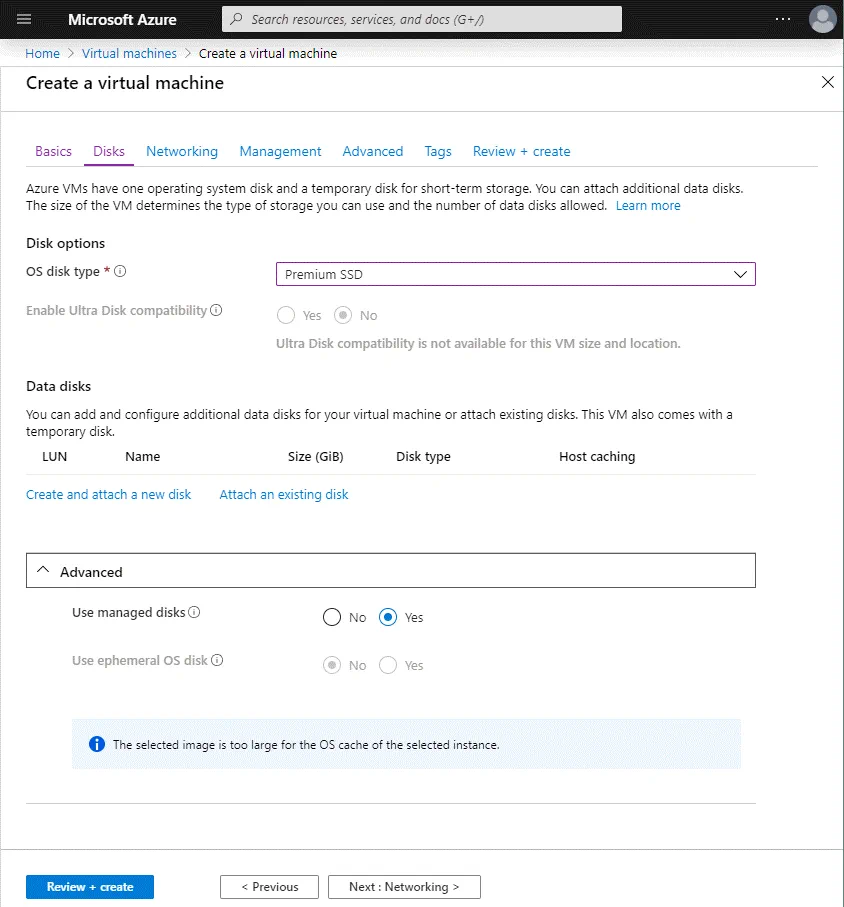
On this tab, you should select the configuration of the virtual disk that you wish to create.
Disk options
OS disk type: Premium SSD. The VM size selected previously supports premium SSD disks, and you can leave this option as it is most practical. Other available options are Standard HDD and Standard SSD.
You can create additional disks for an Azure virtual machine when the VM is created, even if the VM is currently running.
Hit Next to configure networking.
Networking
On the Networking tab, you should select the following parameters.
Network interface
Virtual network: Select an existing virtual network or create a new one. In this example, testnbr-vnet is the name of the virtual network.
Subnet: default (10.0.4.0/24). Select the subnet that will be used to communicate Azure virtual machines with each other in the virtual LAN (local area network) in Azure Cloud. You can create a new subnet.
Public IP: You can leave the default value.
NIC network security group: Basic
Public inbound ports: Allow selected ports
Select inbound ports: RDP (3389). This is the setting you saw on the first screen of the VM creation wizard.
Accelerated networking: Off
Load balancing
Place this virtual machine behind an existing load balancing solution: No
")
Now you can go to configure management settings.
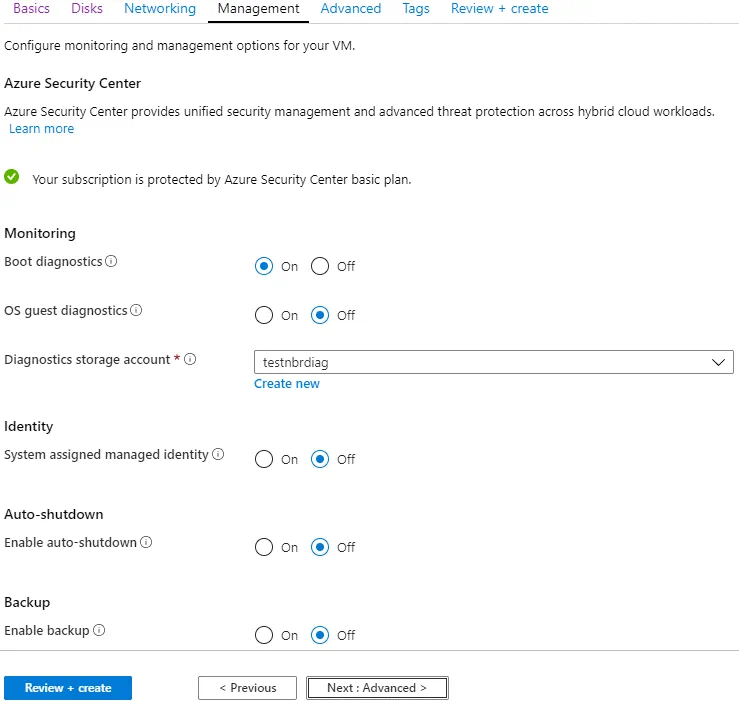
Management
In this tab, you can configure monitoring and management options for your Azure virtual machine. You can leave the default management parameters and create a diagnostic storage account if the account has not yet been created. If you are unsure as to what options to configure in this tab, leave the default parameters.
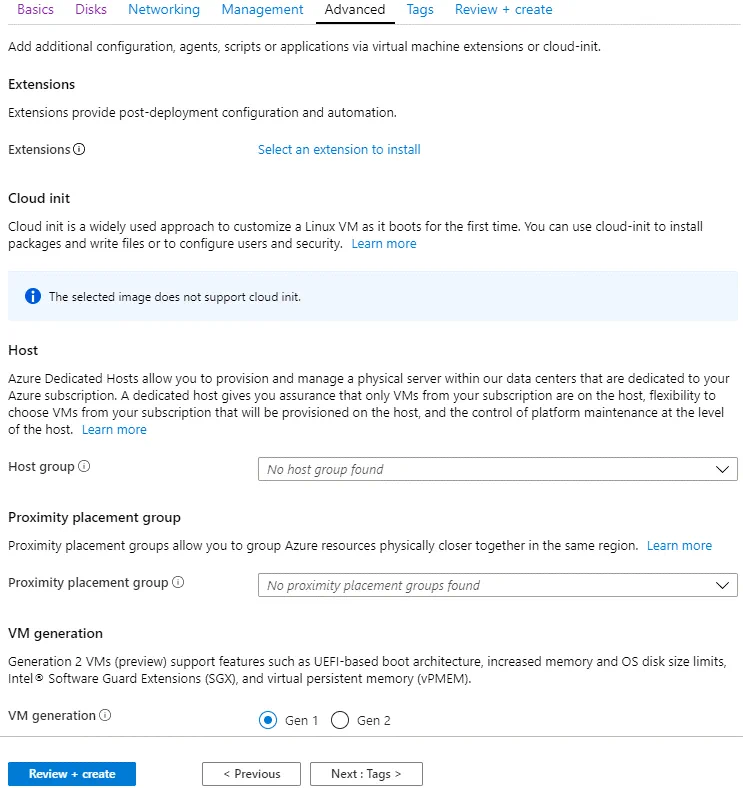
Advanced
On this tab, you can leave the default settings and select the generation of the virtual machine (Generation 1 or Generation 2). In the current example, a Generation 1 VM is being created.
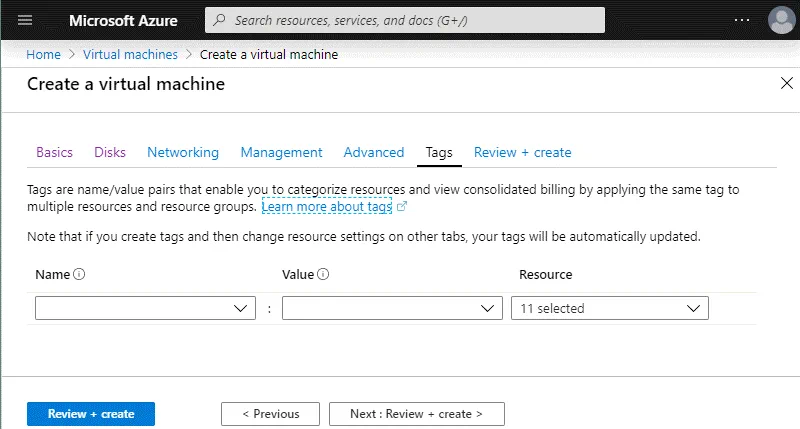
Tags
You can add custom tags if need be.
Now you can click Review + create to check the configuration of the new VM.
Validation passed means that everything is OK and you can create a new VM.
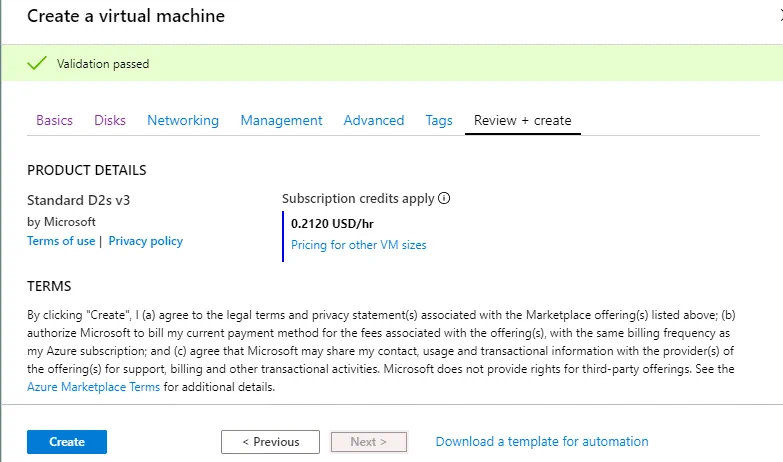
If you need to deploy similar identical new Azure VMs, you can download a template for automation.
Finally, click the blue Create button to start the process of virtual machine creation.
Wait until the VM has been created.
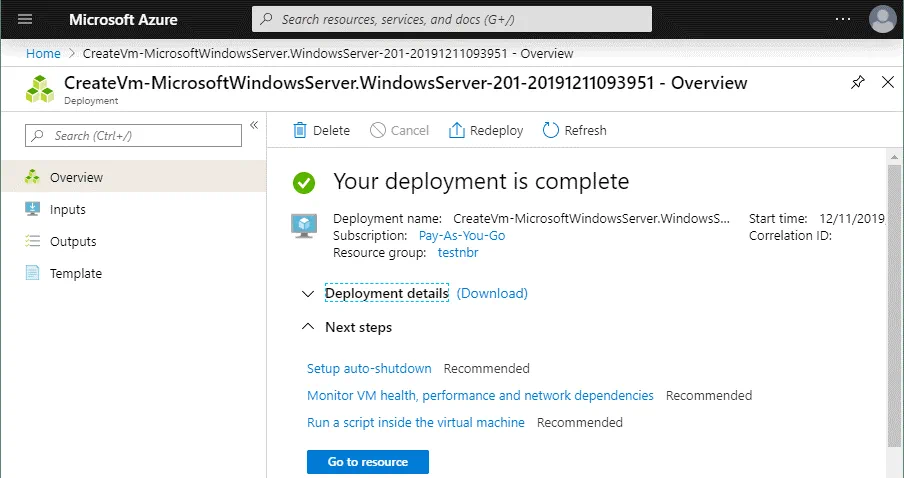
When a VM is deployed successfully, you will see the following screen.
Installing the Hyper-V Server Role
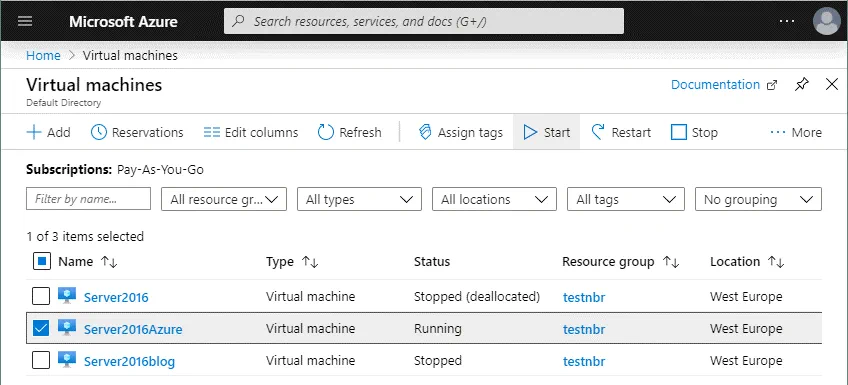
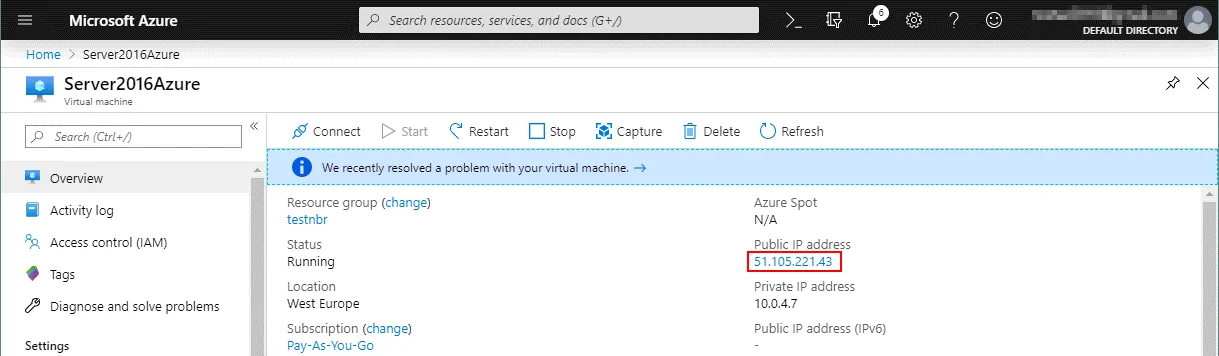
Once you have deployed a new Azure VM running Windows Server 2016, you can install the Hyper-V role. The VM you have created in Azure should start automatically after creation. You can also start the VM manually whenever you want. In order to start a VM in the Azure web interface, go to Home > Virtual machines, select the VM you have deployed (tick the checkbox) and click Start.
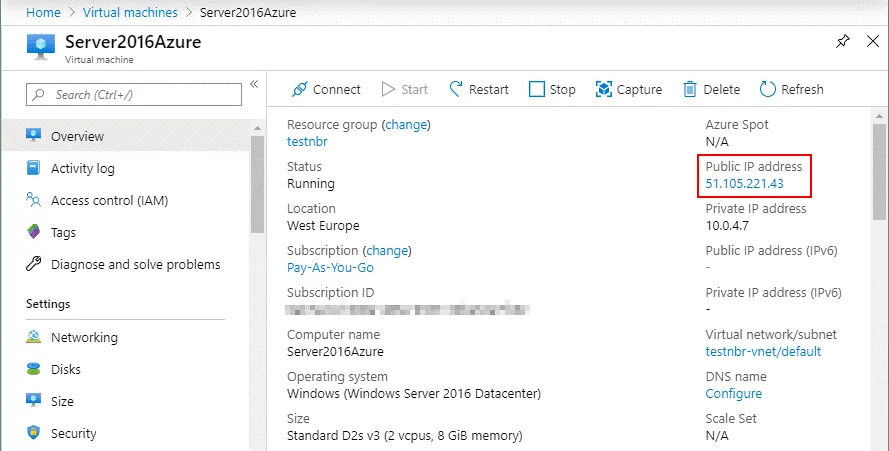
Click the VM to see the options menu and VM information. Find the external IP address for this VM. Use this IP address to connect to the Windows Server 2016 VM running in Azure via Remote Desktop. In this example, the external IP address of the Azure VM is 51.105.221.43.
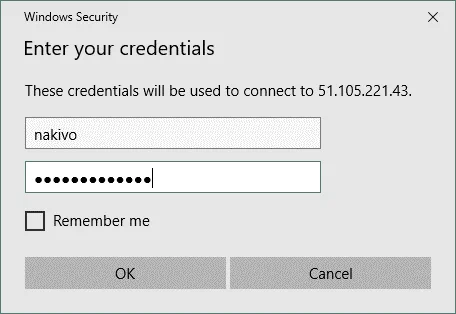
On your local Windows machine, open the Remote Desktop client and connect to Windows Server 2016 running in Azure. You can find the appropriate shortcut in the Windows Start menu (Start > Windows Accessories > Remote Desktop Connection) or open CMD and run the command:
mstsc -v: 51.105.221.43
Enter the administrative credentials for Windows that you set during the process of the Azure VM creation.
Click Yes if the pop-up confirmation window appears.
Preparing to Hyper-V installation
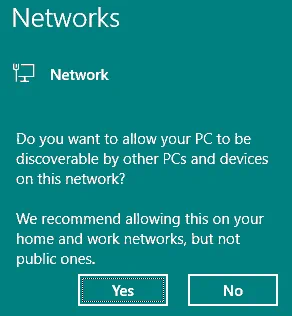
After establishing the remote desktop session and connecting to the remote Windows Server 2016 VM running in Azure, you should see a blue pop-up window in the right side of the screen. This screen appears when the network adapter is connected to the network for the first time. You should see the question on this blue window:
Do you want to allow your PC to be discovered by other PCs and devices o this network?
Click Yes.
After that, ensure that your network adapter uses the Private network profile. Alternatively, you can change the profile prom Public to Private manually.
The default network adapter name is Ethernet.
You can change the network profile to Private in PowerShell:
$Profile = Get-NetConnectionProfile -InterfaceAlias Ethernet
$Profile.NetworkCategory = “Private”
Set-NetConnectionProfile -InputObject $Profile

Open the Networks and Sharing center. Right click the network icon in the taskbar (near the clock) and select Open Network and Sharing Center. In the opened Network and Sharing Center window, you can check the network profile (must be Private network). Hit Change adapter settings in the Control Panel Home section of the window.
")
In the Advanced sharing settings window, select the Private profile (that must be the current profile) and turn on network discovery, then turn on file and printer sharing (see the screenshot below).
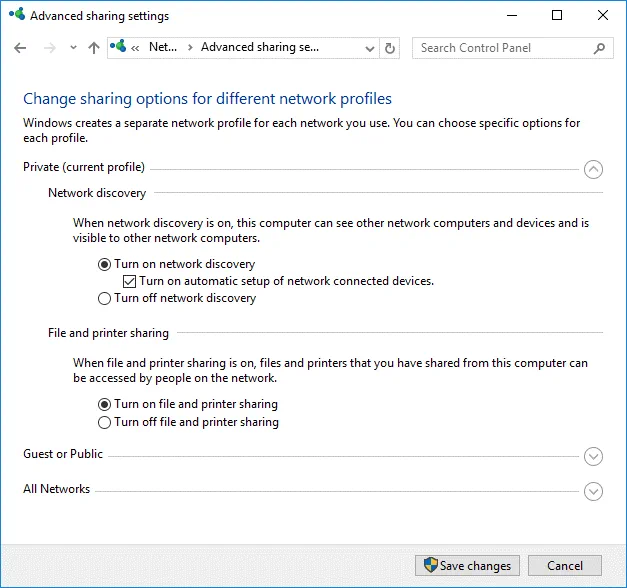
Hit Save Changes and close the window.
Installing Hyper-V
Run PowerShell as an administrator and run the command to install the Hyper-V role on your Windows Server 2016 in Azure.
Install-WindowsFeature -Name Hyper-V -IncludeManagementTools -Restart

The Azure VM running Windows Server 2016 will automatically reboot to finish Hyper-V installation. The remote desktop session will be disconnected. Connect to your Azure VM after the machine reboot manually by using the Remote Desktop client.
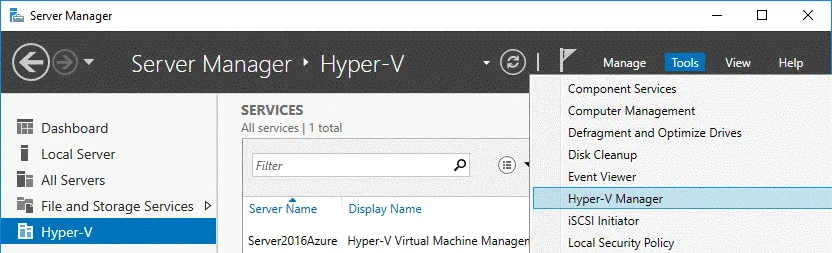
Once you have connected to the Windows Server 2016 VM running in Azure via RDP, configure the Hyper-V Server. In the Server Manager window that is opened automatically when Windows Server 2016 is booted, you can see the Hyper-V option. In order to open Hyper-V Manager, go to Tools > Hyper-V Manager. As you can see on the screenshot, the host name is equal to the Azure VM name you defined during the virtual machine creation.
Preparing a Hyper-V Virtual Network
There are no virtual switches created in Hyper-V by default, so you should create and configure a new virtual switch manually.
In the Hyper-V Manager, you can right click your Hyper-V Server name and in the context menu, select Virtual Switch Manager. In the graphical user interface of the Virtual Switch Manager, you can create a virtual switch of three types: External, Internal, and Private.
Read the blog post about Hyper-V virtual switches and create one of the three mentioned virtual switches whose configuration fits your needs. However, you should be aware that creating the NAT network is possible only in the command line interface of PowerShell.
The NAT virtual switch and the network behind the NAT will be created in this blog post to make nested Hyper-V VMs that are running in their own isolated network but have access to the internet and Hyper-V host. The Hyper-V host will be able to connect to nested Hyper-V VMs.
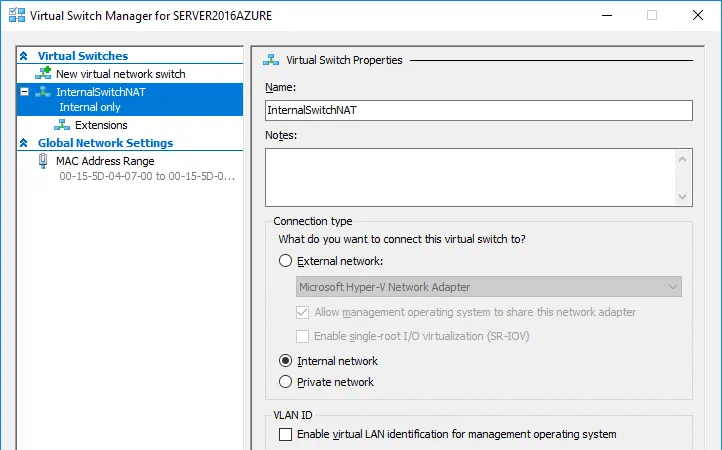
Let’s open PowerShell to create and configure a new virtual switch in the NAT mode:
New-VMSwitch -Name “InternalSwitchNAT” -SwitchType Internal
Where InternalSwitchNAT is the name of the virtual switch, and Internal is the virtual switch type.
Check the indexes of the network interfaces:
Get-NetAdapter
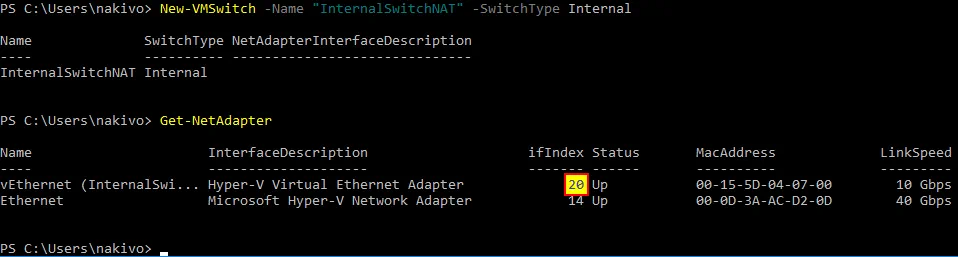
As you can see, a vEthernet (InternalSwitchNAT) virtual network adapter is created in Windows Server 2016 running as a Hyper-V host in Azure.
In our example, the interface index for the needed adapter is 20.
Set the IP address for the vEthernet (InternalSwitchNAT) virtual network interface you created previously:
New-NetIPAddress -IPAddress 192.168.217.1 -PrefixLength 24 -InterfaceIndex 20
In this example, the IP address of this interface is 192.168.217.1
24 is the length of the network mask and is equal to 255.255.255.0

Create a new virtual network and set the network address for the created network:
New-NetNat -Name “InternalNATnet” -InternalIPInterfaceAddressPrefix 192.168.217.0/24
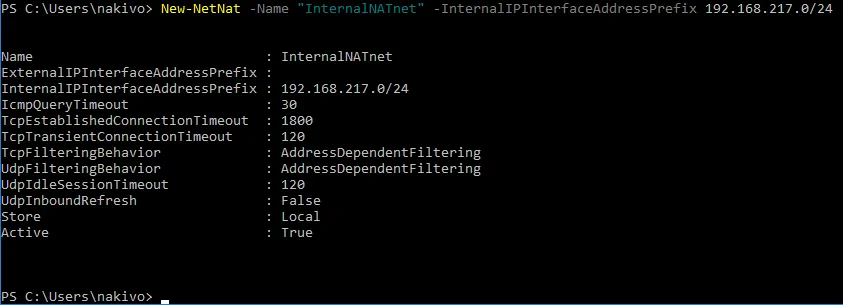
You can verify that a new virtual switch has been created if you open the GUI of Virtual Switch Manager.
Finally, the virtual network interface vEthernet (InternalSwitchNAT) has the following configuration:
IP address: 192.168.217.1
Netmask: 255.255.255.0
Configuring firewall for the NAT network
You have to configure Windows firewall to allow networking and allow access from nested virtual machines to the Hyper-V host.
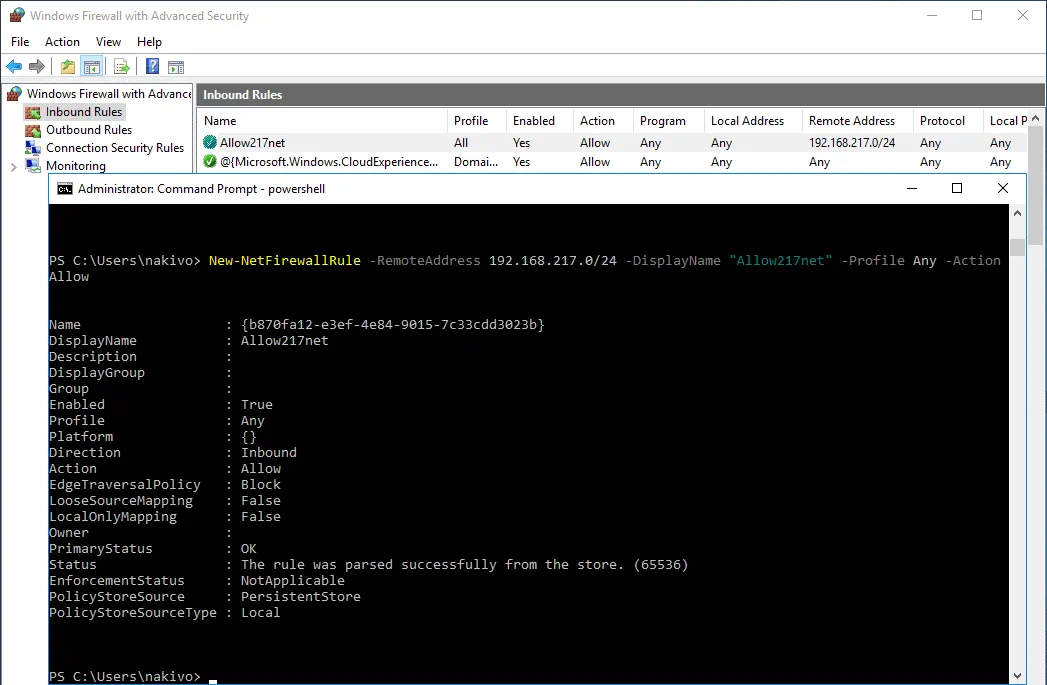
Create a new Inbound rule in Windows Firewall on the Hyper-V host (you should allow inbound connections from your internal NAT network you have created before).
Rule Name: Allow217net
Action: Allow the Connection
Protocols and ports: Any
Programs and services: Any
Scope: 192.168.217.0/24
Profiles: Domain, Private, Public (you can select only the Private profile that is used in the configuration above)
You can create this rule with one PowerShell command:
New-NetFirewallRule -RemoteAddress 192.168.217.0/24 -DisplayName “Allow217net” -Profile Any -Action Allow
You can open the GUI of Windows Firewall and ensure that the rule is created.
You can list all available rules of Windows Firewall by using the PowerShell cmdlet
Get-NetFirewallRule
Creating Nested VMs for Testing
It is recommended that you create two nested Hyper-V VMs to test networking between nested VMs, between Hyper-V host and nested VMs as well as testing Internet access from the nested VMs.
Now, let’s copy the installation ISO image of Windows Server 2016 to the Hyper-V host running in Azure, and create two nested Hyper-V VMs running Windows Server 2016 (if you don’t have the Windows Server 2016 installation image, you should download the image or create the image manually). Next, we will try to connect these two nested VMs to the virtual Hyper-V NAT network and check whether Hyper-V networking is configured properly.
The ISO image is copied to the temporary directory (C:\temp\) in this example (because the ISO file will be deleted anyway after creating two test Hyper-V nested VMs). Please don’t copy any important data to the temporary storage of the Azure virtual machines (disk D: in this case) because data can be deleted automatically from that temporary storage.
In accordance with recommended practices, you can create a second persistent virtual disk for the Azure VM and store nested Hyper-V VMs including VM replicas (Hyper-V replicas) on that disk (for example, E:). As you recall, a new virtual disk can be hot added to the Azure VM while the VM is running. In this blog post, all VMs will be stored on disk C: for educational purpose.
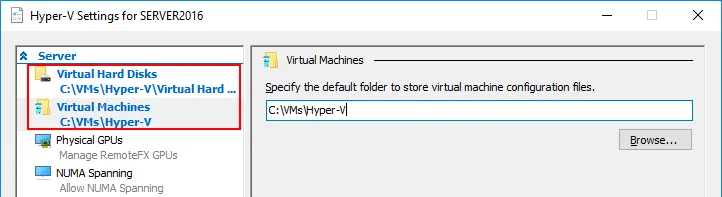
Another recommendation is for you to specify the directories to set VM files and virtual disks in global Hyper-V settings. For example, you can set E:\VMs\Hyper-V\ as the directory to store VM files and E:\VMs\Hyper-V\VirtualHardDisks as the directory to store virtual disks.
You can read how to create a new Windows VM in Hyper-V in this blog post.
When creating nested Hyper-V VMs, don’t create large virtual disks for that VMs. A 20-GB dynamic virtual disk is sufficient to install Windows Server 2016. After testing, you can delete these VMs and go to the configuring environment for preparing the remote site in Azure Cloud for Hyper-V VM failover. Don’t forget to connect virtual network adapters of the nested Hyper-V VMs to the NAT network (InternalSwitchNAT) that was recently created which you are going to test.
Other VM parameters can be:
RAM: 2 GB
CPU: 1 processor
Generation: 1
IP addresses of the virtual network adapters of nested VMs are set manually:
NestedWinTest
IP address 192.168.217.21
Mask 255.255.255.0
Default gateway: 192.168.217.1
DNS Server1: 8.8.8.8
DNS Server 2: 192.168.217.1
NestedWinTest2
IP address: 192.168.17.22
Mask: 255.255.255.0
Default gateway: 192.168.217.1
DNS Server1: 8.8.8.8
DNS Server 2: 192.168.217.1
You can configure the DHCP server on the Hyper-V host running in Azure or on a nested Hyper-V VM if needed.
After deploying two nested Hyper-V VMs connected to the InternalSwitchNAT network and configuring Windows Firewall (all protocols and ports are allowed in this case), you can ping each host from nested VMs and from Hyper-V host. As you can see on the screenshot below, the virtual network behind the NAT is configured properly on the Hyper-V Server running as the Azure VM.

This means that now you can configure the Azure environment for use as a remote site when creating Hyper-V replicas and failing over Hyper-V VMs to the replicas from your local site. You need to allow the appropriate TCP ports for inbound connections and ICMP connections on your Azure VM running Hyper-V before you can get to configuring NAKIVO Backup & Replication components. NAKIVO Transporter will be installed later on the Hyper-V host running in Azure after configuring the firewall.
Configuring the Firewall for NAKIVO Backup & Replication
According to NAKIVO Backup & Replication network requirements, the following ports must be opened for inbound traffic to establish network connections between Director and Transporter:
TCP: 9445, 9446, 9448-10000, 445, 137-139, 5986;
ICMP traffic must be allowed to make NAKIVO Backup & Replication function properly over the network.
NAKIVO Director is the centralized management interface that is installed on the defined machine when you are installing the full solution. The Director is used to manage Transporters, backup repositories, inventory, VMware environments, Hyper-V environments, etc. Only one Director can be installed when you deploy NAKIVO Backup & Replication.
NAKIVO Transporter is the component responsible for data transferring operations including compression, encryption, and deduplication, and is intended to perform backup, replication and recovery. One Onboard Transporter is installed by default on the machine on which the Director is installed, and this Onboard Transporter cannot be removed from the product. Optionally, you can deploy multiple Transporters on other machines to allow for data encryption, compression, and simplified configuration for transferring data to remote networks, as well as for distributing workloads.
You need to configure a firewall in Azure as well as Windows firewall on a Hyper-V host running as an Azure virtual machine.
Configuring a firewall in Azure
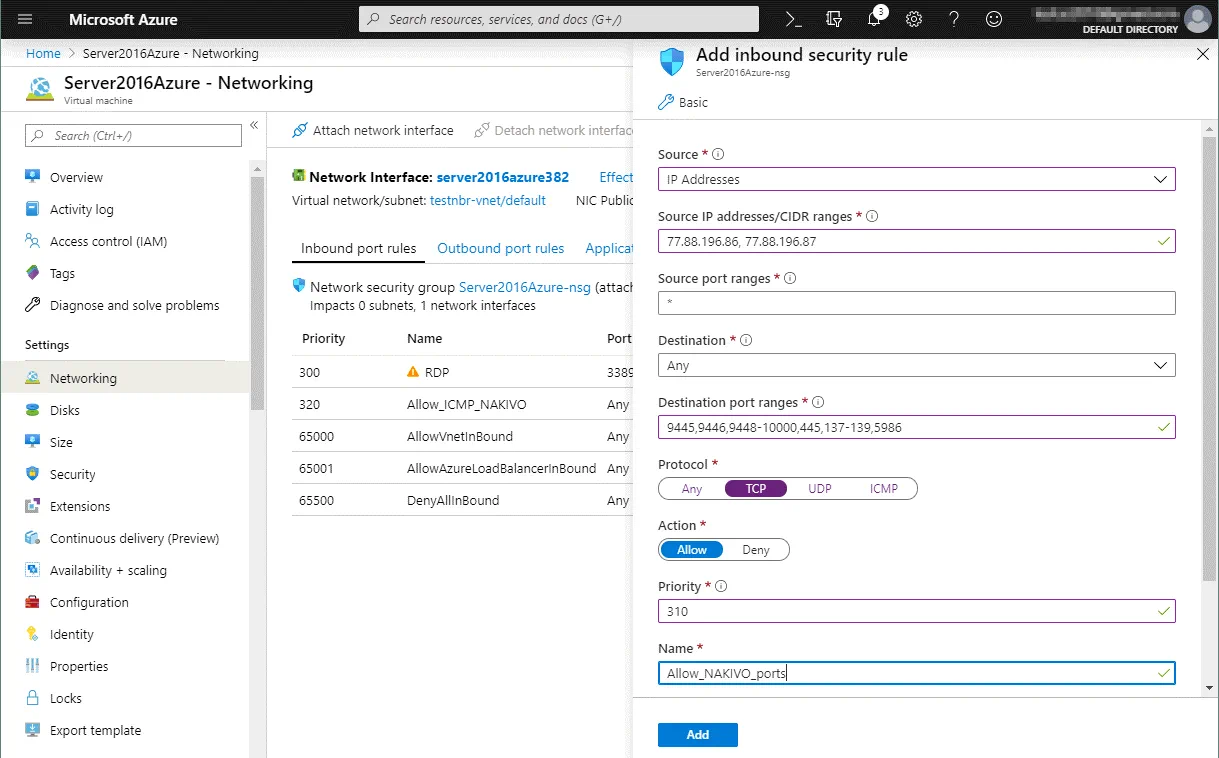
In the web interface of Azure, go to Home > Virtual machines, select your VM (Server2016Azure in this case) and click this VM name to open VM settings. Then in the left pane, click Networking to open the network settings. Hit Add inbound port rule to create a new firewall rule.
")
In the right side of the screen, you can see a new window where you should configure the parameters of the new firewall rule. In our example, the parameters of the first firewall rule created for proper work of NAKIVO Backup & Replication are listed below.
Source: IP address
Source IP addresses: 77.88.196.86, 77.88.196.87 (select external IP addresses used on the routers in the Office 1, Office 2 etc.)
Source port ranges: *
Destination: Any
Destination port ranges: 9445,9446,9448-10000,445,137-139,5986
Protocol: TCP
Action: Allow
Priority: 310 (default)
Name: Allow_NAKIVO_ports
Hit the Add button to save the configuration and add the new firewall rule.
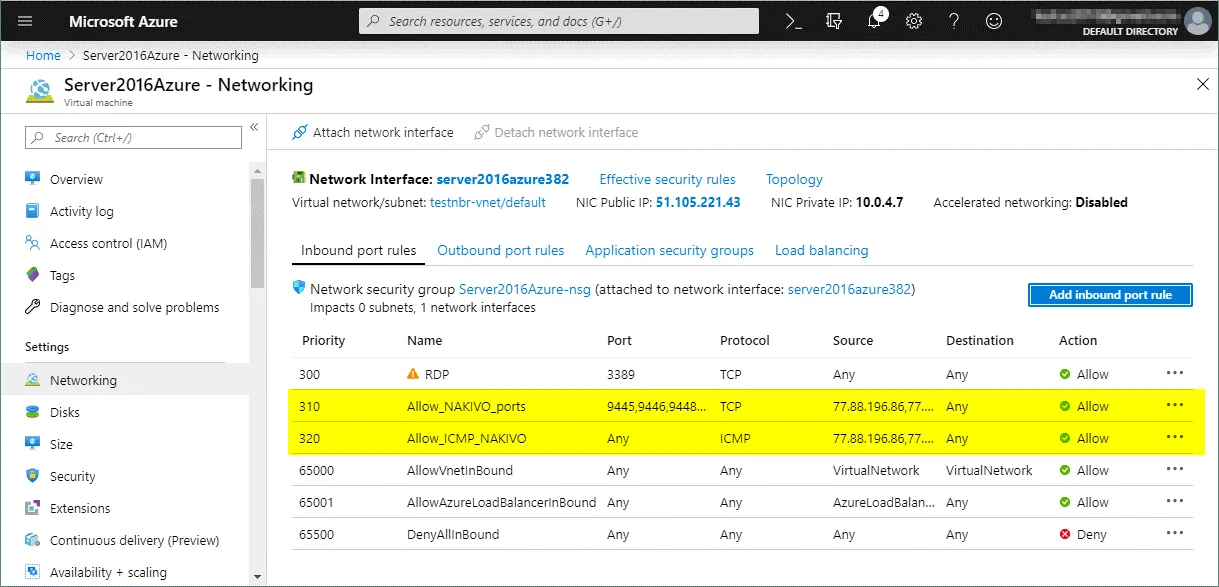
Click Add inbound port rule once more to allow ICMP connections. The second rule must have parameters as shown below.
Source: IP addresses
Source IP addresses: 77.88.196.86, 77.88.196.87 (select your trusted external IP addresses used on the routers in Office 1)
Source port ranges: *
Destination: Any
Destination port ranges: *
Protocol: ICMP
Action: Allow
Priority: 320 (default)
Name: Allow_ICMP_NAKIVO

Now the necessary rules have been created in Azure for the Hyper-V host running in Azure Cloud as an Azure VM.
Firewall in Azure is now configured. You have also to configure another firewall in Windows that is running on the Azure VM.
Configuring Windows Firewall on the Hyper-V host in Azure
Go back to your RDP session with which you manage your Hyper-V host that is running in Azure. If you have closed that session, connect to the Hyper-V host running in Azure with RDP once again. Open Windows Firewall and add similar two rules in Windows Server 2016.
Rule 1 must contain the following parameters:
Name: Allow_NAKIVO_ports
Source: IP addresses
Source IP addresses/CIDR ranges: 77.88.196.86, 77.88.196.87
Source port ranges: *
Destination: Any
Destination port ranges: TCP 9445, 9446, 445, 5986, 9448-10000, 137-139
Protocol: TCP
Action: Allow
Priority: 310 (default)
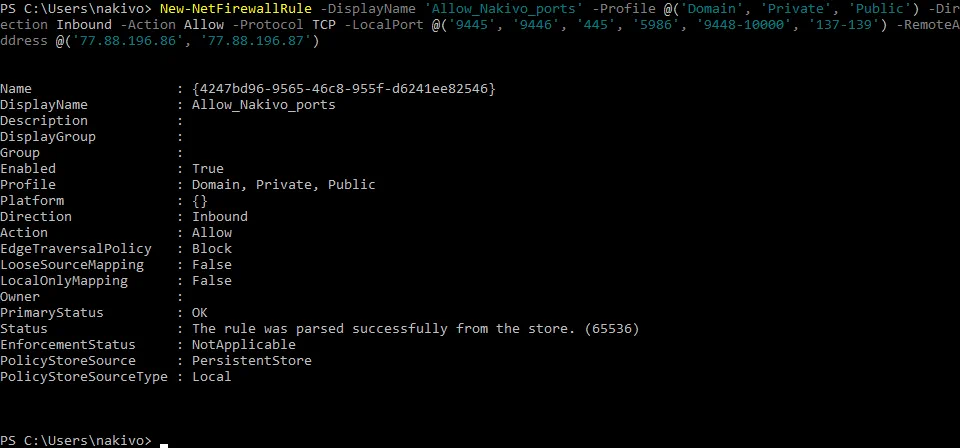
A rule can be created in the Windows Firewall GUI and in PowerShell. Let’s create the rule in PowerShell.
Run PowerShell as Administrator and execute the command:
New-NetFirewallRule -DisplayName ‘Allow_Nakivo_ports’ -Profile @(‘Domain’, ‘Private’, ‘Public’) -Direction Inbound -Action Allow -Protocol TCP -LocalPort @(‘9445’, ‘9446’, ‘445’, ‘5986’, ‘9448-10000’, ‘137-139’) -RemoteAddress @(‘77.88.196.86’, ‘77.88.196.87’)
Similarly, create the second rule in order to allow for inbound ICMP connections. You should use two commands to allow for ICMPv4 and ICMPv6 inbound connections in Windows Server 2016.
New-NetFirewallRule -DisplayName “Allow_ping_NAKIVO4” -Direction Inbound -Protocol ICMPv4 -IcmpType 8 -RemoteAddress @(‘77.88.196.86’, ‘77.88.196.87’)
New-NetFirewallRule -DisplayName “Allow _ping_NAKIVO6” -Direction Inbound -Protocol ICMPv6 -IcmpType 8 -RemoteAddress @(‘77.88.196.86’, ‘77.88.196.87’)
Now all the necessary rules have been added in Windows firewall of the Hyper-V host residing in Azure. You can check in the Windows Firewall GUI to verify that the rules have been created successfully.
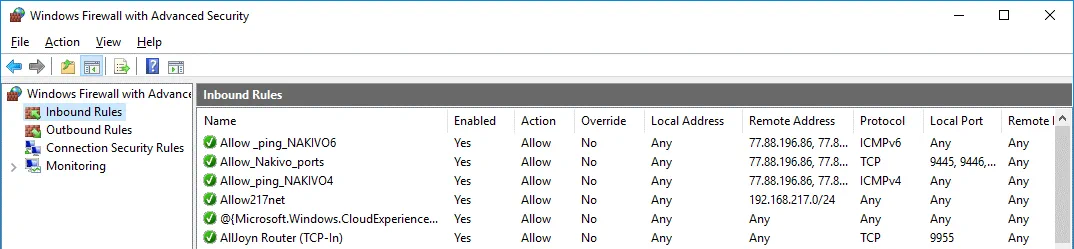
Reboot the Windows Server 2016 VM in Azure and go to configuring NAKIVO Backup & Replication.
Configuring NAKIVO Backup & Replication
Now you are ready to add the Hyper-V host running as the Azure VM to the inventory of NAKIVO Backup & Replication. In this example, NAKIVO Backup & Replication is deployed on the machine running on the primary site (on premise) that is named Office 1. If you have not installed the NAKIVO Backup & Replication full solution yet, you can do it manually by installing the product on a Linux machine, Windows machine, NAS device or even on Raspberry Pi as well as deploying a virtual appliance on VMware ESXi host. Read more about how to install NAKIVO Backup & Replication in the help center.
Adding the Hyper-V host to the Inventory
Notice, that when you add a Hyper-V host to the inventory of NAKIVO Backup & Replication, Transporter is automatically installed on that Hyper-V host. Hence, you don’t need to deploy Transporter manually on the remote Hyper-V host running in Azure. Check the external IP address of your Azure VM running Hyper-V. You can use the web interface of Azure for this purpose.
Your Hyper-V host running in your physical environment should be added to the Inventory before adding a remote Hyper-V host running in Azure Cloud. In this example, the local Hyper-V host is already added to the Inventory. Let’s now add a remote Hyper-V host deployed in Azure to the Inventory.
Open the web interface of NAKIVO Backup & Replication by entering in the browser the IP address of the machine on which the product is installed. In this case, the following address is used: https://192.168.17.63:4443
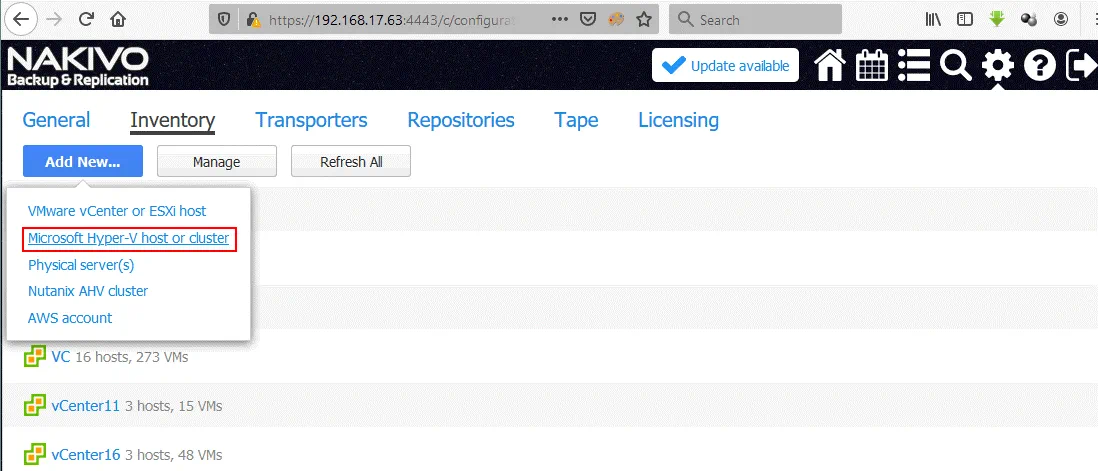
Go to Configuration > Inventory and click Add New. In the opened menu, select Microsoft Hyper-V host or cluster.
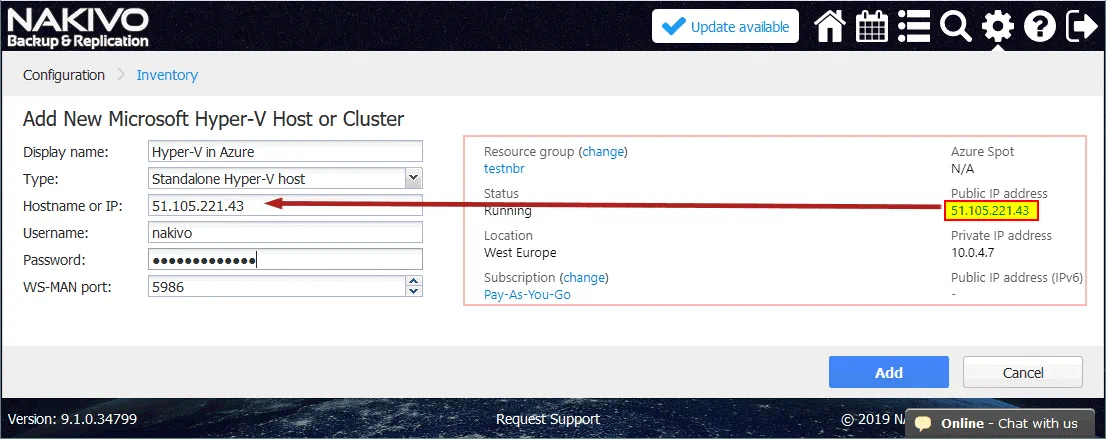
The following information should be added to your Hyper-V host running in Azure.
Display Name: Hyper-V in Azure
Type: Standalone Hyper-V host
Hostname or IP: 55.105.221.43 (enter your IP address of the Hyper-V host running in Azure)
Username: nakivo (enter the user name you have set when deploying the virtual machine running Windows Server 2016 and Hyper-V in Azure)
Password: ************* (Enter the password for Windows your user on the Hyper-V host in Azure)
WS-MAN port: 5986 (you can leave the default value).
Note: Firewalls must be configured properly as mentioned above. If a Hyper-V host cannot be added to the inventory and you see an error message like “Cannot connect to the “\\55.105221.43\C$” network share. Make sure network shares on this host are accessible,” go and check the firewall settings.
You can log in to the system console of your NAKIVO Backup & Replication machine and ping the external IP address of the Hyper-V host in Azure. Also, be sure to check the external IP address of the router that is obtained from an ISP (Internet Service Provider). If NAKIVO Backup & Replication is installed on Linux, you can use this command to check the WAN IP address:
dig +short myip.opendns.com @resolver1.opendns.com
Then make sure that the IP address displayed in the console after running this command is added to the firewall rules on the Azure side as an allowed IP address for inbound connections.
After adding Hyper-V hosts, your Inventory should resemble the Inventory on the screenshot below.
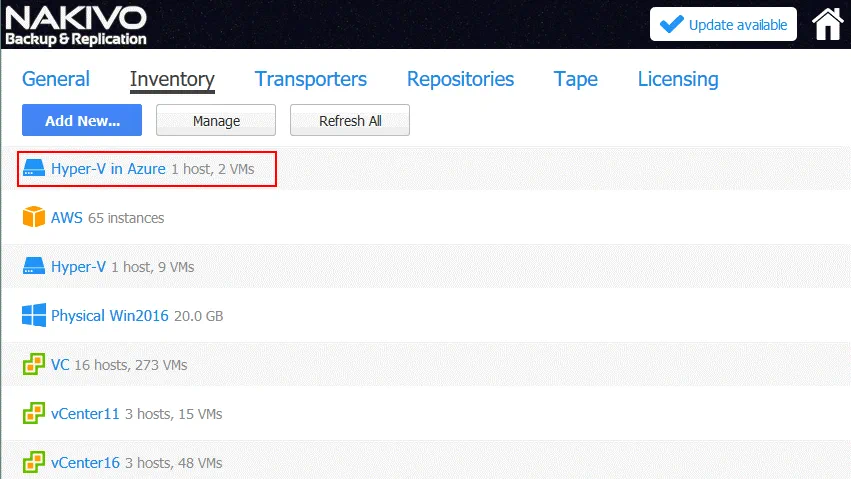
The Transporter has now been installed on the remote Hyper-V host running in Azure. This means that you can create a Hyper-V replica of a source VM running on your primary (on premise) Hyper-V host running on the primary site (datacenter) that is called Office 1 in this example. On the screenshot below, you can see a list of source VMs residing on a local Hyper-V host (192.168.17.63 in this case). Similarly, you can check two nested VMs created for network testing that are residing on the Hyper-V host in Azure. The WinServer2016blog VM will be replicated in the next section of this blog post.
")
Creating a replica of a Hyper-V VM
Go to the Home Page in the web interface of NAKIVO Backup & Replication. Click Create and select Microsoft Hyper-V replication job.
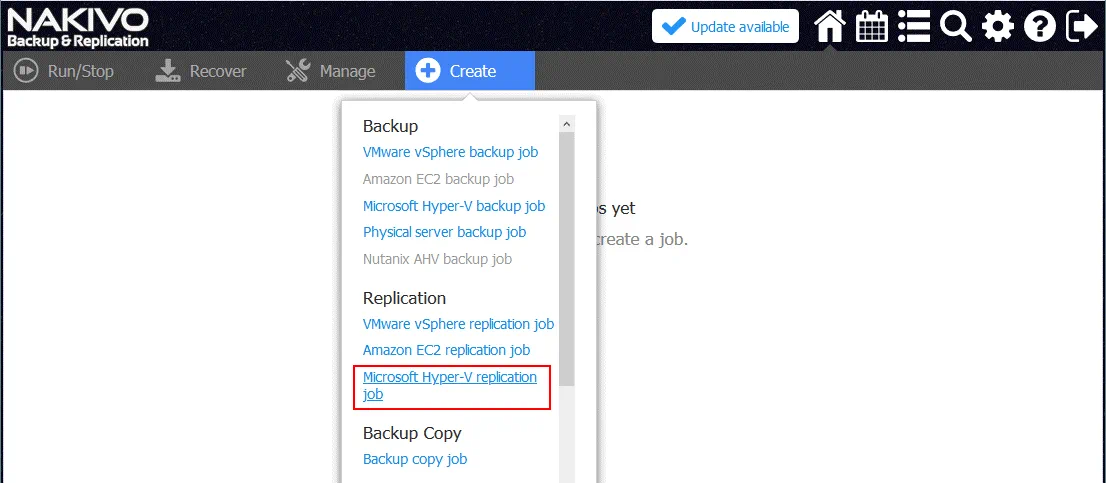
The New Replication Job Wizard for Microsoft Hyper-V is opened.
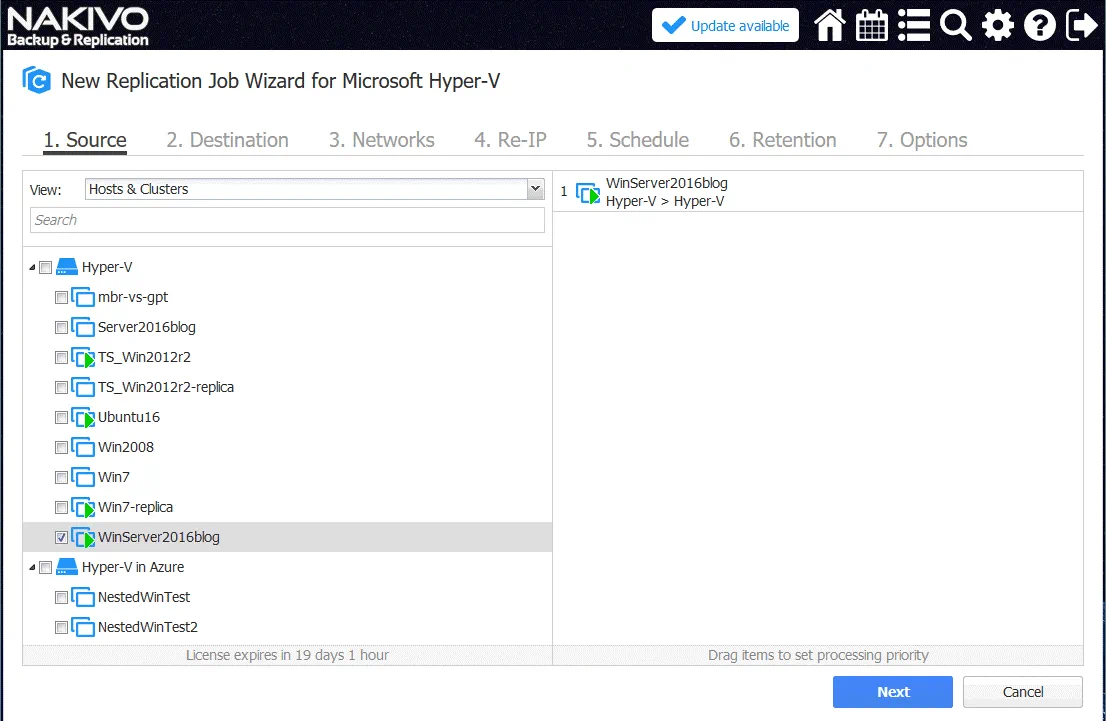
1. Source. Select the virtual machine that you want to replicate. In this example, WinServer2016blog is the name of the VM that will be replicated to Azure. You can see two nested VMs on the Hyper-V host in Azure that were created for testing.
Click Next on each step to continue.
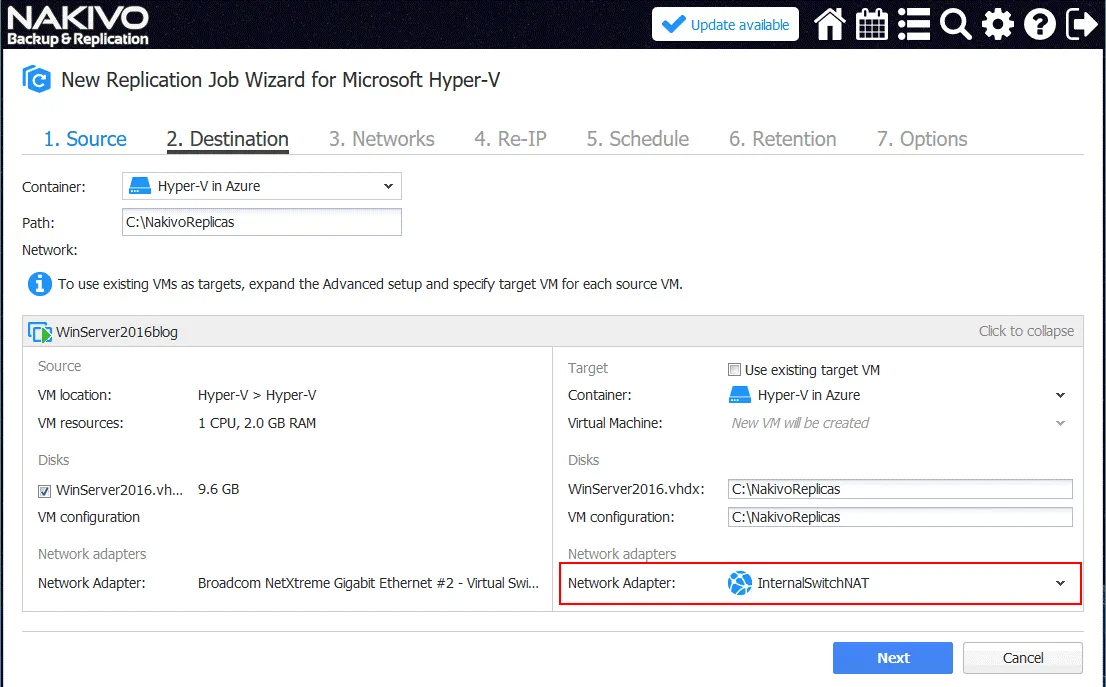
2. Destination. Select Hyper-V in Azure as the destination container. C:\NakivoReplicas is used as the destination directory on the Hyper-V host in Azure to store VM replicas. If you have added an additional virtual disk to store VMs, then it is better to select a directory on that disk (for example, disk E:\NakivoReplicas).
Click the VM name to expand advanced settings and select the network to which the virtual network adapter of the virtual machine will be connected. In this example the VM-replica will be connected to the InternalSwitchNAT virtual network (that was created manually after deploying the Hyper-V host in Azure).
3. Networks. You can configure network mapping at this step.
Network mapping is intended to define to which virtual network (virtual switch) a virtual network adapter of a VM replica must be connected after finishing the replication job. This feature prevents you from manually configuring network settings for the VM replica on the destination Hyper-V host.
In our example, a source Hyper-V VM is connected to the Broadcom NetXtreme network. The VM replica of this VM must be connected to the InternalSwitchNAT network (that was created in PowerShell above).
")
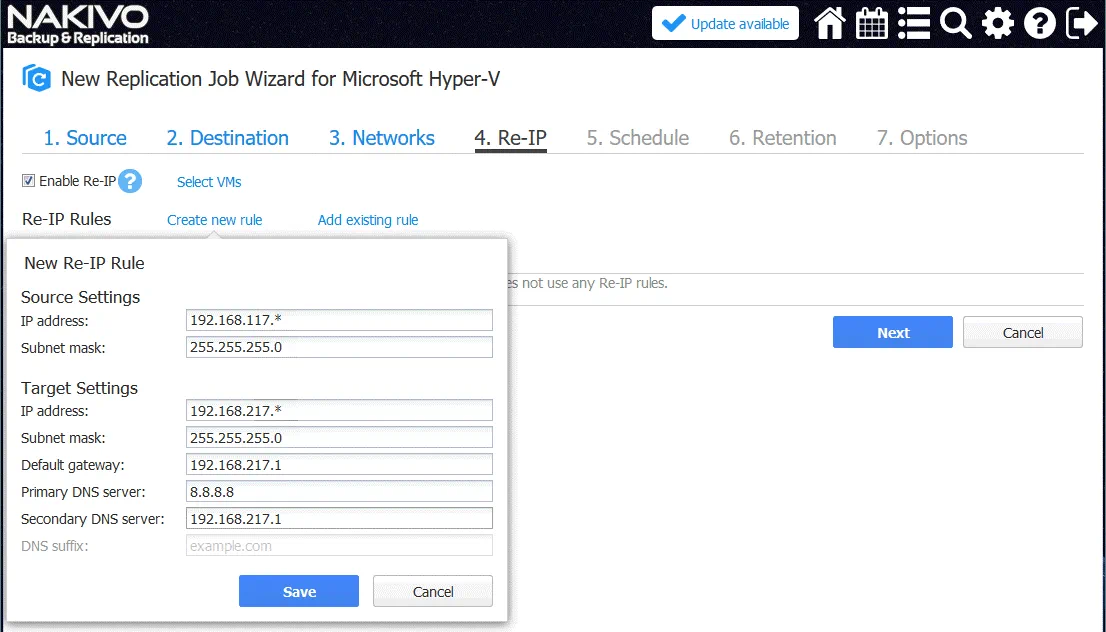
4. Re-IP. After configuring Network Mapping, a VM replica will be connected to the required virtual network. Now it’s time to define the IP address that is valid for the selected network for VM replica. The Re-IP feature allows you to create a rule that can be applicable to multiple VMs and set which source IP addresses must be changed to which destination IP address.
Let’s click Create new rule and create a new Re-IP rule.
In this example, the source settings are:
IP address: 192.168.117.* (asterisk means any value from 1 to 254 in this case)
Subnet mask: 255.255.255.0
The Target settings are:
IP address: 192.168.217.*
Subnet mask: 255.255.255.0
Default gateway: 192.168.217.1
Primary DNS server: 8.8.8.8
Secondary DNS server: 192.168.217.1
Thus, the IP address of the source VM 192.168.117.7 will be changed to 192.168.217.7.
Don’t forget to select VMs to which the rule will be applied (click Select VMs).
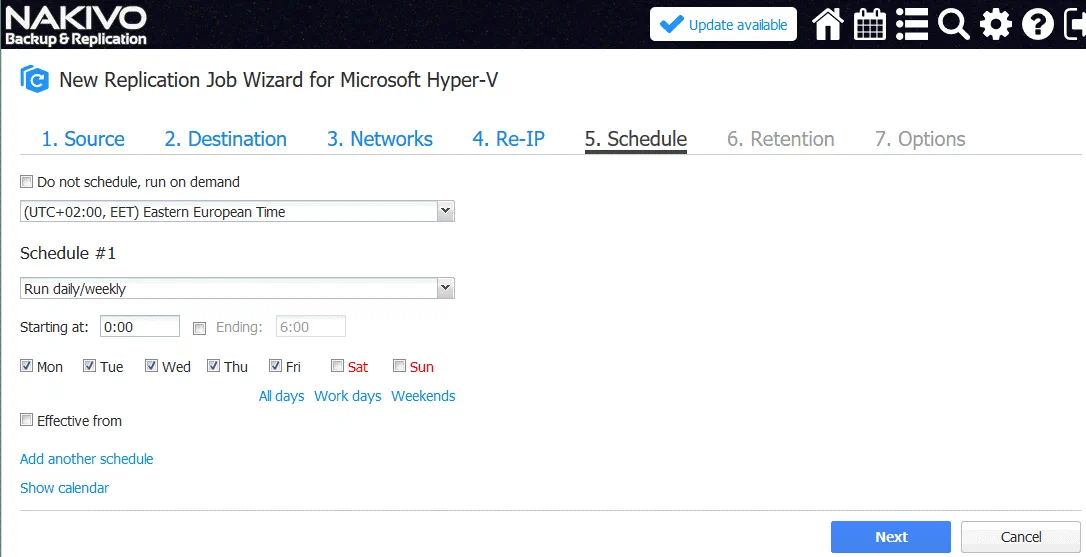
5. Schedule. Configure the scheduling options
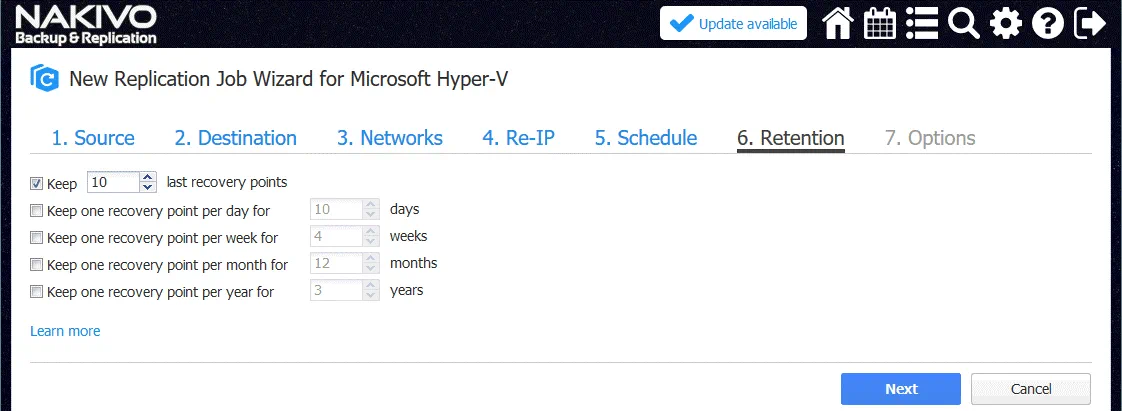
6. Retention. Configure retention settings depending on your needs.
7. Options. Select the required VM options. The most important options are explained below.
Job Name: Hyper-V replication to Azure
App-aware-mode. Enabled, click settings and define your user name and password.
Change Tracking: If your source host is running Windows Server 2016 or later, use Hyper-V RCT. If Windows Server 2012 R2 or older is running Hyper-V, use the proprietary method.
Other settings may be left by default.

Hit Finish & Run to save the Hyper-V replication job settings and run the job.
Wait until the VM is replicated to the Hyper-V host in Azure. The amount of time needed to finish the job depends on your internet bandwidth and the size of the virtual disks.
Note: If you see the error message [Replication of the “WinServer2016blog” VM cannot be started. There is no connection between all possible source and target transporters for this VM in job “Hyper-V replication to Azure”], check your network configuration. Click Learn More to see details.
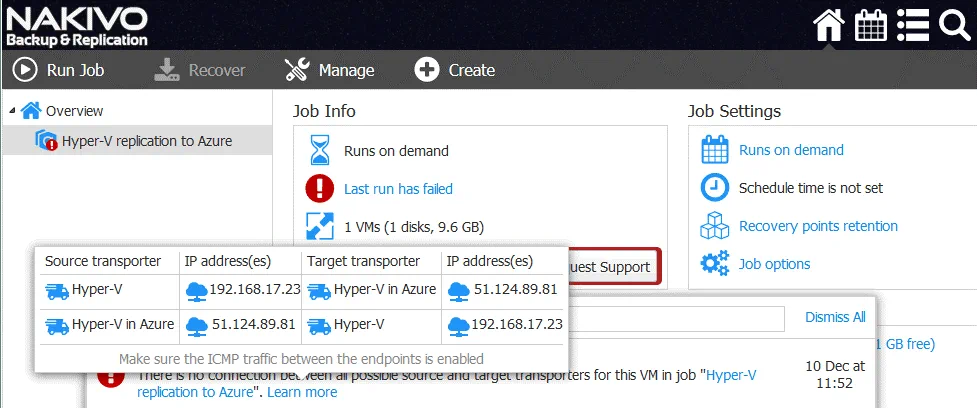
Check the firewall settings on your local side and on the Azure side. Check Advanced shared settings on the source Hyper-V host in the network properties. Refresh the Inventory, and the transporters on the appropriated tabs of the Configuration page of NAKIVO Backup & Replication web interface.
When you ensure that everything has been configured correctly, try to start the Hyper-V replication job to Azure once again. Now the Hyper-V replication job should run correctly.

When the replication job is finished, you can see the VM replica (WinServer2016blog-replica) on the Hyper-V host in Azure. This Hyper-V replica is a nested VM in Azure.
VM Failover to Azure
Now, when you have a VM replica, you are ready for VM failover with NAKIVO Backup & Replication.
On the Home page, click Recover and in the appeared menu, select VM replica failover.
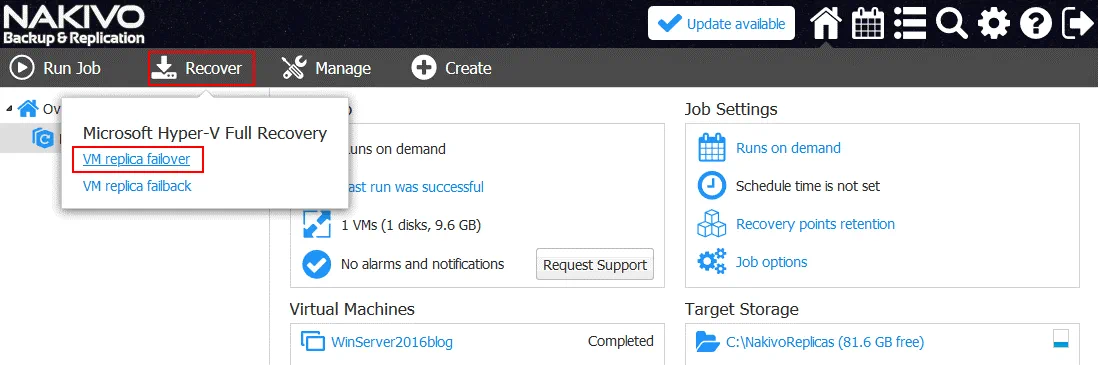
The new Failover Job Wizard for Microsoft Hyper-V is opened.
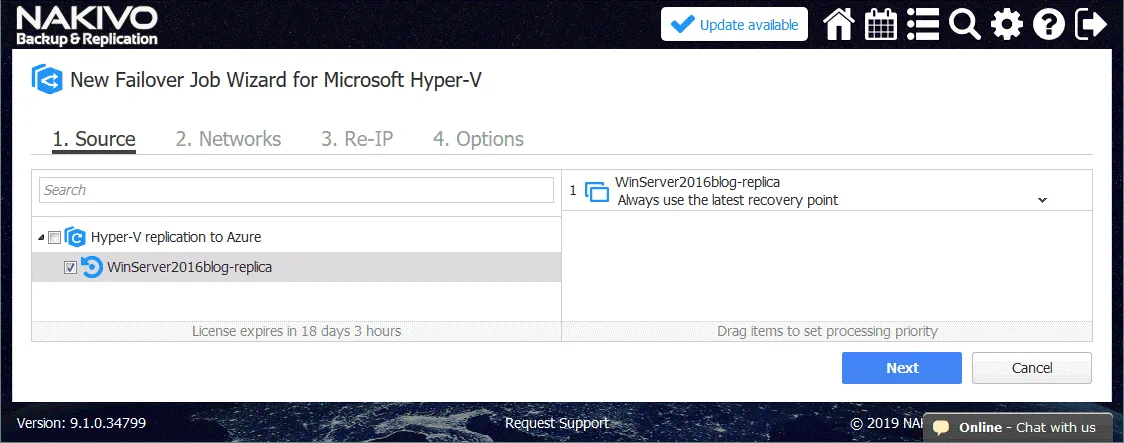
1. Source. Select your VM replica that will be used to fail over. In this case, WinServer2016blog-replica is the name of the nested VM replica in Azure.
2. Networks. You can turn on Network Mapping to avoid reconnecting the VM replica to the needed virtual Hyper-V network manually, as is shown for the replication job.

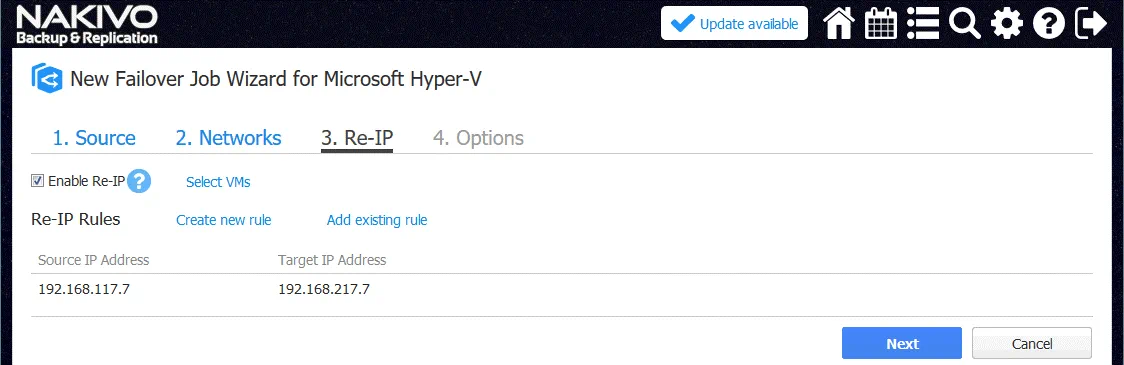
3. Re-IP. You can enable Re-IP to avoid re-configuring IP addresses manually on the VM-replica after failover. Click Select VMs and select your VM replica to which the Re-IP rule must be applied.
4. Options. Enter the job name (for example, Hyper-V failover to Azure).
Select Power off source VMs to avoid conflicts and ensure that all changes will be made in the VM replica but not in the source VM.
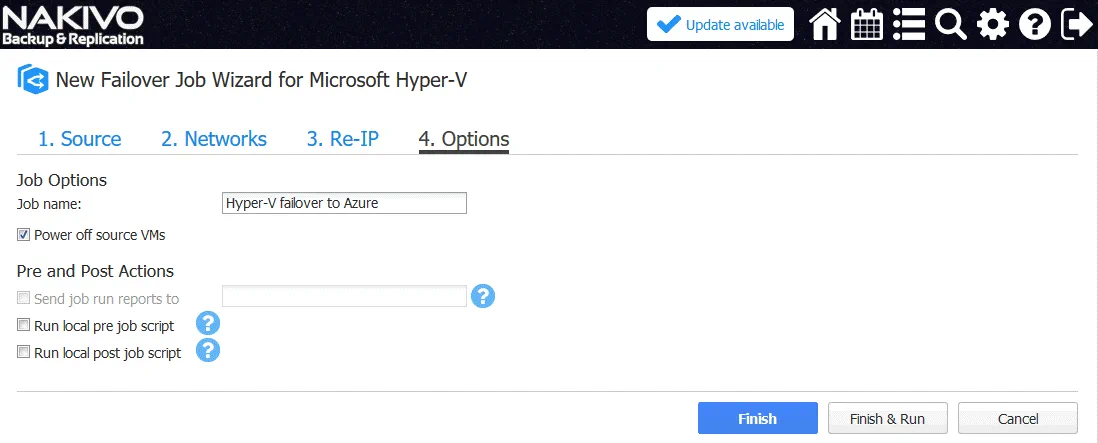
Click Finish & Run to save and run the failover job.
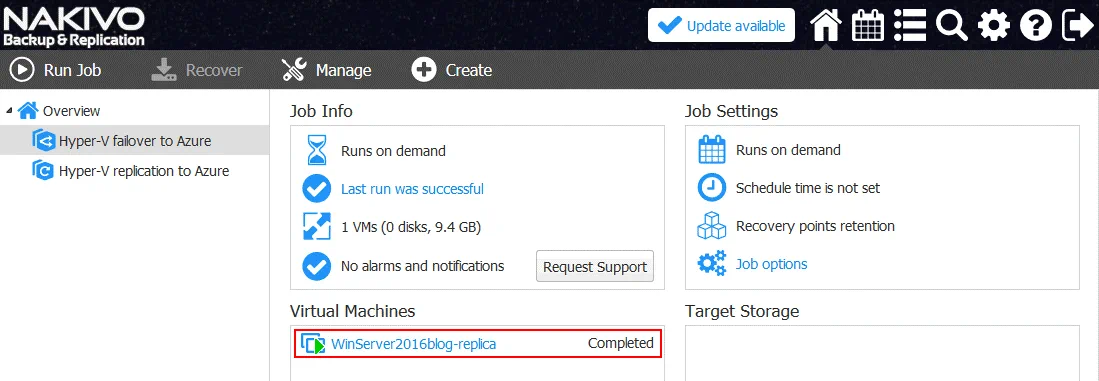
Wait for a while until the Hyper-V failover job is finished.
When the job is completed, you will be able to see that the VM replica is running and the source VM is powered off.
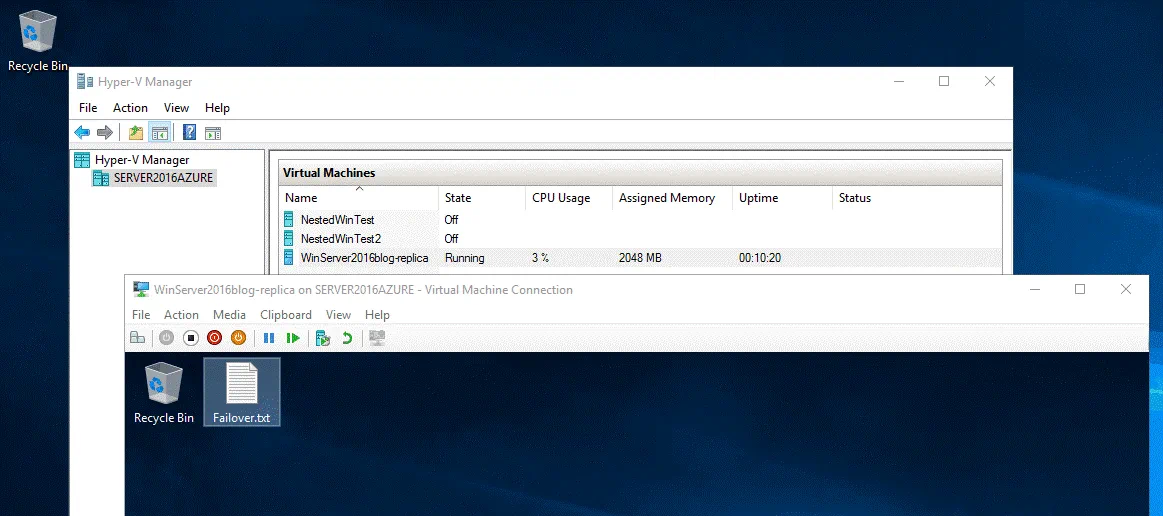
You can connect to your Azure VM running Hyper-V via RDP and see that a nested VM replica is powered on. All changes are now written to the nested VM replica.
When your infrastructure on the primary site is recovered, you can perform the VM failback operation and turn back workloads to the primary site (Office 1 in this case) from Azure that is used as the remote recovery site. After performing VM failback, changes made in the VM replica will be transferred to the original VM. This operation is called failback.
VM Failback
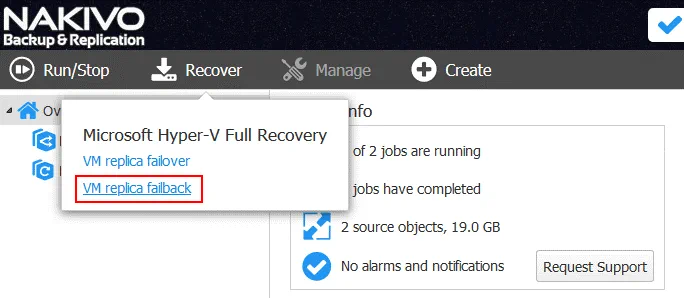
In order to perform failback, on the home page of the NAKIVO Backup & Replication web interface, go to Recover > VM replica failback.
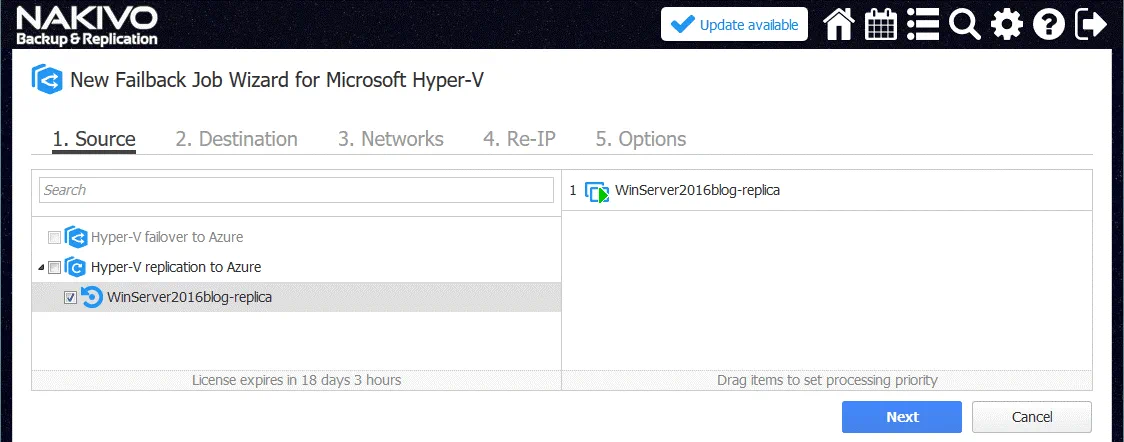
The Failback Job Wizard will be opened.
1. Source. Select the VM replica that was used for VM failover (WinServer2016blog-replica in our example). It is recommended that you shut down the VM replica before starting the failback job.
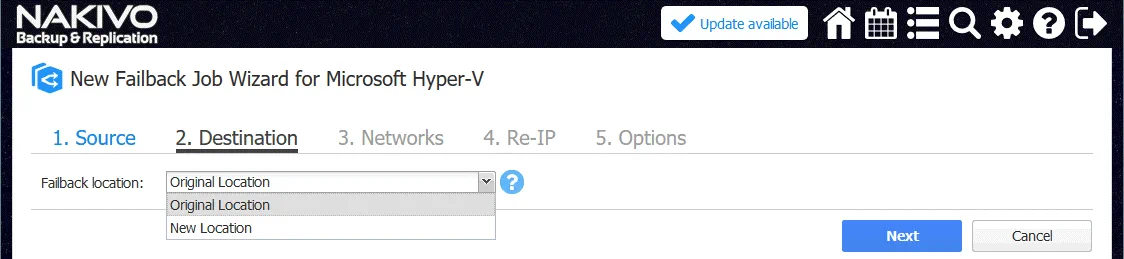
2. Destination. Select Original Location in the drop down menu. You can select the New Location if needed.
3. Networks. Create the inverse network mapping rule (in the reverse order) comparing to the previous rule when you configured a failover job. In this case, the source network is InternalSwitchNAT and the target network is Broadcom NetXtreme.
")
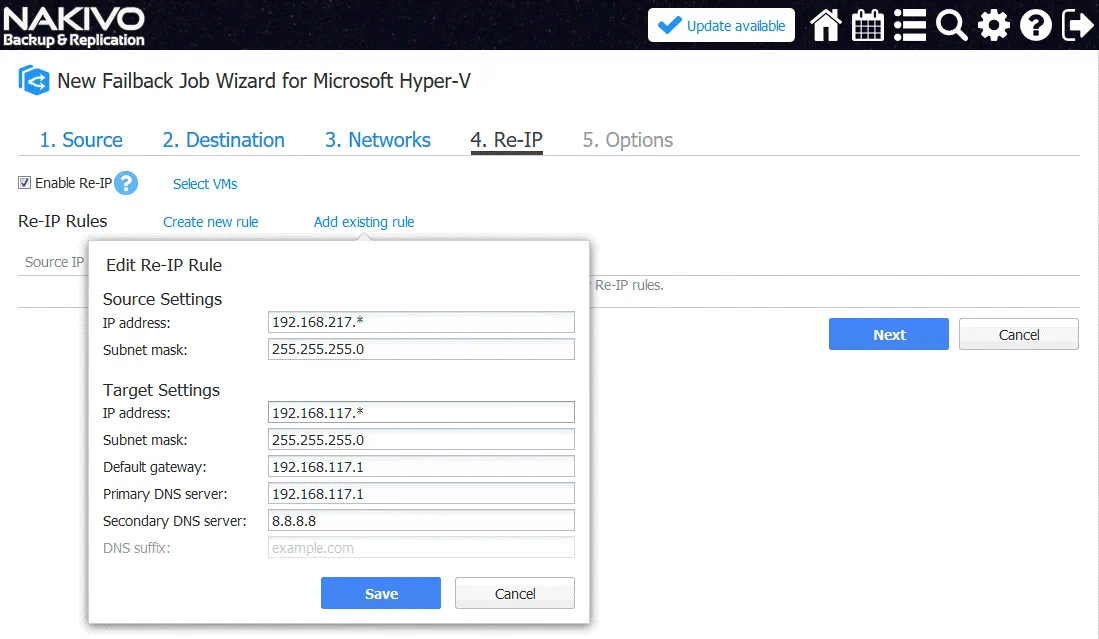
4. Re-IP. Change the IP address in reverse order. In our example, the Re-IP rule settings are shown below.
Source Settings
IP address: 192.168.217.*
Subnet mask: 255.255.255.0
Target Settings
IP address: 192.168.117.*
Subnet mask: 255.255.255.0
Default gateway: 192.168.117.1
Primary DNS server: 192.168.117.1
Secondary DNS server: 8.8.8.8
Click Select VMs and select your VM replica (WinServer2016blog-replica in this case).
5. Options. Define failback job options such as VM name, pre and post actions.
Enter the job name: Hyper-V Failback from Azure.
Tick the checkbox: Power off replica VMs.
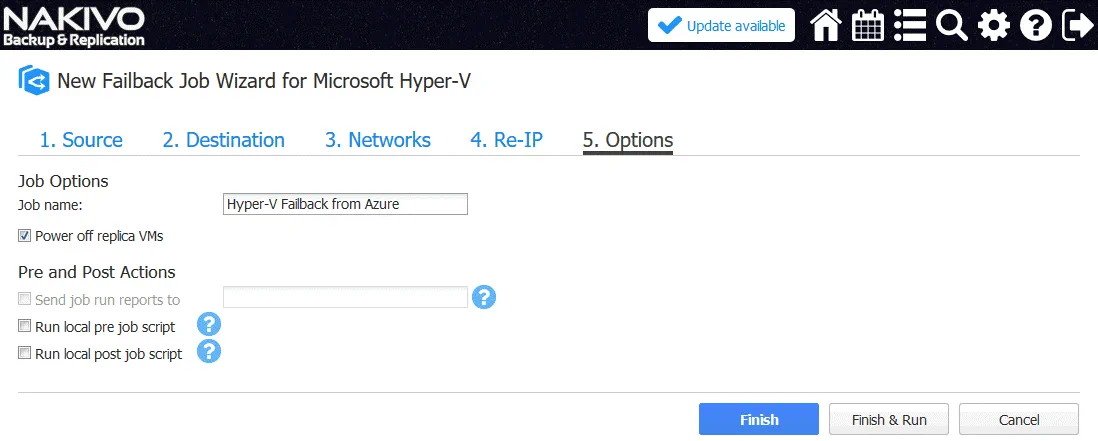
Hit Finish and Run to save settings and run the failback job. Wait until the changes are synchronized with the source VM. After that, you can continue to use your VM on the primary site.
Note: Your firewall on the primary site (that is called Office 1 in this blog post) must be configured properly to allow network interaction and data transferring between components of NAKIVO Backup & Replication. Otherwise, you can get an error message like:
Replication of the “winServer2016blog-replica” VM has failed. An error has occurred while replicating one or more virtual disks of the “WinServer2016blog-replica” VM.
In this case, check the firewall settings on your router and Hyper-V server on your primary site. You may need to create some firewall rules similarly to those you have created in Azure.
A simple example of network configuration is explained in this blog post in order to demonstrate the working principle. You can configure a site to site VPN connection as an alternative that will provide you with more flexibility and advanced options in terms of the network connectivity.
Conclusion
Having VM replicas on the remote site is a recommended option for your disaster recovery plan. Public cloud services can be used as a disaster recovery site if you are unable to deploy your own remote site for disaster recovery. Microsoft Azure that uses the Hyper-V engine for running virtual machines is a good solution for running VMs in the cloud. However, the format of Azure VMs and Hyper-V VMs has a list of differences that don’t allow you to replicate Hyper-V VMs directly to Azure. Hyper-V nested virtualization is a useful feature that allows you to run a VM inside a VM, and this functionality can be used to replicate Hyper-V VMs to Azure.
This blog post has covered how to utilize Hyper-V nested virtualization in Azure and replicate your Hyper-V virtual machines to the Microsoft Azure Cloud for protecting against disasters. NAKIVO Backup & Replication can replicate Hyper-V VMs to the Hyper-V host running as an Azure VM in the cloud, and perform VM failover and VM failback in the framework of a disaster recovery scenario.
Now you should understand how to configure the Azure environment, Hyper-V environment, firewall, and NAKIVO Backup & Replication to make a disaster recovery process fast and easy.