How to Request SSL Certificates from a Windows Certificate Server for Hyper-V
Hyper-V has built-in tools for VM replication from one Hyper-V host to another. This comes in handy for failover in a case of failure. Often, Hyper-V replication is configured on Hyper-V servers connected to an Active Directory domain and inside a cluster. However, it is possible to configure Hyper-V replication when servers running Hyper-V are in a Workgroup. To do this, you need certificates.
This blog post explains how to create certificates to configure Hyper-V replication in a Workgroup by using built-in Windows Server 2016 tools.

Why Use Certificates for Hyper-V
Certificate-based replication allows you to replicate virtual machines without adding Hyper-V hosts to a Windows domain or cluster. This feature is especially useful for small companies that have three or four servers and don’t want to deploy a cluster and configure a domain using Active Directory.
Another reason to use Hyper-V replication with certificates in Workgroups is security. If Hyper-V servers involved in the VM replication process are members of a domain, these Hyper-V servers can be fully controlled if a user has the credentials to the Active Directory administrative account. In certain undesired scenarios, such as ransomware attacks, with AD domain administrator credentials, attackers can destroy all information on the resources they can access. That’s why it can be safer in some cases to leave Hyper-V servers used for VM replication in a Workgroup.
Hyper-V supports two types of authentication: Kerberos and HTTPS certificates. Kerberos is used for computers in an Active Directory domain, and HTTPS certificates are used in non-domain environments. An SSL certificate request is performed when an HTTPS secure connection is used.
Overview of the Main Steps
Before starting a detailed explanation of the workflow, let’s list the main steps that should be performed to configure Hyper-V replication in a Workgroup by using certificates.
- Configure hostnames on both Hyper-V servers. A Hyper-V server role must be enabled.
- Enable HTTPS traffic and required inbound connections in Windows firewall.
- Create and configure certificates on the first server. Export/import certificates.
- Copy certificates to the second server
- Configure replication on the second server by using certificates.
- Configure replication on the first server. VMs must not have any checkpoints.
In our blog post, we use two Windows Server 2016 machines with a Hyper-V role installed.
Configuring Hostnames on Servers
Let’s begin with editing hostnames. Configure DNS names for the source server (the primary server) and the replica server (the second server or destination server). You should add the main DNS suffix. Using fully qualified domain names (FQDN) is required to use certificates. In our example, the names of servers are:
Hyper-v-prim.test.net – the primary server (the first server)
Hyper-v-repl.test.net – the replica server (the second server)
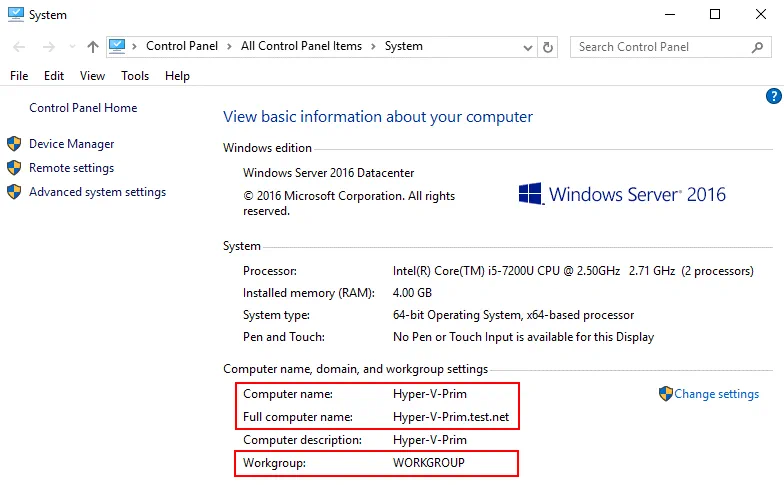
In order to change a hostname, open system settings (right click the My Computer or This PC icon) and, in the Computer name, domain, and workgroup settings section, click Settings. In the Computer Name tab, click Change. Then in the Computer Name/Domain Changes window, enter a computer name, select Workgroup (not a Domain), click More, and enter a primary DNS suffix of the computer. As mentioned above, a full name with a DNS suffix is required for Hyper-V hosts to enable replication by using certificates. A suffix is test.net in our example. If a hostname is hyper-v-prim, a fully qualified domain name is Hyper-v-prim.test.net for our primary server.
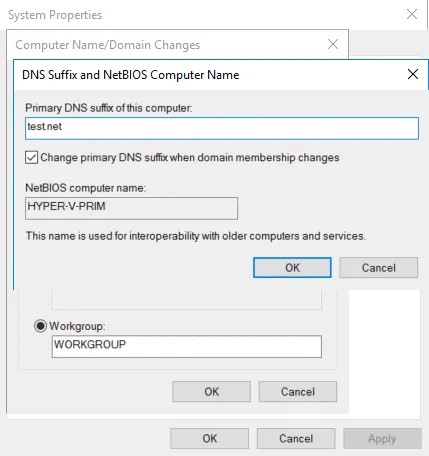
On the screenshot below, you can see the computer name configuration for the primary server.
Once you have configured hostnames on both servers, you can start creating certificates on the servers.
Creating Certificates on the Primary Server
Certificates can be created by using multiple methods. The command line interface is usually used for this purpose. The first option is to use the MakeCert tool to create self-signed certificates. Now the MakeCert tool is deprecated, and we are going to use another solution.
Use the New-SelfSignedCertificate cmdlet as a modern alternative to the MakeCert tool to create self-signed certificates.
On the primary host (Hyper-v-prim.test.net), run the following commands in PowerShell (as the Administrator) to generate certificates:
New-SelfSignedCertificate -DnsName "Hyper-v-prim.test.net" -CertStoreLocation "cert:\LocalMachine\My" -TestRoot
New-SelfSignedCertificate -DnsName "Hyper-v-repl.test.net" -CertStoreLocation "cert:\LocalMachine\My" -TestRoot
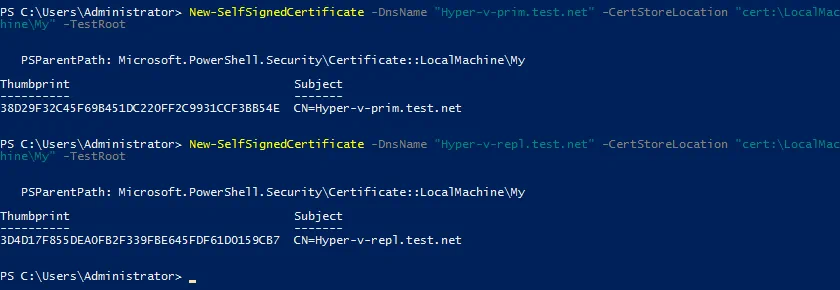
Then check created certificates, and continue configuring the server. Three certificates must be created after running these commands (two server certificates and one root certificate).
Checking created certificates in MMC
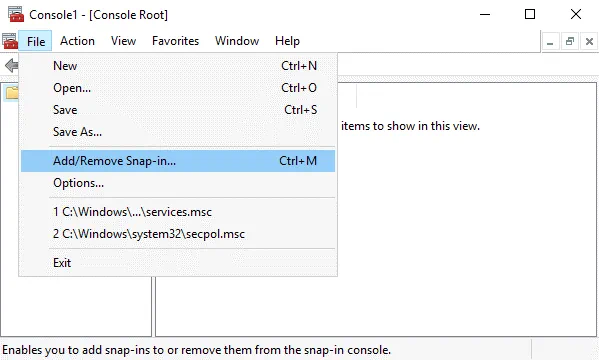
Open MMC (Microsoft Management Console) on the first server. In order to open MMC, type mmc in PowerShell).
Add a new snap-in in MMC to manage certificates in the Windows GUI (Graphical User Interface).
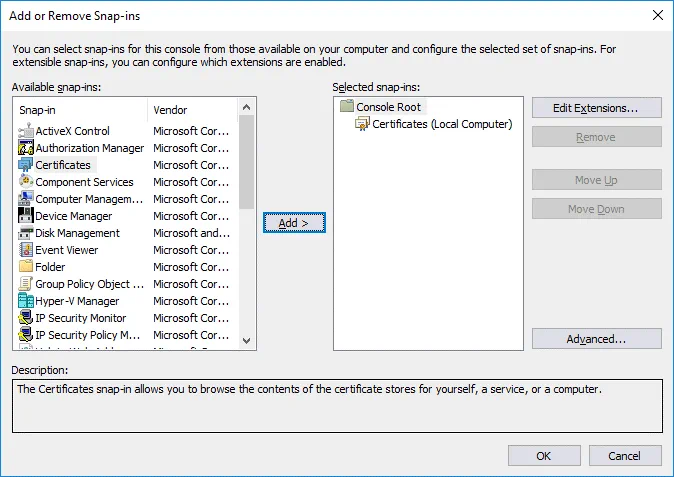
Click File > Add/Remove Snap-in…
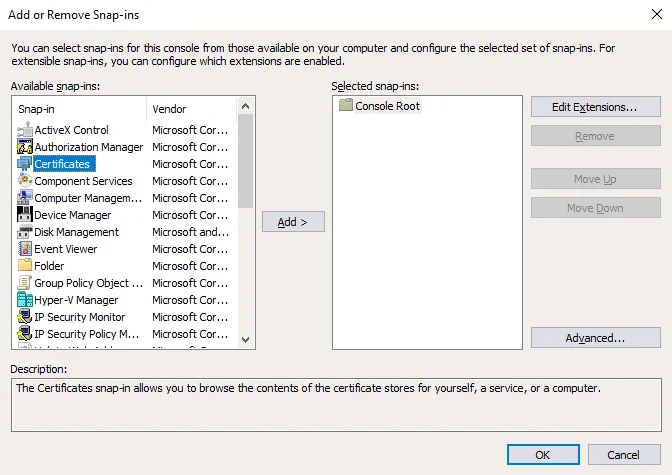
In the left pane (Available snap-ins) of the window that opens, select Certificates, and click Add.
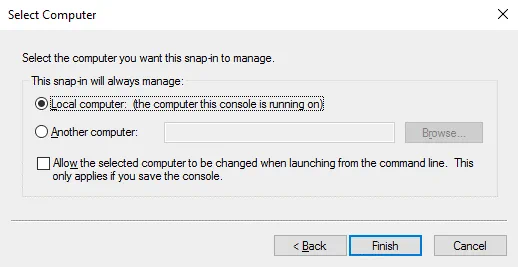
In the pop-up window, select Computer account, and hit Next.
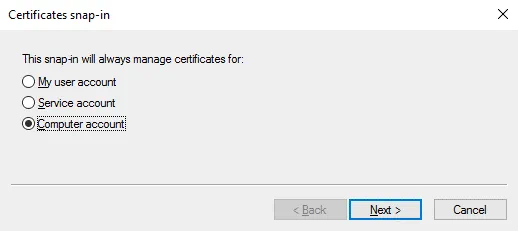
Leave Local computer selected (it is selected by default), and hit Finish.
Certificates (Local Computer) should be displayed in the right pane (Selected snap-ins) of the window now.
In the Add or Remove Snap-ins window, hit OK (a snap-in has been already selected).
You can save the added snap-in in MMC.
Click File > Save as.
Enter a file name, for example, Certificates1.msc.
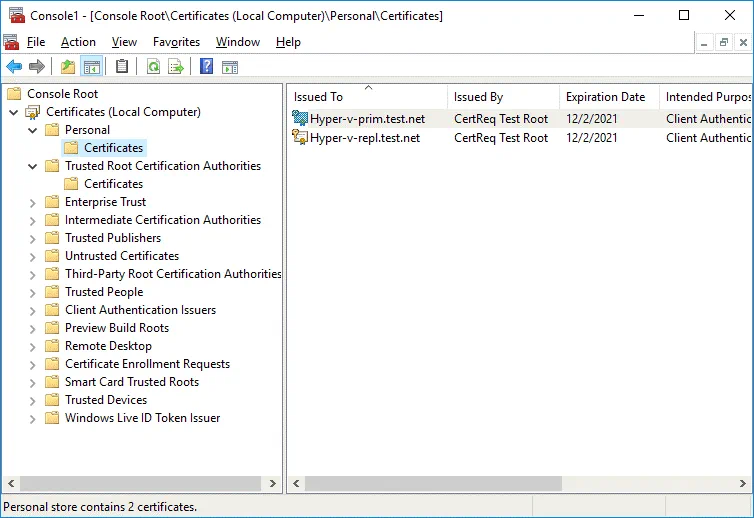
Go to Certificates (Local Computer) / Personal / Certificates. You should see two certificates we have created in PowerShell before – Hyper-v-prim.test.net and Hyper-v-repl.test.net.
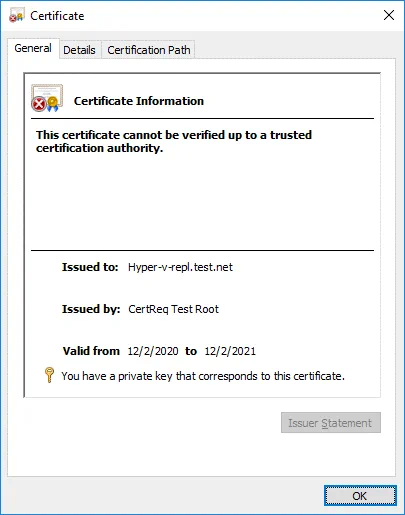
Double click a certificate to see certificate details. A certificate for the second server (Hyper-v-repl.test.net) is not trusted now.
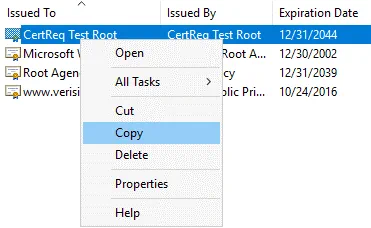
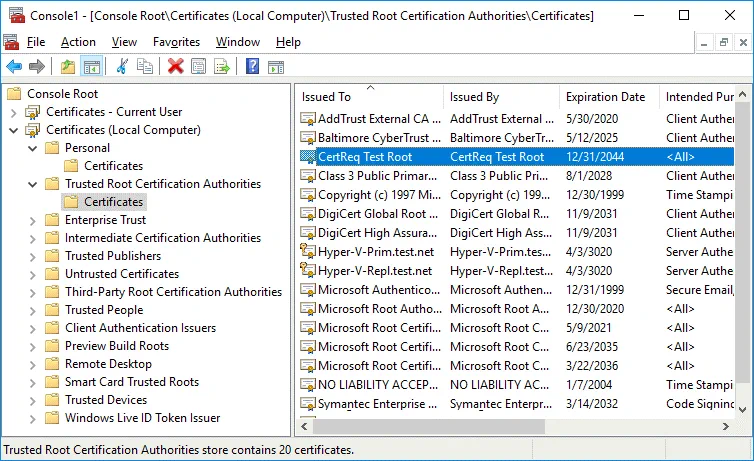
Go to Certificates (Local Computer) / Intermediate Certification Authorities / Certificates. Find the CertReq Test Root certificate that is required for prooper work. Double-click this certificate to see details. The CA Root certificate is not trusted.
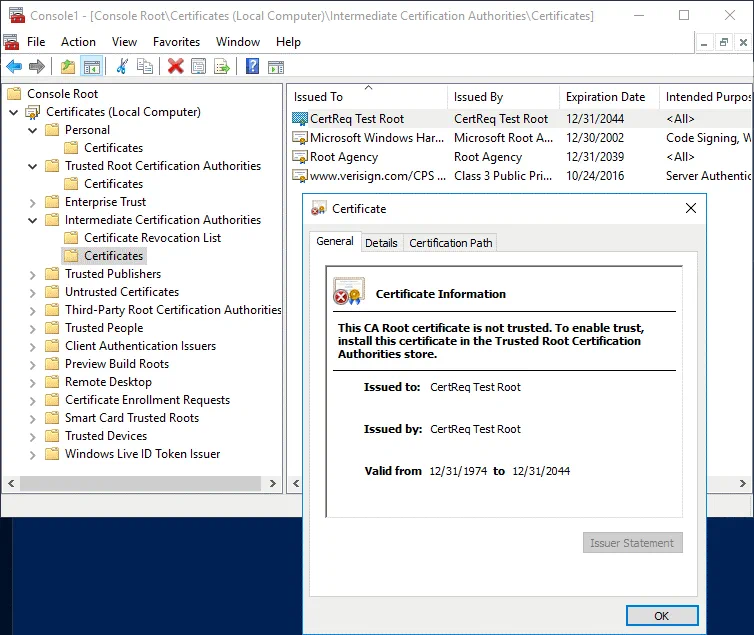
Copy the CertReq Test Root certificate from Intermediate Certification Authorities / Certificates to Trusted Root Certification Authorities/Certificates to make certificates trusted. Select the certificate, press Ctrl+C to copy and Ctrl+V to paste.
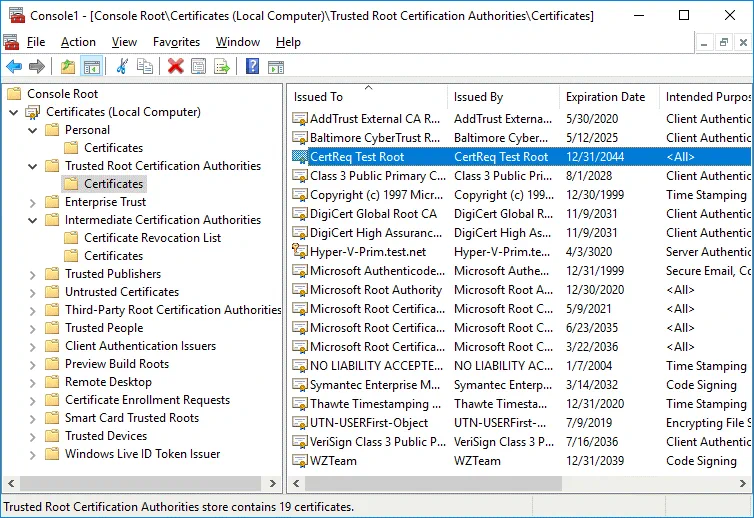
The CertReq Test Root certificate must be located in Trusted Root Certification Authorities / Certificates (as shown on the screenshot below).
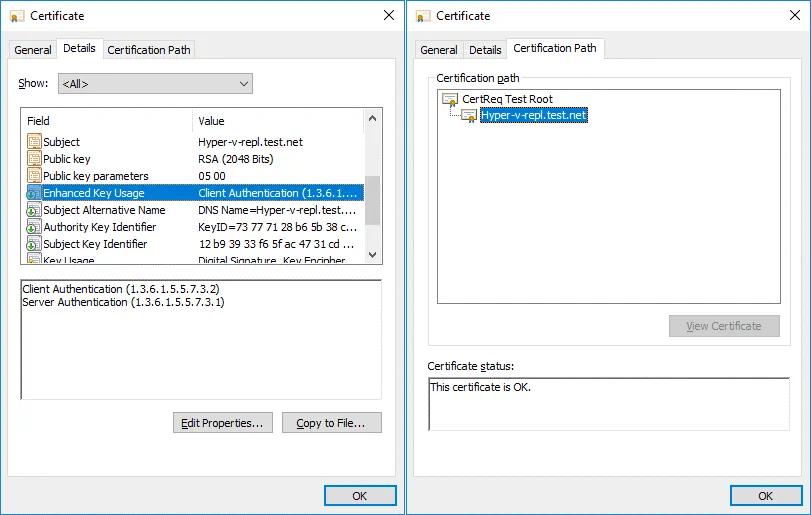
Check your certificates located in Personal/Certificates again. First, we check the certificate for a replica server (Hyper-v-repl.test.net). The certificate is now trusted and has the expiration date of the certificate that you can see in the General tab. Now you also know how to check SSL certificate expiration date in Windows.
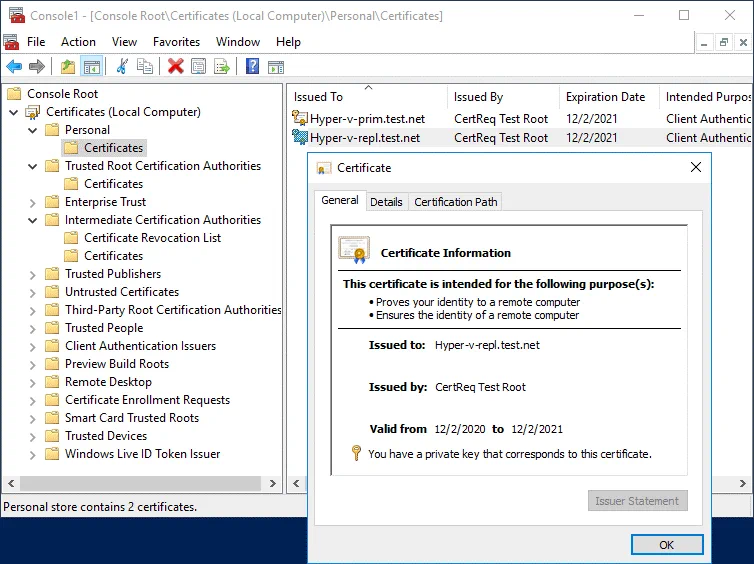
Check other parameters for the certificate in the Details tab (Enhanced Key Usage) and Certification Path tab. This certificate is OK.
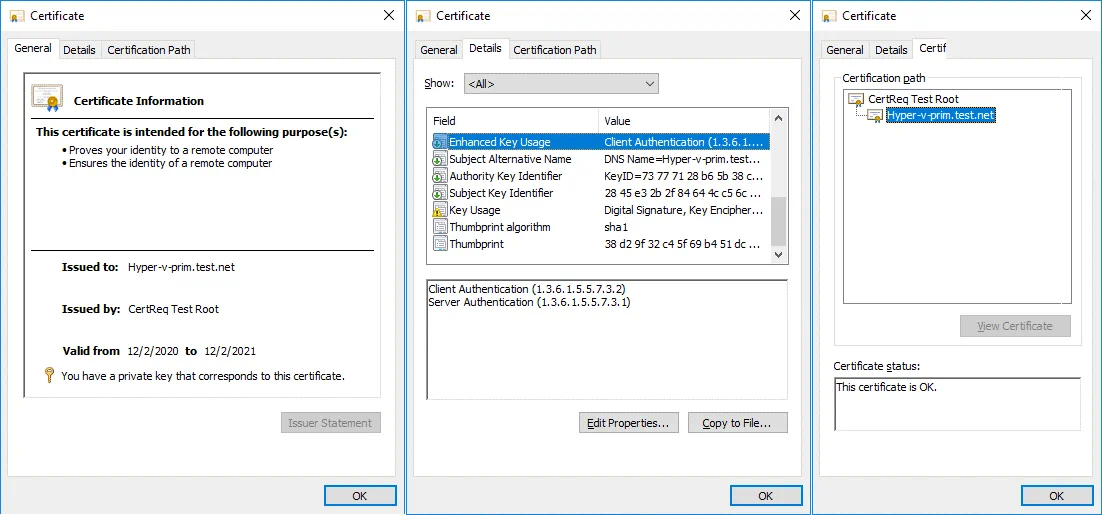
Then check the certificate for the primary server just as you checked the certificate for the replica server.
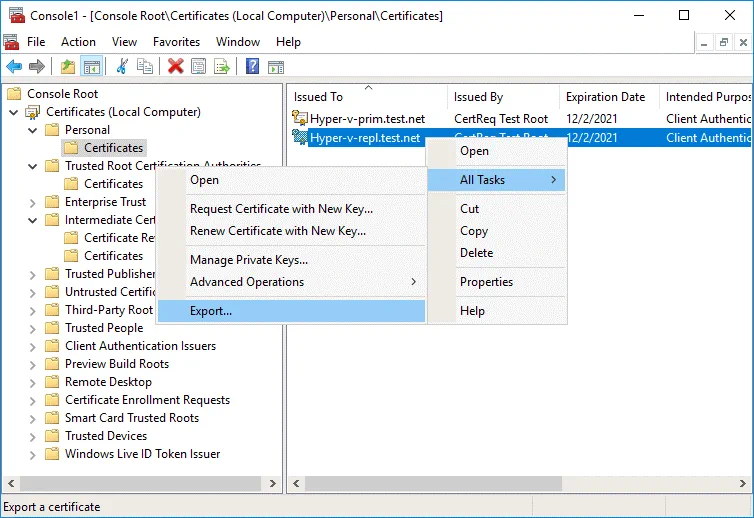
We have configured certificates for the primary server (Hyper-v-prim.test.net), and we need to configure the certificate on the second server now. We need to copy the required certificates to the second server (Hyper-v-repl.test.net) where the replicas will be stored. In order to do this, export the certificates.
Exporting a certificate from the first server
On the first server, select the certificate needed for the second server (Hyper-v-repl.test.net) that is located in Personal/Certificates. Right-click the certificate and in the context menu click All Tasks > Export.
The Certificate Export Wizard opens.
1. Welcome. There is nothing to configure on the welcome screen. Hit Next at each step to continue.
2. Export Private Key. Select Yes, export the private key.
3. Export File Format. Select Personal Information Exchange – PKCS #12 (.PFX), and select Include all certificates in the certification path if possible.
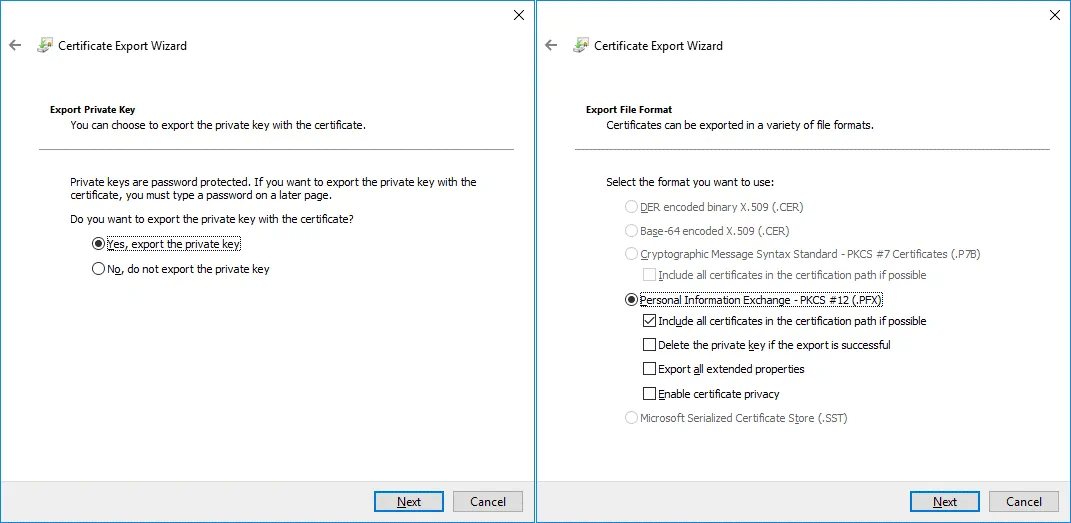
4. Security. Enter a password to maintain security and protect the private key.
5. File to Export. Specify the name and location of the file you want to export, for example, C:\temp\Hyper-v-repl.pfx
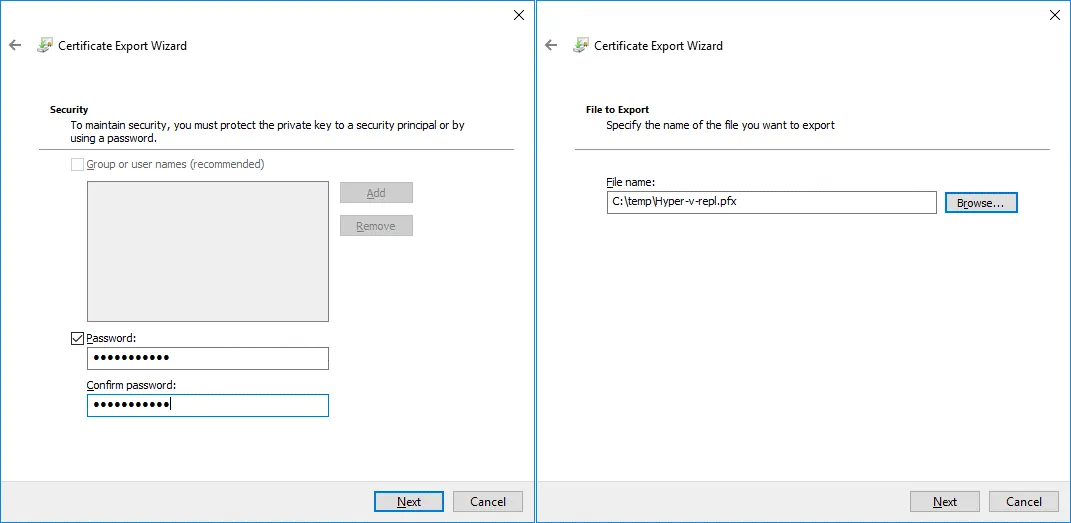
6. Completing the Certificate Export Wizard. Check configuration and hit Finish.
You should see the message: The export was successful. It means that everything is OK.
Exporting the root certificate from the first server
Two certificates have been exported. Now you should export the root certificate the same way. Actions are performed on the first server (Hyper-v-prim.test.net).
Select the CertReq Test Root certificate located in Trusted Root Certification Authorities / Certificates.
Right-click the certificate; click All Tasks > Export.
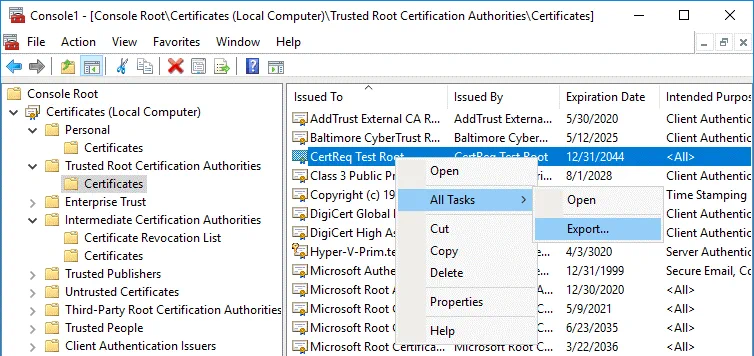
The Certificate Export Wizard opens.
1. Welcome. Hit Next to continue.
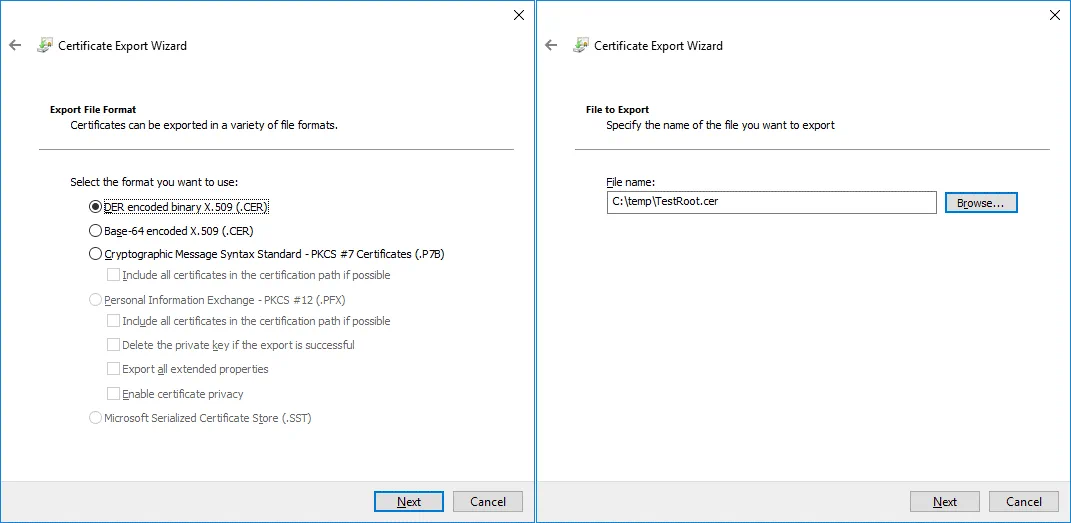
2. Export File Format. Select the format you want to use:
DER encoded binary X.509 (.CER)
3. File to Export. Enter the file name and path to save the file, for example, C:\temp\testRoot.cer
4. Completing the Certificate Export Wizard. Check configuration and finish export.
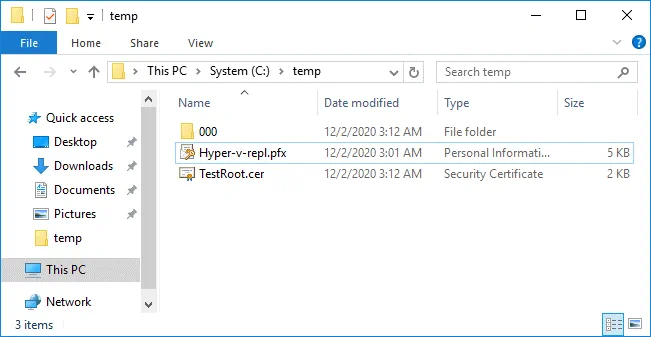
Certificates are exported to Hyper-v-repl.pfx and TestRoot.cer files that are now located in C:\temp\ on the first server.
Copying the exported certificates to the second server
Copy the two exported certificate files (Hyper-v-repl.pfx and TestRoot.cer) from the first server to the second server.
We copy files to C:\temp\ on the second server.
We can use the network path \\Hyper-v-repl\C$ or \\192.168.101.213\C$ to copy certificates via network (where 192.168.101.213 is the IP address of the replica server in our case). Firewall configuration must allow connections for the SMB protocol.
Importing certificates on the second server
Once you have copied certificates to the replica server, you should import these certificates to the replica server.
Open MMC on the replica server (the second server) just as you did on the primary server.
Add a snap-in in the MMC window.
Click File > Add/Remove Snap In.
Select Certificates, click Add.
Select Computer account, and select Local Computer.
Hit OK.
As a shortcut to open this snap-in in the Windows GUI, you can use the command in Windows CMD or PowerShell:
certlm.msc
This command opens Windows certificate manager (the certificates management console) to configure local machine certificates.
Go to Certificates (Local Computer) / Personal.
Right-click the empty space and, in the context menu, click All tasks > Import.
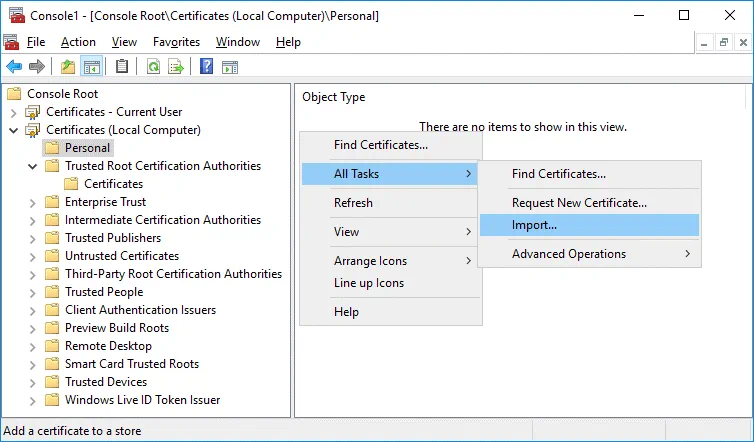
The Certificate Import Wizard opens.
1. Welcome. Select Local machine.
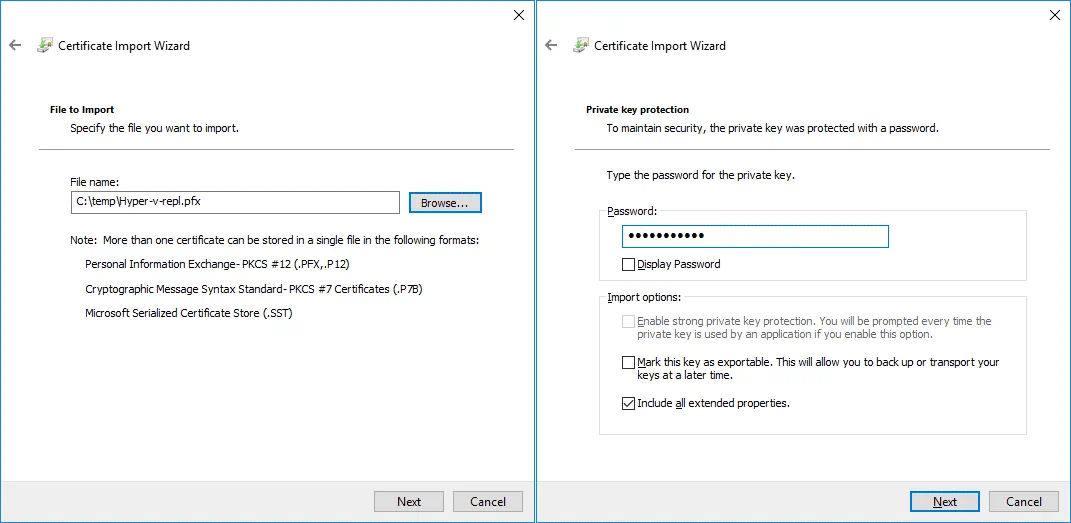
2. File to Import. Browse the Hyper-v-repl.pfx file. Click Browse, select to display all files, and select Hyper-v-repl.pfx
3. Private key protection. Enter the password you have set when exporting the certificate.
4. Certificate Store. Place all certificates in the following store:
Certificate store: Personal
5. Completing the Certificate Import Wizard. Check configuration, and hit Finish.
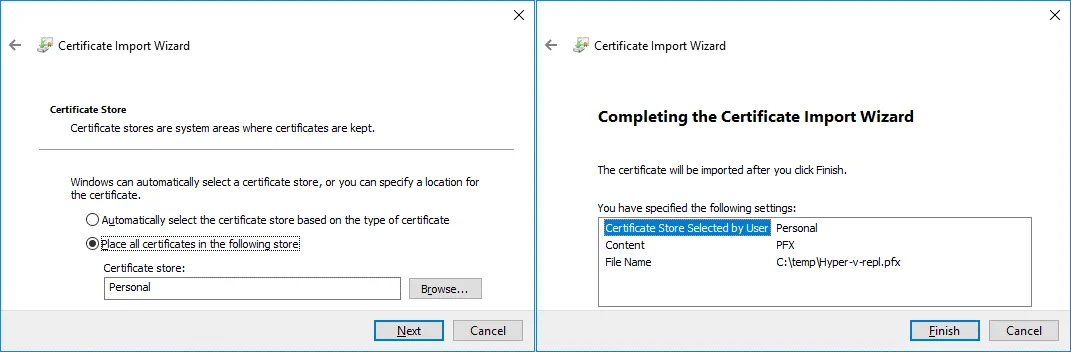
If everything is correct, you should see the message: The import was successful.
Now the Hyper-v-repl.test.net certificate is located in Certificates (Local Computer) / Personal / Certificates on the replica server (the second server). In our case, the CertReq Test Root certificate has also been imported to this location.
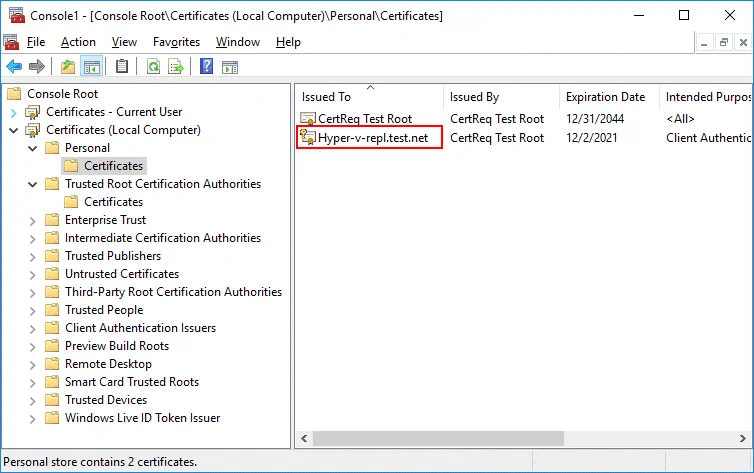
The CertReq Test Root certificate must be located in Trusted Root Certification Authorities / Certificates. Copy this certificate to the needed location. You can import TestRoot.cer manually just as you imported Hyper-v-repl.pfx
Certificate revocation check
Keep in mind that certificate revocation check is mandatory by default, and self-signed certificates don’t support revocation checks on Windows Server 2012. For this reason, you have to disable certificate revocation checking for test certificates. Add settings to Windows Registry on both machines. Run the following command in CMD or PowerShell as an Administrator.
reg add "HKLM\SOFTWARE\Microsoft\Windows NT\CurrentVersion\Virtualization\Replication" /v DisableCertRevocationCheck /d 1 /t REG_DWORD /f
![]()
You may need to reboot the machine.
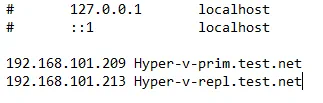
Resolving hostnames
Add recordings to the hosts file (C:\Windows\system32\drivers\etc\hosts) on both machines to allow resolving hostnames to IP addresses when working in Workgroup (when machines are not members of an Active Directory Domain). In our case we add these lines to the host file on both servers:
192.168.101.209 Hyper-v-prim.test.net
192.168.101.213 Hyper-v-repl.test.net
Configuring Replication Settings on a Replica Server
Perform the following actions on the second server where VM replicas should be stored.
Open the Hyper-V Manager.
Right-click the replica server (Hyper-v-repl.test.net in our case), and, in the context menu, hit Hyper-V Settings.
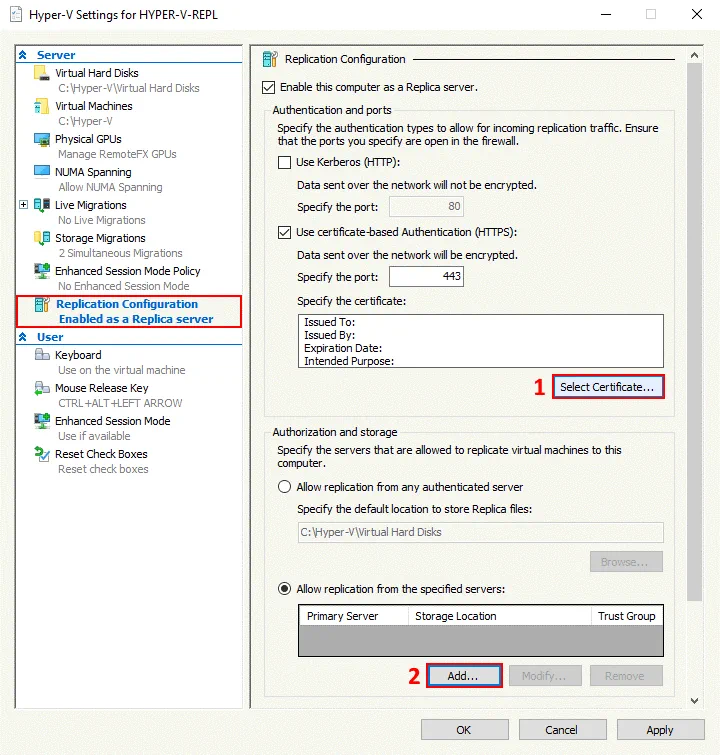
In the left pane of the Hyper-V Settings window, select Replication Configuration.
Select these checkboxes in Replication Configuration:
- Enable this computer as a Replica server
- Use certificate-based Authentication (HTTPS)
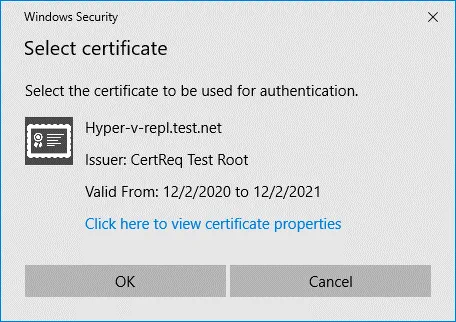
Click Select Certificate.
The Windows Security pop-up window displays information about your certificate. Hit OK to select this certificate.
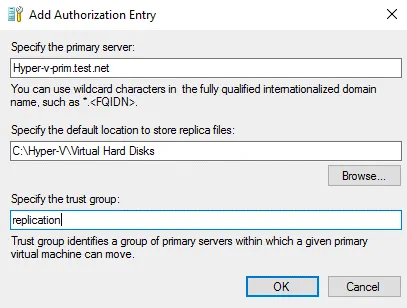
In Replication Configuration, select the Allow replication from the specified servers, option and click Add.
Configure parameters in the Add Authorization Entry window.
Specify the primary server: Hyper-v-prim.test.net
Specify the default location to store replica files: C:\Hyper-V\Virtual Hard Disks\ (this is an example – use your custom location not on C:)
Specify the trust group: replication
Configuring Windows Firewall
Configure firewall to enable inbound traffic. Enable inbound TCP connections on port 443 on the replica server (or disable the firewall temporary for test purposes).
Enable-Netfirewallrule -displayname "Hyper-V Replica HTTPS Listener (TCP-In) "
netsh advfirewall firewall show rule name=all dir=in | find "Hyper-V "
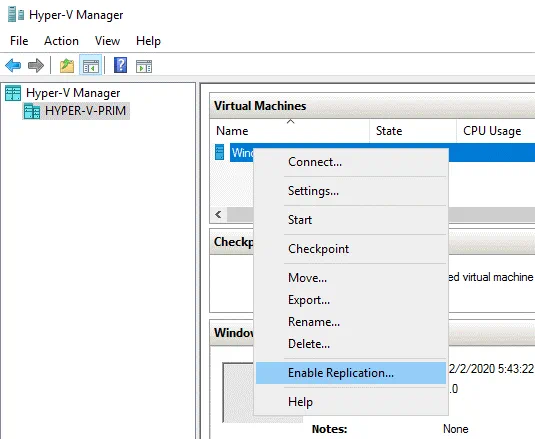
Configuring Replication on the First Server
Create a VM on a primary Hyper-V server to replicate. Make sure that the source VM doesn’t have any snapshots before you enable replication. Enable replication on the first machine, which is the primary server (Hyper-v-prim.test.net in our case).
Right-click a VM, and, in the context menu, hit Enable Replication.
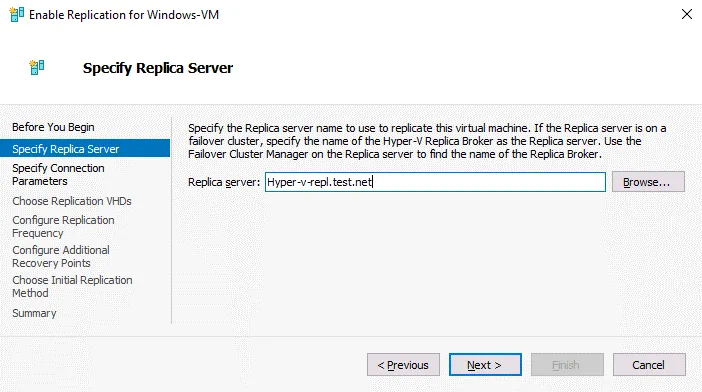
The Enable Replication wizard opens.
Before you Begin. Hit Next to continue.
Specify Replica Server. Enter the name of your replica server. In our case, we use Hyper-v-repl.test.net as a replica server.
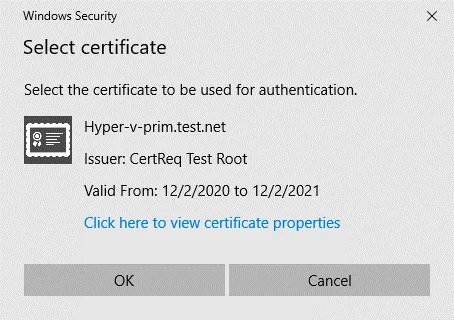
Specify Connection Parameters. Select Use certificate-based authentication (HTTPS), and click Select Certificate.
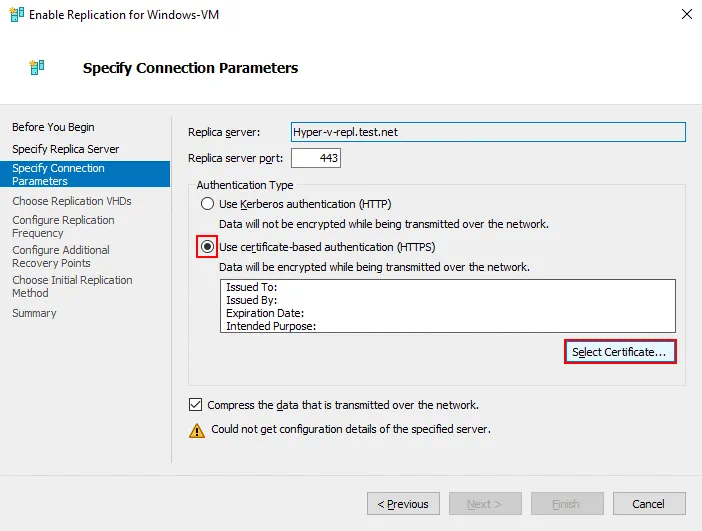
Once you click Select Certificate, a pop-up window opens with details about the certificate you have configured before. Hit OK to use this certificate.
Configure other replication settings as usual to complete replication configuration on the source server.
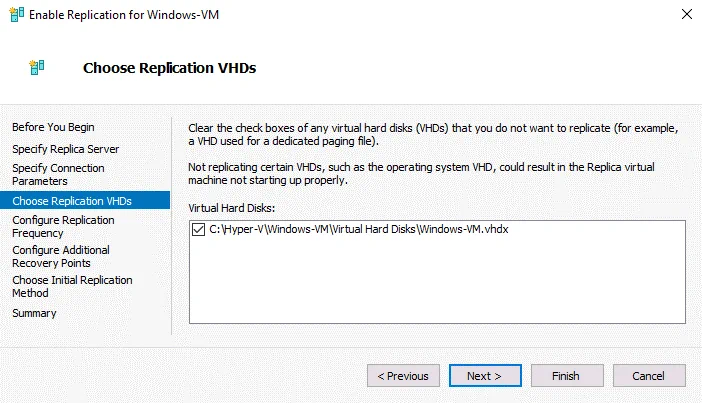
Choose Replication VHDs. Select VM virtual disks that must be replicated. You can select all VM virtual disks or only some of them.
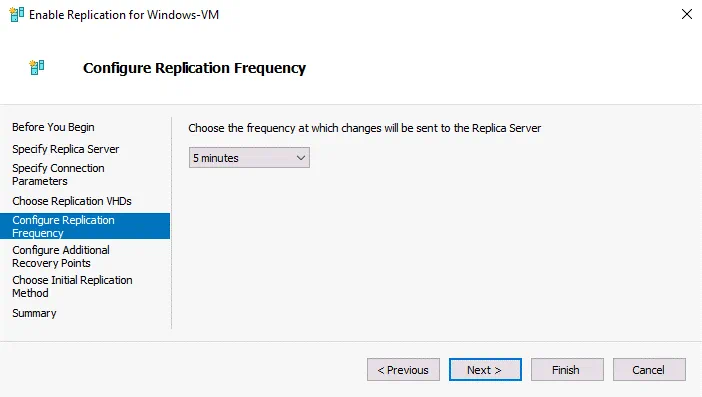
Configure Replication Frequency. Choose the frequency at which changes are sent to the replica server, for example, 5 minutes.
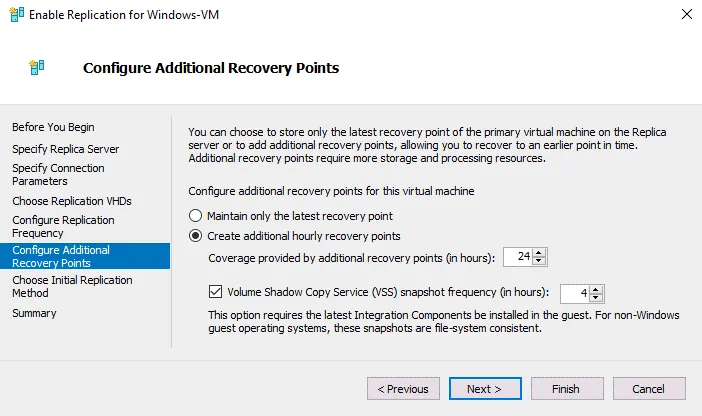
Configure additional recovery points for this virtual machine. We choose to create additional hourly recovery points in our example. Select options that better fit your needs. Recovery points are a result of incremental replication (snapshot-based).
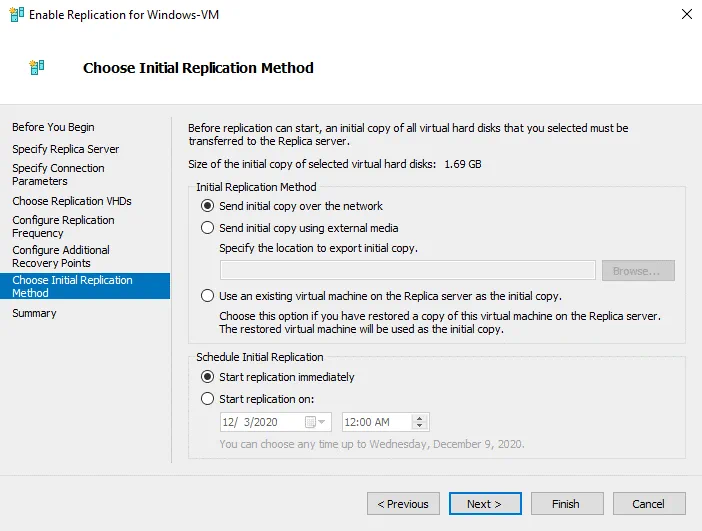
Choose Initial Replication Method. Select Send initial copy over the network.
Hit Finish to finish configuring native Hyper-V replication by using certificates in a Workgroup, and close the Wizard.
Alternatives to Native Hyper-V Replication
Built-in Hyper-V functionality to perform replication is useful. But sometimes you may need extended functionality to perform Hyper-V replication and virtual machine failover. There is a good alternative to native Hyper-V replication.
NAKIVO Backup & Replication is a universal data protection solution that can back up Hyper-V virtual machines and perform VM failover. The product supports Hyper-V replication in Active Directory domains and Workgroups. The following functionality is included:
- Application-aware replication. Data in a VM-replica is consistent when you replicate a VM in a running state due to using Microsoft Volume Shadow Copy (VSS) service running inside virtual machines.
- Incremental replication using Microsoft’s Resilient Change Tracking (RCT) allows you to save disk space and time. The first running of a replication job copies all data of a source VM, and then only changed data is copied by creating the appropriate recovery points for a VM replica.
- Flexible retention settings and GFS retention policy. Keep a wide range of recovery points for different periods of time, and optimize storage space used in a backup repository.
- Network acceleration boosts replication speed by using data compression, saving you time.
- Log Truncation for Microsoft Exchange and SQL to save storage space for Hyper-V VMs running a database when replicating them.
- Automated VM failover allows you to recover a VM in a short time.
- Site Recovery allows you to create complex disaster recovery scenarios with multiple actions, including Hyper-V VM replication and failover.
You can recover a machine from a physical server backup to a VM, or recover a Hyper-V VM backup to a VMware VM. Don’t wait for a disaster – download NAKIVO Backup & Replication and protect your Hyper-V VMs today!

Conclusion
Hyper-V replication is important to protect Hyper-V virtual machines and ensure that you can recover data and workloads in a short time after any failure. Sometimes you may need to configure Hyper-V replication in non-domain environments when Hyper-V servers are not members of an Active Directory domain and belong to a Workgroup.
You need to create self-signed certificates to replicate Hyper-V VMs in a Workgroup and configure authentication for Hyper-V servers by using these certificates. Configuration applies to hostnames, firewall, and certificate revocation checking before configuring VM replication on Hyper-V hosts.