How to Update NAKIVO Solution Components
It is recommended that you update NAKIVO Backup & Replication with every new release to get the latest security patches, enhancements and access to new features. The NAKIVO solution consists of three main components: Director, Transporter and Backup Repository.
The Director and all installed Transporters should be updated to completely update your instance of the solution. To be able to use the latest features and apply the enhancements, the versions of the Director and Transporters should match. This blog post explains how to update NAKIVO Backup & Replication with all the needed components.
About the Update Process
Starting from version 8.5, NAKIVO Backup & Replication supports automatic updates, which makes the update process more convenient. If automatic updates are not available or not supported (for example, if your instance of the solution is located in an isolated environment), you can update the product manually.
NOTE: Before installing an update of NAKIVO Backup & Replication, ensure that there are no data protection and repository maintenance jobs running. Otherwise, all running jobs will be stopped during the update.
To update the product manually, download the installer or updater file of the latest version for your platform from the NAKIVO website. Note that the updater only works for updates of the minor version to the latest version/build while the installer available on the website works for updating to the latest major and minor versions.
If you have the NAKIVO solution installed on a VM, it is recommended that you create a VM snapshot. In case anything goes wrong, you can then use the snapshot to roll back the changes. After installing the update and verifying that everything is working properly, make sure to delete the snapshot to avoid performance degradation and related issues.
If you have a multi-tenant deployment of NAKIVO Backup & Replication, then only users with master-tenant permissions can manage software updates of the product components.
NOTE: For larger environments with several Transporters, if the Director is updated but the Transporters were not automatically updated, you can enable the system.transporter.allow.old option in the NAKIVO Backup & Replication expert mode to ensure that the Director can still work with the outdated Transporters while you manually update the Transporters.
Automatic Update in the Web Interface
The easiest way to update the components of NAKIVO Backup & Replication is by using the update option in the NAKIVO solution web interface. Auto-update is supported for the full solution deployment on Linux and Windows, that is, for the Director, auto-injected Transporters, and Transporters manually installed with a master password set for them. Read the full list of NAKIVO auto-update requirements.
Follow these steps to use the auto-update feature:
- Open the web interface of NAKIVO Backup & Replication in a web browser and log in:
https://NAKIVO_Director_IP:4443
- Go to Settings > General > Software Update and click Check For Updates.
- If the product is up to date and there are no updates available, you see the message shown in the screenshot below.

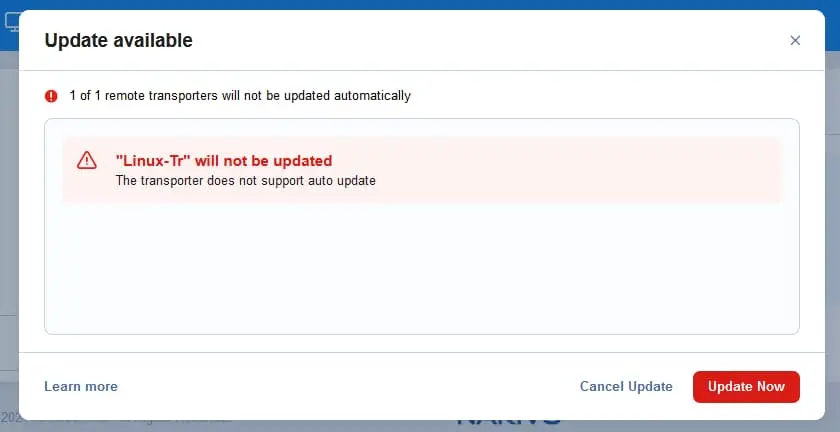
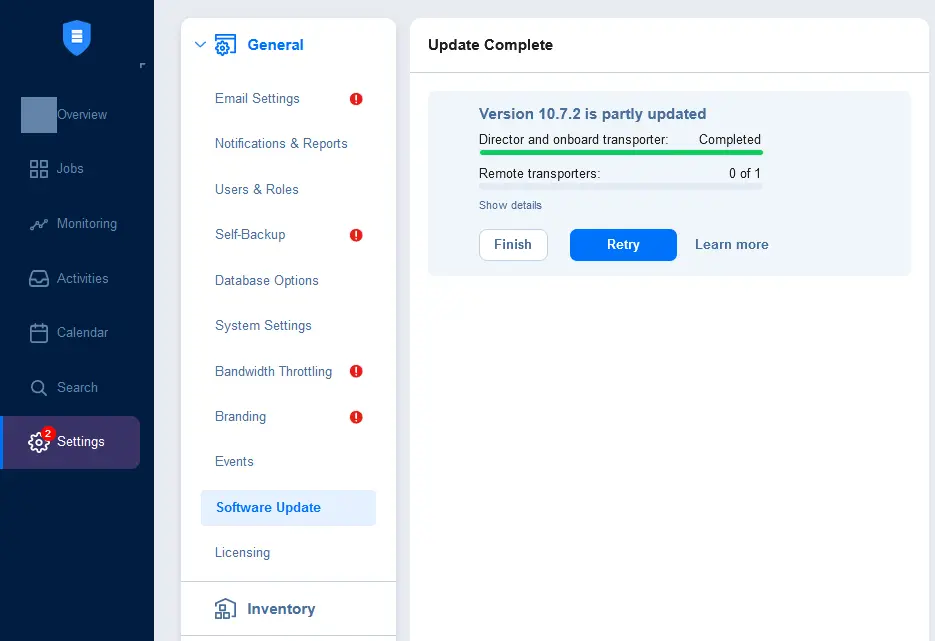
If a new version is available, you should see the new version number and the buttons to download and update. To start the update process, click Download & Update.

- Read the notification message and click Update Now to update the NAKIVO Director and supported Transporters. The Director is updated first, and then, the update is transferred and executed on supported Transporters.
As mentioned above, using this method allows you to automate updating the deployed NAKIVO Transporters connected to the Director. If some of the deployed Transporters cannot be updated automatically, a message is displayed. You have to update those Transporters manually.
- Read the important Update ready message before you proceed. When you click Update Now, A self-backup, which is a back of your NAKIVO Backup & Replication configurations, is performed before starting the update. All running activities, including backup jobs, recovery jobs, repository maintenance, etc are stopped. If you have critical jobs running, you can wait until they are completed and then proceed to update the NAKIVO solution. If you are ready to update, click Update Now.

- Once the update process starts, a progress bar is displayed in the web interface of NAKIVO Backup & Replication. Wait until the update process is finished. Don’t reboot the machines running NAKIVO Backup & Replication during the update process.

- Once the update is completed, you can check the update status of the NAKIVO components in Settings > General > Software Update.
You can also check the current version of NAKIVO Backup & Replication (the Director component) in Help > About.

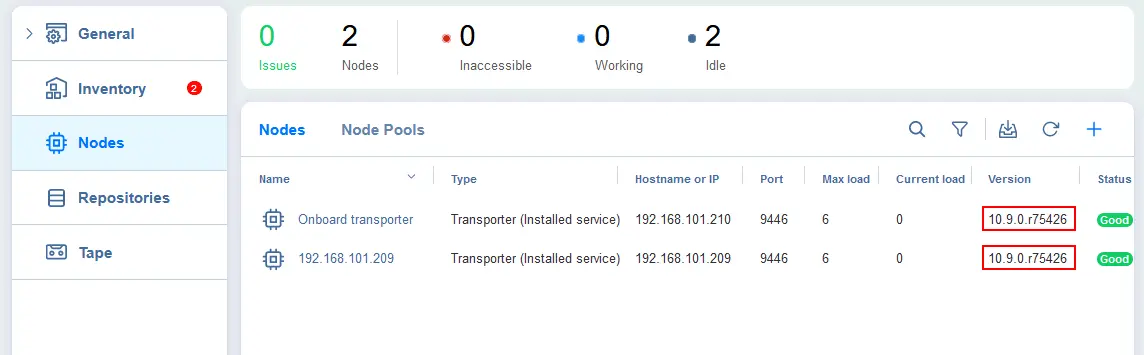
You can check the version of Transporters in Settings > General > Nodes (in version 10.8 and later).
Note: If you notice that the version is not the latest after auto-update or any of the Transporters are not updated automatically, read the sections below to see how to update the Director and Transporter components manually. You can use manual updates if automatic updates are not supported or the internet connection is limited on machines where NAKIVO Backup & Replication is installed.
Updating NAKIVO Components on Linux and Virtual Appliances
In this section, learn the steps to update the components of NAKIVO Backup & Replication installed on Linux or deployed as a pre-configured VMware virtual appliance. The VMware virtual appliance with the NAKIVO solution is based on Linux (Ubuntu Server), and the update process is the same as for a Linux deployment.
You need to download the NAKIVO installer for the new version to use as an updater for your installation and store this installer on the machine with a Director and/or Transporter installed.
One common method is to transfer the downloaded file from your own machine to a Linux machine:
- Download a Linux installer from https://www.nakivo.com/resources/download/trial-download/
or download an updater from https://www.nakivo.com/resources/download/update/
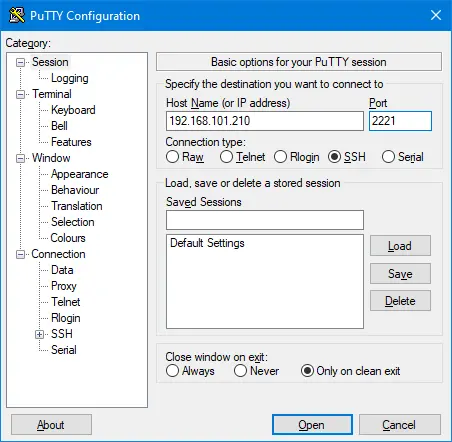
- Connect to the Linux machine, which can be a Linux-based virtual appliance with an SCP/SFTP client, via an SSH encrypted connection. We use WinSCP as an SCP/SFTP client for connecting to the Linux machine from Windows.
Select the parameters to connect to a Linux-based virtual appliance:
- File protocol: SFTP
- Host name: Enter the IP address of the remote Linux machine
- Port number: 2221 (this port is used by the SSH server installed on the NAKIVO virtual appliance)
- User name: nkvuser
- Password: Read the VM notes or the documentation to find the default password for your virtual appliance
If you deployed the NAKIVO Director or Transporter on Linux manually, the user credentials and SSH port number may be different (an SSH server on Linux uses port 22 by default).
Click Login to connect.

- We can see the commander-style window of WinSCP where the files of the local Windows machine are displayed in one panel and the files of the remote Linux machine are displayed in another panel.
Copy the installer file, such as NAKIVO_Backup_Replication_v10.9.0.75563_Installer-TRIAL.sh or the updater file, such as NAKIVO_Backup_Replication_v10.9.0.76010_Updater.sh to the /opt/nakivo/updates/ directory on the remote Linux machine.
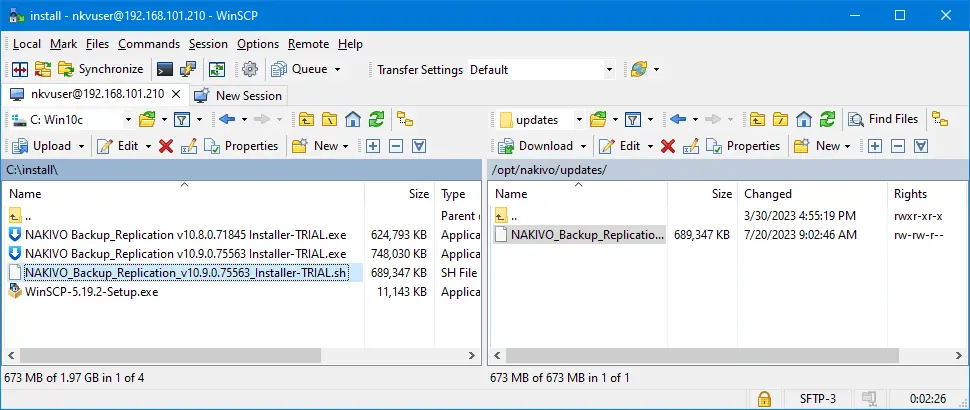
- You can close WinSCP after copying the new installer file of NAKIVO Backup & Replication to the remote Linux machine.
- Connect to the remote Linux machine where the NAKIVO Director or Transporter is installed with an SSH client such as PuTTY. We use PuTTY because we are connecting from a local Windows machine.
Use the same connection parameters as you used before for connecting to the remote Linux machine with an SCP/SFTP client such as WinSCP. Then click Open.
- Go to the directory where the installer of a new version of NAKIVO Backup & Replication is stored. In this case, /opt/nakivo/updates/ is this directory.
cd /opt/nakivo/updates/ - Set the permissions to execute the NAKIVO installer file:
sudo chmod +x ./NAKIVO_Backup_Replication_v10.9.0.75563_Installer-TRIAL.sh - Run the NAKIVO installer to update the NAKIVO components installed on the current Linux machines:
sudo ./NAKIVO_Backup_Replication_v10.9.0.75563_Installer-TRIAL.sh
- Read the license agreement. Press Enter to scroll down the text. Type y and press Enter to accept the license agreement.

- The installer of NAKIVO Backup & Replication detects the NAKIVO components that have already been installed on the current machine (Direct and/or Transporter) and updates them. Wait until the update process is finished.
If everything is correct, you should see the message:
NAKIVO Backup & Replication updated successfully.

Updating from the NAKIVO console menu
If you have placed the downloaded installer or updater file in /opt/nakivo/updates/ which is the default directory to store NAKIVO update files, you can run the update process from the NAKIVO console menu for the Linux-based VMware virtual appliance. This is the alternative method to launch the updater/installer:
- Use VMware Remote Console (VMRC), VMware Workstation or VMware web console for connecting to the interface of the VMware virtual appliance.
- Select Manage NAKIVO services. Hit Enter to enter the selected menu entry.
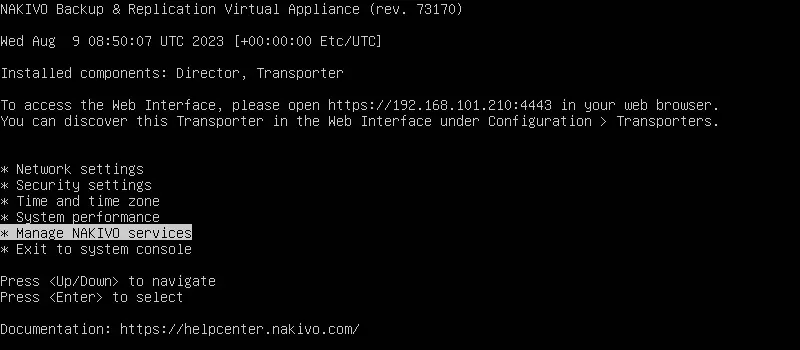
- Go to Software update.

- Installer and updater files of NAKIVO Backup & Replication stored in /opt/nakivo/updates/ are displayed on this screen. Select the needed file and press Enter to run the update.

- Follow the instructions, similarly as when launching the installer or updater .sh file from the Linux command line.
Updating NAKIVO Components on Windows
To update NAKIVO Backup & Replication components installed on Windows:
- Download the new installer of NAKIVO Backup & Replication for Windows from the official NAKIVO download page or download the updater from the update page. The file name should be like NAKIVO Backup_Replication v10.9.0.75563 Installer-TRIAL.exe for the installer file and NAKIVO Backup_Replication v10.9.0.76010 Updater.exe for the updater file.
- Run the .exe file of the installer or updater you have downloaded.

- The installer window opens. The installer detects whether NAKIVO Backup & Replication components are installed on this machine. If you are updating the Transporter, you can enter a master password to protect the connection between the Transporter and Director.
Select the checkbox that you accept the License Agreement and click Update Now.

- Wait until the components are updated on Windows. You can see a progress bar for the update process.

- If NAKIVO Backup & Replication components have been updated successfully, you should see the message: Update was successful!
Click Finish to close the window.

Updating the Master Password
If you have entered a master password when updating the Transporter, you must enter the same master password for connecting the Director to the Transporter in the Transporter options in the web interface.
To enter a master password for the updated Transporter:
- Go to Settings > Nodes to open a list of Transporters and other nodes.
- Hover over the needed Transporter that was updated, click the three dots icon … and hit Edit.

- Enter the new master password you set while updating the Transporter in the appropriate field of the Security section. Hit Connect.
Check the certificate details in the displayed dialog box and hit Accept.
Hit Apply in the Edit Transporter Options window.

- Refresh the Transporter on the Nodes page to ensure that the Transporter is connected properly.