
How to Perform SharePoint Online Backup: Native Tools vs Third-Party Solution
SharePoint Online is one of the most popular cloud applications for storing and managing files. Due to the global shift toward remote work, more than 86% of Microsoft SharePoint users now rely on cloud-based servers instead of on-premises servers.
As the number of users grows, data loss events like human errors and cyberattacks in the cloud become inevitable. The native Microsoft recovery tools provide limited protection and recoverability options. For more comprehensive protection, you can perform SharePoint Online backup using a dedicated backup solution.
This post details the native Microsoft recovery tools and explains how you can overcome their limitations using the NAKIVO solution for SharePoint Online backup and restore.
SharePoint Online Backup and Recovery Using Native Microsoft 365 Features
SharePoint Online data is spread across different sites, lists, libraries and OneDrive folders, which makes backing up this data complicated. In addition, Microsoft does not provide tools specifically designed for SharePoint Online backup. However, you can find several native data protection features that allow you to restore data in certain scenarios in case it is deleted, corrupted or lost.
It is important to mention that traditional backup methods used for backup of SharePoint Server on-premises do not work with SharePoint Online.
Recover SharePoint files from the Recycle Bin
In SharePoint Online, when you delete items such as sites, libraries, lists, calendar events, folders and files, they are sent to the recycle bin. The Recycle Bin is divided into two stages:
- First-stage recycle bin (also known as the site recycle bin): You can recover deleted files in SharePoint from here if you need to.
- Second-stage recycle bin (also known as the site collection recycle bin): Items deleted from the first-stage recycle bin appear here. Only administrators can restore files from this stage and send them to their original location.
Items are retained for a maximum of 93 days combined for both stages before they are permanently removed. Sometimes items are deleted sooner when:
- An administrator manually deletes them from the site collection recycle bin.
- The available space is depleted – in which case, the recycle bin automatically removes the oldest files first.
Within up to 14 days after the item has been permanently removed from your recycle bin, you can send a ticket to Microsoft support requesting to restore your entire site collection in SharePoint Online. This method of recovery has its disadvantages:
- Recovery through support is not guaranteed.
- Granular recovery options are not available, and you can only recover entire sites.
- There’s a risk of losing the latest changes because the recovery process overwrites existing data.
- If the data is not restored within this period, it is gone forever.
SharePoint Online Versioning
Versioning allows you to save multiple versions of the same document. You can recover SharePoint files by reverting back to previous versions when needed.
New versions are created in the following cases:
- Periodically almost every 30 minutes.
- Every time you change a file and upload it to SharePoint Online.
- Once you close a file.
- When you upload a new file with the same name as an existing SharePoint Online file.
You can also recover SharePoint files by restoring an entire shared document library to a previous version. However, this process undoes all the changes you made on files and folders in the last 30 days.
By default, versioning is enabled for document libraries and the number of versions is limited to 500 but can be increased to 50,000. You can also enable this feature for page libraries and SharePoint Online lists but not for site metadata.
Note: Storing multiple versions requires additional storage space. Certain Microsoft 365 subscription plans do not provide unlimited storage which means that you might have to upgrade your plan or pay for additional storage.
Retention policies for SharePoint Online
This feature allows you to create rules that define how long you preserve SharePoint Online documents and files. In other words, you can configure which data can be deleted and when, with the main objective of archiving files for legal and compliance purposes.
It is possible to set specific retention policies for different content types. This way, when you create a document library, folder or file, the associated policy is automatically applied to it. Keep in mind that retention policies do not support the recovery of deleted list columns in SharePoint.
Note: Compliance retention policies are only available in Microsoft Purview Audit (Premium) for Microsoft 365 E5, A5 and G5 subscription plans.
eDiscovery in SharePoint Online
eDiscovery allows you to use the In-Place Hold and retain SharePoint sites, including all their documents, lists, pages and subsites until you lift the hold. You can edit and delete the content knowing that a copy remains unchanged in the Preservation Hold Library. Once you need to recover SharePoint Online data, you can use the search capabilities to find and export the needed files to your computer.
Note: eDiscovery is only available for Microsoft 365 Enterprise E3 and E5 subscription plans.
OneDrive Sync for SharePoint Online
With a Microsoft 365 subscription, you can sync SharePoint Online files to a folder on your desktop and use them even when you are offline. All the changes you make on these files are automatically synced with SharePoint Online once you go back online.
Limitations of Native SharePoint Recovery Tools
According to its Shared Responsibility Model, Microsoft is responsible for ensuring the availability of its services and platforms to users worldwide. Users, on the other hand, are responsible for protecting the data they create and share on Microsoft 365. With that in mind, the native recovery tools have several limitations, including:
- Single storage location: Your entire data is stored in the same cloud meaning that a single breach can wipe out your original and backup data simultaneously.
- Limited retention period: Deleted items are stored in the recycle bin for a specific period and if you do not recover them before that period expires then they are permanently removed.
- Ineffective recovery: In some cases, versioning can be disabled which means that you can’t restore a previous version of a file. Even when versioning is enabled, you have to manually recover individual file versions which can be time-consuming and unreliable.
- Weak data protection: Keeping your files on your desktop using OneDrive Sync is not a robust ransomware protection option since they can also get infected once you go online.
Advantages of Using NAKIVO’s Solution for SharePoint Online Backup
To ensure optimal data protection, Microsoft recommends using third-party backup tools. NAKIVO’s solution provides efficient SharePoint Online backup with near-instant recovery, in addition to other important capabilities:
- Set up a dedicated backup repository and safely store backups of Microsoft 365 data on a local machine.
- Retain multiple recovery points using the grandfather-father-son (GFS) retention policy so you could restore deleted data for as long as you need and meet compliance requirements.
- Instant granular recovery of sites, subsites, libraries, lists, list items and files.
- Recover items to their original location or send them to a different site.
- Benefit from additional security features such as role-based access control and two-factor authentication.
- Protect Exchange Online and OneDrive for Business data.
How to Back Up SharePoint Online with NAKIVO Backup & Replication
To back up SharePoint Online using NAKIVO Backup & Replication, start by adding your Microsoft 365 account to the solution’s inventory and creating a SaaS backup repository. Once that is done, you can set up your backup jobs using a simple step-by-step wizard. Let’s have a closer look at these steps.
Adding a Microsoft 365 account to Inventory
Start by checking if the platform you are using meets the necessary requirements. Once done, you can add your Microsoft 365 account to the inventory in NAKIVO Backup & Replication:
- In the left pane, click Settings.
- Go to the Inventory tab and select Add New.
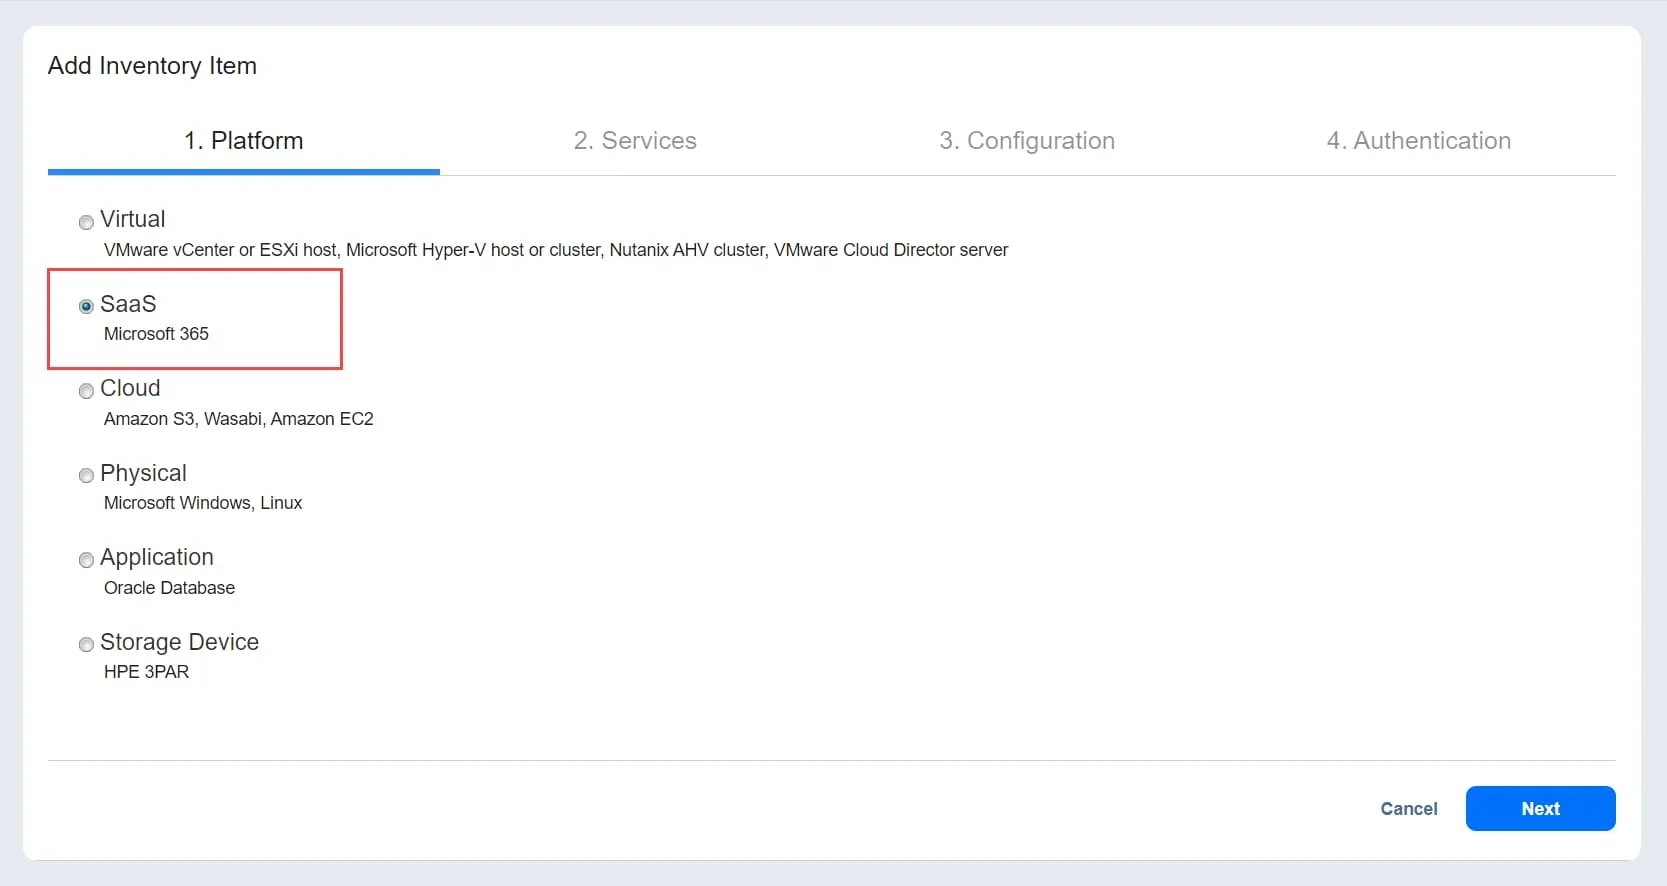
- On the Platform page, choose SaaS, then click Next.
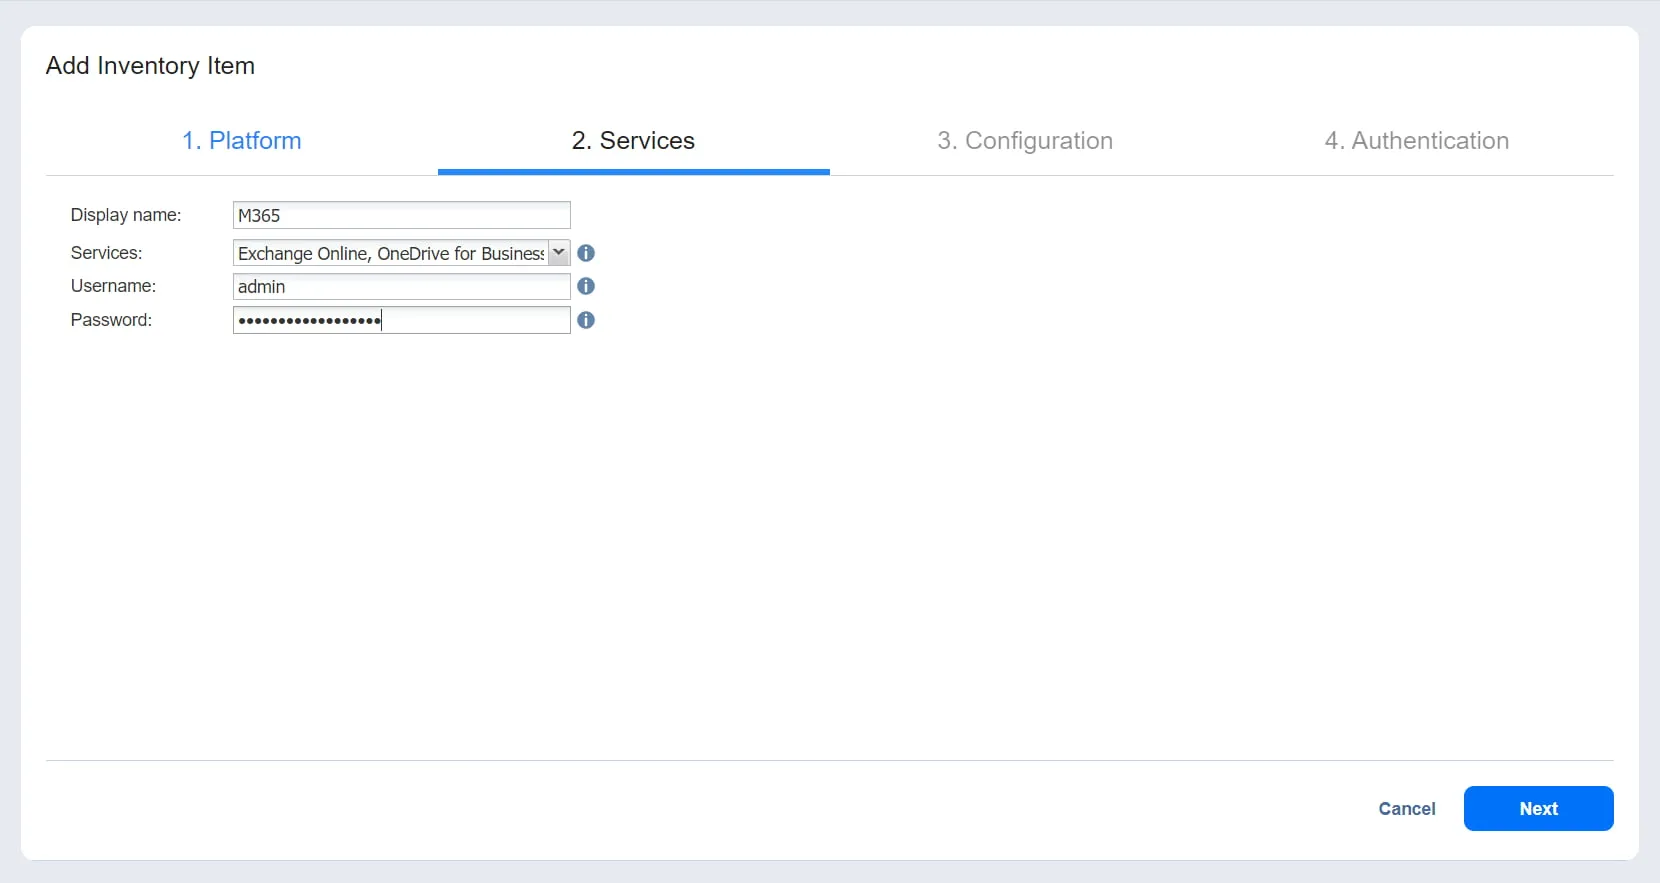
- On the Services page, enter the following information:
- Display name: Give a name for the account you are creating.
- Service: Choose the Microsoft 365 service(s) you want to back up.
- Username: Provide the administrator username required for SharePoint Online and Exchange Online Groups support.
- Password: Provide the administrator password required for SharePoint Online and Exchange Online Groups support.
Click Next to proceed.
- On the Configuration page, choose one of the below options:
- Automatically register a new Azure AD application: The solution automatically registers the Microsoft 365 account as a new application in Azure Active Directory and grants the required permissions after authentication.
- Use an existing Azure AD application: Manually add an existing Microsoft 365 application that is already registered in Azure Active Directory.
Click Next when you are done.
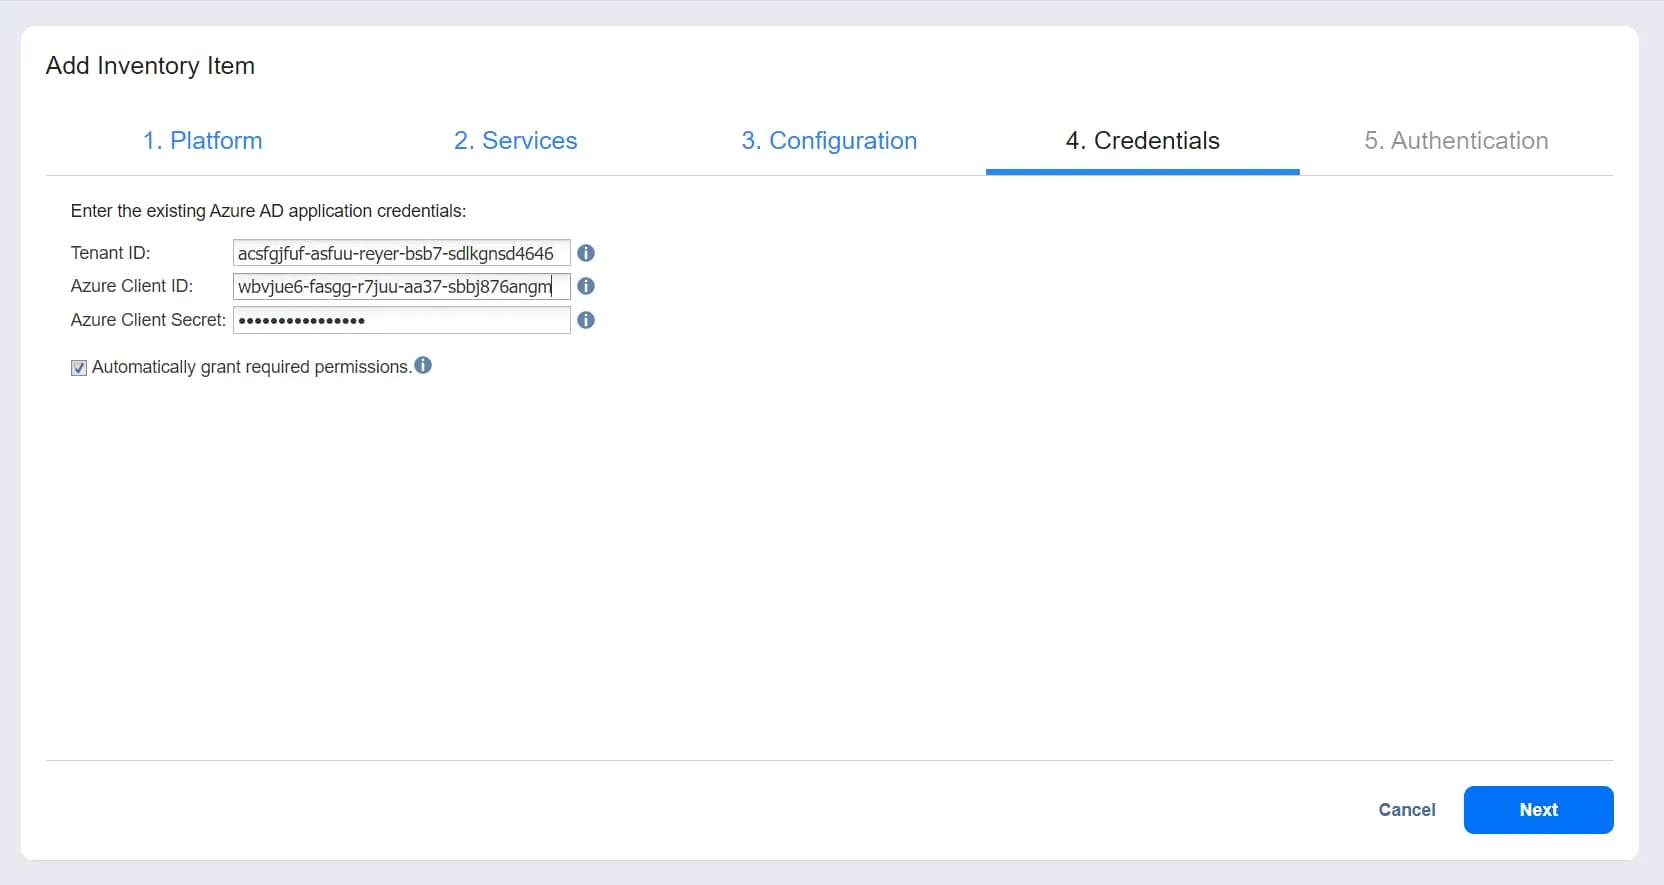
- If you chose Use an existing Azure AD application, the Credentials page opens:
- Enter your Azure AD credentials:
- Tenant ID: Enter the Azure Tenant ID created when registering your Microsoft 365 account in Azure Portal.
- Azure Client ID: Enter the Azure Client ID created when registering your Microsoft 365 account in Azure Portal.
- Azure Client Secret: Enter the Azure Client Secret obtained from the Azure Portal.
- Select Automatically grant required permissions (optional): If you choose this option, the NAKIVO solution automatically checks your organization’s Microsoft 365 account for the required API permissions and adds them if they are missing. Once done, click Next to move to the following page.
You can also choose to manually grant the required permissions. In this case, click Finish to complete adding the item to the inventory.
- Enter your Azure AD credentials:
Note: Refer to Obtaining Microsoft 365 Credentials to learn where you can find credentials and how you can grant permissions in the Azure Portal.
- The Authentication page is only available if you have selected Automatically register a new Azure AD application on the Configuration page (step 5) or Automatically grant required permissions on the Credentials page (Step 6). Once here, the following information is displayed:
- Application name: Enter a name for the application.
- Code: This field displays the code that you need to add on https://microsoft.com/devicelogin.
- New code (optional): Use this to generate a new code if needed.
- Copy code: Copy the displayed code.
- Click Finish to complete adding the item to the inventory.
Make sure that the Global Administrator role is assigned to the account in the Microsoft 365 admin center to complete the authentication process.
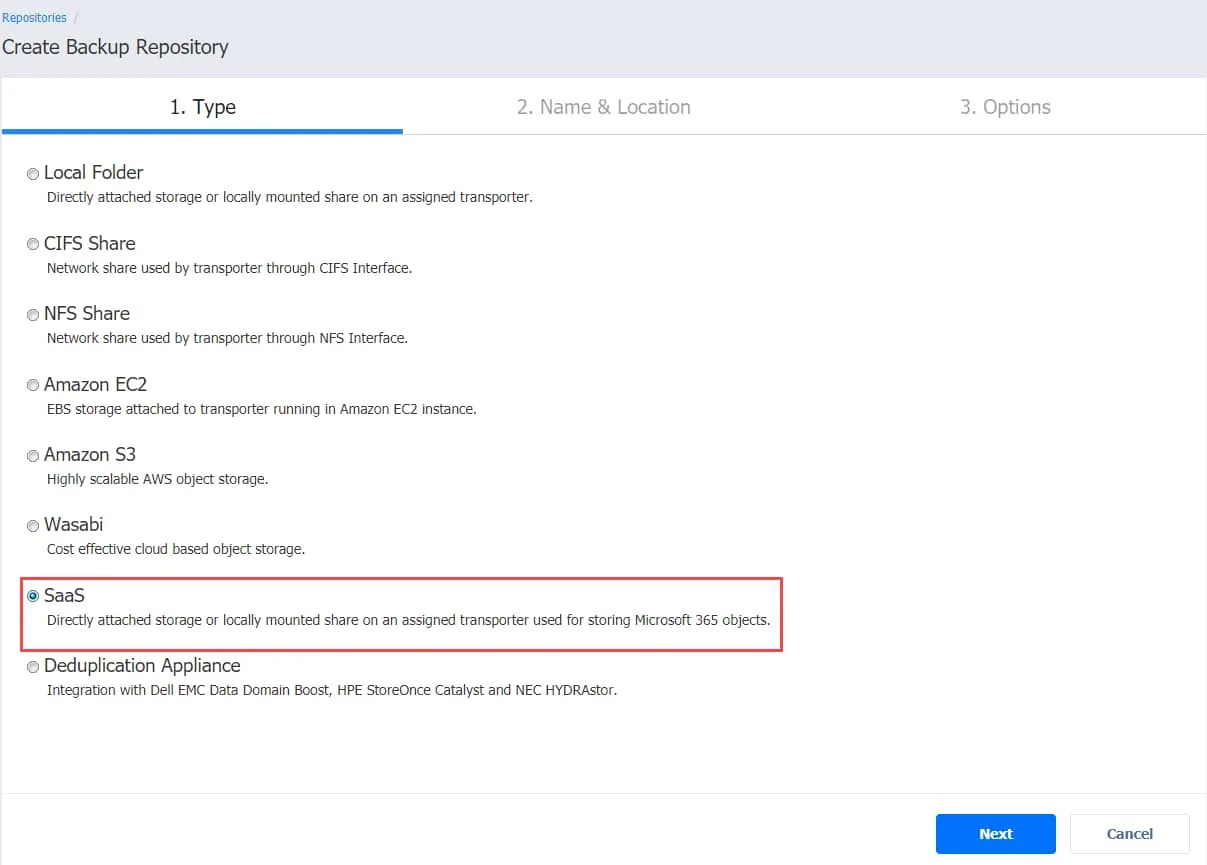
Creating a backup repository
You need a dedicated SaaS repository to store all Microsoft 365 data including SharePoint Online backups. The backup repository creation wizard is divided into three steps:
- Type: Choose SaaS as the backup repository type for Microsoft 365 items, then click Next.
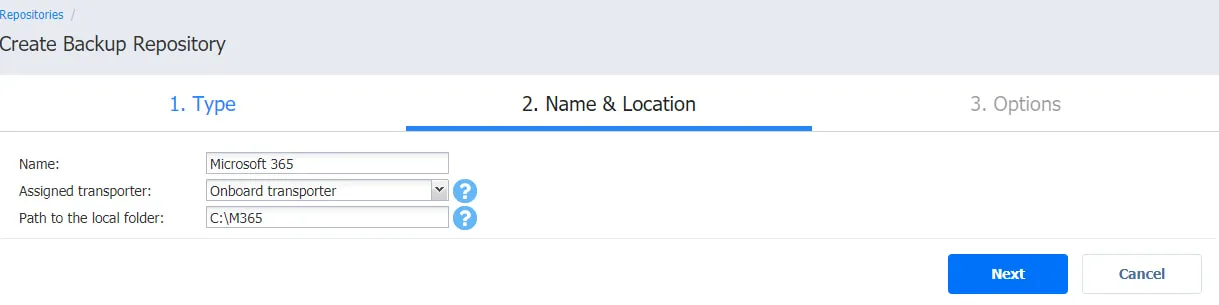
- Name and Location: On this page, you need to complete the following:
- Name: Enter the name of the backup repository.
- Assigned transporter: Select the Transporter from the drop-down list.
- Path to the local folder: Add the path to the local folder.
Once done, click Next.
Note: You can deploy a Transporter, the solution component responsible for data transfer, on a remote machine, create a directory on that remote machine, and use it to create a Backup Repository. This approach provides you with more flexibility and allows you to store Microsoft 365 data backups on remote machines.
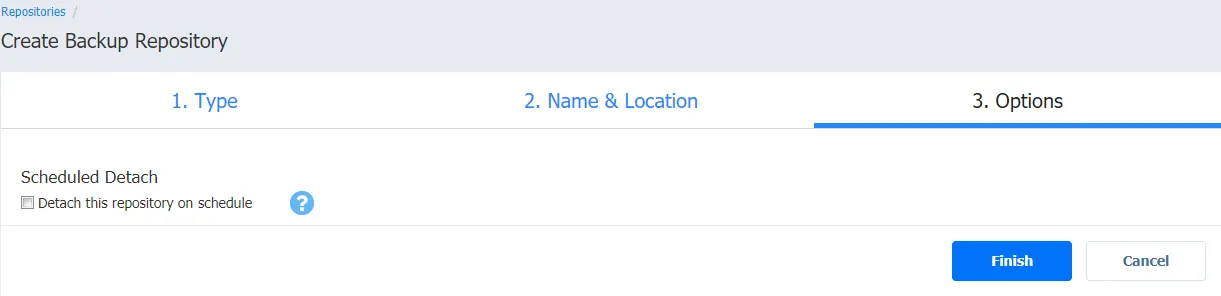
- Options (optional): On this page, you can select Detach this repository on schedule to detach and attach the backup repository according to a specific schedule when backup jobs are not running. You can then copy or move the backup repository to another storage media. This process preserves data consistency by stopping all interactions with the repository.
- Click Finish to create the backup repository.
Creating a Microsoft 365 backup job
Now that your Microsoft 365 account is added to the inventory of NAKIVO Backup & Replication and you created a backup repository, you can start a SharePoint Online backup job.
To start the backup job, open the Dashboard in the solution’s web interface and click Create then Microsoft 365 backup job.
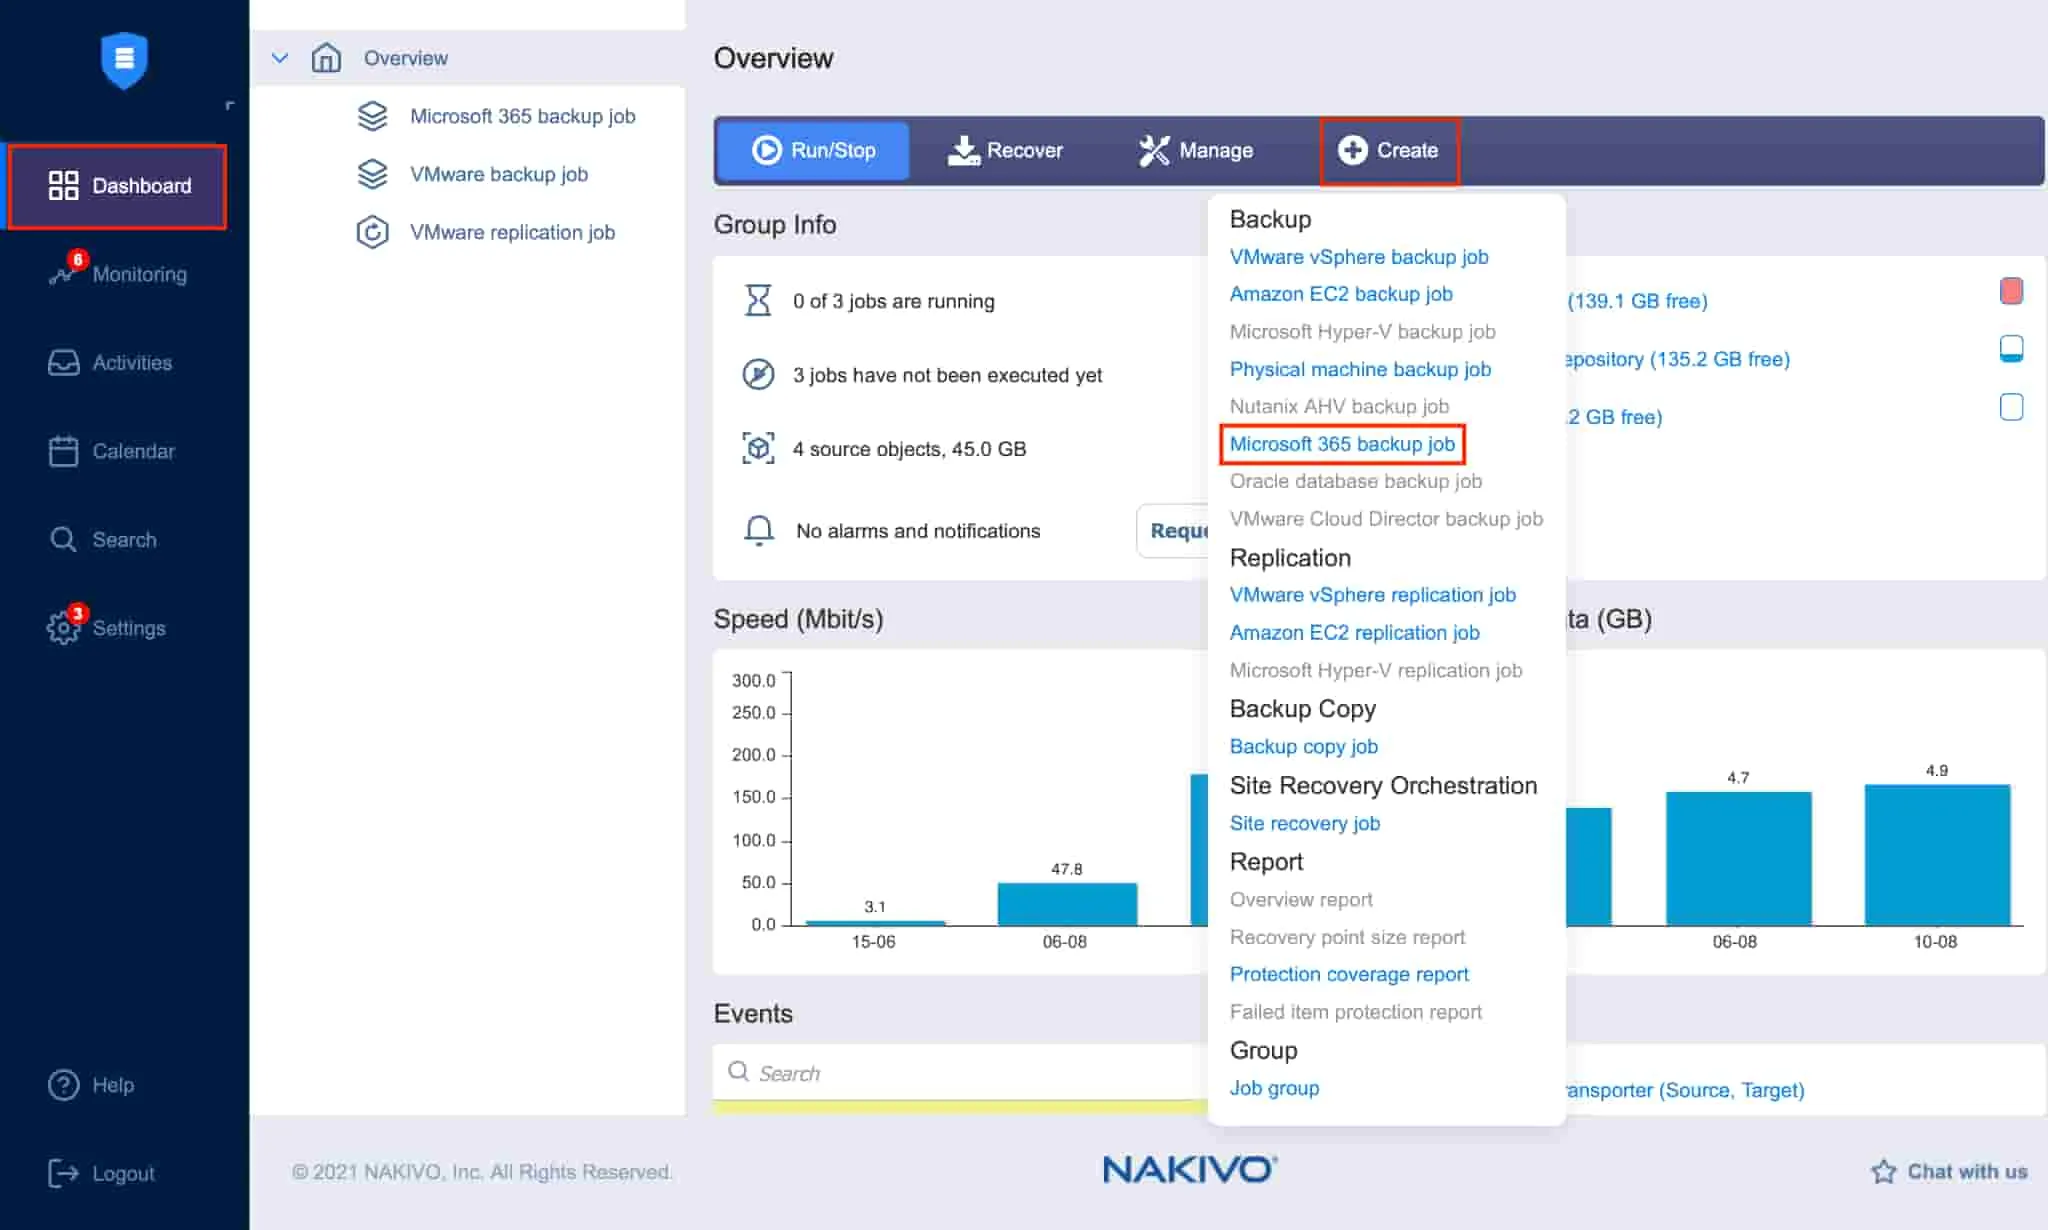
The backup job wizard for Microsoft 365 consists of the five steps below:
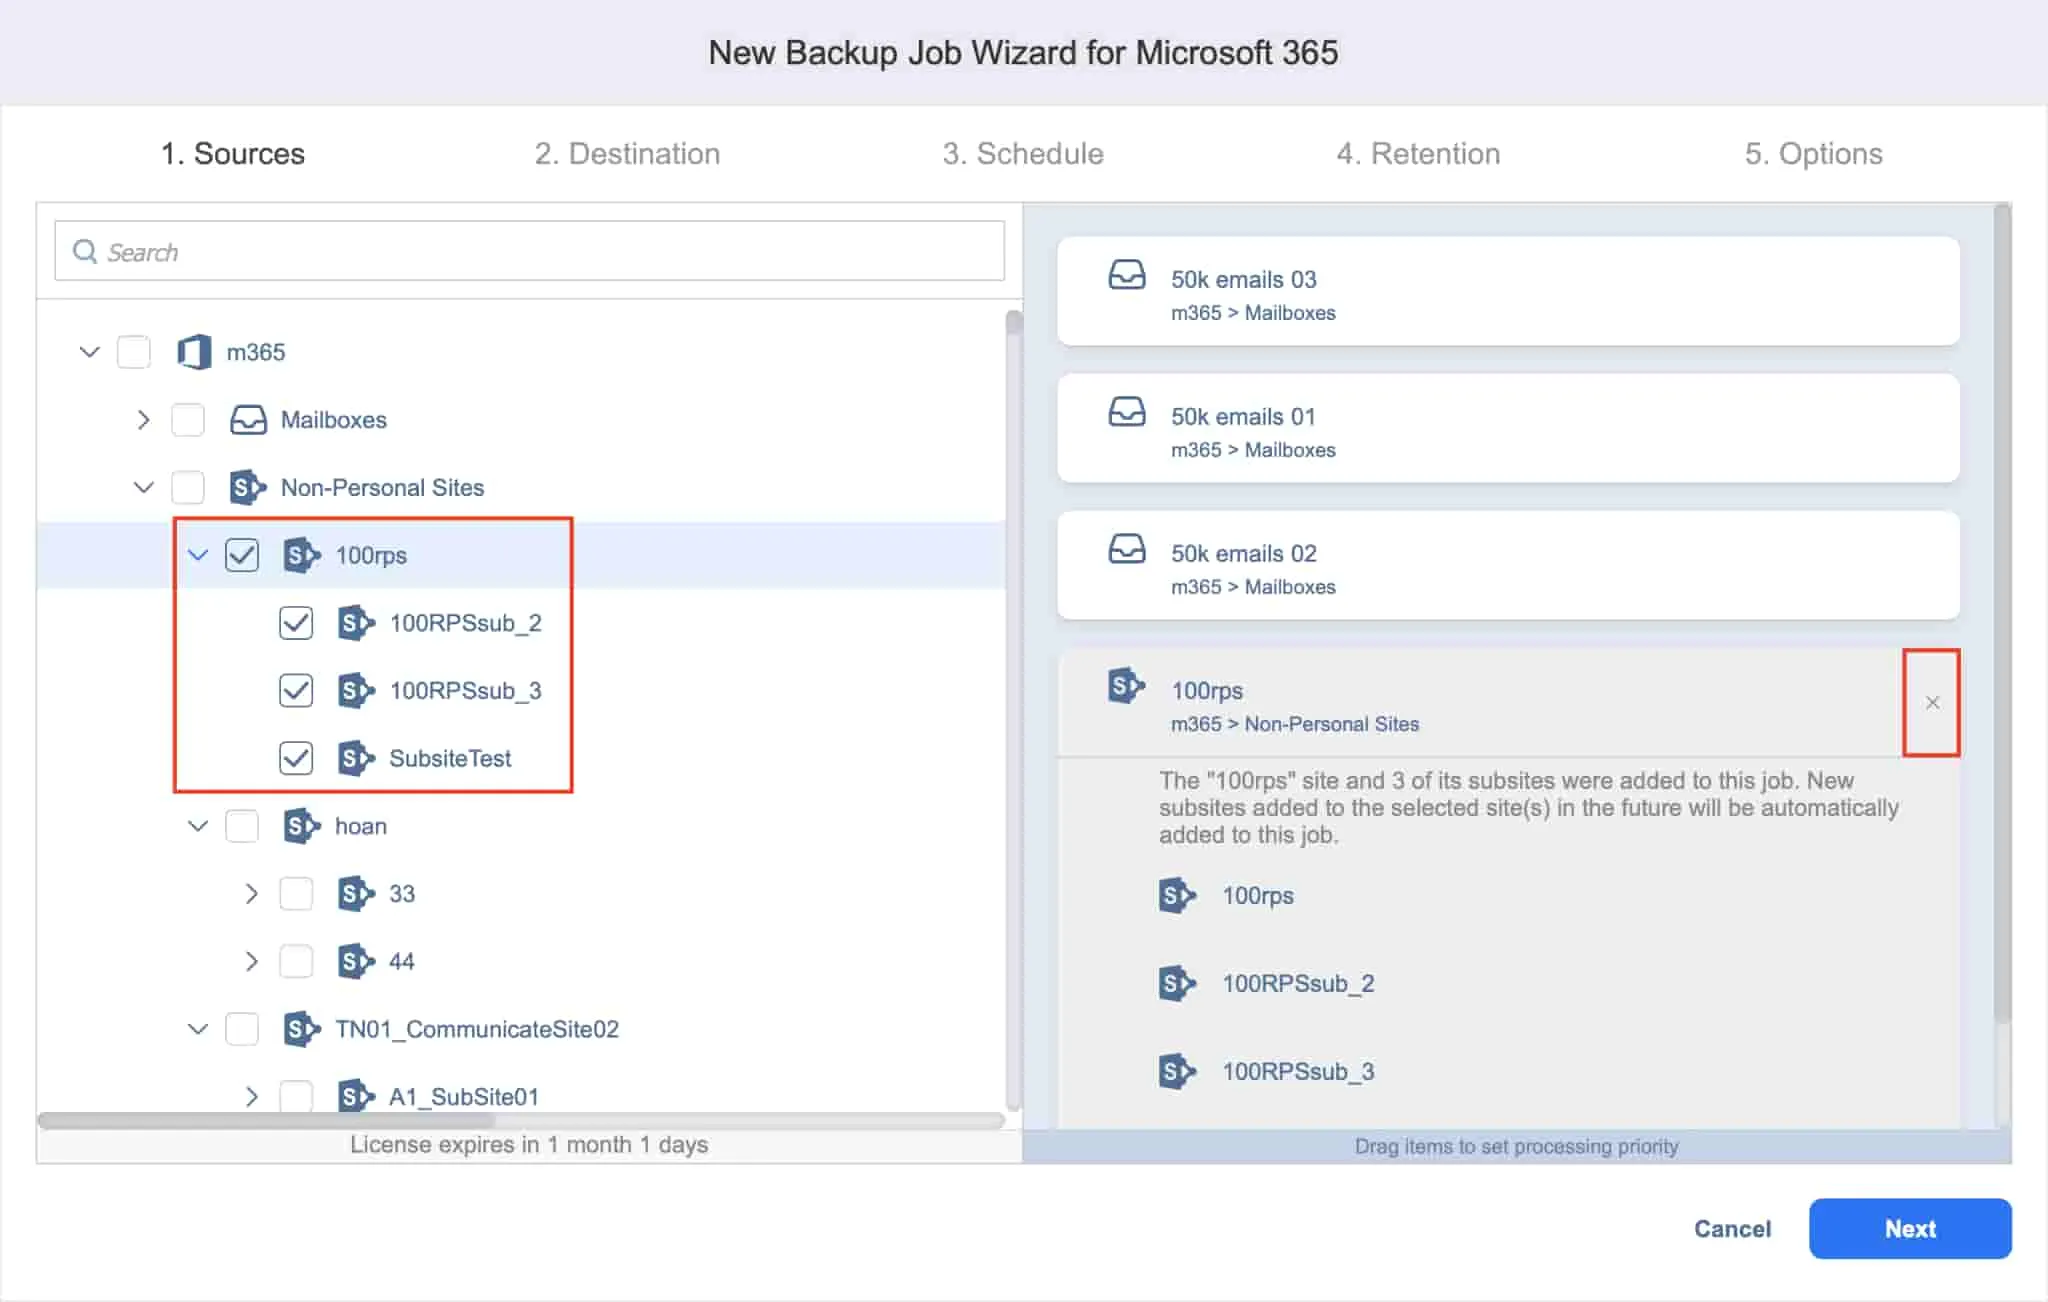
- Source: The left pane on this page displays the items that you can add to your backup job. Select or search for one or multiple SharePoint sites and subsites.
Click Next to confirm the selection and move to the next page.
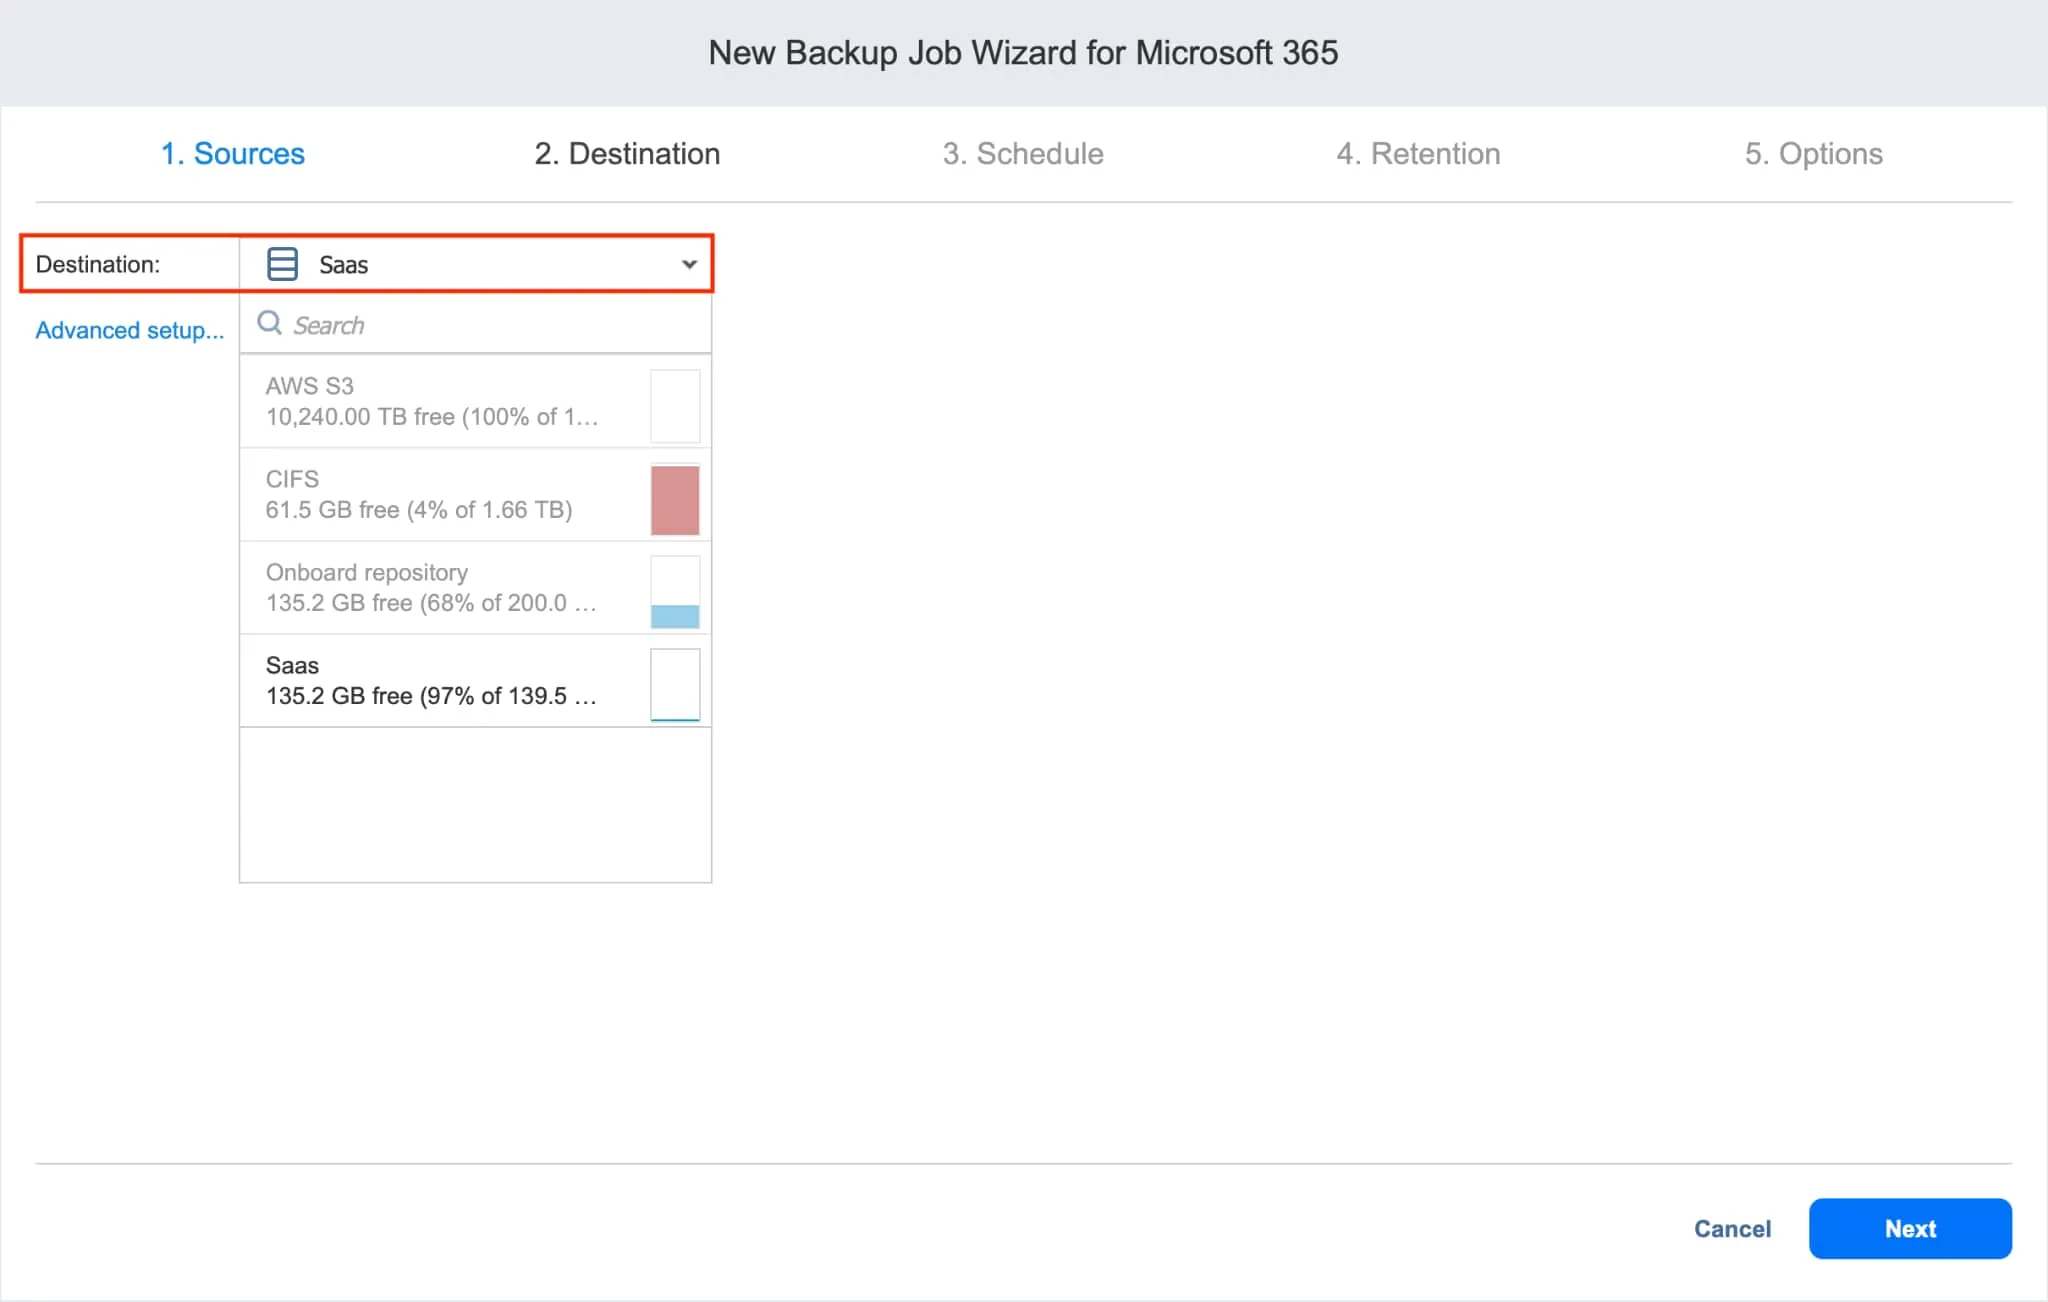
- Destination: Here you can specify the SaaS backup repository in which you want to store your SharePoint Online backup.
- Setting a single backup repository for all items: Choose a backup repository from the Destination drop-down list.
- Setting different backup repositories for each item: Click Advanced setup then choose a location for each SharePoint Online site.
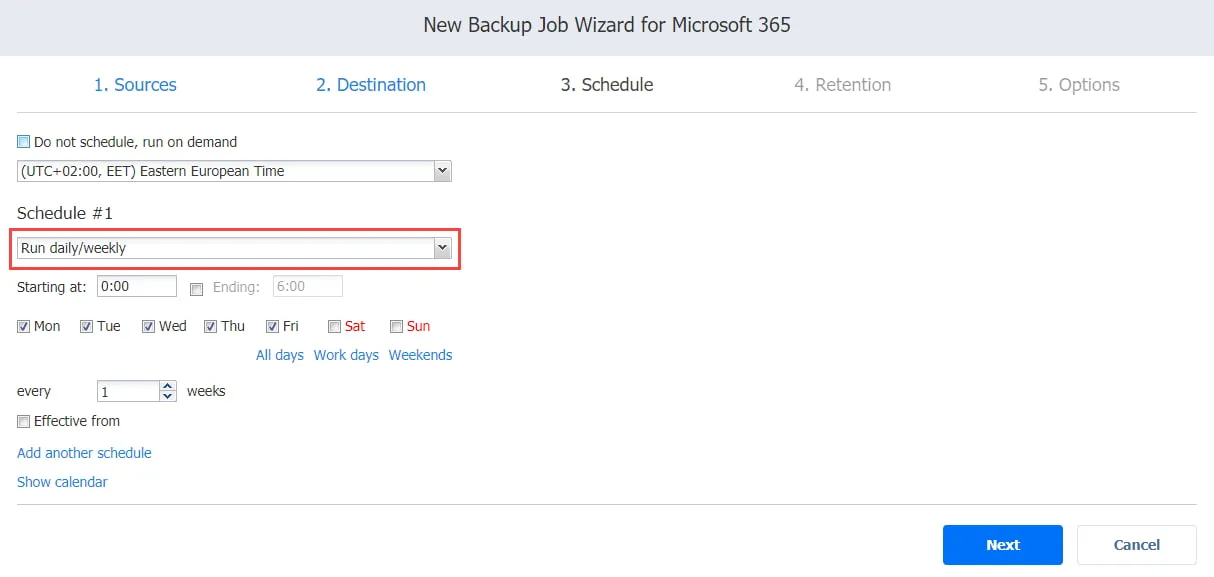
- Schedule: On this page, you can select whether to run the SharePoint Online backup job manually or schedule it on a daily, weekly, monthly or yearly basis. You can also chain backup jobs to run automatically after each other.
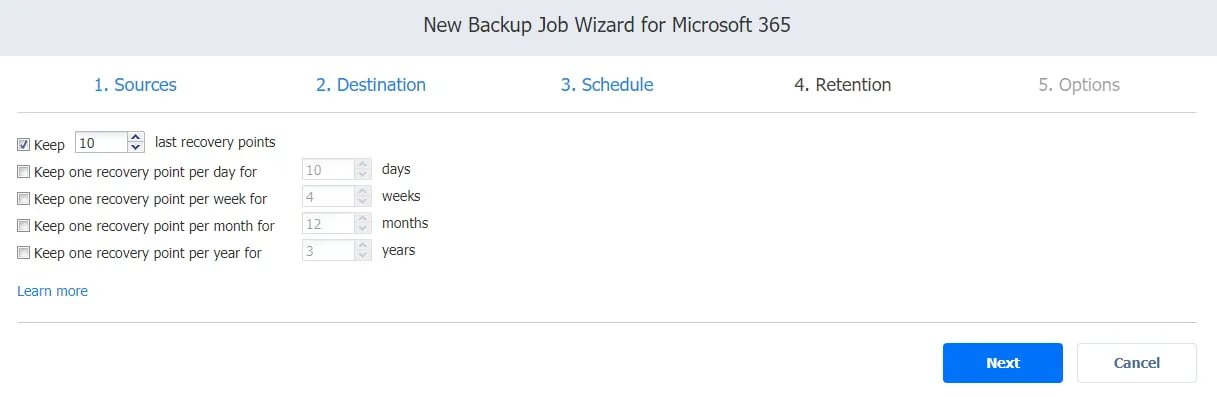
- Retention: NAKIVO’s solution creates a recovery point for each item in the backup repository after each job. This allows you to recover individual objects or the entire account. You can choose how many recovery points should be preserved using the grandfather-father-son (GFS) backup rotation scheme.
- Options: Here, you can enter the job name and enable certain actions before a SharePoint Online backup begins and after it is complete. You can receive backup reports or run custom pre- and post-job scripts.
- Click Finish or Finish & Run to complete the job creation wizard.
How to Recover SharePoint Online data with NAKIVO Backup & Replication
Now that you can safely back up SharePoint Online data using the NAKIVO solution, you need to learn how to recover it as well.
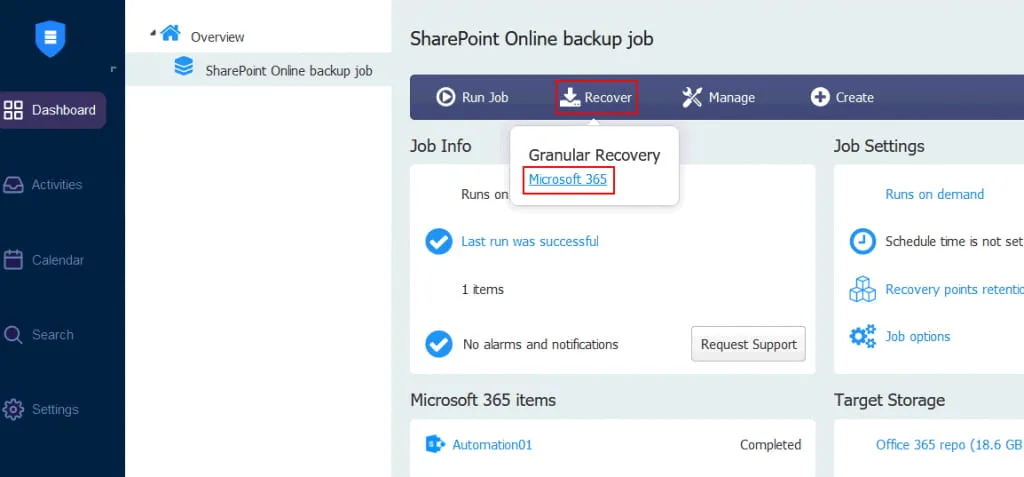
To start the recovery process, click Recover then Microsoft 365 in the web interface of NAKIVO Backup & Replication.
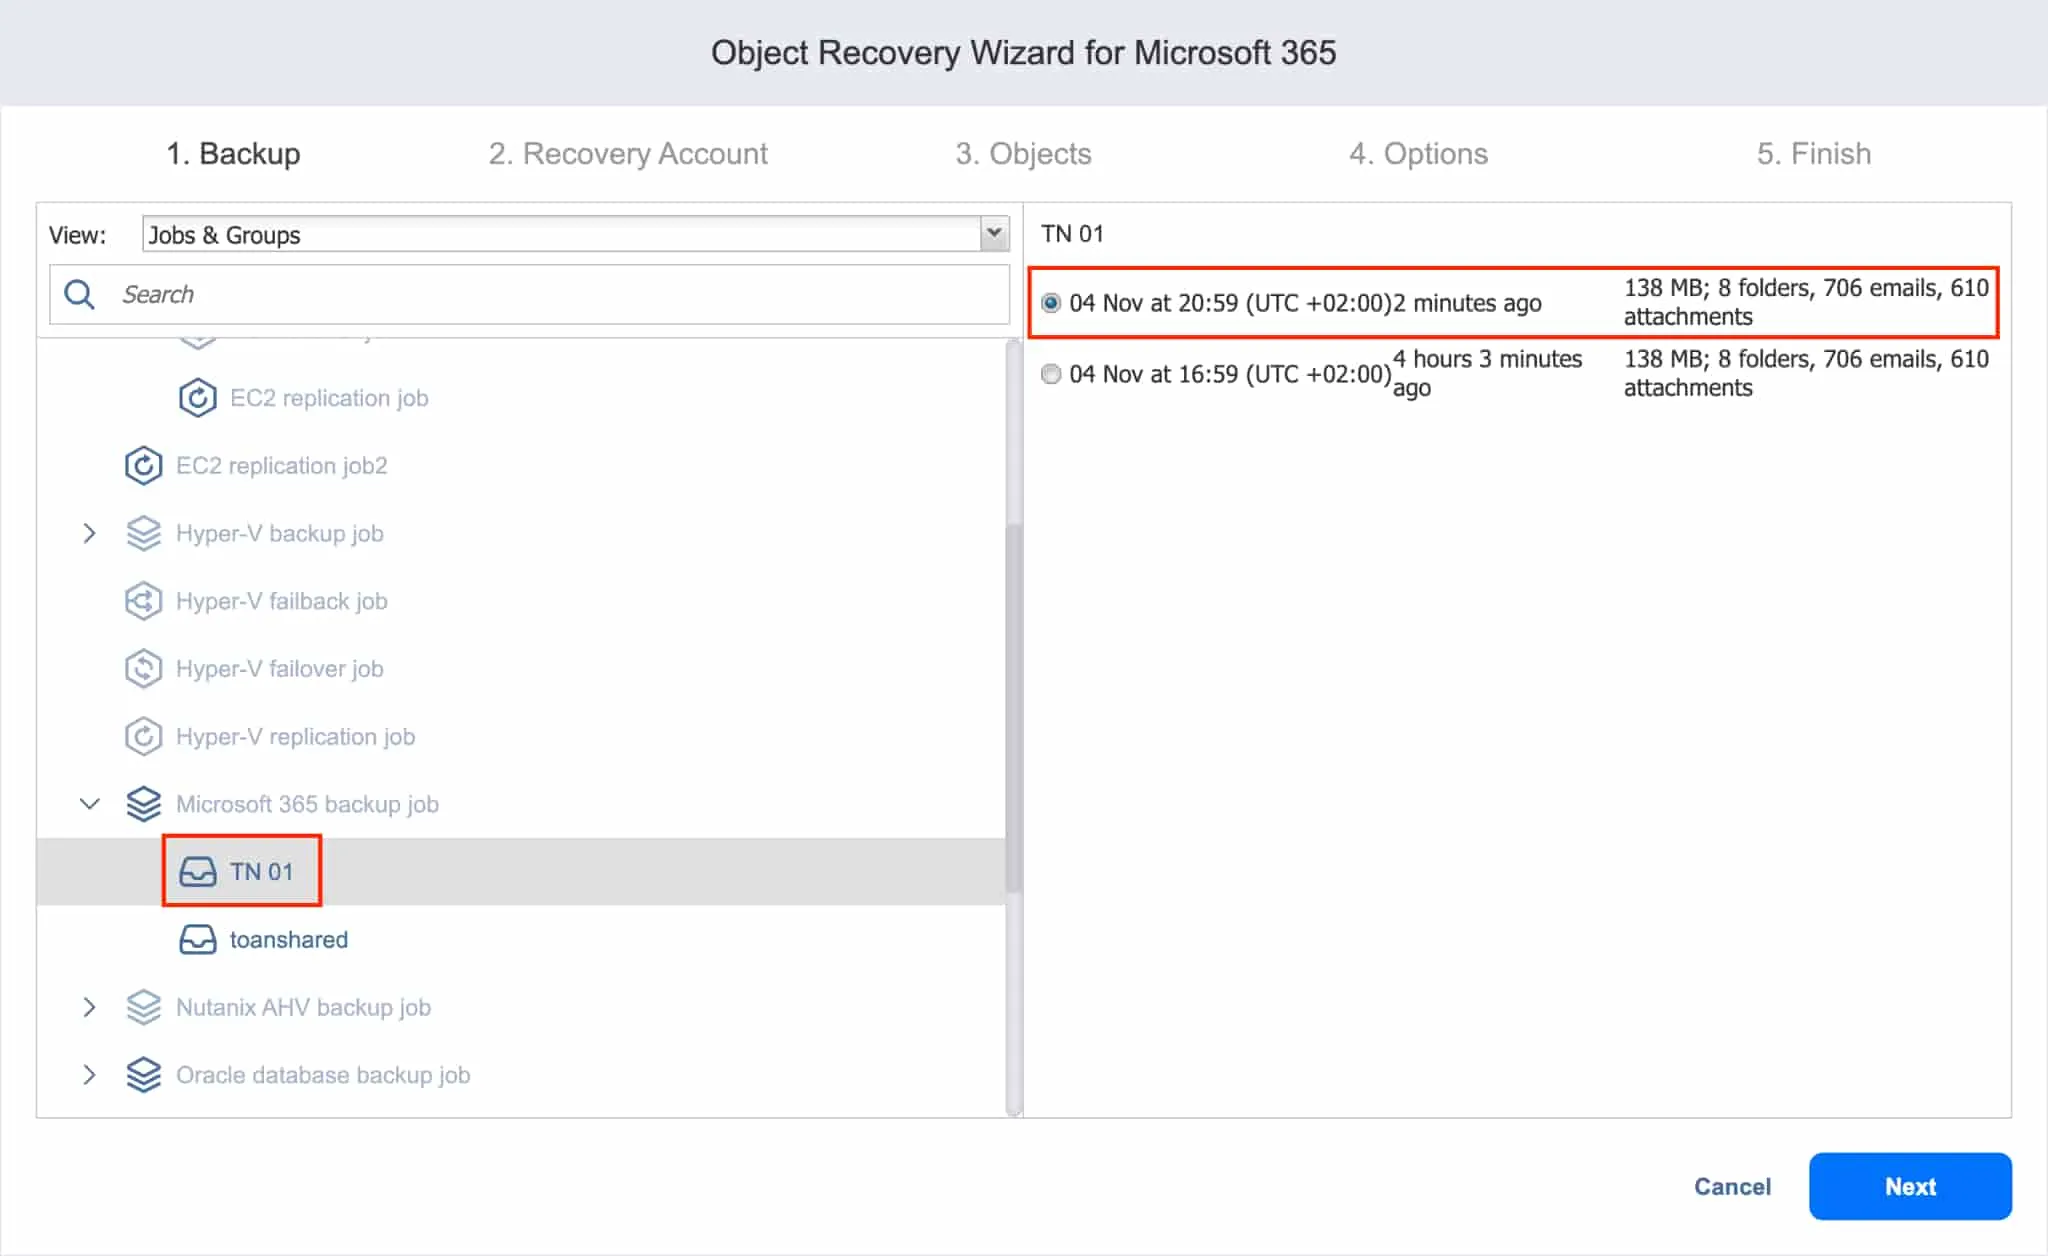
The Object Recovery Wizard consists of four steps:
- Backup: You can find all the items you want to recover in the left pane. Select the SharePoint Online site and choose the recovery point in the right pane.
Click Next to continue.
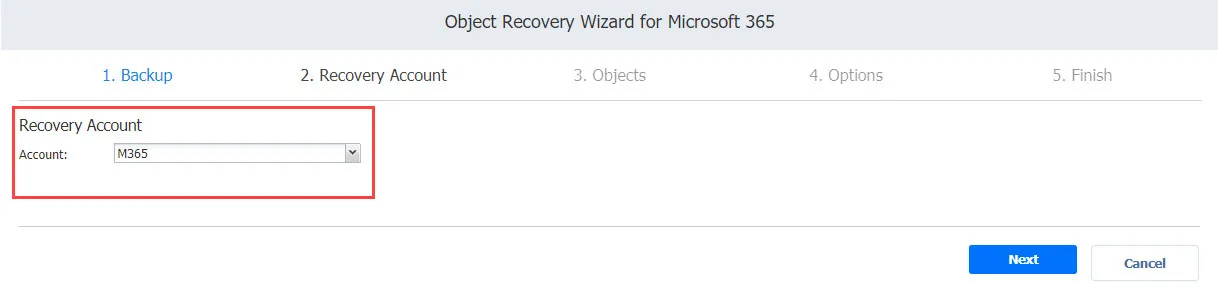
- Recovery account: Choose the Microsoft 365 account to which you want to recover your items from the drop-down list.
Click Next to proceed.
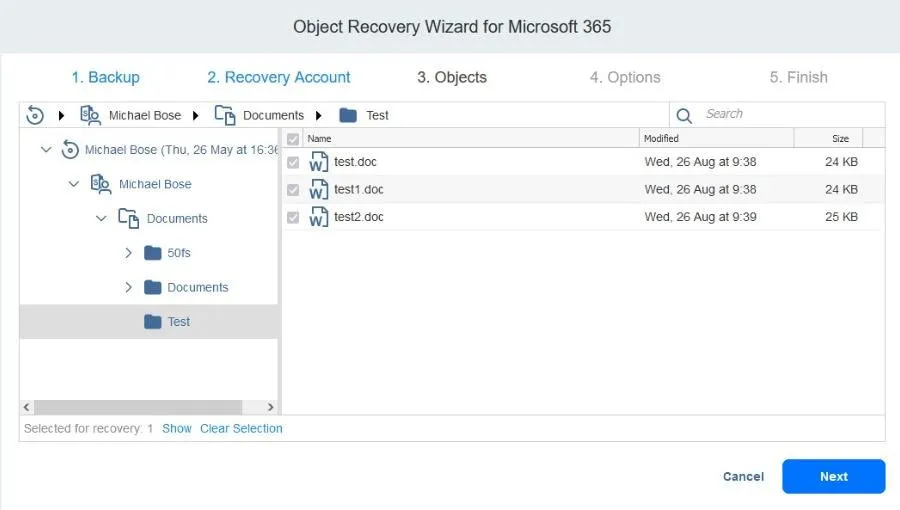
- Objects: Select the objects you want to restore. You can choose or search for SharePoint Online sites, document libraries, lists, list items, folders and files.
Once done, click Next.
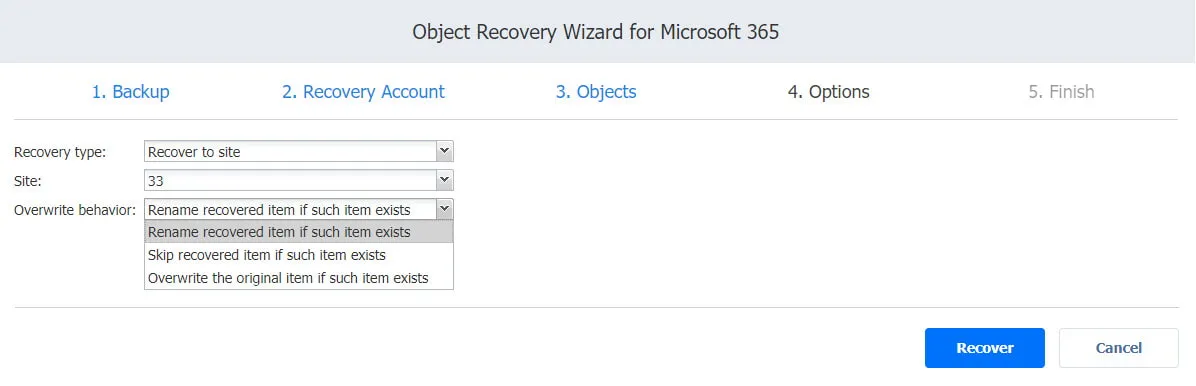
- Options: On this page, you can configure the parameters below:
- Recovery type: Choose whether to recover to the original location or to a different site.
- Overwrite behavior: Specify if you want to rename recovered item if such item exists, skip recovered item if such item exists or overwrite the original item if such item exists.
Note: Recovering to the original location will not be possible if the selected recovery account differs from the original account.
- Click Recover to start the SharePoint Online recovery process and wait until the data is completely restored.
Conclusion
The native Microsoft 365 data recovery features offer limited functionalities and do not guarantee optimal data protection and safety in case of a breach. NAKIVO Backup & Replication allows you to back up SharePoint Online data and easily recover it when you need to.

