Best Practices of Using SAN Storage for VM Backup
Storage Area Network (or SAN) has long been staple storage in the enterprise datacenter. Especially since virtualization has also become a major component of enterprise datacenters, traditionally, availability of shared storage has long been a requirement to take advantage of all the enterprise features found in today’s virtualization products. SAN is generally the most expensive storage you can configure, as SANs today are generally highly intricate and powerful hardware devices in their own right.
Since Storage Area Networks are built for high performance and redundancy, they generally contain multiple storage controllers, I/O cards, drives, network connectivity, etc. With the expensive nature of SAN technology, organizations want to be as efficient as possible when making use of a SAN in their environments. Additionally, the powerful features and functionality of SAN hardware can be harnessed for VM backup. Let’s take a look at best practices for using SAN, its efficiency, as well as advantages of its features and functionality.

Best Practices for Using SAN in Backing up Virtual Machines
When thinking about the return on the capital expenditure on a Storage Area Network (SAN), we want to make sure we are utilizing it as efficiently as possible and using the features and functionality that make SAN powerful. Modern backup solutions need to interact with SAN in such a way as to operate as efficiently as possible, as well as leverage the technologies that are present with these powerful storage systems.
Ideally, data protection solutions should provide the least amount of overhead possible on production storage area network systems, while still achieving the objective of protecting production data. This benefits production workloads by allowing for minimal impact on production performance due to data protection jobs transferring data from production.
Traditional backup solutions have historically had a negative impact on disk I/O performance with production systems. This results in windows server backup being scheduled outside of production business hours and an inefficient and ineffective use of connected storage systems. The traditional problems associated with production storage I/O impact left organizations vulnerable, as RPOs were unsatisfactory in terms of scheduling of data protection jobs.
Direct SAN Access and Hot Add
When thinking about modern backup solutions, how far the technologies have come, and how they interact with a modern SAN solution attached to hypervisor hosts such as VMware, we want our data protection solution to utilize our SAN’s features and functionality effectively and efficiently.
The power of using a backend SAN unit, whether Fiber Channel or iSCSI, should also allow us to see real performance improvements with data protection jobs, as well as production workloads. NAKIVO Backup & Replication includes technology, which allows to directly “talk” to the SAN unit itself and achieve the best transfer speeds and efficiency. By using the built-in feature called Direct SAN Access transport mode, NAKIVO Backup & Replication bypasses the network and is able to transport backup and replication data directly over a SAN. This mode can be enabled for VMware backup and replication. SAN transport does not make any write/modification operations on the SAN LUNs, so data integrity is never compromised.
As mentioned above, today’s SANs possess tremendous processing power and are able to leverage hardware accelerated data reads and writes. The Direct SAN Access transport mode, when deployed on a NAKIVO Backup & Replication Transporter that has direct access to SAN storage via the iSCSI or Fiber Channel connection, is able to bypass using the network as a means to transfer the VM backup data. Instead of having to transfer data across traditional network links, NAKIVO Backup & Replication relies on the VMware VDDK library to enable VM data to be read directly from LUNs over dedicated iSCSI or Fiber Channel connections and then process and transfer the data to the backup repository.

SAN Direct Access Transport mode leverages the power of SAN hardware to increase throughput and reduce network load
This allows us to get the best of our SAN storage capabilities and harness the hardware horsepower of the SAN itself to allow NAKIVO Backup & Replication to read the backup data directly from the SAN and transfer it.
Used in conjunction with the Direct SAN Access transport mode and the Hot Add feature, NAKIVO Backup & Replication can mount (Hot Add) VM snapshots and read VM data directly through the hosts storage I/O stack.
Efficient Transfers Using Changed Block Tracking (CBT)
To go along with the transfer efficiency accomplished by applying the Direct SAN Access Transport mode, as well as the Hot Add feature, modern solutions like NAKIVO Backup & Replication transfer data as efficiently as possible. By using the virtual machine Changed Block Tracking (or CBT) functionality made possible by the VMware Data Protection API, NAKIVO Backup & Replication is able to significantly reduce the amount of data being copied for each backup interval. We are only asking SAN storage for the block changes that occurred since the last backup, instead of copying across full backups for each backup iteration.
Considerations for SAN Access Mode
As mentioned above, backup data for virtual machines located on SAN storage can be transferred using the Direct SAN Access, which enables significant performance improvements. To enable the Direct SAN Access mode, there are a few requirements you need to make note of:
- Ensure you have iSCSI connectivity (iSCSI network) to the iSCSI target;
- The source transporter that reads virtual machine data from the SAN must be one of the following:
- A physical machine connected to the SAN;
- A virtual machine running on a VMware ESXi host that is connected to the SAN;
- If using a Windows virtual machine, make sure the virtual machine with the source transporter is not managed by either the VMware vCenter server or ESXi host you are backing up or replicating.
Configuring Direct SAN Access Mode in Windows
For Direct SAN Access mode, we configure our Windows source transporter machine to have direct communication with the SAN LUN that our VMs reside on. A critical first step when configuring Direct SAN Access Mode for Windows is to configure the default behavior of Window’s mounting the SAN volume. If Windows is configured to mount and “initialize” the volume, this re-signatures the volume and can corrupt data. We need to make sure this is not the default behavior.
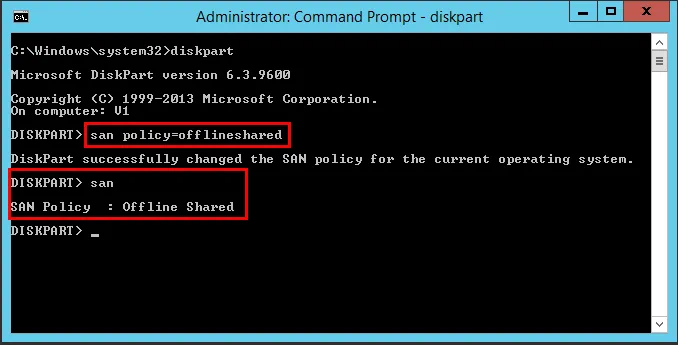
Set the SAN Policy
Before making an iSCSI or Fiber channel connection, set the san policy=offlineshared. To do this, use the diskpart utility as shown below:
- Type diskpart
- Type san policy=offlineshared
- To verify setting change, type san
- Reboot the server
Add SAN Storage
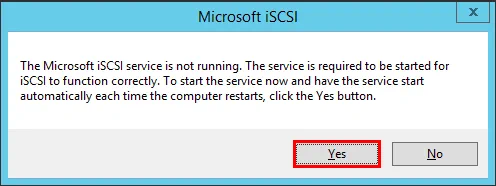
Let’s see how you can add iSCSI SAN storage to your Windows Transporter machine. The first thing you need to do is to add the iSCSI target to your Windows iSCSI Initiator. To configure the iSCSI target, run the command iscsicpl from a “run” menu. You will be presented with a message asking if you want to start the “Microsoft iSCSI service” and set it to start “automatically” each time the computer restarts. Select Yes.
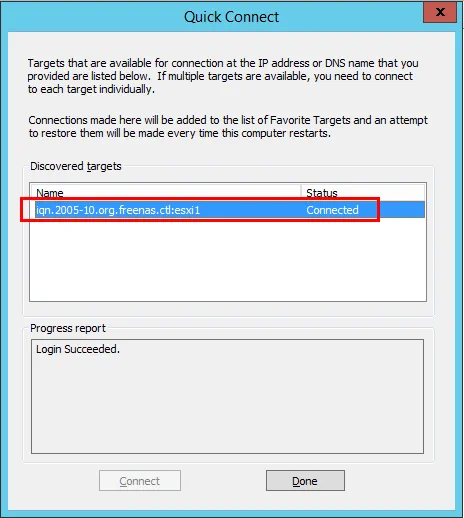
Now, you need to add the iSCSI Target that you want to connect to. This will be the same target that your ESXi hosts use to add the iSCSI shared storage. Enter the target IP Address and click the Quick Connect… button.

You should see the status of Connected.
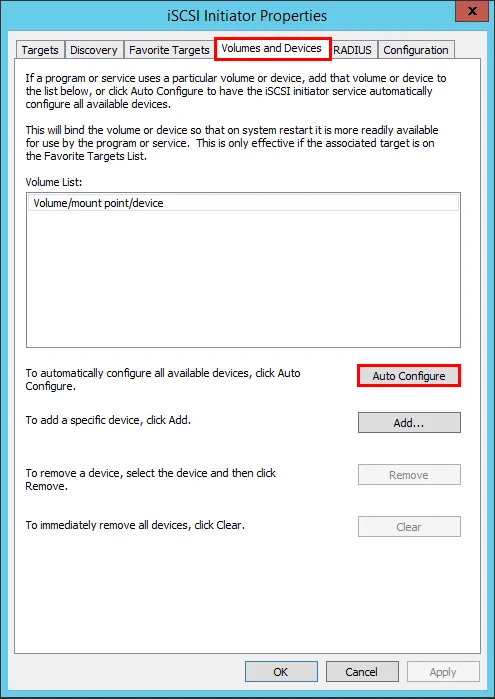
Next, select the Volumes and Devices tab and click the Auto Configure button to add the volume(s) presented by the iSCSI target.
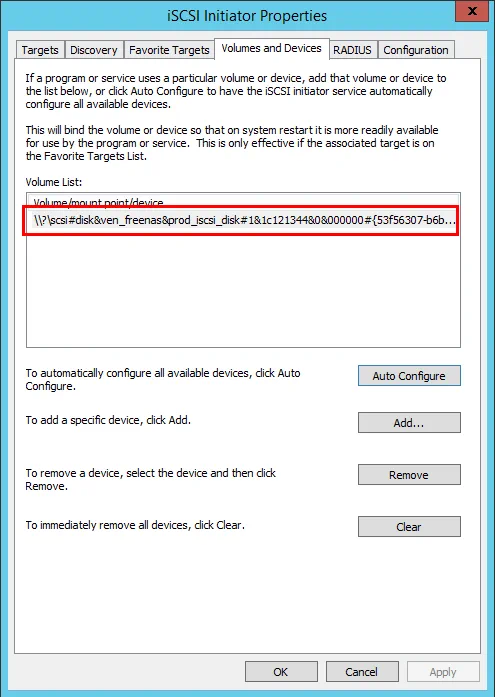
You will see the volume added accordingly.
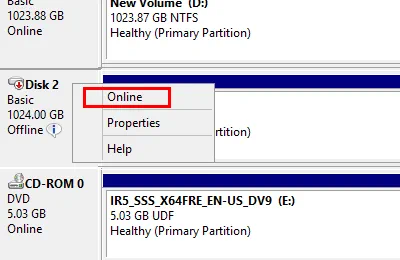
Now, you need to online the disk in disk management.
NOTE: Since you setup your SAN policy, you shouldn’t see the directive to “initialize the disk”. If you see the initialize directive, stop immediately and revisit the policy, making sure it is set correctly and that you have rebooted to ensure the policy has taken effect.
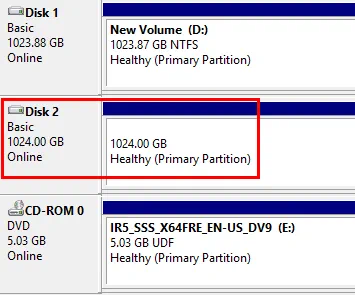
The disk should come online without issue.
You are now ready for direct SAN access using the Windows Transporter.
Configuring Direct SAN Access Mode in Linux
First, if installing NAKIVO Backup & Replication on Ubuntu 16.04 or higher, you need to install AppArmor. AppArmor is a kernel enhancement to confine programs to a limited set of resources.
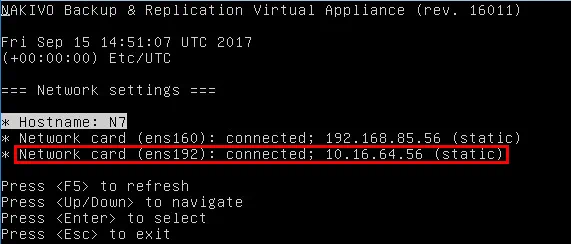
Next, make sure to have the iSCSI network provisioned on the Linux machine that will have direct SAN access. Below, we have added a network adapter connected to the iSCSI network and addressed accordingly.
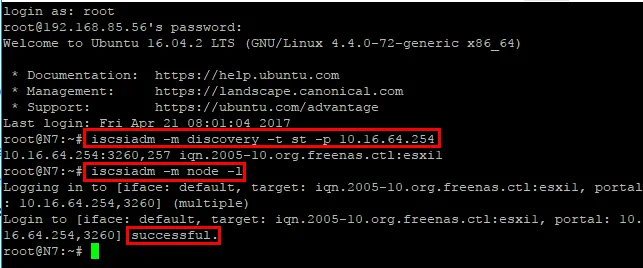
To add the iSCSI Target in Linux, run the following commands:
- iscsiadm -m discovery -t st -p <iSCSI target IP address>
- iscsiadm -m node -l
After running the commands, you should see that the login to the iSCSI portal was successful, as shown below.
The Linux machine should now be ready for Direct SAN Access mode.
Takeaways
Storage Area Networks are extremely powerful in today’s modern enterprise datacenters. By default, they include tremendous processing and data I/O horsepower, as well as built-in redundancy. Organizations thinking about architecting a modern data protection solution for production workloads want to choose a backup solution that will be able to utilize the best of their modern SAN technology. This includes a solution that is able to “speak” directly to the SAN hardware using direct iSCSI or Fiber Channel connections.
Additionally, modern backup solutions take advantage of VMware APIs to allow for CBT transfers of backup data. This allows for efficient transfers of backup data that only represent the block changes made since the last backup iteration. NAKIVO Backup & Replication is a great example of a modern backup solution leveraging these and many other technologies allowing to efficiently use enterprise datacenter hardware, such as SANs, for the successful VM backup.