How to Open VMDK Files in VMware and Extract Data
Understanding how to open VMDK files and extract content from VMDK files is useful when you encounter a problem with a virtual machine. You may find that VMs cannot be started after issues with the installation of applications, OS updates, malware attacks, accidental data deletion, etc. When this happens, you lose access to the VM’s virtual disk.
Luckily, you can open VMDK files with WinZip, Linux Reader or VMware Workstation Player. Read on to learn about the methods to recover the content of VMDK virtual disk files. Note that these methods only apply if the virtual disk is not encrypted or corrupted.

What Is a VMDK File?
VMDK is a virtual machine disk file format, which is the open format developed by VMware. This virtual disk format has the .vmdk extension for files and is used by VMware and VirtualBox virtual machines. However, virtual machines residing on ESXi servers use a slightly different format of vmdk virtual disks. On the ESXi datastore, the virtual disk descriptor and the virtual disk extent that contains raw data of the virtual disk are two separate files.
The pattern of the virtual disk descriptor name is diskname.vmdk and the pattern of the virtual disk extent name that contains all raw data is diskname-flat.vmdk. As for virtual disks of the VMware Workstation format, they are represented as a single diskname.vmdk file (monolithic sparse), which is an extent data file containing an embedded virtual disk descriptor. A virtual disk descriptor defines the structure of the virtual disk, virtual disk geometry, virtual hardware version, and IDs.
Virtual disk descriptor file
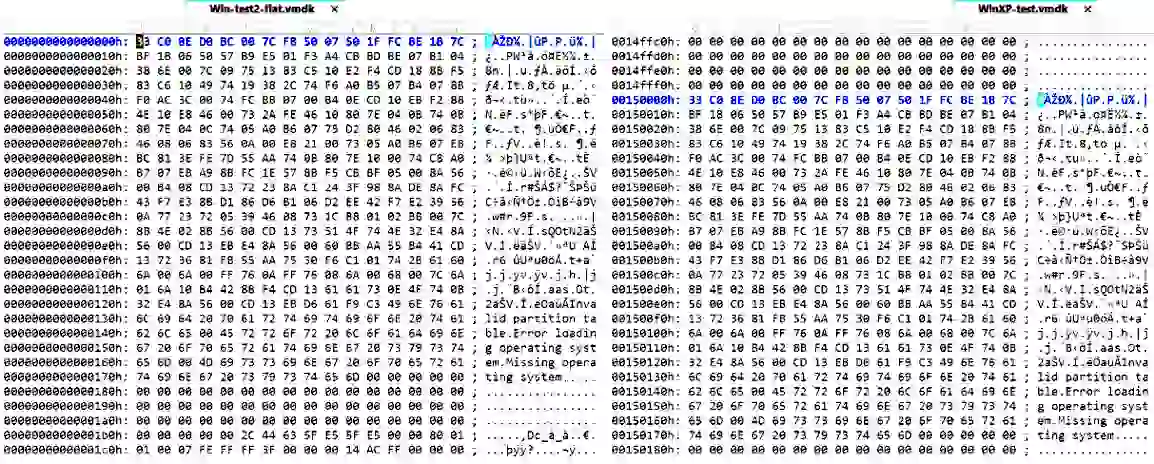
A virtual disk descriptor is represented as plain text. On the left side of the screenshot below, you can see a virtual disk descriptor of the ESXi format (a vmdk file that can be opened with any text editor). On the right side of the screenshot, you can see the data of the virtual disk descriptor that is embedded into a single vmdk file of the VMware Workstation format. The vmdk file can be opened in a HEX editor.

As you can see, the embedded disk descriptor data is written to the monolithic vmdk file of the Workstation format from the 0x200 address, which is the number of the first byte. If you transform the 200 HEX value into a binary and decimal format, you will get:
200 HEX = 1000000000 Binary = 512 Decimal
This means that if you want to extract the embedded descriptor from the vmdk file, you should extract a portion of data starting from the 512th byte. You can find more information on VMware virtual disk descriptor files and learn how to extract, edit, and import an embedded virtual disk descriptor in the blog post about converting VMware VMs to Hyper-V VMs.
Virtual disk data file
In the screenshot below, two virtual disk files are opened in a HEX editor. The same operating system is installed on both virtual disks (the first partition used for installing the OS was created and formatted with a built-in Windows disk utility). On the left side of the screenshot a –flat.vmdk file is displayed (ESXi format). The raw data is written from 0x00000000 on this virtual disk –flat.vmdk file. On the right side of the screenshot, the virtual disk of the Workstation format is displayed, and the same data is written from 0x00150000 (byte number 5376), which is not the beginning of the vmdk file.
Now, after familiarizing yourself with the theory, it’s time for the practical part. Before you proceed, it is recommended that you back up your data to prevent any possible virtual disk damage. Perform operations with your disks at your responsibility and risk.
2 Methods to Open VMDK Files by Powering on a VM
To open VMDK files by powering on existing VMs, you need a hypervisor such as VMware ESXi, VMware Workstation, VMware Player, or Oracle VirtualBox to be installed on your physical computer. You can opt for the legacy method by using a live DVD or by mounting the VMDK file as a virtual disk.
Method 1: Using a Live DVD even if the OS on the VM is dead
The idea behind this method is that you have a VM and can boot from a DVD disc. The ISO disk image can be used as the DVD disc inserted into the virtual DVD drive of the VM. After booting the operating system from a DVD media, you can mount the partitions of your virtual disk and copy files from the virtual disk to a USB hard disk attached to the VM or to your host machine, or to any other machine via the network. Some Live DVD distributions mount disks (partitions) automatically.
This is a legacy method because the principle is similar to copying files from physical disks of physical computers when the installed operating system cannot boot. This method can be used to extract data from VMDK disks of VMs running on VMware ESXi and VMware Player/Workstation.
Be aware that the operating system booted from Live DVD must recognize file systems of partitions of your virtual disk whose files you want to access. For example, Windows cannot work with Linux file systems such as EXT3, EXT4, ReiserFS, etc., by default. Using additional tools on Windows may help to resolve this issue. In turn, modern Linux recognizes Windows file systems such as NTFS and FAT32, and this is why you can use Linux-based Live DVD discs to copy files stored on virtual disks used by your Windows VM that cannot boot.
Example: Opening VMDK files on ESXi
Let’s consider an example for applying this method: you have a VM with Windows Server 2016 on an ESXi host, and the OS on the VM cannot boot, but you need to get the files recorded on the VMDK virtual disk. There are two NTFS partitions on the virtual disk: the boot system partition and disk C. The official Ubuntu 18 installation ISO image is used in this example. The Ubuntu installation media can be used as Live DVD.
NOTE: The workflow for newer versions of the products considered in this blog post is the same. You can use VMware Workstation 17, ESXi 8.0, Windows Server 2019, Ubuntu Linux 22.04, etc., and use the working principle explained in this article.
- Upload the ISO image to the datastore that is accessible for the ESXi host on which the VM is residing.
- Open VMware vSphere Client, go to Hosts and Clusters, select your VM, and click Edit Settings.
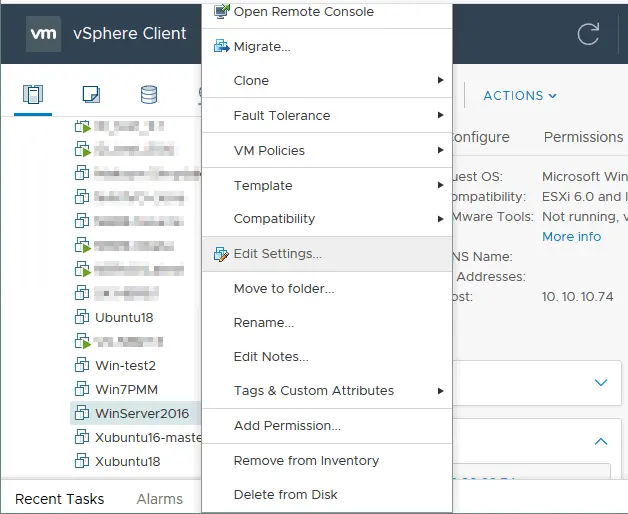
- In the VM settings window, go to CD/DVD drive options. Select the Datastore ISO File option if you have the necessary ISO file on the datastore accessible by the ESXi host. Then, for the CD/DVD Media option, click Browse and select the appropriate ISO file on the datastore. The file name is ubuntu-18.04.1-desktop-amd64.iso in this case.

- Start the VM, boot from the ISO image, and select Try Ubuntu Without Installing. Once Ubuntu has booted from the Live DVD media, open the console (Terminal).
- Get the root privileges:
sudo -i - List available hard disk devices:
ls -al /dev/sd*There are two partitions – /dev/sda1 and /dev/sda2
- Make directories to be used as mount points for each partition:
mkdir /mnt/win-disk1mkdir /mnt/win-disk2 - Mount the partitions of the virtual disk to the appropriate directories:
mount /dev/sda1 /mnt/win-disk1/mount /dev/sda2 /mnt/win-disk2/ - Then list files and directories of the mounted partitions:
ls -al /mnt/win-disk2/ls -al /mnt/win-disk1/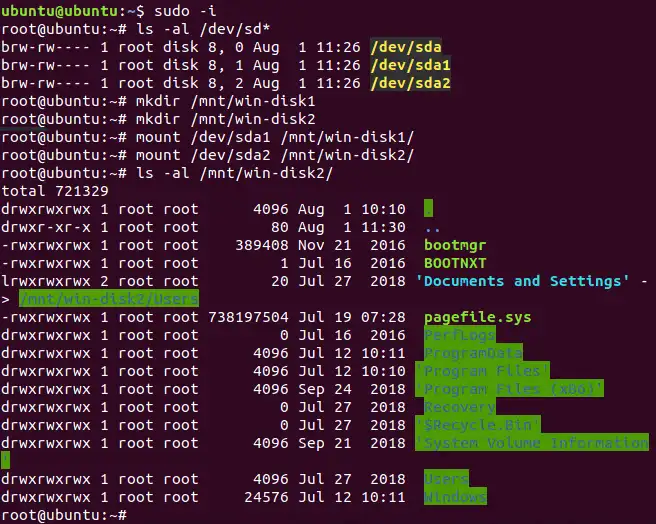
As you can see in the screenshot above, the partition mounted to /mnt/win-disk2 is the partition used as disk C: in Windows.
- Now you can attach a USB hard disk drive (HDD) to the USB port of your ESXi host and connect this HDD to the virtual machine with the USB pass-through feature. This way you can copy the necessary files stored on the VMDK file used as a virtual disk by the virtual machine. Another way is to use an SMB (CIFS) share and copy the contents of the virtual disk (that is, the VMDK file) to another location via the network.
In this example, we explain copying data to an SMB share. The SMB share has been created on the host whose IP address is 192.168.17.125, the share name is \\192.168.17.125\share, and user10 has write permissions for this share. Don’t forget that Linux, unlike Windows, uses the right slash when connecting to the share.
Let’s mount the SMB (CIFS) share on Linux loaded from the live DVD. First, create a directory to be used as the mount point.
mkdir /mnt/smb-share - Then mount the SMB (CIFS) share to this directory:
mount -t cifs -o user=user10 //192.168.17.125/share /mnt/smb-share - Enter the password of the user.
- Now, your Linux system is connected to the SMB share, and you can copy the contents stored inside the VMDK file to the SMB share over the network.
Let’s go to the directory to which the SMB share is mounted and copy the bootmgr file from the mounted partition of the virtual disk (the VMDK file on the ESXi datastore) to the current directory (SMB share).
cd /mnt/smb-sharecp /mnt/win-disk-2/bootmgr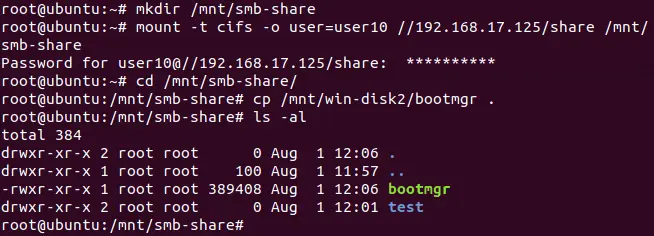
- Then make sure that the necessary files have been copied, and check the contents of your SMB share.
ls -al /mnt/smb-shareAs you can see in the screenshot above, the bootmgr file used in this example has been copied successfully. Now you know the first method of copying the contents of the VMDK file to another location when an operating system installed on a VM cannot boot. The logic of using this method on VMware Player or VMware Workstation is the same.
Method 2: Mount a VMDK file as a virtual disk to a healthy VM (ESXi/Workstation/Player)
This method is similar to the previous one, but in this case, the VMDK virtual disk should be attached to an existing virtual machine that has a functioning operating system. You can attach a VMDK file as an additional virtual disk to an existing VM running on an ESXi host, VMware Workstation, and VMware Player.
If you want to open a VMDK file of the ESXi VM on VMware Workstation or Player, you should copy both the virtual disk and its descriptor (vmdk and –flat.vmdk files) to a physical disk that is accessible for your computer where VMware Workstation or Player is installed. If snapshots have been taken for the VM, and changes have been made with VM disks after that, don’t forget to copy the VMDK files of delta (differencing) virtual disks in addition to the parent VMDK files.
Let’s consider two examples:
Example 1: how to open a VMDK virtual disk of one VM by using another VM on an ESXi host (both are registered on an ESXi host)
Example 2: how to extract content from a VMDK virtual disk of an ESXi VM by attaching the virtual disk to a VM of the VMware Workstation format
Keep in mind that the functioning operating system on the first (healthy) VM must be compatible with file systems used on the virtual disk of the second VM that has a non-bootable operating system (a VM whose VMDK file you want to attach as an additional virtual disk to extract files).
Example 1: Mounting a virtual disk to a VM running on ESXi
- Power off the VM that uses a virtual disk from which files you want to extract.
- Find this virtual disk in the ESXi datastore.
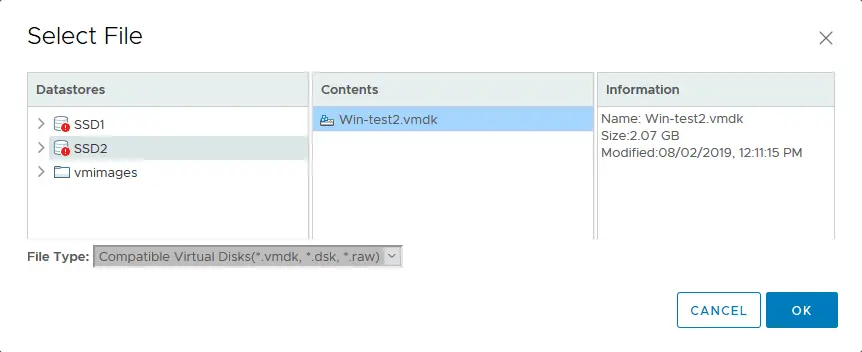
- Copy the virtual disk to another directory on the same datastore or another datastore to prevent an error caused by the virtual disk lock. In our example, we will show how to open a VMDK file whose name is Win-test2.vmdk (this is a virtual disk of the Win-test2 Windows virtual machine in our case). The ESXi host is managed by vCenter. If you use a standalone ESXi host without vCenter, you can use the logic explained in this example – the differences are only in the user interface.
- Open VMware vSphere Client, go to Storage, and select the datastore on which the necessary VMDK file is located. Select the VMDK file and click Copy to.
NOTE: If you have a standalone ESXi host and don’t have vCenter, open VMware Host Client by entering the IP address of your ESXi host in the web browser, then go to Storage > [Your datastore name] > Datastore Browser, select your VMDK file and hit Copy. Select the destination and hit the Copy button to confirm. Remember that virtual disks are displayed as VMDK files in the web interface of VMware vSphere Client and VMware Host Client, but a virtual disk consists of the –flat.vmdk and vmdk files (a virtual disk and its descriptor). You can also open the ESXi console directly on the server or by connecting via SSH to copy the files.

- In the opened window, select the destination. You can copy the VMDK file to some location on the same datastore or to another datastore. Let’s copy the VMDK file to the root directory of the same datastore for this demonstration. Both vmdk and –flat.vmdk files are copied in this case.

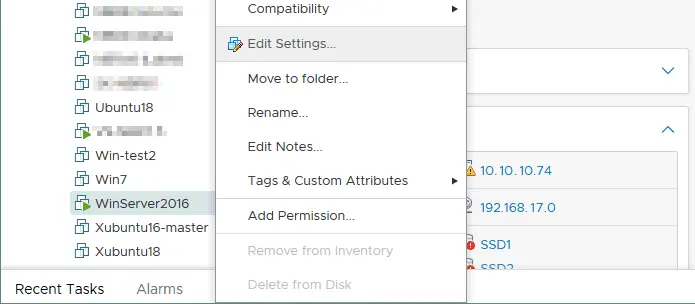
- Now you need to attach the VMDK virtual disk to another healthy VM whose operating system is working properly. In this example, a VM running Windows Server 2016 on the same ESXi host is used (the VM name is WinServer2016). A virtual disk can be attached to this healthy VM while the VM is running. In vSphere Client, go to Hosts and Clusters, select the healthy VM, right-click the VM, and click Edit Settings.
- In the window that appears, hit Add New Device and select Existing Hard Disk.

- Select the copy of your VMDK file that you have made previously. In the current example, the copy of Win-test2.vmdk located in the root directory of the datastore has been selected.
- Power on the healthy VM to which you have attached the virtual disk you are interested in, if the VM has not been powered on yet. A virtual disk is added on the fly for a running Windows Server 2016 VM.
- In the guest Windows OS, go to Computer Management > Disk Management (or run diskmgmt.msc in the command line) and find your virtual disk attached. By default, the new attached disk is offline. Right-click the disk and hit Online. A disk letter should be assigned automatically for partitions on the added disk. If a disk letter has not been assigned for a partition, right-click the partition, and click Change Drive Letter and Paths.

- Now you have full (read/write) access to files and directories of the VMDK virtual disk. Just open the mounted disk in Windows Explorer and copy the necessary content of the VMDK file mounted to the healthy VM. You can also delete unnecessary data from the attached VMDK virtual disk (for instance, if there are any files that were created by viruses), but be careful and don’t harm a virtual disk if there are related snapshots for the mounted VMDK disk.

Example 2: Mounting a virtual disk to a VM running on VMware Player or Workstation
This example is similar to the previous one, but a VM running on VMware Workstation is used to open VMDK files of the ESXi VM. This method can be used when there is no free disk space on the ESXi datastore to copy a virtual disk, for example. A virtual disk of the Win-test2 VM that was mentioned in the previous example will be mounted to a VMware Workstation VM to extract its content.
- In VMware vSphere Client, go to Storage > [Your datastore name] > Files, select your VMDK file and hit Download.
As you recall, a virtual disk of the ESXi format consists of vmdk and –flat.vmdk files. You need to download both files to your machine where VMware Workstation or VMware Player is installed. When you download a virtual disk from the ESXi datastore with VMware HTML5 vSphere Client, these two files are packed into one zip archive.
As an alternative, you can enable SSH access to your ESXi host, go to the datastore directory, and copy both virtual disk files to your computer manually by using an SCP client, for instance, WinSCP.
NOTE: When you download a thin provisioned virtual disk from an ESXi datastore that has the VMFS file system to your computer, you will get a lightweight vmdk file and a –flat.vmdk file whose size will be equal to the maximum provisioned size of the virtual disk (as you would do when downloading a thick provisioned virtual disk). This is because thin provisioning can be considered as a VMFS file system feature.

Now you can see two files of the ESXi-format virtual disk that have been downloaded in a ZIP archive. The size of the thin provisioned virtual disk on the VMFS datastore is about 2 GB now (see the screenshot above), and the size of the same disk downloaded to a workstation machine is about 8 GB (see the screenshot below).
- Unzip the two files from the archive. By default, the files are extracted to the Win-test2.vmdk directory, whose name is the same as the archive name but without a file extension.

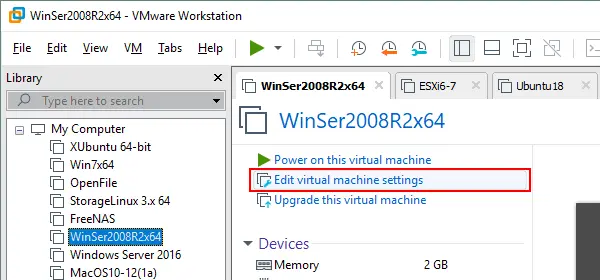
- For this step, you should have a healthy VM with a functional operating system on your machine with VMware Workstation or Player installed. While in the previous example, the VM running Windows Server 2016 was used, a healthy VM running Windows Server 2008 is used in this example.
Open VMware Workstation or VMware Player, select your healthy VM, and edit virtual machine settings.
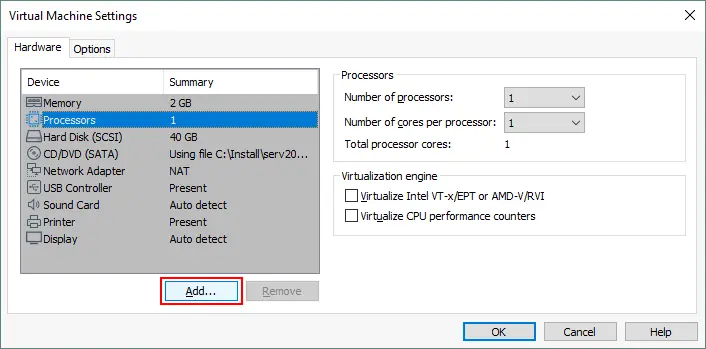
- In the Hardware tab, click the Add button.
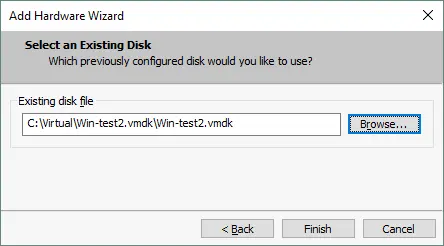
- In the Add Hardware Wizard that opens, select Hard disk as the hardware type. Then, select a type of disk (you may leave the recommended value). On the Select a Disk screen, select the Use an existing virtual disk option.
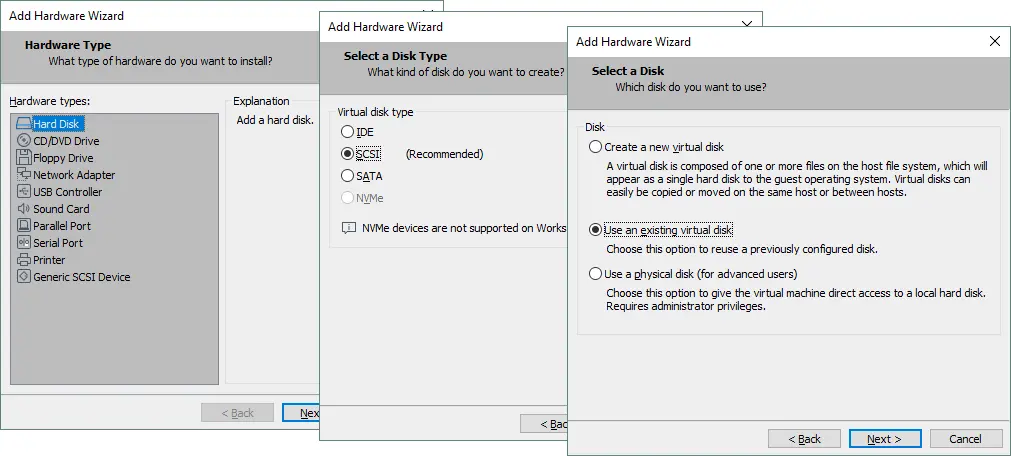
- Select the vmdk file (not –flat.vmdk) that you have extracted from the ZIP archive. You can browse the file or enter the entire path to the file manually.
In this example, ESXi 6.5 and VMware Workstation 15 are used. The VMware Workstation VM running Windows Server 2008 in our example has the Workstation 12 hardware version (VM version 12). The ESXi VM whose virtual disk we want to attach has the VM version 7.
- We get an error message in VMware Workstation saying that the virtual disk copied from the ESXi host is not compatible with this virtual machine:

This error can be fixed by editing the disk descriptor file (the lightweight vmdk file in the case of virtual disks of ESXi VMs). Open your VMDK file in the text editor and edit the number in the Ddb.virtualHWVersion string. In our case, 13 gets changed to 12.
NOTE: Remember that for virtual disks of VMware Workstation VMs, a virtual disk descriptor is built in the virtual disk VMDK file (there is no separate descriptor file as for virtual disks of ESXi VMs).

After editing the file, the virtual disk is successfully added to the existing VM.
- Power on the VM if it has not been powered on yet.
- Open Disk Management in Windows, change your virtual disk status to online, assign a drive letter to a partition, and browse the files.

How To Extract Data from a VMDK File without Powering on a VM
The methods that don’t require you to configure and power on a virtual machine have their own advantages. Some of these methods don’t require installing a hypervisor. You can mount VMDK files directly to your host operating system in a short period of time.
Method 1: Mounting VMDK files in a host OS with VMware Workstation
This method requires a VMware Workstation installation on a Windows or Linux operating system running on your physical computer. VMware Workstation provides a nice feature that allows you to mount VMDK files to your host operating system. Virtual disks of the ESXi format and delta disks related to VM snapshots are supported. Similarly to all previous methods considered in this blog post, your operating system must support the file systems of virtual disk partitions.
If you have snapshots of your virtual machine, the delta virtual disks are created after creating each snapshot. You should have a parent virtual disk and delta disks available if you want to open a virtual disk state the moment after taking one or another snapshot. In this case, you should mount the appropriate delta virtual disk to your host operating system. Dependencies related to the parent virtual disk will be resolved automatically.
If you have snapshots but wish to open a parent virtual disk, open the parent virtual disk in the read-only mode. This is because making changes on the parent virtual disk can damage snapshots or linked clones created from a parent virtual machine with the parent virtual disk. The read-only mode prevents you from writing data on a virtual disk after mounting the disk to the host OS. You can mount VMDK virtual disk files if a VM that uses this virtual disk is powered off, or if a particular VM isn’t using this virtual disk.
Let’s look at how to mount a VMDK virtual disk of the VMware Workstation VM that has snapshots. There is Windows installed on one NTFS partition on a virtual disk of the VM. After taking the first snapshot, the Snapshot1.txt file is created in the root directory of disk C: and, similarly, after taking the second snapshot, the Snapshot2.txt file is created there. The first example is for Linux, and the second example is for Windows. Virtual disk files of the old Windows XP VM are used in this example.
Example 1: Mounting VMDK on the Linux host
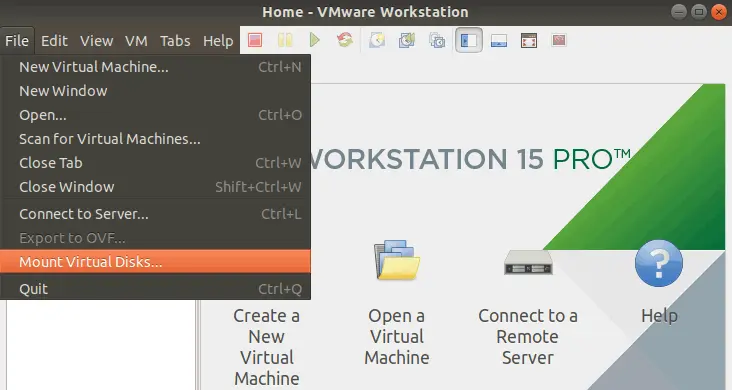
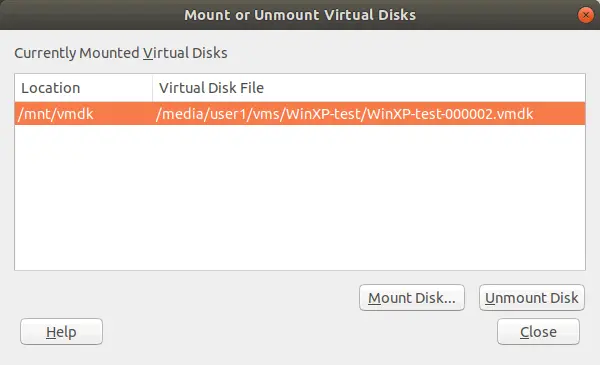
- Open VMware Workstation for Linux and go to File > Mount Virtual Disks.
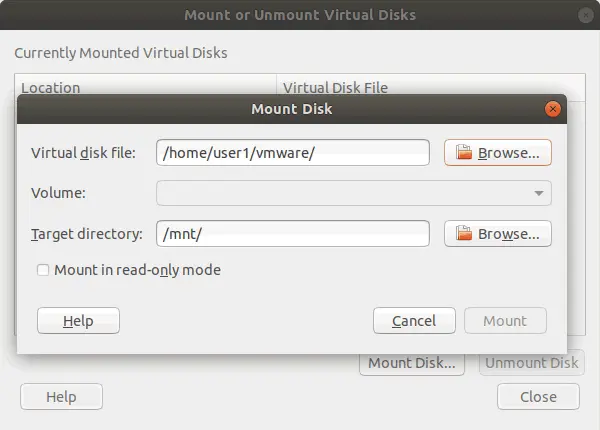
- Click Mount Disk, and a pop-up window opens. Click Browse and select the virtual disk VMDK file.
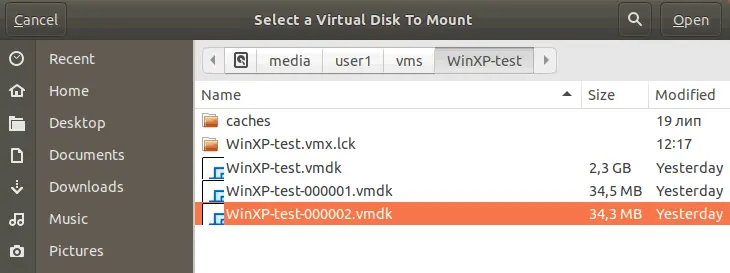
- Let’s select the VMDK file of the second differential virtual disk created after taking the second VM snapshot. The name of this file appears as VM_name-000002.vmdk in such cases (WinXP-test-000002.vmdk is used in this example).
- Create the directory on your Linux file system for mounting a virtual disk of the VMDK format to that directory. Let’s create the /mnt/vmdk/ directory in the Linux console.
mkdir /mnt/vmdk/ - Set permissions for your user (user name is user1 and is a member of group1 in this example):
chown -R user1:group1 /mnt/vmdk/chmod -R 0775 /mnt/vmdk/ - Now, select the directory you have created as the target directory, check the “Mount in read-only mode” checkbox, and click Mount.

- Now you are able to open the /mnt/vmdk/ directory in your Linux file explorer and browse files and directories located on the VMDK virtual disk. You can see Snapshot1.txt and Snapshot2.txt files, which were created after creating the first and second snapshots in this example. Each of these two files is located on a separate delta VMDK virtual disk.

- Don’t forget to unmount the VMDK virtual disk from the directory (mount point) on your host Linux system when you’re done with the operations with the virtual disk content.
If you prefer using the console interface, you can mount VMDK disk images on the Linux host in the console with this command:
vmware-mount /media/user1/vms/vm_name/vm_disk_name-000002.vmdk /mnt/vmdk
Where:
vm_name is the name of the virtual machine that is the same as the VM directory name in this case. WinXP-test is the VM name in our example.
vm_disk_name is the name of the virtual disk (WinXP-test.vmdk is used in this example).
vm_disk_name-000001.vmdk is the name of the first delta (differencing) disk created after taking the first VM snapshot (WinXP-test-000001.vmdk in this case).
vm_disk_name-000002.vmdk is the name of the second delta disk created after taking the second VM snapshot accordingly (WinXP-test-000002.vmdk in this case).
- Mount the virtual disk. By default, the virtual disk is mounted in read/write mode. You can use the -r key in the command line to mount a disk in read-only mode.
vmware-mount /media/user1/vms/vm_name/vm_disk_name-000002.vmdk /mnt/vmdk - List all mounted VMDK virtual disks:
vmware-mount -L - Before finishing working with mounted VMDK virtual disks, unmount all virtual disks:
vmware-mount -x
Example 2: How to mount VMDK on the Windows host
The idea of how to mount VMDK files in Windows is similar. In addition to the File > Map Virtual Disks option in the graphical user interface (GUI) of VMware Workstation, you can follow the steps below. Let’s mount the VMDK file of the first differential virtual disk created after taking the first VM snapshot. The name of this VMDK file has the following format: VM_name-000001.vmdk (WinXP-test-000001.vmdk is opened in this tutorial).
- Right-click the VMDK file in Windows Explorer and click Map Virtual Disk.

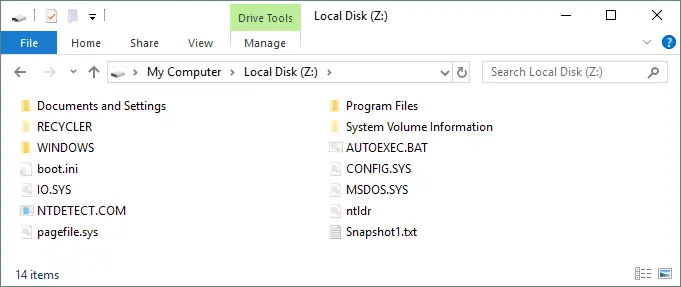
- Select the parameters to mount a VMDK file. It is recommended that you open the VMDK file in read-only mode to prevent any possible damage of virtual disks that belong to the snapshot chain after writing data. The default drive letter is Z: in this case, and the drive opens in Windows Explorer automatically after mapping if the appropriate checkbox is selected. Click OK to proceed.

- Now the virtual disk is mounted as disk Z: in Windows, and you can read vmdk file contents. In the screenshot below, you can see the Snapshot1.txt file created after taking the first snapshot. The Snapshot2.txt file is missing because it was created after taking the second VM snapshot, and we have opened a delta virtual disk related to the first VM snapshot.
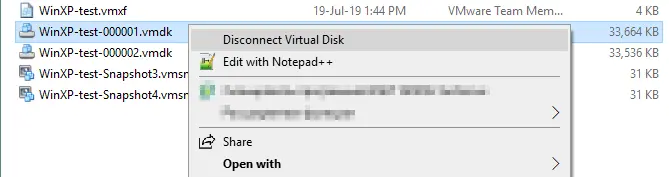
- When you have finished working with the mapped VMDK virtual disk, don’t forget to disconnect the disk. Right-click the appropriate VMDK file and then click Disconnect Virtual Disk. After disconnecting the virtual disk, you can power on that VM that uses this virtual disk.
Method 2: Using 7-zip to extract content from VMDK files
If you are looking for how to open VMDK files without running virtual machines, you can install 7-zip and extract content from virtual disk images. 7-zip is a free tool intended to archive files and unpack files from archives and other images. You can use 7zip as a vmdk extractor. This tool can be used on Linux and Windows machines.
7-zip can open vmdk and –flat.vmdk files (this utility can open a single –flat.vmdk file if the descriptor vmdk file is missing) – 7-zip is actually for virtual disks of the ESXi format. 7-zip cannot open delta VMDK files created after taking VM snapshots.
How to open VMDK files with 7-zip on Linux
- Install a full pack of 7-zip on your Linux machine. Ubuntu is used in this example.
apt-get install p7zip-full - List contents of the vmdk file with 7-zip:
7z l vm_name.vmdk - Let’s find the files that contain “boot.” in their names, for instance:
7z l /media/user1/vms/WinXP-test/WinXP-test.vmdk | grep boot[.]Where user1 is the name of our Linux user, l – list.

- Let’s extract (e) the boot.ini file from the VMDK image:
7z e /media/user1/vms/WinXP-test/WinXP-test.vmdk boot.iniYou can extract other files and directories from the VMDK file the same way.
How to open VMDK files with 7-zip on Windows
- Download the compatible version of 7-zip from the official website and install the application on your Windows machine. Use the EXE installer for more convenience.
- After installing 7-zip on Windows, new 7-zip options are added to the context menu when you right-click any file or folder in Windows Explorer (see the screenshot below). Use these options to open the VMDK file as an archive or extract files right now.

- In the screenshot below, the content of the standalone Win-test2-flat.vmdk file is displayed in the GUI of 7-zip used in Windows. You can extract the VMDK contents that you need.

How to Mount VMDK Files in Linux (Other Methods)
One of the most powerful capabilities of Linux is the ability to perform the highest number of operations in the console, even with built-in tools. These tools will help you mount VMDK files and access the content stored on virtual disks. Ubuntu Linux is used in the provided examples.
Method 1: How to mount VMDK files by using /dev/loop
Loop devices are pseudo-devices in Linux, which make files accessible as block devices and can be used to mount disk images that contain file systems. Loop devices are named as /dev/loopX where X is the number of the loop device. This method is good for mounting –flat.vmdk files, even without a virtual disk descriptor.
Let’s explore how to mount a VMDK file in Linux to access the files of the virtual disk as an example. There is a virtual disk of the ESXi format that contains one partition – the descriptor file is missing. A long time ago, Windows XP was installed on that virtual disk.
- Use one of the two commands to check the number of existing loop devices on your Linux system.
fdisk -l | grep /dev/loopdf -h | grep /dev/loop - In our case, devices with numbers 1 to 21 already exist (/dev/loop1 – /dev/loop21). Thus, let’s create the loop device number 30 – this number is free. We will associate this device with the –flat.vmdk file.
losetup /dev/loop30 /vms/Win-test2-flat.vmdk - Set the offset:
losetup -o 32256 /dev/loop31 /dev/loop30Where 32256 is the offset that is 63*512 for a disk formatted in Windows XP/Server 2003 and older Windows versions (63 is the number of the first sector of the partition, and 512 bytes is the sector size). For Windows 7/Server 2008 and newer Windows versions, try the offset 105906176.
You can retrieve information about the sector size, and the first sector used for the boot start with the command:
fdisk -l /dev/loop30 /vms/Win-test2-flat.vmdk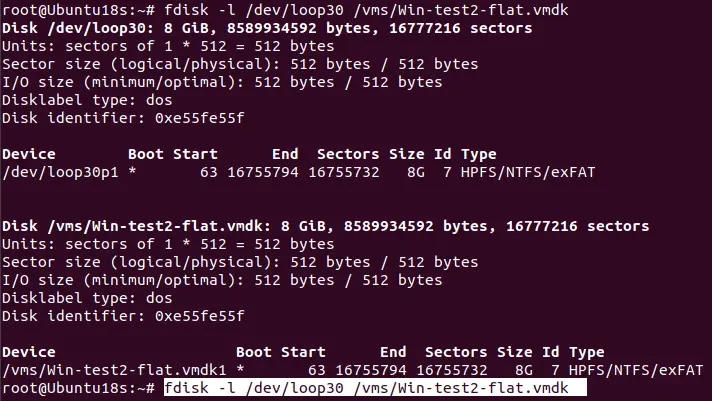
As an alternative, for virtual disks that contain multiple partitions, you can use parted to determine the start and the end of each partition:
parted /dev/loop30In the parted console, enter the following commands:
unitBprint
- Create a directory to be used as the mount point for the VMDK image:
mkdir /mnt/vmdk-image - Mount the loopback device associated with the VMDK image to the created directory:
mount /dev/loop31 /mnt/vmdk-image - List the content of the mounted image:
ls -al /mnt/vmdk-image - After finishing working with the content of the virtual disk, unmount the vmdk image and disconnect the loop device:
umount /mnt/vmdk-imagelosetup -d /dev/loop31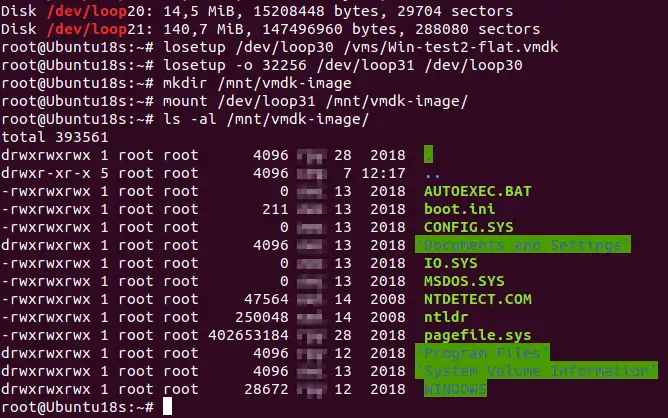
Method 2: How to mount VMDK files with kpartx
Kpartx is a tool that can mount partitions within image files to the directories of your real Linux file system. This tool can be used to set up device mappings for partitions of block devices. This method also works for mounting –flat.vmdk images used on ESXi servers. Let’s see how to mount the –flat.vmdk file used in the previous example.
- Install kpartx:
apt-get install kpartx - Add the partition mapping for the VMDK image in the verbose operating mode:
kpartx -av /vms/Win-test2-flat.vmdk - Mount a partition to the /mnt/vmdk-image directory prepared before:
mount /dev/mapper/loop30p1 /mnt/vmdk-image/Where loop30 is the number of the loop device, and p1 is the number of the partition inside the image (the first partition on the disk image).
- List the content of the virtual disk partition you have mounted:
ls -al /mnt/vmdk-image/
- When you have finished operations with the files of the VMDK image, unmount the VMDK virtual disk image:
umount /mnt/vmdk-imagekpartx -d /vms/Win-test2-flat.vmdk
Conclusion
Knowing multiple methods of extracting VMDK content gives you flexibility and reliability because each method can be the best option in certain situations. Moreover, it is even better to have backups of your VMs in addition to that knowledge.
NAKIVO Backup & Replication can back up and restore VMs running in VMware vSphere in the best way. You can recover the entire VM, the particular virtual disk or separate files from backup to a custom location.