How to Extend Windows VM Partitions
When a virtual disk on a virtual machine is full, you need to increase the virtual disk size. However, partitions located on the virtual disk do not expand automatically and should be expanded manually.
Learn how to increase the virtual disk size and extend Windows partitions using different methods and combine these methods for different scenarios.

Preparing to Extend Windows Partitions
Let’s first go over the setup used in this post. The process involves two steps:
- Increasing the size of a virtual disk in VMware vCenter by using vSphere Client
- Increasing the partition size in the Windows VM
The version of Windows installed on the VM as a guest OS is Windows Server 2019 in our example. There is one 20-GB virtual disk with one system partition (C:) on which Windows is installed.
Note that the workflow for Windows Server 2022, Windows Server 2016, Windows 10, Windows 8, and Windows 7 is similar. For Linux environments, you can read how to extend partitions in Linux.
The requirements to expand a virtual disk of a VM are:
- The virtual machine must be powered off.
- Virtual disks must not have snapshots.
Expanding a Windows Virtual Disk in vSphere Client
First, you must increase the size of the virtual disk used by the virtual machine. In this example, we use VMware vSphere Client to increase the virtual disk size.
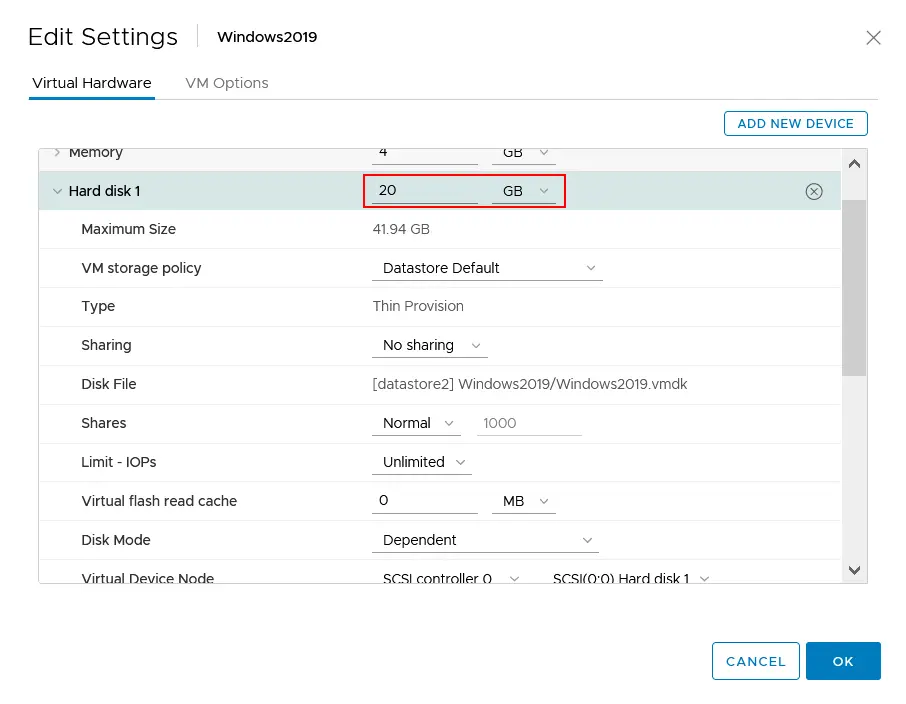
- Select a virtual machine whose virtual disk you want to expand, right-click the VM, and in the menu that opens, hit Edit Settings to open the virtual machine settings.

- In the Virtual Hardware tab, expand settings for the needed hard disk, for example, Hard disk 1. Enter the new size for the selected hard disk. In our example, we expand a virtual disk from 20 GB to 30 GB. Hit OK to save settings and expand the disk. If hard disk settings are grayed out, power off the VM and try again. Make sure that there are no snapshots for VM disks.
Extending Windows partitions with Disk Management Snap-in
The virtual hard disk has now been expanded, but the size of partitions remains the same. The most user-friendly method to extend Windows partitions is using native disk management tools in the graphical user interface of Windows 10 and other versions.
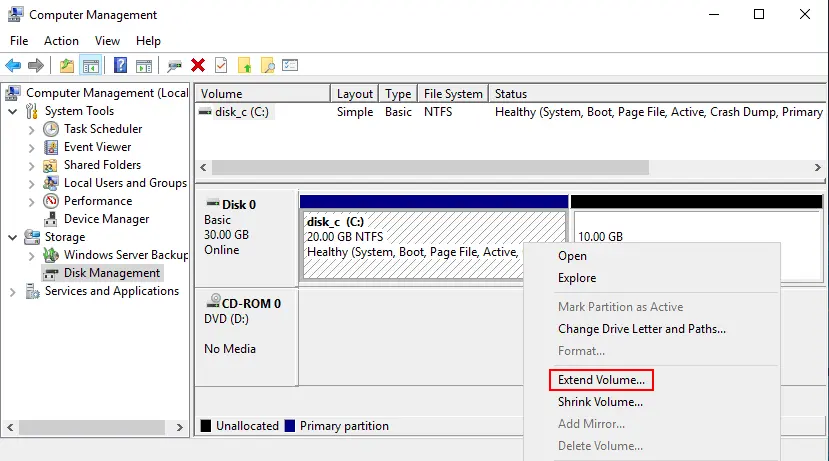
- Open Computer Management, and then open Disk Management.
- In Windows Server 2016, 2019, and 2022, click Tools > Computer Management in Server Manager.
- In Windows 10 and other client Windows versions, right-click the My Computer (This PC) icon, and in the context menu, click Computer Management.

- In the left pane of the Computer Management window, click Disk Management.
- You can open the Disk Management snap-in in different Windows versions from the command line interface by running the
diskmgmt.msccommand.
- Right-click the needed partition, and in the context menu, click Extend Volume.
NOTE: There must be free space right after the partition that you want to extend. If you have two partitions on a disk (C: and D:), and you want to extend the first partition (C:), your unallocated disk space should be between the first and the second partition (after C: and before D:).
- Welcome to the Extend Volume Wizard. Hit Next to Continue.
- Select Disks. Select the unallocated disk space on your disk to be used to extend the needed disk partition. In our example, we select 10 GB of unallocated disk space, which appeared after increasing the size of the virtual disk. You can select the amount of disk space in MB (it can be less or equal to the size of unallocated disk space).

- Completing the Extend Volume Wizard. Hit Finish.
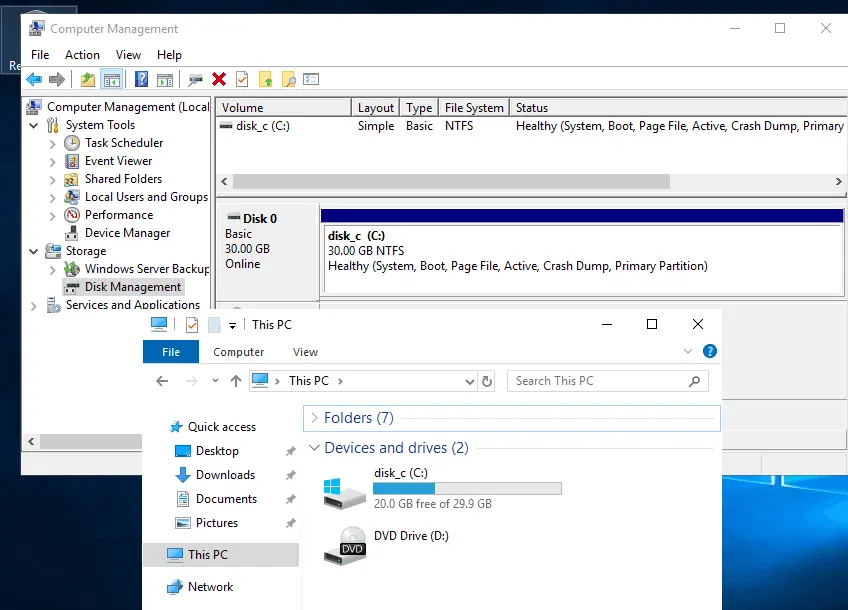
Now the partition size has been increased, and there is no unallocated disk space on the virtual disk. You can check the free space in the Disk Management window and in Windows Explorer.
If the extend volume option is inactive in Windows 10 for some reason, use the next method explained below.
Extend Partitions for Windows With Diskpart
In the section above, we were able to extend partitions right in the operating system by using the Disk Management snap-in. This option is only available for newer Windows versions to extend partitions including system partitions. This option is not available, however, in Windows XP, Windows Server 2003, and older Windows versions (You may have old Windows versions installed, such as Windows XP, to run old applications).
Another option is to connect old devices via USB (the USB Pass-through feature of VMware allows you to connect USB devices directly to a virtual machine) when devices don’t have drivers for newer versions of Windows. If you cannot install Windows XP on modern hardware due to ended support and missing drivers, you can still use this operating system on virtual machines. In this section, we explain how to increase the size of a virtual disk used by the Windows XP VM and how to extend a partition on this virtual disk afterward.
NOTE: As security patches are not released for Windows XP and Windows Server 2003 now, avoid connecting machines running these operating systems to a production network for security reasons. Attackers can use unpatched software vulnerabilities to initiate malware attacks. Microsoft recommends that you use the latest versions of Windows. Windows XP is used as an example in this section of the blog post.
There must be unallocated (unpartitioned) disk space right after a system partition to expand the system partition.
This workflow is applicable for Windows XP and newer Windows versions.
Preparing the environment to extend Windows partitions
Let’s use the native built-in command-line Windows tool, which is available in Windows XP and all newer Windows versions and editions. The idea is to use the Windows 10 installation image to boot from this virtual DVD image, run diskpart, and resize a partition. The advantage of using diskpart in Windows 7 and newer versions of Windows is the support of 4-KB blocks and their alignment (native tools of Windows XP don’t support this feature). You can use this method to extend partitions on machines running other Windows versions.
A Windows XP VM is running on an ESXi host in this example. You can edit the configuration of the VM running on the ESXi host by using VMware Workstation as an alternative to vSphere Client. VMware Workstation provides functionality for connecting to vCenter Servers and ESXi hosts and managing virtual machines. You can use this method to resize virtual disks and partitions of VMs running on VMware Workstation on your computer. Just keep in mind that the locations of VM files are different in this case.
Let’s start from the very beginning. Before increasing the size of a virtual disk in a VM running Windows XP, the disk partitioning scheme in Disk Management looks as in the screenshot below. There is one 10-GB virtual hard disk and one partition C: which fills all disk space. Windows is installed on this NTFS partition.

Expanding a virtual disk in VMware Workstation
To extend the hard drive of a virtual machine:
- Open VMware Workstation and click File > Connect to Server. Enter the IP address of the ESXi host on which your VM is residing or the IP address of vCenter Server that manages ESXi host with the needed VM. Enter administrative credentials for the selected server (by default, the root username is used for ESXi hosts and administrator@vsphere.local for vCenter).

- Select the VM with the virtual disk that you want to expand in the list of VMs on the appropriate server.
- Shut down the VM.
- Then click VM > Settings in VMware Workstation.

- In the Hardware tab, select the hard disk that you want to expand, then in the right section of the window, click Expand. The Windows XP VM, for which we will extend volume C:, has a thin provisioned 10-GB virtual disk.
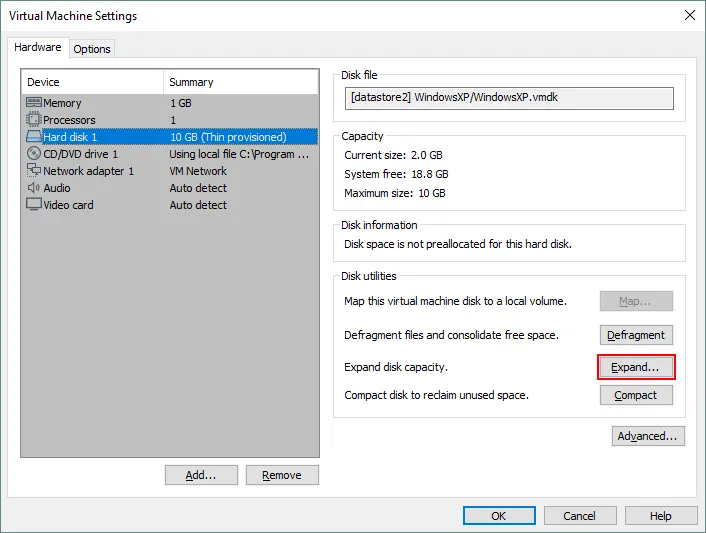
- Enter the new maximum disk size. Let’s expand the virtual disk from 10 GB to 18 GB. VMware displays the following notification:
Expand increases only the size of a virtual disk. Sizes of partitions and file systems are not affected.
OK. Click Expand to apply changes to the virtual disk.
- When the disk is successfully expanded, a message is displayed with the reminder to repartition the disk. Hit OK to close this window.

- Now in the hard disk options of VM hardware, you see that the size of the virtual disk has been increased to 18 GB.

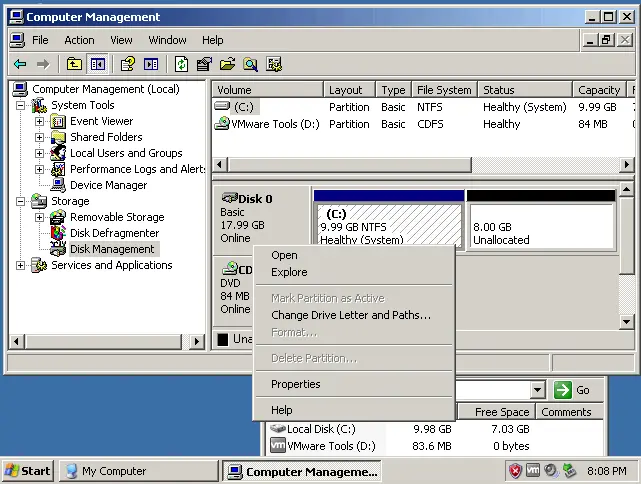
- If you power on the Windows XP VM and open the Disk Management snap-in, you notice that 8 GB of disk space is added as unallocated disk space after the first partition (disk C:). If you right-click a partition, you don’t see the Extend/Shrink options because there is no support for these features in Windows XP. Shut down Windows XP on this VM, and prepare the ISO installation image of a newer Windows version.
- In VMware Workstation, open VM settings of the Windows XP VM. In hardware settings, click CD/DVD drive 1, and in the right pane of the window, select the needed Windows installation image.
As the considered VM resides on an ESXi host, and VMware Workstation is used to manage this VM, there are multiple options for the CD/DVD drive of the VM. You can select the ISO image stored on a datastore of a remote server (ESXi server) or select the ISO image stored on a machine where VMware Workstation is installed. You can also insert an optical disc into the physical drive of the ESXi server or a computer running VMware Workstation.
Let’s use the Windows 10 ISO image stored on a local machine and insert it into a virtual CD/DVD drive. Hit OK to save the VM configuration and close the window.

Using diskpart on the Windows installation medium
Diskpart is the advanced Windows command line tool and includes features not available in the GUI.
To extend volume in Windows with diskpart by using a Windows 10 installation medium:
- Power on the VM and press F2 quickly to open BIOS settings of the virtual machine. In the Boot tab, select CD-ROM Drive as the first boot device, save changes, and exit.
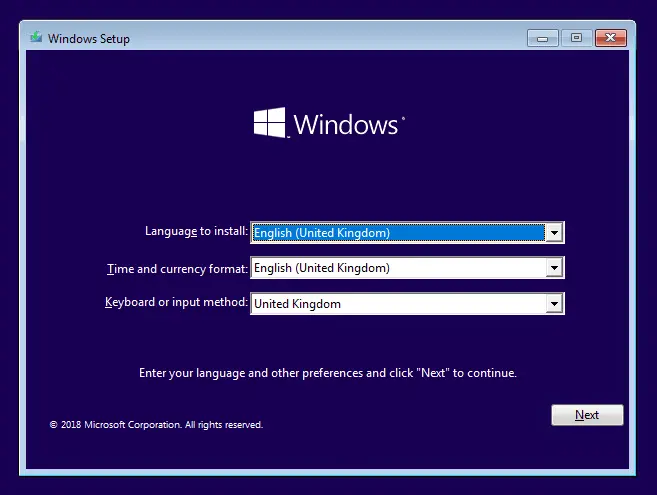
- Boot from the selected Windows installation medium (Windows 10 ISO image in this case).
- Press Shift+F10 at the stage of language selection to open the command prompt (CMD).
- Type diskpart in the CMD window and press Enter. The prompt has been changed to:
DISKPART> - Display a list of all disks connected to the current machine:
list diskIn the following screenshot, you see our virtual disk that was expanded to 18 GB, including 8 GB of free (unallocated) disk space. In the left column, the numbers of disks are displayed. The needed disk is marked as Disk 0.
- To select the disk, enter the command:
select disk 0
- Once you have ensured that the needed disk is available, list available disk partitions:
list volumeIn this case, we want to extend Volume 1, that is the NTFS partition on which Windows is installed.
- Now select the partition whose size you want to increase:
select volume 1 - To extend the partition to the maximum available size, enter the command:
extendIf you want to extend a partition to a custom size, enter a command like this one:
extend size=10240Where 10240 means 10240 MB. If units are not defined in the command, megabytes are used by default. This command makes the selected partition larger by 10 gigabytes.
- Check whether the selected partition is extended and list volumes (partitions) again. Run the command:
list volumeor
list partition - As you can see in the following screenshot, the needed partition has been extended successfully, and you can close the diskpart tool:
exit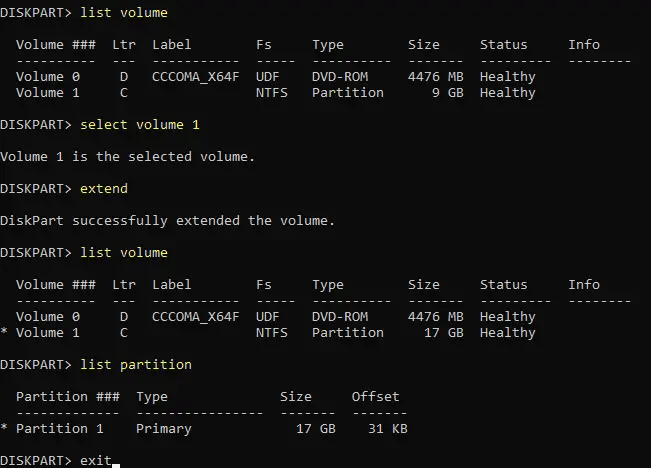
- Reboot the virtual machine, eject the ISO image from the virtual CD/DVD drive, set the virtual hard disk as the first boot device in BIOS of the VM.
- Boot Windows XP installed on the virtual hard disk that was expanded. Open the Disk Management snap-in and check disk partitions. The partition was extended successfully, and a guest Windows XP was loaded successfully from this extended partition.
You can use the same workflow to extend partitions for Windows Vista, 7, 8, 10, Windows Server 2003, 2008, 2012, 2016, and 2019 when resizing partitions from the installed OS is not possible.

Using a Helper VM
Another method to extend a partition on a virtual disk is connecting this virtual disk to another VM on which partition management software is available. The first VM is the source VM, and the second VM is the helper VM.
Let’s say that you have two virtual machines. Windows XP is installed on the first machine, and Windows 10 is installed on the second machine. You have expanded a virtual disk used by the Windows XP VM, and you want to extend a partition on that disk. This operation cannot be done by native Windows XP tools. At the same time, Windows 10 has the appropriate built-in tools with the functionality to extend partitions (Disk Management, diskpart). Windows XP and Windows 10 are used in this section as an example. You can use other/newer versions of Windows.
The workflow to increase the partition size on a disk used by the first VM is the following:
- Power off both VMs.
- Open VM settings of the second VM (on which Windows 10 is installed).
- In the Hardware tab, click Add > Hard disk. Select to use an existing virtual hard disk, and define the location of the VMDK file of the appropriate virtual disk (a virtual disk from the XP VM in our example).
- Power on the second VM, and boot from the virtual disk on which Windows 10 is installed.
- Open the Disk Management snap-in in Windows 10 and find the virtual disk with the partition on which Windows XP is installed.
- Right-click the partition of the disk that you want to extend and click Extend Volume in the context menu.
- Configure the volume parameters and set the needed volume size.
- When done, close the Disk Management snap-in and shut down the Windows 10 VM.
- Open the virtual machine settings of the Windows 10 VM. Disconnect (remove) the virtual disk of the Windows XP VM.
- Check the VM settings of the Windows XP VM. Make sure that the expanded virtual disk is present in the VM configuration.
- Power on the Windows XP VM, boot the operating system, and check the size of disk partitions.
Extend Windows Partition in PowerShell
One more way to expand Windows partitions is by using PowerShell. Let’s look at how to extend a partition after expanding the size of a virtual disk from 20 GB to 30 GB for a Windows 10 VM. The disk contains one C: partition (volume). This method can be applied to Windows 10, 11, Windows Server 2016, 2019, and 2022.
- Run PowerShell as Administrator.
- Set the disk volume to resize as a variable:
$drive_letter = "C" - Get the available size for expanding the volume:
$size = (Get-PartitionSupportedSize -DriveLetter $drive_letter) - Resize the partition to the maximum available size:
Resize-Partition -DriveLetter $drive_letter -Size $size.SizeMax
You can create a PowerShell script to avoid running each command manually.
- Create a script file, for example,
extend_volume_c.ps1and place the file in any directory, for example, C:\temp\. - Add the following lines to this ps1 file:
# Specify the disk drive to be extended$drive_letter = "C"# Get the partition size$size = (Get-PartitionSupportedSize -DriveLetter $drive_letter)# Resize the volume to the maximum available size on the diskResize-Partition -DriveLetter $drive_letter -Size $size.SizeMax - Run PowerShell as Administrator.
- Run the script:
C:\temp\extend_volume_c.ps1 - Check whether the partition size was extended:
Get-PSDrive
Using VMware vCenter Converter
As an alternative to previous methods, you can use VMware vCenter Converter Standalone to extend virtual disks and adjust disk partition size on VMware VMs running on ESXi or VMware Workstation. You can extend volumes on Windows 10 and other Windows versions supported by the converter.
Note that you need to prepare enough free space because a new VM is created by VMware Converter, and data on the source VM is copied to the destination VM.
In this example, let’s expand a virtual disk of a Windows VM from 18 GB to 22 GB with automatic resizing of a system partition (disk C:). As a result, we have the V2V (virtual to virtual) conversion in this example.
- Open VMware vCenter Converter Standalone, and click Convert machine.

- Source System. Select the type of the source VM. You can select a VMware infrastructure VM (a VM residing on an ESXi host in vSphere) or a VMware Workstation VM. A source VM can be powered on or powered off.
Let’s select a powered-off Windows VM residing on an ESXi host. If you select a VM on an ESXi host, enter the credentials of the ESXi host or vCenter Server that manages the ESXi host with the VM.
Hit Next at each step of the wizard to continue.

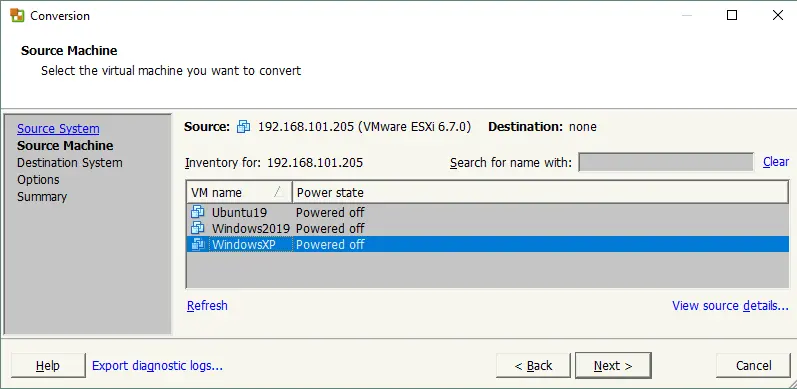
- Source Machine. Select the source machine with the virtual disks that you want to expand.
- Destination System. Select the destination VM type: a VMware Infrastructure virtual machine or a VMware Workstation virtual machine. Select the VMware product for compatibility. Enter the virtual machine name and location.

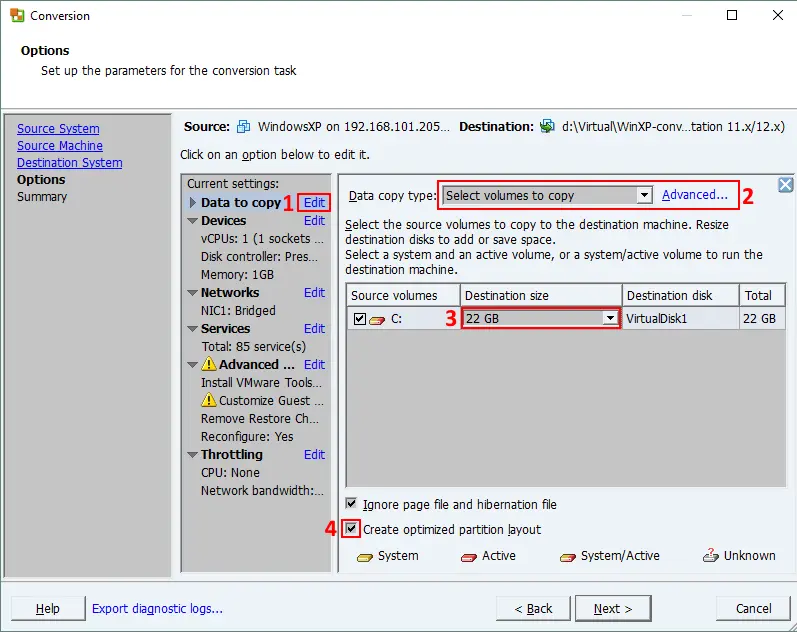
- Options. Click Edit data to copy to expand disk options. In the drop-down menu, select volumes to copy and hit Advanced. In the following table, select the needed virtual disk, partition, and set the destination size. Select the Create optimized partition layout checkbox to extend the partition to fit the size of the expanded virtual disk.
Finish the wizard, and wait until a copy of the VM is created by VMware Converter. Then, if everything is correct, you can delete the source VM.
Conclusion
The most convenient method to extend volumes on Windows 10 is using native disk management tools in the graphical user interface. If this method is not available on your Windows machine or you have a more complex partitioning scheme, you can use diskpart, the advanced command line tool available also on a boot DVD image or use a helper VM. PowerShell commands allow you to increase partition size in latest Windows versions. Finally, VMware vCenter Converter can be used to increase the volume size and adjust the virtual disk size automatically.
Whichever method you choose, it is important to ensure that you have recent backups of your VMs to ensure that you can recover the VMs as well as app and system data if anything goes wrong. NAKIVO Backup & Replication is a comprehensive data protection solution for virtual, physical, cloud and SaaS environments.