How to Convert OVA/OVF Files to Hyper-V VM
Microsoft’s Hyper-V is a native hypervisor for Windows, that is you can use it to run virtual machines (VMs) with different guest operating systems. Unlike VMware’s hypervisor products, deploying a VM from an OVA format because the OVA file format is not supported in Hyper-V and you cannot import OVA to Hyper-V as is. This blog post explains the steps to convert OVA to Hyper-V format and deploy a VM.

What Is OVA?
An OVA file is a container used for more convenient distribution and deployment of virtual machines in different environments. The VMs are packaged into OVA files, which are archives of the TAR format, that can be preconfigured for convenient and fast deployment.
OVA stands for Open Virtualization Archive or Open Virtual Appliance. When importing a VM from OVA, hypervisor software extracts the contents of the OVA file and sets up a VM according to the specifications defined in the OVA package without the need to manually create and configure each component.
An OVA file can be considered an archive that contains:
- A virtual disk image such as VMDK
- An OVF descriptor which is an XML-like text file
- ISO virtual DVD image files
- MF – manifest file with the information about files included in the OVA or OVF VM package
- Certificate
- Other files
OVA template files are platform-independent and supported by hypervisors such as VMware ESXi, VMware Workstation, Oracle VirtualBox, QEMU, and others. Unlike the mentioned hypervisors, Microsoft Hyper-V doesn’t support deploying VMs from OVA/OVF templates and exporting VMs to OVA templates.

The workflow to import OVA to Hyper-V consists of three main steps:
- Extract VMDK from OVA (extract a virtual disk file from an OVA template).
- Convert VMDK to VHD or VHDX.
- Create a VM in Hyper-V and import the existing virtual disk, which is the virtual disk previously converted.
As you can see, there is no universal OVA to Hyper-V converter that can convert OVA to Hyper-V directly.
Extracting OVA Contents
Extract the content of the OVA template. You can open an OVA file as you open tar or zip archives in an archiver such as 7zip. When you extract files from an OVA template, you get an OVF template with files (that is you convert OVA to OVF). You don’t need to extract content from the OVF template, which is usually supplied in a separate directory together with a virtual disk file and configuration file for the VM template.
We create the OVF subdirectory in C:\temp\vm\ and extract the contents of the OVA template. First of all, we need to extract VMDK from OVA to this directory.

Converting a Virtual Disk
The second step is to convert the virtual disk from the VMDK format to the VHD or VHDX format, which is supported by Hyper-V. You can convert the extracted virtual disk with one of three tools:
- qemu-img
- vboxmanage
- Microsoft Virtual Machine Converter
Qemu-img
Qemu-img is a free utility for Windows to convert virtual disk images of different file formats. This utility is a command-line utility from the creators of QEMU.
- Download qemu-img from the official web page.
- Unpack the contents of the downloaded archive to a custom directory, for example, C:\Programs\qemu-img\
- Open the Windows command line (CMD). You can do this by clicking Start and typing CMD.
- Go to the directory where qemu-img is located if you didn’t add the location of this utility to the OS $PATH variable:
cd C:\Programs\qemu-img\ - Run the command to convert a VMDK virtual disk to VHDX:
qemu-img convert -p -f vmdk "C:\TEMP\VM\ovf\WinXP-test-disk1.vmdk" -O vhdx -o subformat=dynamic "C:\TEMP\VM\WinXP-HV.vhdx"Where:
-p sets to show the progress of the process.
-f is the format of the source virtual disk image.
“C:\TEMP\VM\ovf\WinXP-test-disk1.vmdk” is the path of the source virtual disk.
-O is used to set the format of the output virtual disk image file (vhdx in this case).
-o subformat=dynamic sets the output VHDX, which is a dynamic disk in this case. A VHDX virtual disk can be fixed or dynamic.
“C:\TEMP\VM\WinXP-HV.vhdx” is the destination path for the output virtual disk file.

Wait until qemu-img finishes converting the VMDK file extracted from OVA to Hyper-V VHDX. The needed time depends on the size of the virtual disk file and the performance of the storage subsystem.
vboxmanage
Virtual Box Manager or vboxmanage is a command line utility that comes with VirtualBox, which is a hypervisor supported by Oracle. You need to install VirtualBox to use vboxmanage, which is a multiplatform utility for Windows, Linux, and macOS. The vboxmanage utility can do more operations than the graphical user interface of VirtualBox and can convert virtual disks of different formats. Read the VirtualBox vs Hyper-V comparison to learn more about features and supported virtual disk formats.
- Go to the directory where VirtualBox is installed (we use the default installation path in this example):
cd "C:\Program Files (x86)\Oracle\VirtualBox" - Run the command to convert a VMDK virtual disk to a VHD format for Hyper-V:
VBoxManage.exe clonehd --format vhd "C:\TEMP\VM\ovf\WinXP-test-disk1.vmdk" "C:\TEMP\VM\WinXP-HV.vhd"
The progress of the process is displayed in the console. Wait until the virtual disk cloning/converting process is finished.
Microsoft Virtual Machine Converter
Another solution is to use Microsoft Virtual Machine Converter. Be aware that this tool is not updated anymore (but is available as archived content). You can find the installer here and try to convert OVA to Hyper-V VHD or VHDX.
- Install Microsoft Virtual Machine Converter (MVMC) from the downloaded file.
- Open PowerShell in Windows. You can do this by clicking Start and typing PowerShell.
- Import the PowerShell module supplied with the converter:
Import-Module “C:\Program Files\Microsoft Virtual Machine Converter\MvmcCmdlet.psd1" - The command to convert a VMDK virtual disk to a Hyper-V virtual disk is:
ConvertTo-MvmcVirtualHardDisk -SourceLiteralPath "C:\TEMP\VM\ovf\WinXP-test-disk1.vmdk" -DestinationLiteralPath "C:\TEMP\VM\WinXP-HV2.vhd" -VhdType DynamicHardDisk -VhdFormat Vhdx
If you see the error “The entry 1 is not a supported disk database entry for the descriptor“, you need to edit the virtual disk descriptor. The details about the Microsoft converter and editing the descriptor can be found in the blog post about converting VMware VMs to Hyper-V VMs.
Creating a New VM
Once you convert OVA to Hyper-V VHD or VHDX by extracting a VMDK file from the OVA package, you need to create a new Hyper-V virtual machine and use the existing virtual disk, which is our converted virtual disk. Read the blog post with the detailed walkthrough about how to create a new Hyper-V VM in Windows 10.
- Open Hyper-V Manager on your Windows host machine.
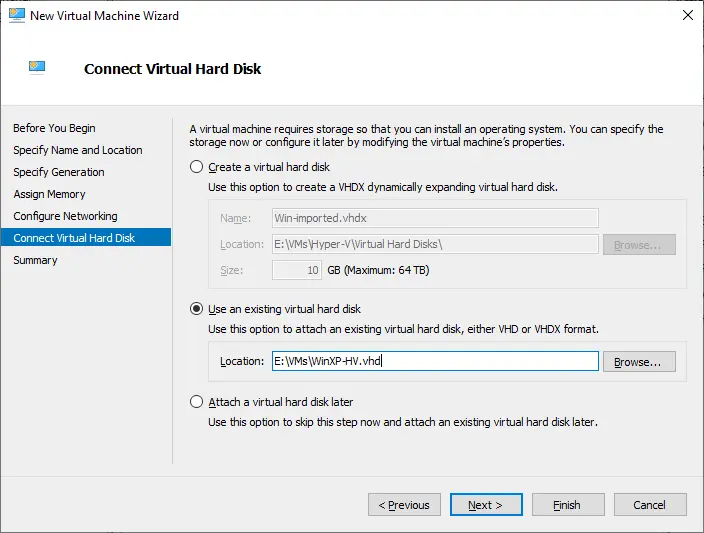
- Right-click the hostname of your Hyper-V host in Hyper-V Manager and click New > Virtual Machine in the context menu. The New Virtual Machine Wizard opens. Follow the wizard steps and configure a new VM as needed up to the Connect Virtual Hard Disk step.

- At the Connect Virtual Hard Disk step, select Use and existing virtual hard disk. Click browse and select the virtual disk you got as a result of the virtual disk conversion explained in the previous section. In our case, we select E:\VMs\WinXP-HV.vhd, which we copied to this directory.
- Start the virtual machine you have already created using the Hyper-V virtual disk converted from a VMDK file, which was extracted from the OVA file. You may need to install Hyper-V Integration Services on a guest OS of this VM.

Conclusion
After you deploy a VM in Hyper-V, please don’t forget about VM backup. Use NAKIVO Backup & Replication for fast and efficient backup of Hyper-V and VMware VMs. Moreover, the NAKIVO solution supports Cross-Platform Recovery to export virtual disks directly from a backup to the needed VMware or Hyper-V format.