Running Automatic and Manual Office 365 Updates
Office 365 is a set of cloud-based services including popular applications such as Word, Excel, PowerPoint, and Outlook. All Office 365 applications can be used in a web browser. But Word, Excel, PowerPoint, Outlook, and OneNote are traditional applications that you can install on a computer running Windows or macOS. When using the web versions of Office 365 apps, you’re always using the latest versions with the latest features. Stand-alone versions of Office 365 apps provide more convenience and performance when editing documents, but you may need to check for updates. Software vulnerabilities can be found in any application, and Office 365 is no exception.
Vulnerabilities can be used by malicious actors to initiate malware or ransomware attacks on your computers. Microsoft regularly fixes new-found vulnerabilities and includes them in Office 365 software updates. That’s why you are more protected if you use Office 365 software that is up-to-date. This blog post covers Office 365 update settings and explains how you can change these settings by using different methods.

Update Options in Office 365 Applications
How to update Office 365? Let’s look at how to update Microsoft Office 365 applications installed on a computer by using the update options in these applications. You need to have stand-alone applications from the Office 365 suite installed on your computer and an Office 365 subscription. Make sure the subscription plan you use includes stand-alone Office applications. Log in to Office 365 in one of the applications by using an active account with the assigned license.
- Open one of the Office 365 applications installed on your computer, for example, Microsoft Word 365.
- In the menu bar of the Word window, click File.
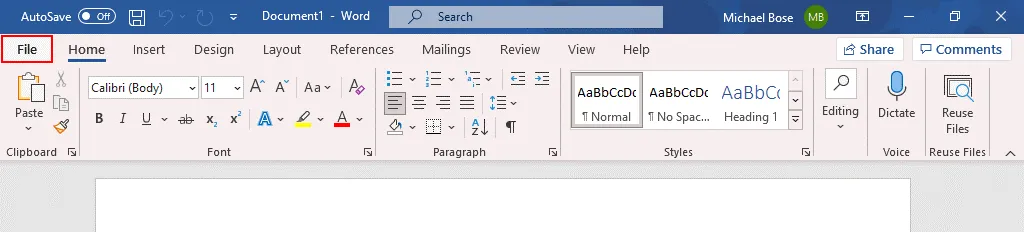
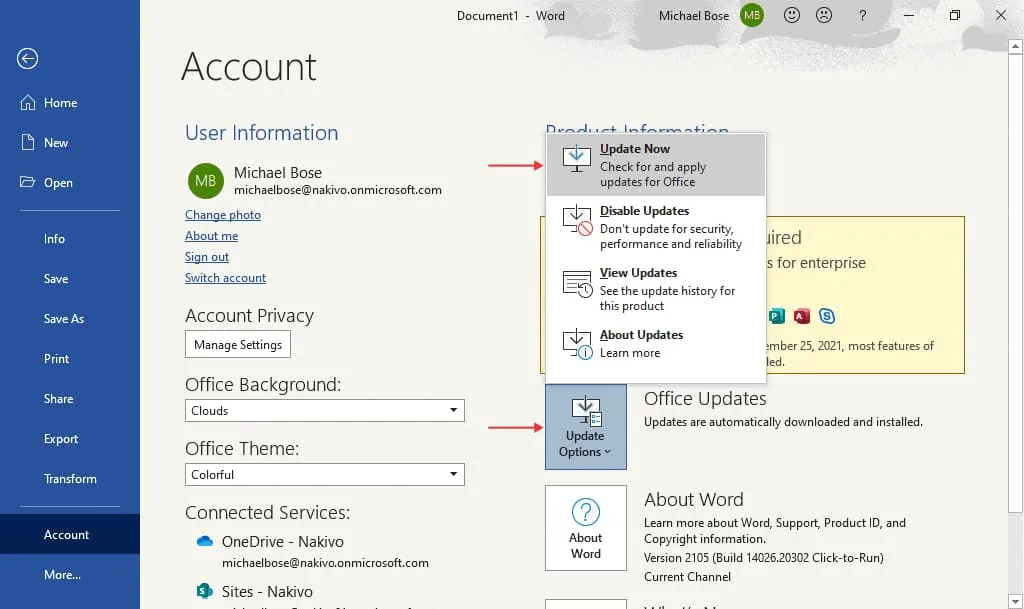
The File menu opens. - Click Account (More > Account).
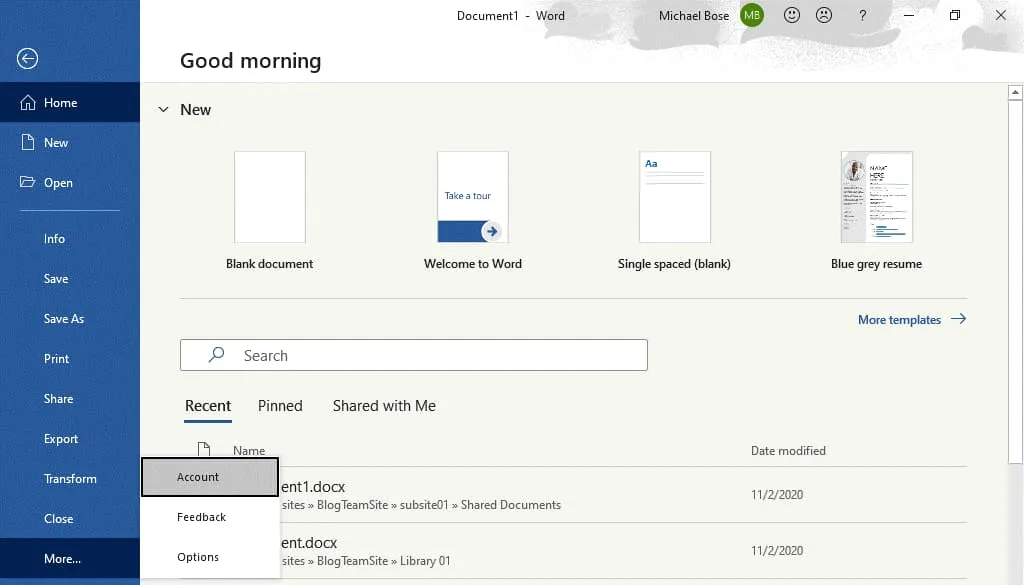
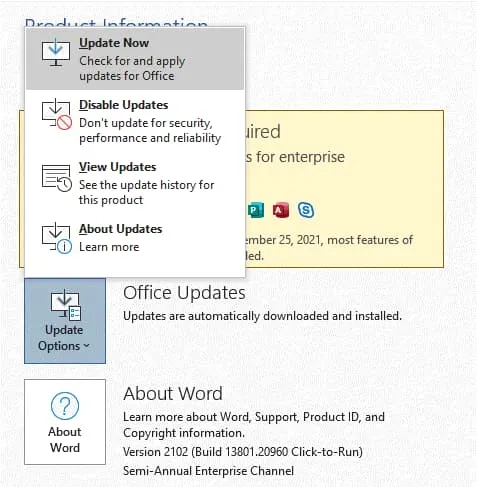
- The Account screen opens. We have already logged in to Office 365. In the Office Updates section, click Update Options. In the menu that opens, you get four options:
- Update Now – this is the option to update Microsoft Office right now.
- Disable Updates – use this option if you want to turn off Office updates.
- View Updates – this option opens a Microsoft web page with the information about Microsoft 365 updates and each version. You can check software changes compared to the previous version.
- About Updates – click this option to display the description about automatic Microsoft 365 updates.
- To start the update process, click Update Now.
- First, Office 365 needs to check for Office updates. If there are available Microsoft 365 updates, then the updates are downloaded and installed. You should see four steps during updating Microsoft Office 365:
- Checking for updates – Office 365 software connects to Microsoft servers to check for updates.
- Downloading Office updates – Microsoft Office updates are downloaded to the computer.
- Save your work before continuing – opened Microsoft Office 365 applications must be closed to continue and install updates. Save changes to open files if necessary and click Continue. Office 365 applications are closed after you click Continue.
- Applying updates – downloaded Office 365 updates are being installed on the computer.
- The appropriate window is displayed at each step while updating Microsoft Office 365.

- Once the Microsoft 365 update is finished, you should have the latest version of Office 365 available on your computer. Now you can reopen the Office 365 applications.
Update Channels
One of the Office 365 features is that installed Office applications such as Word, Excel, and PowerPoint are updated more frequently compared to traditional Microsoft Office 2019, 2016, etc. Microsoft provides several update channels for customers. The update frequency depends on the selected update channel. Thus, you can control how often updates should be installed by selecting the update channel. Let’s look at the most used update channels.
Semi-Annual Channel. Security updates are provided once per month. Non-security updates are provided twice per year. New features are released in January and July. Features included in the Semi-Annual Channel were previously released in the Monthly Channel. This channel is the default Office 365 update option for Office 365 Pro Plus and is generally the basic option. Other names for this channel are “Broad” and “Deferred”. Use this channel if you want to keep the oldest supported build longer and avoid frequent major updates.
Semi-Annual Channel (Targeted). This update channel is similar to the Semi-Annual Channel, but new features are released four months earlier – in March and September. Security and non-security updates are delivered monthly. This channel is positioned as the testing channel because new features are available earlier.
Monthly Channel. The newest features are provided as soon as they become available. Security and non-security updates are delivered monthly. The Monthly Channel (also known as the Current Channel) is the default option for Office 365 Business subscription plans (such as Office 365 Business Premium).
Monthly Channel (Targeted). This update channel is similar to the Monthly Channel but updates are released about a week in advance. This channel was formerly known as the “Insiders” build and now is known as the “Current Channel Preview” build.
| Channel | Channel name in the configuration |
| Semi-Annual Channel | Channel=“Deferred” |
| Semi-Annual Channel (Targeted) | Channel=“FirstReleaseDeferred” |
| Monthly Channel | Channel=“Current” |
| Monthly Channel (Targeted) | Channel=“FirstReleaseCurrent” |
How to Check Microsoft Office Version and Update Channel?
You need to know how to check the Microsoft Office version to understand whether your Office applications are up to date.
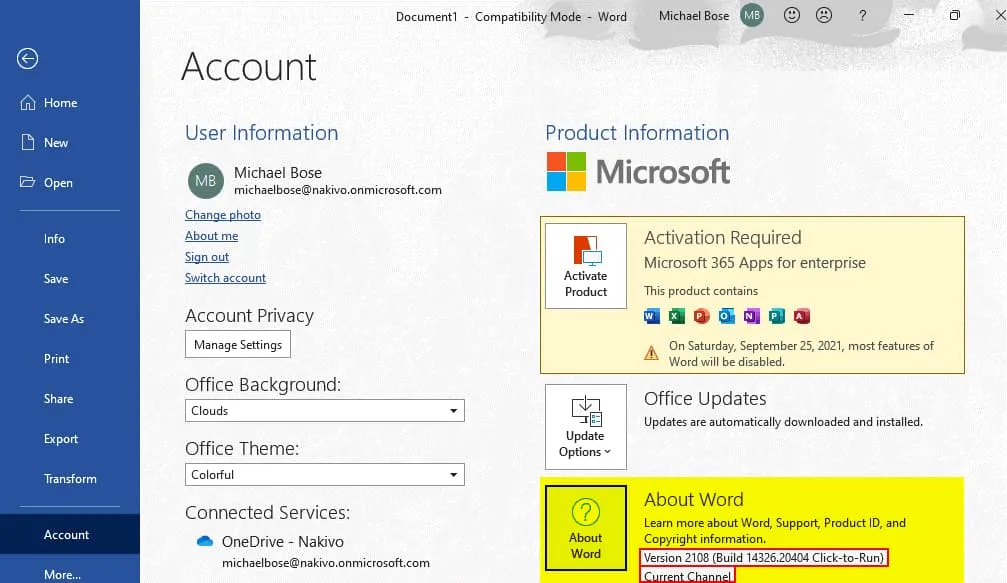
- Open one of the installed Office 365 applications on your computer, for example, Microsoft Word.
- Click File > Account and locate the About Word section.
- The version number, build number, and update channel name are displayed in this section. In our example, we have Office 365 version 2108, build 14326.20404. The Current Channel is used to deliver Office 365 updates.
Methods to Edit Update Channel Options
There are multiple methods to change an Office 365 update channel. Office 365 must be already installed when you use the second, third, and fourth options:
- Using settings in the Office 365 admin center
- Using the command prompt on a Windows machine where Office 365 applications are installed
- Editing registry settings in Windows
- Editing a group policy in Windows
- Using the Office Deployment tool with a custom configuration
Note: When you move from a channel with a higher Office 365 build number (for example, Current Channel) to a channel with a lower build number (such as Semi-Annual Channel), the update (the amount of downloaded data) can be larger than usual. Features available only in the newer version are removed in this case.
Channel options in the Office 365 admin center
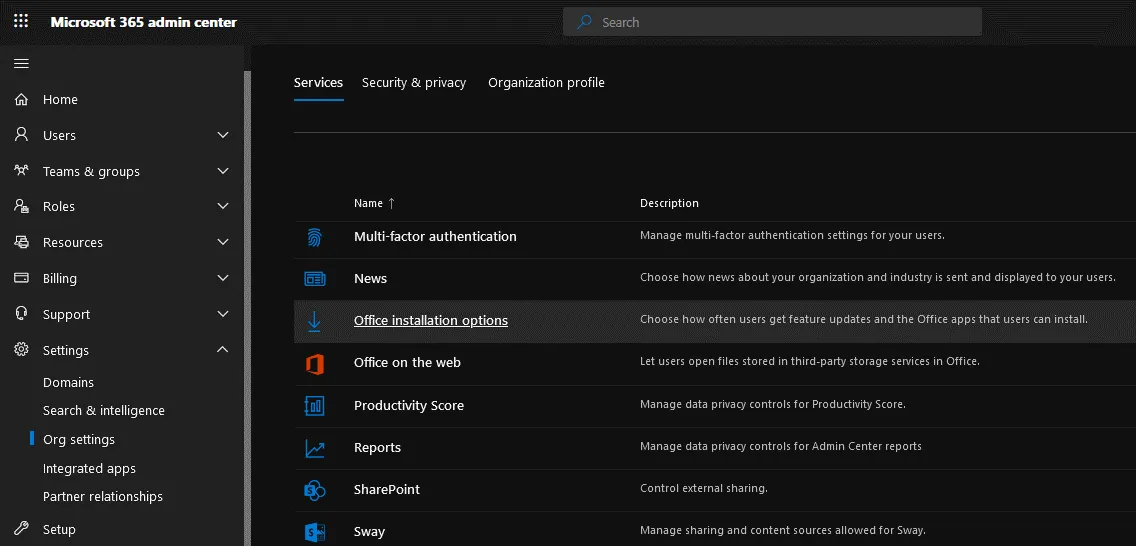
- Open the Microsoft 365 admin center (which was renamed from Office 365 admin center) in your web browser. You must have administrative permissions for your Office 365 user account to use the admin center and change Office 365 update settings.
- In the navigation pane of the admin center, go to Settings > Org settings.
- Select the Services tab and click Office installation options.
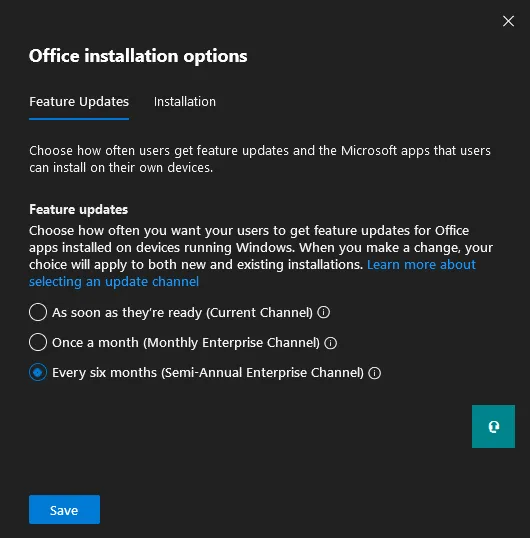
- The Office installation options display pane appears, and you can set how often users should receive Office 365 updates within your organization. In the Feature Updates tab, select one of the update options and the channel to update Microsoft Office 365:
- As soon as they’re ready (Current Channel)
- Once a month (Monthly Enterprise Channel)
- Every six months (Semi-Annual Enterprise Channel)
- To save Office 365 update settings, click Save.
- You can also configure other Office 365 update options in the admin center, such as Office 365 release preferences. In the navigation pane, go to Settings > Org settings, then select the Organization profile tab and click Release preferences.
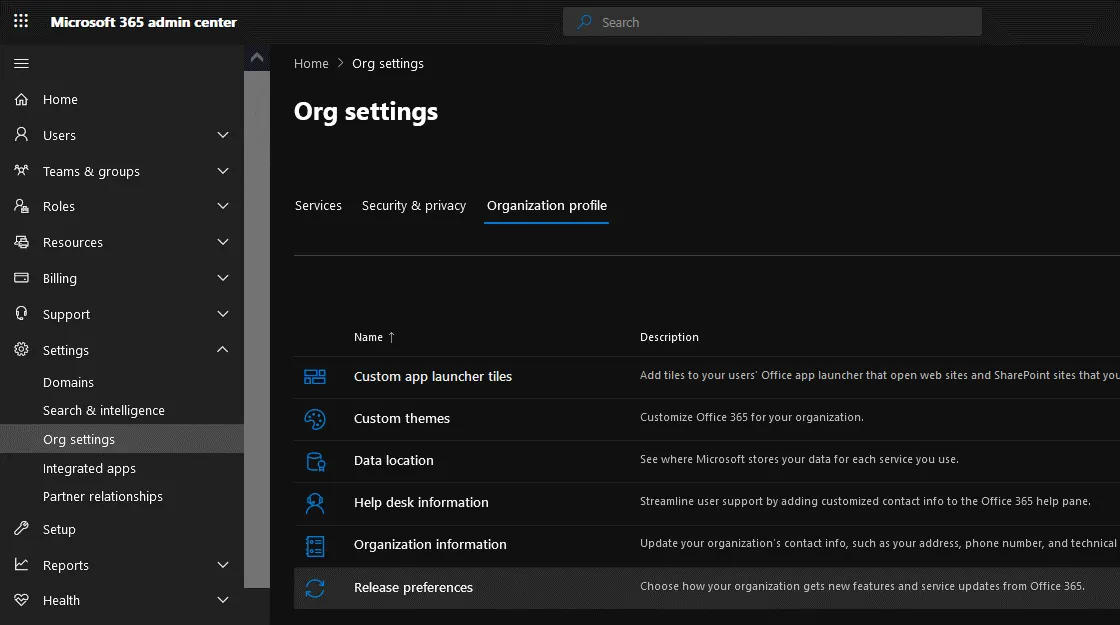
- The Release preferences display pane appears.
- Choose how your organization gets new features and service updates from Office 365:
- Standard release for everyone
- Targeted release for everyone
- Targeted release for selected users
- To save the configuration, click Save.

Changing the Office 365 update channel in the command line
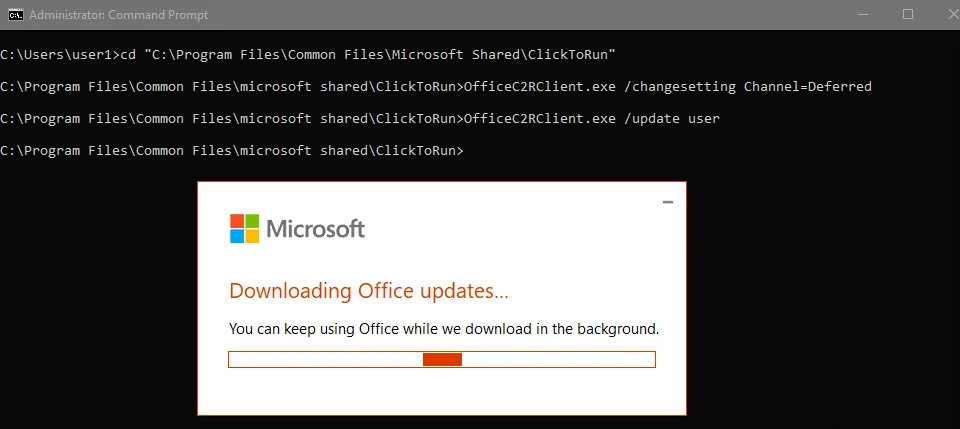
- On a computer where Office 365 applications are installed, open the command line as Administrator. In order to open the command line (CMD), click Start, type cmd, right-click the cmd shortcut, and in the context menu click Run as Administrator.
- Go to the folder where the needed Office 365 tool is located:
cd “C:\Program Files\Common Files\Microsoft Shared\ClickToRun” - Run the command to change the Office 365 update channel. In this example, we are changing the update channel from Current to Semi-Annual:
OfficeC2RClient.exe /changesetting Channel=Deferred - Update Office 365 update settings for the current user:
OfficeC2RClient.exe /update user - A window similar to the window displayed when downloading updates appear. Wait until Office 365 is reconfigured and Microsoft Office updates for the selected changes are downloaded and installed.
- The Office 365 update channel has been changed successfully.
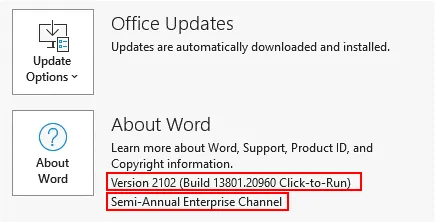
The version of Microsoft Word is now 2101 (the version was 2108 before changing the channel). The Microsoft 365 update channel is now the Semi-Annual Enterprise Channel.
Using the Registry Editor
- Open the registry editor in Windows. Press Win+R or open CMD, type regedit, and press Enter.
- Go to HKEY_LOCAL_MACHINE\SOFTWARE\Microsoft\Office\ClickToRun\Configuration
- Find the CDNBaseUrl entry. You can see the URL in the Data field for the Office 365 update channel that is selected now.
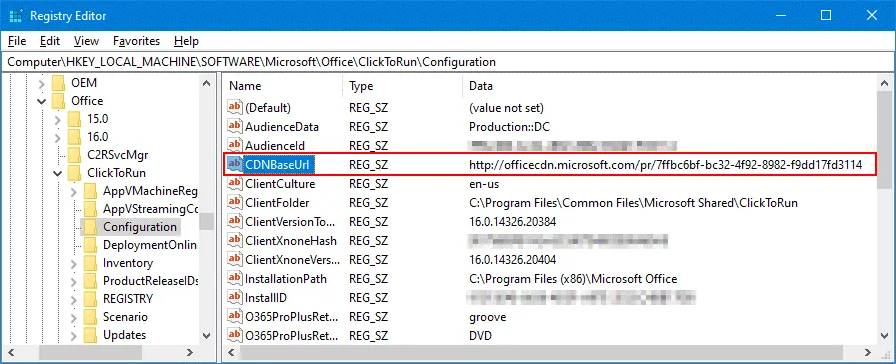
- URLs for different Office 365 channels are listed below.
- Semi-Annual Channel:
http://officecdn.microsoft.com/pr/7ffbc6bf-bc32-4f92-8982-f9dd17fd3114 - Monthly Channel (Current Channel):
http://officecdn.microsoft.com/pr/492350f6-3a01-4f97-b9c0-c7c6ddf67d60 - Current Channel (Preview):
CDNBaseUrl = http://officecdn.microsoft.com/pr/64256afe-f5d9-4f86-8936-8840a6a4f5be - Semi-Annual Enterprise Channel (Preview):
CDNBaseUrl = http://officecdn.microsoft.com/pr/b8f9b850-328d-4355-9145-c59439a0c4cf - Beta Channel:
CDNBaseUrl = http://officecdn.microsoft.com/pr/5440fd1f-7ecb-4221-8110-145efaa6372f
- Right-click the CDNBaseUrl entry. In the context menu, click Modify.
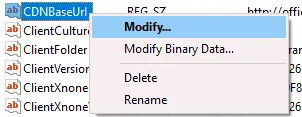
- In the edit string, enter the new value data that represents the Office 365 update channel you want to use. In this example, we change Semi-Annual Channel to Monthly Channel (Current Channel) and paste the URL: http://officecdn.microsoft.com/pr/492350f6-3a01-4f97-b9c0-c7c6ddf67d60
- Click OK to save the settings.
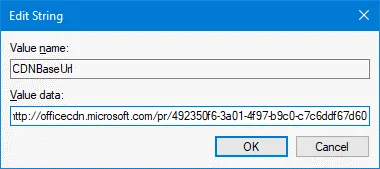
- The new value is set.

Now you can update Office 365 by using the updated channel you have selected in the last configuration.
- Open one of the Office 365 applications installed on your computer, for example, Microsoft Word. Go to File > Account > Update options > Update now to initiate the update.
- Once the Office 365 update is finished, you can check the product version and the channel name. Now we have Office 365 version 2108 (Build 14326.20404) and the Current Channel is used for updates. The latest Office 365 version for the selected channel is installed.

Using Group Policy Editor
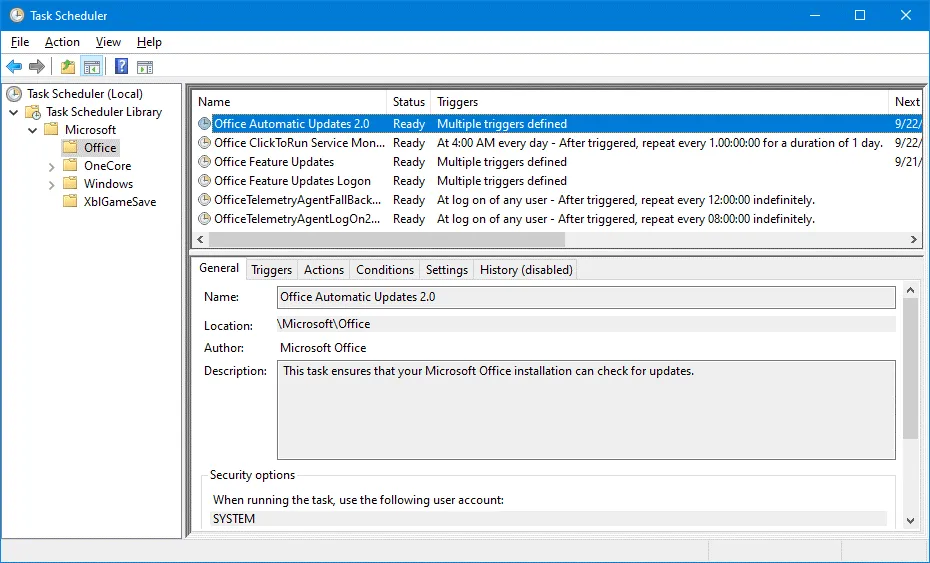
In Task Scheduler, make sure that the Office Automatic Updates 2.0 task is enabled. This task is required to run automatic updates for Office 365. The task detects changes in the policy and updates the selected channel in the configuration.
- To open Windows Task Scheduler, click Win+R, type taskschd.msc, and click Enter. As an alternative, you can find the appropriate shortcut in the Start menu or Control Panel.
- Go to Task Scheduler Library > Microsoft > Office and find Office Automatic Updates 2.0.
- In our example, everything is OK, the task is present. We can now configure a group policy for selecting a channel for Office 365 updates.
- To open Windows Group Policy Editor, click Win+R, type gpedit.msc in the Run window, and click Enter.
- The needed administrative template is missing. There is no Microsoft Office folder that contains the needed policies in the Administrative Templates folder. For this reason, we need to add the required administrative template to edit Office 365 update group policies.
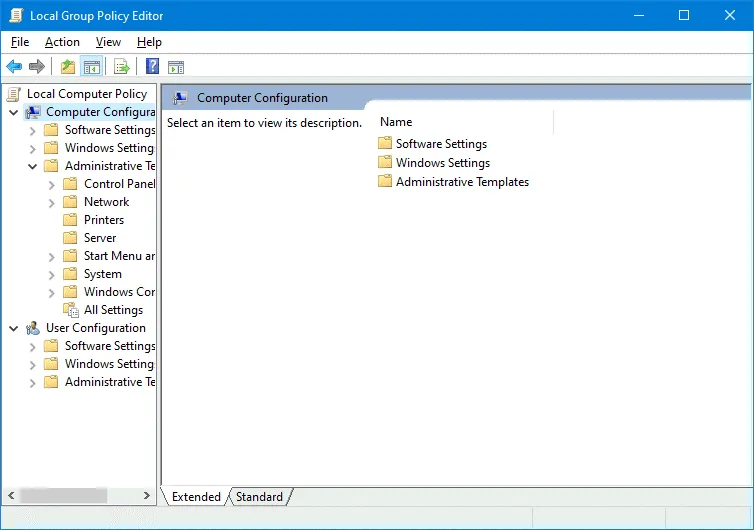
- You can close Group Policy Editor for now while you add the missing administrative templates.
- Download administrative template files for Office 365 by using this link:
https://www.microsoft.com/en-us/download/details.aspx?id=49030
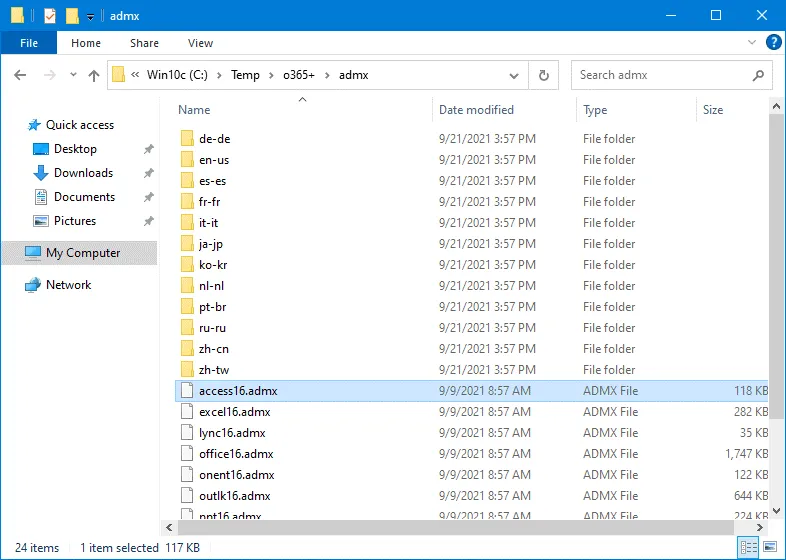
Depending on the version of Office 365 installed on your Windows computer, select the 32-bit or 64-bit version. We use the 64-bit version. - Run the downloaded file:
admintemplates_x64_5224-1000_en-us.exe - Define the directory to which files should be extracted, for example, C:\temp\o365+\
- ADMX files are extracted to the selected directory. ADMX files are Windows administrative template files used to configure settings by changing registry entries. ADMX files are XML-based files that can be created and edited in an editor that supports the XML format.Note: The ADM extension changed to ADMX starting from Windows Vista and Windows Server 2008.
- Check the admx subdirectory in the directory to which you have extracted the files (C:\temp\o365+\admx in our case). There are subdirectories for different languages. We use English and also need files in the en-us directory.
- Windows administrative template files (ADMX files) are stored in C:\Windows\PolicyDefinitions\ where C:\Windows\ is the default Windows installation directory. This path can be defined as %systemroot%\PolicyDefinitions\ for any name of the directory in which Windows is installed.
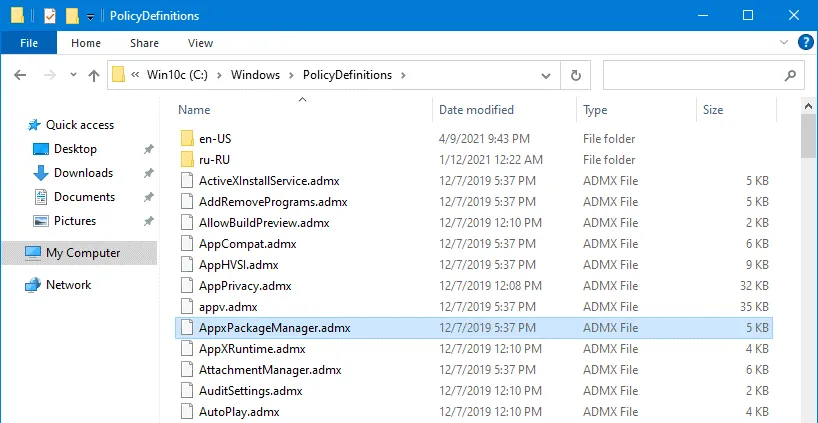
- In order to add administrative templates, you should copy the appropriate ADMX files to %systemroot%\PolicyDefinitions\, which is a system folder.In the screenshot below, you can see the contents of C:\Windows\PolicyDefinitions\. We copy the extracted files from C:\temp\o365+\admx\ and C:\temp\o365+\admx\en-us\ to C:\Windows\PolicyDefinitions\ and C:\Windows\PolicyDefinitions\en-us\ accordingly.
- Run gpedit.msc and open Windows Group Policy Editor once again.
Now the needed templates are available. - Go to Computer Configuration\Administrative Templates\Microsoft Office 2016 (Machine)\Updates.
- Double-click the Update Channel setting.

- In the Update Channel setting window, select the Enabled radio button. Then select the needed channel name in the drop-down list (for example, Current Channel). Click OK to save the configuration and close the window.

- If you want to immediately update group policy settings, including Office 365 update settings, then run the command in the command line:
gpupdate
By default, a policy should update automatically every 90 minutes. The Office Automatic Update 2.0 task should run after you update the policy and run gpupdate for the changes to take effect.
Using the Office Deployment Tool
Using the Office Deployment Tool was explained in the blog post about Office 365 ProPlus and remote desktop configuration. The tool is used to start Office 365 installation with custom parameters. In order to define the Office 365 update channel, download and extract the tool. Then edit or add the following section to the xml configuration file:
<Configuration>
<Updates Channel=”MonthlyEnterprise” />
</Configuration>
Define the Office 365 update channel such as:
<Updates Channel=”Current” />
or
<Updates Channel=” Channel=”Deferred” />
You can define any supported update channel. Save the XML configuration file and deploy Office 365.
Office 365 update channel configuration set in the group policy (explained in the previous section) has higher precedence than the configuration for the Office Deployment Tool. Make sure that the update channel is not set in the group policy to configure the update channel with the Office Deployment Tool.
Conclusion
Office 365 updates allow you to have up-to-date applications with bug fixes and new features. You can tune the update options depending on your needs and set the frequency of receiving the updates. Different Office 365 update channels are used for this purpose. Multiple methods can be used to define the update channel. Office 365 updates fix security vulnerabilities that can be considered as a potential threat to your data.
Therefore, it is recommended that you back up your data. NAKIVO Backup & Replication is a universal data protection solution that supports Office 365 backup and can protect physical and virtual machines.