The Most Useful ESXCLI Commands for Your VMware Environment
You can use vSphere Client, the GUI provided by VMware, and VMware vSphere Web/HTML5 Client, which is web-based, to manage ESXi hosts and your VMware environment. Though most settings are available in the GUI, you may sometimes need to get information or change a configuration that is not displayed in the GUI.
In this case, you need the command line interface (CLI) or the “console”, which allows you to configure all settings, including the hidden ones. In addition to traditional commands that are the same in Linux and ESXi, ESXi has its own ESXCLI commands.
This blog post has been created in the format of a catalog that lists useful ESXCLI commands, which are part of the ESXi shell commands.

How to Open the ESXi Shell Console
By default, ESXi shell is disabled for local and remote access. This means that you cannot run ESXi shell commands until you enable ESXi shell or SSH access. VMware imposes this restriction for security reasons.
Let’s look at the three main methods for enabling the command line interface in ESXi.
Enabling access to the console using the default ESXi interface
This method is used when you have physical access to an ESXi host, including the host’s monitor and keyboard.
- In the ESXi Direct Console User Interface (DCUI), go to Troubleshooting Options, navigate to Enable ESXi Shell and Enable SSH strings, and press Enter to enable each option.
- After enabling the ESXi shell, press Alt+F1 to open the console on the machine running ESXi. You should enter your login and password after that (the credentials of the root user can be used).
- You can execute ESXi shell commands.
- If you need to go back to the ESXi DCUI, press Alt+F2. The Enable SSH option allows you to open the ESXi console remotely by using an SSH client.

Enabling access to the console using VMware Host Client
- Open a web browser and enter the IP address of your ESXi host in the address bar, then log in.
- Go to Host > Actions > Services and click Enable Secure Shell (SSH) to enable SSH access until ESXi reboot.
Similarly, you can enable the console shell on a local ESXi host in the Services menu. Go to Manage > Services. Right-click the TSM-SSH service. Hit Policy > Start and Stop with host to enable SSH access even after ESXi reboot.
- Now you can connect to the ESXi console by using your SSH client remotely.

Enabling access to the console using vCenter and VMware vSphere Client
This method can be used if your ESXi host is managed by vCenter Server.
- Log in to VMware HTML5 vSphere Client in a web browser.
- Go to Hosts and Clusters and select your ESXi host.
- Select the Configure tab, open System > Services, and click SSH in the list of services.
- Hit Start to start the SSH server once or hit Edit Startup Policy and select Start and Stop with host if you wish to enable the SSH server for an extended period of time. You can also enable ESXi shell in the Services menu.

Once SSH access is enabled, you can connect to an ESXi host with an SSH client remotely and run ESXCLI commands.
Connecting via SSH
In order to connect to the ESXi console remotely via SSH, in the Linux console, perform the following actions.
- Execute a command like:
ssh 192.168.101.221or
ssh root@192.168.101.221where 192.168.101.221 is the IP address of the ESXi server used in this example.
- You need to enter the username and password of the ESXi user (root can be used as a default administrative user on ESXi).

Similarly, you can connect from one ESXi host to another via SSH in the command line.
In Windows, you can use PuTTY:
- Open PuTTY
- Enter the ESXi host IP address and port.
- Hit Open to connect to the ESXi host via SSH.

Connecting to an ESXi host via SSH and running ESXCLI commands remotely is the most commonly used and secure approach.
How to Install ESXCLI in Linux
The alternative way to run ESXCLI commands remotely is by installing ESXCLI on Linux. Python must be installed for this purpose. Below are the main steps for installing ESXCLI in Linux:
- Back up your Linux machine before making system changes.
- Download ESXCLI from the VMware website
- Extract content from the downloaded esxcli-8.0.0-22179150.tgz archive (run as root):
tar zxf esxcli-8.0.0-22179150.tgz -C /opt/vmware - Run the ESXCLI installer with the command:
python setup.py install - Try to connect to an ESXi host and run a command in ESXCLI remotely:
esxcli --server ESXI_IP_address --helpYou will get an error because ESXi requires a trusted relationship between hosts:
Certificate error. Server SHA-256 thumbprint: 64:CC:E5:F8:A4:AA:F6:9B:58:55:78:B7:E3:B3:69:10:83:3B:22:3C:BB:17:3D:12:28:D1:CD:E9:48:7A:FF:AA (not trusted)
- To fix this issue, run the command with specifying a username, password, and the thumbprint displayed in the previous output message:
esxcli --server 192.168.101.101 --username root --password 'your_password' --thumbprint 64:CC:E5:F8:A4:AA:F6:9B:58:55:78:B7:E3:B3:69:10:83:3B:22:3C:BB:17:3D:12:28:D1:CD:E9:48:7A:FF:AA --help
Alternatively, you can try to install a certificate on a Linux machine. A certificate is stored in /etc/vmware/ssl/rui.crt on an ESXi host.
ESXCLI Commands Overview
ESXCLI, part of the ESXi shell, is a CLI framework for managing a virtual infrastructure (ESXi components such as hardware, network, storage, etc.) and control ESXi itself at a low level. Technically, ESXCLI is a Python script (/bin/esxcli.py in ESXi). All ESXCLI commands must be run in the ESXi shell (console). Generally, esxcli is the command that has a wide list of subcommands called namespaces and their options. The esxcli command is present right after ESXi installation, along with other ESXi shell commands.
You can locate esxcli and explore the nature of ESXCLI after executing the following commands:
which esxcli
ls -l /sbin/esxcli

As you can ensure by checking the console output, ESXCLI is a script written in Python that is located in the /sbin/ directory. If you want to see the contents of the script, you can use the built-in text editor vi.
Basically, the ESXCLI syntax is as follows:
esxcli [options] {namespace}+ {cmd} [cmd options]
Thus, ESXCLI consists of branches that are the main categories (namespaces) of ESXCLI commands. Notice that esxcli commands are case sensitive, similarly to other console commands used in ESXi. The entire list of all available ESXCLI namespaces and commands is displayed after running the command:
esxcli esxcli command list
The list of available ESXCLI commands depends on the ESXi version. New commands can be added.
Hence, the list of top ESXCLI namespaces for ESXi 8.0 is as follows:
- device – device manager commands
- esxcli – commands related to ESXCLI itself
- fcoe – Fibre Channel over Ethernet commands
- graphics – VMware graphics commands
- hardware – commands for checking hardware properties and configuring hardware
- iscsi – VMware iSCSI commands
- network – this namespace includes a wide range of commands for managing general host network settings (such as the IP address, DNS settings of an ESXi host, firewall) and virtual networking components such as vSwitch, port groups, etc.
- nvme – managing extensions for VMware NVMe driver
- rdma – commands for managing the remote direct memory access protocol stack
- sched – commands used for configuring scheduling and VMkernel system properties
- software – managing ESXi software images and packages for ESXi
- storage – commands used to manage storage
- system – commands for configuring VMkernel system properties, the kernel core system and system services
- vm – some commands that can be used to control virtual machine operations
- vsan – VMware vSAN commands
The main commands appear as verbs indicating the same action:
- list – show the list of objects available for the defined namespace (for example,
esxcli hardware bootdevice list– list available boot devices) - get – get the value of the defined setting or property (for instance,
esxcli hardware clock get– check the time set) - set – set the necessary parameter manually (for example,
esxcli hardware clock set -y 2024 -s 00– set the year to 2024 and set the seconds to 00) - load/unload – load/unload system configuration (
esxcli network firewall load– load the firewall module and firewall settings stored in the configuration file)
If you are unable to remember a particular ESXCLI command related to the appropriate namespace, you can enter the command and see a tip in the output of the console.
For example, type:
esxcli network to see all available commands for the network namespace
and then type:
esxcli network vm to check the commands for the vm namespace.

The ESXCLI log file is located in /var/log/esxcli.log
The data is written to this file if an ESXCLI command has not been executed successfully. If an ESXCLI command is run successfully, nothing is written to this log file.
Useful ESXCLI Commands
Now that you are familiar with the basic working principle of ESXCLI commands, let’s look at specific examples of useful commands that can be used in VMware vSphere. The list of ESXCLI commands considered in this article is divided into categories equivalent to namespace names.
Commands to check hardware details in ESXi
By using the hardware namespace, you can view the full information about installed devices.
- In order to view installed PCI devices, run the following ESXCLI command:
esxcli hardware pci list | more - Check the amount of memory installed on the ESXi server:
esxcli hardware memory get
- View the detailed information about installed processors:
esxcli hardware cpu list
ESXCLI system commands
In this section, you can see the commands of the system ESXCLI namespace.
- Check the precise ESXi version and build number, including the number of installed updates and patches:
esxcli system version get - Check the hostname of an ESXi server:
esxcli system hostname get - Check the ESXi installation time:
esxcli system stats installtime get
- Check the SNMP configuration:
esxcli system snmp get - Enter the ESXi host to the maintenance mode:
esxcli system maintenanceMode set --enable yes - Exit the maintenance mode:
esxcli system maintenanceMode set --enable no
After entering an ESXi host into the maintenance mode, you can shut down or reboot the host.
- Power off an ESXi host:
esxcli system shutdown poweroff - The command for rebooting the host is similar:
esxcli system shutdown reboot - You can also set a delay and write a reason of rebooting the host to be saved in system logs:
esxcli system shutdown reboot -d 60 -r "Installing patches"In this example, the delay is 60 seconds.
Another command is to set the custom welcome message instead of a standard background screen with a shaded inactive main menu where the “<F2> Customize System/View Logs <F12> Shut Down/Restart” tip and the IP address to manage the host are displayed. Notice that after setting a custom welcome message, you will see only this set message on the black screen. You can type “Press F2” manually to avoid confusion.
- The custom message can be used for hiding information about your ESXi host on the display connected to the ESXi host when a user is not logged in.
esxcli system welcomemsg set -m="Welcome to NAKIVO! Press F2" - Verify whether the welcome message is already set:
esxcli system welcomemsg get
ESXCLI network commands
The network namespace is one of the largest namespaces of ESXCLI. Let’s explore the commands that can be useful for diagnostics.
- Check the status of active network connections:
esxcli network ip connection list
- View the list of installed network adapters:
esxcli network nic list
- Display the information about network interfaces:
esxcli network ip interface list - Display the information about IP addresses of the network interfaces that are present on the server:
esxcli network ip interface ipv4 get - Display the network information for VMs:
esxcli network vm list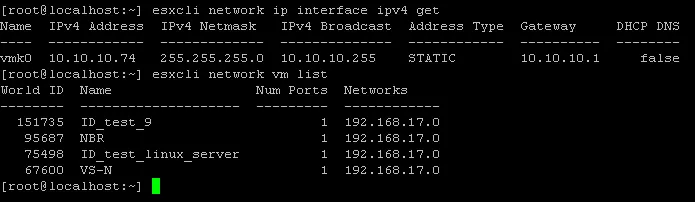
- View the domain search settings:
esxcli network ip dns search list - View the DNS servers set in the network settings:
esxcli network ip dns server list - List virtual switches and port groups:
esxcli network vswitch standard list - Show statistics for the vmnic0 network interface:
esxcli network nic stats get -n vmnic0 - Check the firewall status and rule settings:
esxcli network firewall getesxcli network firewall ruleset listNOTE: The default firewall policy is to drop traffic if the opposite rules are not set.
- You can temporarily disable the firewall on an ESXi host for troubleshooting:
esxcli network firewall set --enabled false - The firewall must be enabled with the command:
esxcli network firewall set --enabled true
It is recommended that you have the ESXi firewall enabled for security reasons.
The network namespace includes many commands. Only the basic and the most popular of them are considered in the Network section of today’s blog post. It is possible to configure a high number of network parameters with ESXCLI, but it would require a long walkthrough that is out of scope for today’s article.
ESXCLI storage commands
The storage namespace allows you to check and edit storage settings.
- Check the information about mounted VMFS volumes:
esxcli storage vmfs extent list - View mappings of VMFS file systems to disk devices:
esxcli storage filesystem list - List all the iSCSI paths on the system:
esxcli storage core path list - Display the list of mounted NFS shares:
esxcli storage nfs list
How to check SMART in ESXCLI
S.M.A.R.T. is useful for disk diagnostics and for preventing disk failure. You can read the S.M.A.R.T. data and, if you discover that something is wrong with your disk, you can make a timely decision to replace the disk.
- First, list all storage devices and locate the unique device name (see the screenshot below):
esxcli storage core device list - Then use the command to get the S.M.A.R.T. data of that disk device:
esxcli storage core device smart get -d naa.50026b7267020435where naa.50026b7267020435 is the name of the device used in this example.

Check iSCSI adapter list
iSCSI is a widely used protocol for accessing shared storage on a block level, and there is a separate iscsi namespace in ESXCLI for managing iSCSI storage.
- Show the list of available iSCSI adapters:
esxcli iscsi adapter list - Re-discover and re-scan iSCSI adapters:
esxcli iscsi adapter discovery rediscover -A adapter_nameesxcli storage core adapter rescan -A adapter_name
Instead of -A adapter_name you can rescan all adapters by using the --all option.

Check ESXi software VIB list
Software packages intended for ESXi are usually distributed as VIB files (vSphere installation bundle). A VIB file is similar to a container with zipped packages that can be installed in the system, with a descriptor and a signature file. In turn, VIBs are usually distributed as files packed into an archive file in the standard ZIP format. You may need to include VIBs into an ESXi image in order to use the appropriate hardware or install VIBs in an existing system for applying a security patch.
- You can view the list of VIB packages installed on your ESXi host:
esxcli software vib list - You can install a VIB with ESXCLI (the ESXi host must be in maintenance mode):
esxcli software vib install -d /vmfs/volumes/datastore1/patches/patch_name.zip
Managing VM operations in ESXCLI
The vm namespace can be used for operations on running virtual machines processes.
- Check the list of running VMs and display their World IDs:
esxcli vm process list
You can kill the unresponsive virtual machine with ESXi shell commands. Using ESXCLI, in this case, can be helpful when a VM cannot be shut down by using GUI, such as the GUI of VMware vSphere Client, VMware Host Client, or VMware Workstation.
- Shut down the VM by using the World ID displayed in the output of the
esxcli vm process listcommand. In the current example, the World ID of the necessary VM is 75498.esxcli vm process kill -w 75498 -t soft - If the soft command type was not helpful, consider performing an immediate shutdown of the VM by using the hard method.
esxcli vm process kill -w 75498 -t hard
There are three available command options for the kill command:
- soft – a correct signal is sent in the guest operating system to shut down a VM correctly
- hard – a VM is shut down immediately
- force – VM is powered off similarly to how a computer is powered off when unplugging the power cable. Only use this type of powering off the VM if the previous two types were unsuccessful.
Other Useful ESXi Shell Commands
Besides ESXCLI commands, you can use a lot of ESXi shell commands:
- Open the ESXi DCUI from the console (the colors are different when you connect to the ESXi shell via SSH):
dcui
Press Ctrl+C to go back to the command prompt.
- Convert a thick provisioned virtual disk to a thin provisioned virtual disk by using vmkfstools:
vmkfstools -i /vmfs/volumes/vmfs_datastore/vm_name/thick_disk.vmdk -d thin /vmfs/volumes/vmfs_datastore/vm_name/new_thin_disk_name.vmdkAmong ESXi shell commands, vmkfstools is a powerful command for performing storage operations as well as managing storage devices, VMFS volumes, and virtual disks. Read more about thick and thin provisioning as well as virtual disk shrinking in the blog post.
- Open the ESXi task manager:
esxtopAfter opening the task manager with the
esxtopcommand, you can switch between tabs by pressing the appropriate keys:C – CPU
I – interrupt
M – memory
N – network
D – disk adapter
U – disk device
V – disk VM
P – power management
- Find the file in the current directory:
find . -name filename.txt - Replace the . character with the name of the directory in which you would like to locate a file, and replace
filename.txtwith your file name. For example, if you wish to find a diskname.vmdk file in the /vmfs/volumes/ directory, run the command:find /vmfs/volumes/ -name diskname.vmdk - Open the interactive VMware console:
vsish - Show loaded vmkernel drivers:
vmkload_mod --list - Check the settings of the swap partition:
esxcli sched swap system get - You can list users by using one of the following commands:
esxcli system account listcat /etc/passwd or less/etc/passwd
- You can see all ESXi commands located in the sbin directory:
ls /usr/sbin
Creating a new user
There are at least two methods of creating a new ESXi user by using ESXi shell commands.
The ESXi adduser command
- If you type the
addusercommand in the ESXi console, you will get the message:-sh: adduser: not found
- You should define the full path to the appropriate busybox binary to run this command:
/usr/lib/vmware/busybox/bin/busybox adduserNow you can see the usage options for this command.
- Finally, run the exact command to add an ESXi system user:
/usr/lib/vmware/busybox/bin/busybox adduser -s /bin/sh -G root -h / user1Where:
-s /bin/sh is a shell used after user login;
-G root – the group name whose member is a new user (the root group);
-h / is a home directory (the root directory) of a new user;
user1 is the user name.
- Enter a new password and confirm the password when prompted.

Create a user in ESXCLI
As an alternative, you can add a new user with just one command by using ESXCLI:
esxcli system account add -d="NAKIVO user" -i="nakivo" -p="Password-Test321" -c="Password-Test321"
Where:
-d means the displayed description
-p is the password set for the new user
-c is the password confirmation
Which method to choose to create a new user in the command line? The single command used in the second method may seem convenient but not in terms of security. If you remember, there was a warning message displayed right after logging in to the ESXi shell:
All commands run on the ESXi shell are logged and may be included in support bundles. Do not provide passwords directly on the command line. Most tools can prompt for secrets or accept them from standard input.
If security is a concern for you, enter commands without including passwords as plain text into the commands. If a password is needed, it is usually prompted and can be entered in the standard console input. For example, if you would like to create a new user with ESXCLI, use a command like:
esxcli system account add -d="user2" -i="user2" -p -c
An ESXi password will be prompted separately and will not be displayed in the console while entering the password.

Conclusion
There are VMware console commands to manage system components, network, storage, VIB software, and virtual machines. Using the command line interface in ESXi gives you more power in addition to the nice graphical user interfaces of VMware vSphere Client and VMware Host Client.
You can use ESXi shell commands locally and ESXi SSH commands remotely to view and configure settings that are hidden or not available in the GUI. Use the ESXi command list provided in this blog post for fine ESXi tuning and experience the extra power of using the command line interface in VMware vSphere.
You can learn more by reading about PowerCLI, another type of the command line interface for managing VMware vSphere from Windows PowerShell.