How to Install Kali Linux on VirtualBox: In-depth Guide
Kali Linux is a Debian-based Linux distribution developed for penetration testing and is especially useful for security specialists and enthusiasts. Kali Linux, formerly known as BackTrack Linux, includes a lot of tools and applications for network audits. Kali can be run as a Live DVD and can be installed on a computer as a host operating system (OS) as any other Linux.
However, it is not recommended that you use Kali as a general-purpose desktop operating system. At the same time, when using Kali Live DVD, settings are not saved after a system reboot. In this situation, virtual machines can be of great help.
Here we will explain how to install Kali Linux on VirtualBox with the basic network configuration. Windows is used as a host operating system in this article, but you can use this workflow on Linux and macOS.

Preparation Steps For Installing Kali Linux on VirtualBox
Downloading the Installation Image of Kali Linux
Go to the official website and download the ISO image of Kali Linux. There are multiple 32-bit and 64-bit images. Each image allows you to select one of the graphical user interfaces (Gnome, KDE, XFCE, LXDE, etc.) during installation. The latest version is available on the main download page. You can also download older Kali Linux images if needed.
Let’s download Kali Linux 64-bit v.2023.3 and then go over the installation process. You can download images via HTTP and Torrent protocols. Save the ISO file to a custom folder, for example, D:\VirtualBox\kali-linux-2023.3-installer-amd64.iso. You can also verify the SHA256 checksum to make sure that your image is consistent after finishing downloading.

Creating a New VM
Once you have downloaded the installation image, you can create a new VM.
- Open VirtualBox and create a new VM (Machine > New or Ctrl+N) on which Kali Linux will be installed.

- Set the following VM parameters in the appropriate sections:
- Name and Operating System
- Name: Kali_x64
- Machine Folder: D:\Virtual\VirtualBox (Try not to use a system partition C: to store VMs).
- Type: Linux
- Version: Debian (64-bit)
- Hardware
- Memory size: 4096 MB.
The VM memory size must be large enough to run a guest OS, though you should leave enough unallocated memory to run your host OS. In our example, a host machine with 16 GB of RAM is used, which leaves enough memory for a host OS.
- Processors: 1 CPU
- Memory size: 4096 MB.

- Hard Disk
- Create a virtual hard disk now.
- Set the virtual disk file location, for example, D:\Virtual\VirtualBox\Kali_x6Kali_x64.vdi
It is recommended that you store virtual disk files in the VM folder (this folder is selected by default).
- Set the virtual disk file size – at least 20 GB.
- Hard disk file type: VDI. A native VirtualBox format is selected.
- Storage on physical disk: Dynamically allocated (the analog of thin provisioning in VMware).
Click Create to finish creating the new VM.

- Name and Operating System
- After creating a new VM, you should configure some additional settings. Select your recently created virtual machine and open the VM settings by clicking the appropriate icon.

Display options
- Go to Display > Screen and set Video Memory to 128 MB. This will prevent the installer from hanging.
- Next, select the checkbox Enable 3D acceleration (optional). It will be useful for applications that need 3D acceleration and help to avoid performance degradation.

Network options
- Go to the network settings and select the networking mode of the VM’s virtual network adapter.
- Let’s select the Bridged mode to use the VM network adapter as you would for a physical network adapter of a host machine. In this case, the VM network adapter is connected to the same physical network as the host machine.
- You can set additional options such as network adapter name, type, MAC address, etc.

Boot options
You have to insert your virtual ISO DVD image into the VM’s virtual DVD drive and then boot a virtual machine from that ISO disk.
- In VM settings, go to Storage, select the IDE controller of your virtual optical drive (it is empty by default).
- Click the empty status, then click the disc icon near IDE Secondary Master (IDE Secondary Device 0) and in the menu that opens, select Choose Virtual Optical Disk File.
- Browse to the Kali Linux installation ISO image that you have downloaded from the official site (kali-linux-2023.3-installer-amd64.iso).
- Hit OK to save settings.

Installing Kali Linux on VirtualBox: Step-by-step Guide
Now, you can start your new VM (Kali_x64 in this case) and begin the Kali installation.
- Click the Start button in the VirtualBox window.

- After booting from a virtual DVD, you will see a boot menu where you can select boot options for Kali Linux, such as Boot from Live DVD, Install, Graphical Install, etc. Select Graphical Install. Press Enter to continue.

- Select a language. Choose the language you wish to use for the installation process and the installed system. English is selected for our installation. Click the Continue button on each screen to move forward.

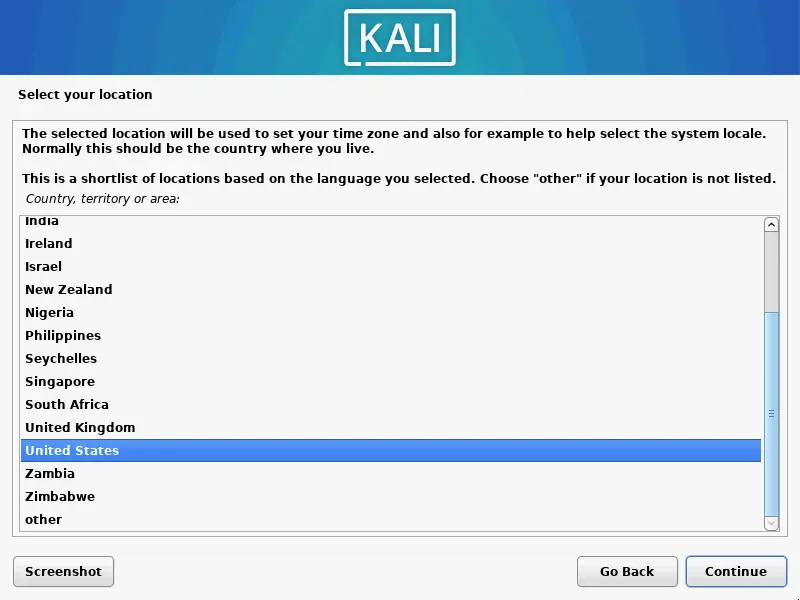
- Select your location. This option is used to set your time zone, time format, etc. United States is selected in our example.
- Configure the keyboard. Select your keyboard layout. We use American English.

- Configure the network. Enter the hostname for your Linux system, for example, kali-virtualbox.

- Configure the domain name. If you don’t use a domain in your network, you may leave this field empty.

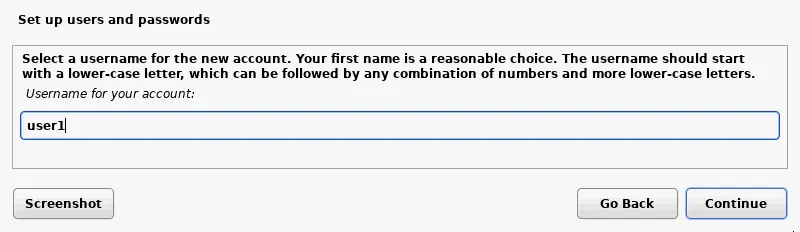
- Set up users and passwords. Enter the full name of your user that can be the same as the username or not. This user account will be used to log in to Kali Linux on VirtualBox. We create user1 for this purpose.

- Enter a username for your account. While the previous screen requested a full user name for the explanation of the user, this screen requests that you enter a username for the account registered in the Linux system. We create an account named user1.
- User password. Enter the password for the created user and confirm this password.

- Configure the clock. Now, you can select a precise time zone for your country.

- Partition disks. You can use manual and guided partitioning of disks. For the first time, you can select Guided – use entire disk. The entire disk will be used for creating one big partition.

- Confirm that you want to erase the disk. There’s no reason for concern in this case, as the empty 20-GB virtual disk is used for partitioning. Note that VirtualBox uses binary (real) Gigabytes while the Kali Linux installer uses decimal Gigabytes (where 1 GB = 1000 MB) – that’s why the number differs.

- Select a preferred partitioning scheme for your virtual disk. Let’s select All files in one partition.

- Check the overview and select Finish partitioning and write changes to disk.

- Select Yes and confirm that you would like to write changes to the disk.

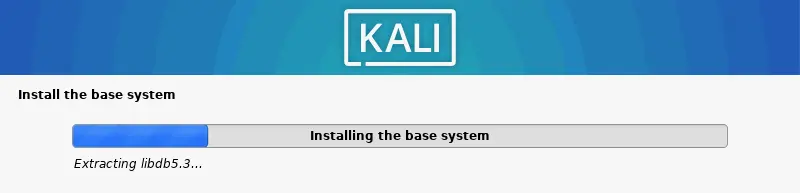
- Wait for the system to be installed. As Kali Linux is being installed, the files are being copied to the virtual disk of the VM.
- Software selection. Select the desktop environment for the graphical user interface of Kali Linux. You can use Xfce by default, which is a lightweight choice.

- Install the GRUB boot loader on a hard disk. Since there are no other operating systems and boot loaders on the virtual disk, it is necessary to install GRUB in this case. Select Yes to install GRUB.

- Select a disk on which to install GRUB. In our case, /dev/sda is the necessary disk and is the only disk connected to a VM.

- Finish the installation. When the installation of Kali Linux on VirtualBox is complete, you will see a notification message. Now, you can reboot the virtual machine to boot the Kali Linux installed on the VirtualBox VM.

- After the reboot, you will see the login screen of Kali Linux. Enter your username (user1 in our case) and then enter the password set while installing Kali Linux on VirtualBox to sign in.

- Now you should see the Xfce desktop of Kali Linux installed on your VirtualBox virtual machine.

Installing VirtualBox Guest Additions on Kali Linux
VirtualBox Guest Additions improve the performance and user experience, including features such as Drag & Drop and Shared Clipboard. You can install VirtualBox guest additions by inserting the ISO image located in the VirtualBox installation folder by default, or you can install Guest Additions from online Linux repositories by using your Linux package manager. Manual installation is required for v.2019.2 and older. Kali v2019.3 and newer detect that Linux is installed inside a VM, and Guest additions are usually installed automatically.
To install Guest Additions, do the following (use sudo if you need to run commands as root):
- Update the package repositories tree:
apt-get update - Install VirtualBox Guest Additions with the command:
apt-get install -y virtualbox-guest-x11
- Reboot the machine:
init 6 - Verify that VirtualBox Guest Additions have been installed successfully. Check the VirtualBox Guest Additions version by getting information about the appropriate Linux kernel module. In order to see general information about the vboxguest module, use the command:
modinfo vboxguest - If you want to see the version of VirtualBox Guest Additions only, use:
lsmod | grep -io vboxguest | xargs modinfo | grep -iw version
- After installing VirtualBox Guest Additions on a VM, go to VM settings > General > Advanced and enable shared clipboard and Drag & Drop in bidirectional mode.

Connecting the USB Wi-Fi Adapter to the Kali Linux VM in VirtualBox
After completing the general VM configuration, let’s connect an external USB Wi-Fi network adapter to the VirtualBox VM running Kali Linux. You will be able to use all the advantages of the physical USB Wi-Fi adapter in the VM running Kali to audit wireless networks. VirtualBox Extension Pack must be installed to continue configuring the VM.
- Insert your USB Wi-Fi adapter into the USB port of your physical computer.
- Open VM settings and go to the USB section.
- Tick the checkbox Enable USB Controller, Select USB 2.0 (EHCI) Controller (the Wi-Fi adapter used in the current example has USB 2.0 interface).
- Then, add the plus icon and select the necessary USB device from the list of USB devices connected to your host machine. Later, you can untick the checkbox near the added USB device if that device does not need to be attached to the VM.

- Start your Kali_x64 VM and log in to Kali Linux. Open the console (Terminal) and run the command to check your network interfaces and their configuration.
ifconfig
The USB Wi-Fi adapter is connected and the name of its interface is wlan0. Let’s change the MAC address to go unnoticed.
- Shutdown the Wi-Fi network interface:
ifconfig wlan0 down - Change the MAC address of the wireless network adapter. Set the random MAC address with macchanger:
macchanger -r wlan0 - Enable the wlan0 network interface:
ifconfig wlan0 up - Check whether the MAC address of your Wi-Fi network interface has been changed:
macchanger -s wlan0ifconfig wlan0
The MAC address has been changed successfully.
- Enable the monitor mode for your wireless network interface with airmon-ng (by default, a Wi-Fi adapter works in the managed mode). The monitor mode is required for security testing of Wi-Fi networks.
airmon-ng start wlan0 - If there are any processes that could cause trouble, kill them with the command:
airmon-ng check kill - Run this command again:
airmon-ng start wlan0
- After starting the monitoring mode, a virtual wlan0mon network interface is created. You can also change the MAC address of the wlan0mon network interface to a random MAC address.
ifconfig wlan0mon downmacchanger -r wlan0monifconfig wlan0mon up - Now run the airodump-ng utility to view the networks whose signal level allows testing them:
airodump-ng wlan0mon
As you can see on the screenshot below, the physical USB Wi-Fi adapter connected to the virtual machine running Kali Linux works fine. Wi-Fi access points and associated clients are displayed in the console.

Now that you know how to Install Kali Linux on VirtualBox manually and how to configure a wireless network adapter for using it in Kali Linux, you can continue testing Wi-Fi networks, but further configuration of Kali Linux for testing wireless networks is out of scope for this blog post.
How to Install Kali Linux on VirtualBox Using a Preconfigured VM
Previously, we explained manual installation of Kali Linux on VirtualBox.
There are other two methods to install Kali Linux on VirtualBox VMs: deploying an OVA VM template (deprecated) or deploying a downloaded preconfigured VM. We will use official pre-configured VM images of Kali Linux created by the Offensive Security team (Kali development team) for VirtualBox, VMware, Hyper-V and QEMU virtualization platforms.
- Download the appropriate OVA template from the official Offensive Security website. In this example, the Kali Linux VirtualBox 64-bit OVA image is downloaded. Save the archive with the VM to a custom location.

- Unpack contents from the archive with the available archiver, for example, 7zip.
- Click + Add to add an existing virtual machine to VirtualBox.

- Select the .vbox file extracted from the downloaded archive with the virtual disk file.

- A VM has been imported. Start the VM with Kali Linux on VirtualBox by selecting this VM and clicking the Start button.

The default credentials to log in to Kali Linux on VirtualBox by using a downloaded VM are kali/kali. VirtualBox Guest Additions are pre-installed in this case. You can use a VM with Kali Linux deployed from a downloaded VM, similarly as you use the Kali Linux VM you have created and configured manually on VirtualBox.
Kali Linux on VirtualBox Advantages
The advantages of using Kali Linux on VirtualBox are:
- By running multiple operating systems simultaneously (a host OS and a guest OS or multiple guests), you don’t need to reboot a computer as when using dual boot.
- A VM running Kali Linux is isolated from your host OS – running Kali on a VM in an isolated environment is secure.
- You can take a snapshot and roll back to the previous VM state if something goes wrong. The risk of harm to Kali Linux on a VM is minimal as a result.
- You can copy a configured VM on which Kali Linux is installed to other computers.
- You can attach physical USB devices, such as external network adapters, directly to a VM due to the VirtualBox USB pass-through feature.
Make sure that VirtualBox is installed on your host operating system before continuing, using the latest VirtualBox version if possible. Please install VirtualBox Extension Pack on your host machine to use some advanced features such as USB pass-through.