How to Convert Linux Physical Machine to a Hyper-V Virtual Machine
What if you need to a recover physical server from backup, but a source physical server is damaged and there is no free physical machine that can be used for recovery? In this case, you can recover physical server to virtual environment and work with the recovered virtual machine (VM) until hardware of the physical machine is repaired.
NAKIVO Backup & Replication offers the improved Physical Machine Backup ensuring protection of physical Linux and Windows servers as well as Windows workstations. By using Physical Machine Backup in combination with backup export (Cross-Platform Recovery), you can recover physical machines to VMs from backups.
This blog post explains how to recover physical Linux server to a virtual machine from backup by using NAKIVO Backup & Replication. What’s more, this guide details how to convert physical machines to virtual machines by using NAKIVO Backup & Replication as a P2V converter.
Download NAKIVO Backup & Replication now and see how you can back up and convert production machines in your own IT infrastructure with a single solution.
Use Cases for P2V Recovery
Recovery of a physical machine to a virtual machine is also called P2V recovery. There are two main use cases for P2V recovery—temporary P2V recovery and permanent P2V migration.
Temporary P2V recovery. This is the recovery of a physical machine to a virtual machine from backup until a damaged physical machine is repaired, reconfigured or replaced. This approach has minimal downtime. If a physical server or workstation goes offline, you can recover that machine to a VM from backup. Until a physical machine is repaired or replaced, a recovered VM is operating in place of the damaged physical server or workstation. In case of a P2V recovery of a workstation, a user can connect to a recovered VM remotely from any available computer. When damaged physical machine is repaired, all necessary data should be transferred to the repaired machine. After that a temporary VM, which was operating during the physical machine repairs, can be deleted, and all the workload can be transferred to the repaired physical machine.
Physical machines should be backed up on a regular basis. This way, even if your computer unexpectedly breaks down, you can be sure that your data is safe and secure and can be used for recovery. The following illustration shows the advantages of temporary P2V recovery that helps reduce downtime.

Permanent P2V migration. This option is often used when changing your IT infrastructure and converting physical machines to virtual machines for permanent usage. For example, if you buy a new server to run a hypervisor, you can choose to convert a physical Linux server to a VMware virtual machine (VM) or convert a physical Windows Server to a Hyper-V VM (depending on your virtual environment). NAKIVO Backup & Replication can be used as a P2V converter to this end.
How Linux Server Backup Works
This blog post describes the process of P2V recovery of Linux machines. However, you will not be able to restore data without performing backup first. Let’s take a look at how Linux Server Backup works in NAKIVO Backup & Replication.
When a physical Linux server is added to Inventory in NAKIVO Backup & Replication, a physical machine agent that communicates with NAKIVO Backup & Replication Director and Transporters is deployed on the Linux machine. The inst.sh installer file is uploaded to the target Linux machine via SSH. Next, the certificate (certificate.pem) and token bhsvc.id file (ID + pre-shared key) are uploaded for secure communication between the agent and director, and after that the agent is installed silently. The agent runs as a service after installation and starts automatically (if it is not the one-time agent deployment). Physical machine agent cannot be installed on the machine that already has a Transporter. Physical Linux machine will become visible in Inventory in NAKIVO Backup & Replication after the successful installation of the agent. You can create and run backup jobs for physical machines after adding them to Inventory, similarly to the way you run jobs for VMware and Hyper-V VMs.
The capabilities of the physical machine agent:
- It supports LVM (logical volume management) snapshots.
- It works in secure mode by using a certificate and pre-shared key.
- If you update NAKIVO Backup & Replication (Director), the associated physical machine agents will be updated automatically.
- File level recovery to source is supported.
- Incremental backup with proprietary change tracking method is supported.
Requirements
Physical Linux server that you want to back up must meet the following requirements.
Hardware requirements:
32-bit or 64-bit CPU (x86 / x86-64 architecture)
Minimum 1 GB of RAM
Maximum supported disk size is 64 TB
MBR or GPT partition table
Storage requirements:
Supported disk types and file systems on a source physical Linux server: Ext2, Ext3, Ext4, XFS, ReiserFS, NTFS, FAT32, Linux SWAP
Supported LVM types: Linear, RAID 0, RAID 1
Officially supported Linux distributions:
Ubuntu 16 – Ubuntu 18 LTS, 64-bit
SLES (SUSE Linux Enterprise Server) v12.0-12.4, 64-bit
CentOS v6.6-7.6, 64-bit
Red Hat Enterprise Linux v6.3-7.5, 64-bit
Network requirements:
SSH server must be running on the Linux server (the openssh-server package must be installed).
The following TCP ports must be opened on the target physical Linux server:
- TCP 22 must be opened to establish SSH connections (secure logins and file transfer via SCP and SFTP).
- TCP 9446 is used by NAKIVO Backup & Replication to communicate with the machine.
Root privileges are needed to deploy the agent. You can enable access of the root user via SSH on the Linux machine, but it is not the best option in terms of security. If your user is not root, make sure that your user can connect to a physical Linux machine via SSH and run the sudo command to get root privileges. Password authentication must be enabled on the SSH server.
The Algorithm for P2V Recovery for Linux Servers
Here’s the sequence of actions for P2V recovery for Linux servers:
- Back up physical Linux server to backup repository
- Export data from backup to virtual disk of the appropriate format (VMDK, VHD or VHDX)
- Copy virtual disk files to the datastore that can be accessed by a hypervisor
- Create a new VM and set it to use the exported disk
- Start a VM on a physical machine running a hypervisor
P2V Recovery Workflow
Let’s walk through the entire process of P2V recovery of physical Linux server to a VMware virtual machine using an example. The source Linux server runs Ubuntu 18.04 LTS while the destination ESXi host runs ESXi 6.5 and is managed by vCenter Server (version 6.5). The account used on the Linux server is user1 with sudo enabled. No additional P2V converters are used in this case. Linux physical server is converted to a VM from backup by using NAKIVO Backup & Replication.
Adding physical Linux machine to Inventory
- First you have to add physical Linux server to Inventory in NAKIVO Backup & Replication. Log in to NAKIVO Backup & Replication, go to Configuration > Inventory. Click Add New and select Physical machine(s).

- On the Add New Physical Machine(s) page, set the required parameters.
Display name: Ubuntu physical machine
Type: Linux
Hostname(s) or IP(s): 192.168.16.61
Username: user1
Password: ********
SSH port: 22
Physical machine agent will be installed on your physical Linux machine. - Click Add.

- Now you can see your physical Linux server in Inventory.

Creating a backup of a physical Linux server
Create a new Physical machine backup job in NAKIVO Backup & Replication. On the home page, click Create > Physical machine backup job.

New Backup Job Wizard for Physical machine opens.
1. Machines. Select the needed machine from the available list of physical machines. Linux and Windows machines are sorted in separate categories. Ubuntu physical machine is selected in this example. Hit Next to continue for each step in the wizard.

2. Destination. Select a backup repository. In this example, the CIFS backup repository is used to store a physical Linux backup. You can expand options by clicking your Linux server name (Ubuntu physical machine in this case) and selecting custom disks and partitions to back up.

3. Schedule. This is the usual step for backup jobs in NAKIVO Backup & Replication. Select the required scheduling options.

4. Retention.
Set the retention settings that you need.

5. Options. Here, you can set the job name, enable or disable application-aware mode, select the change tracking method, and set network acceleration and encryption. Keep in mind that you can only use NAKIVO proprietary method for change tracking, unlike jobs for VMware and Hyper-V VMs. This is because you are going to back up a physical machine and not a virtual machine on a host level.
When you configure all job options, hit Finish to complete the job creation, or hit Finish & Run to save the job settings and run the job.

Wait until your physical Linux server is backed up. The backup progress is displayed in the web interface of NAKIVO Backup & Replication.

Backup Export
Once your physical Linux server is backed up, you can perform machine recovery and conversion to the Hyper-V or VMware VM with NAKIVO Backup & Replication by using backup export.
On the home page click Recover > Export backups to export data from backup to virtual disk of the appropriate format.

Backup Export Wizard opens.
1. Backups. Select the backup of your physical Linux server and the needed recovery point. By default, the latest recovery point is selected. Click Next for each step to continue.

2. Disks. Select the required disks from a backup. By default, all existing disks are selected.

3. Options. Select the backup export options.
Export format: VMDK
Export location: CIFS share
Path to the share: \\FILESERVER\Share07
Username: backupuser
Password: ********
Click Test Connection to check that you have entered the right credentials with sufficient read / write permissions.

Once connection is tested successfully, click the Export button to start the backup export process.

4. Finish. When backup export starts, you can switch to the Activities tab and monitor the progress of the running Backup Export job.

Wait until the Backup Export job is completed.

Copying exported disks to the ESXi datastore
When the Backup Export job is complete, you can see the virtual disk files in the defined location. In our case, it is a shared folder, and two virtual disk files of the VMware ESXi format are stored there:
Ubuntu-physical-machine_Disk1_Wed–29-Jan-2020-at-10-17-30-(UTC-+00-00).vmdk
Ubuntu-physical-machine_Disk1_Wed–29-Jan-2020-at-10-17-30-(UTC-+00-00)-flat.vmdk
The ESXi format of a virtual disk requires two files—a disk descriptor file (.vmdk) and a file that contains raw data (-flat.vmdk). The names of the exported files contain the name of the physical machine defined in Inventory, the disk number, and the day of the week, date, time, and time zone.

Let’s rename the virtual disk files to shorter names for convenience before uploading these files to a datastore attached to an ESXi host.
Physical_Linux_Recovered.vmdk
Physical_Linux_Recovered-flat.vmdk


Copy virtual disk files to the datastore. In this example, VMware vSphere Client is used for connecting to vCenter and configuring the ESXi host that is managed by vCenter.
In VMware vSphere Client, go to Datastores and select the datastore connected to the ESXi host that you want to use for running the recovered Linux server. In this example, the name of selected datastore is SSD2. Next, open the Files tab and click New Folder to create a new directory in the selected datastore.

Define the name for the new directory, for example, Physical_Linux_recovered.

The Physical_Linux_Recovered directory is created in the SSD2 datastore.
Open the created directory, click Upload Files, and select two exported and renamed files (.vmdk and -flat.vmdk) to upload.

Once the two files are uploaded (.vmdk and -flat.vmdk), only one virtual disk file will be visible even though the datastore contains two uploaded files. You can verify that there are two files by connecting to the ESXi host via SSH and checking the content of the directory to which you uploaded these files.

You can see two files of the virtual disk in the console.

Creating a new target VM on ESXi
Now you need to create a new virtual machine and set it to use the exported virtual disk. In VMware vSphere Client, go to Hosts and Clusters and select the ESXi host to which datastore you have uploaded the exported virtual disk files. Right click the ESXi host and, in the context menu, select New Virtual Machine to create a new VM.

New Virtual Machine wizard opens.
1. Select a creation type. Select Create a new virtual machine. Click Next for each step of the wizard to continue.

2. Select a name and folder. You should specify a unique name for your VM and select a target location. In this example, the new VM name is Physical_Liniux_Recovered, and the target datacenter name that is managed by vCenter is PM.

3. Select a compute resource. During this step, you have to select an ESXi host to which the datastore that contains uploaded virtual disk files is connected. The compute resource of this ESXi host will be used to run the virtual machine. In this example, a VM is created on the ESXi host with the IP address 10.10.10.74.

4. Select storage. Select the datastore where you have placed the virtual disk files that were exported to recover a physical Linux server to a VMware virtual machine. In this example, these files are stored on the SSD2 datastore and this datastore is selected.

5. Select compatibility. Select virtual machine hardware compatibility (VM hardware version). If you are planning to migrate the VM to other ESXi hosts of older versions, select the lowest ESXi version in this step. ESXi 6.5 and later is selected in our case.

6. Select a guest OS. Select a guest operating system (OS) family and version. Since there is a virtual disk with a Linux machine (Ubuntu 18 x64) installed on it available, we have to select Linux and Ubuntu Linux (64-bit).

7. Customize hardware. This is the most interesting step in the New Virtual Machine wizard needed to import an exported virtual disk of the backed up physical Linux server. By default, the wizard suggests that you create a new empty virtual disk. Select this virtual disk and click on the x icon (marked on the screenshot below).

Next, click the Add New Device button and select Existing Hard Disk.

In the Select file pop-up window, select the directory to which you have uploaded the exported virtual disk files and select the virtual disk file. In our case, a virtual disk data file (-flat.vmdk) and a virtual disk descriptor file (.vmdk) are stored on the SSD2 datastore in the Physical_Linux_recovered directory. As mentioned above, two files of the virtual disk are uploaded to the datastore but only one is displayed in VMware vSphere Client. Hit OK to apply the file selection.
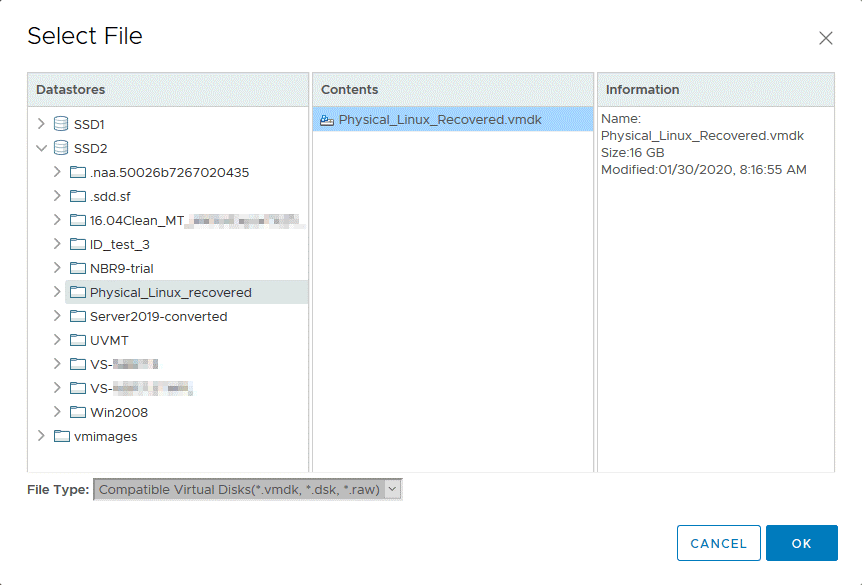
Now you can see that the exported virtual disk has been added to the new VM virtual hardware.

8. Ready to complete. Check the new VM configuration summary and hit Finish to complete the new VM creation.

Go to Hosts and Clusters, select the VM you have just created on the appropriate ESXi host (Physical_Linux_Recovered on 10.10.10.74), then click Actions > Power > Power On to start the virtual machine.

After the virtual machine boots, don’t forget to install VMware Tools. Now a physical Linux server is recovered to a VMware virtual machine from backup using NAKIVO Backup & Replication. In the screenshot below, you can see that Linux P2V conversion (P2V recovery) has been completed successfully.

Conclusion
Recovery of physical machines to virtual machines can be useful in some cases and can help you reduce downtime. NAKIVO Backup & Replication is a universal data protection solution that provides improved Physical Machine support allowing you to back up and recover physical Linux and Windows servers, as well as Windows workstations. NAKIVO Backup & Replication 9.1 with Physical Machine Backup and Backup Export features can be used as a P2V converter without the need to download any other P2V converter. Thus, you can convert a physical machine to a virtual machine with NAKIVO Backup & Replication after doing a backup. You just need to import a virtual disk to a new virtual machine after conversion. This blog post used an example to illustrate conversion of a physical Linux server to a VMware ESXi virtual machine, demonstrating that it’s a straightforward process. Download NAKIVO Backup & Replication 9.1 and try to back up and convert machines in your own IT infrastructure.
You can discuss P2V recovery on the NAKIVO forum, and also read related blog posts:
P2V conversion and V2V conversion
Export of Hyper-V VMs to VMware ESXi
How to convert a physical Linux Server to a VMware VM
How to convert a VMware VM to a Hyper-V VM?
How to convert VMware VMs to Hyper-V?