How to Move Office 365 Emails to Other Email Accounts
There are various scenarios for moving emails from an Office 365 email account to a different account. The target email account may be another Office 365 account or may be hosted by a different email service provider. These scenarios can include having two email accounts and wishing to use just one for all incoming messages or migrating from one email provider to another.
In this blog post, we cover how to forward an email from Office 365 to receive incoming messages in another account using three methods that allow you to set up mail forwarding:
- Using Office 365 webmail or a standalone client
- Using Office 365 admin center
- Using Exchange admin center
In addition, we explain how to move existing emails in an email client from one mailbox to another.

Using the Outlook Web Interface
Using the Outlook web interface to set up mail forwarding is affordable for Office 365 end-users. To configure forwarding, do the following:
Open a web browser and go to https://outlook.office.com to open Outlook Online.
Click the settings icon in the top right corner of the web interface to open Office 365 email settings. Then at the bottom of the Settings pane, click View all Outlook settings.
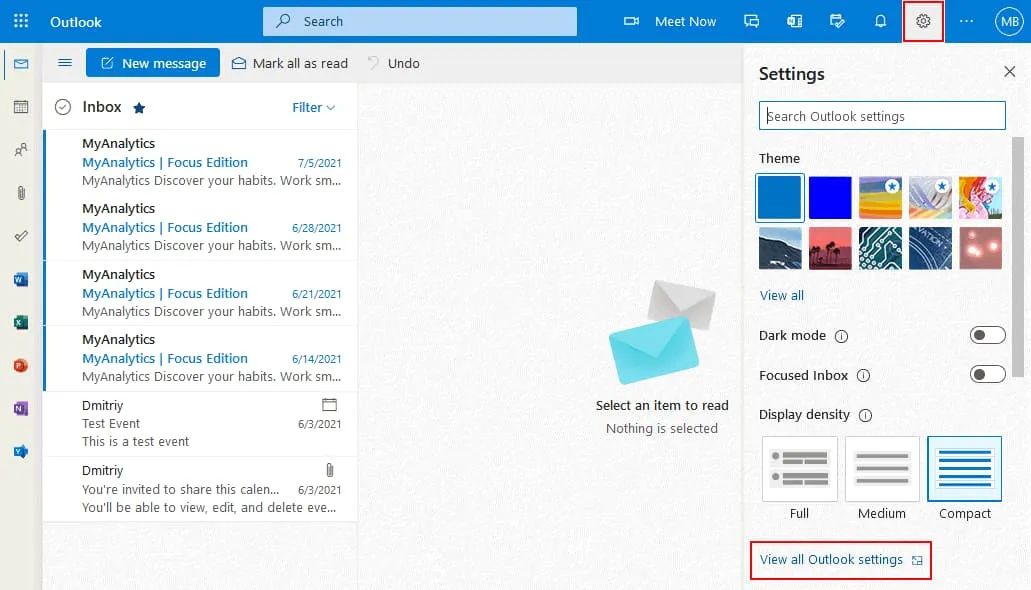
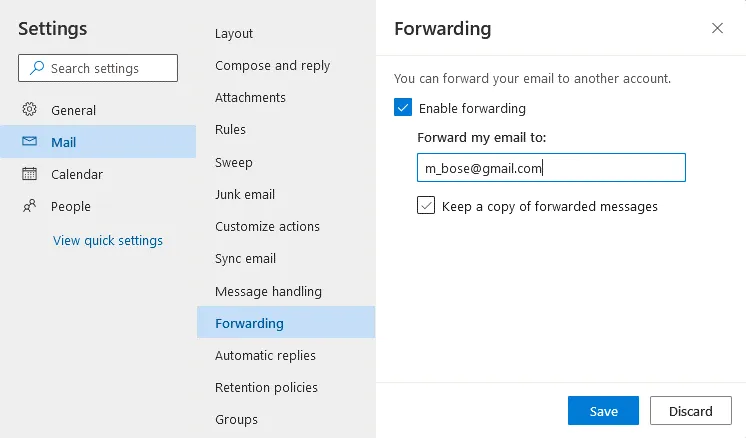
On the settings page, click Mail > Forwarding.
Select the Enable forwarding checkbox.
Enter a destination email address. All new email messages will be forwarded to the email address entered.
It is recommended that you select the Keep a copy of forwarded messages checkbox. With this option selected, an email copy is saved in your Office 365 mailbox and another copy is sent to the destination mailbox. This option helps reduce the risk of losing an email message if the message doesn’t appear in the target destination or forwarding fails.
Click Save to save settings.
You can copy or move old email messages from your Office 365 account to another email account in an email client such as Microsoft Office Outlook.
Using an Email Client
You need to install an email client on your computer to use the methods explained in this section for moving old emails that have been already received and set up mail forwarding for new incoming Office 365 email messages. I use Microsoft Outlook 2016 in this example.
Moving existing emails
You must have two email accounts configured in Microsoft Office Outlook – the Office 365 account (the account from which you are going to copy emails) and another email account, for example, a Gmail account (to which you will copy emails). Read how to configure an email client for the Office 365 account in this blog post.
Open Microsoft Office Outlook on your computer.
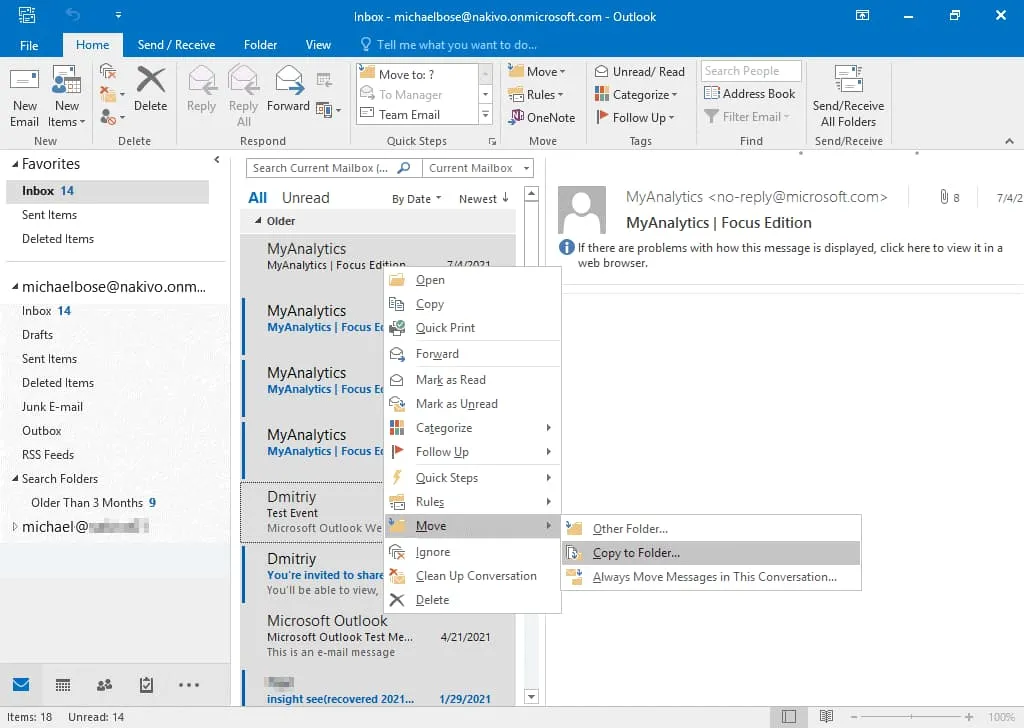
Open the email folder where Office 365 email messages are stored, for example, the Inbox folder. To select the needed messages, press Ctrl and click each message you need. Or press Ctrl+A to select all messages in the email folder. Right-click the selected message or group of messages and in the context menu click Move, then select one of the available options:
- Other Folder – email messages are moved to a destination folder of the destination email account and removed from the source location.
- Copy to Folder – a copy of each selected email message is sent to the destination folder of the destination account. Original email messages in the source location are preserved.
I select the Copy to Folder option (see the screenshot).
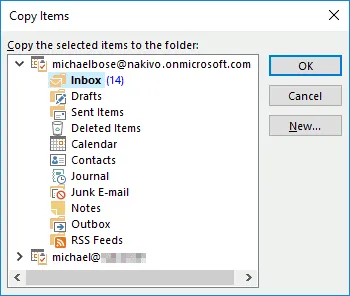
Select a folder in the appropriate email account configured in Microsoft Outlook. Email messages selected at the previous step are moved to the folder selected at this step. Hit OK to proceed.
Creating a rule for Office 365 email forwarding
This method is applicable for new emails that are received after configuring the rule.
Requirements. An Office 365 account must be configured in Microsoft Office Outlook. Configuring Microsoft Office Outlook for the second email account (the destination mailbox) is not necessary.
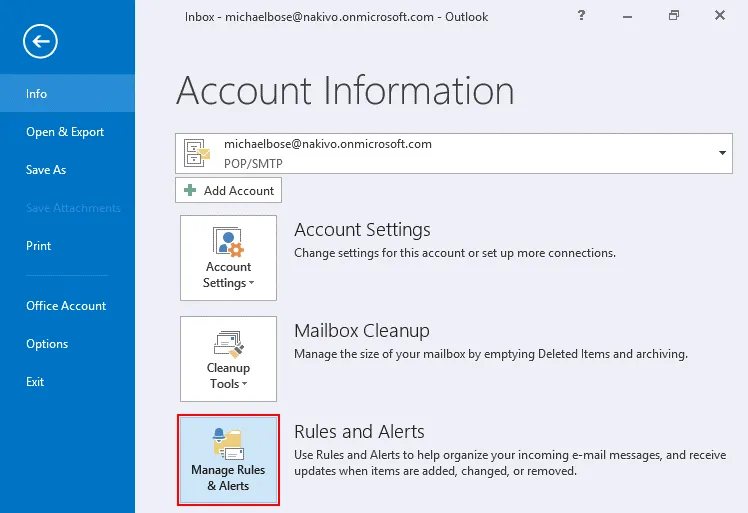
Open Microsoft Office Outlook installed on your computer, click File, select your Office 365 account in the drop-down menu, then hit Rules and Alerts.
Hit New Rule to set up a new email forwarding rule.
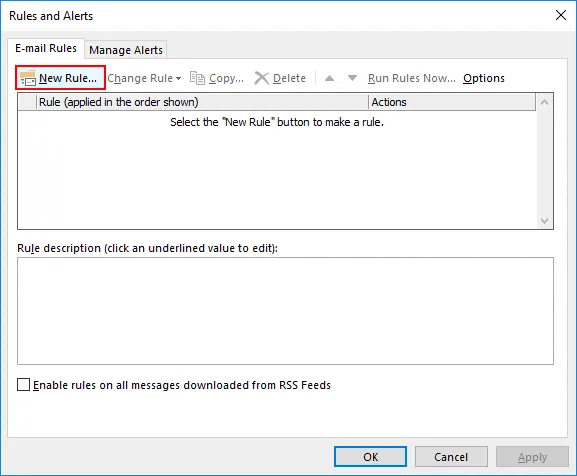
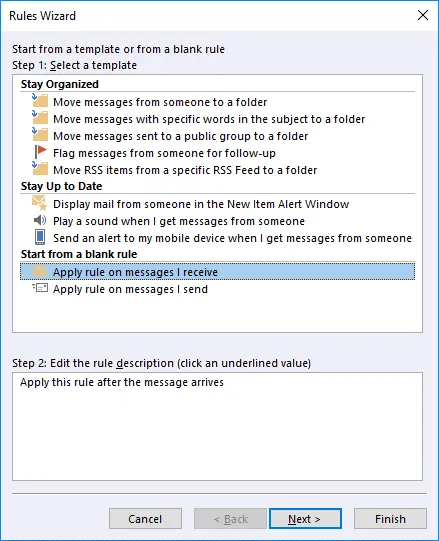
The Rules Wizard opens.
Select a template. Click Apply rule on messages I receive in the Start from a blank rule section. Hit Next at each step of the wizard to continue.
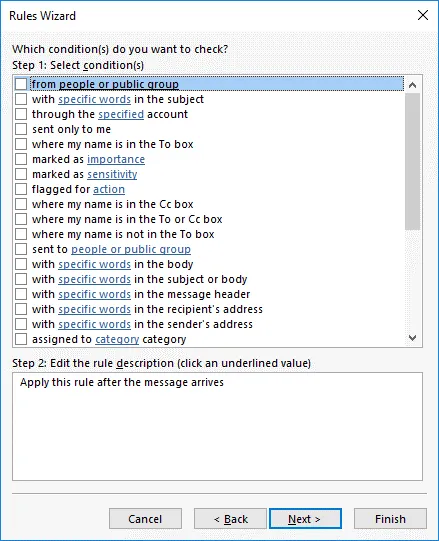
Select conditions. If you want to forward all incoming messages from your Office 365 mailbox to another mailbox, leave these options deselected.
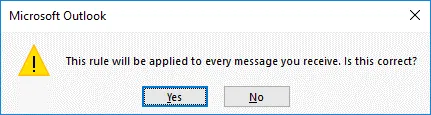
As no conditions have been selected, the following notification message is displayed:
This rule will be applied to every message you receive. Is this correct?
Hit Yes.
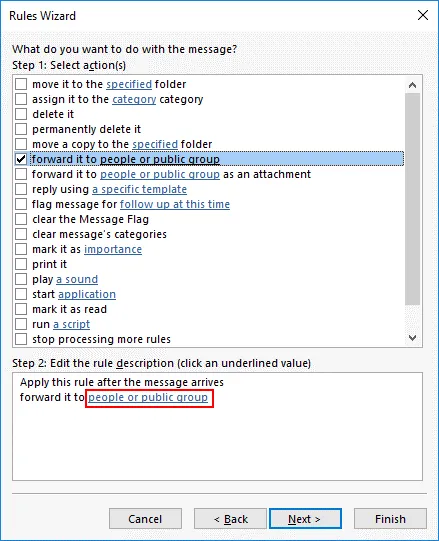
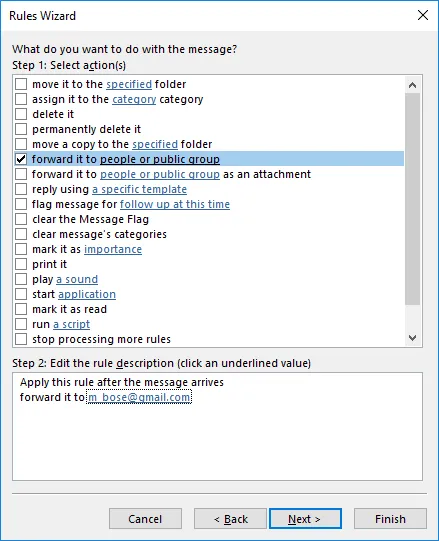
What do you want to do with the message?
Step 1. Select the Forward it to people or public group checkbox.
Step 2. Click people or public group.
Enter the email address of the destination account to which messages should be forwarded in the To -> field. Then hit OK.
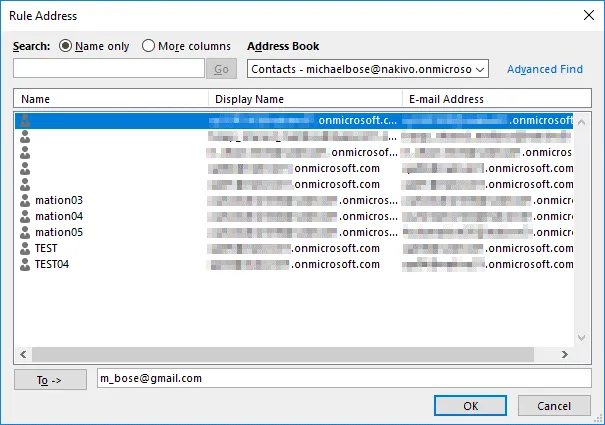
Now the defined destination email address is displayed in the bottom field of Step 2.
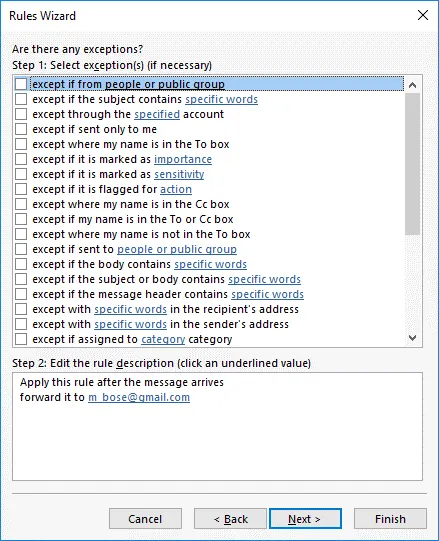
You can select exceptions to the rule (if necessary). I won’t select any exceptions in my example.
Specify a name for the forwarding rule, for example, Office 365 forward emails. Make sure that the Turn on this rule checkbox is selected. You can select Run this rule now on messages already in “Inbox” to move existing Office 365 email messages to another mailbox.
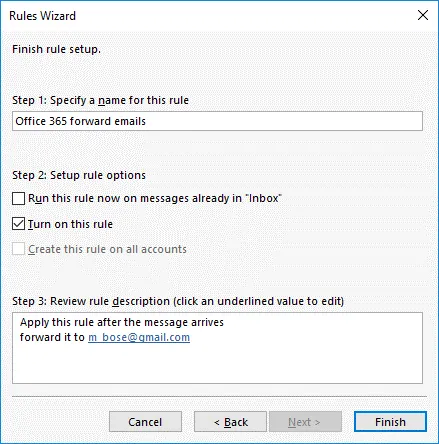
Hit Finish to finish configuring Office 365 email forwarding in Outlook.
Read also how to migrate email messages by using PST files.
Using the Office 365 Admin Center
The Office 365 admin center (that was renamed to Microsoft 365 admin center) is the central place to manage Office 365 email accounts, configure Office 365 email settings, set up mail forwarding, etc. for Office 365 administrators in organizations. The advantage of using the admin center is the ability to configure Office 365 email forwarding centrally without the need to sign in to each user account.
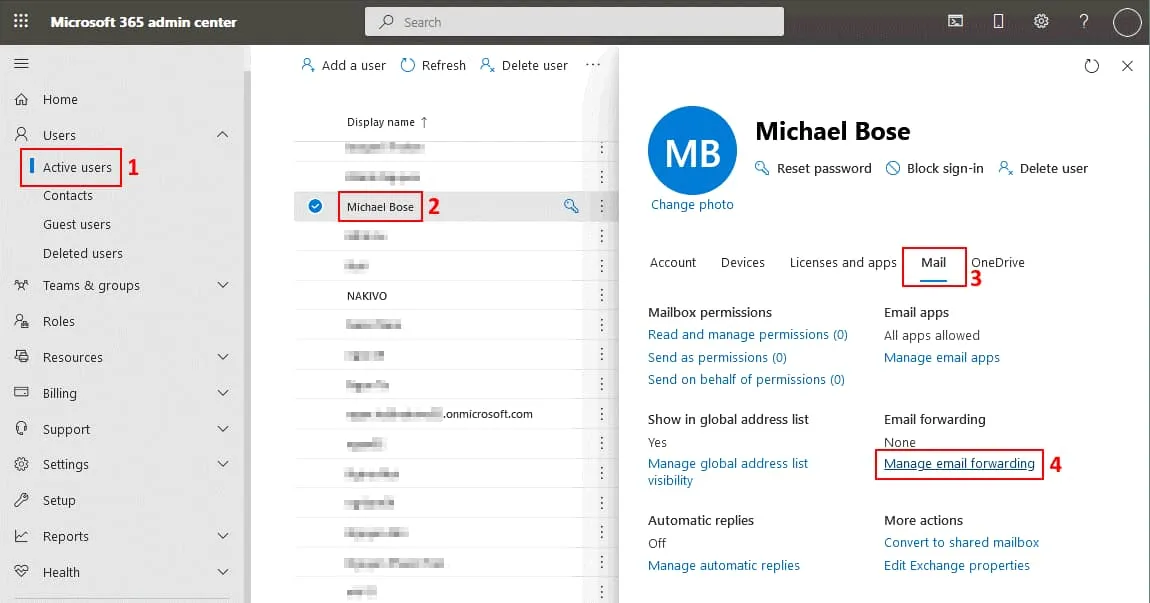
Go to https://admin.microsoft.com in a web browser to open the Office 365 admin center.
Click Users > Active users to open a list of existing Office 365 users in your organization.
Select the needed user by clicking the user name. I select Michael Bose in my case. User details are opened.
Click the Mail tab and hit Manage email forwarding.
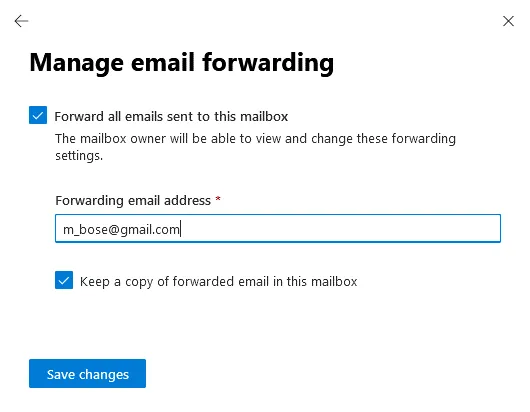
Select the Forward all emails sent to this mailbox checkbox in the display pane that opens.
Enter the forwarding email address (the address to which new email messages should be forwarded).
Select the Keep a copy of forwarded email in this mailbox checkbox if you want to keep incoming messages in this Office 365 email account.
Hit Save changes.
A license must be assigned to the Office 365 user to forward messages received by this Office 365 user account (the account from which you want to forward messages).
Using the Exchange Admin Center
Forwarding email to another account can be configured in the Exchange admin center. This method is the alternative to using the Office 365 admin center. The Exchange admin center is a part of the Office 365 admin center for the purposes of configuring the settings related to Office 365 email.
If you want to set up mail forwarding from an Office 365 account to another (external) email account in the Exchange admin center, you need to add a contact first. A contact contains an email address, user name, and other personal data of the user.
If you want to configure email forwarding from one Office 365 account to another Office 365 account within your organization, you don’t need to add a contact. You need to create a destination account and assign the Office 365 license (in this case you can skip the section about adding a contact and go to the next section).
Adding a contact
Open the Exchange admin center by opening https://admin.exchange.microsoft.com in a web browser.
In order to add a contact, go to Recipients > Contacts in the navigation pane of the Exchange admin center.
Click Add a contact.
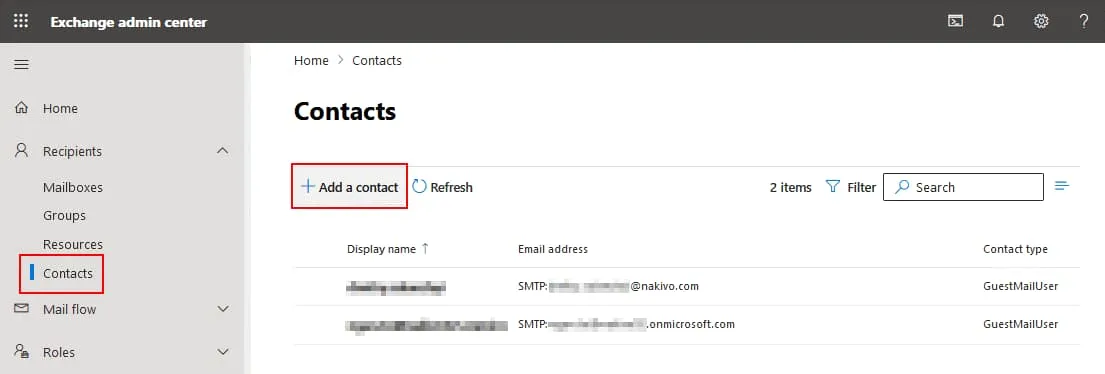
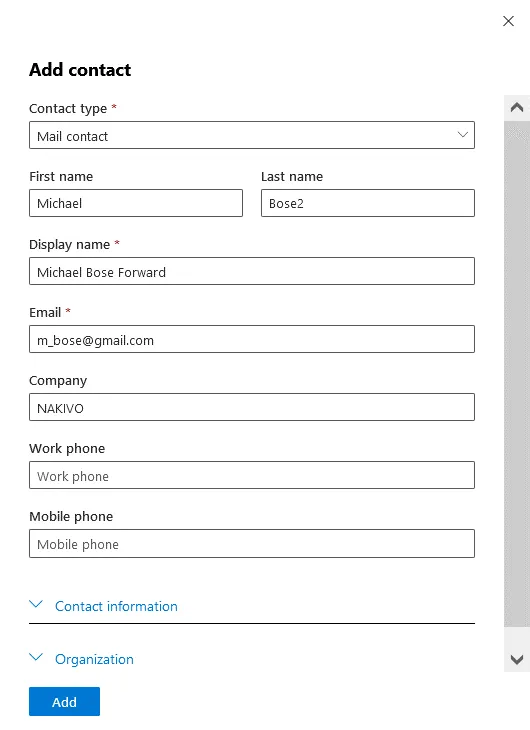
The Add contact window opens. Contact type, display name, and email are the required fields marked with *.
Select Mail contact in the Contact type drop-down menu.
Enter a display name and email address (for instance, Michael Bose Forward and m_bose@gmail.com accordingly). In this example, I explain how to forward Office 365 email to Gmail.
Enter other contact information if needed.
Hit Add to save settings and add a contact.
The external contact is now added and you can set up mail forwarding from an Office 365 account to another email account.
Configuring email forwarding
Let’s set up mail forwarding from the Office 365 account to another account in the Exchange admin center. Go to Recipients > Mailboxes in the navigation pane and select the needed Office 365 user account. Click the account name and in User mailbox details click Manage mail flow settings in the Mailbox tab.
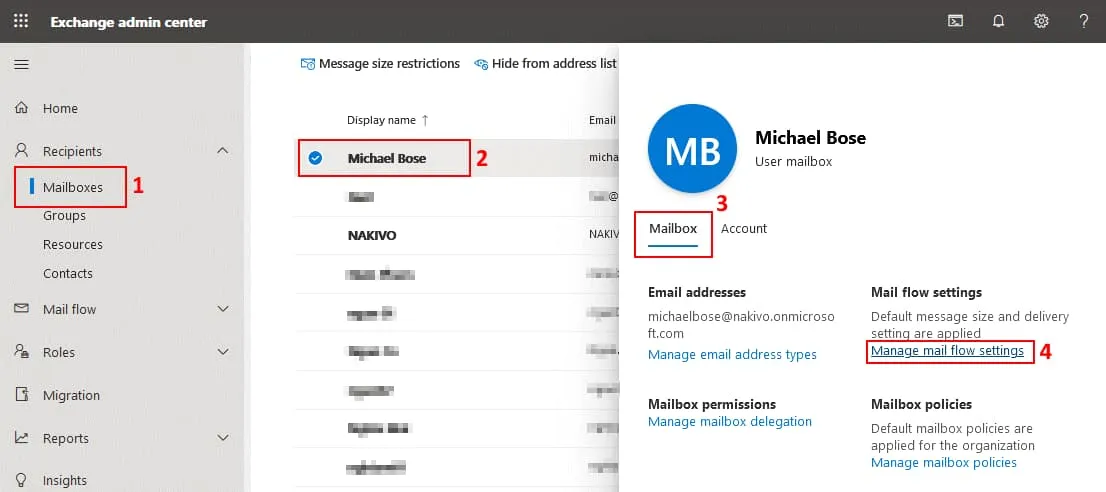
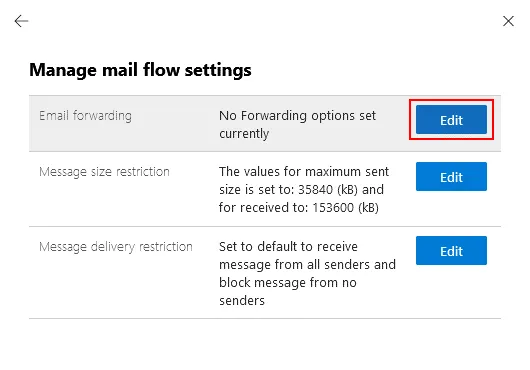
Locate the Email forwarding section in the Manage flow settings display pane and hit Edit.
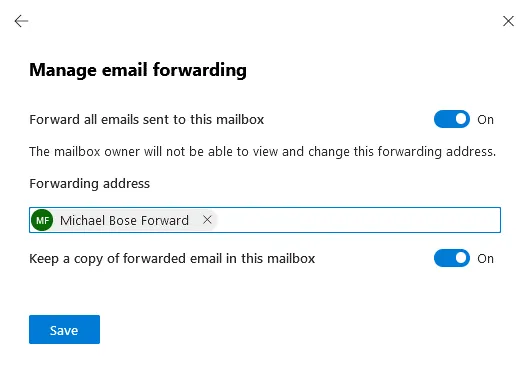
Tap Forward all emails sent to this mailbox (On). The mailbox owner cannot see and change this forwarding address.
Enter a forwarding email address that is the destination address. In my example, I am forwarding the email to another account stored on Gmail servers, and I am using the email contact (for the Gmail account) added to the Exchange admin center configuration before (Michael Bose Forward).
Tap Keep a copy of forwarded email in this mailbox (On).
Hit Save to save settings.
Now you know how to forward an email from Office 365 email accounts to other email accounts, and in particular, how to forward Office 365 email to Gmail.
Conclusion
Users can move emails and set up mail forwarding in the Microsoft Office Outlook email client. Administrators can use the Office 365 admin center and Exchange Admin center to configure email forwarding for one user or multiple users.
If you use email forwarding to other mailboxes as a variant of Office 365 email backup, consider using a specialized backup solution. NAKIVO Backup & Replication supports Office 365 email backup, OneDrive backup and SharePoint backup. Download the Free Edition of NAKIVO Backup & Replication to protect your Office 365 email and other Office 365 data.