How to Install Kubernetes on Ubuntu
Manual deployment of Docker containers on multiple servers can be highly time-consuming, monopolizing the schedule of any system administrator charged with the task. In the modern IT industry, the popularity of clouds, microservices and containers continues to grow, and for this reason, solutions such as Kubernetes were developed.
Kubernetes is an open source container management and orchestration solution that allows you to build a cluster for making deploying containers in the distributed environments easier as well as for providing high availability for containerized applications. The goal of this blog post is to explore how to install Kubernetes on Ubuntu for running applications in Docker containers.

Requirements and System Configuration for Installing Kubernetes on Ubuntu
The Kubernetes cluster consists of master nodes and worker nodes. Hardware configuration depends on your needs and the applications that you are planning to run in Docker containers. The minimum hardware requirements for installing Kubernetes on Ubuntu are:
- At least a 2-core x86/x64 CPU (Central Processor Unit)
- 2 GB of RAM (Random Access Memory) or more
- Internet access
Ports that must be opened for installing Kubernetes on Ubuntu:
| Protocol & port range | Source | Purpose | Direction |
| TCP 443 | Worker nodes, end-users, API requests | Kubernetes API Server | Master node inbound |
| TCP 10250 | Master nodes | Worker node Kubelet health check port | Worker node inbound |
| TCP 30000-32767 | External application clients | Default port range for providing external services | |
| UDP 8285 | Worker nodes | UDP backend of Flannel overlay network | |
| UDP 8472 | Worker nodes | VXLAN backend of Flannel overlay network | |
| TCP 179 | Worker nodes | Required only if Calico BGP network is used | |
| TCP 2379-2380 | Master nodes | etcd server client API | etcd node inbound |
| TCP 2379-2380 | Worker nodes | etcd server client API that is required if Flannel of Calico is used |
By default, the iptables firewall is installed on Ubuntu, but there are not any blocking rules “out of the box”. Hence, if you are installing Ubuntu to try Kubernetes, you don’t need to edit firewall rules. Kube-proxy places its iptables chains first, and then inserts two iptables rules. These rules are KUBE-EXTERNAL-SERVICES and KUBE-FIREWALL which are inserted in the top of the INPUT chain.
Installing Kubernetes on Ubuntu can be done on both physical and virtual machines. The general recommendation is to use the latest version of 64-bit Ubuntu Linux. Today’s blog post explains installing Kubernetes on Ubuntu 18.04 LTS that is running on VMware VMs. The first explained Kubernetes deployment type is with a master node, and two worker nodes are used for the Kubernetes cluster. See the table below to view conditional numbers of nodes, node roles, hostnames and IP addresses of the machines used in the considered example.
| № | Node Role | IP address | Hostname |
| 1 | Master | 192.168.101.21 | docker-nakivo21 |
| 2 | Worker | 192.168.101.31 | docker-nakivo31 |
| 3 | Worker | 192.168.101.32 | docker-nakivo32 |
You can use VMs running on ESXi hosts if you use VMware vSphere, or you can run VMs on VMware Workstation installed on your personal computer with Linux or Windows. We are using VMs running on VMware Workstation in today’s example. VMs use the NAT network with Internet access, and if you prefer VirtualBox to VMware, you can use it.
The IP address of the host machine: 10.10.10.53
The IP address of the virtual gateway for the NAT network (VMNet8): 192.168.101.2
The same Linux user exists on all Ubuntu machines: kubernetes-user
VM configuration: 2CPU, 4GB RAM, 20-GB virtual disk
You can change the IP addresses of the VMnet8 by going to Edit > Virtual Network Editor in VMware Workstation.
For better understanding, all components will be installed on Linux manually without automation tools such as Ansible in today’s example.
Deploying the Ubuntu VM
Create a new VM named is docker-nakivo21.
Install Ubuntu 64-bit on the first machine, and set the host name and user name.
VM name: docker-nakivo21
Username: kubernetes-user

Install VMware Tools after the first login to the installed operating system. If you use physical machines, you don’t need to use VMware Tools and can skip this step.
Note: The $ character in the beginning means that a command is run as a regular user (kubernetes-user in this case). If the string begins with the # character, the command must be executed as root. The sudo (substitute user do or superuser do) command allows you to execute commands as another user including root. You can type sudo -i to get the root privileges in the console. Press Ctrl+D to exit the root mode.
You can install VMware Tools from the ISO image provided with the VMware hypervisor or from Linux repositories (explained below).
$ sudo apt-get install open-vm-tools
If you need advanced desktop experience such as shared clipboard, drug & drop files etc., run:
$ sudo apt-get install open-vm-tools-desktop
Reboot the VM.
$ init 6
Configure Your Ubuntu Machine Before Installing Kubernetes
Some preparations must be made before installing Kubernetes on Ubuntu machines. First of all, you must configure the static IP address and the host name for any usual server.
Set the static IP address
As for any other type of cluster, using static IP addresses on nodes is highly recommended.
Install Linux networking tools before setting the IP address.
$ sudo apt-get install net-tools
Type ifconfig to check the current IP address of your Ubuntu VM.
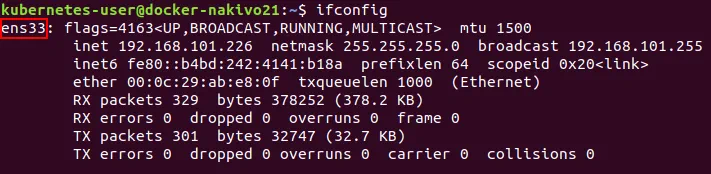
You can see that the IP address is obtained automatically via DHCP. Remember the name of the network interface. In the current example this name is ens33. The name of the first Ethernet network interface is usually eth0 for physical machines.
You need a text editor for editing configuration files. Install vim as the text editor.
$ sudo apt-get install vim
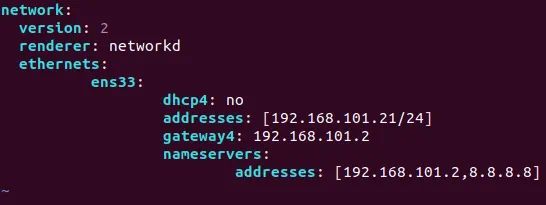
In the latest Ubuntu versions, network configuration is set in the yaml file. Open the network configuration yaml file in vim.
$ sudo vim /etc/netplan/01-network-manager-all.yaml
The default view of the configuration file is:

Edit this network configuration file as shown below:
network:
version: 2
renderer: networkd
ethernets:
ens33:
dhcp4: no
addresses: [192.168.101.21/24]
gateway4: 192.168.101.2
nameservers:
addresses: [192.168.101.2,8.8.8.8]
Save changes and exit.
:wq
$ sudo netplan try
Press ENTER to accept the new configuration.
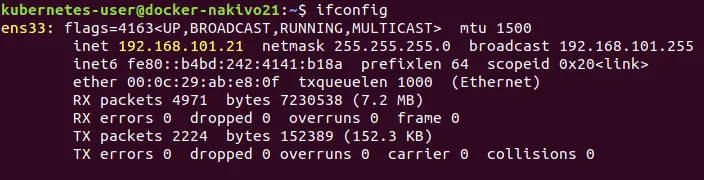
Check whether your network configuration has been changed and try to ping, for example, nakivo.com.
$ ifconfig
$ ping nakivo.com
Configure a hostname
Check your current hostname.
$ hostnamectl
As you recall, the hostname for the first VM that is docker-nakivo21 has already been configured during installation. In order to change the hostname, do the following (this will be needed for configuring the second and third VMs after cloning. Those two VMs are intended to be configured as worker nodes):
For example, if you need to change the hostname to docker-nakivo21 on the first VM, run:
$ sudo hostnamectl set-hostname docker-nakivo21
Check that a new hostname is applied.
$ less /etc/hostname
Edit the hosts file.
$ sudo vim /etc/hosts
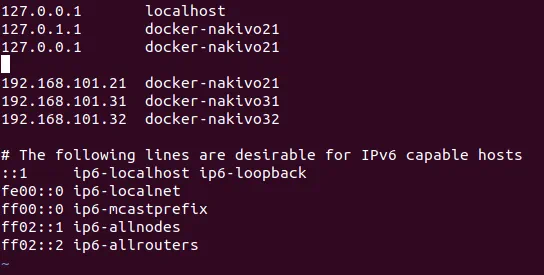
The contents of the host’s file must look like this:
127.0.0.1 localhost
127.0.1.1 docker-nakivo21
Restart the machine.
$ init 6
Disable a swap file
Using a swap file (swap partition) is not supported by Kubernetes and disabling swappiness is necessary to install Kubernetes on Ubuntu successfully.
Disable a swap file to prevent kubelet high CPU usage.
$ sudo swapoff -a
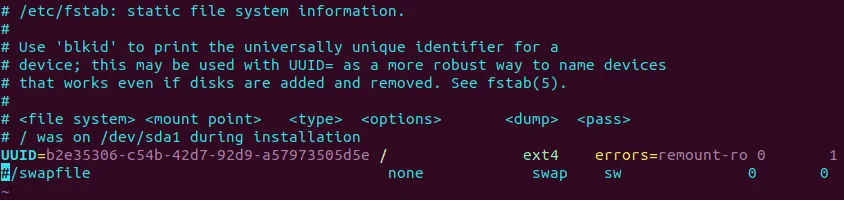
Edit /etc/fstab and comment the string by using the # character.
$ sudo vim /etc/fstab
#/swapfile none swap sw 0 0
You can do the same with sed just with a single command:
$ sudo sed -i ‘/ swap / s/^\(.*\)$/#\1/g’ /etc/fstab
Disable swap in sysctl.conf
$ sudo echo “vm.swappiness=0” | sudo tee –append /etc/sysctl.conf
Where 0 is the percent of swapiness. In this case swap can be used only if you are out of RAM (by default swap is used when more that 60% of RAM is full).
Apply configuration changes without reboot.
$ sudo sysctl -p
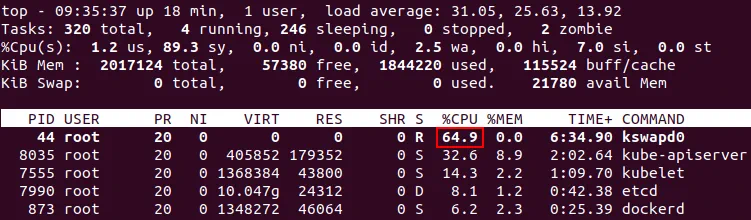
Note: If the swap partition is not disabled, the kswapd0 process of Ubuntu Linux running Kubernetes can consume a large amount of CPU resources on your machine, causing applications to become unresponsive, and the system to hang. This happens when the operating system runs out of memory, and the old memory pages are moved to swap by a Linux kernel system process. For strange reasons, sometimes things go wrong, and a never-ending loop that consumes all CPU resources occurs. On the screenshot below, you see high CPU consumption by the kswapd0 process when Kubernetes is installed on Ubuntu. The load average value is excessively high.
If kswapd0 still overloads your CPU, run the following command to invalidate all memory cashes and stop kswapd0 (execute as root).
# echo 1 > /proc/sys/vm/drop_caches
Shutdown the VM.
$ init 0
This partially configured virtual machine (docker-nakivo21) is about to be used as a master node. Create two machines to be used as worker nodes. If you use physical machines, repeat the previous steps manually (or use automation tools such as Ansible for configuring multiple Linux machines simultaneously via SSH). As VMs are used in the current example, they can be cloned to save time during preparing environment for installing Kubernetes on Ubuntu machines.
Clone the VM
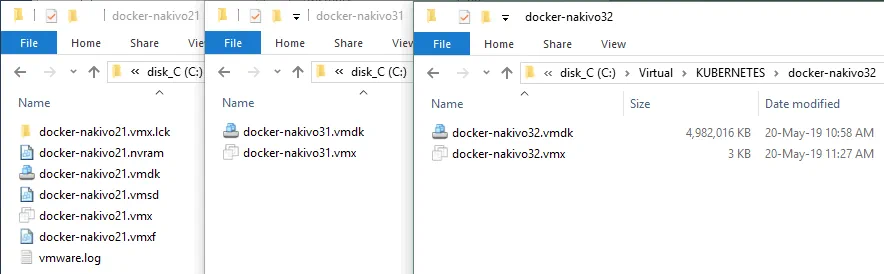
Clone your first VM. If you use VMware ESXi, you can use the built-in cloning feature. You can learn more about this subject by reading our blog post on cloning VMs by using VM templates. If you use VMware Workstation, you can also clone VMs by using two methods (built-in clone tool, and manually). You can click VM > Manage > Clone to create a linked clone. Let’s create a full clone of the first VM and manually copy the VM files. In this case the files are copied from the docker-nakivo21 directory to docker-nakivo31. The directories must be created manually before copying VM files.
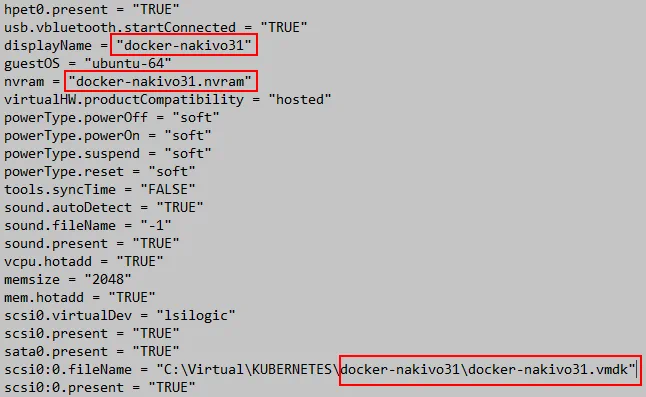
Edit the VMX file, because the VM name and path to the virtual disk file have been changed.
displayName = “docker-nakivo31”
scsi0:0.fileName = “C:\Virtual\KUBERNETES\docker-nakivo31\docker-nakivo31.vmdk”
nvram = “docker-nakivo31.nvram”
The VM that will be used as the first worker node has now been created. Clone the first VM once again, to prepare the second worker node of Kubernetes cluster.
Edit the VMX file for the third VM (the second worker node), as you have done previously.
displayName = “docker-nakivo32”
scsi0:0.fileName = “C:\Virtual\KUBERNETES\docker-nakivo31\docker-nakivo32.vmdk”
nvram = “docker-nakivo32.nvram”
Open the VM clones in VMware Workstation (File> Open and select the VMX file of the VM), or just double click the VMX file of the VM. Power on three virtual machines (your one source VM and two VM clones). Click I Copied It, when prompted.
Note: If you use virtual machines, edit the IP address and hostname on each VM-clone once VMs have been cloned. If you use physical machines, follow all previous steps according to your IP addresses and hostnames for each machine.
Configuring IP Addresses and Host Names on VMs
Change the IP address and hostname on docker-nakivo31 and docker-nakivo32 VMs (as shown above).
Repeat the steps explained in the above sections to configure the static IP addresses and hostnames.
The IP address must be: 192.168.101.31 and 192.168.101.32; the hostnames must be docker-nakivo31 and docker-nakivo32 accordingly on worker nodes.
All machines must be configured for resolving hostnames of nodes to IP addresses. You can configure a DNS server or manually edit the hosts file on each machine. Let’s edit hosts.
Add the following strings to the hosts file on each machine (docker-nakivo21, docker-nakivo31, docker-nakivo32).
$ sudo vim /etc/hosts
Add these lines to the hosts file:
192.168.101.21 docker-nakivo21
192.168.101.31 docker-nakivo31
192.168.101.32 docker-nakivo32
Ping other hosts from each host to ensure that the hostnames are resolved:
$ ping docker-nakivo21
$ ping docker-nakivo31
$ ping docker-nakivo32
Configure SSH Access on All Hosts (VMs)
Configure SSH access on all hosts. Install the OpenSSH server by executing the commands on each machine.
$ sudo apt-get install openssh-server
Go to the home directory of kubernetes-user and generate the SSH key pair (a set of cryptographic keys which consists of a private key and public key). SSH key pairs can be used to access the remote Linux console via SSH without using passwords. The public key can be copied to a machine from which you need to connect remotely, while the private key is highly secret and must be stored on the machine to which you need to connect.
$ ssh-keygen
It is not necessary to enter the password for key generating (the password is optional).
Copy the keys to other Ubuntu machines:
$ ssh-copy-id kubernetes-user@192.168.101.31
$ ssh-copy-id kubernetes-user@192.168.101.32
Enter your user password to confirm copying the keys.
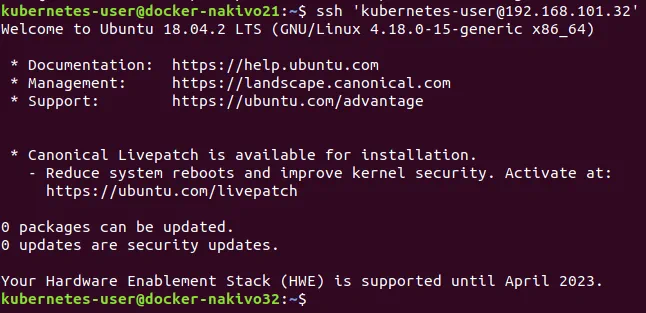
Try to connect to the second machine (docker-nakivo31) as kubernetes-user (that is a regular user).
$ ssh ‘kubernetes-user@192.168.101.31’
Then test connection to the third machine (docker-nakivo32).
$ ssh ‘kubernetes-user@192.168.101.32’
You will see the name of the remote machine in the command prompt of your console after successful connection.
Press Ctrl+D to exit from the remote console.
How do I copy the key for connecting via SSH as a root user?
As you will need root privileges in Kubernetes, let’s create keys for configuring SSH access for root. Execute the following commands on all machines (docker-nakivo21, docker-nakivo31 and docker-nakivo32) that need to be accessed via SSH as a root user.
$ sudo -i
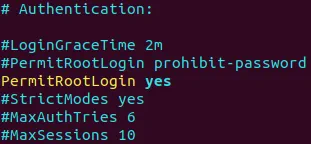
Edit the SSH server configuration file.
# vim /etc/ssh/sshd_config
Add/edit the following string to this file.
PermitRootLogin yes
Restart the SSH server daemon.
# /etc/init.d/ssh stop
# /etc/init.d/ssh start
Set the root password (password for the root user).
# passwd
$ cd /home/kubernetes-user/
$ sudo ssh-keygen -t rsa
Copy the public key to be able to login remotely via SSH as root (the key is stored in the home directory of the regular user since the previous command was run from that directory).
$ sudo ssh-copy-id -i /home/kubernetes-user/.ssh/id_rsa.pub 127.0.0.1
If your key is saved into the home directory of the root user, copy the key with this command:
# ssh-copy-id -i /root/.ssh/id_rsa.pub 127.0.0.1
Confirm this operation and enter your password.
Repeat the action, copying the key from each machine to other machines. For instance, on the docker-nakivo21 machine execute:
# ssh-copy-id -i /root/.ssh/id_rsa.pub 192.168.101.31
# ssh-copy-id -i /root/.ssh/id_rsa.pub 192.168.101.32
Make the public key authorized.
# cat /root/.ssh/id_rsa.pub >> /root/.ssh/authorized_keys
Verify whether you can log in as root via SSH on the local machine.
$ sudo ssh root@127.0.0.1
Try to connect from/to the remote machine without entering a password.
$ sudo ssh root@192.168.101.21
$ sudo ssh root@192.168.101.31
$ sudo ssh root@192.168.101.32
Note: Connecting as a root user may be unsecure. Do not connect as a root if it is not necessary—it is better to connect via SSH as a regular user, and to use the sudo command.
Docker Installation
Docker is the most popular enterprise application container platform supported by Kubernetes. Install Docker on all machines. Execute commands shown below on docker-nakivo21, docker-nakivo31, docker-nakivo32.
However, there’s no need to rush. For the first glance, you can simply install Docker by using the usual command:
$ sudo apt-get install -y docker.io
Still, in this case, the version of Docker used may not be the latest. Let’s remedy that by installing the latest version of Docker.
First, install the required packages.
$ sudo apt-get install apt-transport-https ca-certificates curl software-properties-common
Curl is a universal compact tool designed for transferring data from/to a host without user interaction by using one of the supported protocols (HTTP, HTTPS, FTP, FTPS, SFTP, LDAP, LDAPS, IMAP, IMAPS, POP3, POP3S, SCP, SMB, SMTP, TELNET etc.).
Add the GPG key for the official Docker repository to your Ubuntu system:
$ curl -fsSL https://download.docker.com/linux/ubuntu/gpg | sudo apt-key add –
The console output must be OK.
Add the official Docker repository to your apt package manager:
$ sudo add-apt-repository “deb [arch=amd64] https://download.docker.com/linux/ubuntu bionic stable”
Update your database of the package manager after manual changes have been made by the previous command.
$ sudo apt-get update
Check the version of the Docker package available in the official repository.
$ apt-cache policy docker-ce
Install Docker.
$ sudo apt-get install docker-ce
You can check the version of Docker after installation.
$ docker –version
In this case the output is: Docker version 18.09.6, build 481bc77.
Start Docker and make its daemon loadable automatically on system startup.
$ sudo systemctl start docker
$ sudo systemctl enable docker
Once you have installed Docker on all machines, you can go directly to the step of installing Kubernetes on Ubuntu.
Installing Kubernetes on Ubuntu and Cluster Initialization
Now, nothing prevents you from installing the core Kubernetes components.
Run the commands as root on all machines to be included into the Kubernetes cluster.
$ sudo -i
Add the GPG key for the official Docker repository to your Ubuntu system:
# curl -s https://packages.cloud.google.com/apt/doc/apt-key.gpg | apt-key add –
Add the official Kubernetes repository to the database of available package repositories for your apt package manager.
# cat <<EOF >/etc/apt/sources.list.d/kubernetes.list
deb http://apt.kubernetes.io/ kubernetes-xenial main
EOF
As an alternative, you can add the repository with this command:
# echo ‘deb http://apt.kubernetes.io/ kubernetes-xenial main’ | sudo tee /etc/apt/sources.list.d/kubernetes.list
Where tee is a tool that reads the standard input and writes the input data to standard output and defined files.
Update the package list of available repositories on your Ubuntu system.
# apt-get update

Installing kubectl, kubeadm and kubectl is crucial to install Kubernetes on Ubuntu.
# apt-get install -y kubelet kubeadm kubectl
Install keepalived.
# apt-get install keepalived
# systemctl enable keepalived && systemctl start keepalived
Verify whether the value is 1 for correct functioning of Kubernetes installed on Ubuntu.
# sysctl net.bridge.bridge-nf-call-iptables
In order to set this value to 1 run the command:
sysctl net.bridge.bridge-nf-call-iptables=1
Edit the kubeadm configuration file.
# vim /etc/systemd/system/kubelet.service.d/10-kubeadm.conf
Add the string after the existing Environment string:
Environment=”cgroup-driver=systemd/cgroup-driver=cgroupfs”
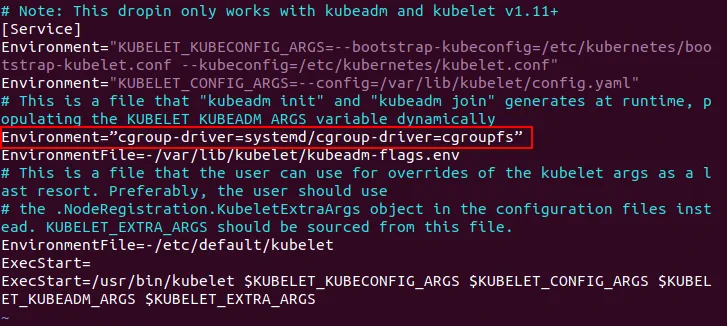
Cgroups are the control groups that isolate resource usage such as processor, memory, disk input/output, network.
On the master node (docker-nakivo21) run the command to initialize the Kubernetes cluster on Ubuntu.
# kubeadm init –pod-network-cidr=10.244.0.0/16 –apiserver-advertise-address=192.168.101.21
Where
–pod-network-cidr is required by the Flannel driver. CIDR (Classless Inter-Domain Routing) defines the address of your overlay network (such as Flannel) that will be configured later. The network mask also defines how many pods can run per node. The CIDR network address and the network address used for Flannel must be the same.
–apiserver-advertise-address=192.168.101.21 defines the IP address that will be advertised by Kubernetes as its API server.
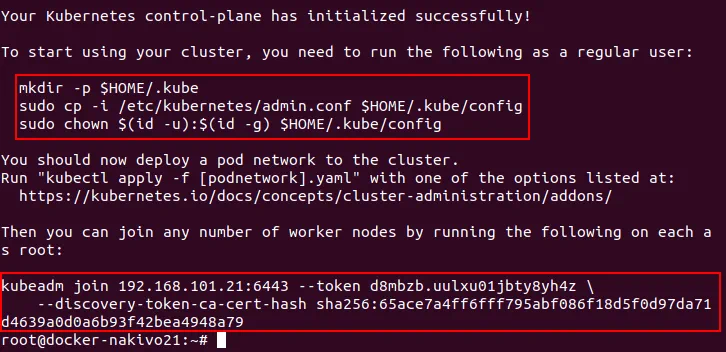
Read the output and save commands displayed at the end of the text. This is an important point. The generated token is required for adding worker nodes to the Kubernetes cluster.
Run the following commands as a user that has run kubeadm init. In this case, the commands are executed as root.
# mkdir -p $HOME/.kube
# sudo cp -i /etc/kubernetes/admin.conf $HOME/.kube/config
# sudo chown $(id -u):$(id -g) $HOME/.kube/config
If you don’t run these commands, Kubernetes shall return the error: The connection to the server localhost:8080 was refused – did you specify the right host or port?
Kubernetes doesn’t copy this config file to the user directory automatically. You should perform this operation manually.

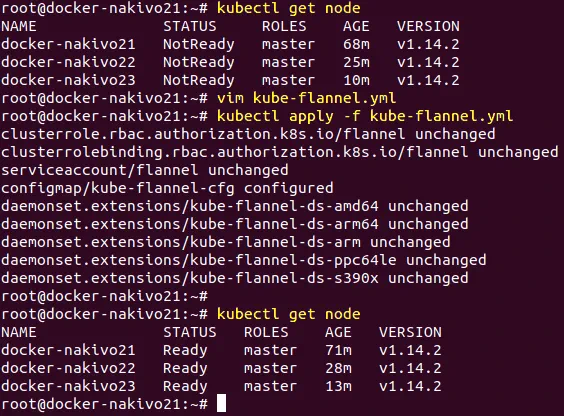
Check the nodes added to the cluster
# kubectl get nodes

You can see one master node that has the NotReady status in the Kubernetes cluster which is being installed on Ubuntu. This is due to the fact that the overlay network has not been configured. Configure Flannel in order to fix the NotReady status of the Kubernetes master node. Create the directory to store yaml files for Docker and Kunernetes, for example /home/kubernetes-user/kubernetes/
YAML (Yet Another Markup Language) offers you greater convenience when creating pods and deployments in Kubernetes. You can define all parameters of containers which must be deployed in the YAML configuration file instead of running each command manually in Linux console. YAML files are also referred to as manifest files in the context of Kubernetes.
Create the yaml configuration file with the following content:
Run the command
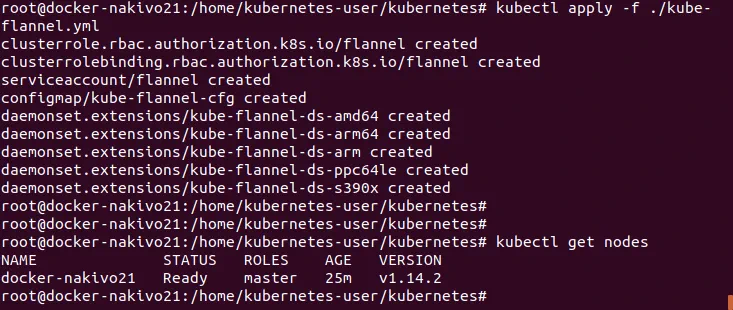
# kubectl apply -f ./kube-flannel.yml
As an alternative, you can find prepared free examples of YAML deployment configurations for Kubernetes on GitHub.
kubectl apply -f https://raw.githubusercontent.com/coreos/flannel/a70459be0084506e4ec919aa1c114638878db11b/Documentation/kube-flannel.yml
Check the nodes added to the Kubernetes cluster you are deploying on Ubuntu:
# kubectl get nodes
The status of the master node now is Ready.
Ensure that Flannel has been set up correctly:
# kubectl get pods –all-namespaces
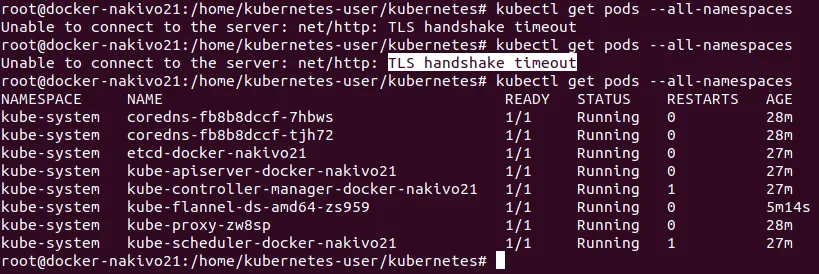
You can see that the Flannel pod is running. This pod consists of two containers – the Flannel daemon, and initContainer used to deploy the CNI configuration to a location readable for Kubernetes.
Sometimes when you install Kubernetes on Ubuntu, the following error may occur:
Unable to connect to the server: net/http: TLS handshake timeout.
How can you fix this issue? Wait for a few seconds and try again — this is often enough.
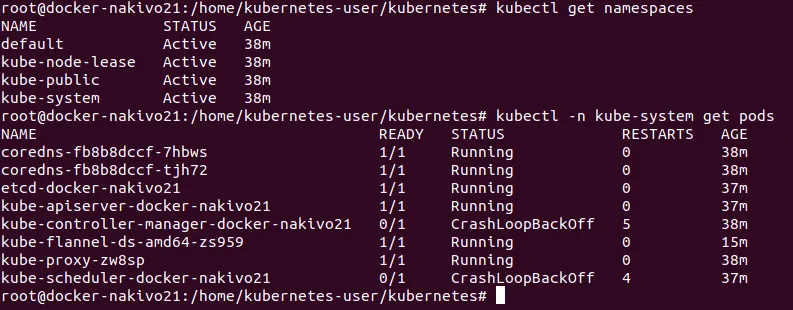
Namespaces are logical entities in the Kubernetes cluster that represent cluster resources and can be considered virtual clusters. One physical cluster can be logically divided to multiple virtual clusters. The default Kubernetes namespaces are Default, Kube-public, and Kube-system. You can get the list of namespaces:
# kubectl get namespaces
As you recall, the basic deployment unit in Kubernetes is a pod which is a collection of containers that share network and mount namespace. All containers of the pod are scheduled on the same Kubernetes node. Check the available pods:
# kubectl -n kube-system get pods
If you wish to reset/stop the cluster, run:
# kubeadm reset
Everything is OK on the master node. This means that now you can continue to install Kubernetes on Ubuntu and switch to adding worker nodes to the cluster.
On the worker nodes (docker-nakivo31, docker-nakivo32) run the command:
# kubeadm join 192.168.101.21:6443 –token d8mbzb.uulxu01jbty8yh4z \
–discovery-token-ca-cert-hash sha256:65ace7a4ff6fff795abf086f18d5f0d97da71d4639a0d0a6b93f42bea4948a79
The token and hash were noted after cluster initialization with the kubeadm init command, as you may recall.
On the master node, check the cluster status again.
# kubectl get nodes

Now you can see one master and two worker nodes in the Kubernetes cluster running on Ubuntu machines.
You can check Kubernetes configuration:
# kubectl cluster-info

Deploying a Pod in Kubernetes
Now you can deploy a pod with containers in your Kubernetes cluster. As you remember, containers are included in pods in Kubernetes. If you use yaml files, create a directory to store that files for more convenience. Go to that directory and run the commands like kubectl apply -f test.yaml
Such a directory has been already created when configuring Flannel – /home/kubernetes-user/kubernetes/
It’s time to deploy a new pod. First you need to create a deployment. Deployment is a controller concept used for providing declarative updates to pods and replica sets. You can create deployment with a single command or by using yaml files.
Example 1 – deploying MySQL
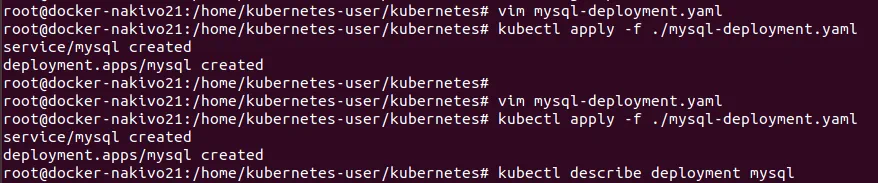
Let’s create a yaml file in this example. The name of the file is mysql-deployment.yaml
See the attached file to view the configuration.
# vim mysql-deployment.yaml
There are two popular approaches for managing resources with kubectl. What is the difference between kubectl create and kubectl apply? When using kubectl create, you tell Kubernetes what you want to create, replace or delete; this command overwrites all changes. Alternatively, kubectl apply makes incremental changes and this command can be used to save changes applied to a live object.
Create a deployment:
# kubectl apply -f ./mysql-deployment.yaml
Kubernetes can display information about your deployment.
# kubectl describe deployment mysql
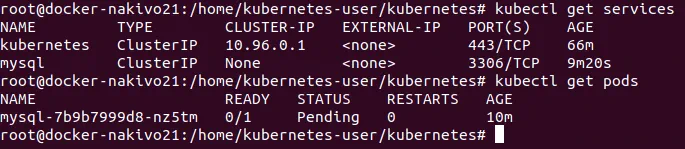
Check pods:
# kubectl get po
or
# kubectl get pods
or
# kubectl get pods -l app=mysql
If you see the pending status for the pod, it can mean that there are not enough computing resources. Try to add some CPU and memory capacity to fix the pending status of the pod in Kubernetes.
You can delete the service if needed:
# kubectl delete service <service_name>
You can also delete a pod:
# kubectl delete pod mysql-7b9b7999d8-nz5tm
Example 2 – Deploying nginx
Let’s deploy nginx by using another method without yaml files.
Create a deployment.
# kubectl create deployment nginx –image=nginx
Check that the deployment has been created.
# kubectl get deployments
Create a service.
# kubectl create service nodeport nginx –tcp=80:80
A service can be created by using the following service types – ClusterIP, NodePort, LoadBalance, and ExternalName. If the NodePort type is used, then a random port from the 30000-32767 range is allocated for accessing the provided services. Traffic that is sent to this port is forwarded to the necessary service.
Check that the service is created and is listening on the defined port.
# kubectl get svc
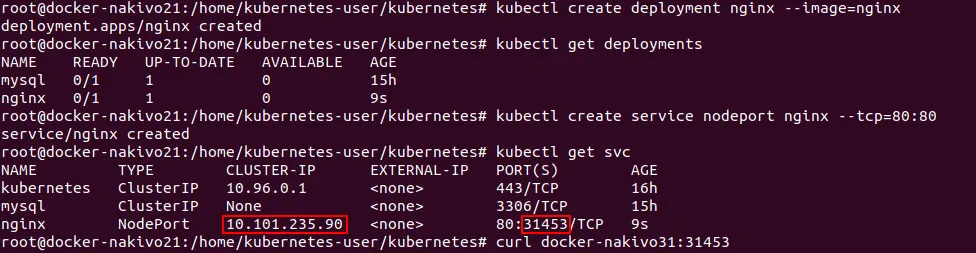
Remember the number of port (31453 in this case).
Check whether your service is deployed and available (the command is run on the master node in this example). Use the hostname of the node and port you have remembered from the previous step.
# curl docker-nakivo31:31453
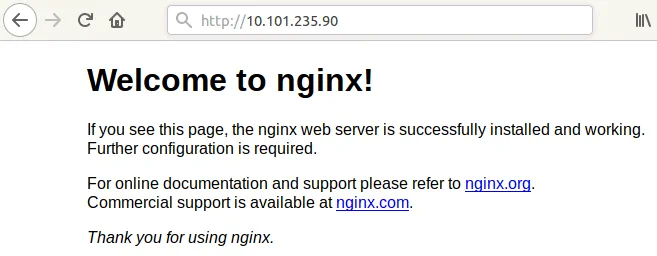
You can also check that the service is accessible in the browser of any node. In the address bar of the web browser try to visit the pages:
http:// 10.101.235.90
or
http://docker-nakivo31:31453
http://docker-nakivo32:31453
If everything is OK, you will see the nginx welcome page.
It is also possible to visit the nginx test page from any machine that has access to the network to which Kubernetes nodes are connected—(192.168.101.0/24) in this case. For example, you can visit the web pages with your browser:
http://192.168.101.21:31453/
http://192.168.101.31:31453/
http://192.168.101.32:31453/
Set Up the Web Interface for Monitoring Kubernetes
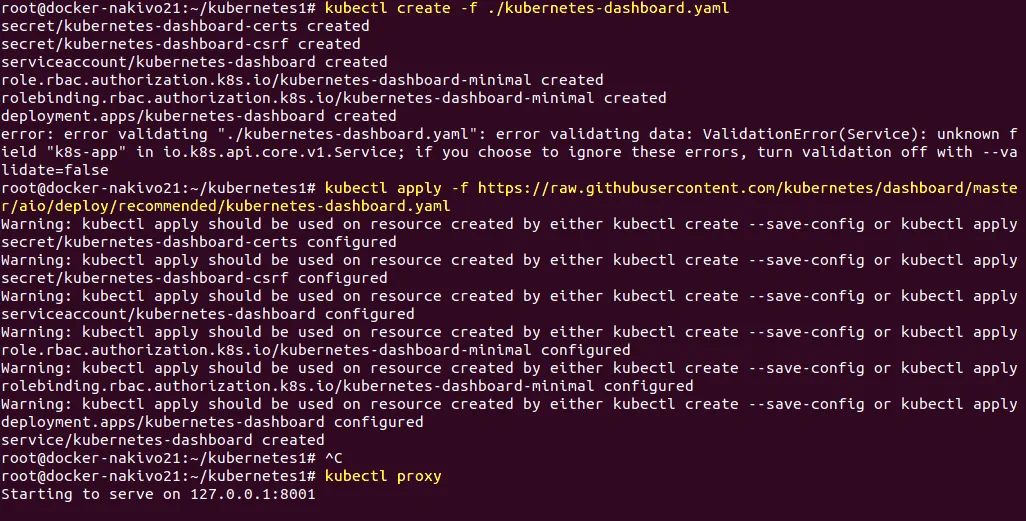
Installing Kubernetes on Ubuntu is almost complete, but you can also install Kubernetes dashboard for more convenience. Kubernetes dashboard is a web interface for Kubernetes management and monitoring. In order to install the dashboard, create the kubernetes-dashboard.yaml file, much like you have done previously before executing the commands.
# kubectl create -f ./kubernetes-dashboard.yaml
# kubectl apply -f ./kubernetes-dashboard.yaml
Check pods.
# kubectl get pods -o wide –all-namespaces
Start the proxy to the Kubernetes API server.
# kubectl proxy
To enter the next commands in the console, please open another console window. Otherwise, the process would be terminated.
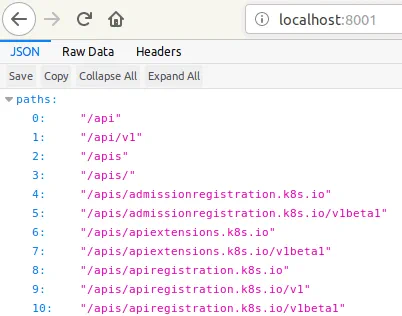
In your web browser on the master node, go to the page:
http://localhost:8001
You can see the test page.
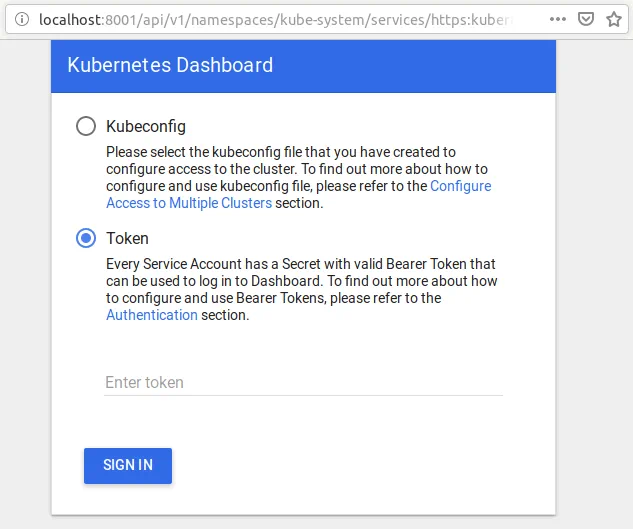
Enter the full address in the address bar of the web browser.
http://localhost:8001/api/v1/namespaces/kube-system/services/https:kubernetes-dashboard:/proxy/
Create a dashboard with a service account by executing the commands in the new console window.
# kubectl create serviceaccount dashboard -n default
# kubectl create clusterrolebinding dashboard-admin -n default \
–clusterrole=cluster-admin \
–serviceaccount=default:dashboard
# kubectl get secret $(kubectl get serviceaccount dashboard -o jsonpath=”{.secrets[0].name}”) -o jsonpath=”{.data.token}” | base64 –decode
Now you can see the generated token:
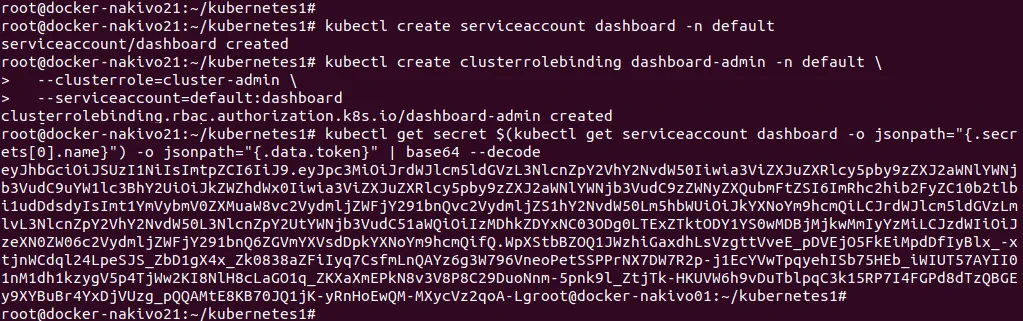
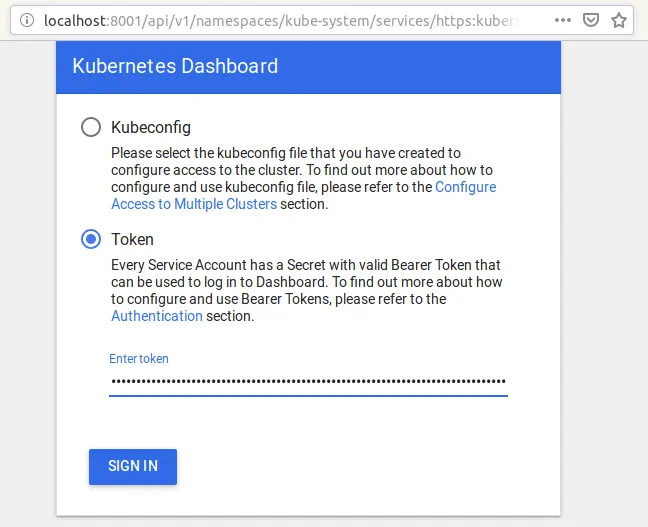
Copy the generated token and paste it in the token section of the web interface to log into the dashboard.
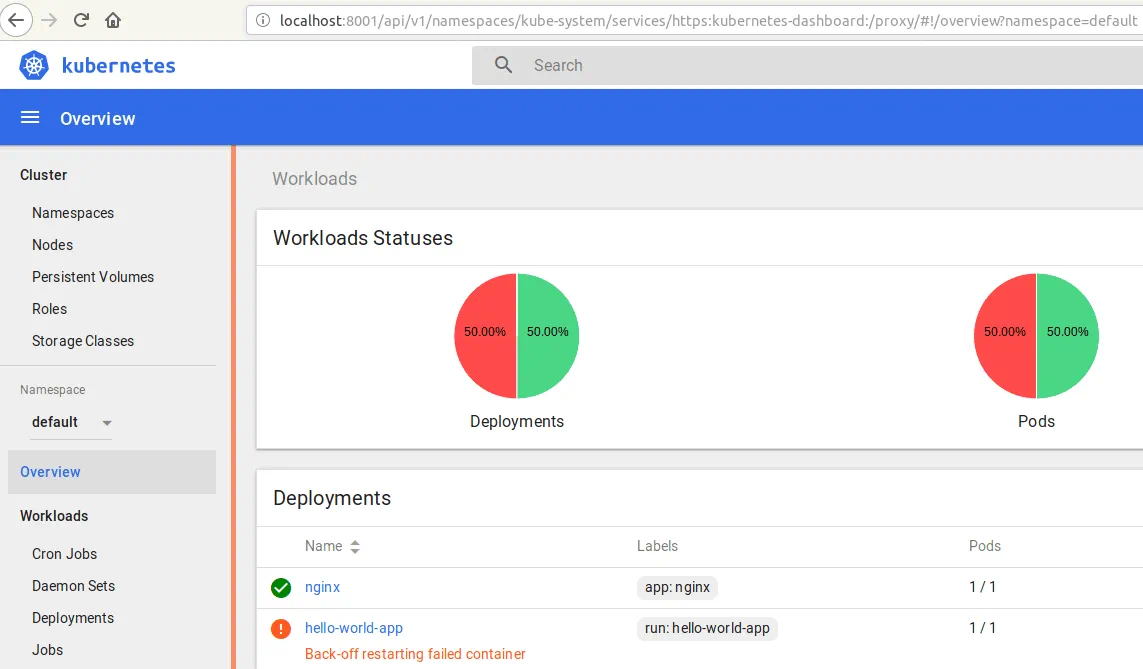
On the screenshot below, you can see the web interface of Kubernetes dashboard. You can see the status of nodes, deployments, and pods, as well as check roles, storage classes, and other components.
Set Up Heapster the Monitoring Tool
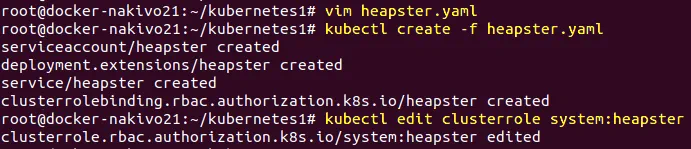
Install Heapster to extend the monitoring options for Kubernetes dashboard by adding CPU, memory and other monitoring parameters. Create a manifest file whose name is heapster.yaml.
# vim heapster.yaml
In the next action, deploy Heapster.
# kubectl create -f heapster.yaml
Edit the RBAC (role based access control) role of Heapster and add permissions for accessing the nodes’ statistics.
# kubectl edit clusterrole system:heapster
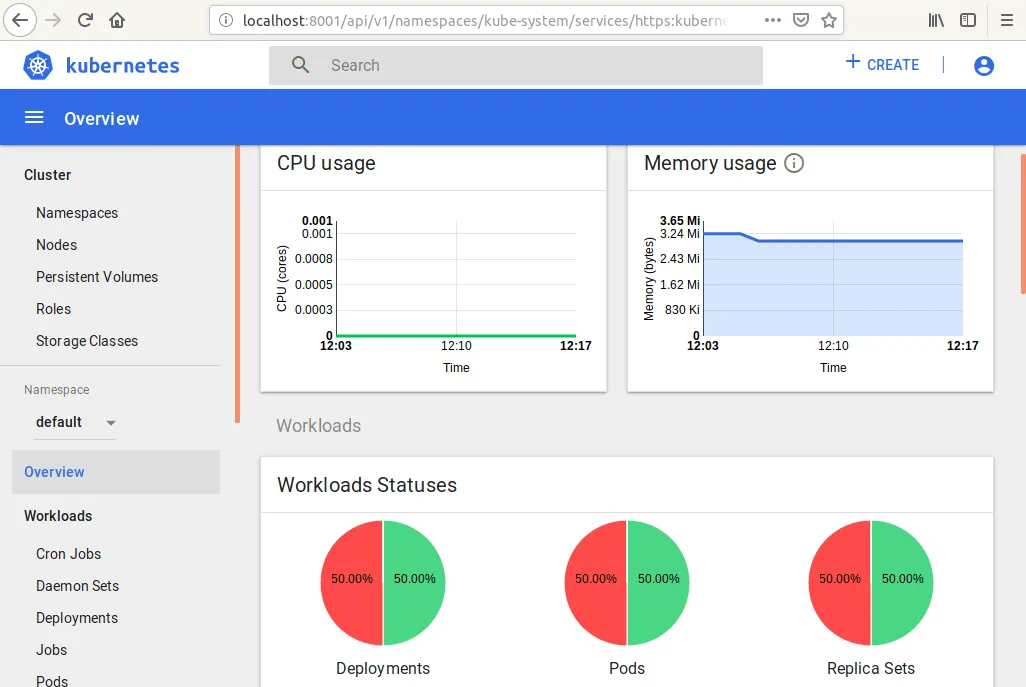
Check that CPU and memory metrics can be measured in the console.
# kubectl top node

Now you can open the web interface of the Kubernetes Dashboard and see that some sections, including CPU usage and memory usage graphs, have been added.
You Kubernetes cluster is now configured and ready to work.
Deploying a High Availability Kubernetes Cluster with Multiple Masters on Ubuntu
Having a Kubernetes cluster with one master node and a couple of worker nodes is a good option, but sometimes the only master node can fail for reasons such as hardware issues or power loss. For higher fault tolerance of the Kubernetes cluster deployed on Ubuntu nodes, it is better to consider deploying the High Availability Kubernetes cluster with multiple master nodes. Using this Kubernetes cluster deployment model allows you to avoid a single point of failure. It is recommended that you use an odd number of master nodes, and the minimum number of master nodes that can provide fault tolerance is three. If you use more than three master nodes and the number of nodes is even, the fault tolerance of the entire cluster does not increase. See the table below for comparing the value of fault tolerance depending on the number of master nodes in the Kubernetes cluster. For example, if you have a cluster with 5 master nodes, the cluster can survive a failure of 2 master nodes because three master nodes remain working (3 out of 5 is more than 50%, and makes up the majority). The cluster size refers to the number of master nodes in the cluster.
| Cluster size | Majority | Fault Tolerance |
| 1 | 1 | 0 |
| 2 | 2 | 0 |
| 3 | 2 | 1 |
| 4 | 3 | 1 |
| 5 | 3 | 2 |
| 6 | 4 | 2 |
| 7 | 4 | 3 |
| 8 | 5 | 3 |
| 9 | 5 | 4 |
This section of today’s blog post explores how to install Kubernetes on Ubuntu nodes in the framework of deploying Kubernetes High Availability cluster , HA proxy and some worker nodes. In the table below, you can see the IP addresses, hostnames and roles of the hosts used for installing the HA Kubernetes cluster on Ubuntu nodes in the test lab explained in this example.
| № | Node Role | IP address | Hostname |
| 1 | Master | 192.168.101.21 | docker-nakivo21 |
| 2 | Master | 192.168.101.22 | docker-nakivo22 |
| 3 | Master | 192.168.101.23 | docker-nakivo23 |
| 4 | HA Proxy | 192.168.101.19 | ha-proxy19 |
| 5 | Worker | 192.168.101.31 | docker-nakivo31 |
| 6 | Worker | 192.168.101.32 | docker-nakivo32 |
Some commands are the same as for installing Kubernetes on Ubuntu using the one master node model. For this reason, comments for some commands are not repeated. You can scroll up this page to recall the commands explanation.
Prepare all machines (HA proxy, master nodes, and worker nodes) for installing Kubernetes by doing the following:
- Configure static IP addresses.
- Set hostnames. The names of all hosts must be resolved to IP addresses.
- SSH access must be enabled and configured by using certificates.
- Swap must be disabled.
These steps must be undertaken before starting Docker installation on each machine, very much like what you read about in the above section when installing Kubernetes on Ubuntu by using one master node was explained. Once you have prepared all machines, go to (192.168.101.19).
Configuring the HA Proxy Load balancer
The HA Proxy load balancer is used to distribute the ingress traffic between Kubernetes nodes. The load balancer is deployed in front of master nodes. Open the console of the ha-proxy19 machine, and perform the actions shown below.
Install cfssl
Cfssl (Cloud Flare SSL) is a toolkit used to generate different certificates including TLS/SSL certificate chains.
Download the binaries from the official repository.
# wget https://pkg.cfssl.org/R1.2/cfssl_linux-amd64
# wget https://pkg.cfssl.org/R1.2/cfssljson_linux-amd64
Make the downloaded binary files executable.
# chmod +x cfssl*
Move these binary files to /usr/local/bin/
# mv cfssl_linux-amd64 /usr/local/bin/cfssl
# mv cfssljson_linux-amd64 /usr/local/bin/cfssljson
Verify the installation by checking the version of the installed cfssl.
# cfssl version
Update the repository tree.
# apt-get update
Install HA proxy.
# apt-get install haproxy
Create and edit the haproxy.cfg file.
# vim /etc/haproxy/haproxy.cfg
Add these lines in the end of this configuration file.
frontend kubernetes
bind 192.168.101.19:6443
option tcplog
mode tcp
default_backend kubernetes-master-nodes
backend kubernetes-master-nodes
mode tcp
balance roundrobin
option tcp-check
server docker-nakivo21 192.168.101.21:6443 check fall 3 rise 2
server docker-nakivo22 192.168.101.22:6443 check fall 3 rise 2
server docker-nakivo23 192.168.101.23:6443 check fall 3 rise 2
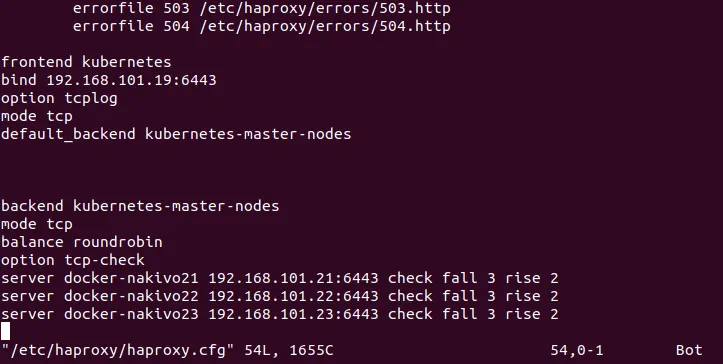
Restart the service.
# systemctl restart haproxy
Generate TSL certificates
You can continue to use the console of the HA proxy machine. Create the certificate authority configuration file, which is named ca-config.json.
# vim ca-config.json
Add the following content to this configuration file:
{
“signing”: {
“default”: {
“expiry”: “8760h”
},
“profiles”: {
“kubernetes”: {
“usages”: [“signing”, “key encipherment”, “server auth”, “client auth”],
“expiry”: “8760h”
}
}
}
}
Create the certificate authority signing request configuration file.
# vim ca-csr.json
Add the content to this file as shown below:
{
“CN”: “Kubernetes”,
“key”: {
“algo”: “rsa”,
“size”: 2048
},
“names”: [
{
“C”: “GB”,
“L”: “London”,
“O”: “Kubernetes”,
“OU”: “CA”,
“ST”: “Nakivo”
}
]
}
Where:
C – country, for example, GB (Great Britain).
L – location such as city or town.
O – organization.
OU – organization unit (for example, a department that is defined as a key owner).
ST – the state or province.
Now generate the and private key.
# cfssl gencert -initca ca-csr.json | cfssljson -bare ca
Verify that the ca-key.pem and the ca.pem keys have been generated.
# ls -al
Creating the certificate for the Etcd cluster
Etcd supports server to server/cluster communication by using authentication through client certificates. You should have a CA certificate and a signed key pair for one cluster member.
Create the certificate signing request configuration file.
# vim kubernetes-csr.json
{
“CN”: “kubernetes”,
“key”: {
“algo”: “rsa”,
“size”: 2048
},
“names”: [
{
“C”: “GB”,
“L”: “London”,
“O”: “Kubernetes”,
“OU”: “Kubernetes”,
“ST”: “Nakivo”
}
]
}
After that, generate the certificate and private key.
# cfssl gencert \
-ca=ca.pem \
-ca-key=ca-key.pem \
-config=ca-config.json \
-hostname=192.168.101.21,192.168.101.22,192.168.101.23,192.168.101.19,127.0.0.1,kubernetes.default \
-profile=kubernetes kubernetes-csr.json | \
cfssljson -bare kubernetes
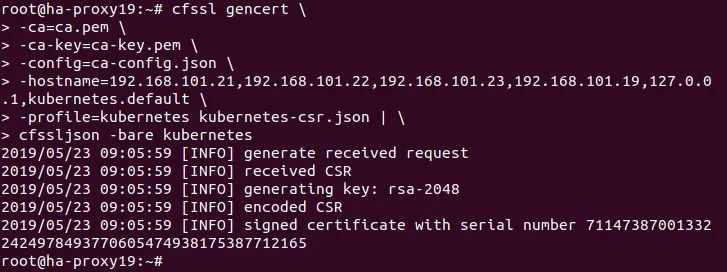
List the files in your directory to verify that the kubernetes-key.pem and the kubernetes.pem file have been generated.
# ls -al
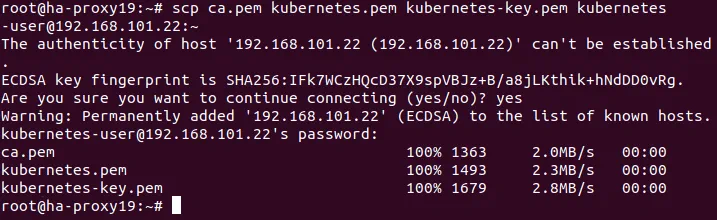
Copy the created certificate to each node.
# scp ca.pem kubernetes.pem kubernetes-key.pem kubernetes-user@192.168.101.21:~
# scp ca.pem kubernetes.pem kubernetes-key.pem kubernetes-user@192.168.101.22:~
# scp ca.pem kubernetes.pem kubernetes-key.pem kubernetes-user@192.168.101.23:~
# scp ca.pem kubernetes.pem kubernetes-key.pem kubernetes-user@192.168.101.31:~
# scp ca.pem kubernetes.pem kubernetes-key.pem kubernetes-user@192.168.101.32:~
# scp ca.pem kubernetes.pem kubernetes-key.pem kubernetes-user@192.168.101.33:~
Where ~ is a home directory of kubernetes-user on Ubuntu hosts.
Preparing the Ubuntu nodes for installing Kubernetes
Run the commands shown in this section on all master nodes and worker nodes. Install Docker, then install Kubernetes on Ubuntu machines which will be included in the Kubernetes cluster. Let’s begin from preparing the 192.168.101.21 master node.
Install Docker.
# apt-get install apt-transport-https ca-certificates curl software-properties-common
# curl -fsSL https://download.docker.com/linux/ubuntu/gpg | sudo apt-key add –
# add-apt-repository “deb [arch=amd64] https://download.docker.com/linux/ubuntu bionic stable”
# apt-get update
# apt-get install docker-ce
Docker is now installed. Cubeadm, kublet and cubectl are the Kubernetes components that are required to install Kubernetes on Ubuntu.
Install Kubernetes components – kubeadm, kublet, and kubectl.
# curl -s https://packages.cloud.google.com/apt/doc/apt-key.gpg | apt-key add –
# echo ‘deb http://apt.kubernetes.io/ kubernetes-xenial main’ | sudo tee /etc/apt/sources.list.d/kubernetes.list
# apt-get update
# apt-get install -y kubelet kubeadm kubectl
Once you have prepared all nodes and installed Docker, kubelet, kubeadm and kubectl, you must install and configure etcd on master nodes.
Installing and configuring etcd on Ubuntu master nodes
Etcd is a store that is consistent and highly available, intended for storing keys as well as backing up all cluster data. The etcd cluster must be set up before configuring the HA Kubernetes cluster with multiple master nodes. Let’s begin from configuring the 192.168.101.21 master node.
Installing and configuring etcd on the 192.168.101.21 machine.
Create a configuration directory for etcd.
# mkdir /etc/etcd /var/lib/etcd
Go to the directory to which certificates have been copied. This is the home directory of the kubernetes user, in this case – /home/kubernetes-user/
Copy the certificates to the etcd configuration directory.
# cp ca.pem kubernetes.pem kubernetes-key.pem /etc/etcd
Verify that the files have been copied.
# ls -al /etc/etcd
Go back to your previous directory
# cd –
Download the etcd binaries from the repository.
# wget https://github.com/coreos/etcd/releases/download/v3.3.9/etcd-v3.3.9-linux-amd64.tar.gz
Extract the etcd archive.
# tar xvzf etcd-v3.3.9-linux-amd64.tar.gz
Now move the etcd binary files to /usr/local/bin/
# mv etcd-v3.3.9-linux-amd64/etcd* /usr/local/bin/
Create an etcd systemd unit file.
# vim /etc/systemd/system/etcd.service
Add the strings shown below to this file.
[Unit]
Description=etcd
Documentation=https://github.com/coreos
[Service]
ExecStart=/usr/local/bin/etcd \
–name 192.168.101.21 \
–cert-file=/etc/etcd/kubernetes.pem \
–key-file=/etc/etcd/kubernetes-key.pem \
–peer-cert-file=/etc/etcd/kubernetes.pem \
–peer-key-file=/etc/etcd/kubernetes-key.pem \
–trusted-ca-file=/etc/etcd/ca.pem \
–peer-trusted-ca-file=/etc/etcd/ca.pem \
–peer-client-cert-auth \
–client-cert-auth \
–initial-advertise-peer-urls https://192.168.101.21:2380 \
–listen-peer-urls https://192.168.101.21:2380 \
–listen-client-urls https://192.168.101.21:2379,http://127.0.0.1:2379 \
–advertise-client-urls https://192.168.101.21:2379 \
–initial-cluster-token etcd-cluster-0 \
–initial-cluster 192.168.101.21=https://192.168.101.21:2380,192.168.101.22=https://192.168.101.22:2380,192.168.101.23=https://192.168.101.23:2380 \
–initial-cluster-state new \
–data-dir=/var/lib/etcd
Restart=on-failure
RestartSec=5
[Install]
WantedBy=multi-user.target
Reload the systemd manager configuration for taking changed configurations from the file system and regenerating dependency trees.
# systemctl daemon-reload
Make etcd start at boot time.
# systemctl enable etcd
Start etcd.
# systemctl start etcd
Do the same actions on the second master node (docker-nakivo22 – 192.168.101.21 and docker-nakivo23 – 192.168.101.22). The only difference in actions needed for these master nodes is in editing the etcd.service configuration file. Define the correct IP addresses for each other master node. For example, the etcd.service configuration file must be the following for the second master node (192.168.101.22) of the current Kubernetes test lab.
[Unit]
Description=etcd
Documentation=https://github.com/coreos
[Service]
ExecStart=/usr/local/bin/etcd \
–name 192.168.101.22 \
–cert-file=/etc/etcd/kubernetes.pem \
–key-file=/etc/etcd/kubernetes-key.pem \
–peer-cert-file=/etc/etcd/kubernetes.pem \
–peer-key-file=/etc/etcd/kubernetes-key.pem \
–trusted-ca-file=/etc/etcd/ca.pem \
–peer-trusted-ca-file=/etc/etcd/ca.pem \
–peer-client-cert-auth \
–client-cert-auth \
–initial-advertise-peer-urls https://192.168.101.22:2380 \
–listen-peer-urls https://192.168.101.22:2380 \
–listen-client-urls https://192.168.101.22:2379,http://127.0.0.1:2379 \
–advertise-client-urls https://192.168.101.22:2379 \
–initial-cluster-token etcd-cluster-0 \
–initial-cluster 192.168.101.21=https://192.168.101.21:2380,192.168.101.22=https://192.168.101.22:2380,192.168.101.23=https://192.168.101.23:2380 \
–initial-cluster-state new \
–data-dir=/var/lib/etcd
Restart=on-failure
RestartSec=5
[Install]
WantedBy=multi-user.target
Initializing the master nodes in the Kubernetes HA cluster
Now you can initialize the master nodes in your Kubernetes HA cluster installed on Ubuntu machines.
Initializing the 192.168.101.21 master node
On the first master node, perform the scope of operations explained below.
Create the yaml configuration file for kubeadm.
# vim config.yaml
Add the configuration parameters to this file:
apiVersion: kubeadm.k8s.io/v1alpha3
kind: ClusterConfiguration
kubernetesVersion: stable
apiServerCertSANs:
– 192.168.101.19
controlPlaneEndpoint: “192.168.101.19:6443”
etcd:
external:
endpoints:
– https://192.168.101.21:2379
– https://192.168.101.22:2379
– https://192.168.101.23:2379
caFile: /etc/etcd/ca.pem
certFile: /etc/etcd/kubernetes.pem
keyFile: /etc/etcd/kubernetes-key.pem
networking:
podSubnet: 10.244.0.0/16
apiServerExtraArgs:
apiserver-count: “3”
The network defined as the podSubnet (10.244.0.0/16) must be the same as in the kube-flannel.yml file.
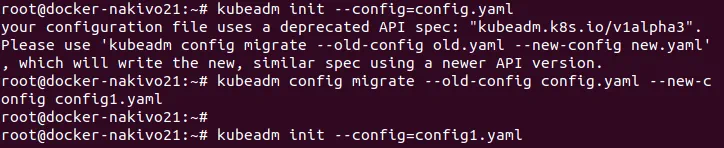
Initialize the Ubuntu machine as a master node.
# kubeadm init –config=config.yaml
Sometimes you can see a warning about the old version of a configuration file:
Your configuration file uses a deprecated API spec: “kubeadm.k8s.io/v1alpha3”. Please use ‘kubeadm config migrate –old-config old.yaml –new-config new.yaml’, which will write the new, similar spec using a newer API version.
Update the version of the configuration file with the command:
# kubeadm config migrate –old-config config.yaml –new-config config1.yaml
Another error may occur when you initialize a node of a multi-master Kubernetes cluster if etcd is not running:
[ERROR ExternalEtcdVersion]: Get https://192.168.101.21:2379/version: dial tcp 192.168.101.21:2379: connect: connection refused

Check whether your etcd is running. You can run etcd manually:
# systemctl start etcd
After successful initialization of the master node in the Kubernetes cluster running on Ubuntu, you get the following message as displayed on the screenshot.
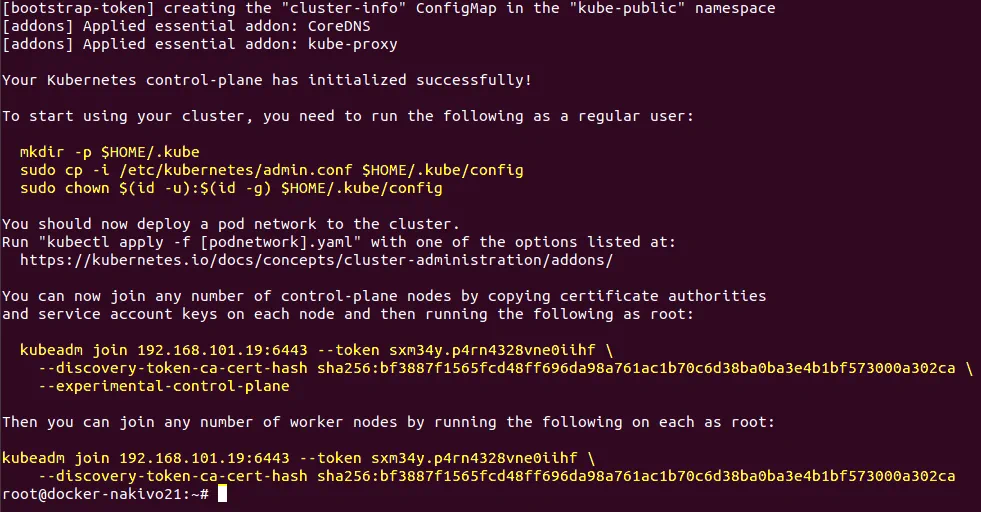
The output of successful execution of this command contains a tip on how to start using your cluster as well as commands that contain a token and certificate hash needed for joining nodes to the cluster. Save these important strings because you will need them soon. They are marked with the yellow color on the screenshot and are duplicated below.
You can now join any number of control-plane nodes by copying certificate authorities
and service account keys on each node, and then running the following as root:
kubeadm join 192.168.101.19:6443 –token sxm34y.p4rn4328vne0iihf \
–discovery-token-ca-cert-hash sha256:bf3887f1565fcd48ff696da98a761ac1b70c6d38ba0ba3e4b1bf573000a302ca \
–experimental-control-plane
Then you can join any number of worker nodes by running the following on each as root:
kubeadm join 192.168.101.19:6443 –token sxm34y.p4rn4328vne0iihf \
–discovery-token-ca-cert-hash sha256:bf3887f1565fcd48ff696da98a761ac1b70c6d38ba0ba3e4b1bf573000a302ca
Run the commands to start using the initialized node in the cluster.
# mkdir -p $HOME/.kube
# sudo cp -i /etc/kubernetes/admin.conf $HOME/.kube/config
# sudo chown $(id -u):$(id -g) $HOME/.kube/config
Check the nodes added to the cluster.
# kubectl get nodes

Copy the certificates to the two other master nodes
# scp -r /etc/kubernetes/pki kubernetes-user@192.168.101.22:~
# scp -r /etc/kubernetes/pki kubernetes-user@192.168.101.23:~
Initializing the 192.168.101.22 master node
Run the commands on the second master node (192.168.101.22).
Remove the apiserver.crt and apiserver.key that are located in the home directory (~) of the kubernetes-user.
$ rm ~/pki/apiserver.*
Move the certificates stored in the home directory to the /etc/kubernetes/ directory.
$ sudo mv ~/pki /etc/kubernetes/
Create the configuration yaml file for kubeadm.
# vim config.yaml
The content of this yaml file is the same as for the first master node (192.168.101.21). See the configuration for initialization of the first master node above. You can copy the already-created file used on the first master node of the Kubernetes HA cluster installed on your Ubuntu machines.
Initialize the second master node.
# kubeadm config migrate –old-config config.yaml –new-config config1.yaml
# kubeadm init –config=config1.yaml
Output is the same as the output that was displayed after the first master node initialization in the Kubernetes HA cluster:
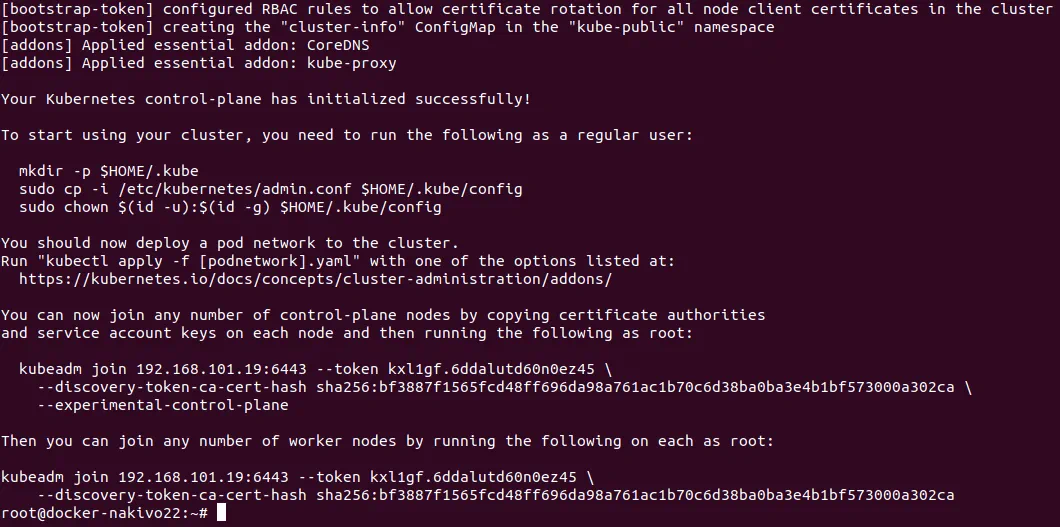
Similarly, execute the commands to start using the initialized node in the cluster.
# mkdir -p $HOME/.kube
# sudo cp -i /etc/kubernetes/admin.conf $HOME/.kube/config
# sudo chown $(id -u):$(id -g) $HOME/.kube/config
Check the nodes added to the cluster.
# kubectl get nodes

Two master nodes out of three have been added to the cluster. One master node is left to be added.
Initializing the third (192.168.101.23) master node
Repeat the same steps as you have done for initializing the second node (192.168.101.22) in the cluster.
Don’t forget to note the commands with token and hashes for adding nodes into the cluster that are displayed after master node initialization.
Check that all three master nodes are successfully added to the cluster.
# kubectl get nodes
Installing Flannel to fix the NotReady status of master nodes in Kubernetes
Let’s install Flannel. Unlike the first example where you learned how to install Kubernetes on Ubuntu to create a single master cluster, in this example Flannel will be installed by using the yaml file.
Run the command to install Flannel and fix the NotReady status of nodes that is displayed, since there is no overlay network configured yet. Create the kube-flannel.yaml file with vim the text editor, for example, on the first master node.
# kubectl apply -f kube-flannel.yml
Remember the address of the podSubnet defined in the config.yaml file. The network address must be the same in the kube-flannel.yaml file.
Check your nodes and their status.
# kubectl get nodes
Now all master nodes work fine.
Adding worker nodes to the cluster
Once you have initialized all master nodes, you can add worker nodes to your Kubernetes cluster. Let’s add the first worker node (192.168.101.31) to the HA Kubernetes cluster deployed on Ubuntu machines. Use the command that was displayed after initialization of master nodes (the command that contains token and hash) to make the worker node join the cluster. Run the command on the 192.168.101.31 machine.
# kubeadm join 192.168.101.19:6443 –token kxl1gf.6ddalutd60n0ez45 \
–discovery-token-ca-cert-hash sha256:bf3887f1565fcd48ff696da98a761ac1b70c6d38ba0ba3e4b1bf573000a302ca
Check the nodes of the Kubernetes HA cluster to ensure that the worker node has been added. You can also see the HA proxy machine in the list of nodes now.
# kubectl get nodes
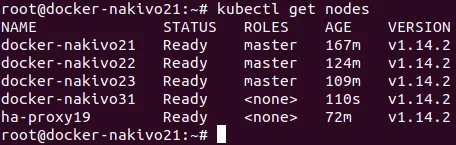
Likewise, add other worker nodes to the Kubernetes High Availability cluster installed on Ubuntu machines. You can add more worker nodes at any time depending on your demands. At this point, today’s tutorial is finished.
Conclusion
Installing Kubernetes on Ubuntu is not as difficult as it may seem at the first glance. You have to spend some effort for deploying Kubernetes cluster, but, as a result, you get a lot of advantages such as centralized easier management, high scalability, and load balancing. The simplest type of Kubernetes deployment is a one master deployment – you should install Kubernetes on Ubuntu nodes including master and worker nodes.
If you need more reliable infrastructure to run containerized applications, consider deploying a multi master Kubernetes, known as the Kubernetes High Availability cluster. This type of Kubernetes deployment excludes a single point of failure, and your cluster can survive if some of master nodes fail.
For both deployment types, you have to configure SSH access, set static IP addresses and hostnames, install Docker, disable using swap partition, and finally, install Kubernetes components such as kubeadm, kubectl, kubelet, and configure Flannel for overlay networking. In the case of deploying the HA Kubernetes cluster, you also need to configure the HA proxy on a standalone machine, generate certificates and configure the etcd cluster. The majority of stages of configuring Kubernetes, creating deployments, as well as running pods can be done with two methods: running commands provided by the command line interface manually, and using yaml configuration files. Using yaml files allows you to create more a complex structure, and makes the process of administration more convenient.
You can install Kubernetes on Ubuntu, running on both physical and virtual machines. If your Kubernetes is installed on virtual machines running in vSphere, you can perform additional protection by using VMware High Availability cluster with the Fault Tolerance feature. The logics of Kubernetes deployment explored in this blog post can be also used to install Kubernetes on other Linux distributions.