How to Work with Hyper-V VHD and VHDX Files: Essential Basics
The release of Windows Server 2012 was warmly welcomed due to the introduction of multiple virtualization features, including the new VHDX file format. VHDX is essentially the successor of VHD, but with more advanced capabilities. However, you can still create and manage VHD files in your Hyper-V environment. Let’s explore how Hyper-V VHD and VHDX files differ, what benefits they provide, and how they can be used.

About Hyper-V VHD and VHDX Files
Virtual disks created in the Hyper-V environment can be stored as files in VHD or VHDX format located on a physical disk. Virtual hard disks are an alternative to physical hard drives; they function as the hard disks of a virtual machine (VM). Virtual disks can contain a native file system, disk partitions, sectors, and folders. They can conduct standard disk and file operations. Each VM is required to have at least one virtual hard disk that can be used as a storage for VM data.
Earlier Windows versions supported only a single file format for virtual disks – VHD. As a result of growing technological demands, Windows 2012 introduced the VHDX file format, which has considerably improved storage capacity, enhanced performance on large-sector disks, and ensured higher levels of data protection.
Both Hyper-V VHD and VHDX files can be of different types:
- Fixed. Space for the virtual disk is assigned when the VHD file is created. The virtual hard disk file has the same size as the virtual hard disk. Its size remains constant, regardless of data being added or deleted.
- Dynamically expanding. Space for the virtual disk is assigned on demand. The virtual hard disk has a specified amount of physical storage space that can potentially be used, but the space is allocated as and when needed. Thus, the size of the VHD or VHDX file increases when new data is added.
- Differencing. This disk type is used to identify, store, manage, and revert the changes made to another virtual disk or the parent disk.
Differences Between Hyper-V VHD and VHDX Files
To better understand how Hyper-V VHD and VHDX files function, let’s explore how the file formats differ. In turn, this tells us how each of them can improve the performance of the virtual disks. The following table contrasts the two formats:
| VHD | VHDX |
| The basic file format supported by Windows, Citrix, and Oracle | An advanced file format supported by Windows |
| Up to 2 TB of storage capacity | Up to 64 TB of storage capacity |
| VHD files offer less protection against data corruption than their VHDX counterparts | VHDX files provide robust data corruption protection by keeping track of metadata |
| Support for custom metadata is not provided | Custom metadata is supported and can be stored |
| Supported by Windows Server 2008, 2008 R2, 2012 and 2012 R2 | Supported by Windows 2012 and later |
| No live resizing | Live resizing is available |
| Logical sector size of 512 bytes | Logical sector size of 4 KB |
| Issues with data alignment | Better data alignment |
| Trimming is not supported | Trimming is supported |
As you can see, the new Hyper-V VHDX file format includes several features that have significantly improved its utility. For example, trimming allows you to identify data blocks that are no longer used and can be deleted, which enhances storage optimization and improves overall performance. Another feature that was introduced with the new Hyper-V VHDX file format is Shared VHDX, which allows VMs on the same guest cluster to use a VHDX file as a shared storage. Moreover, Hyper VHDX files allow you to resize (shrink or expand) virtual disks on demand, while the VM is still running, which considerably saves time and reduces overhead. Finally, due to enhanced data alignment, Hyper-V VHDX files can considerably improve I/O operations. By contrast, large-sector physical disks are prone to performance degradation.
Even though VHDX is a more advanced version of the VHD format, there are still some cases where the use of VHD is preferable. For example, Hyper-V VHDX files are not compatible with the earlier versions of Windows Server. Therefore, if you are running virtual environments with mixed guest OSes and you need to move VMs between different hosts, the VHD file format would be the optimal choice, as it is supported by more OSes.
How to Work with Hyper-V VHD and VHDX Files in PowerShell
Now that you know what Hyper-V VHD and VHDX files are and what benefits they can provide, you are ready to create and configure your virtual hard disks. For this purpose, you can use Hyper-V Manager or PowerShell in Administrator mode. In this blog post, we describe how to manage Hyper-V VHD and VHDX file operations in PowerShell. This is the best approach, as PowerShell provides more options for configuring Hyper-V VHD and VHDX files. You can create, convert, merge, or remove disks quickly and easily by running PowerShell scripts.
Create Hyper-V VHD and VHDX files
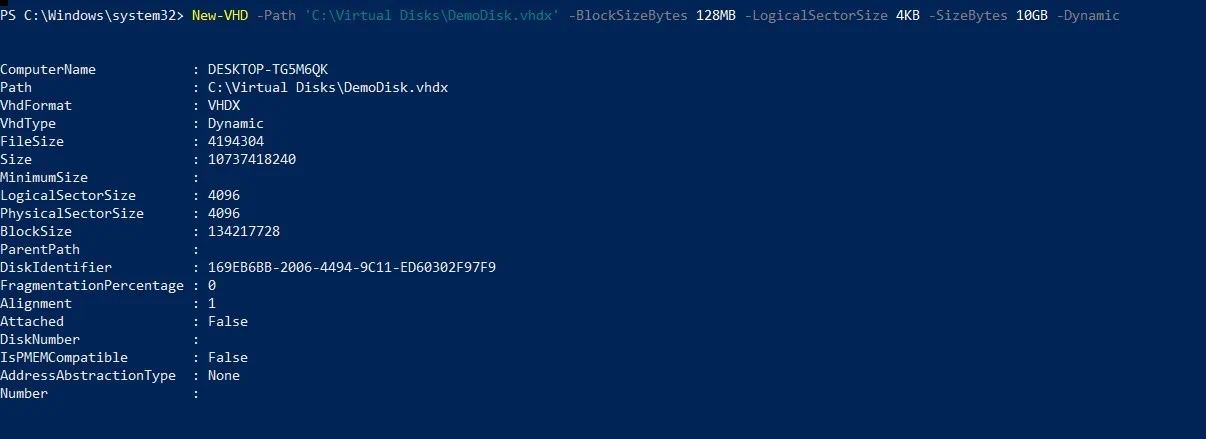
To create a new virtual hard disk in the VHD or VHDX format, open PowerShell as an Administrator and run the New-VHD cmdlet. The following example shows you how to create a virtual hard disk of the dynamic type at the specified path, with the size of 10 GB, a block size of 128 MB, and a logical sector size of 4 KB. Note that it is the file extension (.vhd or .vhdx) that determines the file format; in this case, a VHDX file is being created.
New-VHD -Path 'C:\Virtual Disks\DemoDisk.vhdx' -BlockSizeBytes 128MB -LogicalSectorSize 4KB -SizeBytes 10GB -Dynamic
The virtual hard disk is now created and the following information about the virtual disk is displayed in the PowerShell window.
Add Hyper-V VHD and VHDX files
With the Add-VMHardDiskDrive cmdlet, you can add a virtual hard disk to a specific VM. In the following example, the virtual hard disk DemoDisk.vhdx at the specified path gets attached to the VM named DemoVM. The SCSI controller, the controller number 0, and the controller location 1 are also assigned to the virtual disk.
Add-VMHardDiskDrive -VMName DemoVM -ControllerType SCSI -ControllerNumber 0 -ControllerLocation 1 -Path 'C:\Virtual Disks\DemoDisk.vhdx'
Remove Hyper-V VHD and VHDX files
The Remove-VMHardDiskDrive command is used to delete a virtual hard disk from a VM. To demonstrate how this cmdlet works, here is how to delete the disk created just above:
Remove-VMHardDiskDrive -VMName DemoVM -ControllerType SCSI -ControllerNumber 0 -ControllerLocation 1
Using these cmdlets, you can easily create and delete virtual disks with the required parameters and attach them to specific VMs.
Convert Hyper-V VHD and VHDX files
As mentioned above, VHDX files offer a host of benefits over their VHD predecessors. Thus, in many cases, it is advisable to convert all VHD files to VHDX format. To upgrade Hyper-V VHD files to VHDX, simply run the Convert-VHD cmdlet, which lets you change the file format while saving the content of the source virtual hard disk. The data of the source virtual hard disk is copied to a new disk of the required format. The operation should be performed offline; it is recommended to detach the virtual hard disk. The example below demonstrates the cmdlet that allows conversion of Hyper-V VHD files to VHDX:
Convert-VHD -Path ‘C:\New Virtual Disks\Fixed Disk.vhd’ -DestinationPath ‘C:\New Virtual Disks\Fixed Disk.vhdx’
Recall, however, that VHDX files are only compatible with Windows Server 2012 and later. Thus, you might need to convert Hyper-V VHDX files to VHD. In this case, the same Convert-VHD cmdlet can be used, just in reverse. Remember that the virtual hard disk must be detached before conducting the operation.
Convert-VHD -Path ‘C:\Virtual Disks\DemoDisk.vhdx’ ‘C:\Virtual Disks\DemoDisk.vhd’
Merge Hyper-V VHD and VHDX files
As mentioned above, differencing disks are used to store and revert the changes made to another VHD or a guest OS. Each differencing disk tracks and stores the changes made to one associated virtual disk. In this case, the differencing disk is referred to as a “child disk” and the virtual hard disk is called a “parent disk”. With the Merge-VHD cmdlet, you can merge the changes stored in a differencing disk into the parent disk or into another child disk in the differencing disk chain. Note that this operation is performed offline; ensure that the disk chain is detached.
To merge the child virtual hard disk to the parent virtual hard disk, run the following cmdlet. Note that once the operation is complete and the contents of the child disk are transferred into the parent, the differencing disk is destroyed.
Merge-VHD -Path ‘C:\Virtual Storage\Differencing.vhdx’
In the following example, we have a parent disk, maindisk.vhdx, and a child disk, ChDisk1.vhdx, which itself has a child: ChDisk2.vhdx. The latter virtual disk even has its own child, ChDisk3.vhdx. Together, these disks constitute the differencing chain. The following cmdlet can be used to merge the child virtual hard disks in the disk chain.
Merge-VHD -Path ‘C:\VM Testing\ChDisk3.vhdx’ -DestinationPath ‘C:\VM Testing\ChDisk1.vhdx’
Through this operation, the data from ChDisk3.vhdx and ChDisk2.vhdx is merged into ChDisk1.vhdx. The PowerShell script simplifies the process of merging virtual hard disks; the whole operation can be conducted in one run, no matter the size of the differencing chain. This is an advantage of Powershell – with Hyper-V Manager, you are not permitted to merge multiple layers of the differencing disk chain at once. You would have to merge each layer of the differencing disk chain manually, and these extra steps would cost you time and effort.
Mount Hyper-V VHD and VHDX files
The Mount-VHD cmdlet allows you to mount one or more virtual hard disks. The following example demonstrates how to mount a virtual hard disk with the path C:\Virtual Disks\DemoDisk.vhdx.
Mount-VHD -Path ‘C:\Virtual Disks\DemoDisk.vhdx’
Using PowerShell scripts, you can mount a virtual hard disk in read-only mode:
Mount-VHD -Path ‘C:\Virtual Disks\DemoDisk.vhdx’ -ReadOnly
Dismount Hyper-V VHD and VHDX files
If you want to dismount a virtual hard disk, run the Dismount-VHD cmdlet in PowerShell. In the example below, you can see how to dismount the virtual hard disk with the path C:\Virtual Disks\DemoDisk.vhdx.
Dismount-VHD -Path ‘C:\Virtual Disks\DemoDisk.vhdx’
Another option is to dismount the virtual hard disk using the disk number of the mounted disk, as follows:
Dismount-VHD -DiskNumber 8
Resize Hyper-V VHD and VHDX files
If you want to resize (shrink or expand) a virtual hard disk, the Resize-VHD cmdlet should be used. The following example demonstrates how to resize a virtual hard disk by assigning it a new specified size. In this case, we have expanded the VHDX from 10GB to 20GB:
Resize-VHD -Path 'C:\Virtual Disks\DemoDisk.vhdx' -SizeBytes 20GB
However, shrinking is only available for VHDX files. Note that the virtual hard disk should not be shrunk to a size that is smaller than its specified minimum size. To see the minimum size of the virtual hard disk, run the following cmdlet:
Get-VHD -Path 'C:\Virtual Hard Disks\demovdisk.vhdx’
You can use the following command to shrink the VHDX file to its minimum size:
Resize-VHD -Path 'C:\Virtual Hard Disks\demovdisk.vhdx’ -ToMinimumSize
Conclusion
Both Hyper-V VHD and VHDX files play a significant role in virtual environments as they function as as the hard disks of a VM. The VHD file format was used for a long time, but to keep up with the constant progress of virtualization technology, Microsoft introduced a more advanced version. Thus, the VHDX file format was released with Window Server 2012 to improve the performance of large-sector physical disks, enhance storage capacity, and ensure data protection.
After comparing all the features that Hyper-V VHD and VHDX files provide, it is safe to say that Hyper-V VHDX is a more efficient and reliable file format built to handle performance demands of modern virtual environments.
Make sure you protect your VHD and VHDX disks with a data protection solution tailored for virtualized infrastructure. Consider NAKIVO Backup & Replication which is a fast and cost-effective solution that provides multiple options for securing Hyper-V, VMware, AWS EC2 and Microsoft 365 environments.