How to Protect Backups from Ransomware with NAKIVO’s Malware Scan
Backups have become a primary target for ransomware. Hackers want to ensure that companies pay the ransom by not allowing them to recover their data independently. With NAKIVO Backup & Replication, you get several features (for example, immutable backup targets) to ensure that once created, a backup cannot be infected or corrupted with a new ransomware infection. However, how do you prevent an existing malware infection that may be lying dormant in your production environment from propagating to your backups?
Ransomware can be sophisticated, and after infecting a machine, it can be in an idle state before being activated to destroy data. When a virtual or physical machine infected with ransomware that has delayed encryption is backed up, the malware may remain dormant within the backup. If the infected backup is later restored, the ransomware can potentially become active again, initiating its encryption process over time. This scenario can lead to re-infection of systems and the encryption of newly restored data, posing a significant risk to the integrity of your infrastructure.
In this post, we explain two ways to use the Backup Malware Scan in NAKIVO Backup & Replication to ensure that the backups you create are clean and ready for successful recoveries every time.

NAKIVO Best Practices for Ransomware Recovery
NAKIVO Backup & Replication helps you ensure that you have enough copies of critical data across different locations to recover successfully after any incident.
Some of the best practices for ransomware recovery are:
- Applying the 3-2-1 backup strategy. Create backups at regular intervals to ensure that you have at least three copies of data. At least two copies must be stored on two different media, and at least one copy must be stored offsite. A proper retention policy, for example, using the grandfather-father-son retention scheme, will ensure you have enough recovery points to choose a clean copy if your infrastructure is hit by a ransomware attack.
- Immutability. Store one of the backup copies on immutable storage or air-gapped storage. Storage with immutability allows you to write a backup once but without the ability to edit or delete data after that by ransomware. Air-gapped storage is a storage medium that is physically disconnected after writing a backup that doesn’t allow ransomware to get physical access to this data. NAKIVO Backup & Replication supports several immutable targets.
- Backup and antivirus software integration. You should be using antivirus software for threat detection for physical and virtual machines. Antivirus software can detect and delete most types of viruses. You should also use threat detection for backups by integrating antivirus with your backup solution to allow you to have clean backups for clean recoveries. You can use Backup Malware Scan in NAKIVO Backup & Replication to integrate antivirus and scan backups for malware.
- Replication and DR. Use replication, whether regular or real-time replication, for failover and full site recovery in case ransomware brings down your infrastructure and you need to start your machines at a different location.
Keeping Backups Protected with NAKIVO’s Backup Malware Scan
The Backup Malware Scan feature in NAKIVO Backup & Replication allows you to integrate antivirus software and scan backups for malware.
How NAKIVO’s Backup Malware Scan works
The disks of the physical or virtual machine are exposed directly from the backup as virtual disks. They are then started on the selected hypervisor server, such as an ESXi host, Hyper-V, Nutanix, Linux/Windows machines and VMware Cloud Director.
In the case of an ESXi host, the virtual disks are connected as iSCSI targets to a temporary virtual machine on the ESXi host. The virtual disks of the virtual machines are connected to the scan server as iSCSI targets as well. As a result, the antivirus running on the scan server can scan disks/volumes mounted as iSCSI targets, similarly to how antivirus scans local disks.
Here are some requirements to be met for the feature to work:
- The iSCSI initiator service must run on the scan server.
- An agent is installed on the scan server to connect it with the needed NAKIVO Backup & Replication components.
Note: The Transporter installed on the machine with the backup repository can be used by default as a scan server to scan backups in this backup repository. You can use this default option if antivirus is installed on the machine with a backup repository.
You can check the full list of requirements and supported antivirus software.
The environment used in the walkthrough
This feature can be used right after creating a backup to save time later when you need to recover an object or a machine quickly or just before recovery if you wish to ensure that the recovery point is infection-free.
We provide the workflows for both scenarios below using the following in our environment:
- NAKIVO Backup & Replication v.10.11 virtual appliance: 192.168.101.211
- A scan server with antivirus: Windows 10 x64 (192.168.101.225)
- ESET NOD 32 Antivirus v.16 installed on a scan server
- ESXi 7.0: 192.168.101.201
- ESXi 7.0: 192.168.101.202 (both ESXi hosts are added to the inventory)
- A Windows VM on ESXi 7.0
- A Windows VM backup in a backup repository of NAKIVO Backup & Replication
A backup job is scheduled to run daily.
We installed the antivirus with the default settings in trial mode.
Note: NAKIVO doesn’t supply licenses for antivirus software. You should use a trial key or buy the antivirus license manually.
Adding a scan server
NAKIVO Backup & Replication supports backup scans by antivirus software installed on a scan server available via the network:
- A scan server can be a Windows/Linux physical or virtual machine on which antivirus software is running. Client and server versions of Linux and Windows operating systems are supported for the scan server.
- A scan server must be able to establish a network connection with NAKIVO Backup & Replication.
Note: It is recommended that you use a scan server running on Linux to scan Linux backups and scan servers running on Windows to scan Windows backups. Linux scan servers can scan Windows backups in common cases. However, the idea is that the operating system of the scan server must be able to understand the file system of the backed-up machine.
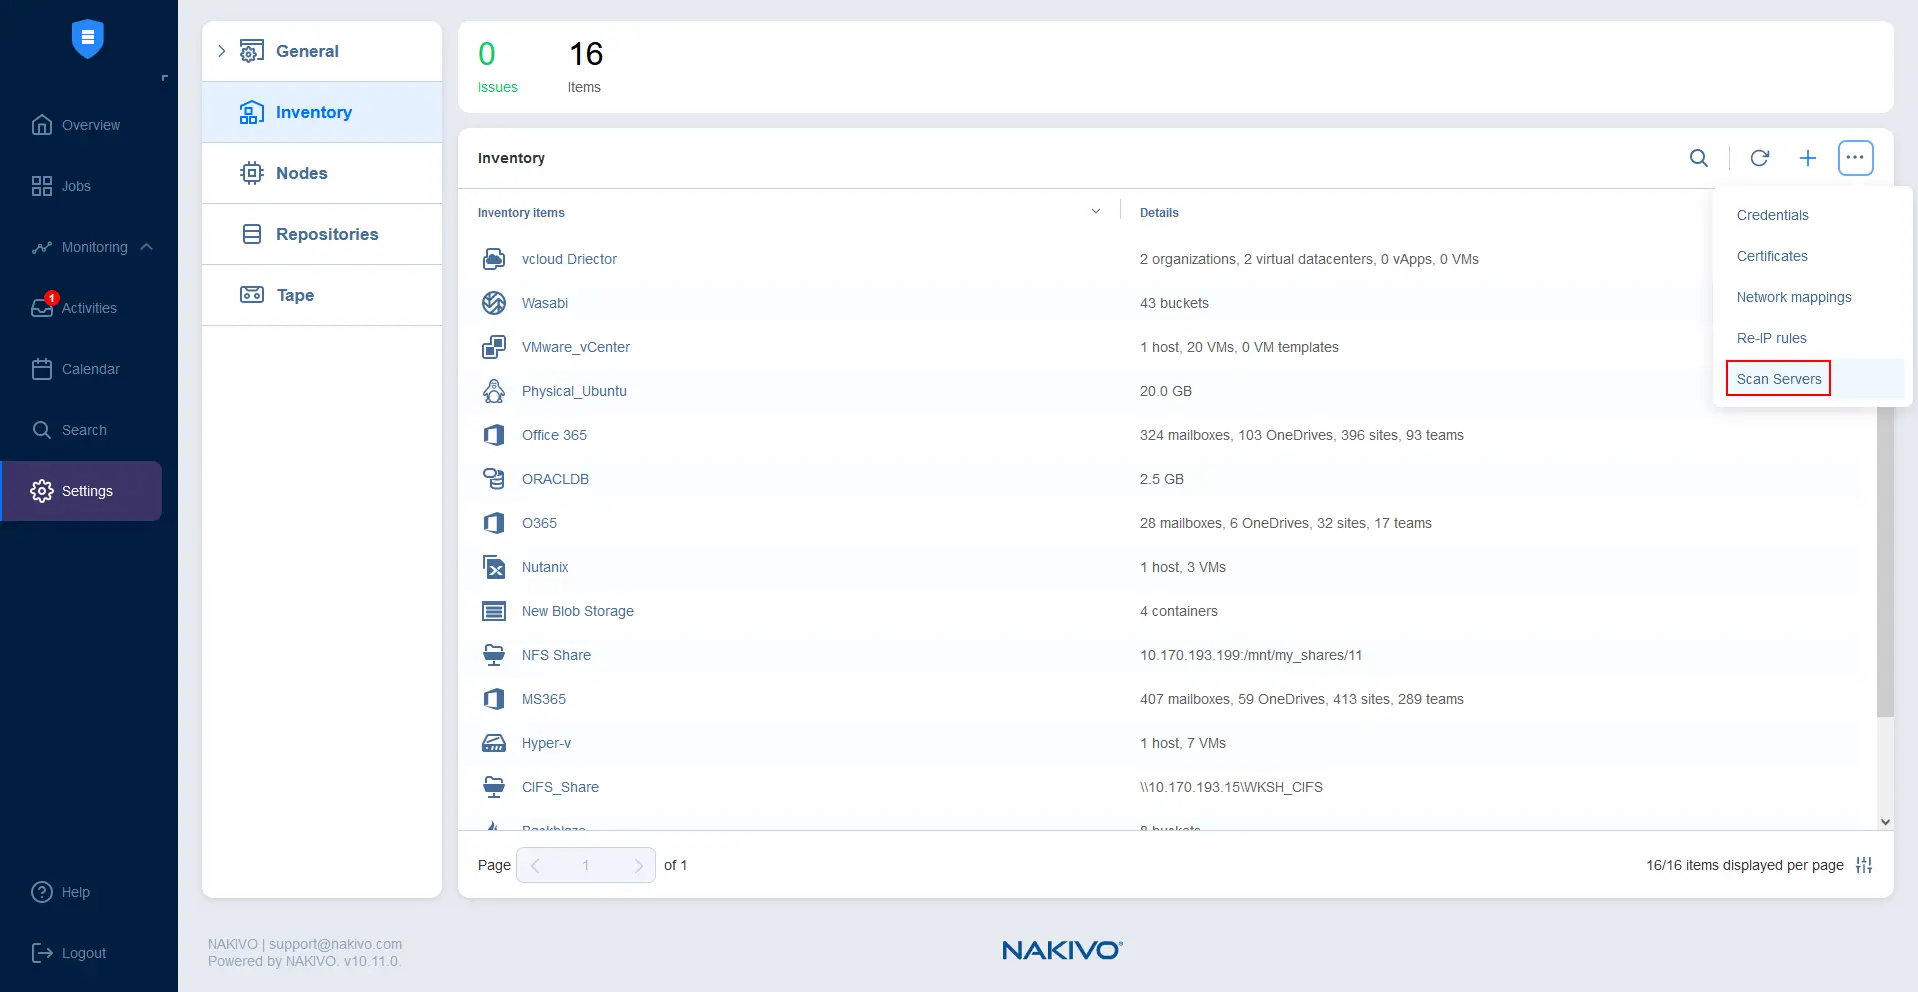
Let’s proceed by first adding a scan server to the inventory in the web interface of the NAKIVO solution.
- Go to Settings > Inventory, click the … icon, and click Scan Servers.
- Enter the parameters of the new scan server that you are adding:
- Display name: ScanServer01
- Platform: Windows or Linux – this is the operating system of the machine on which the antivirus is installed
- Host name or IP: Enter the hostname or IP address of the scan server
- Credentials type: Password (or private key)
- Username: A user account with enough permissions, for example, the administrator
- Password: The password of this user account
Set the maximum load, that is, the maximum number of concurrent tasks.
After entering all the required parameters for the scan server, click Test connection.
If the iSCSI initiator service is not started on the scan server, a message is displayed informing you about this as shown below.

- To start the iSCSI initiator service on a Windows machine:
- Open Computer Management by pressing Win+R, then in the run dialog, entering compmgmt.msc, and pressing Enter.
- Go to Services and Applications > Services, and navigate to the Microsoft iSCSI initiator service. You can start the service once or configure the service to start automatically after Windows boots.
- Right-click the Microsoft iSCSI initiator service and hit Properties.
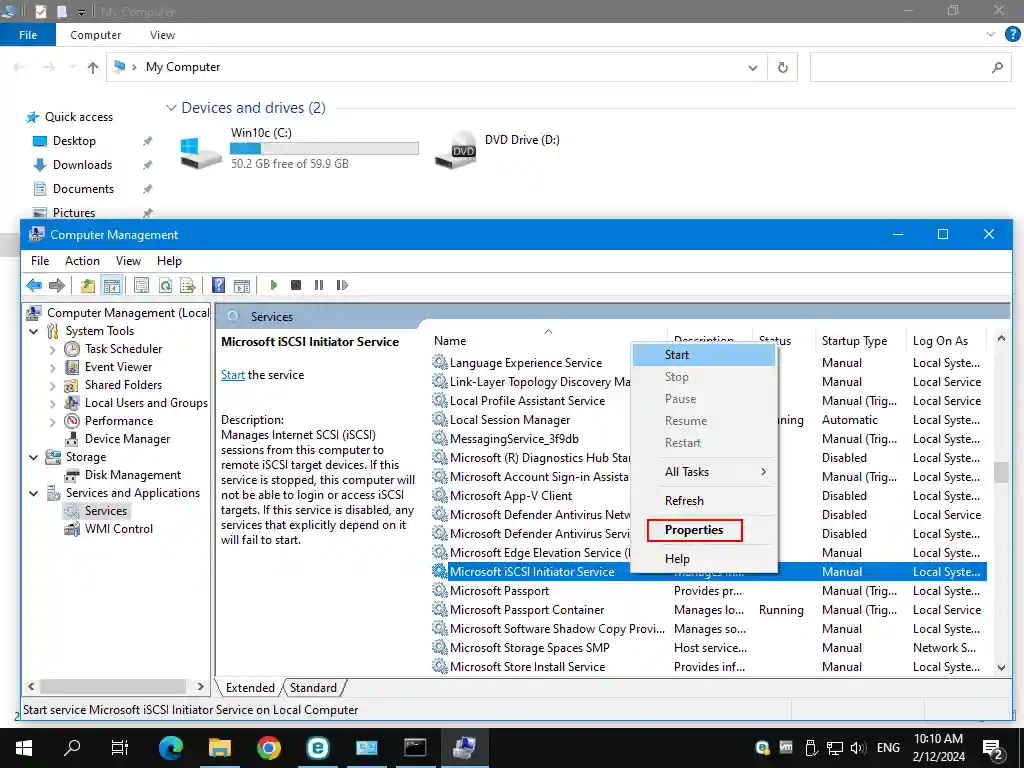
- In the service properties window, set the startup type to Automatic and click Start. Then hit OK to save settings.

- Go back to the web interface of NAKIVO Backup & Replication and click Test Connection again. The connection test should now be successful. Click Add to finish adding the new scan server.
Note: If the test fails, ensure that the firewall is not blocking the network connection and that you meet all the requirements.

- The new scan server is now displayed in the list of scan servers. You can close this window in the web interface.

Once the scan server is added, you can configure backup scans for malware.
Scanning backups for malware before recovery
You can perform malware scans in NAKIVO Backup & Replication before proceeding with the recovery of the following types of backup jobs:
- VMware vSphere VM
- Microsoft Hyper-V VM
- Nutanix AHV VM
- VMware Cloud Director
- Physical Machine
- Flash boot
- Universal object
In this example, we use a Flash VM Boot job for malware scan before recovery:
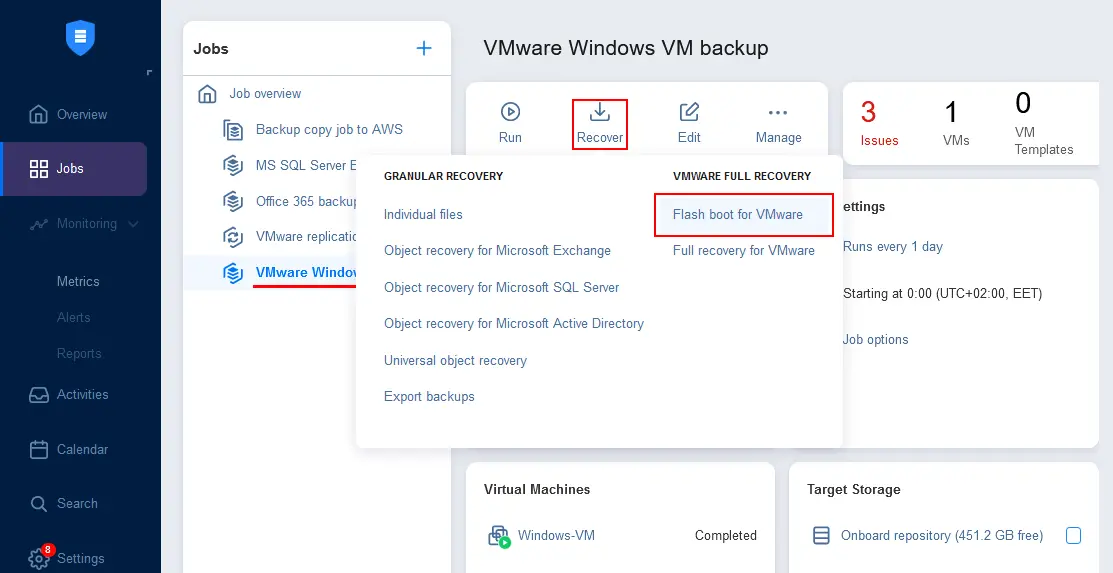
- Go to Jobs and select the backup job that includes backups of the machines you want to check for viruses and malware. In our case, this is the VMware Windows VM backup job.
- Once the backup job is selected, click Recover, and in the recovery menu, hit Flash boot for VMware.
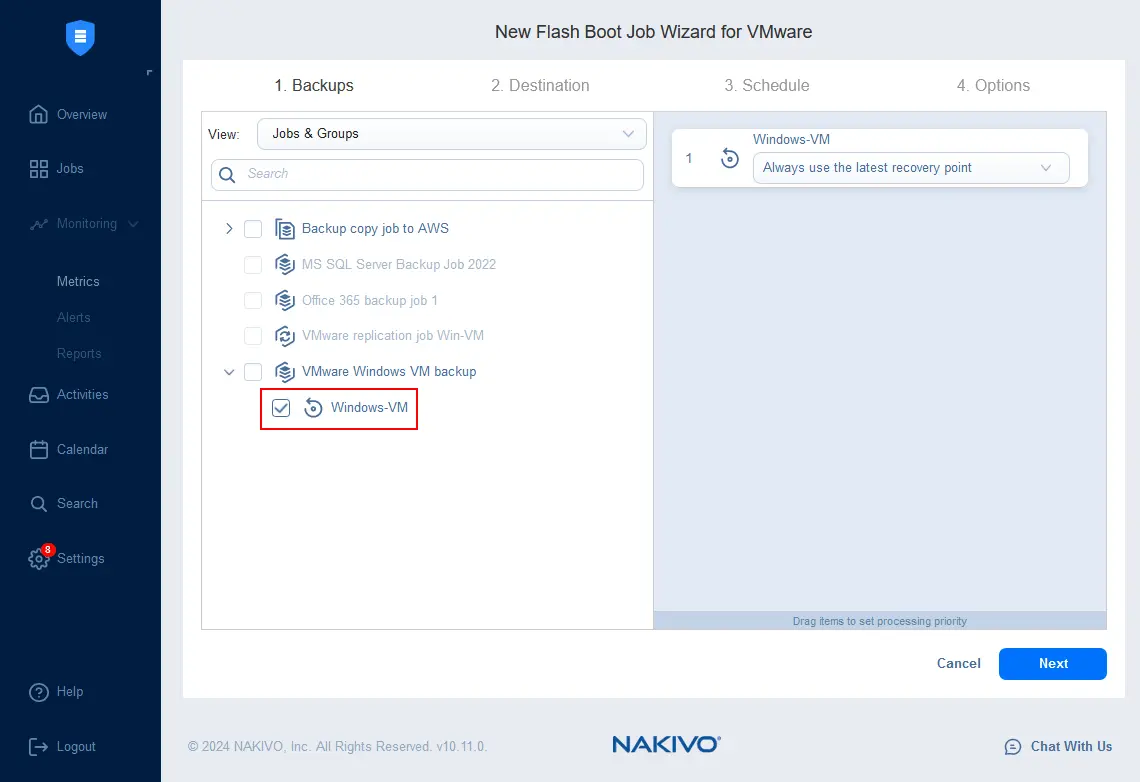
The New Flash Boot Job Wizard for VMware opens:
- Backups. Select backups from the needed backup job that you want to scan for viruses. You can select multiple backups. We select Windows-VM, which is the only backed-up machine in our backups. Click Next at each step of the wizard to continue.
- Destination. Select where to run the temporary VM with virtual disks connected from the backup. The destination options include an ESXi host, ESXi datastore, virtual network, and VM folder (optionally). The selected ESXi host has already been added to the NAKIVO inventory.

- Schedule. Configure the schedule or select to run this Flash VM Boot job on demand. As we want to scan a backup for viruses before recovery, we select to run this job on demand.

- Options. Configure the Flash VM Boot job options.
- Enter a job name.
- For the Malware detection option, click Enabled.
Select the malware detection settings in the pop-up window that appears:
- Scan server: Select the scan server that was added to the inventory before.
- Scan type: Deep scan or quick scan. Quick scan is used to scan standard locations on an OS disk (partition) typically used by viruses. Deep scan scans all files.
- Select behavior if malware detected: Fail the recovery job or Continue and recover to isolated network.
- Set the scan timeout. If the time set is exceeded, then the job is terminated with the failed status.
Once configured, click Apply to save malware detection settings for this job.
Then click Finish & Run to finish the wizard and run the Flash VM Boot job with the malware scan.

- Select the job run scope and hit Run.

Each virtual disk of the temporary VM started on the ESXi host is exposed as an iSCSI target and is mounted to the scan server.
Wait until the temporary VM is created on the ESXi host, and virtual disks are mounted and scanned for malware and viruses.
In the screenshot below, you see that the Flash Boot job is running, and 2 issues have been found. Click the 2 issues link to see the details of the malware scan.
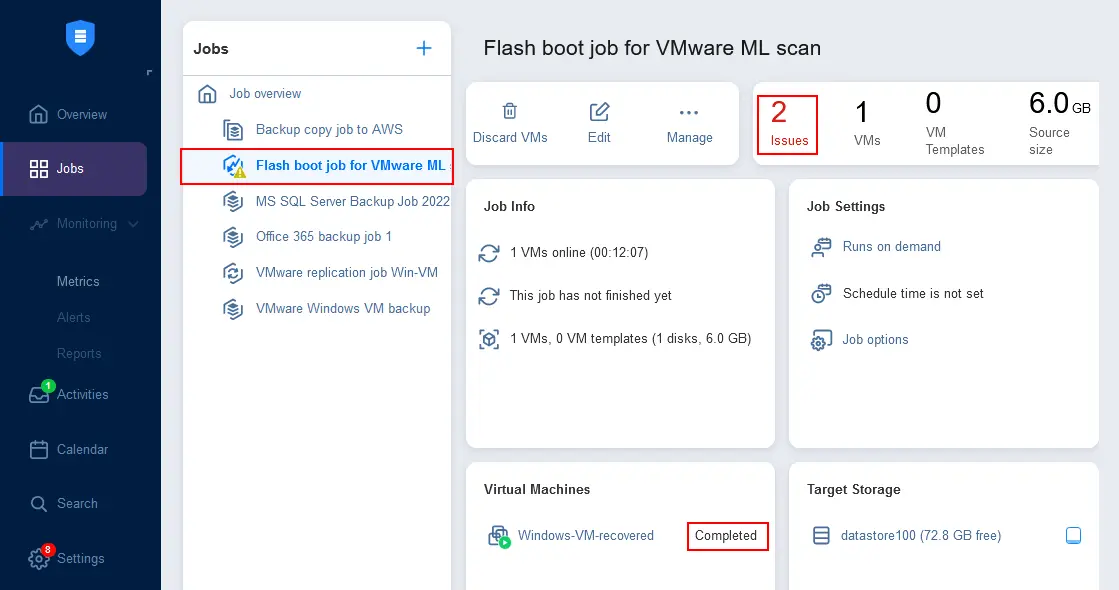
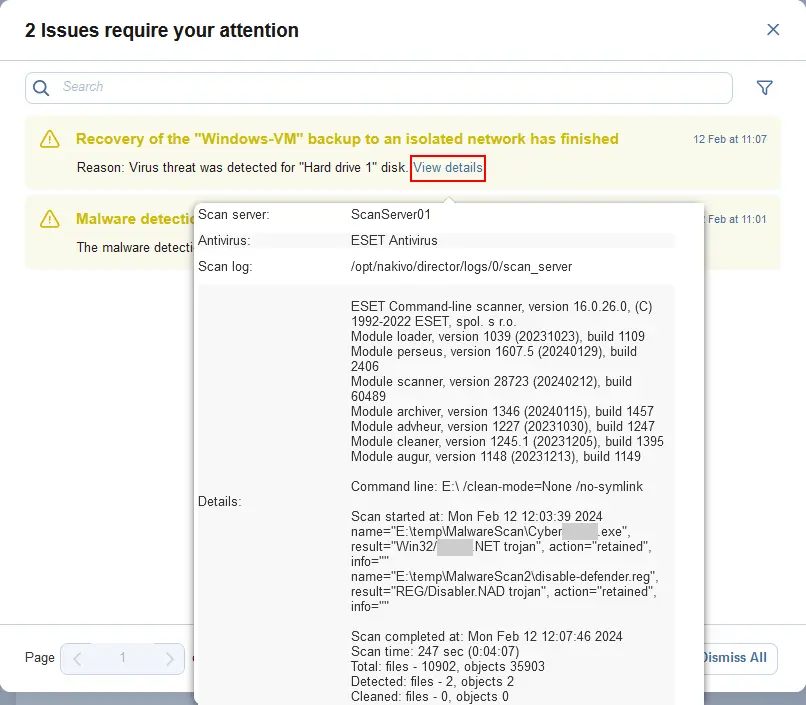
As we can see, 2 issues require our attention. Click View details to display more information. After the malware scan of the VM backup, the antivirus has found two files that may be suspicious and are considered malware by the antivirus.
Note that the Flash VM Boot job does not stop automatically. You have to stop this job manually after completing the malware scan and checking the antivirus scan report.
Scanning for malware right after backup
To automate malware scans after a backup job, you should use the solution’s Site Recovery capabilities:
- Go to Jobs in the NAKIVO Backup & Replication web interface, click + to add a new job, and click Site recovery.

- The New Site Recovery Job Wizard opens. At the Actions step, click Run Jobs to add the Run Job action to the sequence of actions for a Site Recovery job.
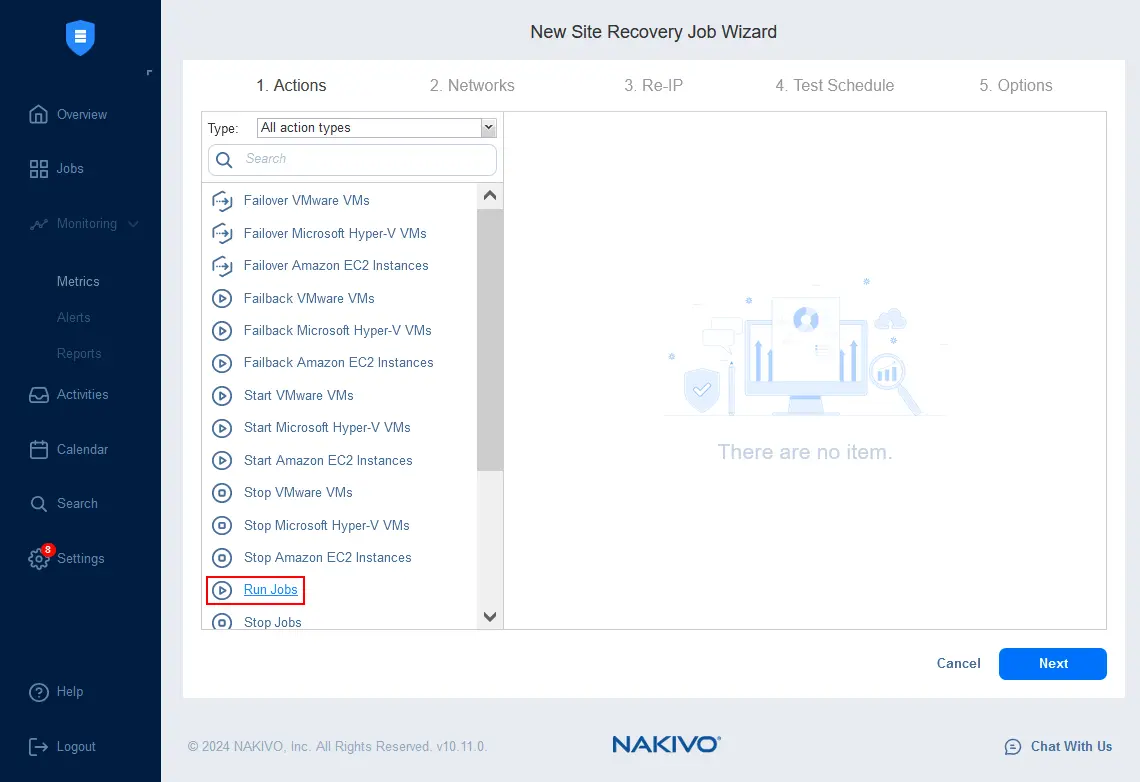
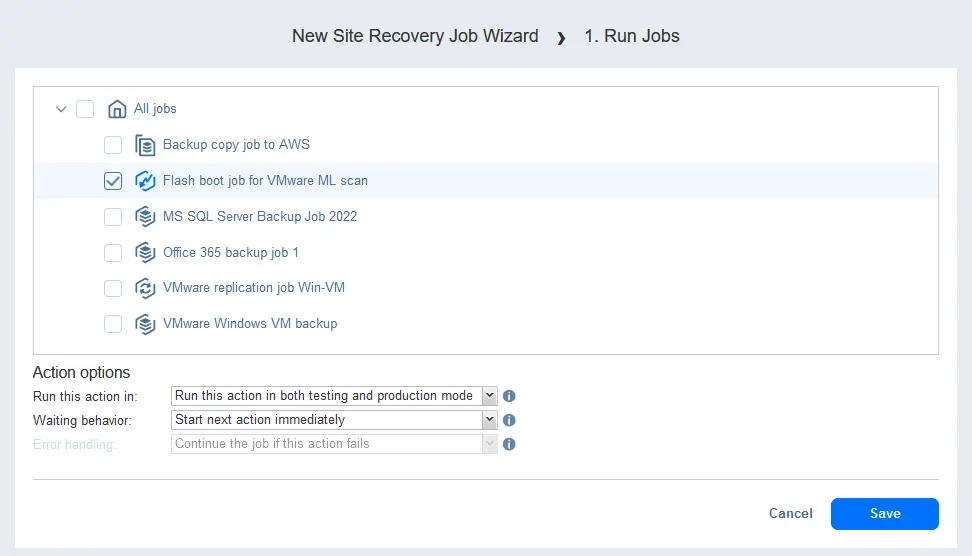
- Select a job to run. Select the Flash boot job for VMware malware scan that was created as described in the previous section.
Select the action options:
- Run this action in: Run this action in both testing and production mode
- Waiting behavior: Start next action immediately
Hit Save to save this Site Recovery job action and continue configuring other job actions.
- Add the Wait action as the second job action to be executed right after starting the Flash VM Boot job.
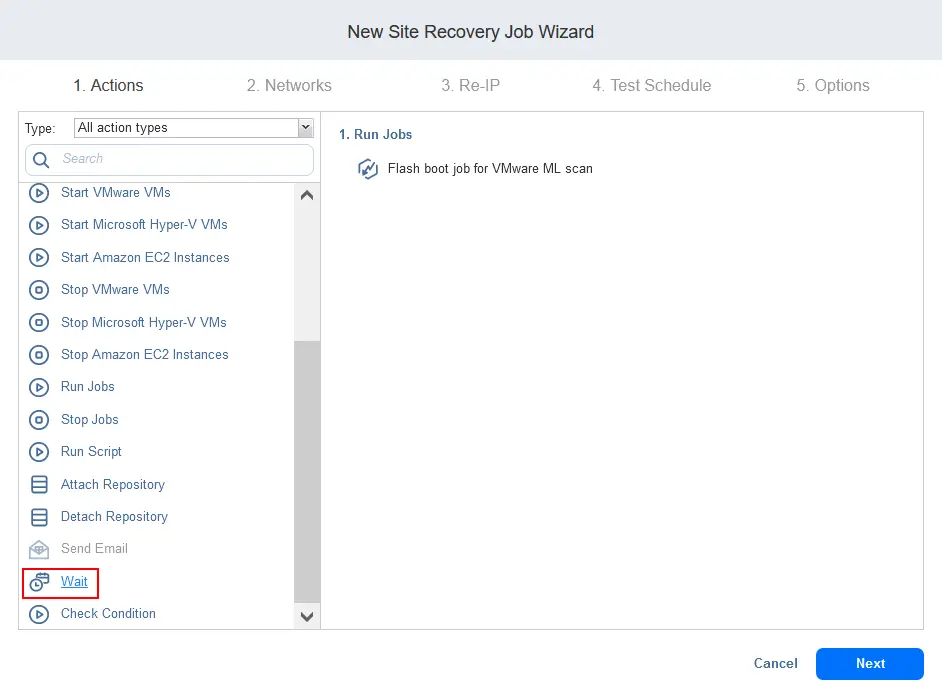
- Configure the Wait action. Set a wait time based on your experience in your environment regarding how long it can take to scan disks of the current backed-up machine. In our example, 1 hour should be enough. You should ensure that there is enough time for scanning to have been completed when the Flash VM boot with the malware scanning job is stopped.
Actions:
- Run this action in: Run this action in both testing and production mode
- Error handling: Stop and fail the job if this action fails
Hit Save and go back to adding Site Recovery actions.

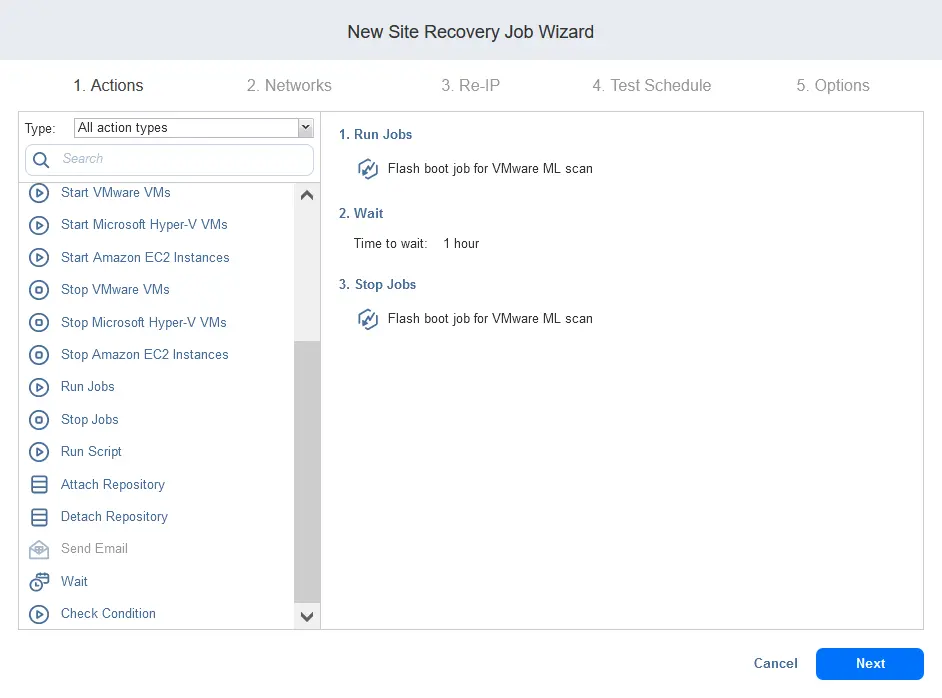
- Click Stop Jobs to add the third action for the Site Recovery job.

- Configure the Stop Jobs action. Select the Flash boot job for VMware VM malware scan (that we used before). After the defined time period to scan a VM backup for viruses (by the Wait action) is out (expires), the Flash VM boot Job must be stopped (this job can be stopped only directly by a user or site recovery Stop action).
Action options:
- Run this action in: Run this action in both testing and production mode
- Waiting behavior: Wait for this action to complete
- Error handling: Stop and fail the job if this action fails
Hit Save to save this job action.

- All three needed Site Recovery job actions have been added. Hit Next in the Site Recovery job wizard to continue.
- As there are no replication or failover jobs, you can skip the network mapping step (Network). Similarly, you can skip the Re-IP step.
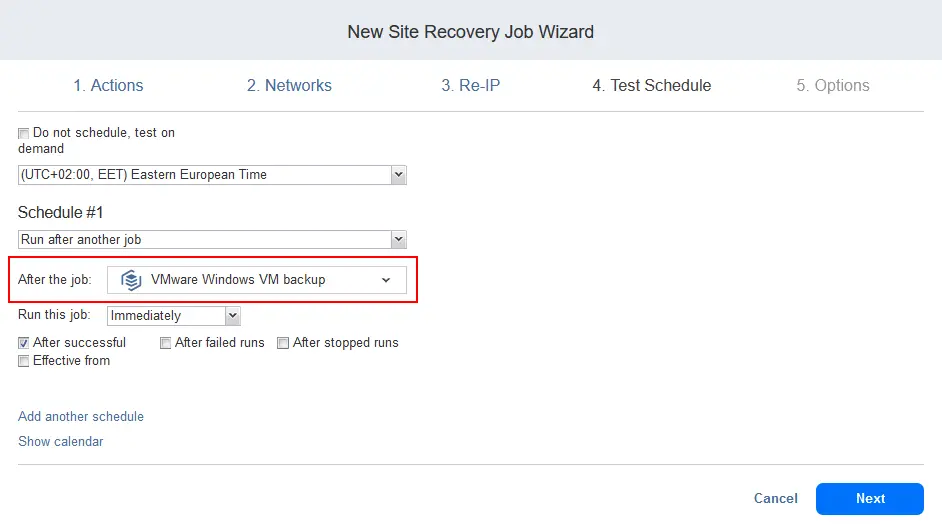
- Configure the test schedule at step 4 of the wizard. Use the job chaining scheduling option to run this Site Recovery job with malware scanning right after the backup job is completed. This means that as soon as our VM backup is completed, the newly created Site Recovery job will be started automatically. This triggers the Flash boot job/action with the malware scan setting on. As a result, malware scanning starts automatically.
Select the following options for Schedule #1:
- Run after another job: VMware Windows VM backup
- Run this job: Immediately.
- Select the After successful checkbox.
- At the Options step, enter a job name, for example, SR Malware scan after VM backup.
Set the recovery time objective. This RTO value must not be less than the time of the Wait action (the second action in the list of our Site Recovery job actions). As the wait time in this example to scan for malware is 60 minutes, we set 65 minutes as RTO for this Site Recovery job. This is needed to avoid job failure resulting from insufficient time to complete all the actions of the Site Recovery job.
Click Finish to save settings and close the wizard.

Now, you can start a Windows VM backup job and see how job automation works:
- The Windows VM backup job is started.
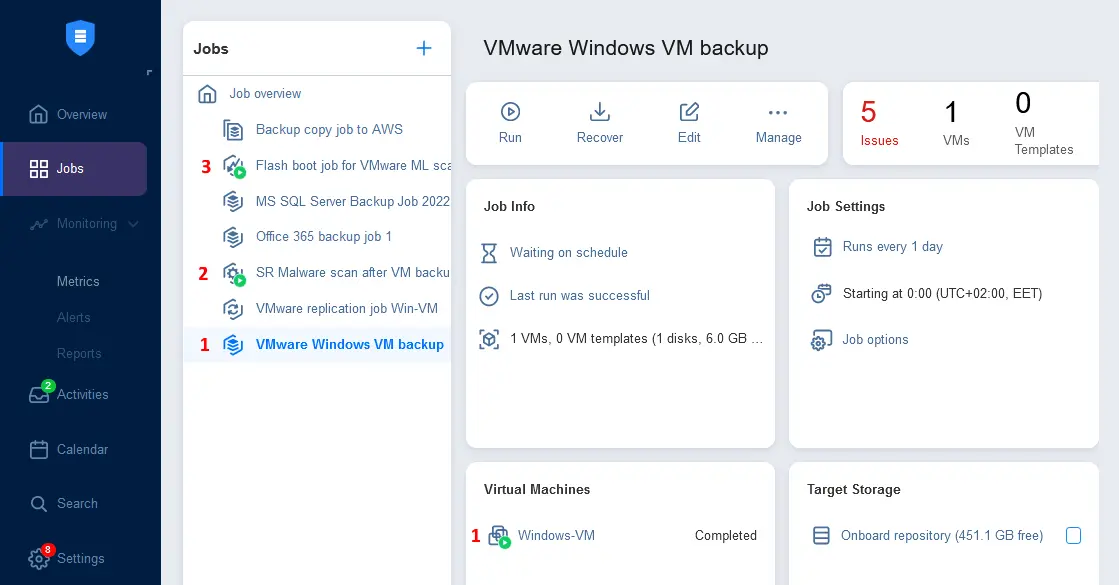
- Right after the VM backup job is completed, the Site Recovery job is started. This Site Recovery job includes the Flash VM Boot job.
- The Flash VM Boot job with malware scan is started as part of the Site Recovery job.
- When the hour set for malware scanning is out, all jobs are stopped. You can check issues and view antivirus reports.
In this example, we explained how to configure malware scans with the NAKIVO solution to run automatically after each backup job. You can also perform malware scans before restoring physical and virtual machines from a backup, as shown below.