Windows Server 2016 Core Installation
When looking to install Microsoft Hyper-V, you need to install the Hyper-V role on Window Server. One option is to use the GUI to run and manage your server and VMs. However, in certain situations, you can save resources by running Windows Server in command line (without GUI).
To install the Hyper-V role, you need to install the Windows Server 2016 Datacenter Server Core as your operating system (OS) platform. For the purposes of this walkthrough, we are using the Datacenter edition of Windows Server, as it unlocks the most powerful enterprise features for Hyper-V. Most enterprises use Windows Server Datacenter or Windows Server Standard because of the Windows licensing advantages. Note that the steps for other editions will differ.
Hyper-V Server is basically Windows Server Core with the Hyper-V role already installed. Thus, simply installing Hyper-V Server can get you up and running with the hypervisor for free. However, it may be better to install Hyper-V on Windows Server for advanced functionality if you have a license. In this case, you should install the OS first and then enable the Hyper-V role. Let’s cover how to install Windows Server 2016 Core and configuration.

Windows Server 2016 ISO Download
To start, you need to download the ISO file. You need MSDN or any other login with Microsoft to download the Windows Server 2016 ISO. However, if you don’t have that, you can download an evaluation copy of Windows Server 2016 from the TechNet Evaluation Center on the Windows Server 2016 download page. The TechNet evaluation copy is a time-limited 180-day version of Windows Server 2016 intended for trial purposes. You are asked to create an account with Microsoft before getting the Windows Server 2016 ISO download link.
Windows Server 2016 Datacenter Server Core Installation
You need to write the ISO image to a DVD disc or USB flash drive. Insert this medium into your computer and boot from this medium to start Windows Server installation.
When installing the Windows Server 2016 OS, you can choose to install the operating system alone, which is a Server Core installation. Server Core is a minimal installation without a graphical interface or management tools. This is the preferred installation method for use in a production environment over the Desktop Experience, which is the regular GUI Windows Server OS.
To demonstrate the installation process for a single standalone Hyper-V host, we use the Server Core installation of Windows Server 2016 Datacenter.
Note: For Windows Server 2016 Datacenter with the graphical user interface (GUI), you can read our blog post on running Hyper-V virtual machines (VMs).
Start by choosing Windows Server 2016 Datacenter in the list with Windows Server editions to install Server Core after you boot from the installation medium. See the screenshot of the Windows Server 2016 installer below with the OS list.

The Windows Server 2016 Core installation is similar to any other Windows Server installation. Go through the steps in the setup wizard:
- Accept the license agreement.
- Choose Custom Install.
- Select the target hard drive on which you want to install Windows.
- Proceed with the installation.
- Once the Windows Server 2016 Datacenter Server Core installation process is complete, you are asked to change the Administrator password. Press Enter.
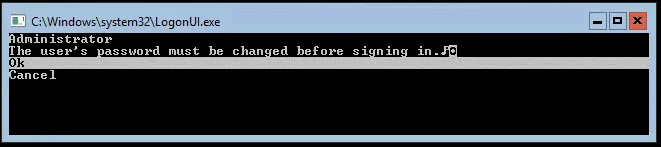
- Once you set the password, press Enter (OK) to continue.

You have finished the Windows Server installation. Now you need to configure the operating system.
Windows Server 2016 OS Configuration
You now reach a CMD command prompt and no visible menu. It is recommended that you configure network settings for your Windows Server 2016 setup.
Configuring network settings
Network settings and most other settings in Windows Server 2016 Core are configured in the console interface:
- Type sconfig in the command prompt to launch the Server Core configuration utility.
- You are then presented with the Server Configuration menu.
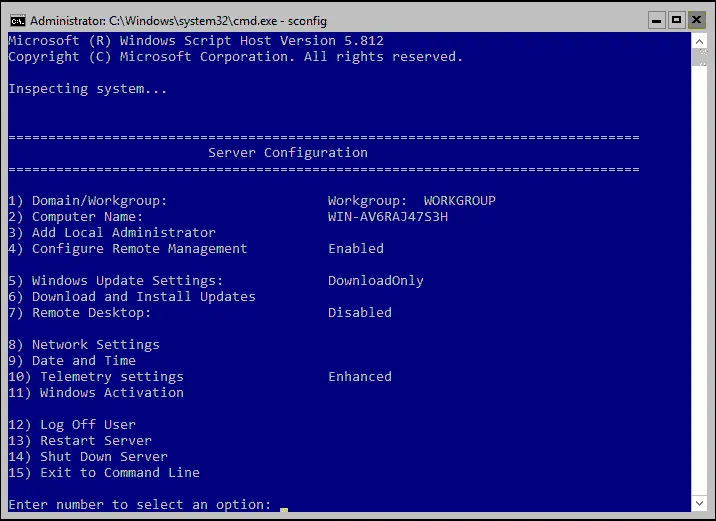
- Type 8 and press Enter to open Network Settings and launch the network configuration menu. It is recommended that you assign a static IP address for Windows Server 2016 setup.
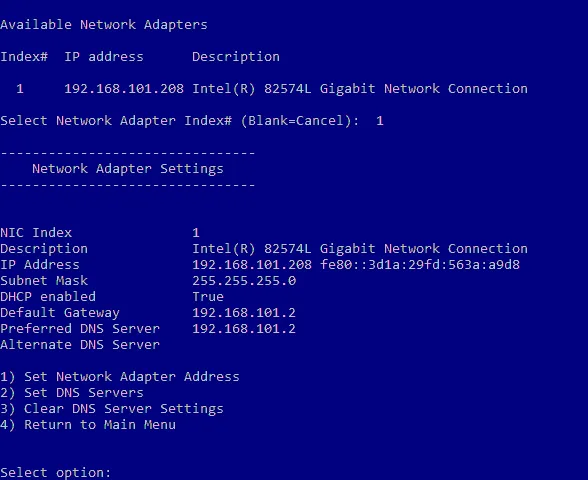
- Choose the network adapter you want to configure. Type the appropriate number and press Enter. You need to always press Enter after entering a value in this configuration menu.
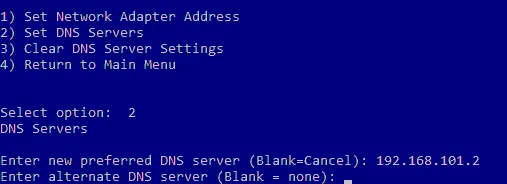
- Now you should see the menu with four entries:
- Set Network Adapter Address
- Set DNS Servers
- Clear DNS Server Settings
- Return to Main Menu
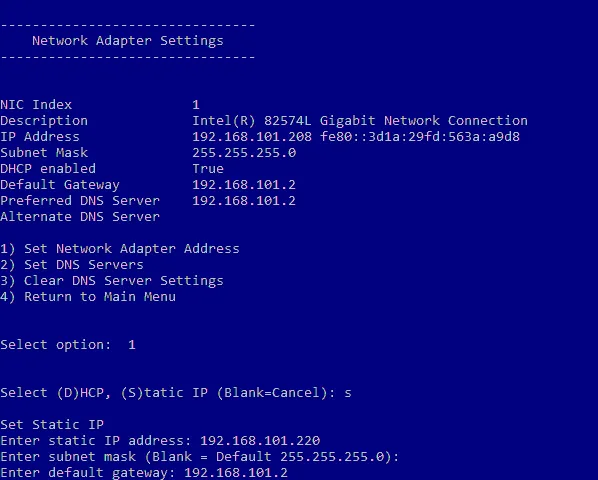
- Type 1 to set the IP address, subnet, and gateway.
- Type S to use the static IP address configuration.
- Enter the appropriate values to meet your network configuration. Once done, you are returned to the previous Network Adapter Settings menu with four entries.
- Type 2 to set DNS servers for the network configuration.
- Enter a new preferred DNS server and alternate DNS server.
Once done, you are returned back to the previous Network Adapter Settings menu.
After configuring the network settings, you should test network connectivity. You can use option 15, Exit to Command Line. This takes you to the cmd prompt, where you can ping your gateway, DNS server, etc.
Changing the computer name
Now let’s run the sconfig command in cmd to open the Server Configuration menu again. You should join a Windows domain and change the computer name. Using an Active Directory domain with a domain controller allows you to manage all Windows machines centrally.
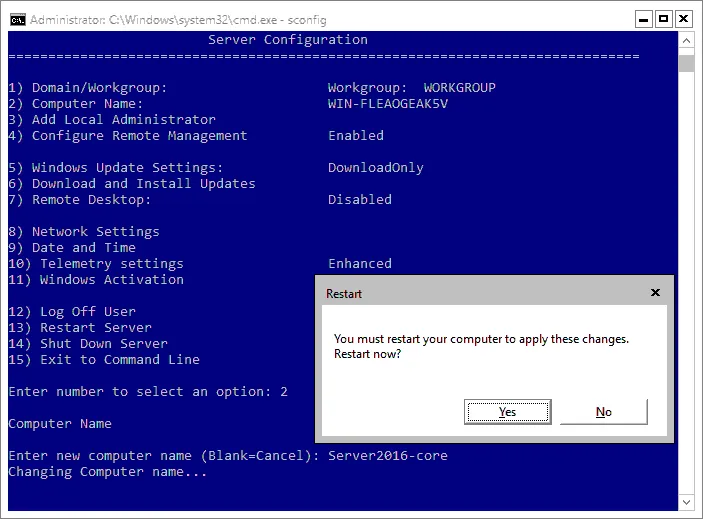
Do the following steps to change the computer name:
- Choose 2 in the Server Configuration menu.
- Enter a new computer name.
- Restart the computer to apply the changes.
Changing Domain/Workgroup options
Open the Server Configuration menu after computer restart (sconfig).
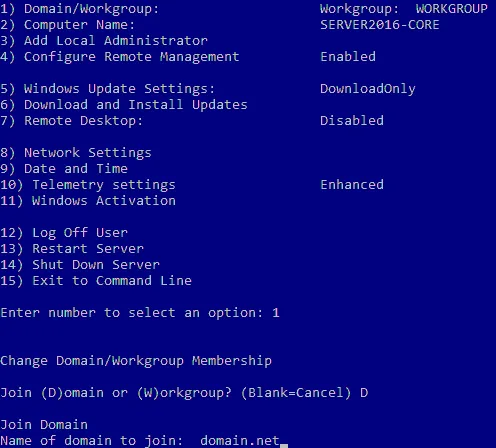
Do the following steps to change the Domain/Workgroup settings:
- Choose the 1) Domain/Workgroup option in the Server Configuration menu.
- Type D to join a domain.
- Enter the domain name.
- You are asked to provide the credentials of a user who has permissions for the needed domain.
- Once you have set up the domain configuration, reboot your Windows Server machine.
After the reboot, you have a functioning Windows Server 2016 Datacenter Server Core and are ready to install the Hyper-V server role.
You can also read about the difference between the GUI and Core Windows Server 2016 installation and configuration to run Hyper-V.
Conclusion
Windows Server installation is not a difficult process. Installing the core version of Windows Server 2016 Datacenter allows you to reduce the footprint and related overhead, as well as install the Hyper-V role on the Windows Server to run VMs. As for the core version, Windows Server 2016 setup is performed mostly in the command line interface.
If you use Hyper-V, don’t forget to back up virtual machines. Download NAKIVO Backup & Replication to protect your physical and virtual environments. The NAKIVO solution supports physical Windows Server backup, Active Directory backup, Hyper-V VM backup and more.