How to Clone Virtual Machines on ESXi Hosts: 5 Methods
Virtualization allows for more efficient workflows and resource utilization thanks to features like VM templates or VM cloning, which allows you to quickly create an identical copy of an existing VM. The new VM does not need to be configured from scratch as it has the same virtual hardware, installed software, and other settings as the original.
The VM cloning feature is available for VMs managed by vCenter Server. But you can also clone VMs running on a VMware ESXi host if, for example, you are using a free version of VMware ESXi.
This blog post explains how to clone existing VMware virtual machines on ESXi servers using different methods with and without vCenter Server.

VMware ESXi Clone VM Environment
It is recommended that you don’t have snapshots for the VM that you want to clone before starting. This can help avoid issues such as restoring the MAC address of the original VM’s network adapter when using a snapshot to restore the VM state for a VM clone. If you have VM snapshots, you will need to change the MAC address manually after restoring a VM state from a snapshot for a VM clone to avoid conflicting MAC addresses.
The environment we use to demonstrate how to make clone machines is as follows:
- ESXi host 1: 192.168.101.201
- VMs on ESXi host1: Windows-VM
- ESXi host 2: 192.168.101.202
- vCenter Server: 192.168.101.103
ESXi 7 and vCenter 7 are used in this environment to explain the workflow and clone virtual machines.
Method 1: VMware ESXi Clone VM Without vCenter – Using VMware Host Client
If you have an ESXi host that is not managed by vCenter Server, you can use VMware Host Client to clone a VM on that ESXi host in a user-friendly web interface.
We have an ESXi host (192.168.101.201) with two datastores (datastore10a and datastore10c). The VM with the name Windows-VM is located on datastore10a. We are going to clone this VM and store the VM clone on datastore10c.
To clone a VM on an ESXi host without vCenter, do the following:
- Log in to VMware Host Client using the administrative account (root).
- Create a directory on the needed datastore to store the files of the VM clone. We click Storage in the Navigator pane, go to datastore10c, click Create Directory, and enter Win-VM-Clone as a directory name. Click Create Directory.

- Open VM settings of the source VM and check the location of the VM files. To do this, go to Virtual Machines, select Windows VM (in the Navigator), and expand Hard Disk1 in the Hardware Configuration pane.
We can see that the virtual hard disk of our VM is located in the Windows-VM directory on datastore10a. If your VM has multiple virtual disks, check the location of each one. In some custom configurations, the virtual disks of a VM can be located in different places. It is important to copy all the virtual disks for cloned virtual machines.
You can also click Edit VM settings and expand the hard disk section in VM settings to view the locations of virtual hard disks.

- Shut down the VM that you want to clone.
- Open the datastore browser and go to the directory of the source VM. To do this, click Storage in the Navigator pane, click datastore10a, and click Datastore browser. Then, we select the Windows-VM directory on datastore10a in the datastore browser.
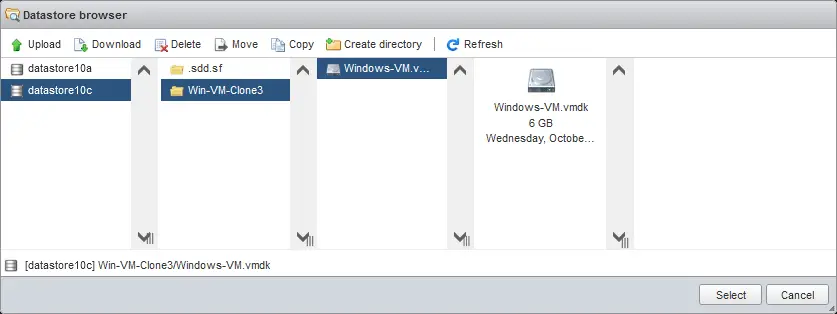
- Copy the VMDK files and the VMX file of the source virtual machine to the directory of the VM clone. First, we copy the virtual disk of the original VM. Select the VMDK file (Windows-VM.vmdk in our case) in the datastore browser and click Copy.

- Select the destination directory in the next window and click Copy. We select the Win-VM-Clone directory on datastore10c.

- If your original VM has multiple virtual disks, repeat these steps to copy all the virtual disks of the VM.
Note that VMware Host Client displays .vmdk and -flat.vmdk files as one item. You can see that there are two files for each virtual disk in the command line interface. A .vmdk file is the virtual disk descriptor file and -flat.vmdk is the virtual disk file containing data. The virtual disks of VMs running in VMware Workstation, in contrast to ESXi VMs, use .vmdk virtual disks with an embedded descriptor (a single file instead of two files).
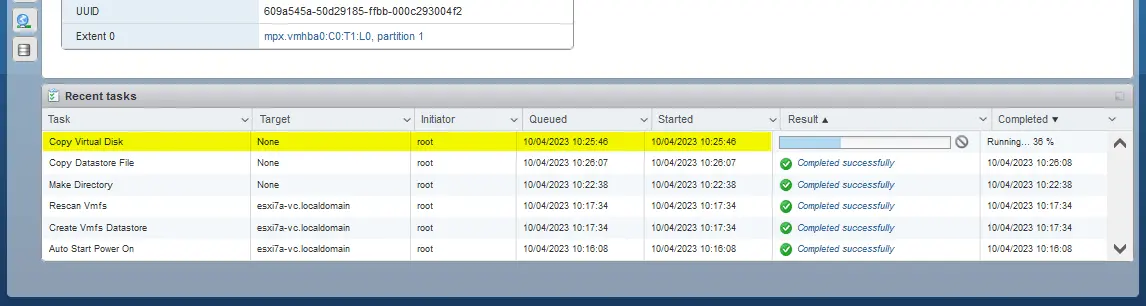
- Wait until the files are copied. You can monitor the progress in the Recent Tasks bar at the bottom of the web interface.
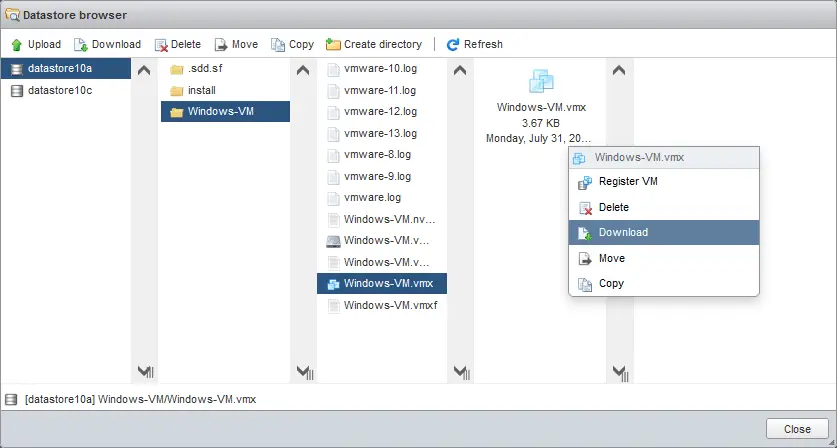
- Download the VMX file, which is a VM configuration file, to your computer. To do this, open the Datastore browser and go to the Windows-VM directory on datastore10a. Select the .vmx file (Windows-VM.vmx in our case) and click Download (you can right-click the .vmx file to open the context menu with options). Save the selected VMX file on your computer.
- Edit the VMX file you have already downloaded (Windows-VM.vmx in our case). You can use your preferred text editor. Even though a cloned virtual machine is an identical virtual machine, there are certain settings, such as VM name, that must be different for each VM in VMware vSphere for more convenience and to make it possible to identify VMs.
- Find the line starting with displayName. Change the VM clone name, which is currently the same as the name of the original VM.
We change the VM name from
displayName = "Windows-VM"to
displayName = "Win-VM-Clone"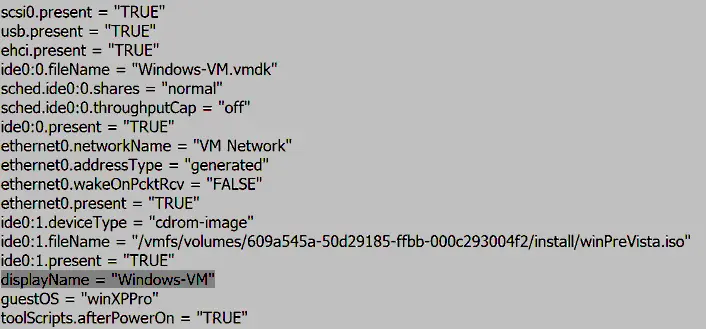
Our displayed VM name will be the same as the name of the directory where the files of our VM clone are stored.
Optional: You can also rename the virtual disk in the datastore browser (Windows-VM.vmdk) and change the value in the appropriate line in the .vmx configuration file to have unique virtual disk names (for example, Win-VM-Clone.vmdk, in our case).
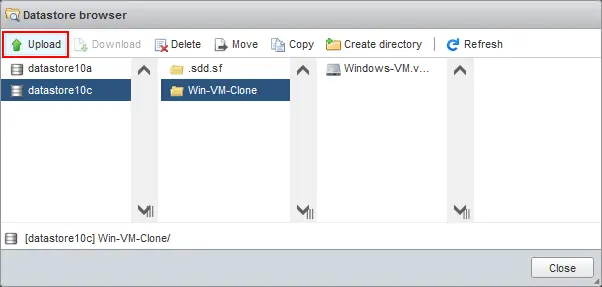
- Upload the edited VMX file to the datastore where the files of the VM clone are located (use the datastore browser, as you did before). We select the datastore10c/Win-VM-Clone/ directory and click Upload (select the appropriate VMX file you have edited in the browser window).
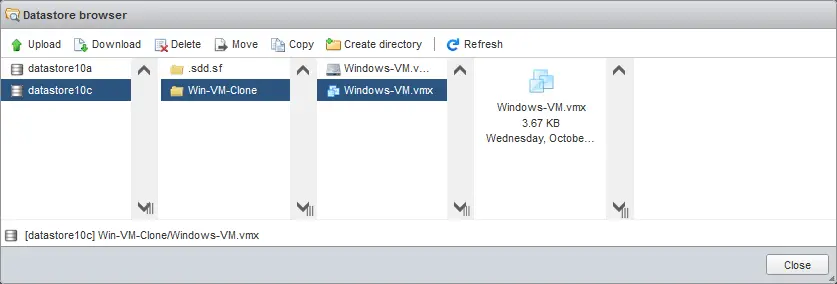
- Now, the edited VMX file is located in the directory of the VM clone (Win-VM-Clone on datatore10c in our case). You can close the datastore browser.
NOTE: If you want to clone a VM to another ESXi host, download the VM configuration and virtual disk files to your computer and then upload these files to the datastore of the destination ESXi host. You can also use an SCP / SFTP client to download and upload files from/to a datastore (such as WinSCP in Windows).
- Once we have copied VM files, we need to register a VM clone on our ESXi host. Go to Virtual Machines in the Navigator pane and click Create / Register VM.

- The New virtual machine wizard opens.
- Select creation type. Select Register an existing virtual machine and hit Next.

- Select VMs for registration. Click Select one or more virtual machines, a datastore or a directory.
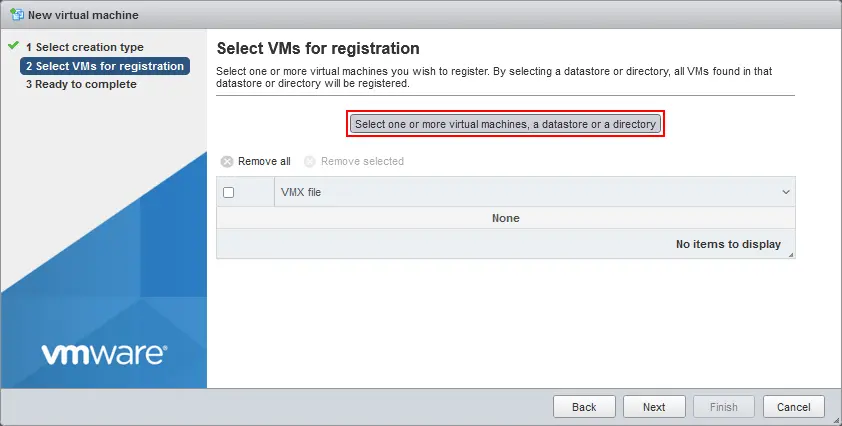
- Select a VMX file located in the VM clone directory in the Datastore browser window that opens and click Select.

- Ensure that the needed VMX file is selected at the second step of the wizard and hit Next.

- Click Finish on the Ready to complete screen.

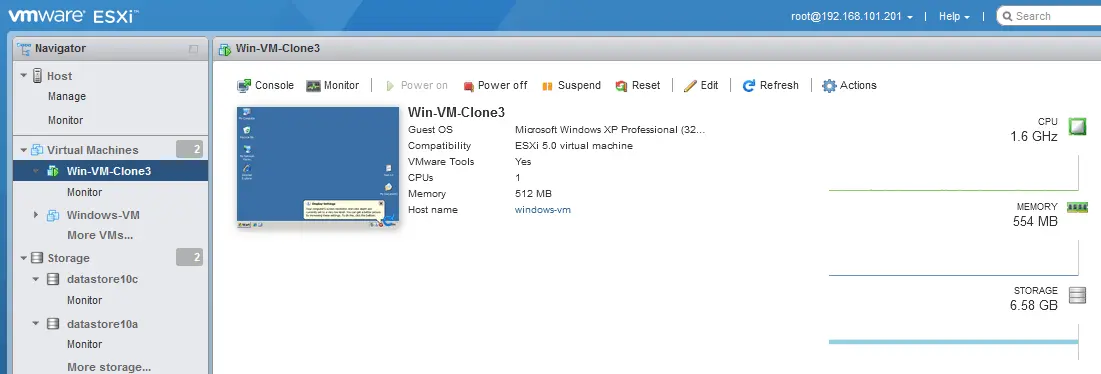
- The VM clone is now registered as a VM and displayed in the list of VMs. You can always rename a VM clone in the web interface of VMware Host Client. You can right-click the VM name and hit Rename in the menu that opens.

- Now, you can start the VM clone. You should see a question after starting the VM as shown in the screenshot.
Select I Copied It (not moved). This is important for setting a new MAC address and universally unique identifier (UUID) for the VM. Keep in mind that you may need to change the VM name and SID (for Windows VMs) in the guest OS to avoid conflicts. Click Answer.

The virtual machine has been cloned successfully on the ESXi host.
Method 2: How to Clone VMs in the ESXi Command Line
Another method to clone virtual machines on an ESXi host without using vCenter Server is using the ESXi command line. You can access the ESXi command line directly using the ESXi shell on an ESXi server or connect to an ESXi server via SSH remotely. Make sure that SSH access is enabled.
To create a VMware clone VM without vCenter in the command line:
- Connect to an ESXi server with an SSH client. If you use Windows, you can use PuTTY.
Check the list of VMs registered on this ESXi host (we are going to clone the same Windows-VM, that is, the original VM in the previous example).
vim-cmd vmsvc/getallvms - We need to shut down the original VM that we want to clone.
Get the ID of VMs (VMID) to identify which VM to shut down.
vim-cmd vmsvc/getallvmsOur Windows-VM has VMID 1 (see the screenshot below).
- The command to shut down a VM is:
vim-cmd vmsvc/power.shutdown VMIDWe use this command to shut down our Windows-VM:
vim-cmd vmsvc/power.shutdown 1 - The command to check the power state of the VM:
vim-cmd vmsvc/power.getstate VMIDIf a VM cannot be shut down, you can use the power off command:
vim-cmd vmsvc/power.off VMID - Check the location of the configuration file of this VM:
cat /etc/vmware/hostd/vmInventory.xml |grep -i Windows-VM | grep vmxor
vim-cmd vmsvc/getallvms |grep -i Windows-VM - You also need to know where the virtual disks of this VM are located (.vmdk and -flat.vmdk files). By default, virtual disks are stored in the VM directory together with the VM configuration file (.vmx).

To check the location of the virtual disks of the current VMs, open the vmx virtual machine configuration file:
less /vmfs/volumes/datastore10a/Windows-VM/Windows-VM.vmxIf a virtual disk is stored in the same directory (such as our first and only virtual disk), then you should see lines like these:
ide0:0.present = “TRUE”
ide0:0.fileName = “Windows-VM.vmdk”
If there is a virtual disk (for example, the second virtual disk) stored not in the VM directory, you should see lines like these:
scsi0:1.present = “true”
scsi0:1.fileName = “/vmfs/volumes/609a545a-50d29185-ffbb-000c293004f2/directory2/SecondHardDisk.vmdk”
If the virtual disk is stored outside the VM directory, you will see the full path defined in the appropriate line of the vmx configuration file.
Now we know the location of the virtual machine files and can proceed to clone the VM. We will store this ESXi clone VM on datastore10c.
- Create a directory to store VM files of the VM clone:
mkdir /vmfs/volumes/datastore10c/Win-VM-Clone2 - Clone the configuration file and the virtual disk(s) of the source VM and store the virtual disk clone in the destination directory of the VM clone. We set new names for destination vmx and vmdk files to match the name of the new VM clone.
- You can clone the virtual disk with
vmkfstools. This tool allows you to set the destination virtual disk format and also allows you to change the thick provisioning format to thin provisioning:vmkfstools -i /vmfs/volumes/datastore10a/Windows-VM/Windows-VM.vmdk /vmfs/volumes/datastore10c/Win-VM-Clone2/Win-VM-Clone2.vmdk -d thin - Copy a VM configuration file (.vmx)
cp /vmfs/volumes/datastore10a/Windows-VM/Windows-VM.vmx /vmfs/volumes/datastore10c/Win-VM-Clone2/Win-VM-Clone2.vmx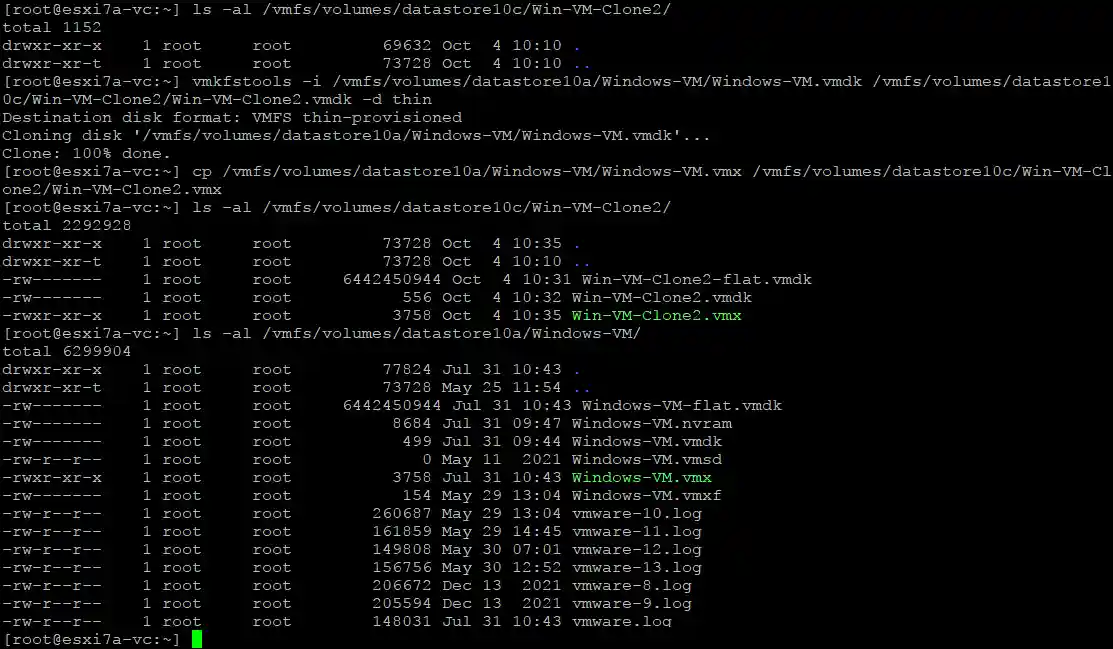
- Alternatively, you can copy virtual disk files (.vmdk and -flat.vmdk) as is using the cp command and setting new names for the destination files.
cp /vmfs/volumes/datastore10a/Windows-VM/Windows-VM.vmdk /vmfs/volumes/datastore10c/Win-VM-Clone2/Win-VM-Clone2.vmdkcp /vmfs/volumes/datastore10a/Windows-VM/Windows-VM-flat.vmdk /vmfs/volumes/datastore10c/Win-VM-Clone2/Win-VM-Clone2-flat.vmdk
- You can clone the virtual disk with
- Now, we need to edit the vmx file of the VM clone to align the VM name and path to the virtual disks / virtual disk name. Thus, we need to replace Windows-VM with Win-VM-Clone2 in the vmx configuration file of the VM clone.
Use vi, the text editor, to exit the vmx file of the VM clone. Use the following command in vi to find and replace a string in the entire file.
:[range]s/{pattern}/{string}/[flags] [count]The command template for our scenario is:
:%s/foo/bar/gIn our case, the command should be as follows:
:%s/Windows-VM/Win-VM-Clone2/gSave the vmx file of the VM clone. Type :wq and press Enter in vi.
- Register the VM clone on the ESXi host:
vim-cmd solo/registervm /vmfs/volumes/datastore10c/Win-VM-Clone2/Win-VM-Clone2.vmx - Get the information about the registered VMs to ensure that the cloned virtual machine has been registered:
vim-cmd vmsvc/getallvms - The VM clone has been registered (with VMID 3, as displayed in the screenshot below).
- Now you can power on the VM clone. To power on this VM clone (a VM with VMID 3) in the command line, you can use the command:
vim-cmd vmsvc/power.on 3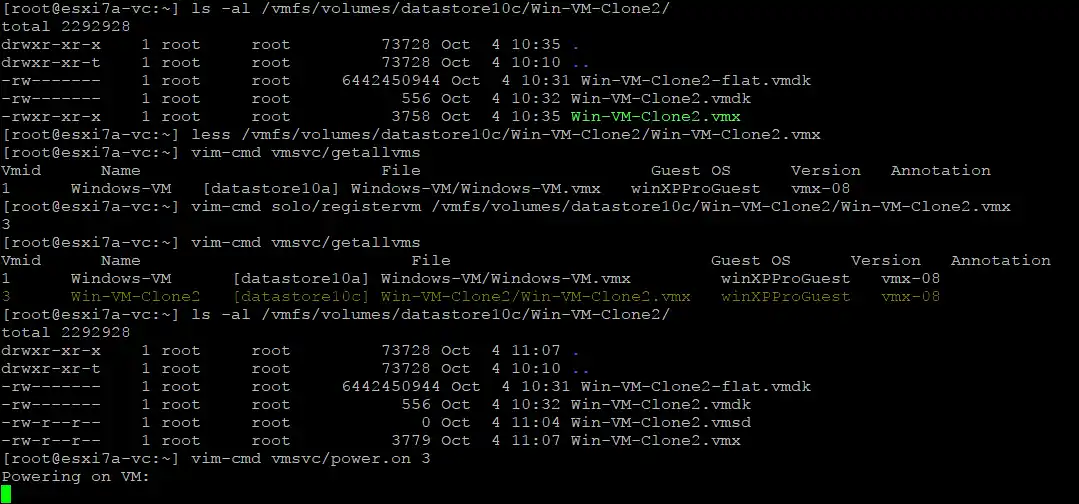
- You should open the VMware Host Client and answer that you copied this VM. The VM is not started until you answer this question.

- As you can see in the screenshot, the VM size is lower because we cloned the source virtual disk, which was thick provisioned to a thin provisioned format (2.76 GB vs 6 GB).

Creating the ESXi clone VM has been completed successfully. You can also use this method to clone virtual machines to another standalone ESXi host without using vCenter Server. You need to use the SCP or SFTP client to copy VM files from/to different ESXi hosts. The rest of the logic of the method remains the same.
Method 3: How to Clone a VM Without vCenter by Creating a New VM
There is one more method to clone a VM on ESXi hosts without using vCenter Server by using VMware Host Client. The advantage of this method is that you don’t need to edit the VMX file of the VM clone. As you create the VM clone, make sure that the VM configuration of the new VM is identical to the configuration of the original VM. The new VM can start if its configuration is different from the original VM.
- Complete the 5 steps of the New virtual machine wizard to create a new VM.
- Copy the virtual disks of the source VM to the VM directory of the VM clone. You can do this in the datastore browser of VMware Host Client, similarly to how we did it in the first example (VM clone method).
- Click Storage and select a datastore where the source VM is stored (datastore10a for our case). Click Datastore browser and select the directory of the source VM (Windows-VM in this example). Select the vmdk virtual disk and click Copy.

- Select the destination directory in the window that opens next (Win-VM-Clone3 in our case) and click Copy.

- If your source VM has multiple virtual disks, copy them all the same way. Optionally, you can rename virtual disk copies stored in the VM clone directory for more convenience using unique names.
- Edit the settings of the VM clone. Go to the Virtual machines page from the Navigator, right-click the new VM, which will be the VM clone, and click Edit Settings in the menu that opens.

- Delete the virtual hard disk created with the new virtual machine. Click the X icon at the Hard disk 1 line in the Virtual Hardware tab of the VM settings window.

- Select the Delete files from datastore checkbox to confirm the deletion of the virtual disk.
- Click Save.

- Open VM settings once again.
- Add the virtual disk copied from the original VM to the VM clone directory.
Click Add Hard Disk > Existing hard disk.
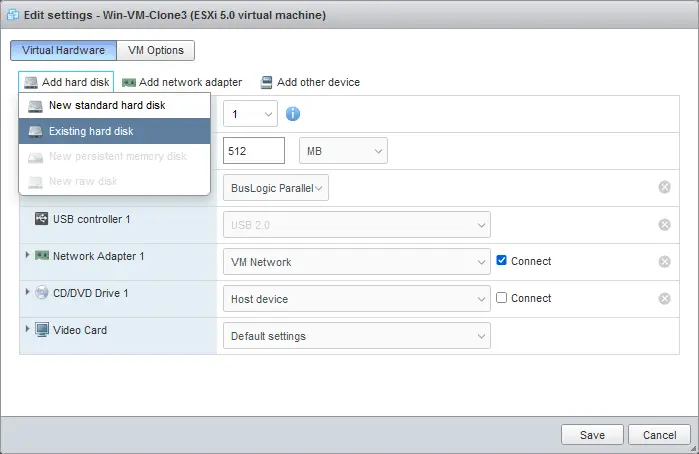
- Select the vmdk virtual disk you have copied to the VM clone directory before. We select Windows-VM.vmdk in the Win-VM-Clone directory on datastore10c.
- If your original VM has multiple virtual hard disks, add all of them to the VM configuration. Click Save to save VM configuration after adding the virtual disks.

- A virtual disk has been added to our VM configuration.
- Power on the VM clone.
- A message with the question (whether a VM was copied or moved) doesn’t appear because we created this VM as a new VM.
Method 4: VMware Virtual Machine Clone with vCenter
VMware vCenter Server, the centralized management system for VMware vSphere, offers a straightforward way to clone VMs, which is more convenient than VM cloning without vCenter. You can clone a VM to the same ESXi host or to another ESXi host that is managed by vCenter.
To create a cloned virtual machine with vCenter in VMware vSphere Client, do the following:
- Log in to VMware vSphere Client to access the management web interface of vCenter.
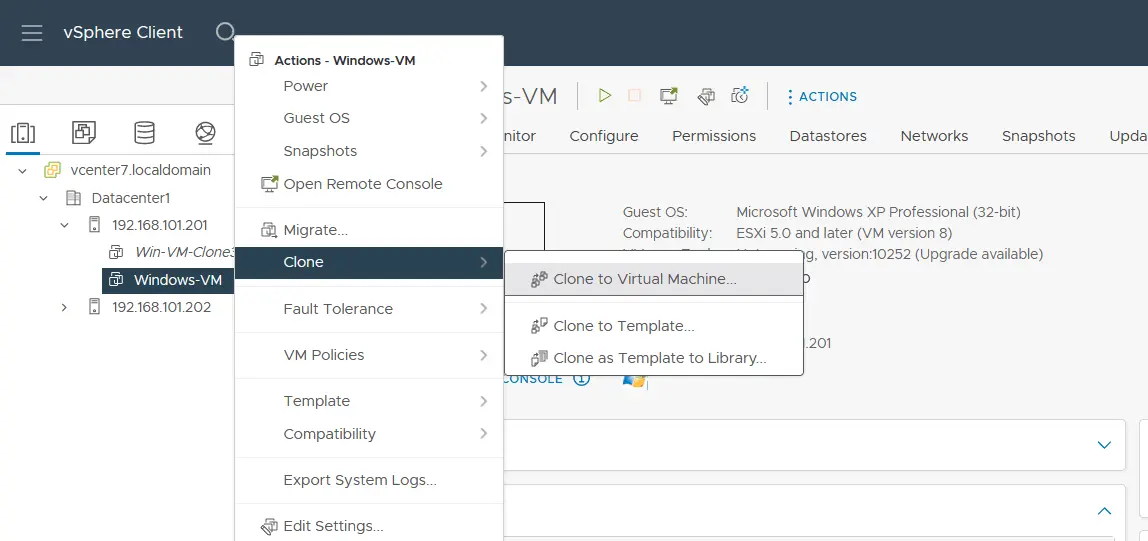
- Select the Hosts and Clusters view and select your VM in the Navigation pane. We are going to clone the VM called Windows-VM, which resides on ESXi host 192.168.101.201.
- Right-click the original VM and, in the menu that opens, click Clone > Clone to Virtual Machine.
- The Clone Existing Virtual Machine wizard opens and contains 5 steps.
- Select a name and folder. Enter a name for the VM clone. We– Win-VM-Clone4 in our case). Select a datacenter and VM folder where to place the cloned VM. Click Next at each step of the wizard to continue.

- Select a compute resource. Select the ESXi host or vSphere cluster that must run the VM clone. In our case, this is ESXi host 192.168.101.201. You can select another ESXi host to run the VM clone, but this host should not be the same as the host with the original VM.

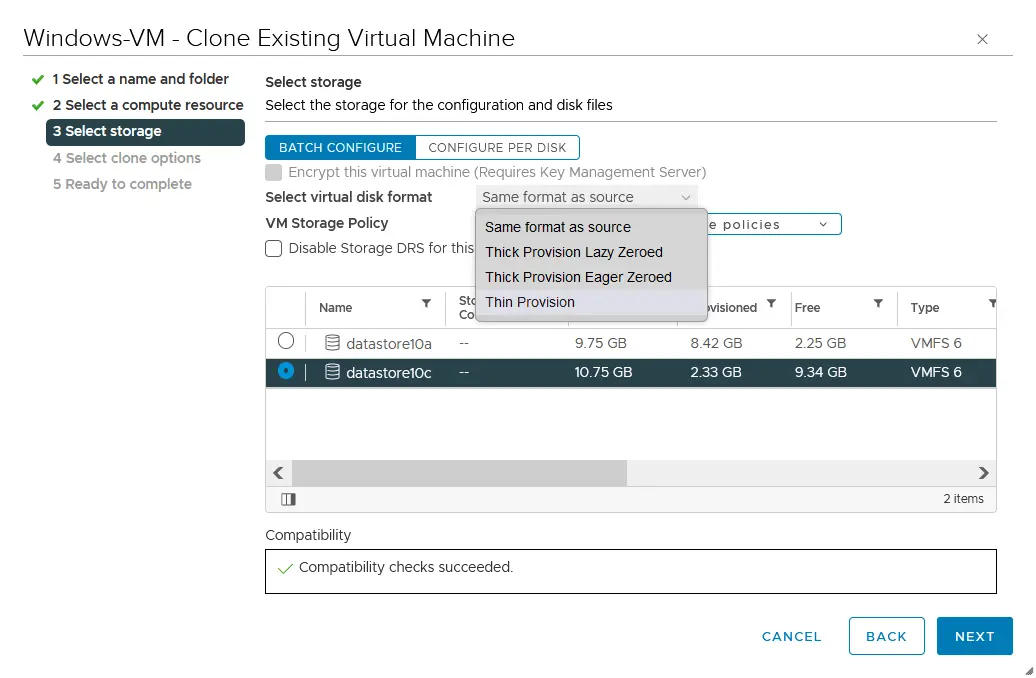
- Select storage. Select a datastore where to place the cloned VM (we select datastore10c). Select a virtual disk format by using one of the options:
- Same format as source
- Thick Provision Lazy Zeroed
- Thick Provision Eager Zeroed
- Thin Provision
You can also select VM storage policies.
- Select clone options. There are some options you can use to customize the clone VM, including changing a hostname in the guest OS.

- Ready to complete. Check the selected parameters for the clone VM and hit Finish.

NOTE: Having the same SID for a VM clone can cause issues, especially if a VM is in an Active Directory domain. You may need to use SYSPREP for Windows or third-party tools to change/reset SID. If MS SQL Server is installed on the VM, you need to make additional pre- (enable a sysadmin SQL account) and post-cloning operations (changing names) with MS SQL Server to avoid issues.
A clone VM has been created, and you can power on the VM.

Method 5: Make a Clone VM with NAKIVO Backup & Replication
VM replication is another way to clone virtual machines on VMware ESXi hosts. A VM replica is an exact copy of a VM, similar to a VM clone. The advantage of VM replication is the ability to automate the VM process and save a VM state for multiple points in time in a VM replica using solutions that leverage VM snapshot functionality.
NAKIVO Backup & Replication is a powerful data protection solution that supports backup and replication of VMware vSphere VMs. Thus, you can create a VM clone (replica) on any ESXi host or cluster.
The advantage of creating VM clones with NAKIVO is that you can clone virtual machines from one ESXi host to another, even if these hosts are not managed by vCenter. You can add vCenter, including all managed ESXi hosts to the inventory, or add multiple standalone ESXi hosts. Configuration is performed in a user-friendly interface.
Other benefits of using the NAKIVO solution include the ability to automate replication and replication from backup, flexible scheduling and retention options, real-time replication for the strictest RPOs, and Site Recovery for DR orchestration.
To clone virtual machines using VM replication, do the following:
- Add ESXi hosts or vCenter Server to the NAKIVO solution by going to Settings > Inventory and click + to add items. You can also click an ESXi host or vCenter displayed in the inventory to view VMs residing on that resource.

- Create a new VMware vSphere replication job by going to Jobs > + > VMware vSphere replication job.
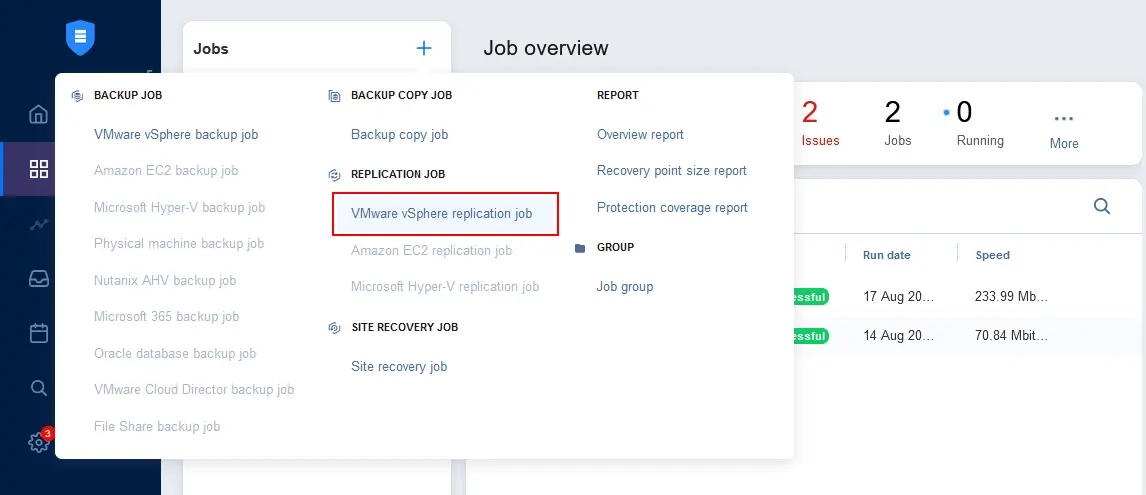
The New Replication Job Wizard for VMware vSphere opens with 7 steps.
- Source. Select the original VM that you want to clone. We select Windows-VM on ESXi host 192.168.101.201. Click Next at each step of the wizard to continue.

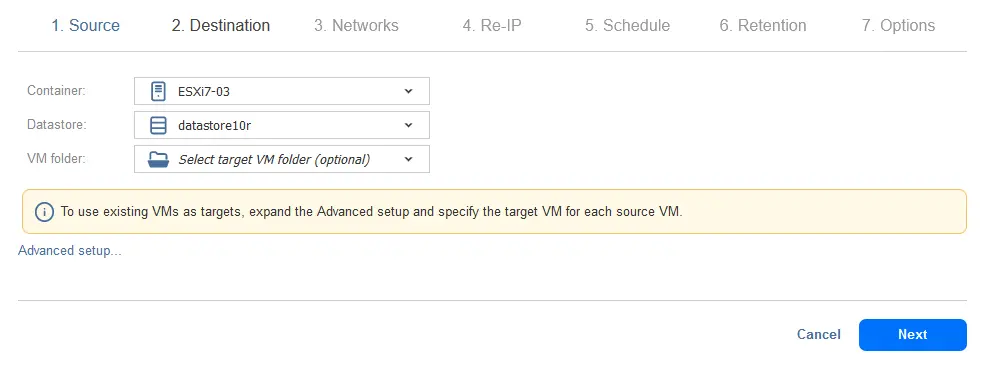
- Destination. Select a container, which can be an ESXi host or cluster managed by vCenter, where to store the VM replica (this resource must be added to the NAKIVO inventory). Select a datastore. You can select a datastore connected to the selected ESXi host or cluster. Select a VM folder on the selected resource if needed.
- Networks. The VM replica (ESXi clone VM) should be connected to a VM network. You can connect the VM replica to any available network on the selected ESXi host or cluster. This functionality is available thanks to the network mapping feature, which is especially useful when you replicate VMs to other ESXi hosts. Also, you can skip this option and connect a VM to the default network.

- Re-IP. If you use network mapping and connect the VM to a different network than the source network, the next step is changing IP addresses in the configuration of VM network adapters to match the addressing of the destination subnet. When using the Re-IP feature, there is no need to edit network settings inside the guest operating system manually after finishing replication.

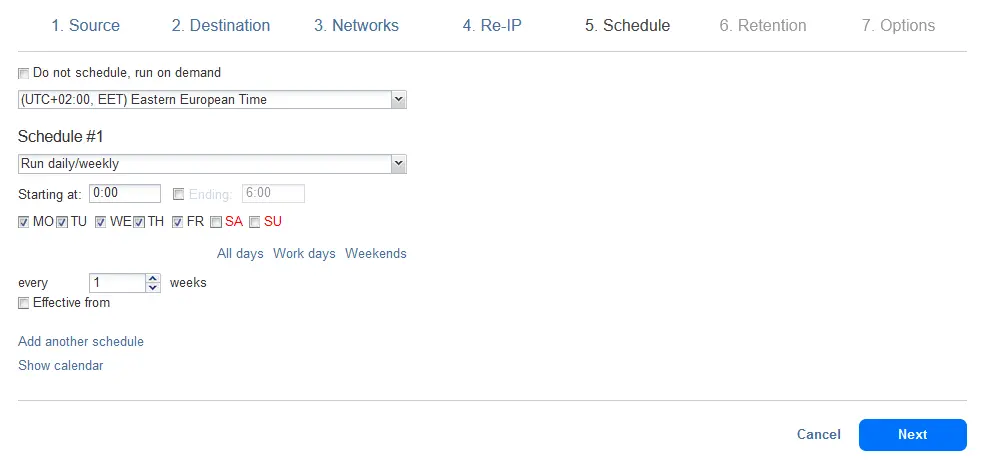
- Schedule. You can run VM replication manually, that is, on demand, or schedule a VM replication job to create a clone VM (replica VM) at regular intervals.
- Retention. You can create multiple recovery points and keep them for the appropriate amount of time by configuring retention settings.

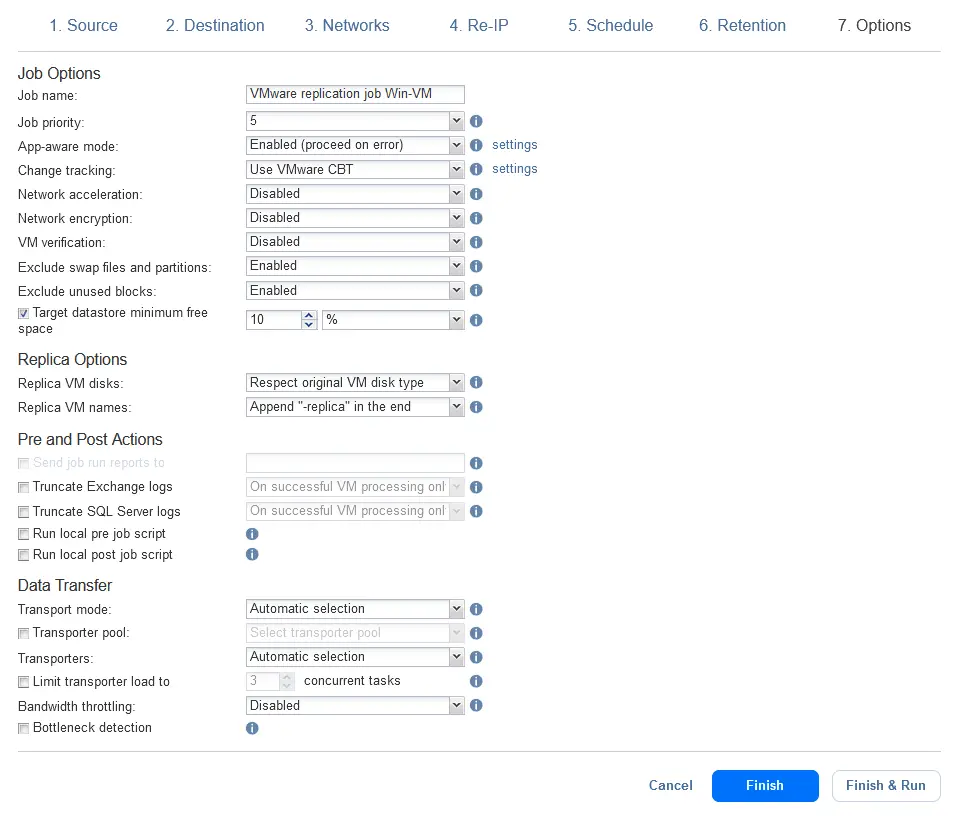
- Options. Enter a replication job name and configure job options that can improve the speed, security, and reliability of VM replication. Click Finish & Run to save job settings and run the VM replication job to create a VMware virtual machine clone with this method.
- You are redirected to the Jobs page, where you can monitor the progress of the replication job. Wait until the job is finished.

As you can see, creating a VM clone with the NAKIVO solution is straightforward. Moreover, NAKIVO Backup & Replication supports Real-Time Replication for VMware VMs for disaster recovery purposes for critical VMs that require strict RPOs of as low as 1 second.