Configuring ESXi Storage Networks in vSphere
ESXi hosts support storage connected via the network, such as NAS and SAN, as well as directly attached storage devices. Network-based storage improves the scalability of a storage subsystem of a server. To use this kind of storage, you need to configure a network properly in your environment and the network settings on an ESXi host.
Read on to learn how you can configure the various core networks required on an ESXi host. This post explains the configuration process of ESXi Storage Networks for iSCSI storage traffic on an ESXi host.
Tools to Configure ESXi Storage Networks
To configure storage networks, you can use the VMware embedded host client for a standalone ESXi host and for any ESXi host managed by vCenter if it is not restricted by vCenter. You can also use VMware vSphere Client to configure ESXi storage networks if your ESXi hosts are managed by vCenter Server. In this case, you can benefit from the advantages of a distributed virtual switch to configure storage networks for multiple ESXi hosts at once.
In this post, we explain how to set up ESXi storage networks in VMware Host Client, which allows for connectivity in ESXi 7.0.
Creating a Virtual Switch
First, let’s create a new virtual switch.
- Log in to VMware Host Client to manage the ESXi host.
- Check the available physical network adapters. Click Networking in the Navigator pane located on the left side of the web interface. Then click the Physical NICs tab. We have 6 physical network interface controllers (NICs) on our ESXi server.

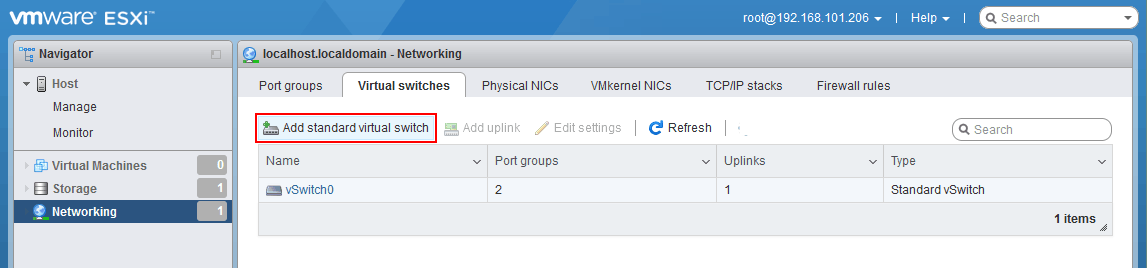
- Next, we create the vSphere standard switch, which will handle the network traffic for our iSCSI network. Go to Networking in Navigator. Select the Virtual switches tab, and click Add standard virtual switch.
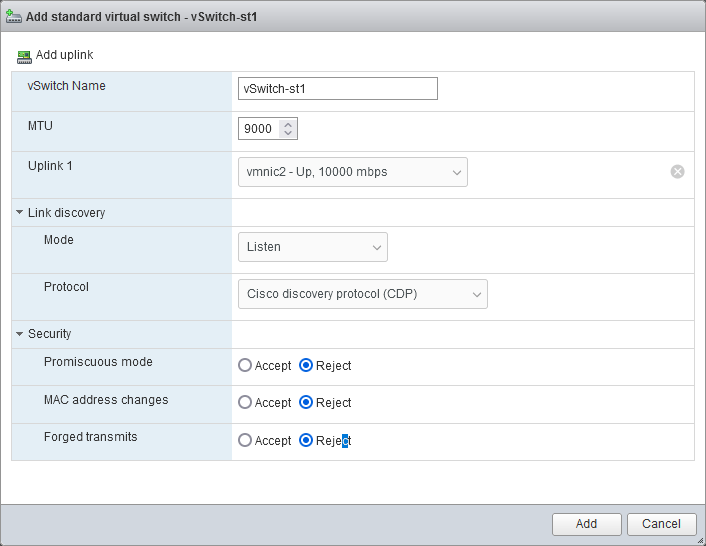
- The Add standard virtual switch window opens. Enter the needed settings:
- Enter a virtual switch name, for example, vSwitch-st1.
- MTU (Maximum Transmission Unit) should be changed from 1500 (the default value) to 9000 Bytes for higher efficiency and performance. Ensure that switches in your infrastructure support the increased MTU before changing the value to avoid issues.
- Select uplink (a physical NIC that will be connected to this virtual switch). We select vmnic2 as uplink 1. The names and numbers in your case may be different.
- As for other settings, you can leave the default values.
Click Add to finish creating a virtual switch.
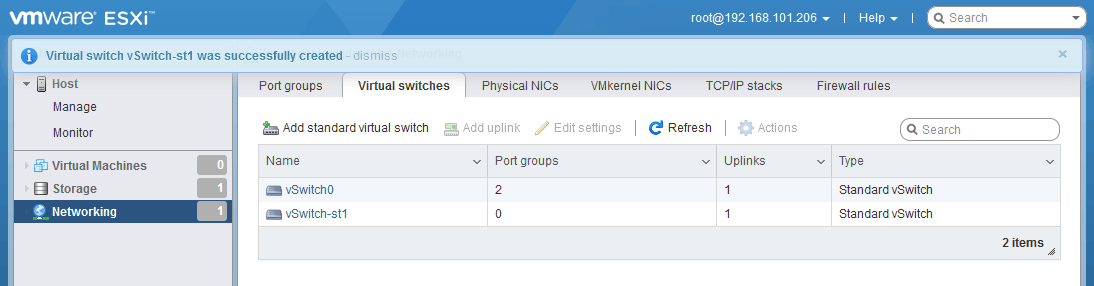
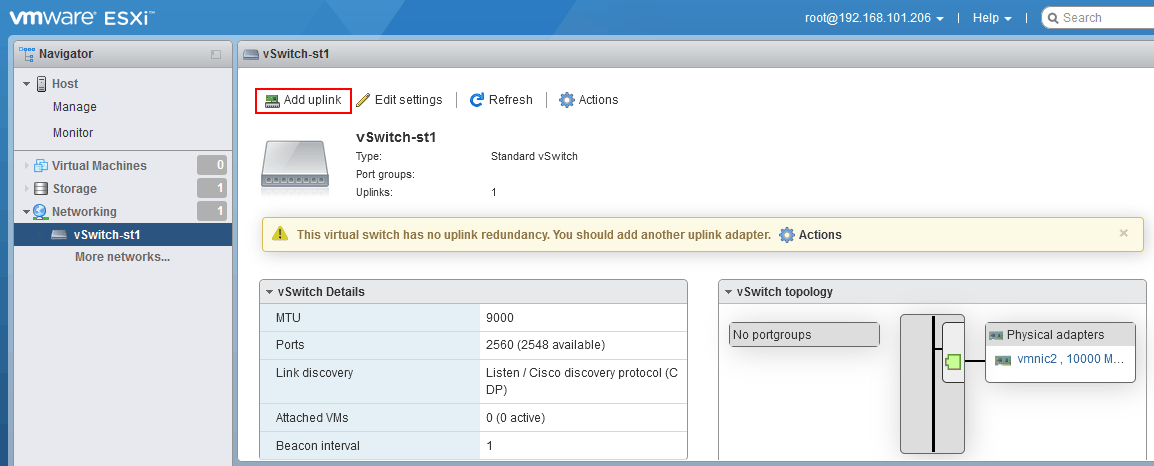
- A new standard virtual switch has been added and you can see it in Networking > Virtual switches. Click this virtual switch to open vSwitch settings (vSwitch-st1 in our case).
- Click Add uplink to add the second uplink and connect the second physical network adapter to the virtual switch for redundancy.
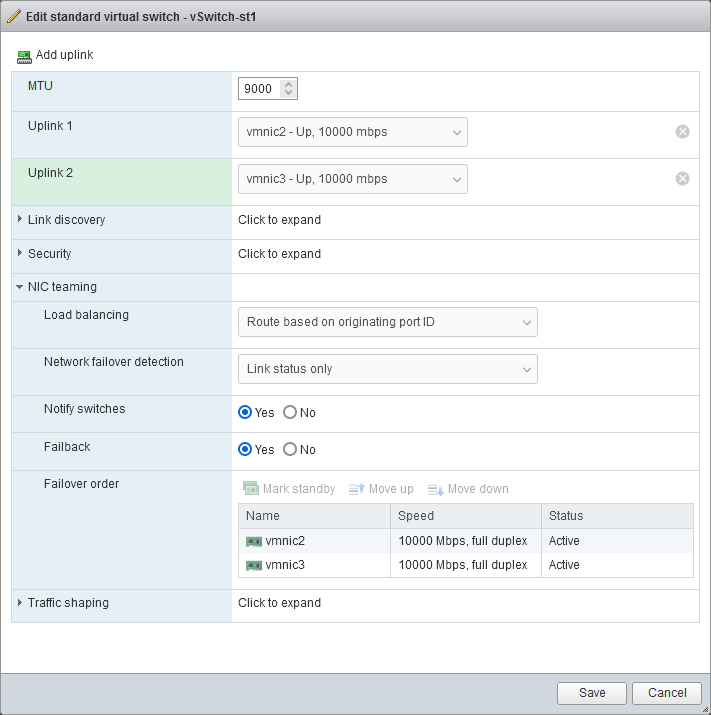
- The Edit standard virtual switch window opens.
- Select a physical NIC for uplink 2. This is vmnic3 in our case.
- Select NIC teaming options. We will configure failover and failback settings for port groups of the virtual switch later.
Click Save to save the virtual switch settings.
Note that If you have not changed the MTU value yet, you can change it now. We need to enable jumbo frames both on the new vSwitch as well as on each new port group. iSCSI performance benefits greatly from the use of jumbo frames. Jumbo frames are Ethernet frames with a payload greater than a maximum transmission unit (MTU) value of 1500 bytes. Typically for iSCSI and other use cases, we use the MTU value of 9000 bytes.
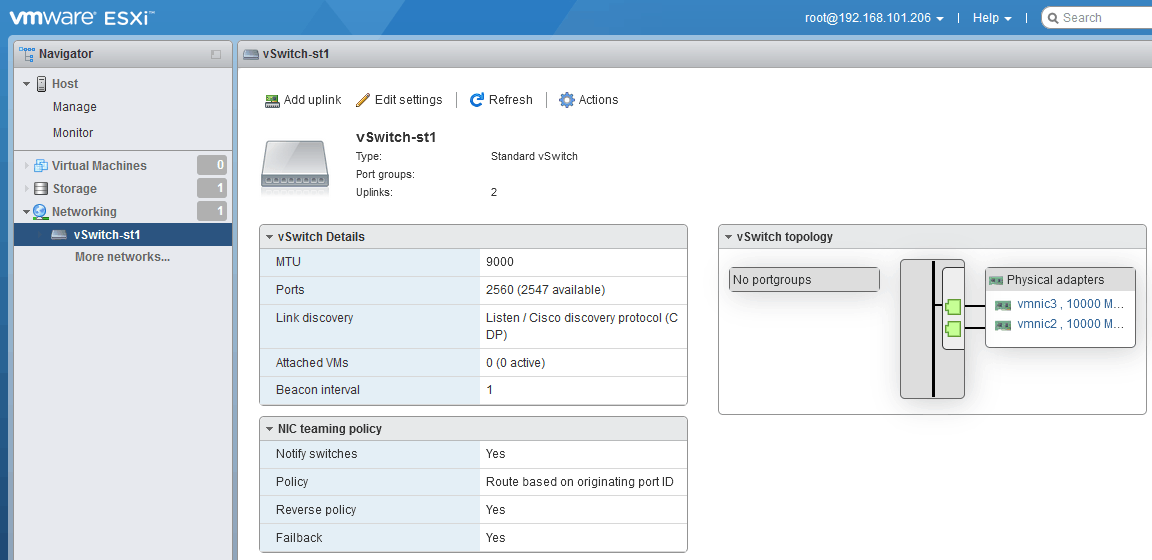
- The second (redundant) uplink is added. You can see the updated scheme with the vSwitch topology. But there are no port groups at this moment.
Adding a VMkernel NIC and Port Group
Now we need to create a port group and a VMkernel network interface controller to the virtual switch.
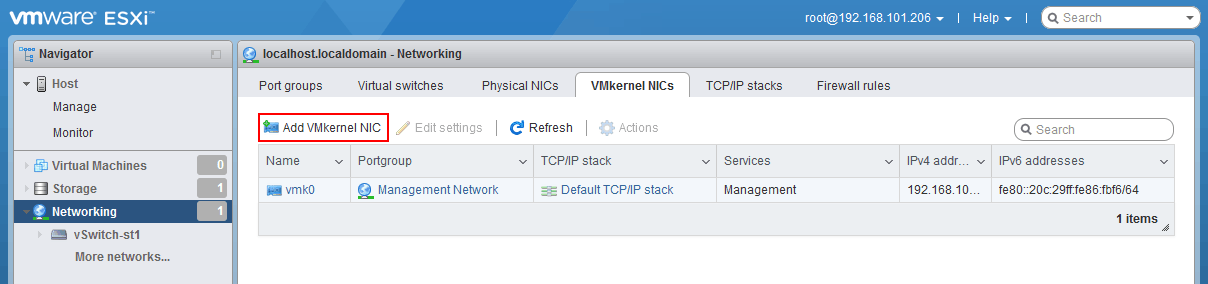
- Go to Networking > VMkernel NICs, and click Add VMkernel NIC.
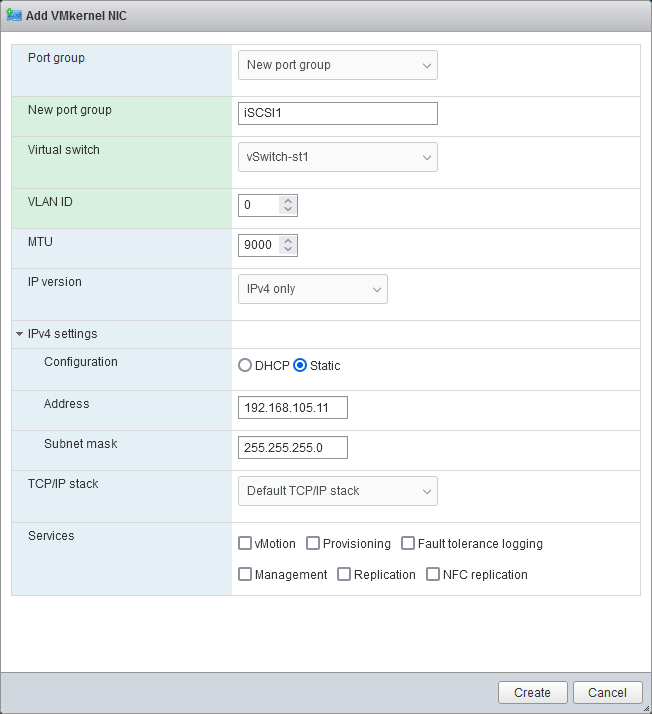
- Select the needed parameters for a VMkernel NIC. We set the parameters as follows:
- Port group: New port group
- New port group name: iSCSI1
- Virtual switch: vSwitch-st1
- VLAN ID: 0 (or set the needed ID if you use VLAN)
- MTU: 9000
IPv4 Settings:
- Configuration: Static
- Address: 192.168.105.11
- Subnet mask: 255.255.255.0
Click Create.
For iSCSI, we need to create multiple port groups. We do this for redundancy and good performance. We set the Network Label for the port group as well as any VLAN ID that we want to assign. This is optional and may not be needed or desired in your environment.
Setting VLANs at the port group level is known as Virtual Switch Tagging or VST. In many VMware environments, if you have a dedicated storage switch, the ports will be set in untagged mode. This means that the physical switch is doing all of the tagging operations and the virtual switch is not aware of this. This is known as External Switch Tagging or EST.
Each environment is different and determines how the VLAN setting is configured for each port group in your environment.
- Let’s add another port group so we could adjust our vmnic assignments.
Go to Networking > VMkernel NICs, and click Add VMkernel NIC.
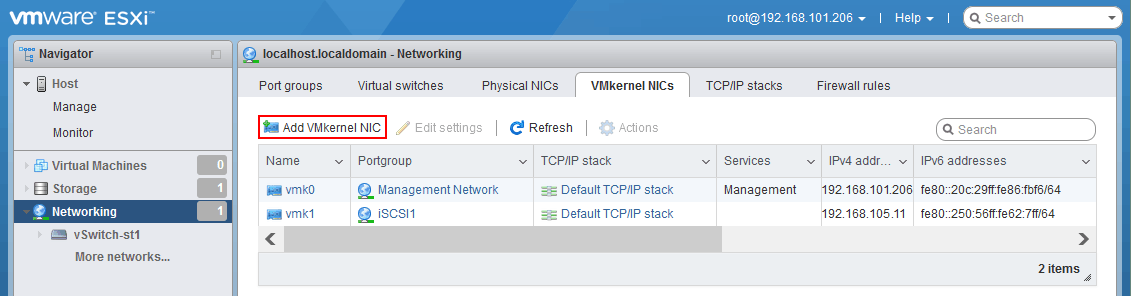
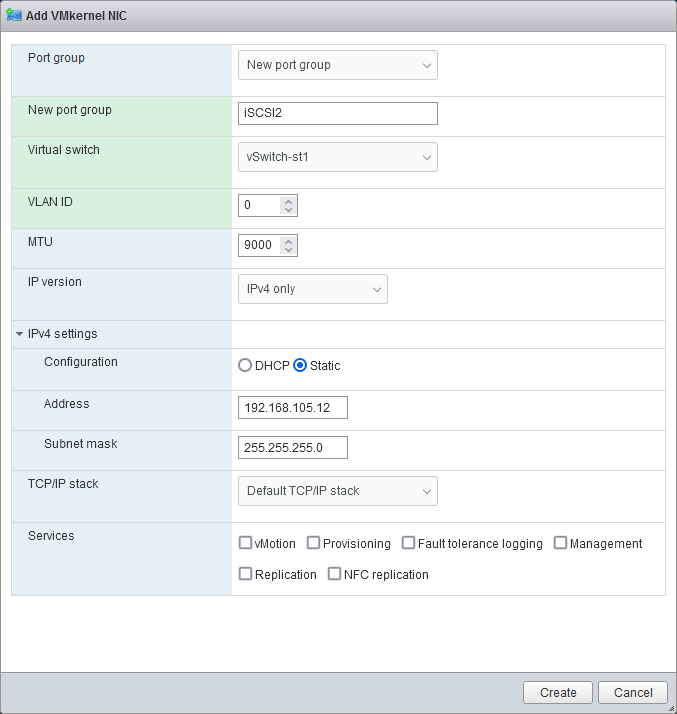
- Add a new port group to the same vSwitch (iSCSi2 to vSwitch-st1 in our case).
We need to assign a different static IP address in the same subnet as we did for our other storage VMkernel port. When finished, we will have two (2) VMkernel ports assigned to our new vSwitch carrying our iSCSI traffic.
- Now, we have a vSwitch with our second iSCSI VMkernel port configured. Let’s edit network failover options in the first port group of our virtual switch.
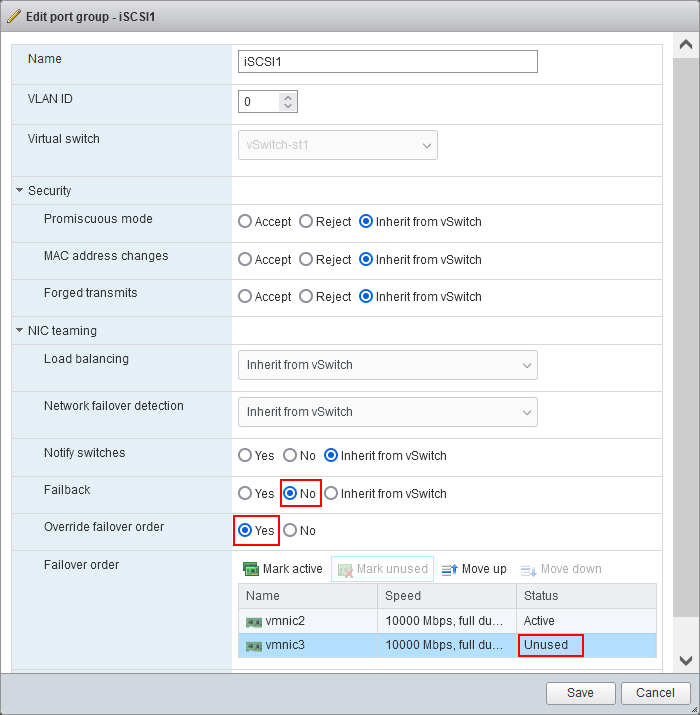
It is also important to set the NIC Teaming properties. We need to disable Failback and also Override the switch failover order for each port group. Additionally, we place the second vmnic in the unused state on each port group. This prevents the VMkernel port from floating across uplinks in the case of a failure. The reason for this is that if the physical NIC loses connectivity, it should be treated as a storage path failure not a network failure.
We want the Pluggable Storage Architecture (PSA) in the VMkernel to handle this event and fail over to an alternate path to stay connected to the storage. This approach enables consideration of storage resiliency based on multiple paths to the storage rather than basing it on the number of ESXi storage networks available to a single storage path.
- Go to Networking > Port groups, select the needed port group (iSCSI1 in our case), and click Edit settings.
In practice, this failover approach is reflected in the following port group settings:
- Failback: No
- Override failover order: Yes
- Mark the second NIC (vmnic3) as unused. Click the second vmnic (vmnic3 in our case) and then click the Mark unused button.
Click Save to save the port group settings.
- Do the same for the second port group.
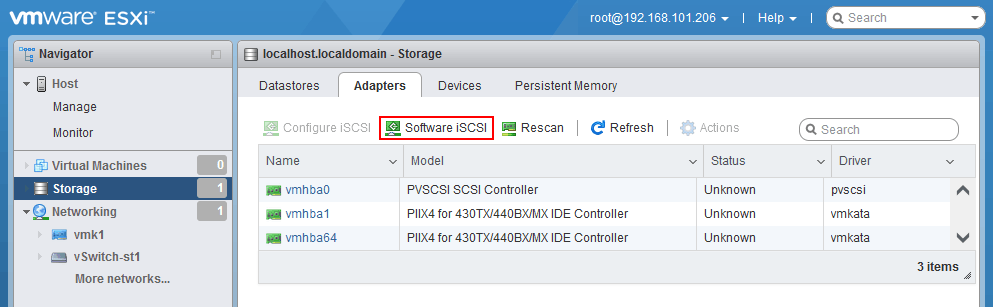
Adding a Software iSCSI Adapter and iSCSI Target
Once we have configured the virtual switch, VMkernel ports and port groups, as well as NIC teaming and Jumbo frames, we can configure software iSCSI to attach iSCSI storage to the ESXi host over the network.
- Go to Storage > Adapters, and click Software iSCSI.
- The Configure iSCSI window opens.
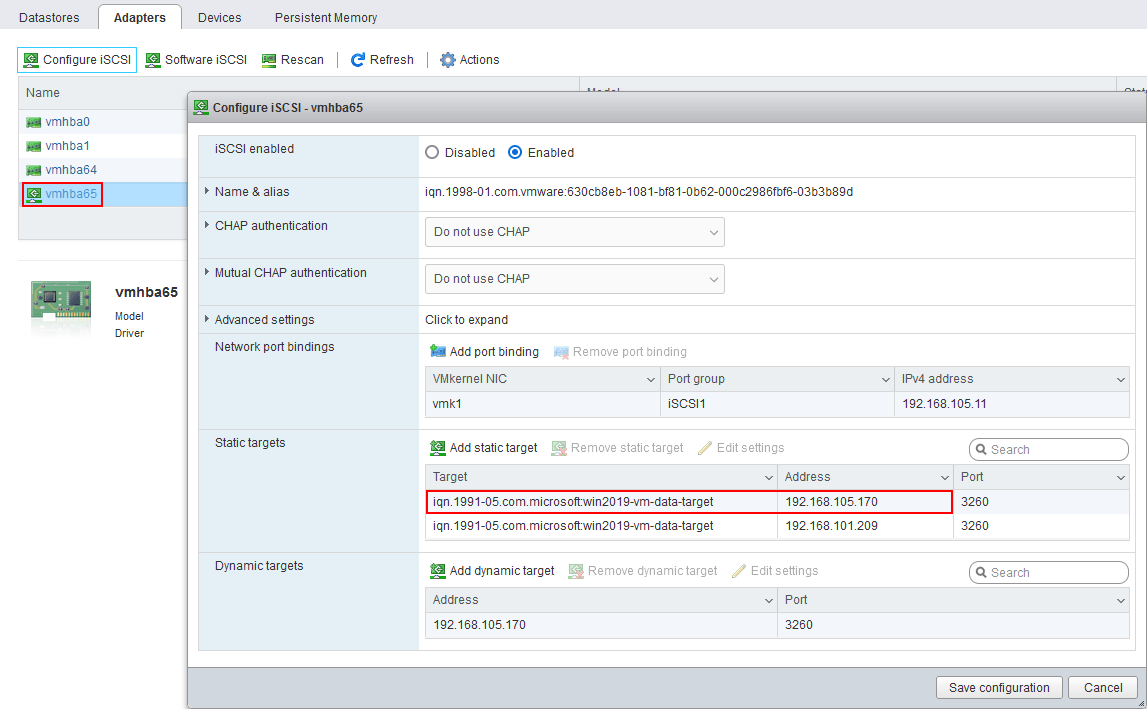
Click Enabled in the iSCSI enabled line.
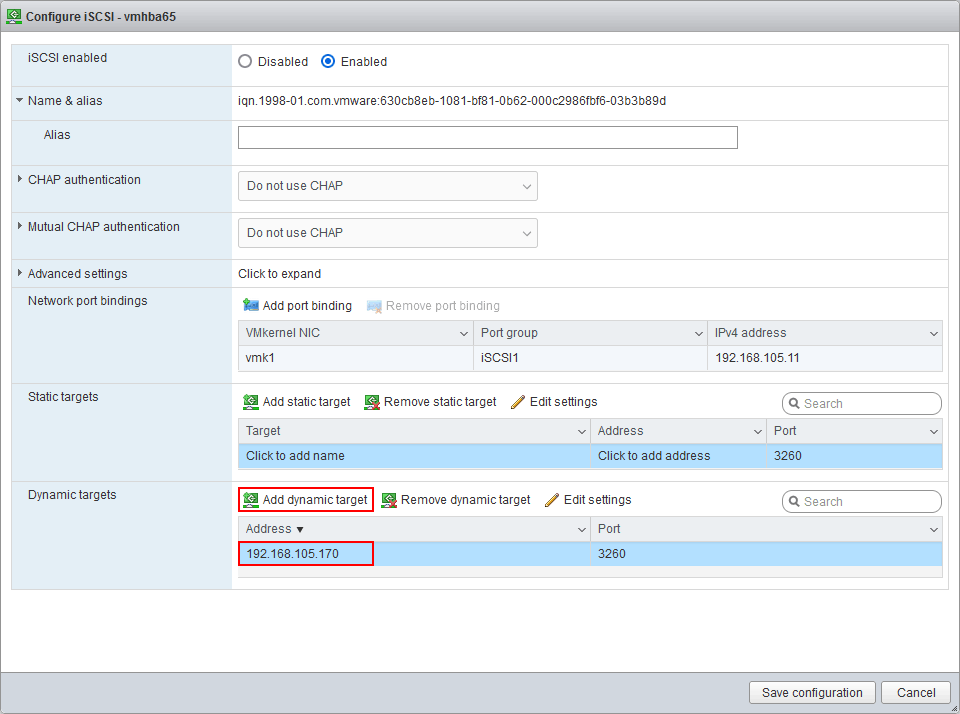
Click Add port binding in the Network port bindings section.
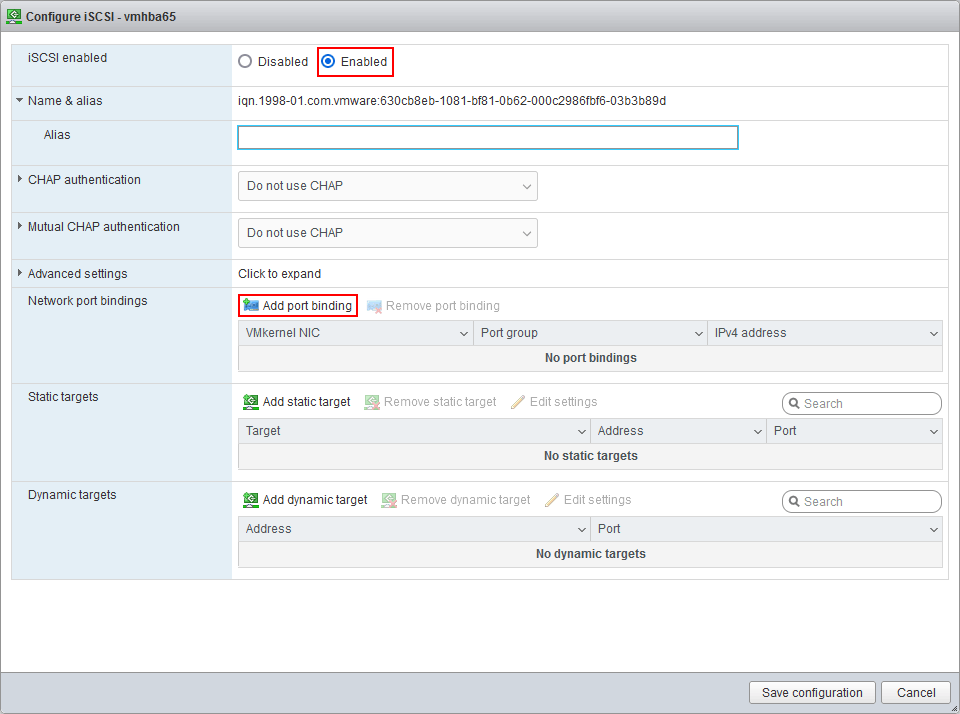
- Select a VMkernel adapter to be used for connecting the network storage, for example vmk1, and click Select.

- Click Add dynamic target and enter the IP address of a server configured as an iSCSI target server. In our example, the IP address of the iSCSI target is 192.168.105.170.
Click Save configuration.
- Go to Storage > Adapters and click Rescan.
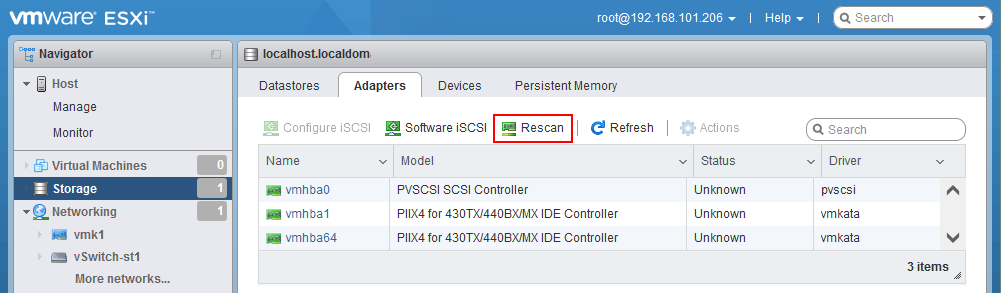
- Select a new iSCSI adapter that is displayed after refreshing and click Configure iSCSI to open the adapter properties (vmhba65 in our case).
You can see that a static target was found and added after we entered the IP address of the dynamic target (iqn.1991-05.com.microsoft:win2019-vm-data-target in this case).
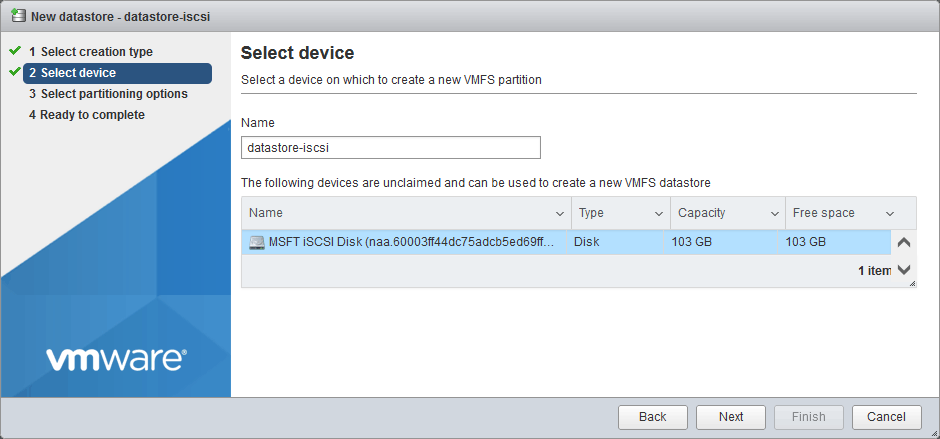
Now you can create a new VMFS datastore on the connected iSCSI target. Select the appropriate iSCSI disk when selecting a storage device to create a datastore.
Conclusion
When you store virtual machines on direct attached storage and network attached storage, make sure to back up these VMs regularly. The NAKIVO data protection solution supports VMware vSphere and other environments for fast backup and recovery.