Thick and Thin Provisioning: What Is the Difference?
In this article, we are going to consider the storage pre-allocation aspect of virtual disk settings in detail and find out what thick and thin provisioning are, how they differ, and which of these storage pre-allocation types is better for your infrastructure.

Thick Provisioning
Thick provisioning is a type of storage pre-allocation. With thick provisioning, the complete amount of virtual disk storage capacity is pre-allocated on the physical storage when the virtual disk is created. A thick-provisioned virtual disk consumes all the space allocated to it in the datastore right from the start, so the space is unavailable for use by other virtual machines.
There are two sub-types of thick-provisioned virtual disks:
- A Lazy zeroed disk is a disk that takes all of its space at the time of its creation, but this space may contain some old data on the physical media. This old data is not erased or written over, so it needs to be “zeroed out” before new data can be written to the blocks. This type of disk can be created more quickly, but its performance will be lower for the first writes due to the increased IOPS (input/output operations per second) for new blocks;
- An Eager zeroed disk is a disk that gets all of the required space still at the time of its creation, and the space is wiped clean of any previous data on the physical media. Creating eager zeroed disks takes longer, because zeroes are written to the entire disk, but their performance is faster during the first writes. This sub-type of thick-provisioned virtual disk supports clustering features, such as fault tolerance.
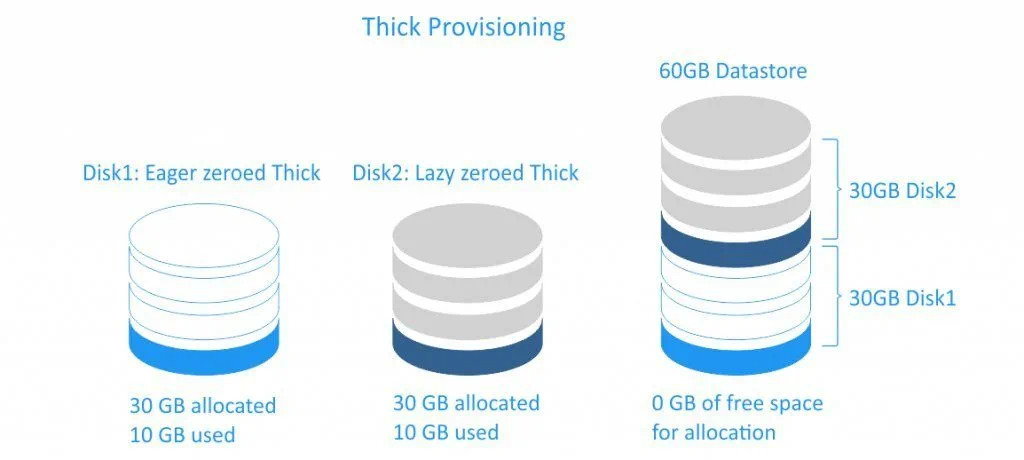
For data security reasons, eager zeroing is more common than lazy zeroing with thick-provisioned virtual disks. Why? When you delete a VMDK, the data on the datastore is not totally erased; the blocks are simply marked as available, until the operating system overwrites them. If you create an eager zeroed virtual disk on this datastore, the disk area will be totally erased (i.e., zeroed), thus preventing anyone with bad intentions from being able to recover the previous data – even if they use specialized third-party software.
Thin Provisioning
Thin provisioning is another type of storage pre-allocation. A thin-provisioned virtual disk consumes only the space that it needs initially, and grows with time according to demand.
For example, if you create a new thin-provisioned 30GB virtual disk and copy 10 GB of files to it, the size of the resulting VMDK file will be 10 GB, whereas you would have a 30GB VMDK file if you had chosen to use a thick-provisioned disk.
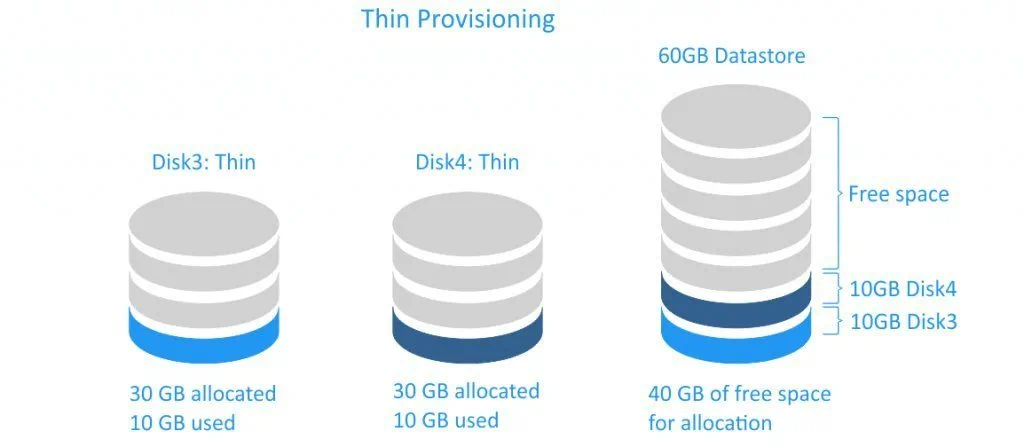
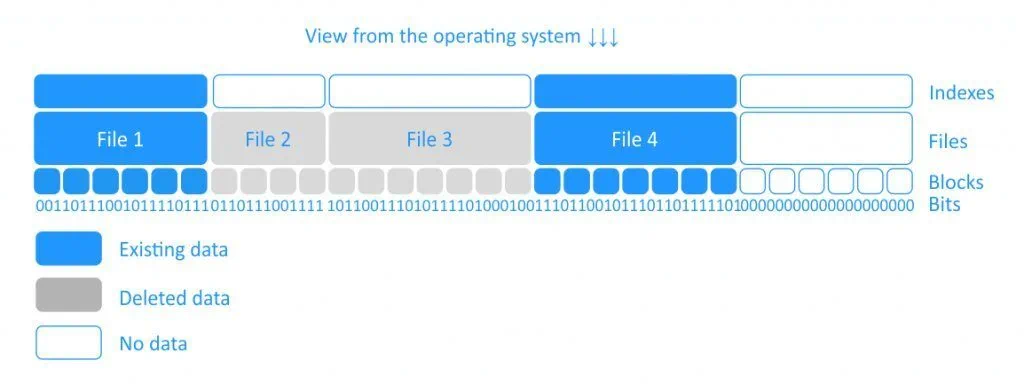
Thin-provisioned virtual disks are quick to create and useful for saving storage space. The performance of a thin-provisioned disk is not higher than that of a lazy zeroed thick-provisioned disk, because for both of these disk types, zeroes have to be written before writing data to a new block. Note that when you delete your data from a thin-provisioned virtual disk, the disk size is not reduced automatically. This is because the operating system deletes only the indexes from the file table that refer to the file body in the file system; it marks the blocks that belonged to “deleted” files as free and accessible for new data to be written onto. This is why we see file removal as instant. If it were a full deletion, where zeroes were written over the blocks that the deleted files occupied, it would take about the same amount of time as copying the files in question. See the simplified illustration below.
Issues That May Occur When Using Thin-Provisioned Virtual Disks
Using thin-provisioned virtual disks is not always smooth. There are some issues that you should be aware of and prepared to deal with.
Let’s consider an example that renders the virtual machines unusable. For example, we have a 20GB datastore with three virtual machines running on it. Each virtual machine has a thin-provisioned virtual disk set with a maximum size of 10 GB. (This practice is called “overprovisioning” – we assign virtual disks more space than they can physically take up. This is done often, as it allows you to scale the system by adding more physical storage as you need it.) The file size of each virtual disk will expand as data is added, until there is no free space left on the datastore. The situation becomes critical when there is only 1GB of free space left on the datastore, as when, for example, VM1 occupies 8 GB, VM2 occupies 7 GB, and VM3 – 4 GB.
Regular methods of file deletion within virtual machines will not help shrink the thin-provisioned virtual disks. If more than 1 GB of new data is written to any of these virtual machines, all three of them will fail, and you will need to migrate one or more of the virtual machines to another datastore to restore their running states.
How to Reduce the Size of Thin-Provisioned Virtual Disk After Deleting Files
To be able to reduce the VMDK file size of your thin-provisioned virtual disks, you need to know how to zero the blocks that the data you deleted previously occupied. Let’s find out how to do that.
Note: Disk shrinking operations are only possible if the virtual machines do not contain snapshots. Also, please be attentive and execute commands at your own responsibility. Always back up all of your important data before carrying out any disk operations.
Shrinking Thin-Provisioned VMware Disks in Linux
Let’s consider an example: we have a 10,266,496 KB (10GB) VMDK file (we learned about its size by going to the directory on the datastore where our virtual machine is located) and want to shrink the virtual disk on which the guest Linux OS is installed. We can try to delete unnecessary files on this virtual disk. However, Linux does not automatically zero blocks after deleting files; you will have to do this yourself. You can do this by using the dd (data duplicator) utility for copying and converting data. This tool is available on all Linux systems.
Note: Before running the dd utility, it is necessary to make sure the datastore has enough capacity to use it (e.g., for ESXi server, you can check the storage capacity in the storage section of the vSphere client – go to Configuration > Storage).
Let’s use the dd utility.
-
First, we check the free space on a guest Linux virtual machine by using the
df -hcommand:root@test-virtual-machine:/# df -hWe get the following output in the console:
Filesystem   Size   Used   Avail   Use%   Mounted on
udev         469M   0      469M    0%     /dev
tmpfs        99M    6,3M   92M     7%     /run
/dev/sda7    17G    8,8G   6,4G    58%    /
tmpfs        491M   116K   491M    1%     /dev/shm
tmpfs        5,0M   4,0K   5,0M    1%     /run/lock
tmpfs        491M   0      491M    0%     /sys/fs/cgroup
/dev/sda1    945M   121M   760M    14%    /boot
/dev/sda6    3,7G   13M    3,5G    1%     /var/log
tmpfs        99M    36K    99M     1%     /run/user/1000
We can see from this output that the
/(root) partition contains 8.8 GB of files. -
Let’s delete a few gigabytes of unnecessary files in the root partition. This is what we see in the console, if we run the
df -h /command:Filesystem Size Used Avail Use% Mounted on /dev/sda7 17G 4,7G 11G 31% /
Thus, our root partition now contains 4.7 GB of files. However, going to the directory where our VMDK file is located, we can see that its size is still 10,266,496 KB (10 GB).
-
Now we are going to fill the free space with zeroes (in our case, we’ll fill 10 GB out of 11 GB available). First, we type
cdfollowed by the name of the directory that the partition that needs to be zeroed out is mounted to (in our case it iscd /, because we want to navigate to the root partition). After that, we run the following command, changing the variables to suit our needs:dd bs=1M count=10240 if=/dev/zero of=zeroIn this command:
ddcan only be run as super user.-
bssets the block size (for example,bs=1Mwould give you a 1-Megabyte block size). -
countspecifies the number of blocks to be copied (the default is forddto keep going forever or until the input runs out). In our case, 10,240 MB is the amount of free space that we want to fill with zeroes, so the number of 1-Megabyte blocks is 10240. -
ifstands for “input file”. This is where you should indicate the source from which you want to copy data. In our case, it is/dev/zero– a special file (a pseudo-device) that provides as many null characters as you want to read from it. -
ofstands for “output file”. This is where you set the destination where you want to write/paste your data (in our case, the name of the file iszero).
After executing the above command, the size of our VMDK file grows. This is the output we see after the successfully completed command:
10240+0 records in
10240+0 records out
10737418240 bytes (10 GB) copied, 59,4348 s, 181 MB/s
Command has been completed successfully.
So, now the size of our VMDK file is 11,321,856 KB (10.8 GB), meaning that it has expanded. Also, if we run the
df -h /command again, we will see the following:Filesystem Size Used Avail Use% Mounted on /dev/sda7 17G 15G 569M 97% /
This means that almost the whole root partition (i.e., 97%) is occupied. This is because we have filled most of the previously “available” space with zeroes. Now, our thin-provisioned virtual disk is ready to be shrunk.
Note: To perform shrinking, it is necessary to install VMware Tools.
-
For virtual machines that are running on VMware ESXi or VMware Workstation, we execute the following two commands in the Linux guest OS.a) To make sure that the disk partition is available, we run the command:
root@test-virtual-machine:/# vmware-toolbox-cmd disk list
This is the output we see in our case (i.e., we see the list of available partitions):
/

/boot

/var/log
The root partition is present, so we can proceed.b) To shrink the partition, we run the following command:
root@test-virtual-machine:/# vmware-toolbox-cmd disk shrink /
This is the output we see in our case:
Please disregard any warnings about disk space for the duration of shrink process.
Progress: 100 [===========>]
Disk shrinking complete.
Now, the size of our shrinked VMDK file is 5,323,456 KB (that is, 5.08 GB – much less than the 10.8 GB it was before).
Note: If your guest virtual machine is running on an ESXi server, after filling the blocks with zeroes, you can follow these steps:
- Power off the virtual machine, or disconnect the virtual disk you want to shrink.
- Connect to the ESXi host with the SSH client.
- Navigate to the Virtual Machine Folder.
- Verify disk usage with
du -h. - Run
vmkfstools -K test-virtual-machine.vmdk. - Verify disk usage with
du -honce again.
Shrinking Thin-Provisioned VMware Disks in Windows
Like Linux, Windows does not automatically zero blocks after deleting files. To be able to zero the free space of the target disks on your Windows virtual machine, you need to download SDelete – a free utility from the Microsoft’s Sysinternals Suite – and unzip the files from the downloaded archive to c:\program files\sdelete
Then follow these steps:
- Run
cmd -
Go to the directory where SDelete is located. In our case, it is:
cd c:\program files\sdelete -
For each partition in the console, use the
sdelete -zcommand. This is what we have in our case:sdelete -z c:
sdelete -z d:
These commands will zero out any free space on your thin-provisioned disk by filling in any unused space on the specified partitions.Wait a couple of minutes until the process is finished. Your VMDK file will expand to its maximum size during the process.
-
Make sure VMware Tools are installed on your Windows virtual machine. By default, VMware Tools are installed to
c:\program files\vmware\vmware tools\Navigate to this directory by typing:
cd c:\program files\vmware\vmware tools\ -
To view the available disk partitions, type:
vmwaretoolboxcmd disk list -
Shrink the disk partitions that you need. In our case, we ran the commands:
vmwaretoolboxcmd disk shrink c:\

vmwaretoolboxcmd disk shrink d:\
Wait until the program has finished shrinking the disk.
You can use this method for virtual machines that are running on VMware ESXi or VMware Workstation.
VMware Storage Distributed Resource Scheduler
Above, we mentioned a solution to shrink thin-provisioned disks manually. However, there is one more way to manage your virtual disks (both thin-provisioned and thick-provisioned), if you use a datastore cluster in vSphere. VMware provides automatic virtual disk migration within the datastore cluster to avoid overflow of disk storage where thin-provisioned virtual disks are located and to balance I/O resources.
If you have more than one shared datastore mounted to the ESXi server, you can set up the Storage Distributed Resource Scheduler (Storage DRS). Storage DRS is an intelligent vCenter Server feature for efficiently managing VMFS and NFS storage that provides automatic virtual machine disk placement and migration. You can also set Storage DRS to manual mode if you prefer to approve migration recommendations manually.
Follow these steps to enable Storage DRS:
- Navigate to the datastore cluster in the vSphere Web Client.
- Go to vCenter > Datastore Clusters.
- Select your datastore cluster and click Manage > Settings > Services > Storage DRS.
- Click Edit.
- Configure the automation settings, I/O-related functions, and advanced options that you need.
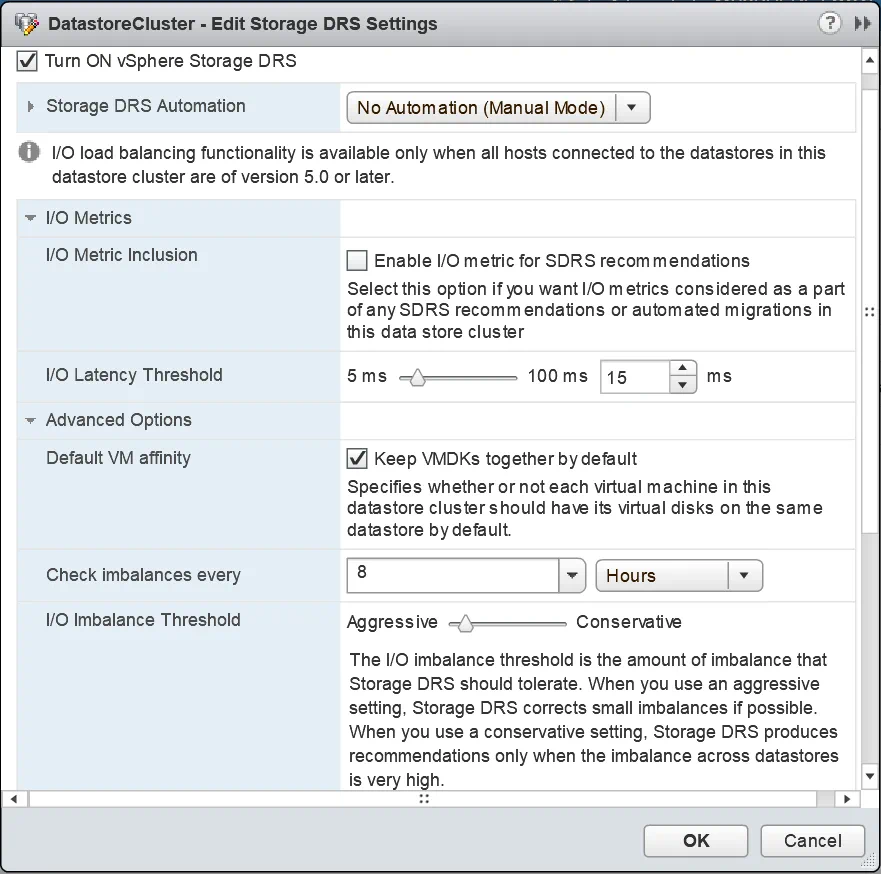
- Click OK to finish.
If there are no datastore clusters in your vSphere environment, follow these steps to create and set up a new datastore cluster:
- Navigate to vCenter > Datacenters in the vSphere Web Client.
- Right-click on your Datacenter and select New Datastore Cluster.
- Enter the name of your datastore cluster and tick the checkbox near “Turn On Storage DRS“.
- Select the automation settings, I/O-related functions, and advanced options that you need.
- Click OK to finish.
Conclusion
In this blog post, we have considered the types of virtual disks and weighed the advantages and disadvantages of each in order to better understand the differences between thick and thin provisioning. Eager zeroed thick-provisioned disks are the best for performance and security, but require enough free storage space and take a lot of time to be created. Lazy zeroed thick-provision disks are good for their short creation times, but they do not provide as much speed as eager zeroed disks do, and are less secure. Thin-provisioned disks are the best choice to save datastore space at the moment of disk creation.
You can create a virtual disk with a greater maximum size than the physical space you have available (“overprovisioning”) and add more physical storage in the future, but remember that if the physical disk space fills up and the thin-provisioned disk cannot grow to accommodate more data, your virtual machines will become unusable – so don’t forget to keep an eye on the amount of free space. We also went through methods of shrinking thin-provisioned VMware virtual disks, in case you prefer not to add more storage and need to reduce the space taken.