Disaster Recovery with NAKIVO: Planning, Implementation and Testing
Backup and disaster recovery are the foundations of data protection strategies across organizations and industries. Disaster recovery is the process of recovering virtual machines and the services running on them at a secondary site (known as a disaster recovery site) when the production site is rendered unavailable. Housing redundant servers, computers, and network equipment with the needed software, these secondary DR sites can be of different types depending on the level of redundancy.
NAKIVO Backup & Replication includes the Site Recovery functionality that allows you to create advanced recovery sequences (with full site failover) that can be started with one click when your primary site goes down. Read this blog post to learn about key DR strategy components like IT disaster recovery planning, testing and performing disaster recovery with NAKIVO’s integrated solution.
Step 1. Disaster Recovery Planning
As an essential step for effective disaster recovery, planning should include an evaluation of the organization’s recovery needs and developing a comprehensive understanding of what components, steps, and procedures should be included in a disaster recovery workflow.
Planning disaster recovery: best practices
1. Conduct a business impact analysis
A business impact analysis (or BIA) is used to determine the potential negative impact of major incidents or natural disasters on business operations. This analysis involves assigning an order of priority for different VMs, sequence of recovery and available time before a disruption significantly impacts business operations. For example, the failure of one VM might cause delays and inconveniences, while failure of another VM can lead to complete disruption of business-critical operations.
2. Assess the risks involved
Before DR planning, compile the relevant data about the risks to your organization’s operations and business continuity. In some areas, a long-term power outage or a virus attack are more likely than a tornado, but natural disasters are a common occurrence in others. A risk assessment helps you determine the appropriate level of protection against certain threats and come up with measures to minimize the risks and mitigate the consequences. Even though the risks cannot be completely eliminated, you will be better prepared for the disaster scenarios that you are likely to face.
3. Develop disaster recovery documentation
Once the risks and their potential impact on your business are identified, you have a better understanding of where to focus your efforts to plan disaster recovery processes. Document recovery procedures, describing all the vital steps and DR measures in detail, and update documents regularly to reflect changes made in the environment. Documentation should include:
- Disaster recovery scope. Assess the importance of each hardware and software component in your infrastructure and include the ones for mission-critical operations in your disaster recovery plan. VMs housing critical information, IT systems, and applications whose operation is essential to ensure continuous delivery of services should be your top priority for recovery.
- VM recovery order. Particular VMs may be dependent on the software or information housed in another VM, which means they cannot operate separately or be started at random. You should specify the recovery order to streamline recovery and eliminate the risk of software conflicts at the DR site. For example, the VM running Active Directory Domain Controller must be up and running before you can start a VM with a file server that uses Active Directory authentication.
Another example is web services, which often rely on software that is installed on several different VMs. The following sequence might need to be implemented:
- The VM with the database server should be started first.
- The VM with the application server can then be started.
- Only then can the VM with the web server be started.
- RTO and RPO in disaster recovery. Set the recovery time objective (RTO) and recovery point objective (RPO) for the different priority VMs in the disaster recovery plan. For example, VMs with financial systems might have shorter recovery objectives than those used for storing archived documents.
- Dependencies. When determining the dependency chain between staff and IT components, work with your staff and take them into account to avoid weak links that can lead to recovery failure. For example, a VM used by the accounting department might need to be recovered first if workers in other departments depend on those financial operations to do their work.
- Staff. Assign roles and responsibilities to team members who are part of DR processes. If they will be working at the DR site, make sure there are workstations set up there with all the required equipment, office furniture, and hardware, so that they can continue their work with minimal interruptions. If employees can work remotely during a disaster, configure VPN access and provide VPN accounts in advance.
- Hardware requirements. The success of a disaster recovery plan depends heavily on the performance and capabilities of the hardware located at the DR site. Several factors should be taken into account:
- Servers must have enough CPU, memory, and disk capacity to sustain transferred workloads. Low CPU performance and insufficient memory can affect the speed of your VMs, while insufficient disk speed results in poor VM performance.
- Networks must provide enough bandwidth for the recovered VMs to interact with each other, with shared storage, and with users as necessary.
Step 2. Preparing for Disaster Recovery
Once you have your documentation, you can proceed to preparing for disaster recovery by preparing the disaster recovery site and setting up replication of critical workloads to that site. Replication is required for VM failover to replica VMs when the primary infrastructure goes down.
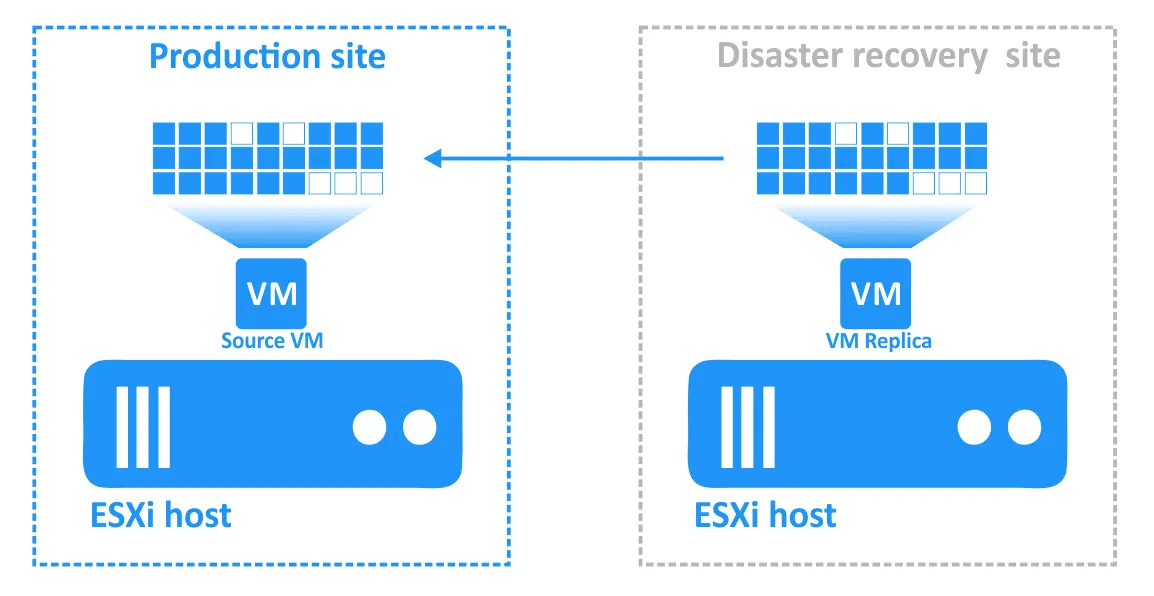
What is VM replication?
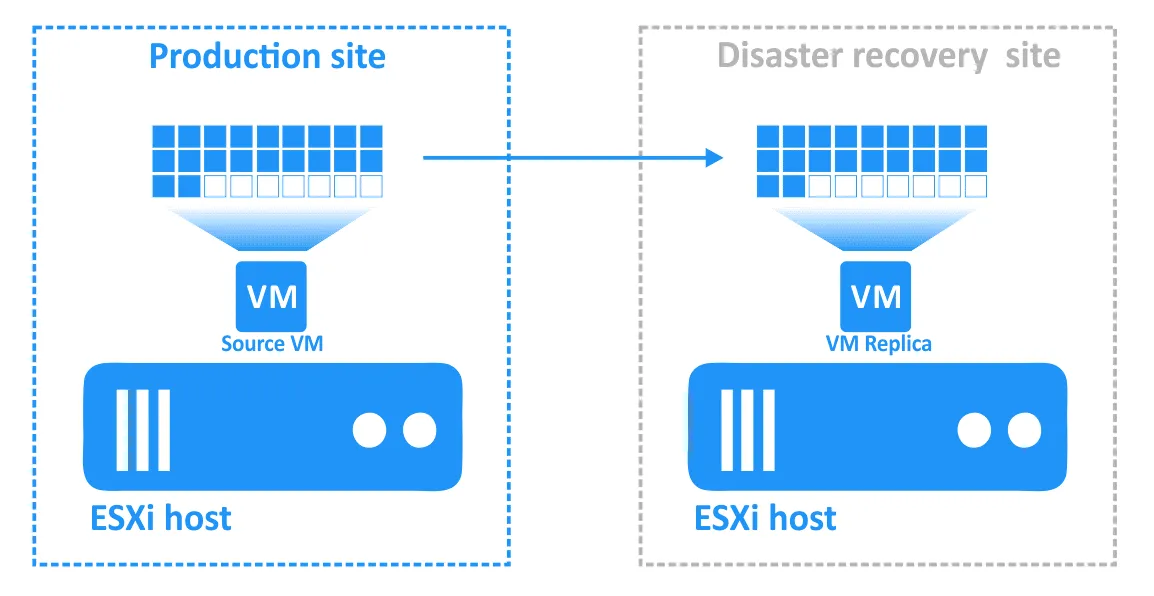
Virtual machine replication is the process of creating an identical copy of a source VM (termed a “VM replica”) on a different host (the target host). The VM replica is a regular VM that remains in a powered-off state until it is needed (at which point it can be up and running on its host almost instantly).
Check how to create and configure a VMware replication job in NAKIVO Backup & Replication for more details.
The process of switching workloads from a source (production) VM to a VM replica at the DR site for the purpose of maintaining business continuity and high availability is known as failover.
VM replication best practices
There are a variety of replication best practices to ensure better reliability and efficacy of the process. Here, we’ll focus on two key points:
- Perform VM replication at the host level rather than the guest level. The virtualization layer is the intermediate layer between the physical hardware and the guest OS running on a VM. Replication performed at the virtualization level is called host-level and is more efficient than the guest-level replication.
- Use application-aware replication to avoid data loss. If a VM snapshot needed for replication is taken while these applications are running without any additional actions, then the effect would be similar to unexpected power loss and shutdown and the data can be lost.
With application-aware methods, the applications are frozen (quiesced) and the memory is flushed, and data cannot be written to the disk before a snapshot is taken. Once the consistent snapshot is taken, a VM replica can be created. Such VM replicas can be successfully restored with the applications therein running properly.
NAKIVO Backup & Replication supports application-aware host-level replication for VMware VMs, Hyper-V VMs, and EC2 instances with special functionality for Microsoft SQL Server, Exchange Server, and Active Directory Domain Controller.
Step 3. Creating a Disaster Recovery Workflow
To create a DR workflow, you need a specialized disaster recovery solution like NAKIVO Backup & Replication, which provides a built-in Site Recovery functionality to orchestrate and automate DR sequences.
- What is a disaster recovery workflow?
- Available actions for a DR workflow
- How to create a disaster recovery workflow
- NAKIVO’s Site Recovery configuration walkthrough
What is a disaster recovery workflow?
A DR workflow is a sequence of actions executed as part of the disaster recovery process for the safe and swift failover of workloads to replicas. The workflow organizes the failover process with actions related to source VMs, target VMs, conditions to be fulfilled, etc. You should define in which order the actions should be executed, as some disaster recovery procedures may depend on the result of execution of others.
Available Site Recovery actions
The Site Recovery functionality allows you to create complex DR sequences by combining actions and conditions in a single workflow. Each action can be executed in test mode only, in production mode only, or in both modes (this is used by default) in NAKIVO Backup & Replication.
You can include any or all of the following actions in a sequence:
- Failover – initiates failover to replica VMware VMs, Hyper-V VMs, or EC2 instances.
- Failback – returns workloads from the VM replica to the source VM. The changes made in the VM replica since the point of failover are written to the source VM when the failback operation is performed. The VMs are synchronized and the source VM is in the actual production state again.
- Start – starts VMware VMs, Hyper-V VMs, or EC2 instances.
- Stop – stops VMware VMs, Hyper-V VMs, EC2 instances that are running.
- Run job – runs a backup job, replication job, site recovery job, backup copy job, or Flash VM Boot job.
- Stop jobs – stops a job (any of the jobs listed in the previous bullet).
- Run script – runs a script on one of the following targets: the server with the Director, a Remote Windows Server, a Remote Linux Server, a VMware VM, a Hyper-V VM, or an EC2 instance.
- Attach repository – attaches a backup repository used by NAKIVO Backup & Replication to store backups.
- Detach repository – detaches a backup repository.
- Send email – sends an email with the message you compose to one or more defined recipients.
- Wait – waits for the designated period of time before proceeding to the next action.
- Check condition – based on your input (all or part of a resource name), checks one of the following conditions:
- The resource exists
- The resource is running
- IP/Hostname is reachable
How to build a Site Recovery workflow
Let’s look at an example of how to create a Site Recovery job in NAKIVO Backup & Replication.
Our setup
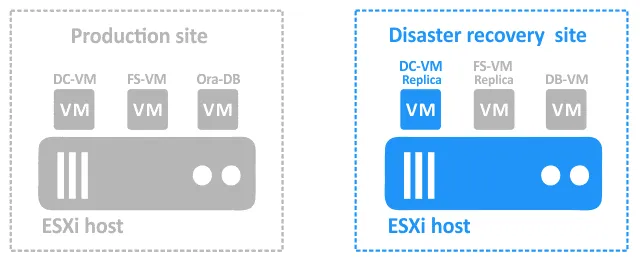
Here’s the setup that we will consider: a primary (production) site with VMware vSphere VMs and a DR site at a remote location:
- DC-VM is a Windows-based VM running Active Directory Domain Controller.
- FS-VM is a Windows-based VM with a file server running (the SMB protocol is used for file sharing). Active Directory is used for user authentication. Oracle database dumps are stored on the file server.
- Ora-DB is the VM on which the Oracle database is running.
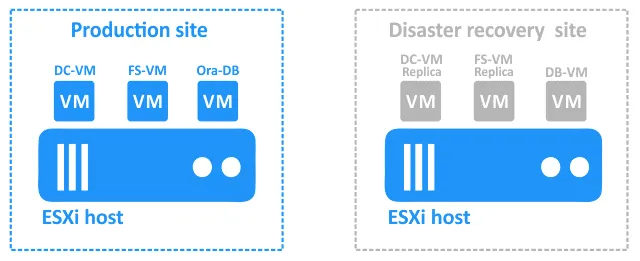
The disaster recovery site contains the following VMs:
- DC-VM-replica and FS-VM-replica are replicas of the production VMs. They can be used as targets for failover.
- DB-VM is a Linux-based VM with Oracle Database software installed but contains no databases.
The database is backed up with NAKIVO Backup & Replication at the database level to FS-VM on the production site (this Oracle database backup is application-consistent). FS-VM and DC-VM are replicated at the host level to the DR site with the NAKIVO solution.
Order of VM recovery
During an incident that brings the production site down, the components must be recovered at the DR site as follows:
- Failover of DC-VM to DC-VM-replica.
- Once DC-VM-replica is up, failover of FS-VM to FS-VM-replica. You have to operate in this order because FS-VM relies on DC-VM for user authentication on the file server.
- Once these two VMs are running, DB-VM can access the shared directory on the file server where the dump is stored. Now DB-VM can be started.
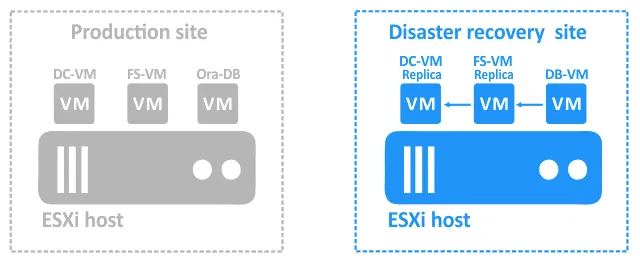
- Once DB-VM is running, run a script that can restore the database from the dump located on the file server. The blue arrows in the diagrams above show the dependencies.
Note that some time may be needed for services to start on a powered-on VM replica after the failover action and before failing over to the next replica or recovering an application or a database. This wait time should be part of the DR sequence.
For this order of VM failover, you need to create a Site Recovery job in NAKIVO Backup & Replication with the following logic:
- Action 1: Fail over DC-VM. Wait until this action is complete before proceeding to the next step. Stop the job if this action fails.
- Action 2. Wait for 3 minutes.
- Action 3. Check condition of DC-VM-replica. Check if the resource is running. If the resource is running, proceed to the next action in the Site Recovery job. If not, stop and fail the job.
- Action 4. Fail over FS-VM. Wait until this action is complete before proceeding to the next action. Stop the job if this action fails.
- Action 5. Wait for 3 minutes.
- Action 6. Check condition of FS-VM-replica. If the resource is running, proceed to the next action of the Site Recovery job. If not, stop and fail the job.
- Action 7. Start DB-VM. Wait until this action is complete before proceeding to the next action. Stop the job if this action fails.
- Action 8. Wait for 5 minutes.
- Action 9. Run script. Target type: VMware VM. Target VM: DB-VM. Script path: /home/oracle/restore_db.sh (when adding this step, you must input the username and password of an account with sufficient permissions to run the script).
NAKIVO’s Site Recovery walkthrough
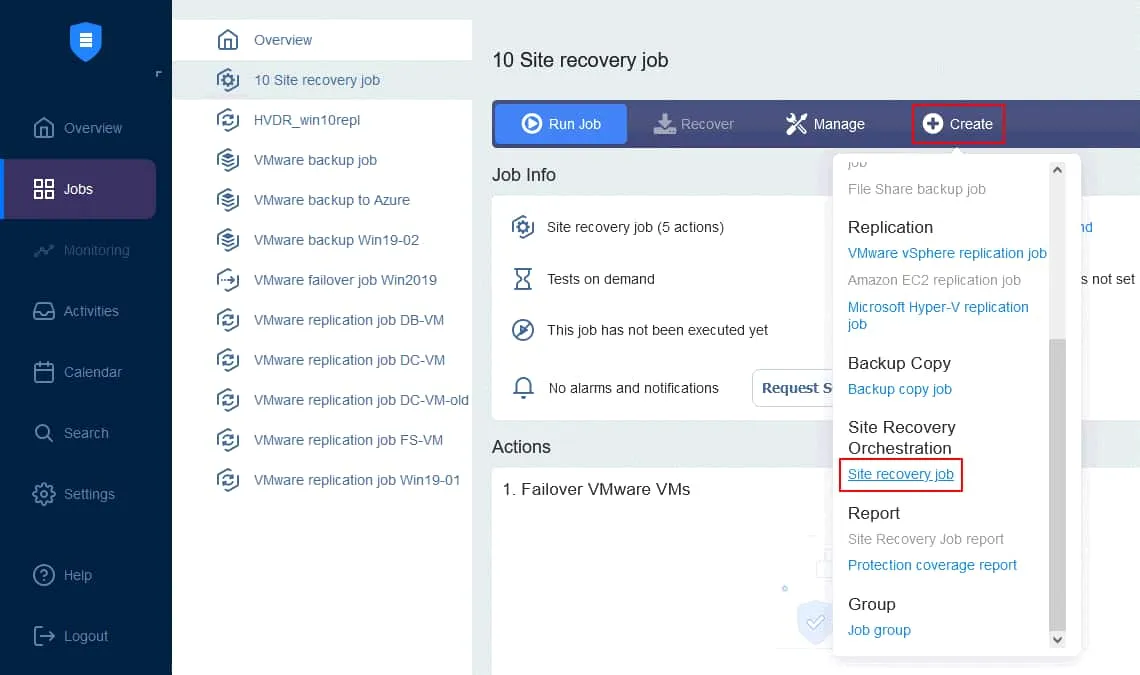
Let’s create a new Site Recovery job based on the plan outlined above. On the Jobs page of your NAKIVO Backup & Replication instance, click Create > Site recovery job.
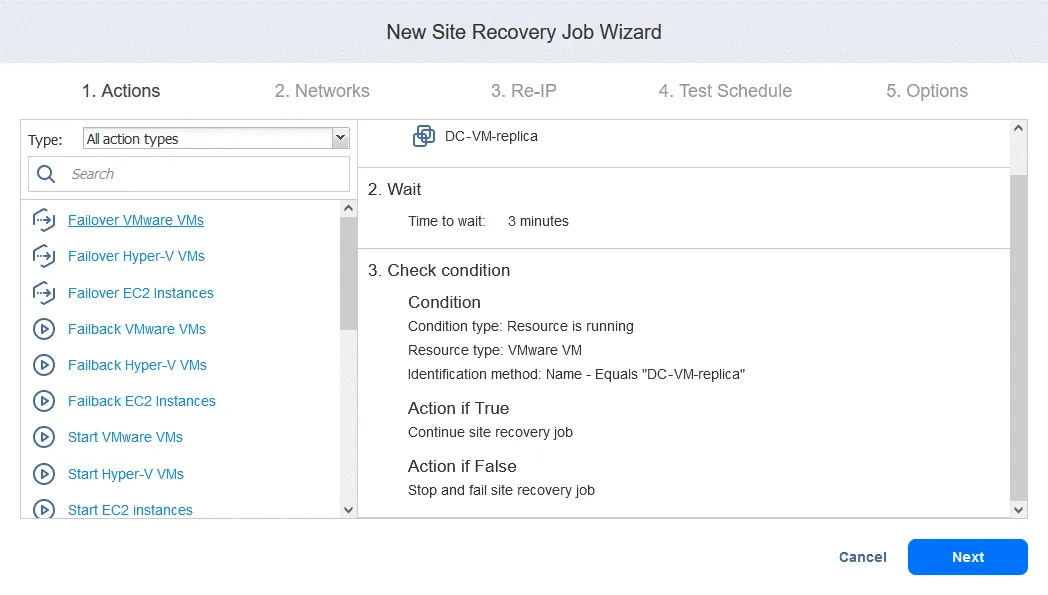
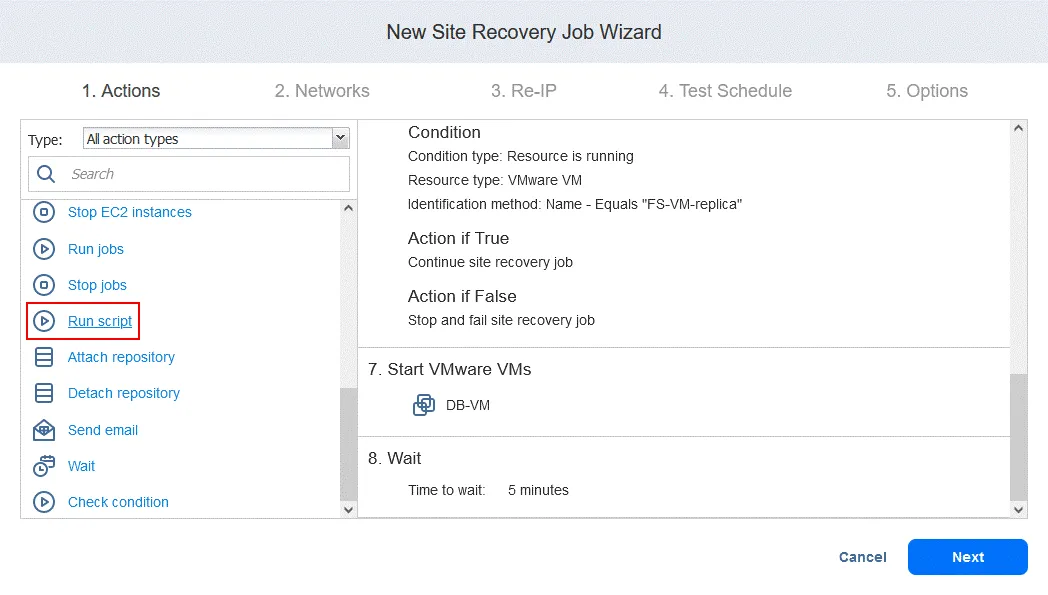
1. Actions
The New Site Recovery Job Wizard is launched. In the left panel, you can find actions that can be added to the job. Simply click an action to add it to the sequence. Note that you cannot mix actions for different platforms in one sequence (we’re creating a job for VMware VMs).
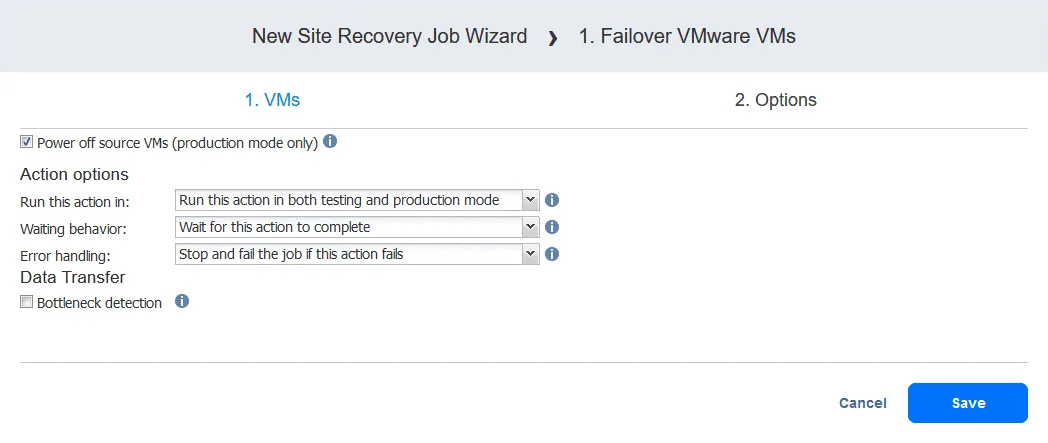
Action 1. Fail over DC-VM
- In the left pane, click Failover VMware VMs.
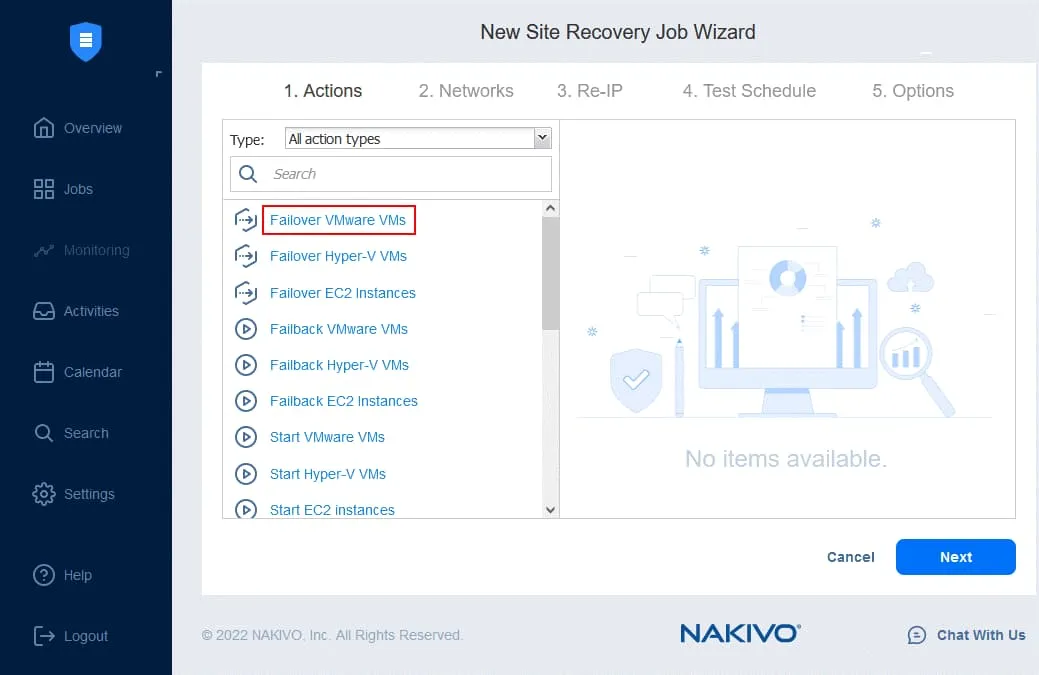
- In the left pane, select the VM replica from an existing replication job. In our workflow, failover to DC-VM-replica is the first action. In the right pane, you can select a recovery point. The latest recovery point is used by default.
Click Next to continue.

- For the disaster recovery failover options, you can deselect Power off source VMs – this option can be used to prevent a conflict of IP addresses if the source VMs and replicas use the same networks.
Based on the logic outlined above, we select the following options:
- Run this action in: Run this action in both testing and production mode
- Waiting behavior: Wait for this action to complete
- Error handling: Stop and fail the job if this action fails
Click Save to save the created action.
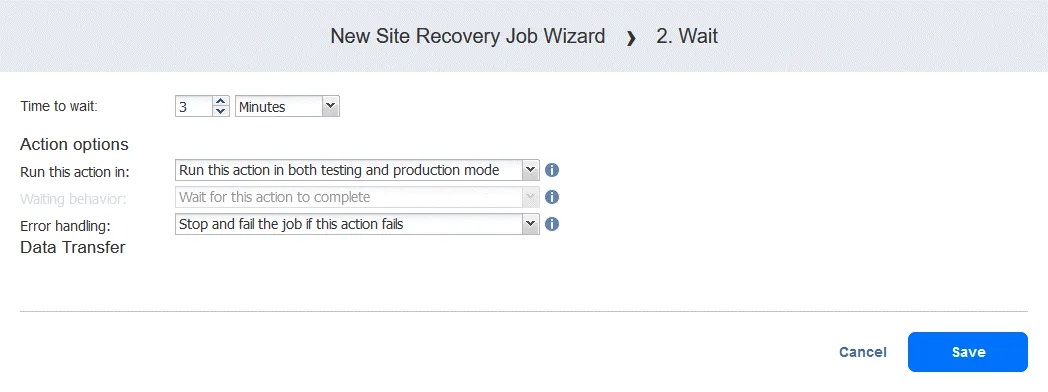
Action 2. Wait for 3 minutes
A wait action is useful in this case because the following failover action in the workflow (failover to FS-VM-replica) would require the DC-VM-replica to be up and already running with Active Directory Domain Services.
- In the left pane of the Actions screen, click Wait.
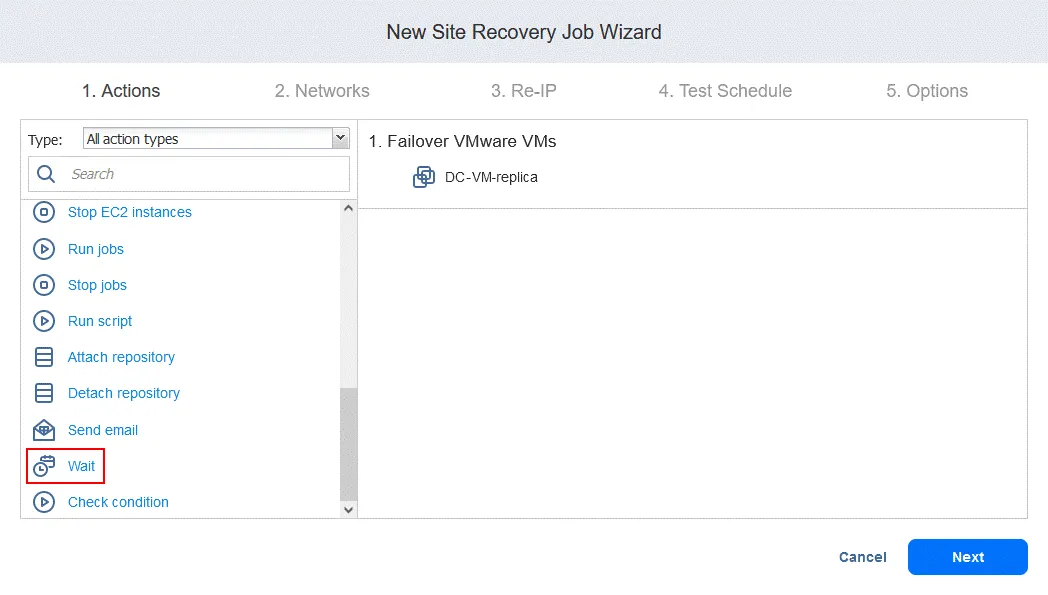
- Select the time to wait (we’re using 3 minutes).
Select the action options as you have done for the first action and click Save.
The new action is added after the previous action, at the bottom of the list. You can reorder, edit, or remove actions. Simply hover your mouse over an action to see the options.
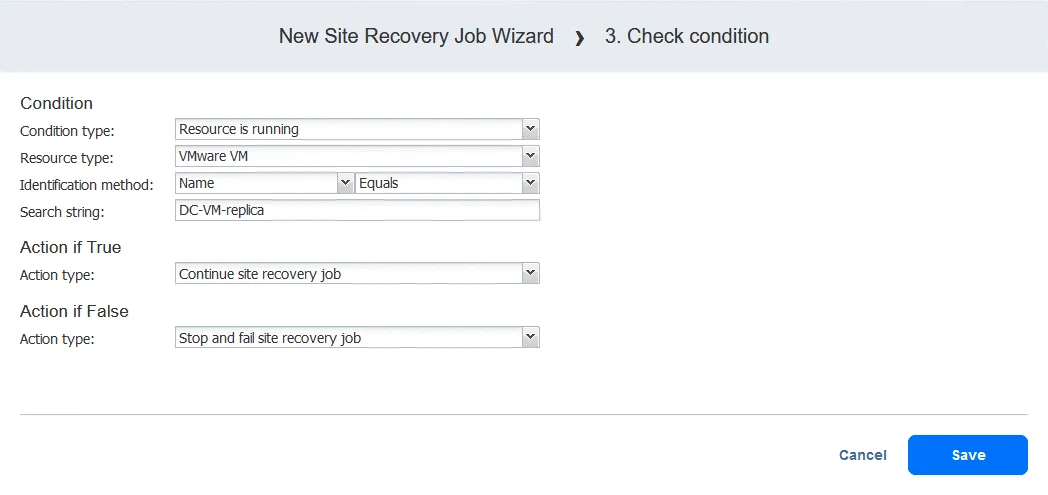
Action 3. Check condition of DC-VM-replica
- In the left pane of the Actions screen, click Check condition to check whether the VM that was failed over in the first action is running.

- Configure this action as follows:
- Select condition type: Resource is running. The other options are resource exists or IP/hostname is reachable.
- Select resource type: VMware VM.
- Select identification method: Name (the other option is ID) to identify the VM in question. You can use any part of the VM’s string. Here, we know the exact name, so we use the Equals function.
- Define the search string: DC-VM-replica.
Now we have an action that checks if the VMware VM named DC-VM-replica is running. Click Save to proceed.
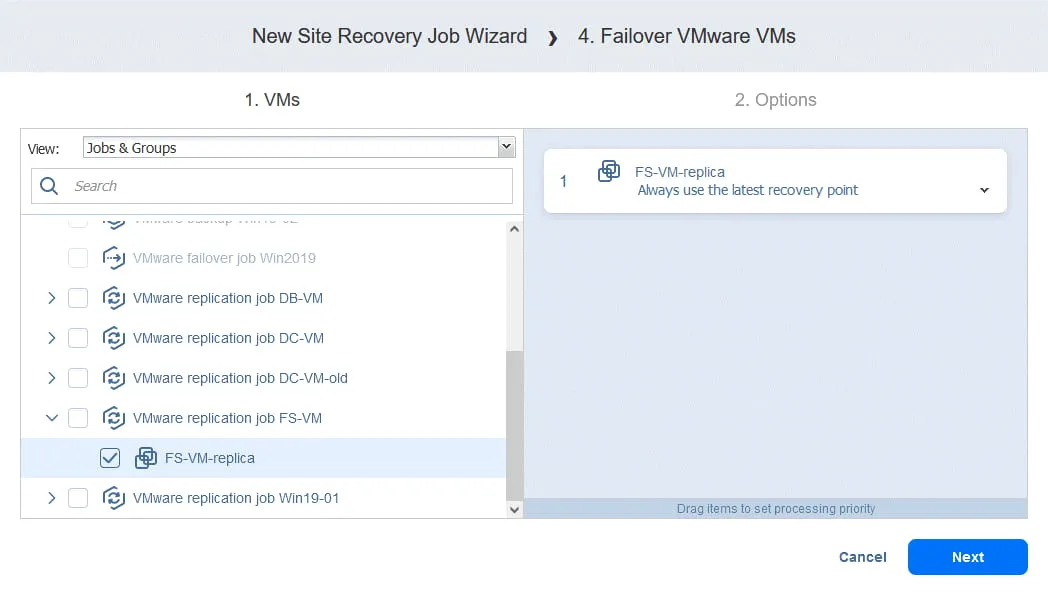
Action 4. Failover FS-VM
- Same as for Action 1, click Failover VMware VMs.
- We select FS-VM-replica in this case. Click Next, then select the same options for the failover action as you have done in Action 1 and click Save.
Action 5. Wait for 3 minutes
Click Wait and configure this action as you did for action 2. The time specified is again 3 minutes in our case.
Action 6. Check condition of FS-VM-replica
Click Check condition in order to check if the VMware VM FS-VM-replica is running. Refer to the action 2 and select the same options – except, of course, for the VM name.
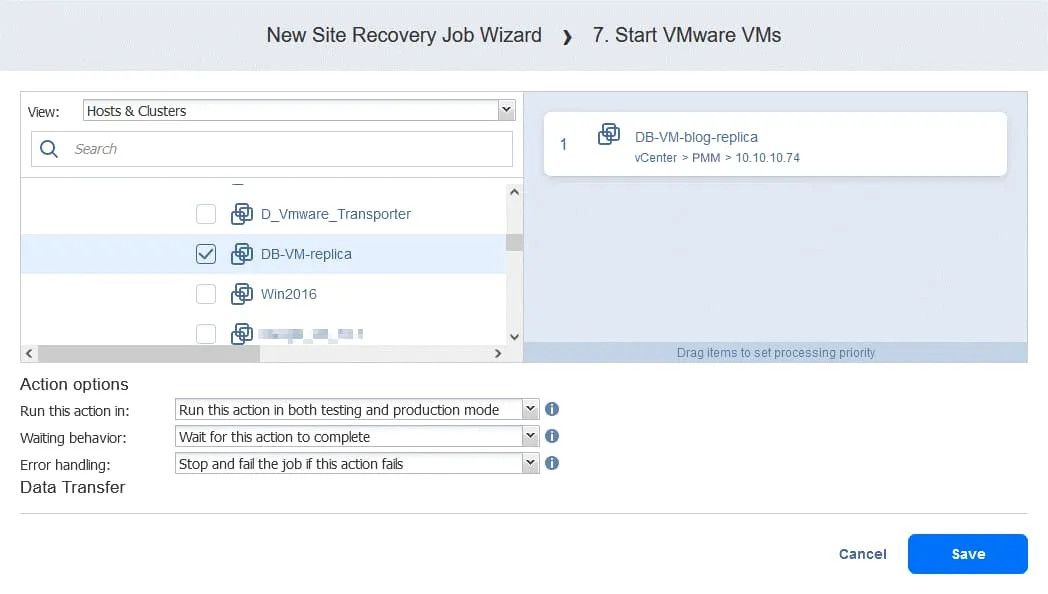
Action 7. Start DB-VM
- Click Start VMware VMs in the left pane of the Actions screen.
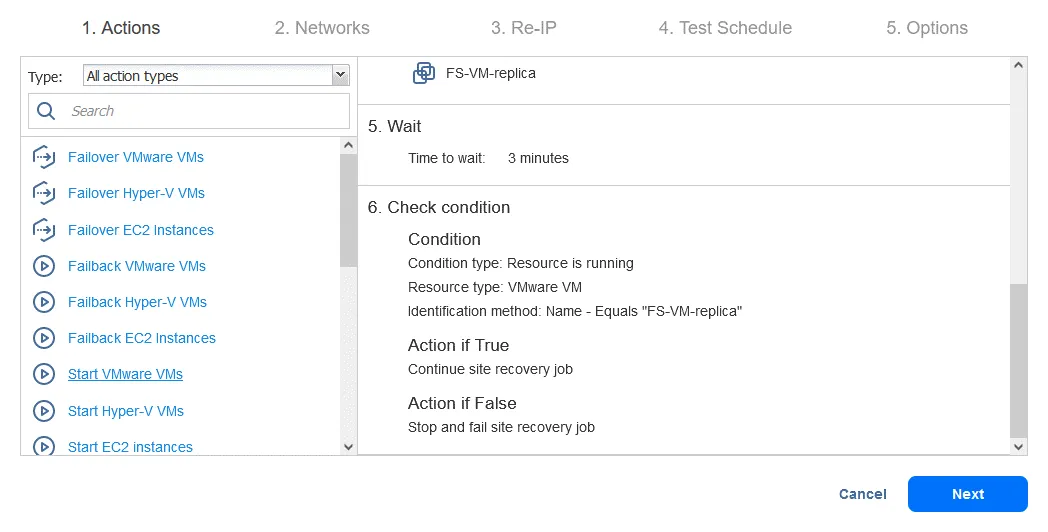
- Select DB-VM. This VM can be started once you are sure that the FS-VM-replica is running. On the bottom of the page, select the same action options as shown in previous actions. Then click Save.
Action 8. Wait for 5 minutes
Wait for 5 minutes. Click Wait and configure this action similarly as for action 2. This should be enough time to start the Oracle service on DB-VM.
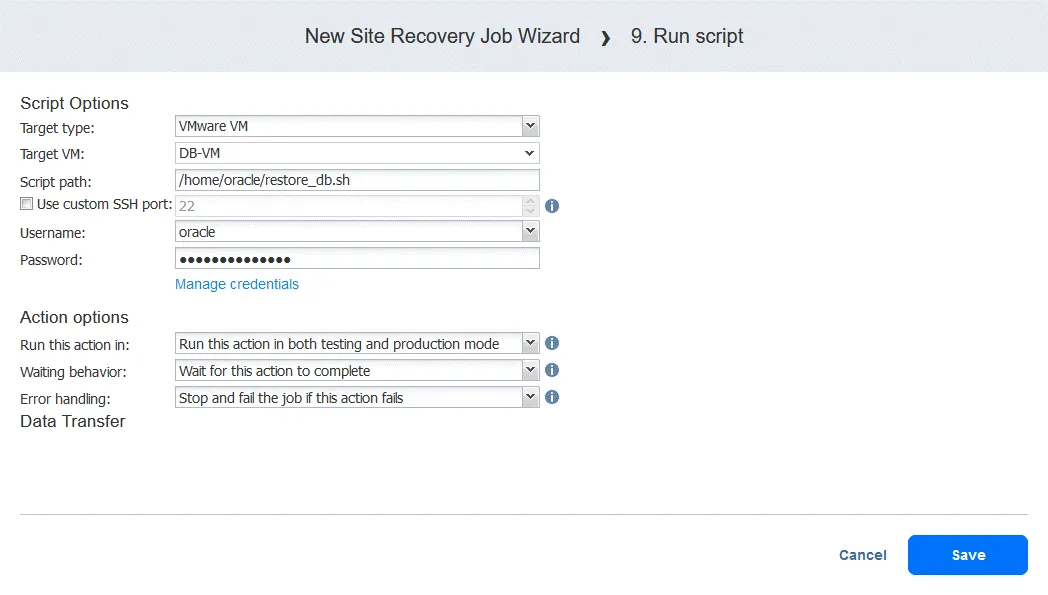
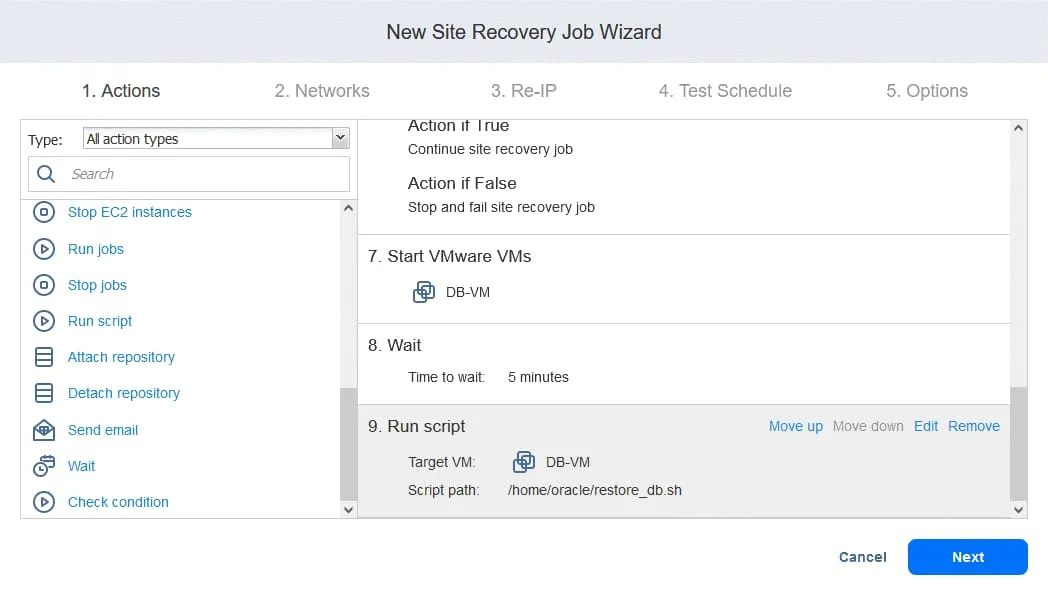
Action 9. Run script
- On the Actions screen click Run script. Recall that this script is intended to recover the Oracle database on the database level from a dump stored on FS-VM-replica.
- Define the script options. In our case:
- Target type: VMware VM
- Target VM: DB-VM
- Script path: /home/oracle/restore.db.sh
- Username: oracle
- Password: (password)
Your script path, username, and password will differ. Don’t forget to ensure that a script file is executable and that the user has sufficient permissions to run the script. Action options are configured as usual in this example.
Click Save when you are ready to continue.
- Now you can see all the actions configured. Click the Next button to continue configuration of the Site Recovery job based on your disaster recovery plan.
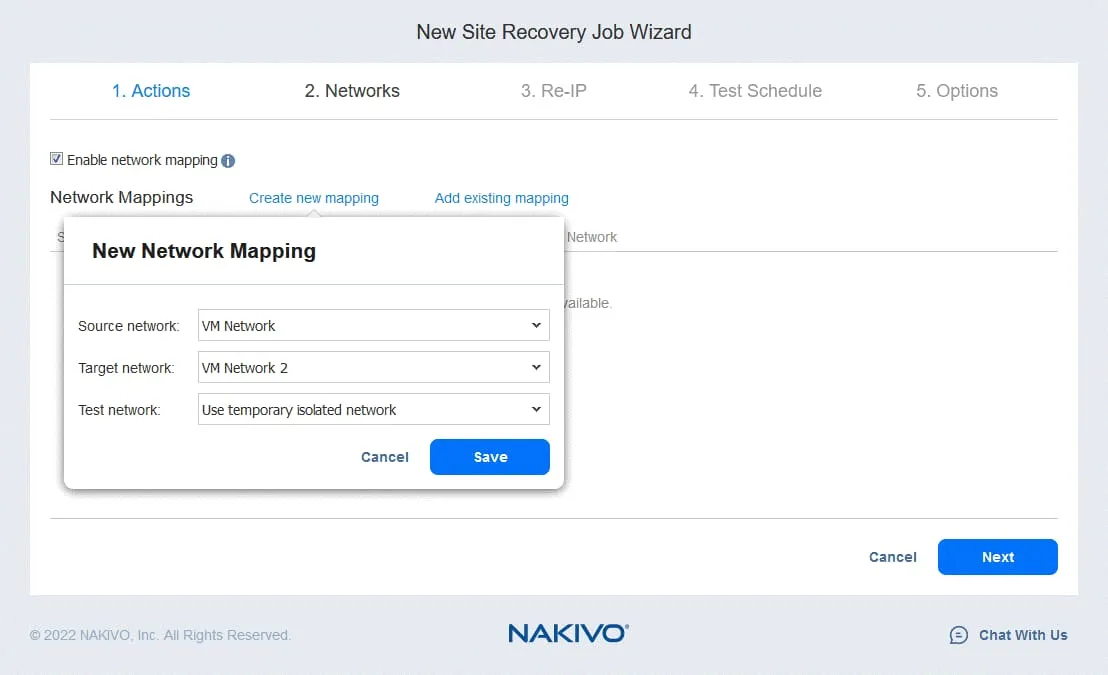
2. Networks
If VMs at the production site and DR site are connected to different networks, select Enable network mapping. Click Create new mapping, in the pop-up windows select a source network, destination network, and a network to use for Site Recovery job testing.
Click Save to save the network mapping rule, then click Next.
Note: You can also use existing mapping rules if you have configured them in other replication, failover, or Site Recovery jobs.
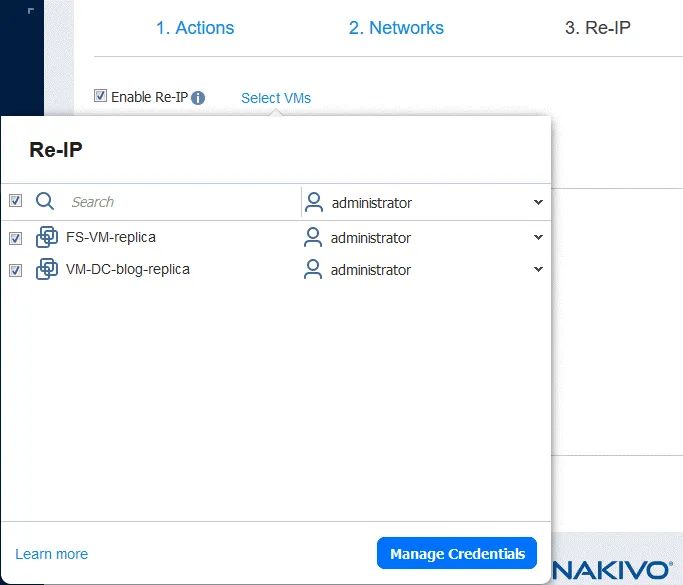
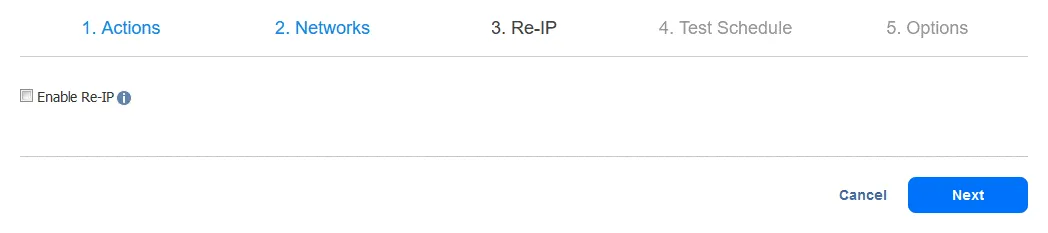
3. Re-IP
If the networks used for VM connection at the source site and target site have different addresses, then you should enable Re-IP by selecting Enable Re-IP.
- Create a new Re-IP rule by clicking Create new rule. Define the source settings and target settings, then click Save.
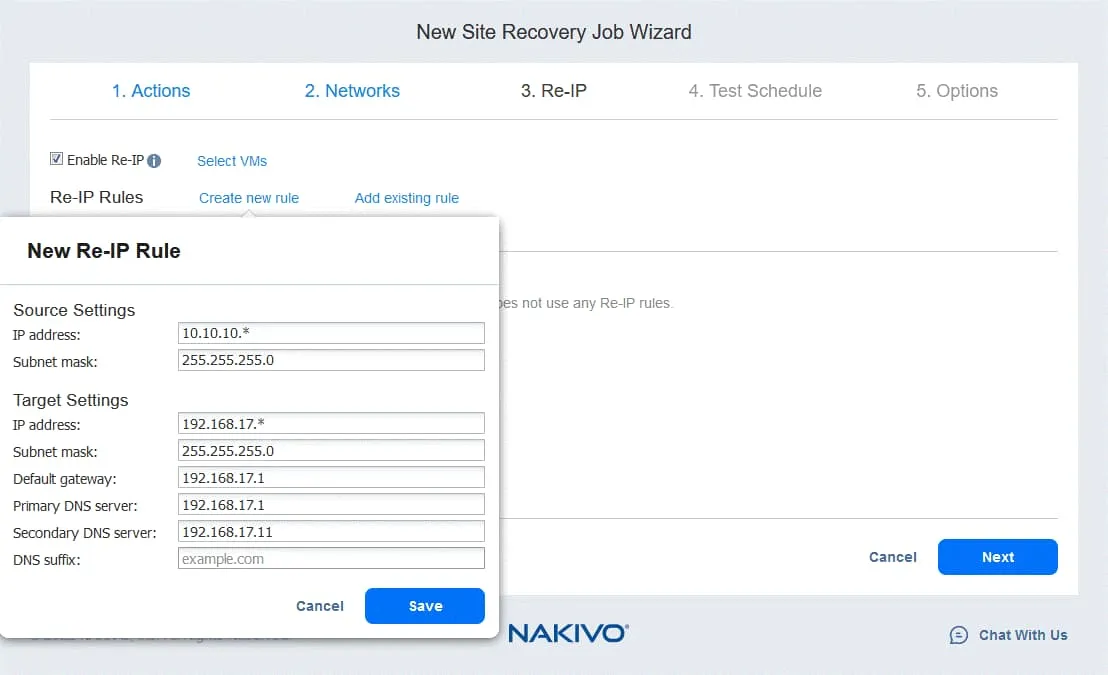
- Click Select VMs and select the VMs for which Re-IP should be used. You should provide the credentials for a user with sufficient permissions to change network settings in the VM guest OS.
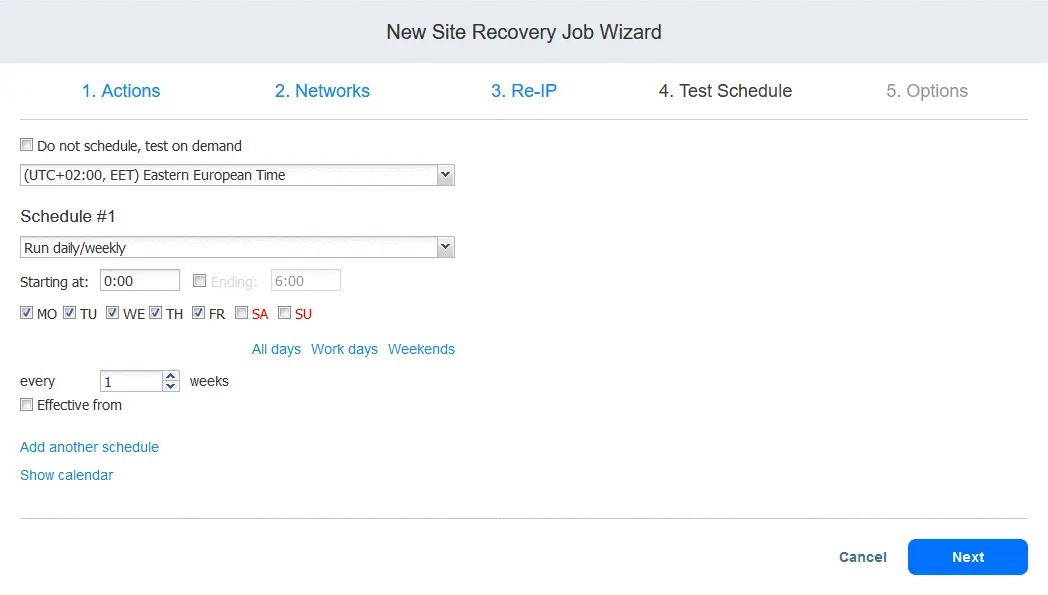
4. Test Schedule
You can create a schedule specifically for the purposes of running Site Recovery jobs in test mode and performing disaster recovery testing. This allows you to test whether the job can be run successfully within the required time frames. When done, click Next.
We’ll talk about the Site Recovery job testing in more detail in step 6.
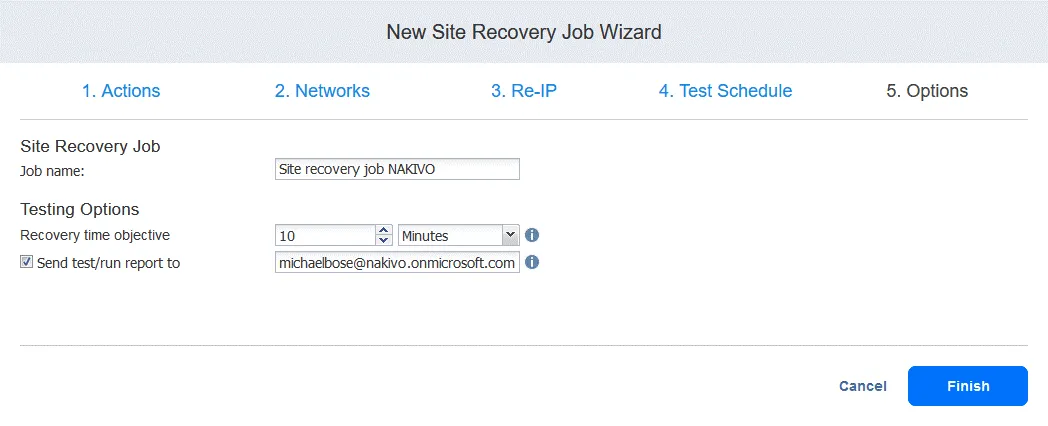
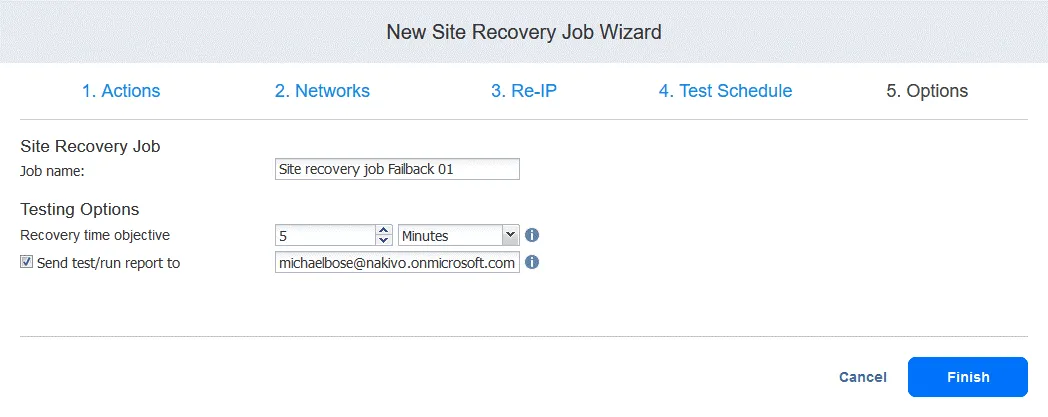
5. Options
Type the job name and recovery time objective. Click Finish when configuration is complete.
Step 4. Re-Protecting the Environment
Once the VMs have been failed over and the workloads migrated to the DR site, the original production VMs are now offline, and replicas at the DR site are now the only functional copies. If a powered-on VM replica now fails, you would have no ability to quickly restore the data and workloads.
In order to protect the VMs running at the DR site, you should replicate these VMs to another safe place. That way, if the VM running at the DR site fails, you can fail over to the new VM replica quickly.
The Site Recovery functionality allows you to configure automated replication as soon as VM failover is completed. Here is a walkthrough example of how to re-protect VMs with a Site Recovery job after a failover.
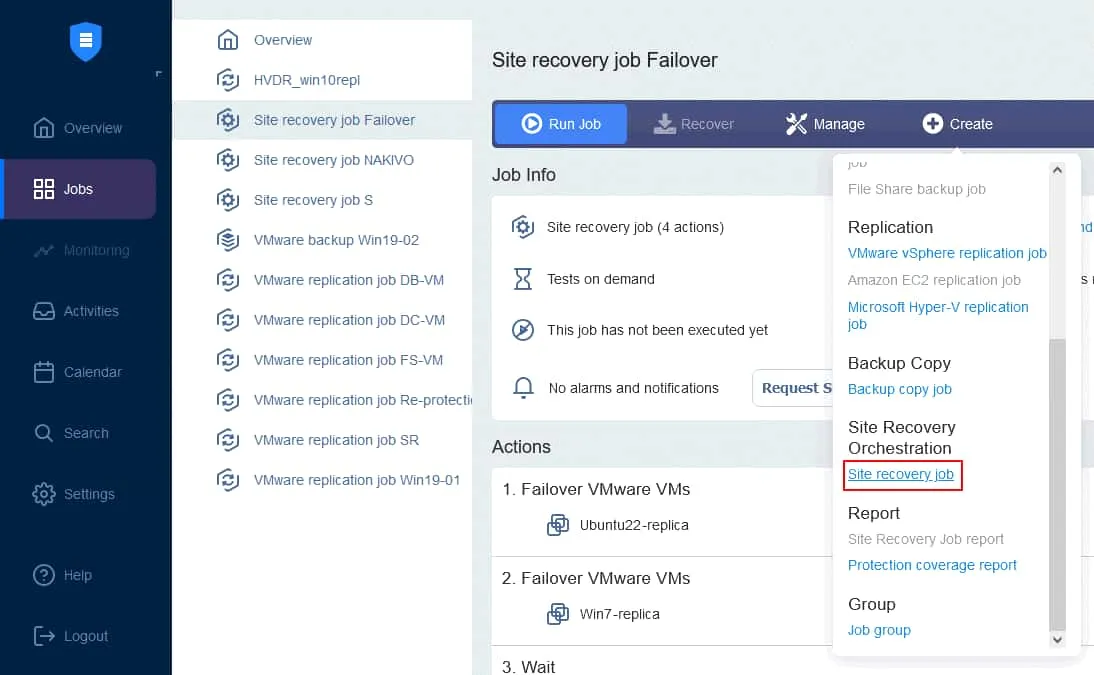
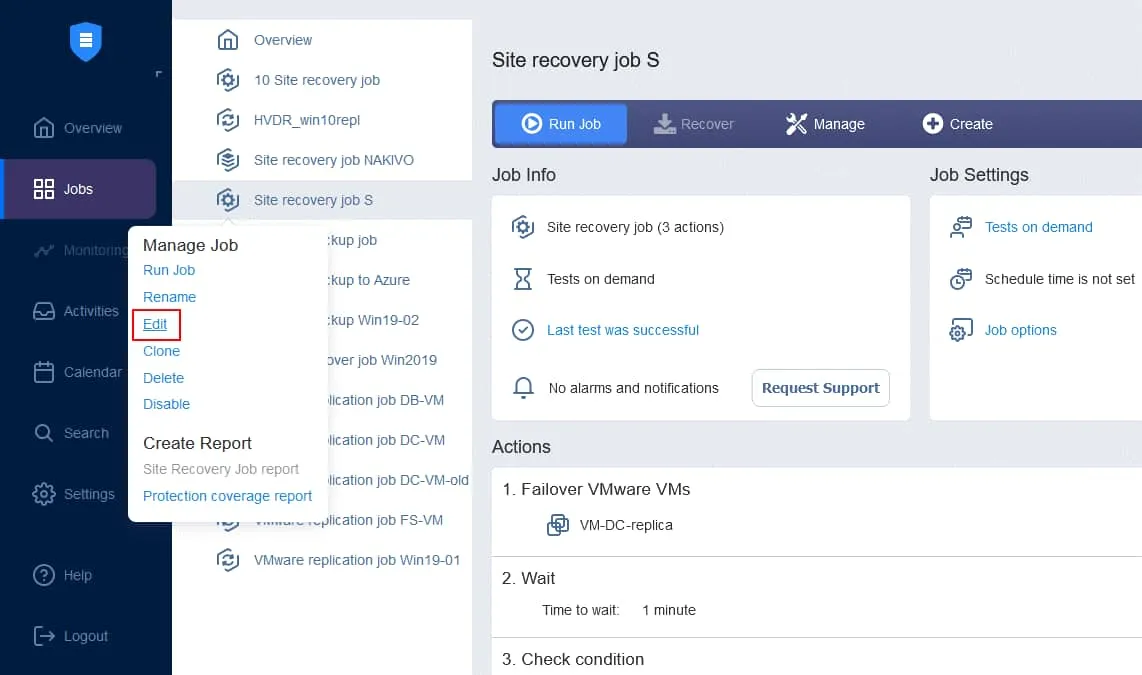
- On the Jobs page, right-click the name of the Site Recovery job you recently created. Click Edit in the context menu.
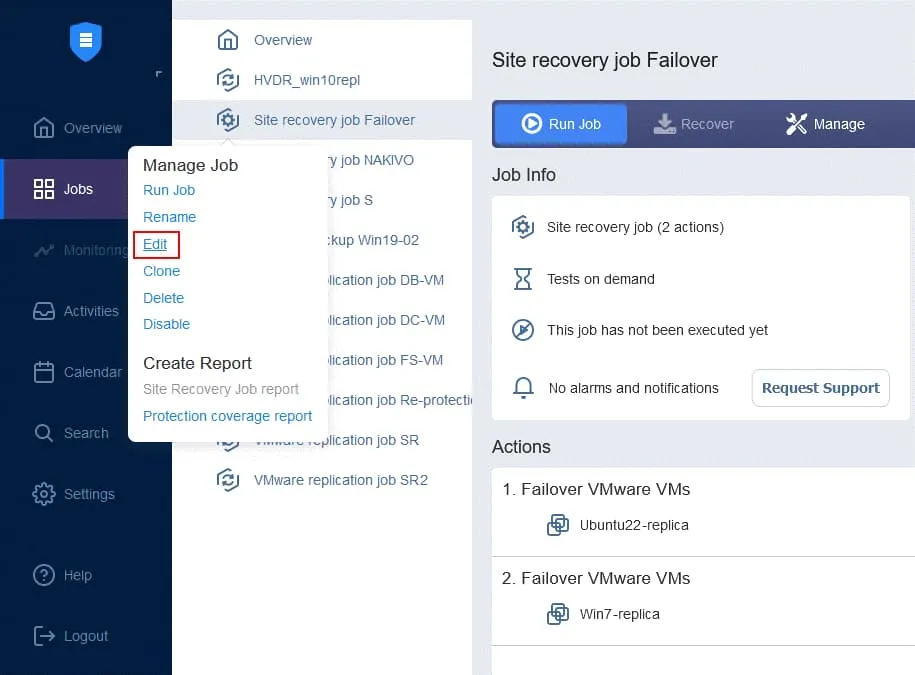
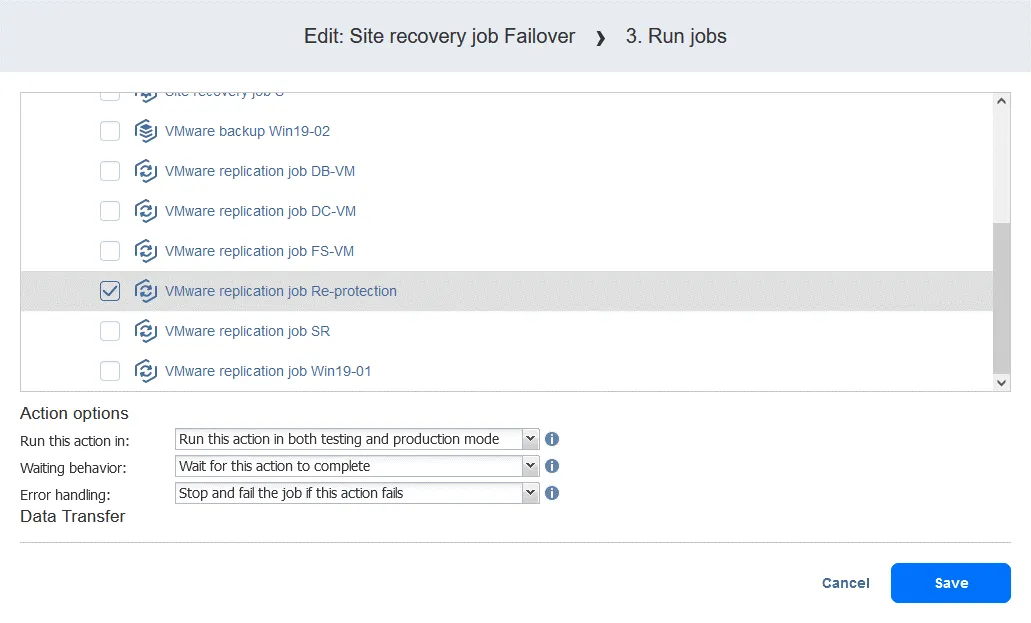
- You can see your failover actions added to the Site Recovery job earlier. Find and click Run jobs from the action list located in the left panel of Site Recovery Actions screen.

- Select the replication job from the job list. Select action options as usual and click Save.
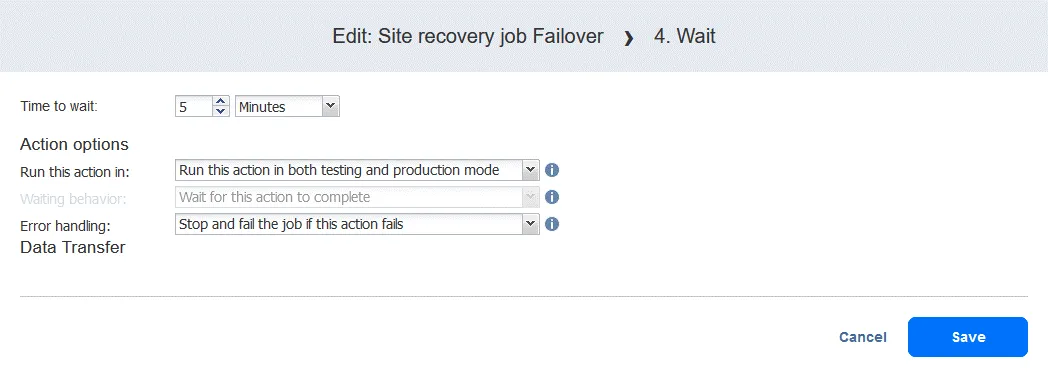
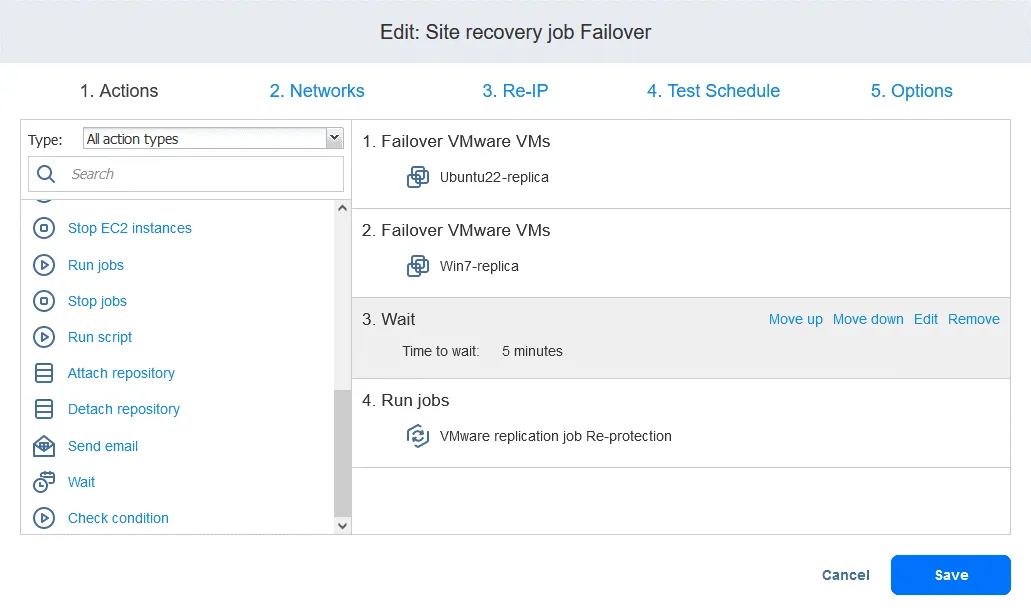
- Add a Wait action between the failover action and the replication job. This gives the VM replica some time to start up and load the operating system (you cannot replicate a powered-off VM). In the Actions list in the left pane, click Wait.

- Select a time to wait – 5 minutes should be enough. Select the action options and click Save.
- When you add the action, it is appended to the end of the action list. Click Move up and move the Wait action from the fourth position to the third position – it needs to occur before replication.
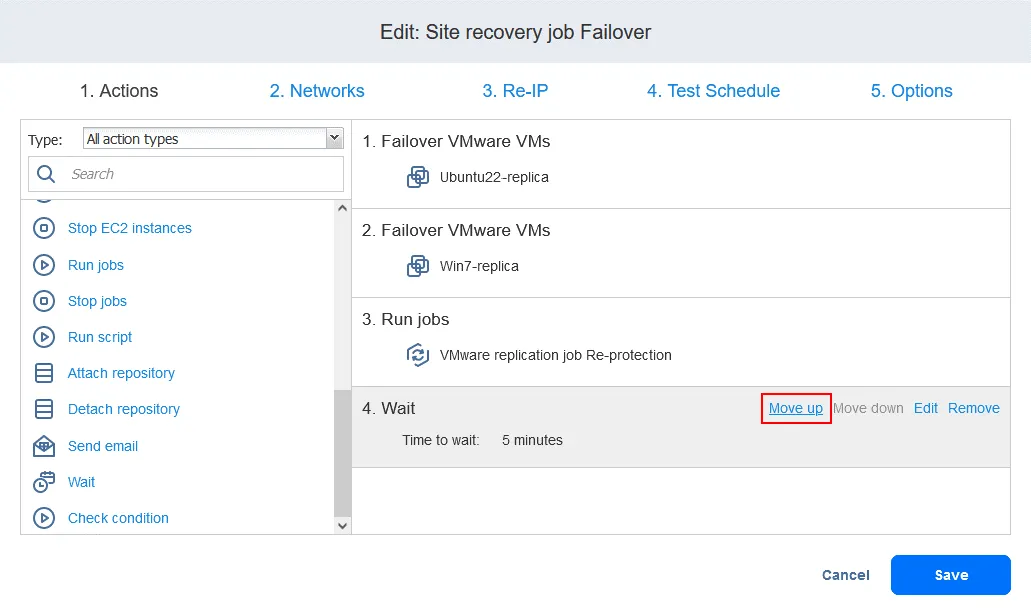
Now the actions are arranged in the needed order.
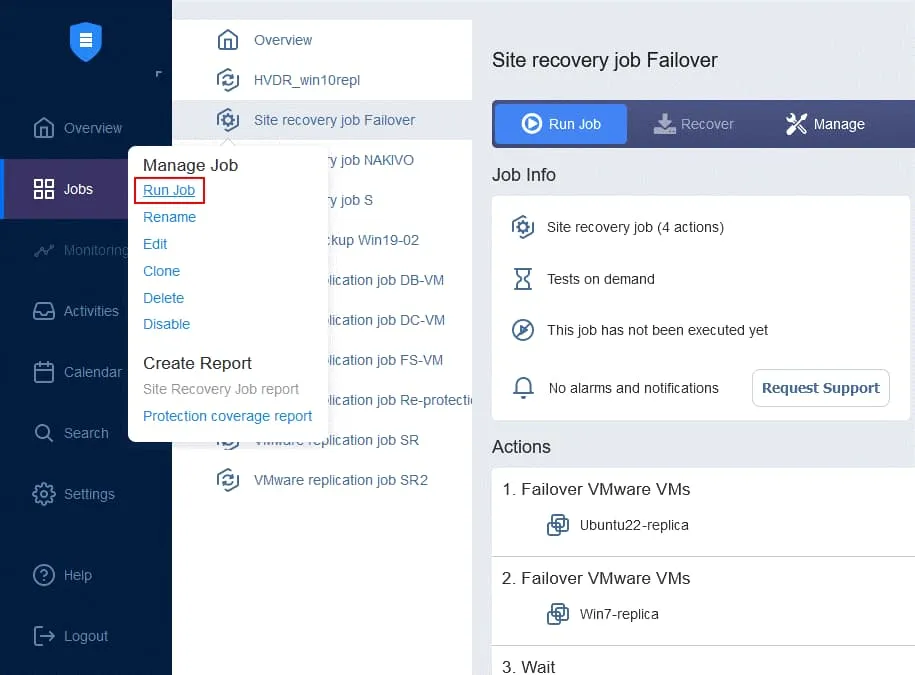
- Finally, the Site Recovery job is ready to be used for performing VM failover and automatic re-protection of the VM replicas used for failover. Right-click the name of your Site Recovery job on the home page and click Run job in the context menu.
Step 5. Failback
Failback is the process of restoring virtual machines in their latest states from the DR site back to the original or a new production site. To understand why you need the failback, let’s recap how failover works:
- When disaster strikes (or is forecast to occur), failover to a VM replica is performed.
- Any changes to the VM (for example, transactions added to a database as customers make online purchases) are written to a virtual disk of the VM replica. Some blocks are written, and others are erased. The virtual disk of the source VM does not have those transactions.
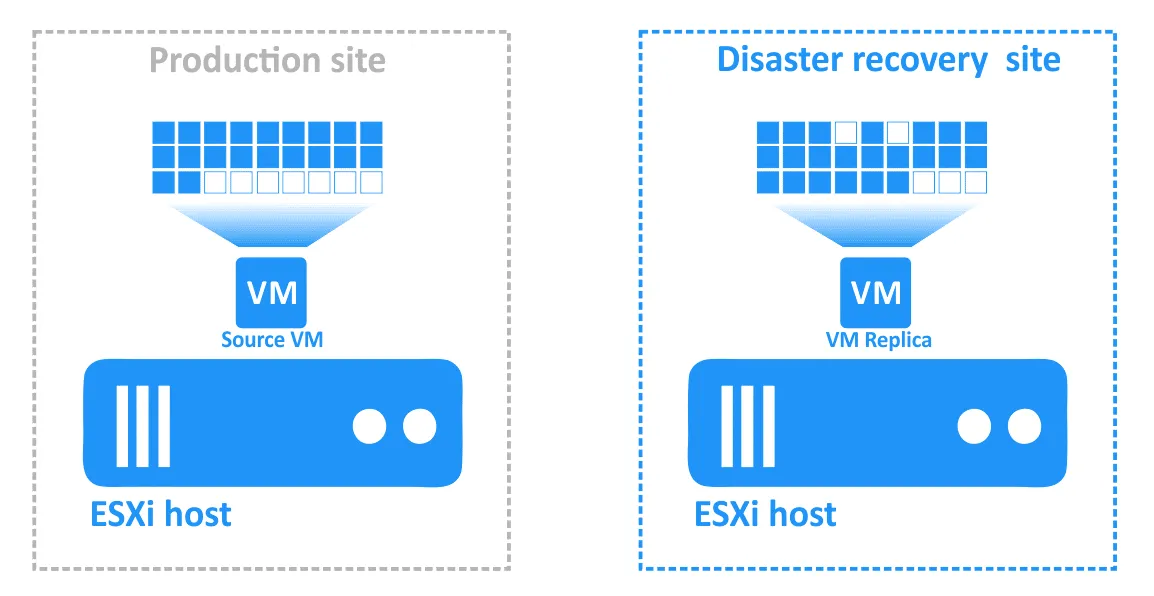
- Once the incident has been resolved and the production site is functional again, the workloads must be brought back to the production site. The updated data of the VM replica must be transferred back to the source VM. The VMs must be re-synchronized with reverse replication using failback.
Configuring failback in NAKIVO Backup & Replication
Failback can be performed either in production mode or in test mode (when all changes in your virtual environment made by the failback action are reverted to the pre-failback state after the test).
Let’s consider how each case works in detail.
| Production failback | Test failback | |
| 1 | Powering off the original source VM (if it exists and is powered on). | |
| 2 |
Creating a protective snapshot of the source VM (if the source VM is functional). Creating this snapshot allows you to restore a pre-failover state of the source VM in case failback cannot be performed properly. |
|
| 3 | Running incremental replication (if the original source VM is online at the production site) or full replication (if the VM is being recovered to a new production site). | |
| 4 | Powering off the VM replica (optional). | The VM replica is used to host the workloads and is not powered off. |
| 5 | Incremental replication is run one more time from the VM replica to the source VM. The delta (the data that changed since the first replication run) should be much smaller this time. | Replication from a VM replica to the original source VM (or a new production VM) is done once only because this is sufficient for testing purposes. |
| 6 | Connecting the original source VM to its new network with Network Mapping (optional). | Connecting the source VM to an isolated network so that there is no disruption whatsoever to the production environment (optional). |
| 7 | Modifying the static IP address of the original source VM with Re-IP (optional). | |
| 8 | Powering on the original source VM. | |
| 9 | Cleanup after a successful failback. After a successful failback operation, both the source VM and the VM replica exist in their regular states.
Cleanup after a failed failback:
|
Cleanup if the source VM didn’t exist before the test failback was run:
Cleanup if the source VM already existed before the test failback was run:
|
Preparing for failback
First, you should create a Site Recovery job that includes failover actions. This process was described in detail before.
- A replication job and a VM replica are required to perform a failover action.
- A Site Recovery job must include a failover action in order to perform failback.
- The VM replicas must be in failover state; hence, you can perform failback only after performing failover.
Running failback
Let’s use an example of how to run a failback with NAKIVO Backup & Replication.
- Make sure that failover has been run as a part of a Site Recovery job (this should have already been created).
- Create a new Site Recovery job – the failback actions can be incorporated into this job. On the Jobs page, click Create > Site recovery job.
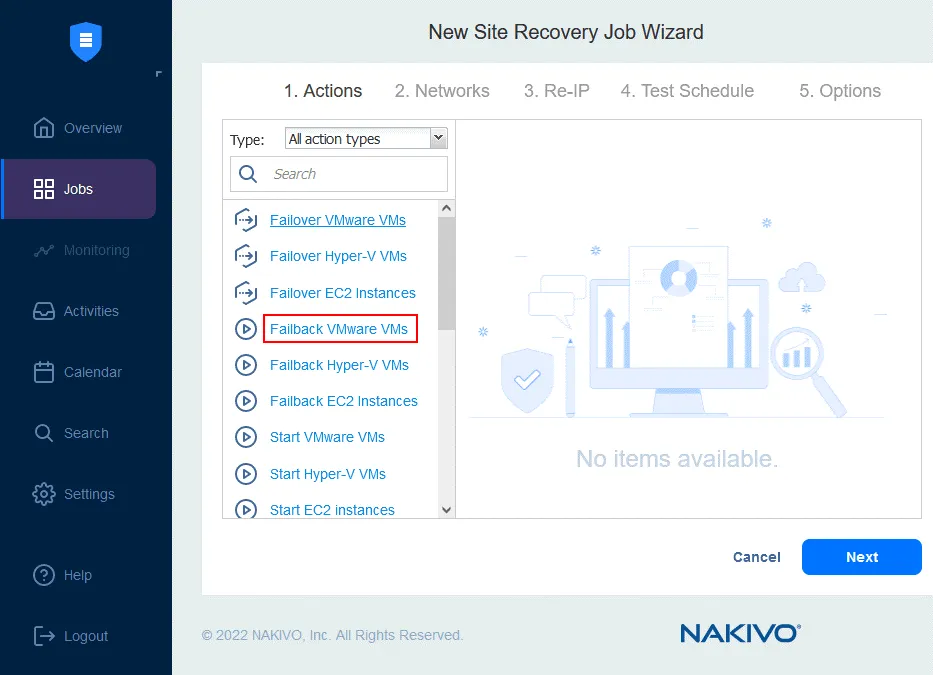
The New Site Recovery Job Wizard is launched.
1. Actions.
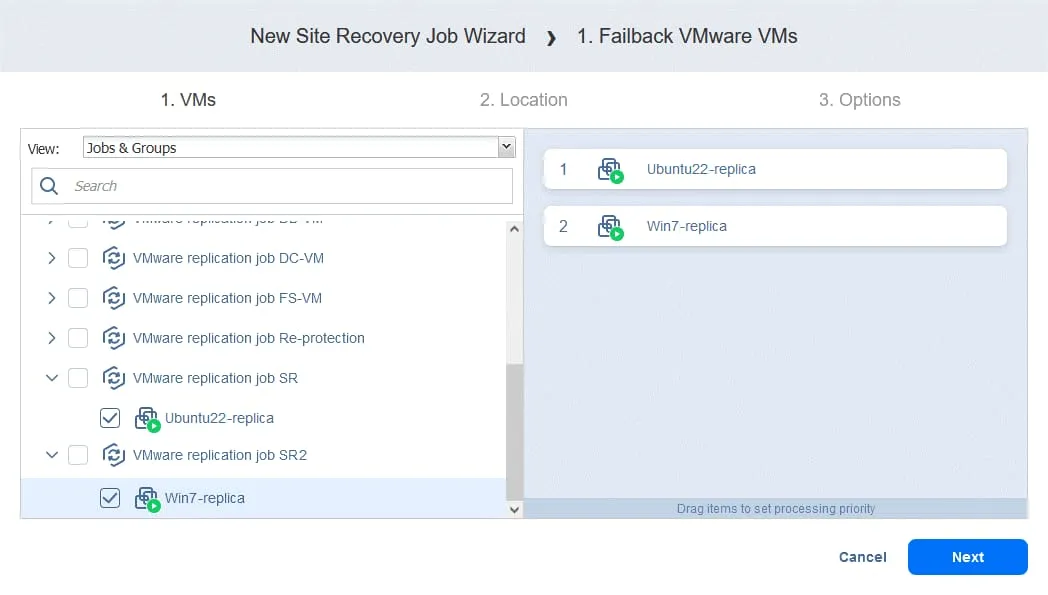
- In the left pane, click Failback VMware VMs (for other environments, use Failback Hyper-V VMs or Failback EC2 Instances).
- Select the VM replicas to which the failover operation should be applied. Click Next.
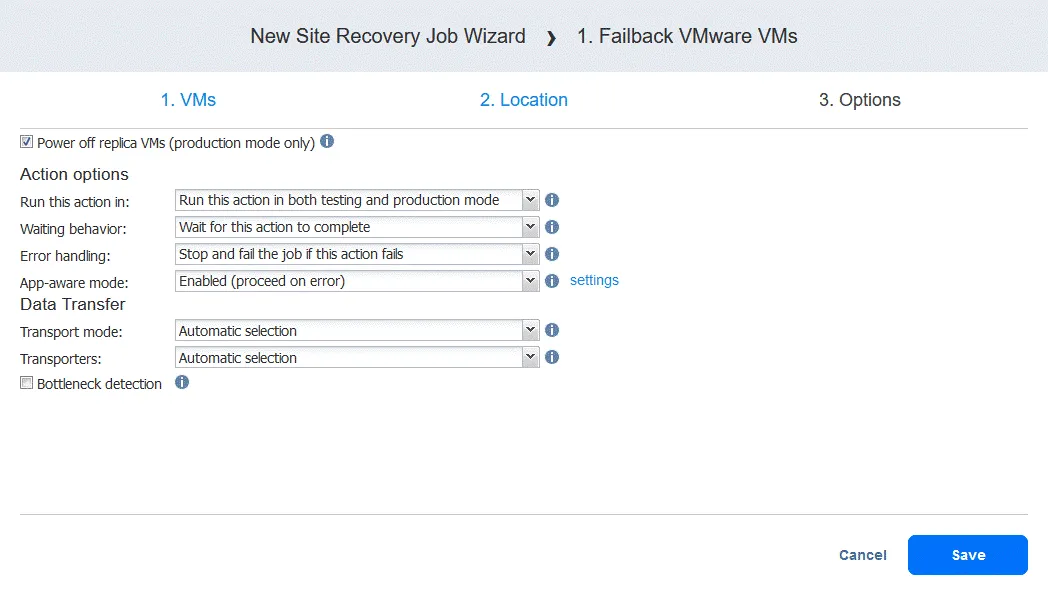
- Select a failback location – this could be the original production site or a new location. Click Next.

- Select the job options. Select Power off replica VMs if needed. Click Save when you are ready to proceed.
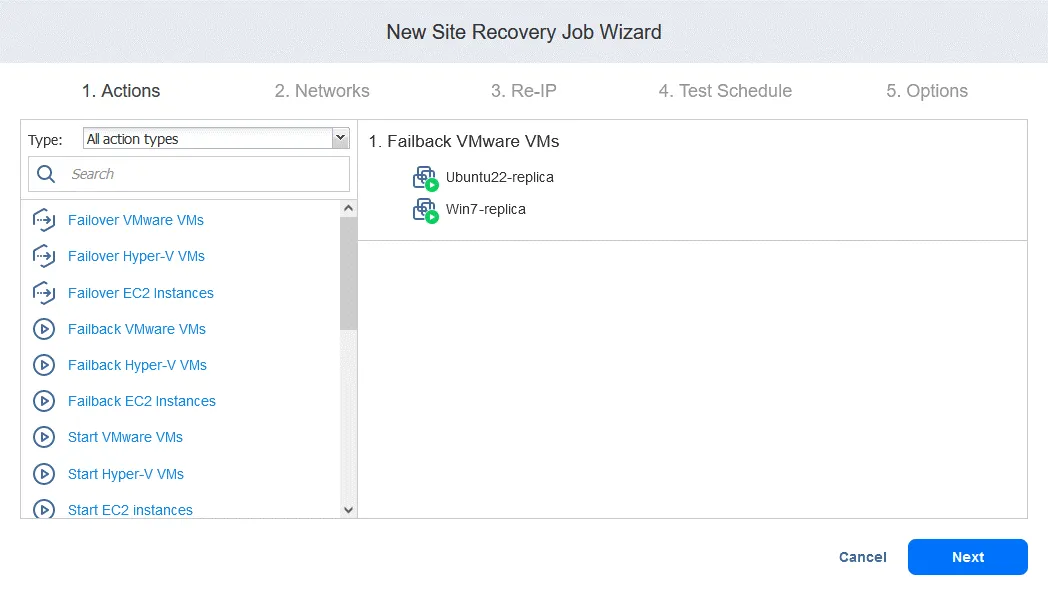
- After you have added the failback action, the Site Recovery job looks like the screenshot below. Click Next.
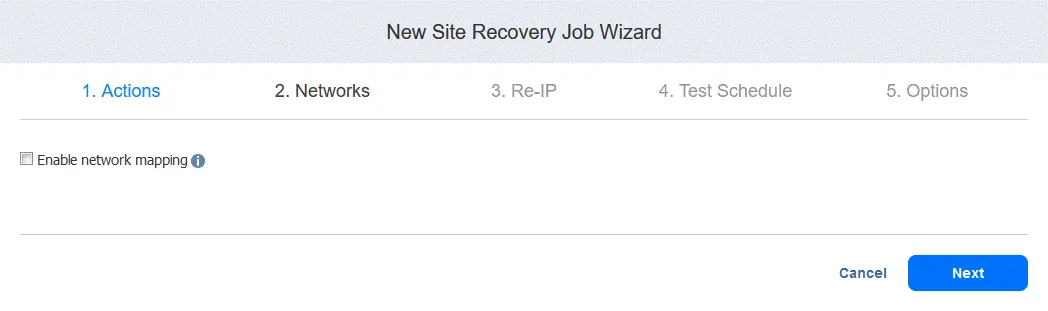
2. Networks. Select this option if you need to enable network mapping for this job. Click Next.
3. Re-IP. Select this option if you need to enable Re-IP for this job. Click Next.
4. Test Schedule. Configure your scheduling options, then click Next.

5. Options. Define the Site Recovery job options and enter the job name. You can set the needed RTO for the VM and specify the email address for the failback report. Click Finish to finalize the creation of this new Site Recovery job with failback.
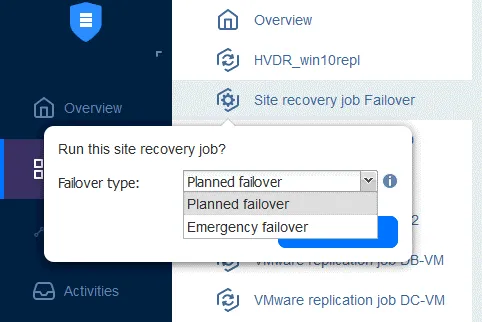
Now you can run this Site Recovery job to perform VM failback: Simply right-click the name of the Site Recovery job, select Run job, and select Test site recovery job or Run site recovery job.

Step 6. Performing Disaster Recovery Testing
Disaster recovery testing helps you ensure that you are ready for recovery when disaster strikes and that all selected components can be recovered successfully within the set time frames.
There are two main reasons why you need disaster recovery testing:
- To make sure that everything can be recovered successfully. When you test your disaster recovery plan and discover some things going wrong, you can fix the issues before they cause serious problems in a real crisis scenario.
- To make sure that RTO values can be met. Disaster recovery testing allows you to check whether or not your workloads can be recovered within the relevant RTOs. A site recovery test can be run manually on demand or automatically on a scheduled basis, which makes the process painless and saves your time.
The differences between test and production failover
The mechanism of executing a failover differs depending on whether the Site Recovery job is run in test or production mode. A breakdown of the steps for each mode is shown in the table below.
| Production (emergency) failover | Test failover | |
| 1 | Disable replication from source VM to the replica | |
| 2 | Roll the VM replica back to a certain recovery point (RP) (optional, last RP is used by default) | Run incremental replication from source VM to the replica once |
| 3 | Connect the VM replica to a new network with Network Mapping (optional) | Connect the VM replica to an isolated network with Network Mapping (optional) |
| 4 | Modify static IP address of the replica with Re-IP (optional) | |
| 4A | Power off the source VM (optional) | — |
| 5 | Power on the replica | |
| 6 | Switch the replica to the “Failover” state | |
As you can see, the second and third points differ between the production and test workflows. You can run replication from a source VM in test mode while the source VM is running. In most cases, when disaster strikes, the source VM no longer works and thus replication cannot be performed. The networks for VM connection can be defined separately in the Network Mapping options for production mode and test mode when configuring a Site Recovery job.
Failover test cleanup is performed after execution of a Site Recovery job in test mode. The VM replica is powered off and reverted to its pre-failover state via snapshot (a snapshot of a VM replica is taken before performing a failover action). The replica is then switched from failover state to its normal state, and replication from the source object to the replica is re-enabled.
Disaster recovery testing capabilities in NAKIVO’s Site Recovery
Let’s quickly go over the main points of the testing capability in NAKIVO’s Site Recovery.
1. Checking the actions included in testing
Review the logic of the actions in the Site Recovery job. Check whether the actions are arranged in the appropriate order and ensure that they do not form an infinite loop. You can edit Site Recovery job options when the job is not running: change the order of actions, add actions, remove actions, or edit action options as necessary.
2. Checking networking
Check that your network works properly. A VPN connection can be used between a production site and disaster recovery (DR) site, but this connection cannot be periodically disconnected in normal state. The network at the DR site must also work without disruptions. Check the Network Mapping and Re-IP settings you have used to configure failover and failback. If a VM is configured for the incorrect network, a network connection may not be established. The same is true for IP settings.
3. Setting the test schedule
Site Recovery job testing can be scheduled in the Site Recovery job scheduling options. Open the web interface of your instance of NAKIVO Backup & Replication. In the left pane, right-click the name of your job and click Edit in the context menu.
The Advantages of NAKIVO’s Site Recovery
- Comprehensive DR orchestration and automation. Site Recovery allows you to implement disaster recovery plans with high levels of automation. You can define the order of VM recovery in consideration of VM dependencies so that when disaster strikes, recovery is as efficient as possible.
- Flexibility to accommodate the needs of various businesses. You can create multiple Site Recovery jobs according to your needs. The set of actions available for incorporation into Site Recovery jobs allows to create different recovery workflows custom tailored for different situations.
- Built into the data protection solution. Site Recovery is a feature included in NAKIVO Backup & Replication and available along with the rest of the product’s comprehensive feature set; you don’t need to buy a separate license for Site Recovery. With this solution, all data protection and disaster recovery activities are managed from a single pane of glass.
- Significant savings compared to other DR solutions. NAKIVO Backup & Replication, with the built-in Site Recovery tool, is a cost-effective solution. The product continues to please users with useful new features while keeping the same affordable prices – especially when compared with the competitors on the disaster recovery market.