SharePoint Online Forms Overview
SharePoint lists are a popular way of storing information in SharePoint as tables. When creating SharePoint lists, the best approach is to use custom forms. But you might be thinking: How do I create a form in SharePoint Online? How do I create a fillable form in SharePoint? Can Microsoft forms be used in SharePoint?
This blog post covers SharePoint forms basics with a focus on SharePoint Online and tries to answer all your questions about the topic.

The Definition of Forms
A form is a window with a number of fields and labels to enter data and fill tables stored as SharePoint lists. Users fill a form and feed information into SharePoint. If you design forms perfectly, users can enter data with higher accuracy. Forms are displayed in the web interface of SharePoint.
Microsoft Forms is used to create a survey in SharePoint. It allows you to write questions and provide different fields to enter answers. You can allow users to answer the questions in a free mode and enter any word or sentence, enter only digital values, and select one or multiple provided answers. Microsoft Forms can be shared and published on a SharePoint site. Then you can view your survey results as charts, diagrams, lists, etc. Microsoft Forms is a web-based application in Office 365 that is easy to use and is integrated with SharePoint and Microsoft Flow (Power Automate). Forms are also used to create purchase order forms, vacation request forms, company polls, quizzes, checklists, SharePoint site requests, etc.
SharePoint forms are used to enter information to SharePoint lists and can be highly customized by special tools to build business logics, use dynamic fields and use conditional formatting. For example, you can create a form to register users to an event that saves attendees to a SharePoint list, highlight fields with colors depending on entered data, etc.
Dynamic fields allow you to show or hide a particular column depending on certain conditions. For example, you have a mandatory column of the Choice type that is called Company, and two choices are provided:
- Microsoft
- VMware
The Choice column is named VMware products with a list of VMware software solutions.
The Choice column is named Microsoft products with a list of software products developed by Microsoft.
When you select the Microsoft value from the Company column, the Microsoft Products field should be displayed in the form, and the VMware Products field would be hidden.
When you select the VMware value from the Company column, the VMware Products field should be displayed, and the Microsoft Products field would be hidden.
Tools to Create Forms
By default, SharePoint provides you a default list form. This form allows you to create lines and columns, set data types and requirements for them, and enter data to a SharePoint list. For most new users, this out-of-the-box functionality is enough. The advantage is that users don’t need to configure anything to use default forms. Just define the needed fields and enter data. Default forms for SharePoint lists support input validation, file attachment, field order optimization, and access limitation. Experienced SharePoint users who need advanced functionality, such as creating business logics or dynamic fields to create SharePoint forms, can use special tools.
InfoPath
Microsoft InfoPath is an application included as part of the Microsoft Office applications. It was developed especially for the advanced management of SharePoint forms. This is one of the most popular solutions to create large and complex SharePoint forms.
InfoPath can create multiple form views, work with structured data, perform calculations, work with extended text fields, and create business logics and workflows. This tool is intended only for editing forms and doesn’t provide features to edit web pages. The interface is not the most intuitive, and users must learn documentation and read tutorials to understand how to use this tool to create forms. Programming skills are not required though.
Unfortunately, Microsoft will end support of InfoPath in 2023. Microsoft recommends that you use more modern solutions to create SharePoint forms because InfoPath has some disadvantages:
- Forms created in InfoPath are saved as XML files stored in SharePoint form libraries.
- Big forms can slow down the working process when loading a form, especially if attachments are added.
SharePoint Forms Designer
SharePoint Designer is a powerful tool to customize SharePoint forms and configure different parts of a web interface. This is a website editing tool. You can add a Data View and insert fields from data sources as forms. You can open an existing SharePoint list and create an .ASPX web page to render and control the form.
With SharePoint Forms Designer you can change the layout, show/hide fields, use data controls, create workflows, work with the form code, and add graphics and text. This product is distributed by Microsoft for free but requires basic programming skills and knowing the structure of SharePoint, including SharePoint file storage.
Power Apps
Power Apps is one of the frameworks for Microsoft Power Platform. This tool uses the platform as a service concept and is a part of the Office 365 suite. Power Apps is positioned as substitution for InfoPath.
The advantages of using Power Apps:
- You can develop SharePoint forms from scratch and customize them
- More than 200 connectors allow you to connect Power Apps across the platforms
- Drag and drop controls
- Good support of almost all web browsers and community support
- Integration with Office 365 Dynamics family
- Creating dynamic fields in forms
You can access Power Apps by using the link
https://powerapps.microsoft.com/en-us/
or from the menu of an existing SharePoint list in SharePoint Online.
Visual Studio
Microsoft Visual Studio is the ultimate solution for software development intended for programmers. If the previous tools don’t meet your needs, consider using Visual Studio. It can be used to develop almost anything. There is integration with SharePoint and programmers can create any functionality needed for SharePoint forms. Use Visual Studio to pass limitations of other solutions to create SharePoint Forms. Visual Studio is a paid solution. If you don’t like any of the mentioned solutions to create SharePoint forms, try solutions from third-party vendors.
How to Create a Poll by Using Microsoft Forms?
It’s time to go to the practical part and look at how to create a form in SharePoint by using Microsoft Forms. Let’s use the simple example of creating a poll.
- Open a new page on a SharePoint site, or create a new page. As we’re beginning from scratch, I’ll show first how to create a new page before going on to create a new form for a poll.
- Log into your Office 365 account, open SharePoint, and open your team site. Read more about SharePoint in this blog post.
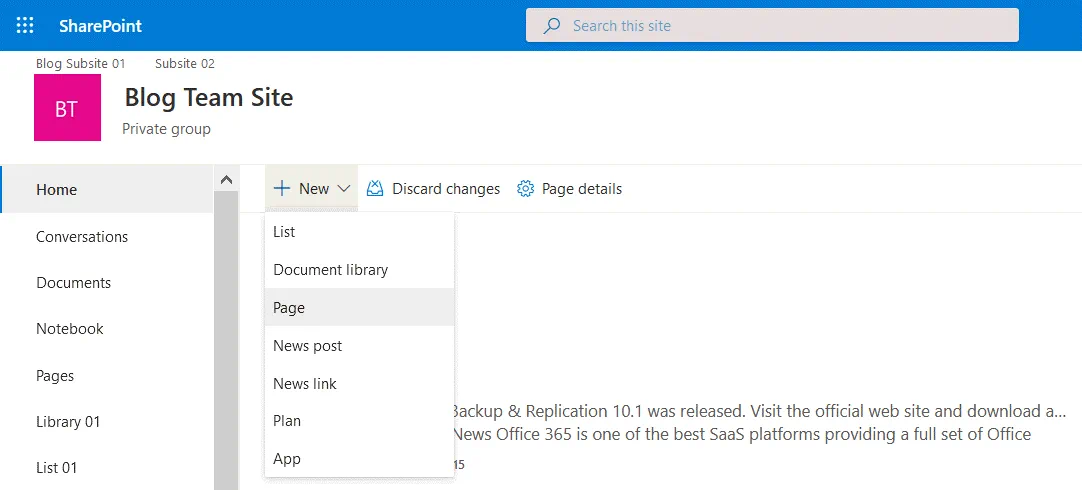
- Go to the home page of your SharePoint site, click New, and hit Page.
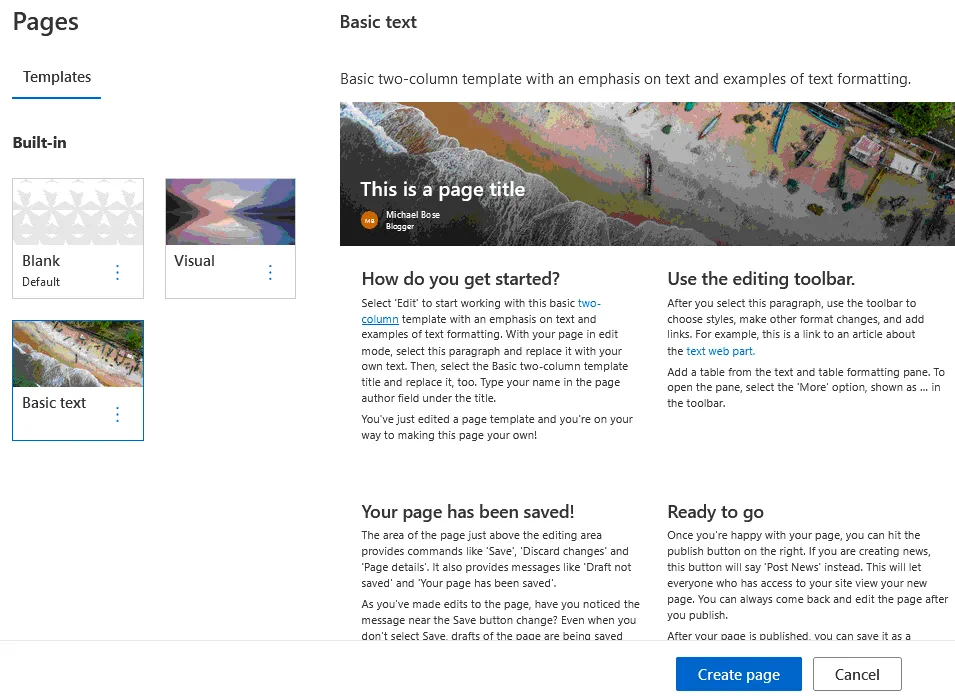
- Select a template for a new page. There are three templates in our case: Blank, Visual, and Basic text. Let’s select the third one and set the title for our page – SharePoint Online Forms. Then hit the Create page button.
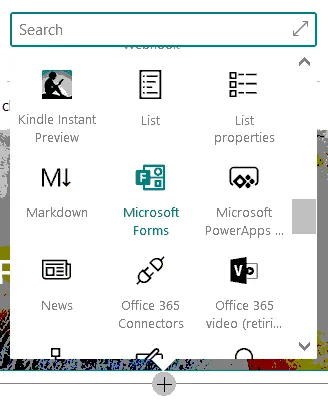
- A page is created. Click Edit (the pencil icon) to add Microsoft Forms to a SharePoint site page. Once you have entered the edit mode, hover the mouse over existing web parts to see the plus icon to add a new web part in the selected place.

- Click the plus icon and, in the menu that opens, hit Microsoft Forms.
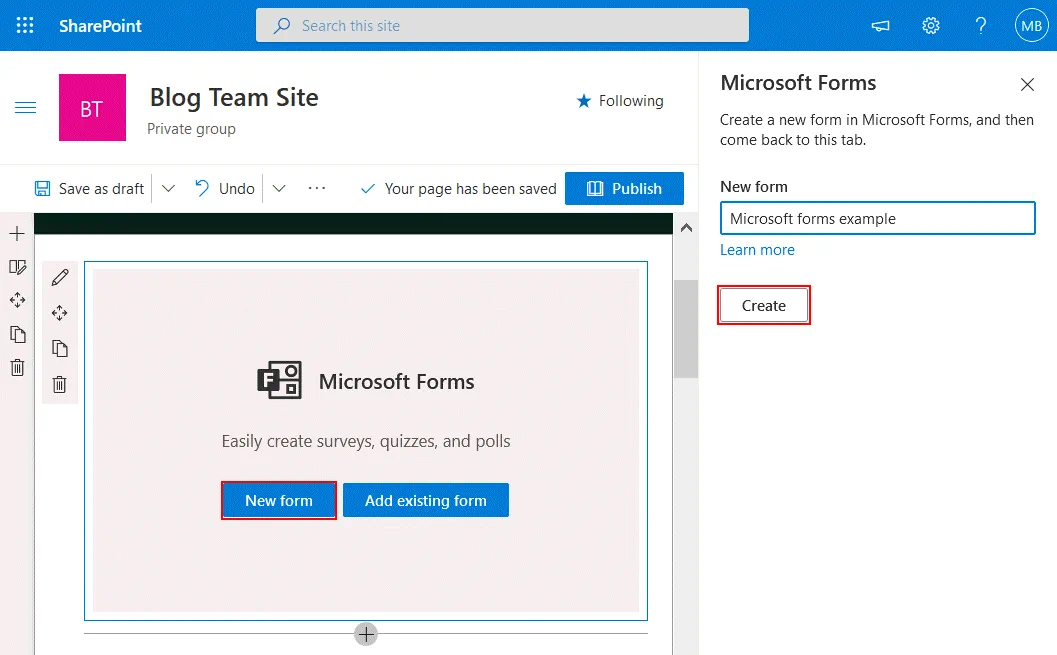
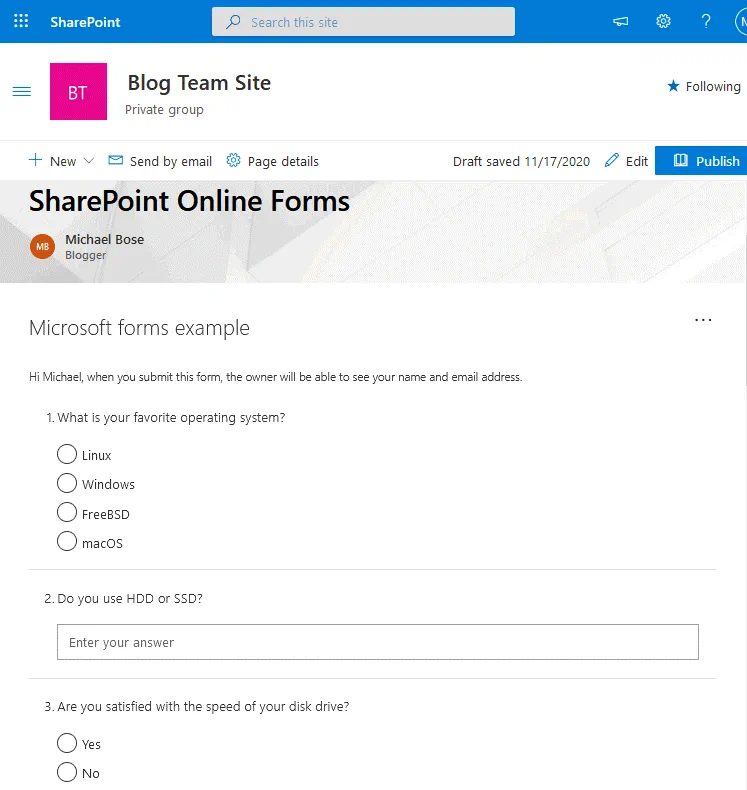
- A new Microsoft Forms part is created on a page, and it contains two buttons. As we create content on a SharePoint site from scratch, we click New form. In the window that opens on the right side of the web interface, enter a new form name, for instance, Microsoft forms example, and hit Create.
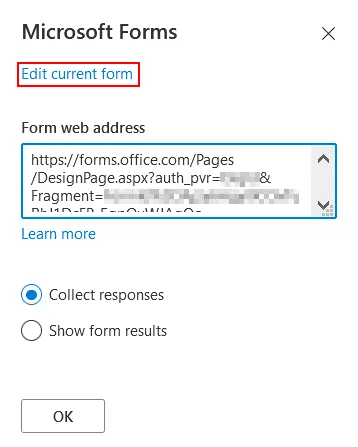
- A new form is created in SharePoint, and a form web address is displayed. You can select which data to display:
- Collect responses
- Show form results
- Click Edit current form.
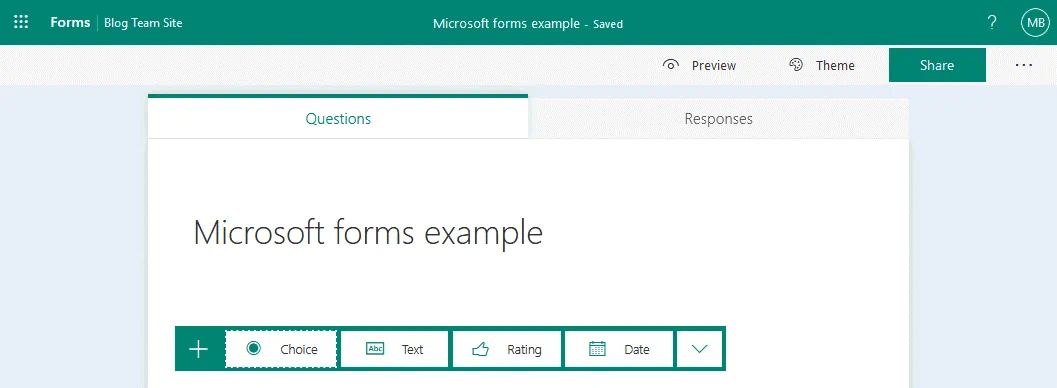
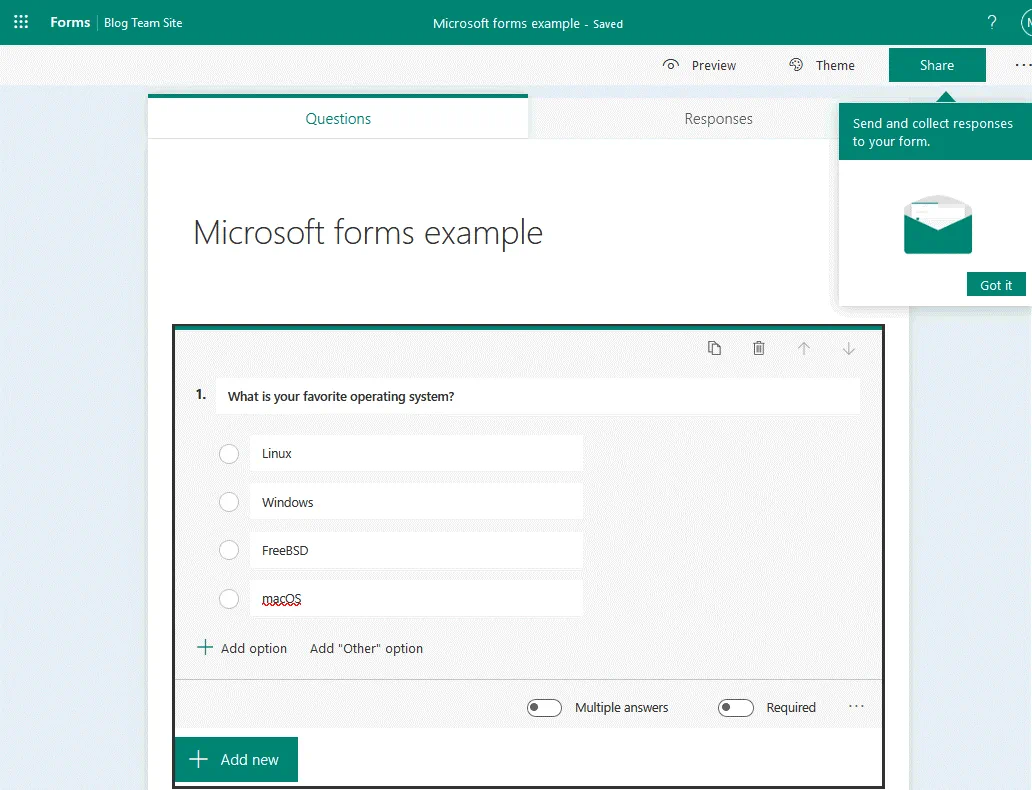
- As we create a form for a poll, we select the Questions tab. Below you can see a panel with the plus icon to add a question and buttons to select options for answers. You can allow users to select one of the provided answers, write any text, rate a position, select date, etc. I will select the first option and write the question with the possible answers.
- You can set the option that allows users to select multiple answers and set the answer as mandatory so that a user cannot skip answering this question. Once you have created the first answer, hit +Add new to create the next answer.
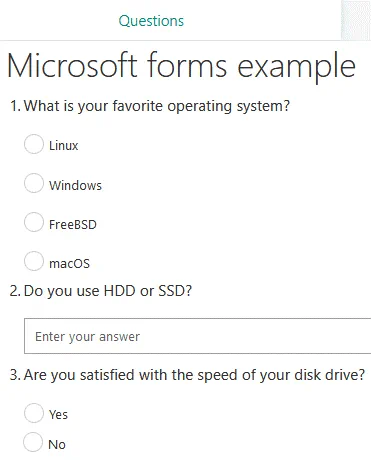
- Use the Publish button once you are sure that the poll has been created successfully without mistakes. We are going to publish a page that contains the poll; hence we are not pressing the Publish button now. In our case we created three questions in our poll as shown on the screenshot below.
- Go back to the page of your SharePoint site where you inserted a web part with a poll. Check your page, and hit Publish to publish the page (the SharePoint Online Forms in our case) that contains the poll on your SharePoint team site.
How to Create and Edit SharePoint Forms
Let’s find out how to create a form in SharePoint to add data to a list by using an example. This part is a little more complicated than creating a poll. You should create a SharePoint list, add columns, and then customize a form in Power Apps.
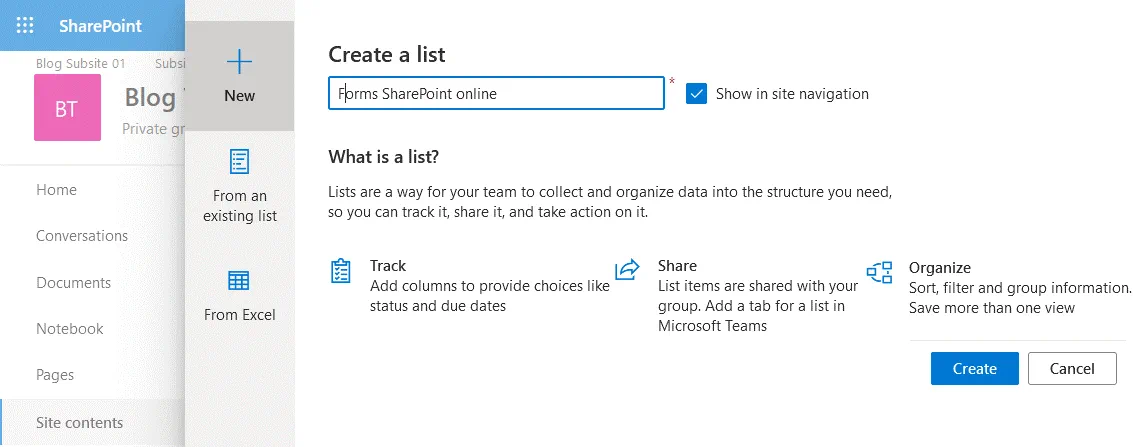
In order to create a list, open your site in SharePoint Online. Hit Site Contents in the navigation pane, click New, enter a name, for example, Forms SharePoint Online (because we are creating this list to explain SharePoint Forms creation), and click Create. As an alternative, you can call your list Warehouse (which works for the example below to make the name simpler).
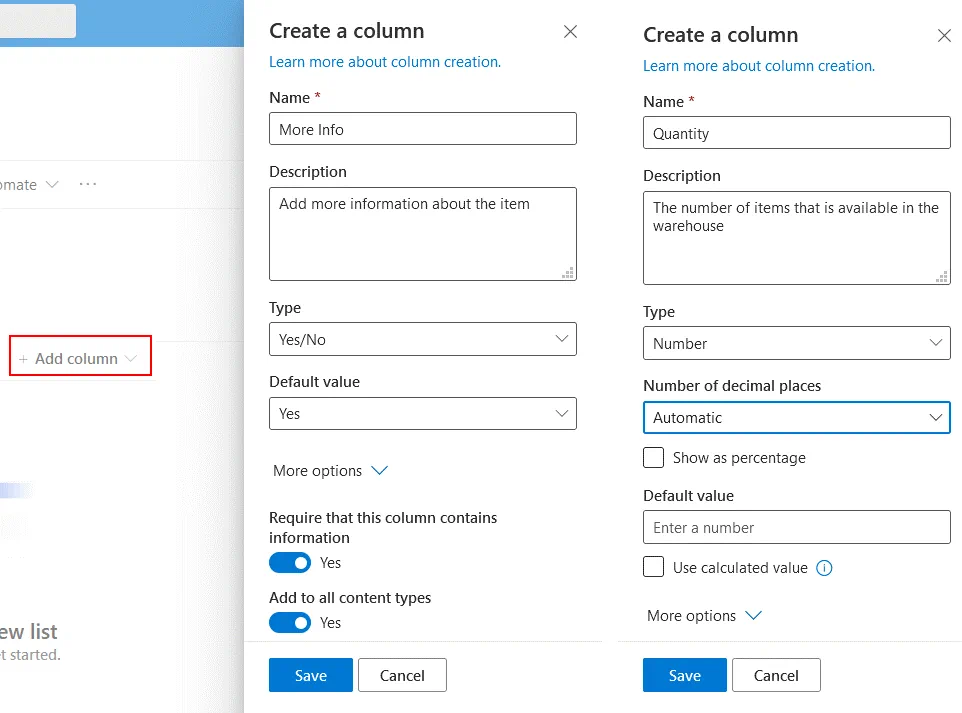
Once a new list has been created, click +Add column. In the window that opens on the right side of the web interface, enter parameters for each column, then click Save. In this example, I create a table to reflect the items stored in a warehouse.
The table contains the following columns:
- Title (is present by default): Represents the name of the item stored in the warehouse.
- More Info (Type: Yes/No): Set to Yes if you have additional information about the item. Otherwise set to No.
- Quantity (Type: Number): The number of items available in the warehouse for the current positions.
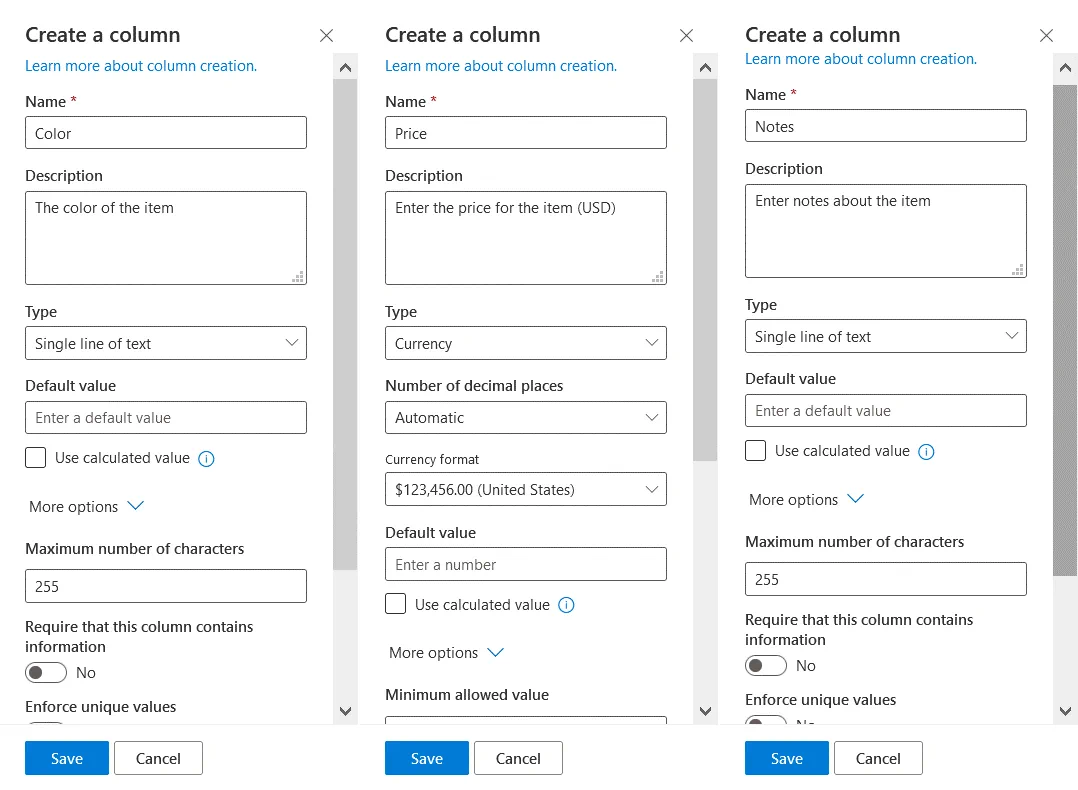
- Color (Type: Single line of text): Allow users to set any colors in any format.
- Price (Type: Currency): The price for the item must be entered in USD.
- Notes (Type: Single line of text): Use notes to define additional information about the item.
The idea of this table is that a user should enter detailed information only if the Yes value is selected in the More Info column. If a user doesn’t have any detailed information about the item and selects No, fields to enter detailed information are not displayed in the form that is used to enter data to a SharePoint list. By default, after creating a form all fields are displayed for all users. Using Power Apps allows you to configure more options for fine-tuning SharePoint forms.
In the screenshots, you can see the parameters set for columns when we create them for a list (called Forms SharePoint Online in this example) in SharePoint Online.
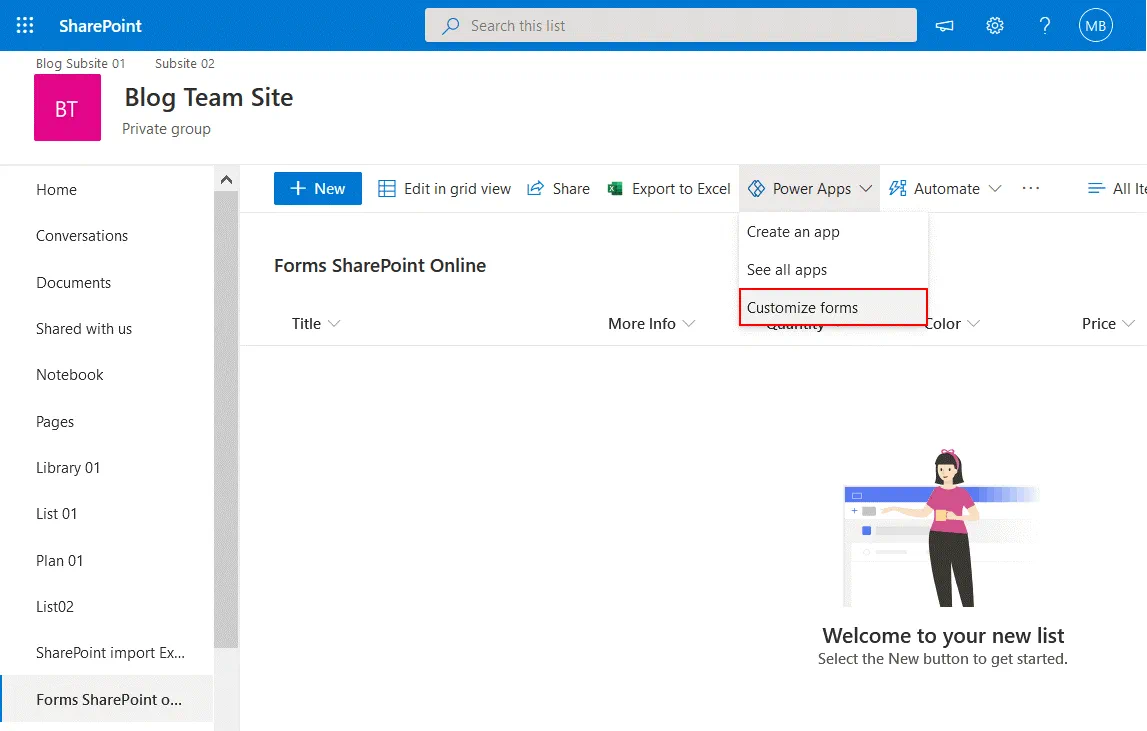
A new SharePoint list with all needed columns is now ready. Now you can edit your SharePoint form. Go to Power Apps > Customize forms. Office 365 users who have permissions to manage, edit, or design a list can edit the associated form.
Power Apps opens in a new tab. Wait for the content to load. You can skip the Welcome to Power Apps Studio dialog.
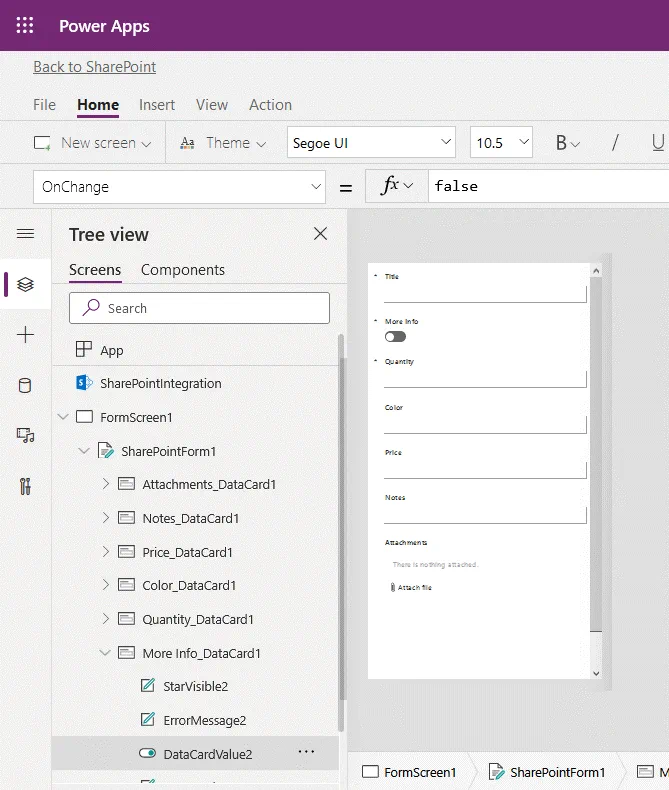
In the left pane of the web interface, you see the tree view with elements of a SharePoint form. In the center of the screen, you see the existing fields. You can drag and drop fields to change their position (order) in the form, create fields, and delete them. The Attachments field is added by default. If you don’t want users to save attached files in a list, delete this field (hover over the field, click the three dots, and hit Remove). In this example, I won’t delete the Attachments field.
In the right pane (the Edit pane), you can edit the properties of selected items, display fields as columns, edit layout settings, etc.

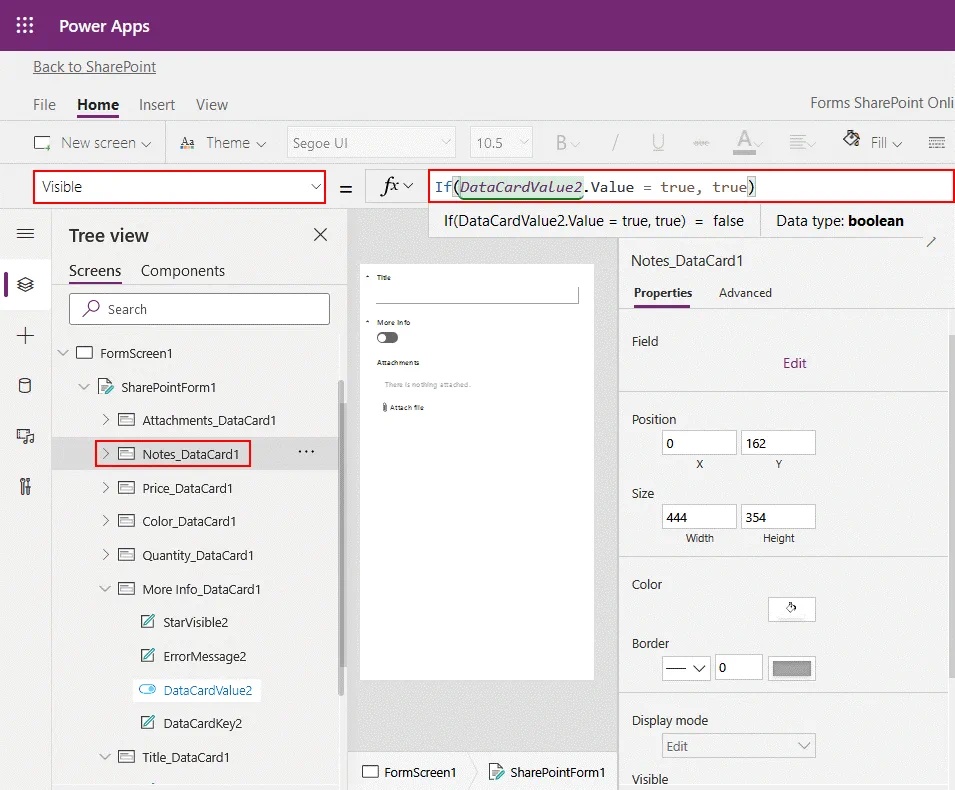
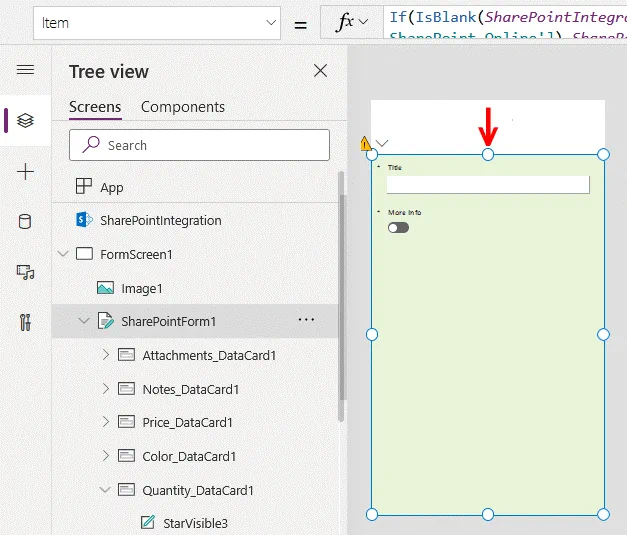
Now you can configure conditional formatting. In this example, we have to explore the MoreInfo field related to the MoreInfo column. Depending on the data (Yes/No) in this column the logics should define whether to display other fields to enter data to other columns. Expand the MoreInfo_Datacard1 item, and remember the name and number of the DataCard value (the switch icon is displayed at this item). In our case, the value is DataCardValue2.
The names of fields related to entering data to the appropriate columns are:
Title_DataCard1
MoreInfo_DataCard1
Quantity_DataCard1
Color_DataCard1
Price_DataCard1
Notes_DataCard1
Attachments_DataCard1
Now you have to configure displaying other fields depending on the data selected in the MoreInfo field. Let’s start from the Notes_DataCard1. Click Notes_DataCard1 in the tree view and, in the drop-down menu, select Visible. In the fx field, enter the formula:
If(DataCardValue2.Value = true, true)
After entering this formula, the appropriate field vanishes from the form. Don’t worry, that is what we need.
Do the same for Price_DataCard1, Color_DataCard1, Quantity_DataCard1, and Attachments_DataCard1.
On the screenshot below, all additional fields disappear after editing.
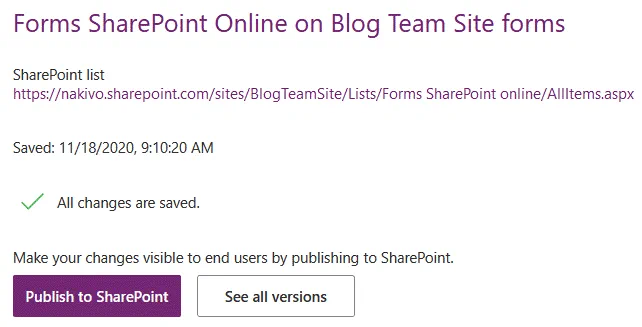
We have configured all the needed fields in the form to be displayed only if we select Yes in the MoreInfo field. Now it’s time to save our form edited in Power Apps to be able to use it in SharePoint Online.
Go to File > Save, and hit the Save button.
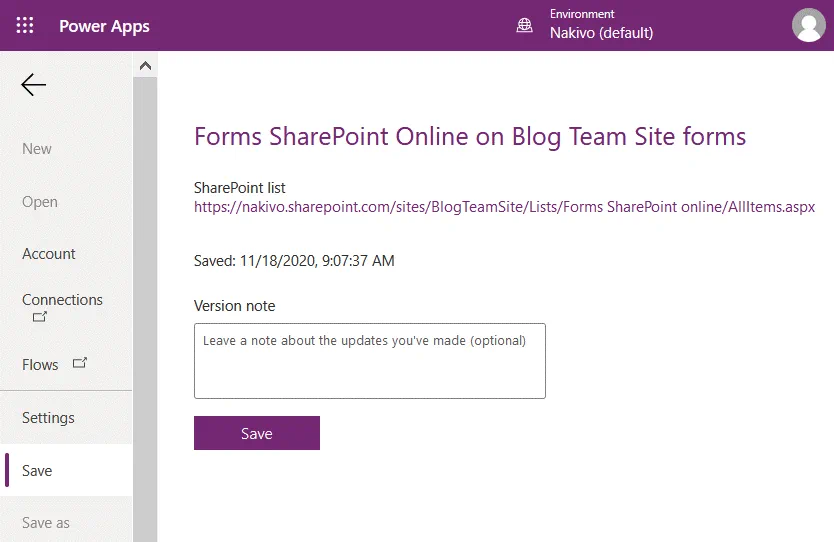
Once all changes are saved, hit Publish to SharePoint. You can see a link to your SharePoint list.
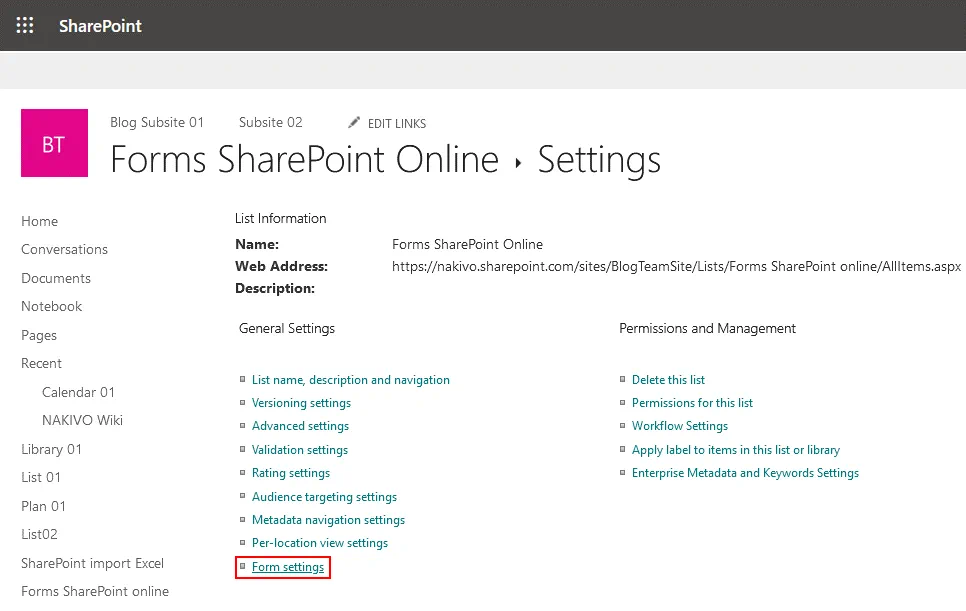
Now you should set the SharePoint list to use your customized SharePoint form. Go back to SharePoint Online, and open your list (we open our list created to display items stored in the warehouse that is called Forms SharePoint Online). Click the settings icon, and hit List settings.
On the List settings page, click Form settings.
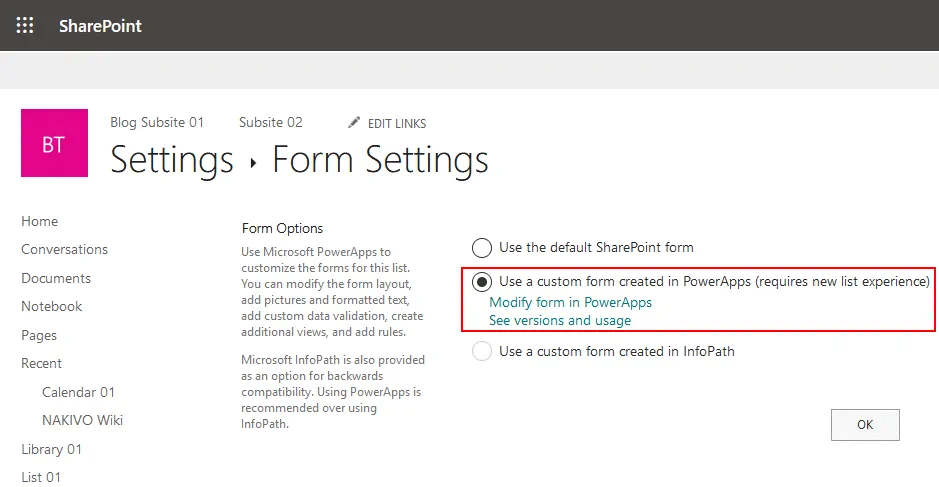
On the Form settings page, select Use a custom form created in PowerApps, and hit OK.
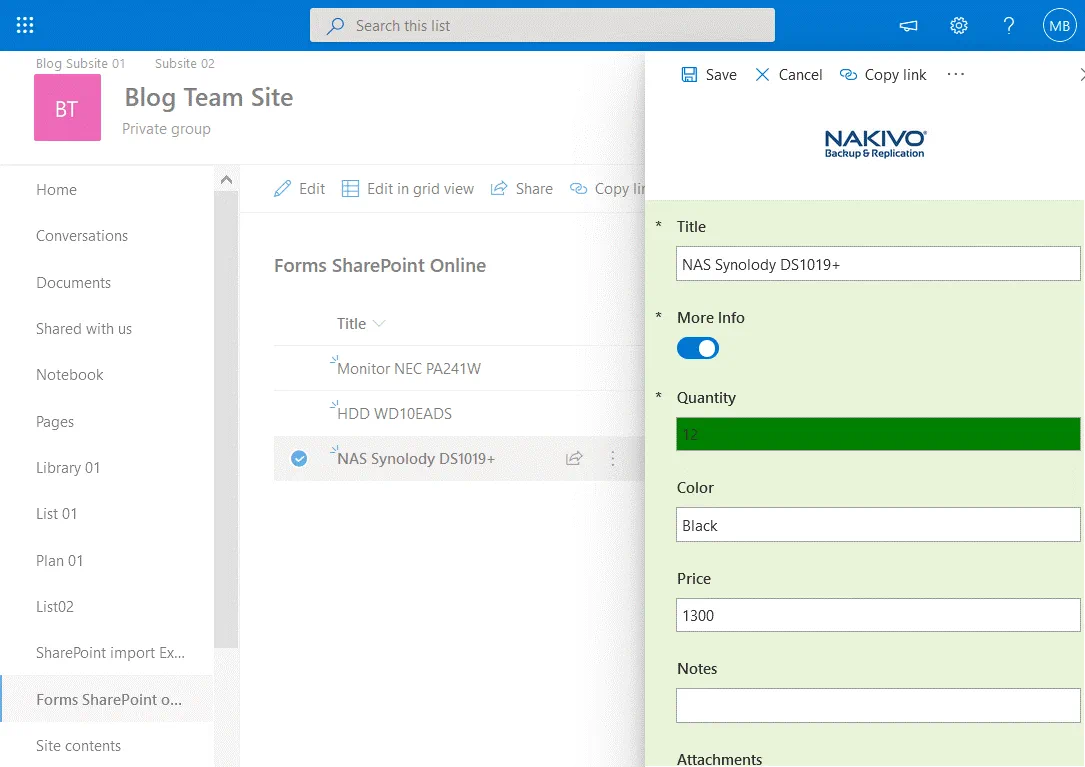
Let’s open our SharePoint list and add a new item to the list by clicking the +New button. Our customized form opens on the right side of the web interface. The More Info switch is turned on (equal to Yes), and all the fields intended to add more information are displayed.
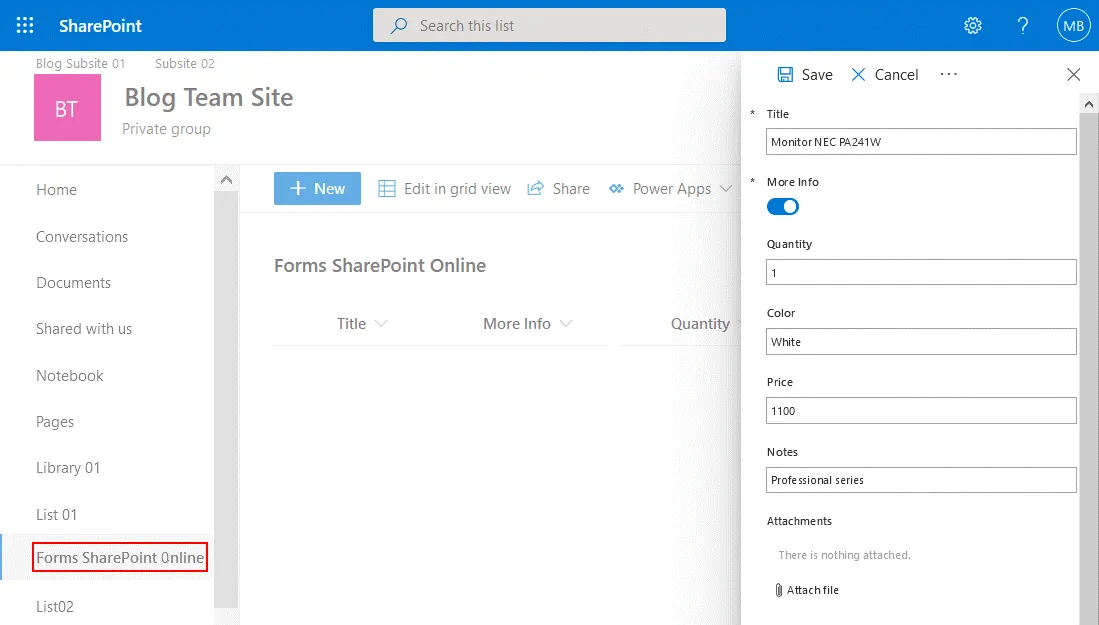
If we select No and turn off the More Info switch, no additional fields are displayed.
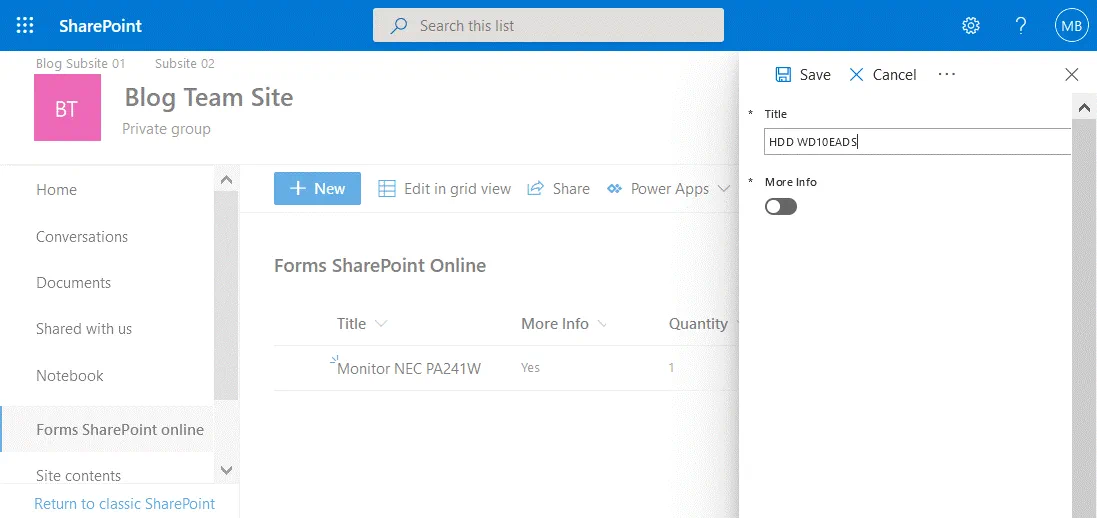
We have added two items to our SharePoint list. When we added the first item, we defined additional information unlike the second item. You can see on the screenshot below – there is no additional data in columns for the second item.

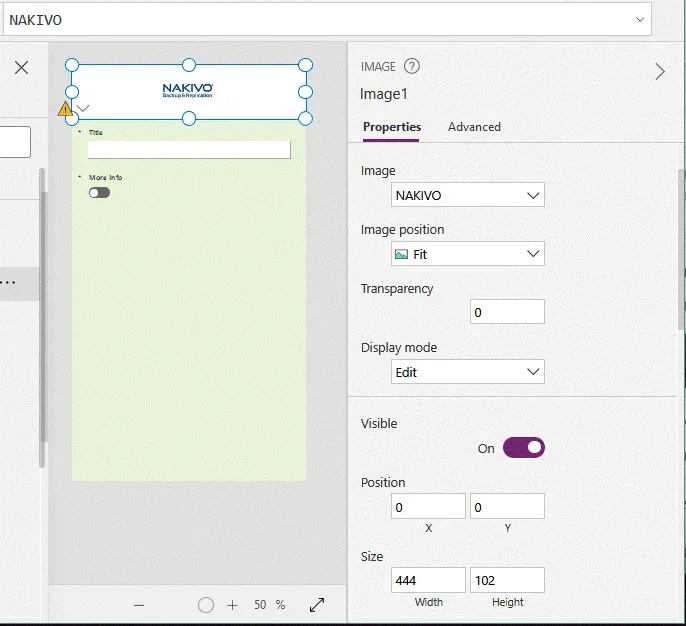
We can modify our SharePoint form by using Power Apps and use custom colors and images to make the form more attractive.
Open your form in Power Apps. Select SharePointForm1, which is the main element in this case. A border with circles is displayed around the selected element. Click the circle, don’t release the left mouse button, and change the size of the element. We reduce the size of the main element to free space for an image and change the background color of the form to light-blue.
In order to add an image, go to Insert > Media > Image.
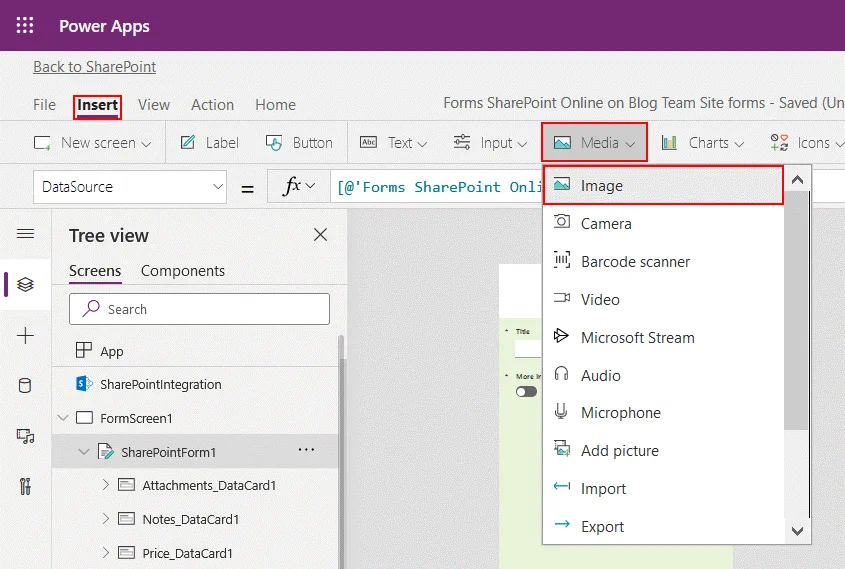
Image1 is now displayed in the tree view. Select this image and, in the Properties tab, click + Add an image file. Browse an image file. Let’s open the image of NAKIVO Backup & Replication.
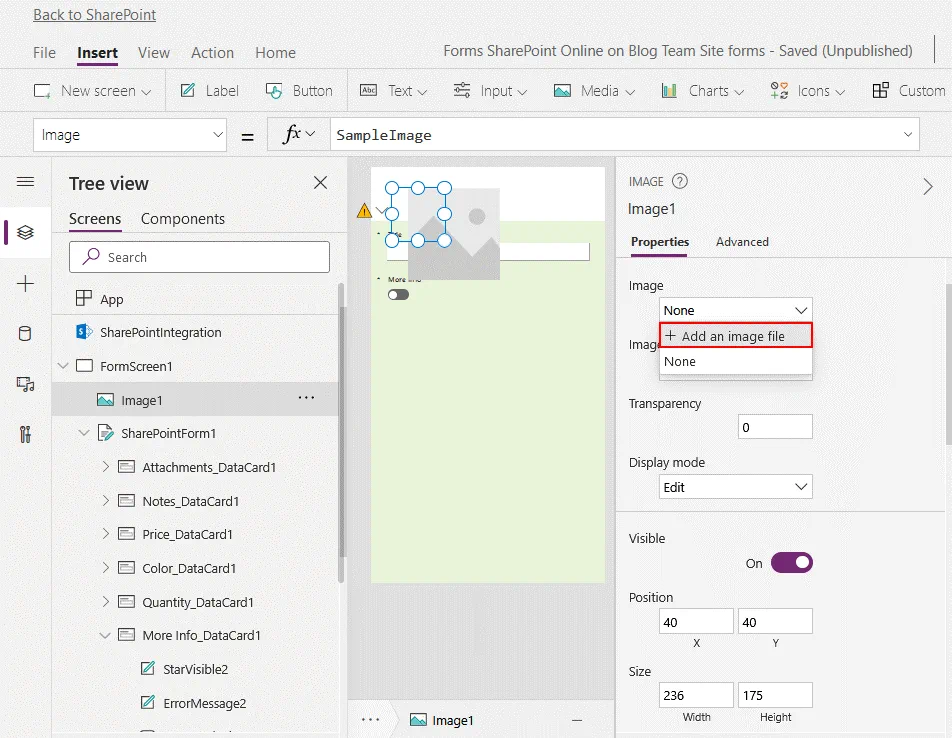
After opening the file, you can stretch the image, move it to the needed location, and set the transparency and other options.
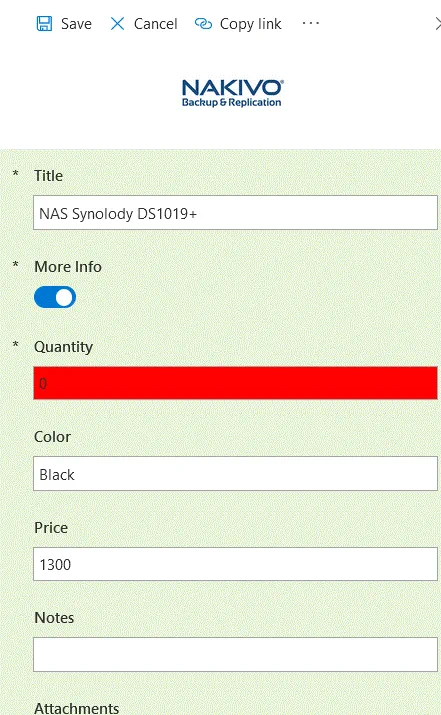
Let’s edit the form and make the Quantity field change color depending on the entered number. If the value is less than 1, then the field is filled with red, otherwise the field is green. This approach can attract the attention of a user editing a SharePoint list if there are no items left in the warehouse and it may be needed to order more items for this product.
In the tree view, expand the Quantity_DataCard1, and select DataCardValue3, which is the field where a user should enter the number of items remaining in the warehouse. Once you have selected the needed field in the form, select the Fill option in the drop-down menu above the Tree view. You can see the default value of fx:
RGBA(255, 255, 255, 1)
This value means that the white color is set to the background of the form.
Change the default value of fx to:
If(Parent.Default<1,Red,Green)

Save the form in Power Apps as explained before (File > Save), and publish the form to SharePoint Online.
The form is published after editing. Add a new item to the list, and then edit this item. If you enter 1 or a higher value into the Quantity field, this field will be green.
If a value is entered that is less than 1 in the Quantity field, this field will be red.
This is the end of the tutorial on creating SharePoint forms. You can create workflows by using Microsoft Power Automation (formerly known as Microsoft Flow) and send an email message when quantity is 0 for any item, for example. This approach allows you to use customized SharePoint forms with Power Apps and automate business processes with Power Automation.
Conclusion
Microsoft forms are usually used to create polls, surveys, and quizzes. They allow you to display results on a SharePoint site page. SharePoint forms are web-based applications used to enter data into SharePoint lists. SharePoint forms can be created in InfoPath, SharePoint Forms Designer, Power Apps, and Visual Studio. In this blog post I’ve explained how SharePoint forms can be customized with Power Apps and provided a basic example. Customized forms offer you more flexibility and advanced functionality compared with defaults forms. Conditional formatting, formulas, and integration with Microsoft Power Automation give you a lot of power when working in SharePoint.
Don’t forget to back up your data in SharePoint and Office 365 to protect against disasters and data loss. Download the Free Edition of NAKIVO Backup & Replication, which is a universal data protection solution for virtual, cloud, physical, and Office 365 environments.