Setting Up an Office 365 SMTP Relay with TLS Connectors
Simple Mail Transfer Protocol (SMTP) is the standard protocol used to send email messages over the internet and to deliver them to recipients. An SMTP server is the node that sends outgoing emails. A single SMTP server may be insufficient to provide the necessary performance, thus requiring an SMTP relay service configuration that transfers emails between mail servers.
With Office 365, generally speaking, you don’t have to configure SMTP relays. You use SMTP relays when you need better protection against spam emails and viruses in incoming messages versus what you get with your on-premises server but don’t want to migrate to Microsoft servers entirely. There are different reasons for keeping the on-premises email server, including:
- for communication inside the company without internet access
- higher storage limits per mailbox
- sending more emails per day than the Office 365 limits allow
Also, you can use Office 365 SMTP relays to send automated email messages from a device or app to increase deliverability rates or when sending bulk emails (for instance, while running a promo campaign), guiding messages through a highly secure third-party server that you trust.

Requirements for Setting Up SMTP Relay
The sending application (the on-premises email server) must support TLS, connect to the Office 365 servers on port 587 (the SMTP port for Office 365 with encryption enabled), and authenticate with Office 365. A valid certificate must be used. It is recommended that you use a certification authority-signed (CA-signed) certificate whose name includes the domain name matching the domain name used by your organization’s email server. The advantage of using certificates issued by trusted certificate authorities is the ability to authenticate the identity of the certificate’s owner. CA-signed certificates are automatically trusted by web browsers and other applications. When you purchase a CA-signed certificate, your domain is validated, and there’s proof that you control the domain.
Additional requirements and limitations are:
- The account that authenticates on the relay server must be the same as the address from which messages are sent through the relay.
- 1,500 messages per day can be sent from one Office 365 account. This limit is set to prevent sending spam.
- Email servers connect to remote email servers on port 25.
- Incoming connections from IP addresses of Office 365 servers must be allowed.
- Your Office 365 account must have enough permissions for editing the configuration of Exchange Online. The account must belong to the Organization Management group.
Read also the blog post about Office 365 SMTP settings.
What are Office 365 Connectors?
An Office Connector is a collection of instructions used to customize how email flows to and from your Office 365 organization. You can set up connectors in Office 365 to route email between Office 365 and your own email servers in both directions. You can configure Office 365 connectors for the mail flow between Office 365 and your on-premises Exchange server.
Using a Connector from Your Mail Server to Office 365
Let’s configure an Office 365 connector for the SMTP relay from your email server to Office 365.
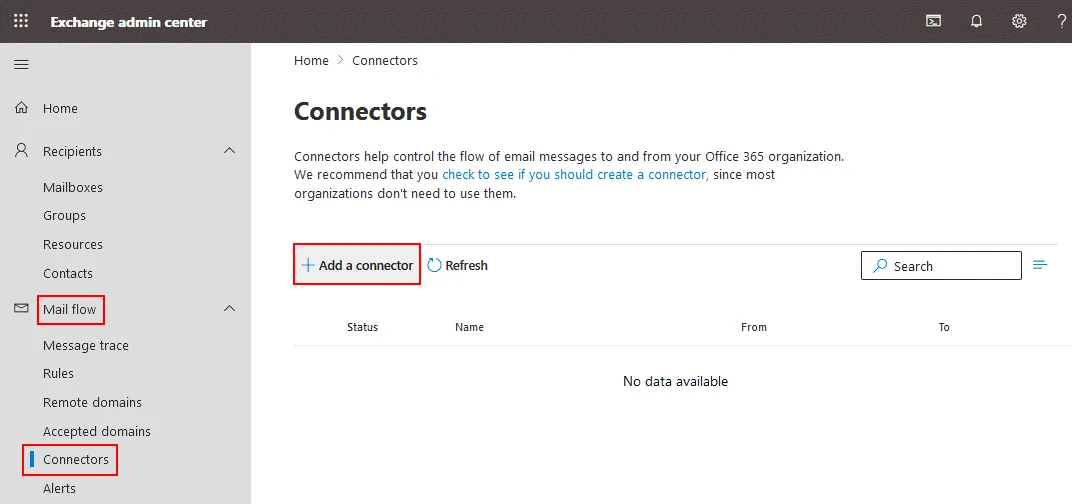
Open the Exchange admin center. You can use this link https://login.microsoftonline.com/jsdisabled.
Go to Mail flow > Connectors in the navigation pane to open Office 365 SMTP relay settings. In my example, the list is empty because no connectors have been created yet. If you have previously created connectors, they should appear on this page.
Click + Add a connector on the Connectors page to add an SMTP connector.
The Add a connector wizard opens.
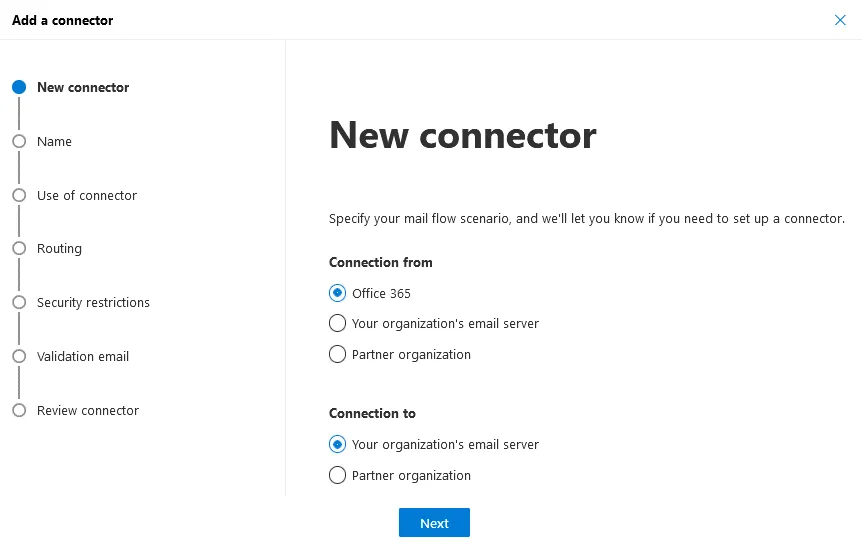
New Connector. Select Your organization’s email server under Connection from.
Under Connection to, Office 365 is greyed out. This default option is selected automatically when you select the Your organization’s email server radio button.
Hit Next at each step of the wizard to continue.

Connector name. Enter the connector name, for example, Office 365 SMTP relay TLS.
Enter a description for the SMTP connector, for instance:
A connector from the on-premises email server to Office 365
Select what to do after the connector is saved:
- Turn it on
- Retain internal Exchange email headers (recommended)

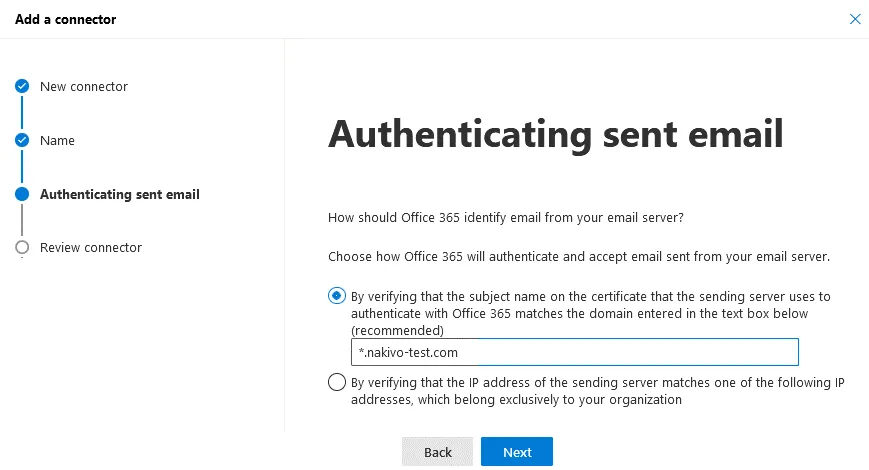
Authenticating sent email. Choose how Office 365 should authenticate and accept an email sent from your server. There are two available options. I select the first option:
- By verifying that the subject name on the certificate that the sending server uses to authenticate with Office 365 matches the domain entered in the text box below.
Enter the domain name used by your organization. If your organization uses multiple domain names, enter any of the domains.
If you prefer to select the second option, you should define the IP address of the domain server in your organization.
Review connector. Review the selected options for the new SMTP connector in Office 365 and click Create connector.
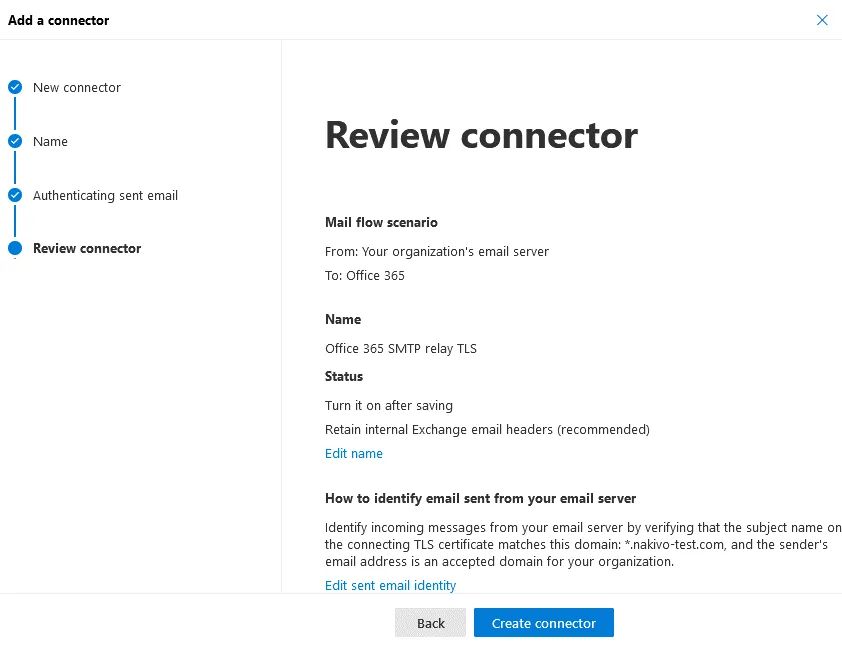
The Office 365 SMTP connector is now created.
Using a Connector from Office 365 to Your Mail Server
Now let’s look at how to configure an Office 365 SMTP relay with a connector for mail flow in the other direction (from Office 365).
Open the Exchange admin center and go to Mail flow > Connectors in the navigation pane.
Hit + Add a connector (similarly as explained in the previous section).
A wizard opens, and the New Connector screen is displayed.
Select Office 365 in the Connection from the section.
Select Your organization’s email server under Connection to.
Hit Next at each step to continue.
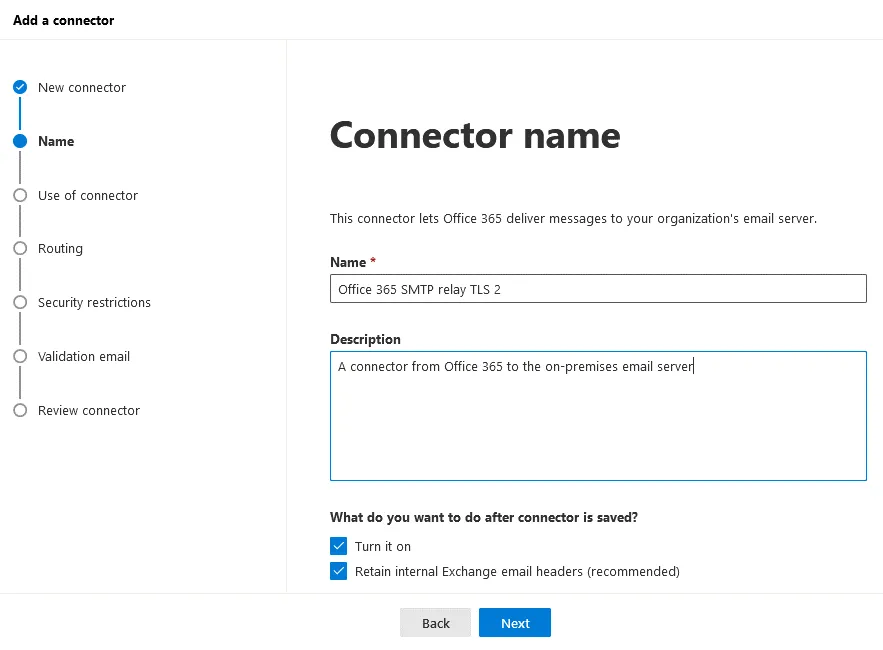
Connector name. Enter an SMTP connector name and description.
Name: Office 365 SMTP relay TLS 2
Description: A connector from Office 365 to the on-premises email server
Select the options to be applied after the connector is saved:
- Turn it on
- Retain internal Exchange email headers
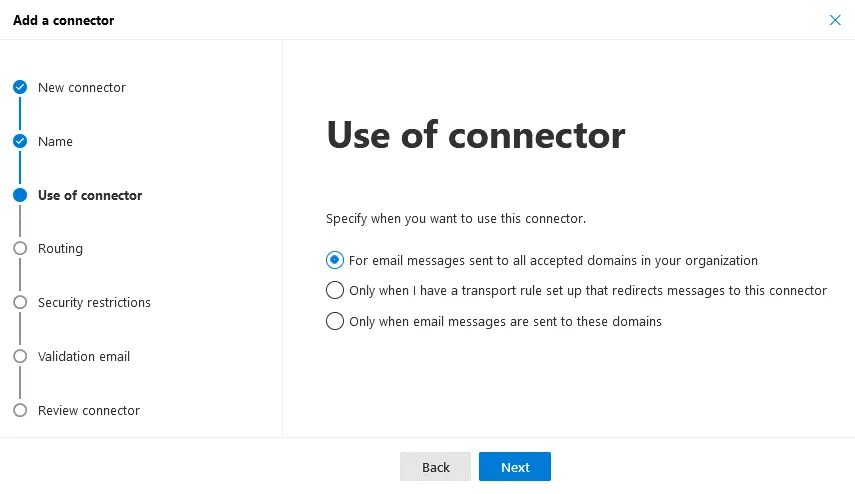
Use of connector. Specify your usage of this Office 365 SMTP connector. There are three options:
- For email messages sent to all accepted domains in your organization
- Only when I have a transport rule set up that redirects messages to this connector
- Only when email messages are sent to these domains
I select the first option in this example.
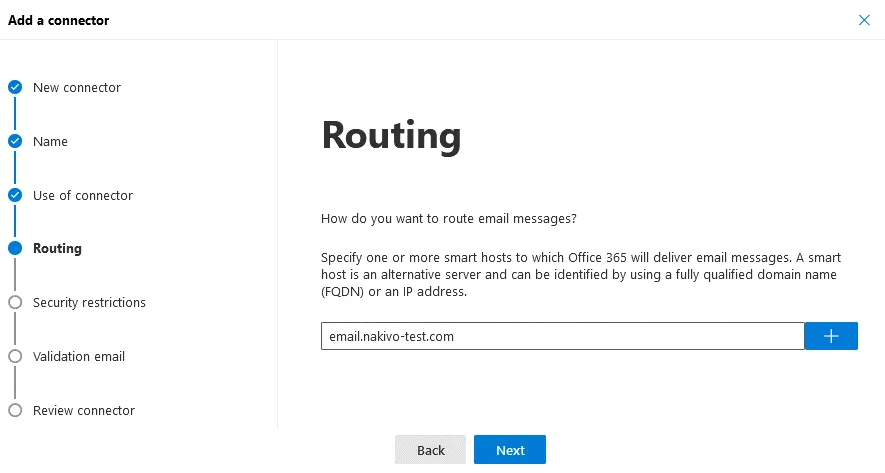
Routing. Specify the smart host to which Office 365 should deliver emails. You can enter a fully qualified domain name (FQDN) or IP address. After entering the name or address of a server, hit the + button to add the server.
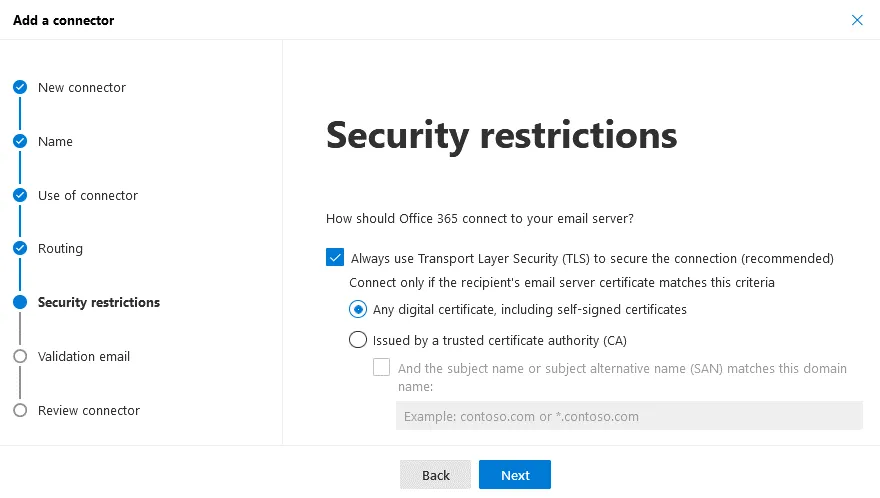
Security restrictions. Select the security options. Since we are creating an Office 365 SMTP relay with TLS connectors, we should define the encryption parameters. Select the checkbox:
- Always use Transport Layer Security (TLS) to secure the connection
Then select one of the two available options:
- Any digital certificate, including self-signed certificates
- Issued by a trusted certificate authority (CA)
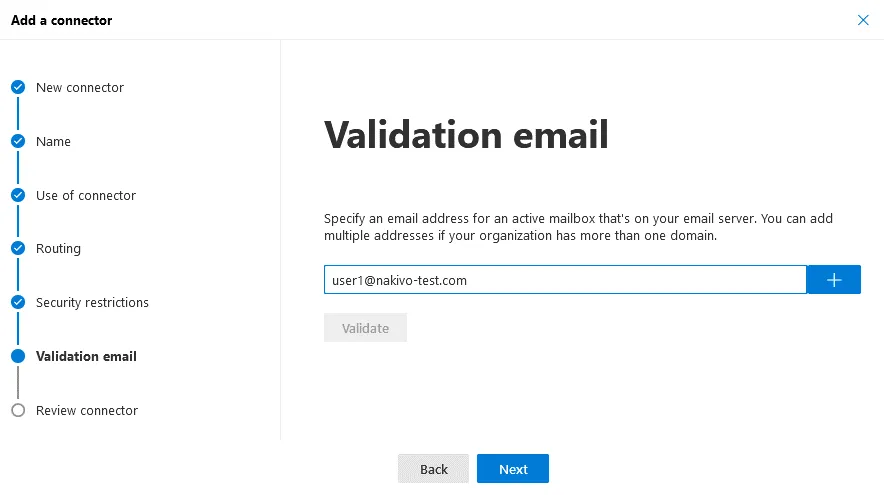
Validation email. Enter the email address of the account on your email server to validate the configuration of the Office 365 mail relay. You can enter multiple email addresses. After entering an email address hit the + button. Then click Validate.
Review connector. There is nothing to configure at this step. Review your configuration of the Office 365 SMTP relay and hit Create Connector.
Using PowerShell
The alternative to the Exchange admin center GUI for configuring Office 365 SMTP relay with Office 365 connectors is using PowerShell. First, connect to Exchange Online PowerShell.
Run the commands to create a TLS connector to receive email:
$splat = @{
Name = ‘SMTP Relay Office 365 (TLS)’
ConnectorType = ‘OnPremises’
SenderDomains = ‘*’
RequireTLS = $true
TlsSenderCertificateName = ‘*.your-domain.com’
}
New-InboundConnector @splat
Where:
Name is the connector name.
ConnectorType is the type of connector. The supported values are OnPremises or Partner.
SenderDomains – this is a list of allowed sender domains. Verified sender domains are valid. Use an * (asterisk) to allow all verified domains for your tenant when you configure Office 365 SMTP relay with this connector. If you need to define multiple domains directly, you can enter a list of domains, for example, ‘domain0.net’, ‘domain1.net’.
RequireTLS – defines that TLS transmission is required for all email messages received by this connector.
TlsSenderCertificateName is a certificate name or subject used by a sender.
Conclusion
You can configure Office 365 connectors in the Exchange admin center and PowerShell. Mail flow between your mail server and Office 365 servers can be configured with connectors and TLS encryption. If you use Office 365 email services, it is recommended that you back up your data stored in Office 365.
NAKIVO Backup & Replication supports Office 365 backup with support for Exchange Online, OneDrive for Business, and SharePoint Online. The solution can also back up on-premises Exchange Server running on physical or virtual machines. Download Free Edition of NAKIVO Backup & Replication and try the product to back up your data.