How to Run macOS on VMware ESXi
VMware vSphere is a leading hardware virtualization platform that allows you to run virtual machines with various operating systems, including Windows, Linux, and FreeBSD, on different hosts and to migrate VMs between hosts. However, by default, macOS is not supported on VMs, that is, it cannot be installed and configured on VMware ESXi or VMware Workstation.
In some cases, you may need to install macOS on a virtual machine, for example, if you need to test applications that can only be run on macOS. This blog post explores different ways to do this.

Preparing the Installation of macOS ISO Image
To start, you need the ISO image of the macOS installer. If you do not have the ISO image, you can create the installation ISO image manually after downloading the package from Apple’s official website. A machine with macOS is required for this process, as you will be redirected to the App Store to download the macOS installation image (browsers on Windows or Linux don’t recognize App Store links). Once the App Store window with the needed macOS version is open, you can read the operating system information and then download the image.
We will go over the installation on an ESXi VM of macOS Ventura 13.2, which is the latest version as of the time of writing. To download macOS Ventura 13.2, we use a machine with macOS Monterey 12, which is the previous version at the moment of writing. The name of our user is user1.
Download macOS Ventura 13.2
To download the macOS app, which we will then convert into an installation image:
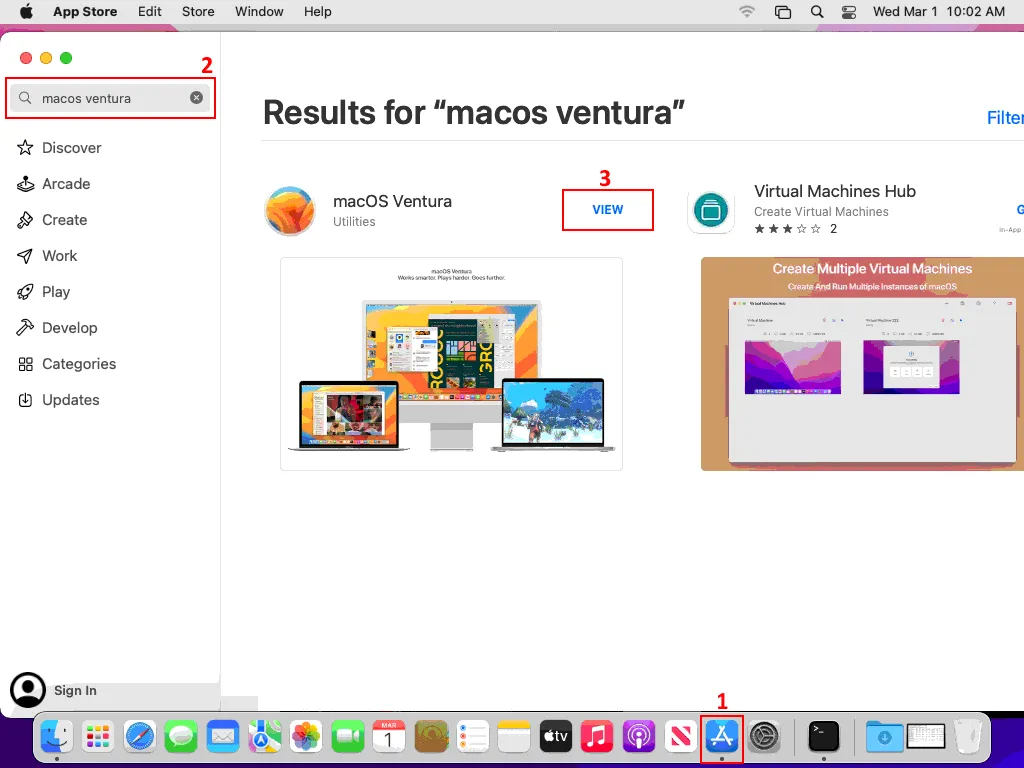
- Open AppStore on the existing macOS machine then type macOS Ventura in the search field. Locate the macOS Ventura item and click View.
- Click Get on the macOS Ventura page.
- Click Download in the dialog window to confirm that you want to download this macOS version.
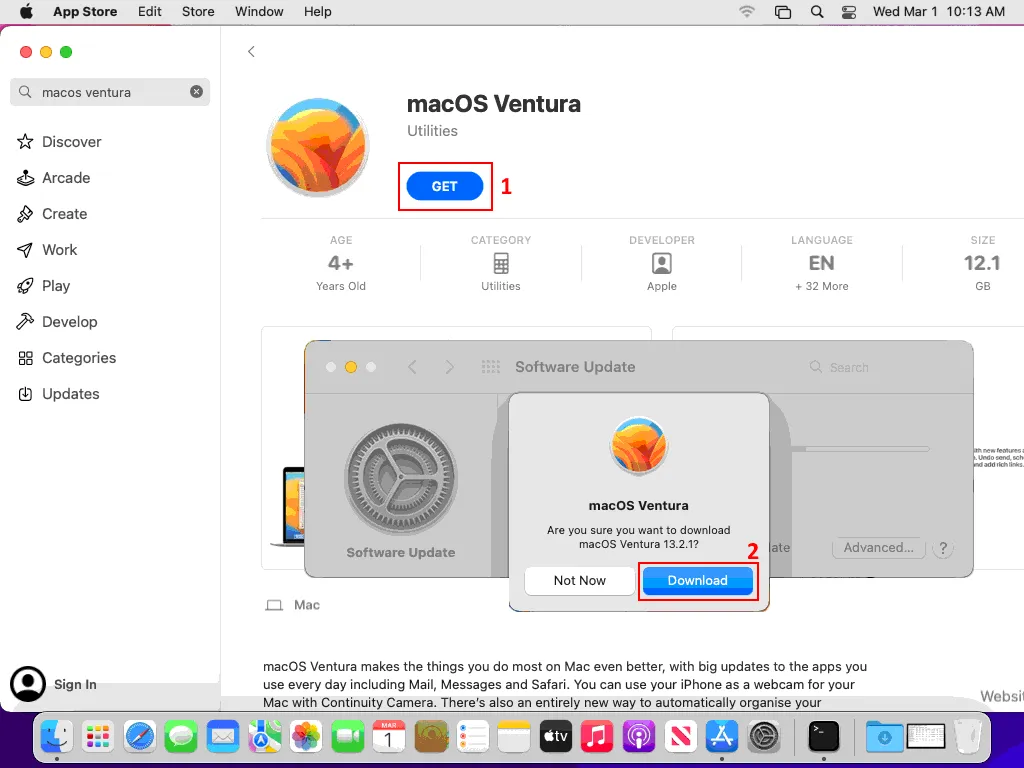
Once you click Download, the downloading process starts.
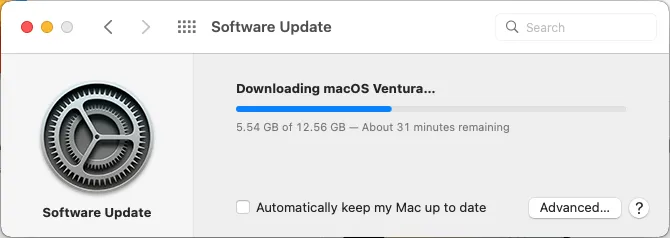
- When downloading is completed, you should see a screen like in the screenshot below. Do NOT click Upgrade Now. If the macOS Ventura installer opens automatically, close that window.

- Go to the Applications folder to find the downloaded macOS Ventura installer. Open Finder, click Applications in the left pane of the window and locate the Install macOS Ventura item (the Install macOS Ventura.app file). The file size is about 12.6 GB, but it can be larger for later versions.

You can right-click the Install macOS Ventura.app file and select Show package contents in the context menu. If you go to Contents > SharedSupport, you can find the InstallESD.dmg file, which is a mountable Apple disk image file that is widely used in the macOS world for distributing software. The InstallESD.dmg file must be converted into a bootable file for compatibility in order to allow inserting it into the virtual DVD drive of a VM to install macOS in VMware.
Increasing the download speed of macOS 13.2 Ventura
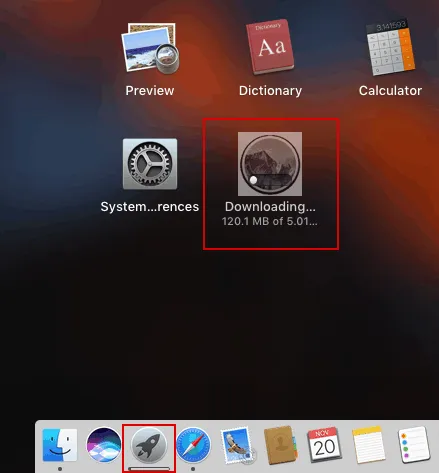
Once the downloading process has begun, you should be able to see the progress of the download in the Launchpad. Downloading the installation package of macOS may be a time-consuming process – the slow downloading of macOS Sierra is a common issue.
Sometimes, temporarily changing the DNS settings in your network configuration may help you to increase the download speed. Try using 8.8.8.8, 8.8.4.4, 4.2.2.2 or 4.2.2.3 DNS servers on your machine.
If this method does not increase the download speed, left-click the Downloading icon to pause your download. Then left-click the icon once more to resume the download. After resuming the download of a file, the download speed increases for a certain period of time.
Creating an installation image
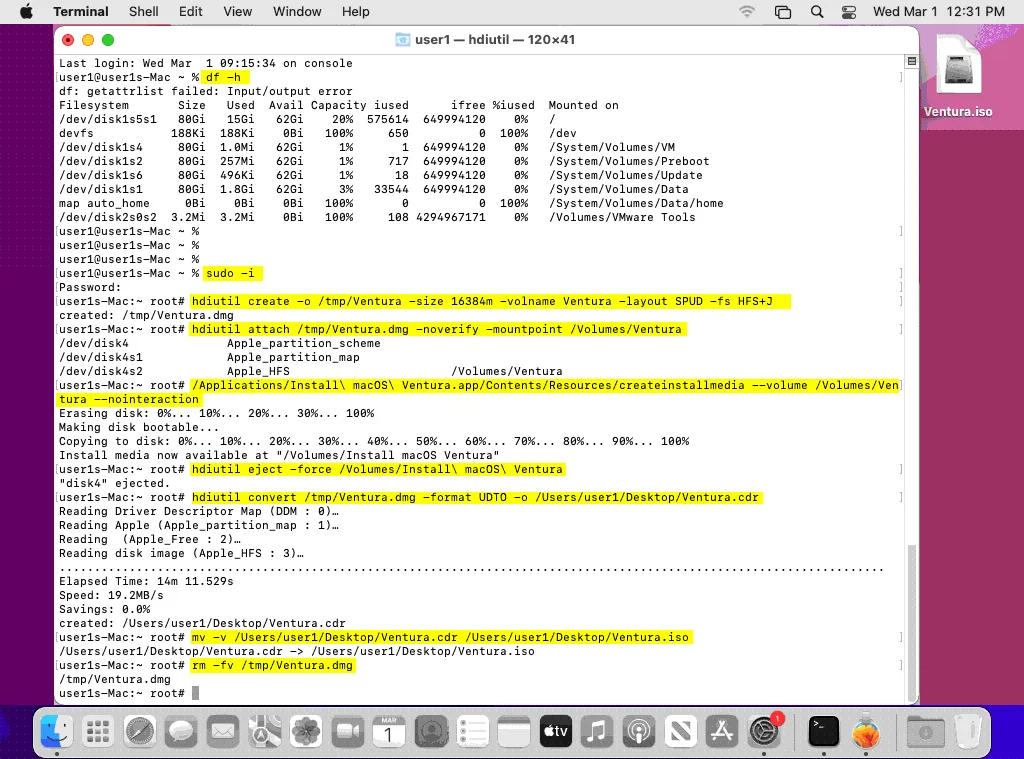
In this example, hdiutil is used to create the bootable ISO image. Hdiutil is a built-in console utility available on macOS, used to work with disk images as data containers that emulate disks. The DiskImages framework is used by hdiutil to to do this.
Open Terminal by opening Launcher, typing Terminal, and clicking the Terminal icon. Once done, follow the steps below:
- Get the root privileges:
sudo -i - Create the Ventura blank ISO image of 16384 MB with a single partition located in the /tmp/ directory:
hdiutil create -o /tmp/Ventura -size 16384m -volname Ventura -layout SPUD -fs HFS+JThe Apple partition layout is SPUD. The journaled macOS file system is HFS+J. This command creates the Ventura.dmg file in the /tmp/ directory. You can create a larger image than the exact size of all the files inside the installer image but not smaller.
A successful output looks like this:
Created: /tmp/Ventura.dmg
- Mount the Ventura.dmg installer image of macOS Ventura to the /Volumes/Ventura mount point:
hdiutil attach /tmp/Ventura.dmg -noverify -mountpoint /Volumes/VenturaThe output should like this:
/dev/disk4         Apple_partition_scheme
/dev/disk4s1     Apple_partition_map
/dev/disk4s2     Apple_HFS                   Volumes/Ventura
It should also be possible to see the mounted disk in Disk Utility now.
- Create the bootable installation media from the new mount point:
/Applications/Install\ macOS\ Ventura.app/Contents/Resources/createinstallmedia --volume /Volumes/Ventura --nointeractionImportant: Be careful to avoid errors when defining the path.
The output displays the progress as follows:
Erasing disk: 0%… 10%… 20%… 30%… 100%
Making disk bootable…
Copying to disk: 0%… 10%… 20%… 30%… 40%… 50%… 60%… 70%… 80%… 90%… 100%
Install media now available at “/Volumes/Install macOS Ventura”
- Eject the attached installation disk image:
hdiutil eject -force /Volumes/Install\ macOS\ VenturaThe console output notifies us that the disk has been ejected.
- Convert the bootable .dmg image to .cdr and store the .cdr image on Desktop of our user:
hdiutil convert /tmp/Ventura.dmg -format UDTO -o /Users/user1/Desktop/Ventura.cdrChange the path to the desktop directory of your user or use another destination path. Wait until the operation is finished. Then you should see the Ventura.cdr installation image in the specified directory.
- Rename the Ventura.cdr image file to the Ventura.iso file:
mv -v /Users/user1/Desktop/Ventura.cdr /Users/user1/Desktop/Ventura.isoDon’t forget to modify the path according to your folder structure.
- The macOS Ventura installation ISO image is ready, and you can install macOS on VMware VMs. You can delete the Ventura.dmg file:
rm -fv /tmp/Ventura.dmg - Press Ctrl+D to exit the root console.
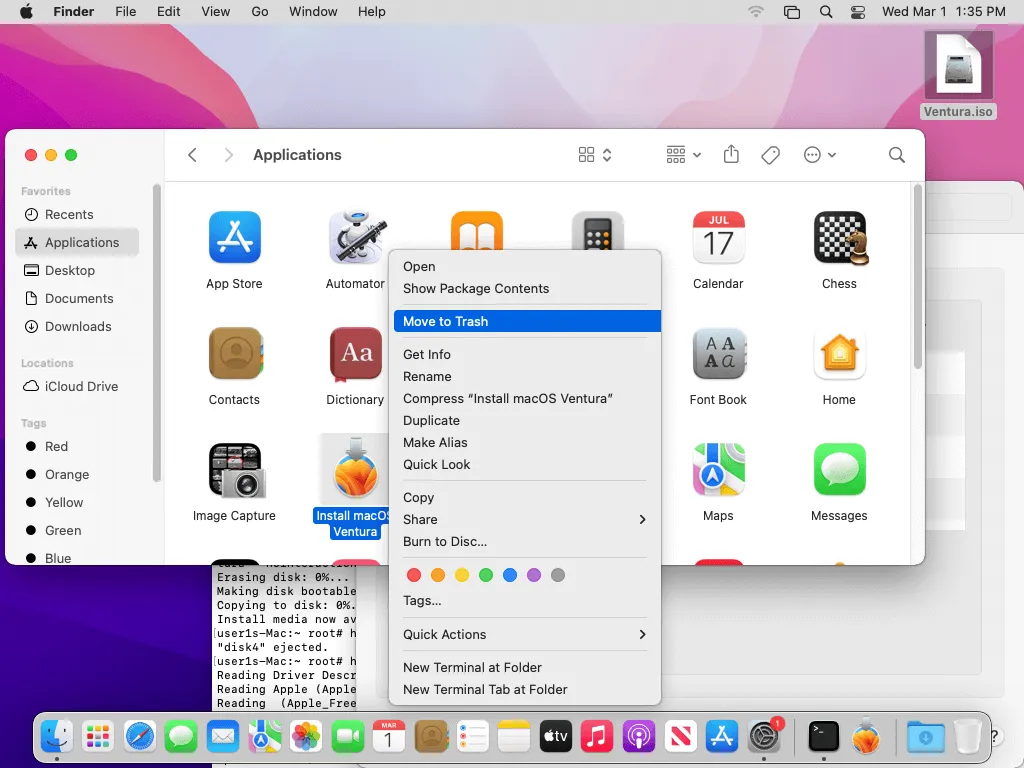
You can also delete the downloaded macOS Ventura installer (not the converted ISO image) to save storage space on your existing macOS machine:
Go to Finder > Applications. Right-click the Install macOS Ventura and click Move to Trash in the context menu.
Preparing an ESXi Host
Now that your bootable ISO image with the macOS installer is ready, you should prepare your ESXi host for the installation of macOS as a guest OS on VMware VMs. You need to enable SSH access, download the unlocker patch, copy the patch to the file system of the ESXi server, and patch the ESXi server.
We use ESXi 7.0 Update 3 (build 19193900) with two datastores on the ESXi server – datastore1 and datastore40.
Enabling Remote Access via SSH
SSH access is required to run commands in the ESXi console and transfer files to the ESXi host.
- Enter the IP address of your ESXi host in a web browser to access the VMware Host Client. Use your root credentials to log in.
- Click Host, then click Actions > Services > Enable Secure Shell (SSH).
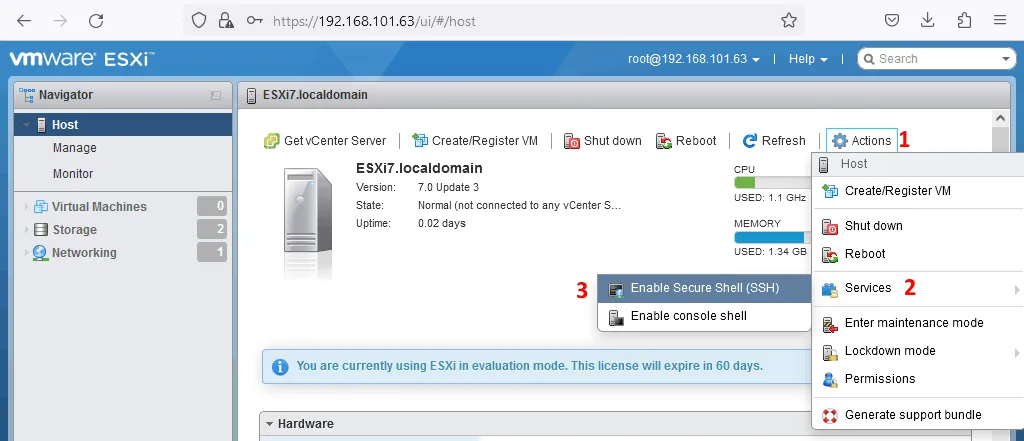
Alternatively, you can enable SSH directly on the ESXi server using yellow-gray Direct Console User Interface (DCUI) by going to System Customization > Troubleshooting options > Enable SSH. This method enables SSH access permanently until you manually disable it.
If you are using VMware vSphere Client (HTML5-based), go to Configure > System > Services, then right-click SSH and click Start.
Patching ESXi to Customize the Host for Running macOS on VMware
The patch is needed to unlock Mac OS X in the list of available operating systems in the VM options during the creation of a VM. Virtual machines with Mac OS X are not supported by default. The patch unlocks the Mac OS X operating system family in the new VM options on ESXi, and allows you to get VMware Tools for macOS.
Unlocker is a patch written in Python and also modifies the VMX files of macOS VMs to make them run properly.
Downloading the patch
Unlocker 2 is universal and supports both VMware ESXi and VMware Workstation (VMware Workstation 15 and ESXi 6.0), while Unlocker 3 is provided in different editions for each VMware hypervisor.
There are two editions of Unlocker 3: Unlocker for VMware ESXi and Unlocker for VMware Workstation.
We need Unlocker for ESXi. The Unlocker patch is free and can be downloaded from the links below.
Download Unlocker 3.0.1 for ESXi 7.0:
https://github.com/erickdimalanta/esxi-unlocker/releases/download/3.0.1/esxi-unlocker-master.zip
The Unlocker page on GitHub:
https://github.com/erickdimalanta/esxi-unlocker
A link to older Unlocker versions:
https://www.insanelymac.com/forum/files/file/339-unlocker/
Transferring files to the ESXi datastore
After downloading the patch, copy the patch files to the datastore on ESXi. Copy the macOS installation ISO image at once for more convenience.
As mentioned before, we have two datastores: datastore 1 and datastore40.
We use datastore1 to store installation files and datastore40 to store VMs. The paths to the datastores are:
/vmfs/volumes/datastore1
/vmfs/volumes/datastore40
You can use two methods to transfer files: a datastore browser in an embedded VMware Host Client (or VMware vSphere Client if vCenter is installed) or WinSCP.
Copying files using VMware Host Client
In order to upload files to the ESXi datastore in VMware Host Client, perform the following actions:
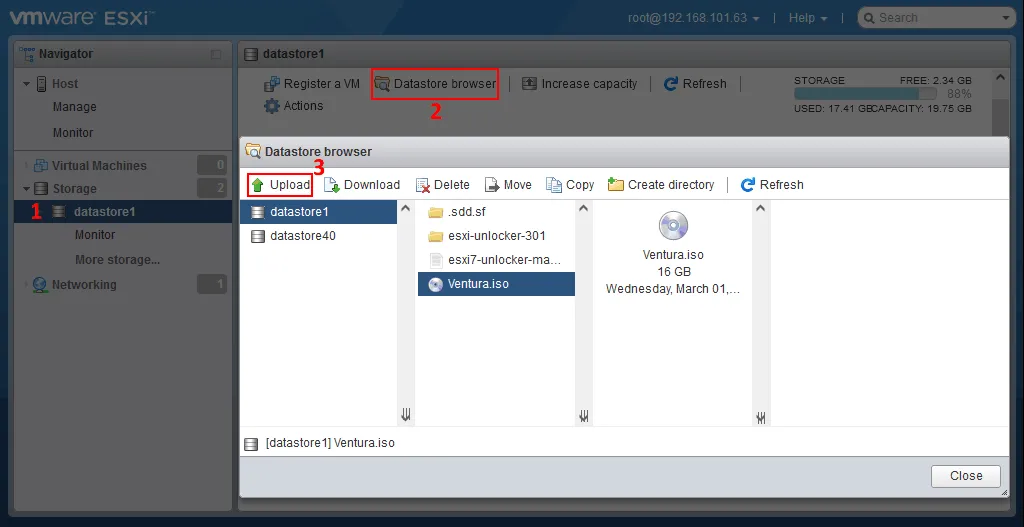
- Go to Storage > Datastores and select the needed datastore. We select datastore1.
- Click Datastore browser and then Upload in the datastore browser window.
- Select the needed files on your computer and click Open. We select esxi7-unlocker-master.zip and Ventura.iso files.
Wait until the selected files are uploaded. You can view the progress in the Recent Tasks pane of VMware Host Client.
Copying files using WinSCP
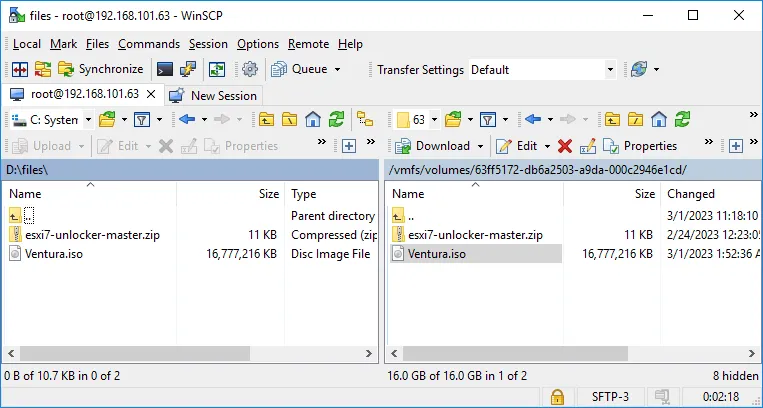
You can use WinSCP (on Windows machines), which supports the transfer of files over SSH by using SFTP, SCP, WebDAV, or S3 protocols (in Linux, you can use the equivalent software). WinSCP has a user-friendly graphical user interface (GUI) and consists of two main panels. To proceed:
- Log in to your ESXi host similarly as you usually do in an SSH client.
- Copy the unlocker files from your local directory to your datastore on the ESXi server.
In this example, the unlocker patch and the macOS Ventura installation ISO image (Ventura.iso) were created beforehand and are placed in D:\Files\ for convenience (on a local computer). The Unlocker patch in a zip archive and Ventura.iso are copied to /vmfs/volumes/datastore1 on the ESXi server. Later, you can mount the ISO image from the datastore to the virtual DVD drive of the virtual machine.
Installing the Unlocker patch
Connect to the ESXi host in an SSH client such as PuTTY and run the following commands to install the unlocker patch on ESXi to unlock macOS on VMware ESXi host.
- Go to the directory where the unlocker patch archive is stored:
cd /vmfs/volumes/datastore1 - Extract files from the unlocker archive:
unzip esxi7-unlocker-master.zip - Set the correct permissions for the directory and extracted files in this directory:
chmod 0775 -R esxi-unlocker-301/ - You can check whether the executable files have the correct permissions to run them:
ls -al esxi-unlocker-301/ - Go to the directory with the unlocker files after setting the permissions:
cd esxi-unlocker-301/ - You can check whether the macOS unlocker patch is installed or not by running the validation command:
./esxi-smctest.shIf the output is “smcPresent = false”, it means that the patch is not installed.
- Install the macOS unlocker patch:
./esxi-install.sh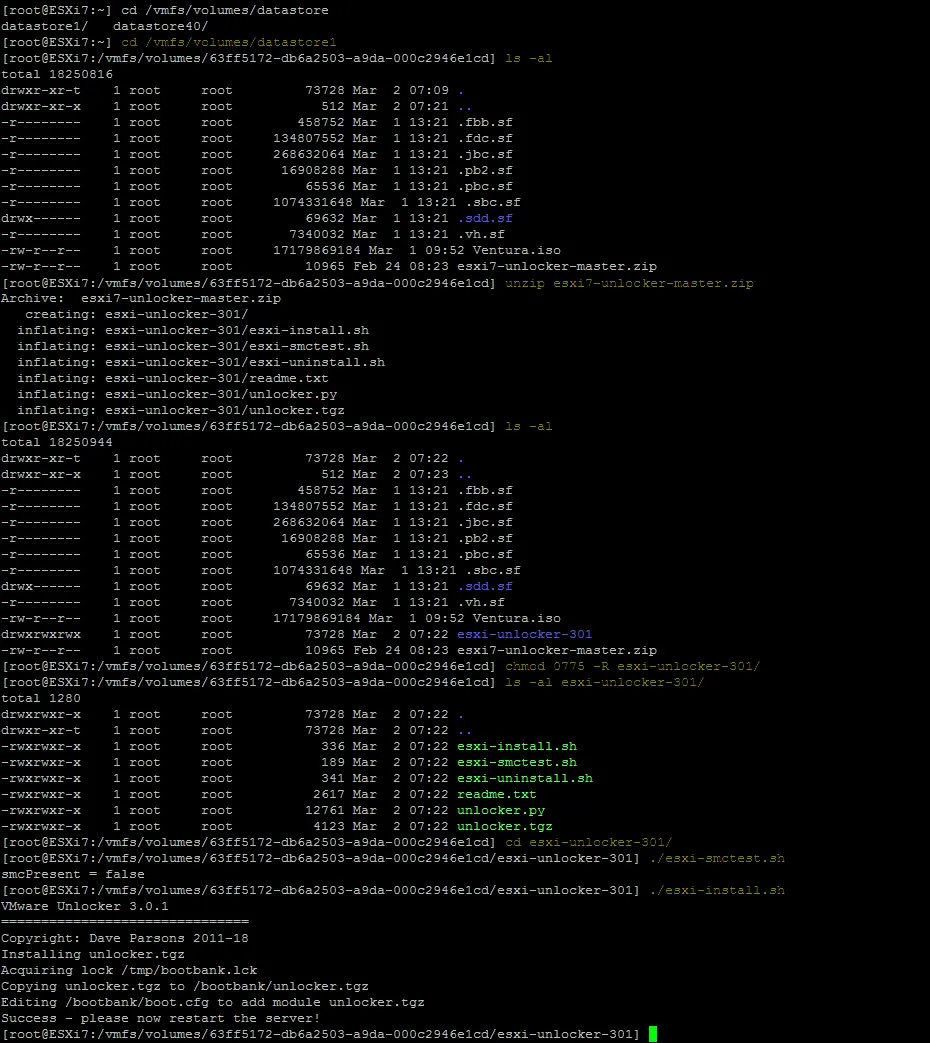
- Restart the ESXi server for the configuration to take effect. Shutdown the running VMs before rebooting the ESXi server:
reboot
Creating and Configuring a New VM on the ESXi Host
We have already copied the Ventura.iso file, which is the macOS 13.2 installation image in our case, to the datastore on our ESXi server (datastore1). Now we can create a new macOS VM using this ISO image to install macOS on VMware ESXi.
Perform the following actions to create and configure a new VM with VMware Host Client.
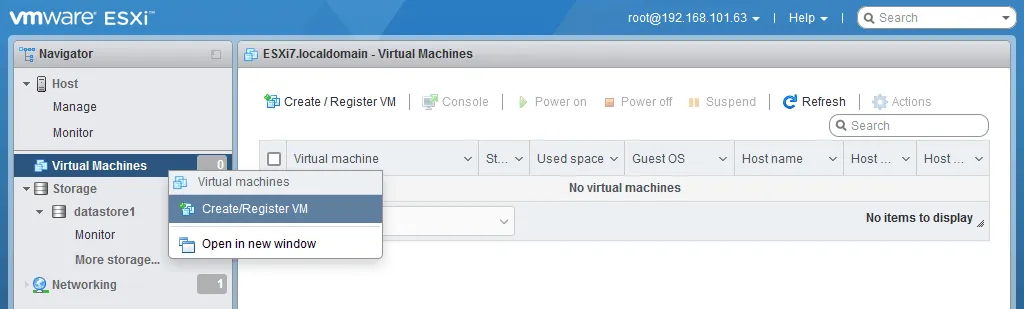
- Right-click Virtual Machines in the navigation pane and select Create/Register VM in the context menu.
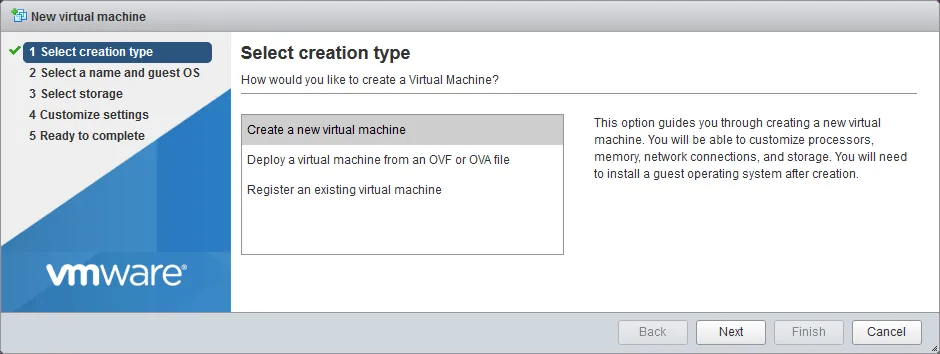
- The New virtual machine wizard appears. Click Create a new virtual machine on the first screen and click Next.
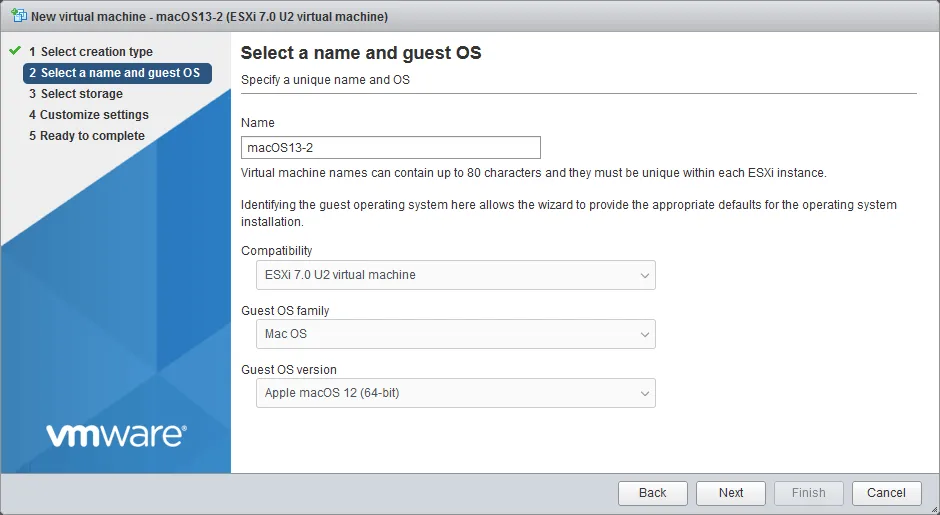
- Select a name and guest OS. Enter a VM name, for example, macOS 13-2, and select the following VM options:
- Compatibility: ESXi 7.0 U2 virtual machine
- Guest OS family: Mac OS
- Guest OS version: Apple macOS 12 (64-bit)
You can select the latest available version in the drop-down menu.
Mac OS as a guest OS family and Apple Mac OS X as a guest OS version are available after applying the unlocker patch. Click Next to continue.
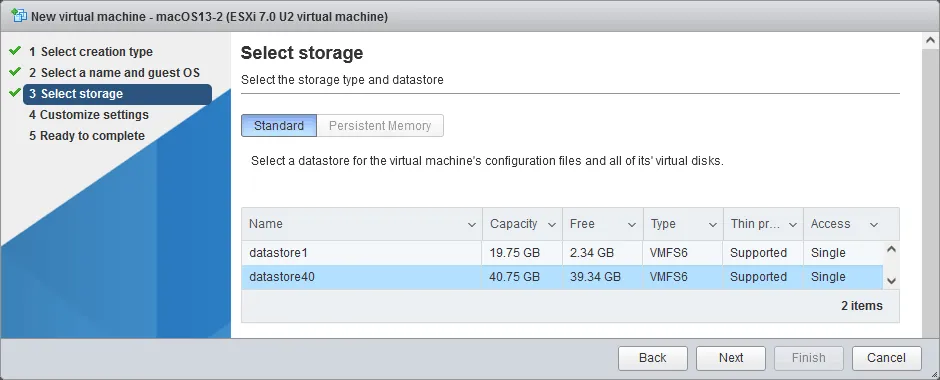
- Select storage. Select the datastore in which you want to store the VM files. We select datastore40 in this example. Click Next.
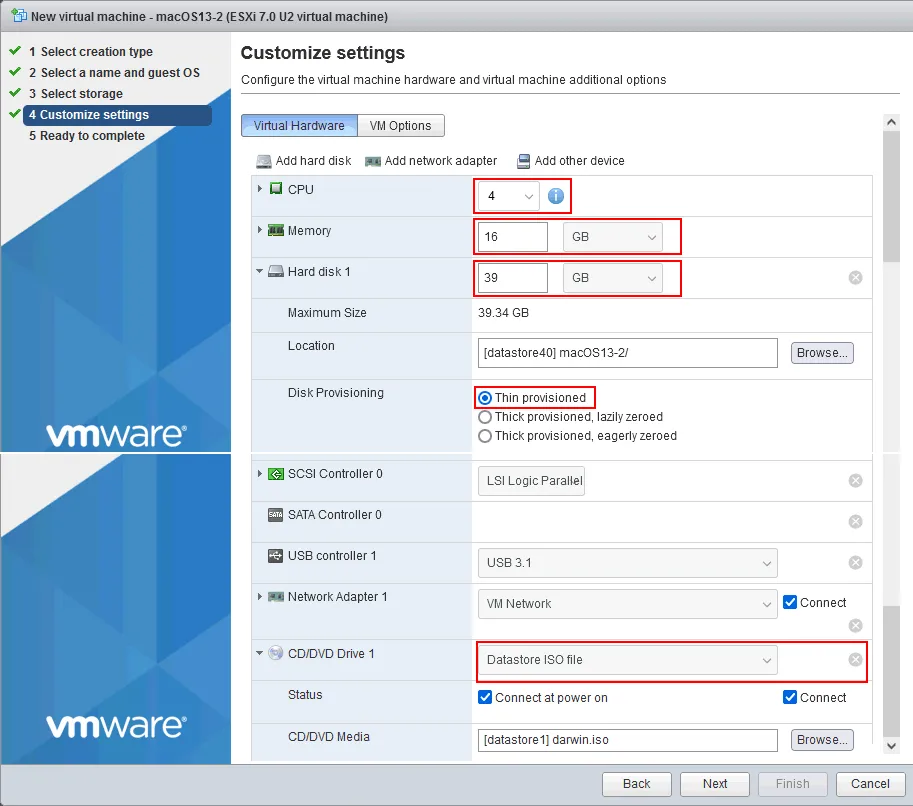
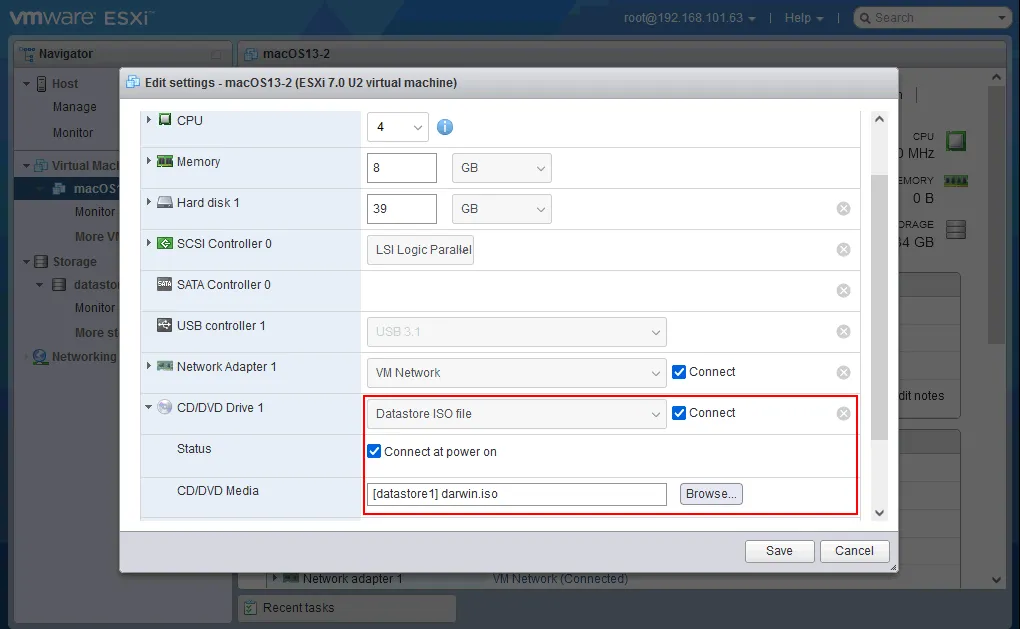
- Customize settings. Configure the VM hardware and the additional options. Define the following parameters:
- CPU: 2 or more (cores/processors)
- Memory: 8 GB or more
- Hard disk: 35 GB or more (you can use a thin provisioned virtual disk to save storage space)
- CD/DVD Drive: Select the Datastore ISO file, check the box Connect and Connect at power on, click Browse and select the ISO file you have uploaded before (Ventura.iso) as DVD media from your datastore.
After configuring the VM settings, click Next.
- Ready to complete. Review your VM settings and click Finish to create the VM.
Tuning macOS VM Configuration
We need to edit the .vmx VM configuration file to avoid issues and failures during installing macOS on VMware ESXi. Connect to the ESXi host via SSH as before and run the following actions.
- Go to the macOS VM directory on the datastore:
cd /vmfs/volumes/datastore40/macOS13-2/ - Open the VM configuration file in a text editor:
vi macOS13-2.vmx - Navigate to the end of the file. Press a to enter the edit (append mode) and add the line in the .vmx file:
smc.version = "0" - Find the line:
ethernet0.virtualDev = "e1000e" - Edit this line and change e1000e to vmxnet3 for this configuration parameter:
ethernet0.virtualDev = "vmxnet3" - Press Esc. Type :wq and press Enter to save the configuration and quit the text editor (vi).

Another solution that can sometimes help is to downgrade the VM hardware version.
Note: You can see that smc.present=true configuration parameter already exists in the .vmx file of the macOS VM after creating the VM with the unlocker patch applied on the ESXi host.
SMC (System Management Controller) is a subsystem in Mac computers that controls a variety of low-level functions such as power management, thermal management, and system performance. The SMC is responsible for controlling the fans, battery charging, sleep/wake functionality, and many other hardware-related features on a Mac computer. It is a crucial component that ensures the stable and reliable operation of the system.
SMC must be emulated for a macOS VM to make it possible for macOS to work properly on the VM.
VMX configuration for macOS on AMD processors
Apple macOS can is released for mac computers with Intel processors but not AMD. The following configuration can help to run the VM on AMD processors, but make sure you don’t violate the license agreement.
The method involves replacing the following line in the .vmx configuration file: smc.version = “0”
to
smc.version = "0"
cpuid.0.eax = "0000:0000:0000:0000:0000:0000:0000:1011"
cpuid.0.ebx = "0111:0101:0110:1110:0110:0101:0100:0111"
cpuid.0.ecx = "0110:1100:0110:0101:0111:0100:0110:1110"
cpuid.0.edx = "0100:1001:0110:0101:0110:1110:0110:1001"
cpuid.1.eax = "0000:0000:0000:0001:0000:0110:0111:0001"
cpuid.1.ebx = "0000:0010:0000:0001:0000:1000:0000:0000"
cpuid.1.ecx = "1000:0010:1001:1000:0010:0010:0000:0011"
cpuid.1.edx = "0000:0111:1000:1011:1111:1011:1111:1111"
smbios.reflectHost = "TRUE"
hw.model = "MacBookPro14,3"
board-id = "Mac-551B86E5744E2388"
Note: Read more about the VMware EVC mode for CPU compatibility in clusters.
Installing Mac OS on VMware VM as a Guest OS
Now power on the virtual machine, boot from the selected ISO image, and start installing Mac OS X 13.2 Ventura on the VMware VM that is running on the ESXi host.
After the macOS installer has loaded, you should see the installation wizard:
- Select the main language for the macOS installer and click the Next button. English is used in this installation example.
- In this step, you must prepare a partition on your virtual hard disk. Click Utilities > Disk Utility.
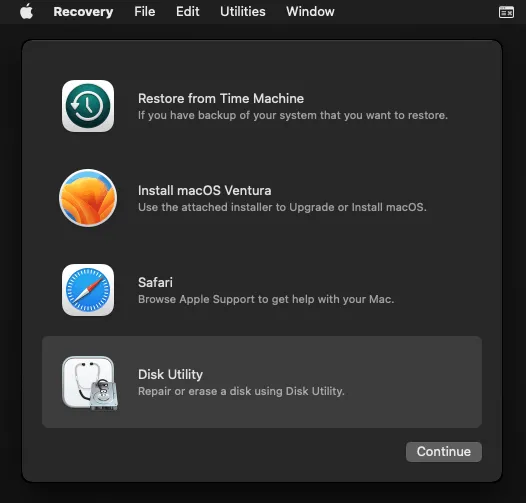
- The Disk Utility opens.
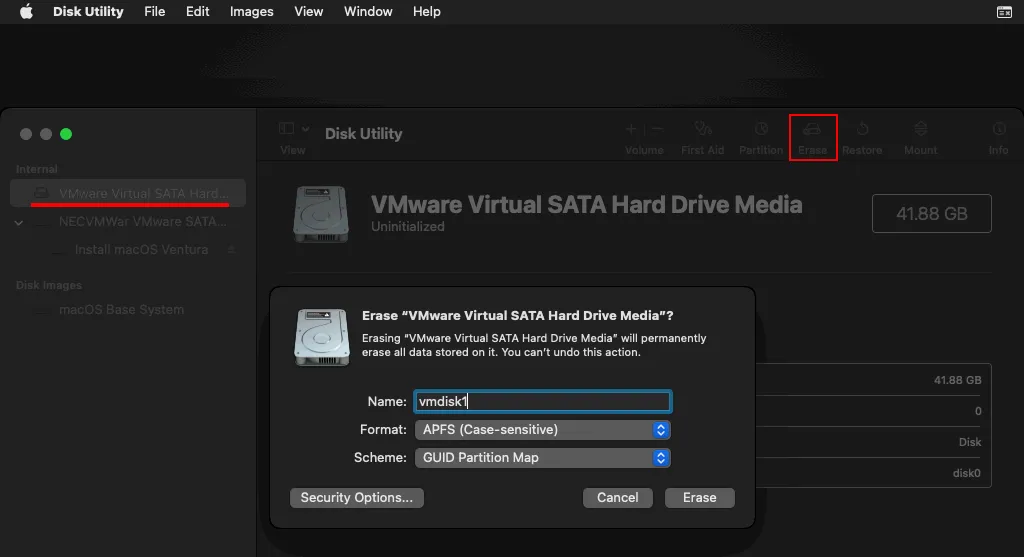
- Select your VMware virtual disk in the left pane of the window.
- Enter a name for your disk (vmdisk1 in this case).
- Select a file system to format (you can select APFS or Mac OS Extended (Journaled) with different options).
- Select a partition scheme (GUID Partition Map).
- Click Erase.
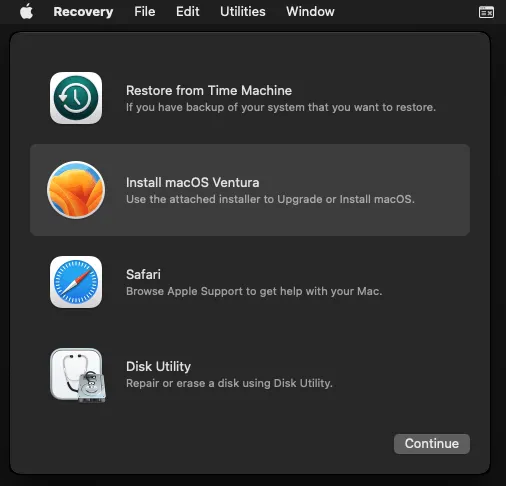
- After erasing the media, close the Disk Utility window: Disk Utility > Quit Disk Utility.
- You are in the Recovery menu again. Click Install macOS Ventura and click Continue.
- The macOS installation wizard opens. Read the end-user license agreement carefully. If you accept the license agreement, click Agree. Click Agree once again in a dialog window to confirm and continue.
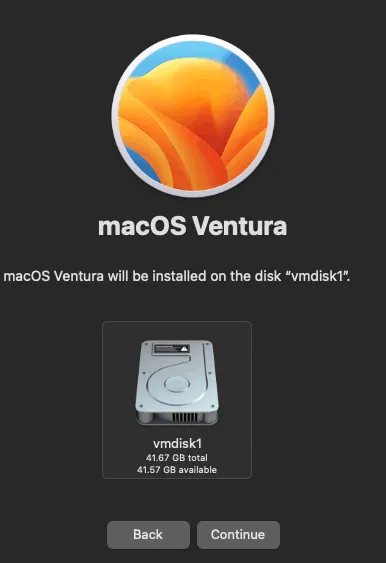
- Select the virtual disk you have prepared before as the target disk to install macOS.
- Wait until macOS is installed and a VM is rebooted. You will the progress bar. Note that it may take some time.
Stage 2 of the macOS installation
A VM is booted from a virtual hard disk. The macOS final configuration wizard opens. The interface is intuitive, and you can see the background colours of your macOS version.
- Select your country and region, for example, United Kingdom. Hit Continue.
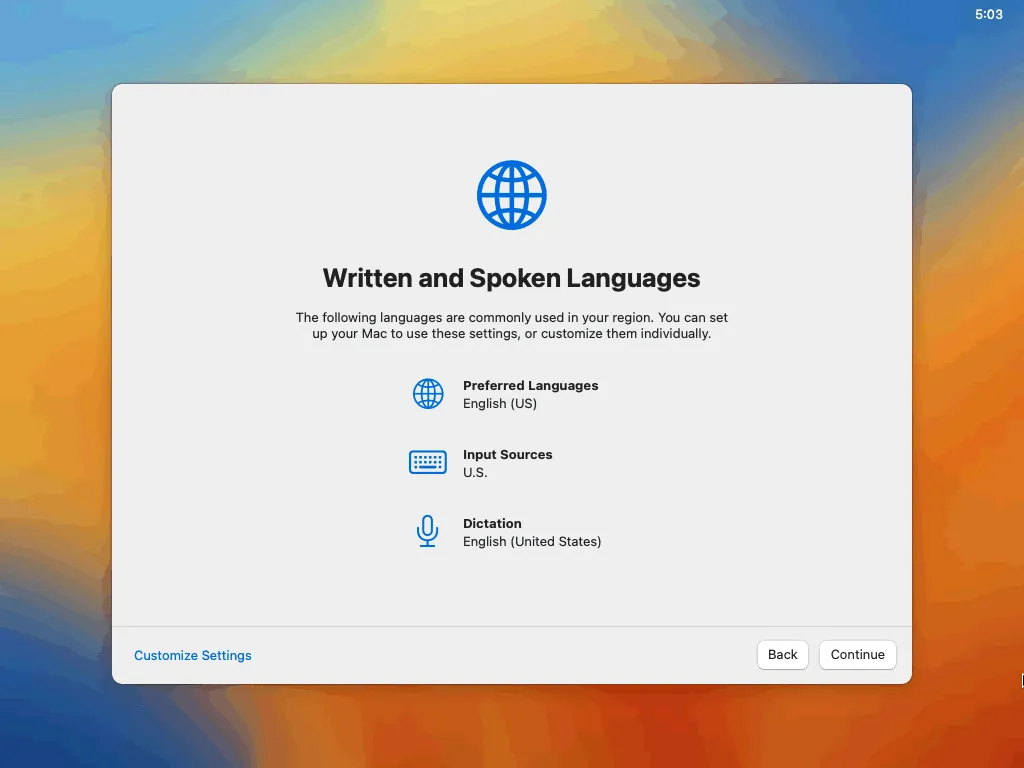
- Select written and spoken languages and customize settings if needed. We select English. Click Continue at each step to continue.
- Accessibility. Click Not Now if you don’t need this feature.
- Data & privacy. You can read the provided information. Click Continue.
- Migration assistant. Click Not Now if you don’t need to migrate any data from other Windows or macOS machines.
- Sign in with your Apple ID. Click Set Up Later. Click Skip in a dialog window to confirm and continue.
- Terms and conditions. Read them attentively and make sure that you don’t violate any of them. Then you can click Agree and repeat clicking Agree once again to confirm.
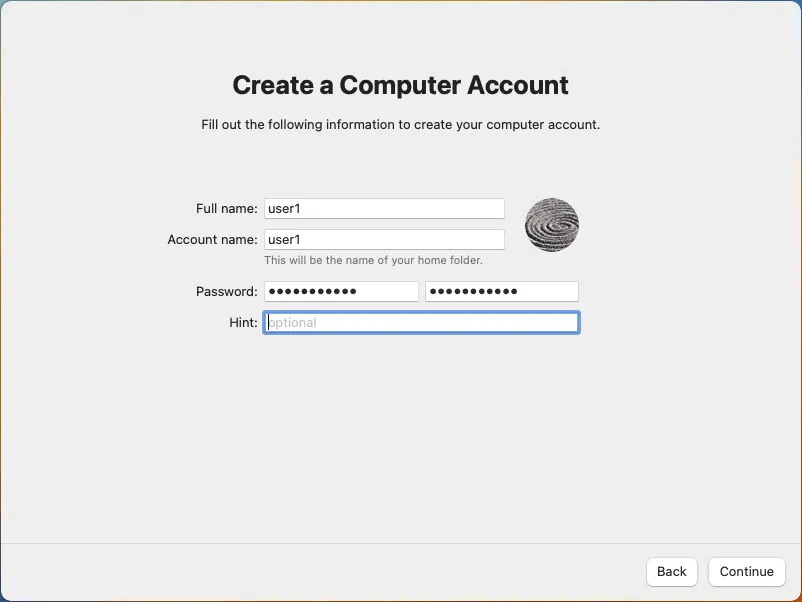
- Create a computer account. Enter the account name, for example, user1. Enter your password and confirm the password.
- Enable location services. Deselect the checkbox and click Continue. Click Don’t Use to confirm.
- Select your time zone. You can select your region/city on the map or in the drop-down list to choose the time zone.
- Analytics. Deselect the checkbox to disable sending your data and click Continue.
- Screen time. Click Set Up Later to skip configuring reports and restrictions.
- Choose your look. Select a light, dark, or automatic (light/dark) scheme for the macOS graphical user interface (GUI).
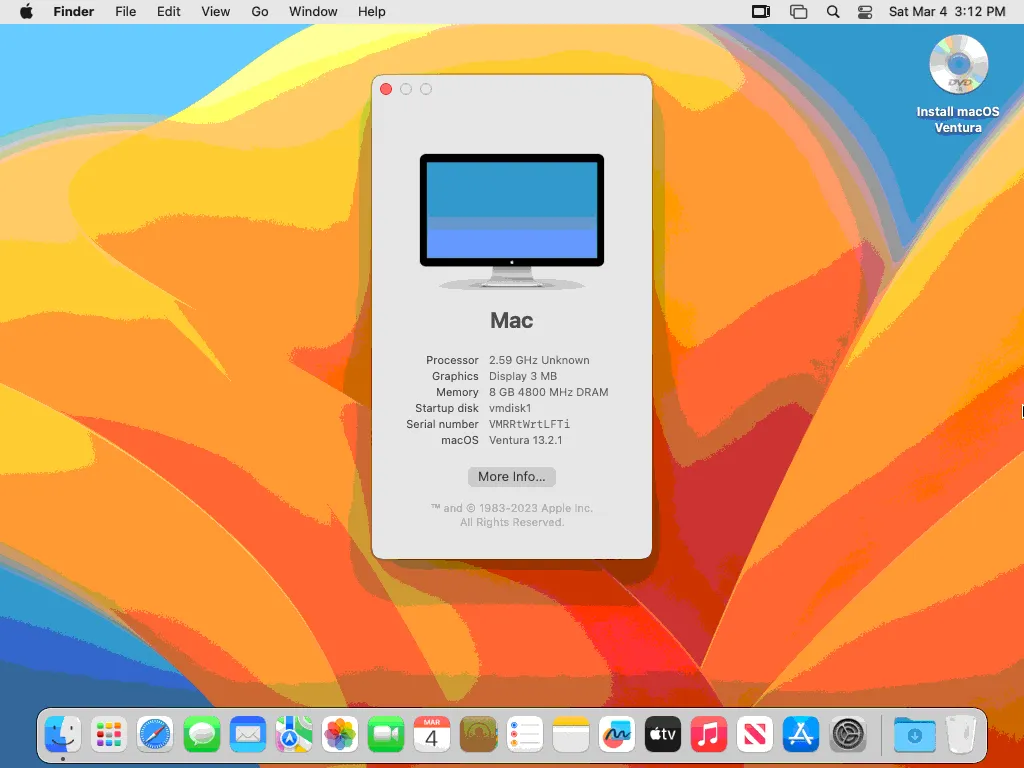
- macOS Ventura is installed. You can click Apple logo > About this mac to view basic information about this machine.
- Eject the macOS installation ISO. Right-click the DVD disc icon on the desktop in the top right corner of the screen and click Eject Install macOS Ventura in the context menu.
However, that is not all, as we need to install VMware Tools on our macOS guest. But first lets look at some potential issues that may occur.
Common Issues and Fixes
Sometimes you can encounter issues and errors when you install macOS on VMware ESXi or VMware Workstation. Let’s cover some of the fixes.
- The macOS installer is stuck and doesn’t boot.

Make sure that the macOS unlocker patch from VMware is installed.
Add the line to the .vmx configuration file of your macOS VM:
smc.version = “0”
- When you boot from a VM to finish macOS installation and follow the steps of the macOS wizard, you are stuck in the network configuration step.
Select how your computer connects to the internet:
- Wi-Fi network
- Local network (Ethernet)
- My computer doesn’t connect to the internet
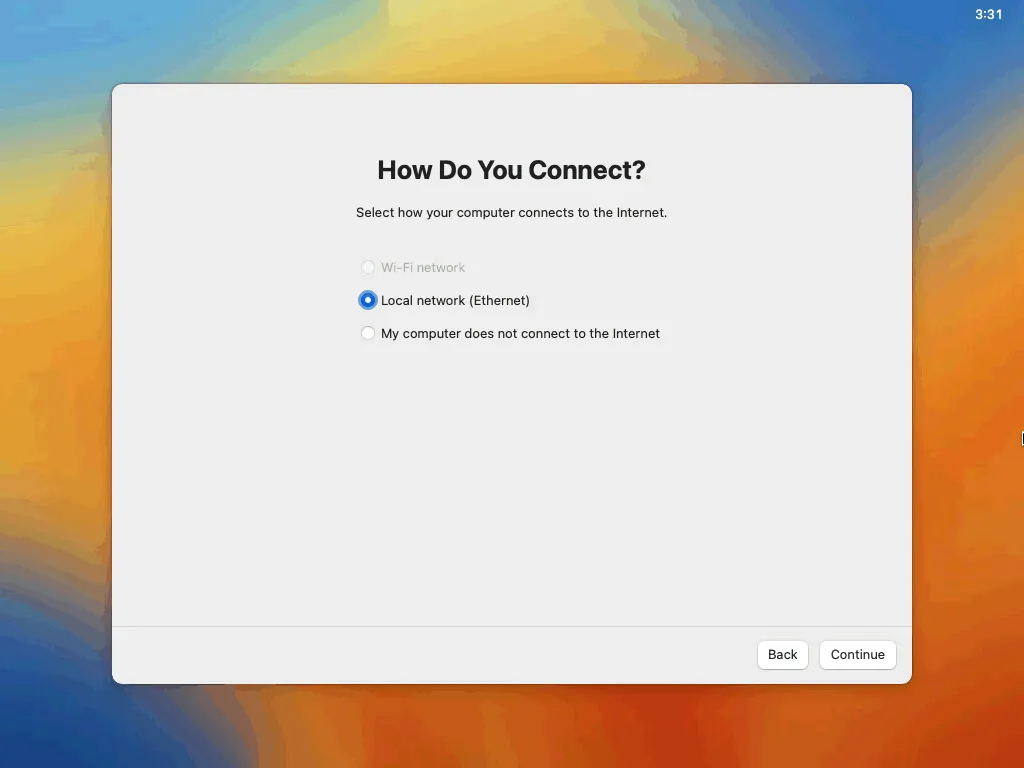
Even if you select Local network (Ethernet) and click Continue, you can get a critical error and a macOS VM is restarted:
Your computer restarted because of a problem. Press any key or wait a few seconds to continue starting up.
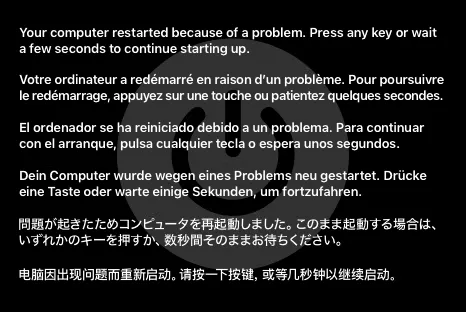
As a result, you have a macOS boot loop when it is impossible to boot macOS on a VMware VM.
A common reason for this error is the unsupported model of a virtual network adapter.
Solution
Edit the .vmx configuration file of the VM.
Change
ethernet0.virtualDev = “e1000e”
to
ethernet0.virtualDev = “vmxnet3”
However, you may need to reinstall macOS on your VM from the very beginning (format a virtual disk partition or recreate a virtual disk for this macOS VM). Sometimes, downgrading the virtual hardware version in a .vmx VM configuration file can help.
Installing VMware Tools
Install VMware Tools for macOS running on a VMware VM to improve the performance and user experience. When you apply the unlocker patch for VMware Workstation, a darwin.iso image with VMware Tools for macOS is copied to a VMware Workstation directory (manually or automatically, depending on the unlocker version).
Why are VMware Tools for macOS referred to as Darwin?
Darwin is the core operating system of macOS, which is a proprietary operating system developed and marketed by Apple Inc. Darwin is the open-source Unix-like operating system, which forms the basis of macOS. It provides the core features of a modern operating system, including process management, virtual memory, security, network stack, and file system.
macOS, on the other hand, is the complete operating system that runs on Apple’s Mac computers. It includes the graphical user interface, various applications, and utilities built on top of Darwin. In summary, Darwin is the core operating system, while macOS is the complete operating system with additional software and a user interface.
Downloading VMware Tools
If the darwin.iso image is missing on your ESXi after applying the patch, you can manually copy the ISO file to the datastore by using WinSCP, VMware Host client, or VMware vSphere client. You can also download VMware Tools for Mac OS X from the official VMware website.
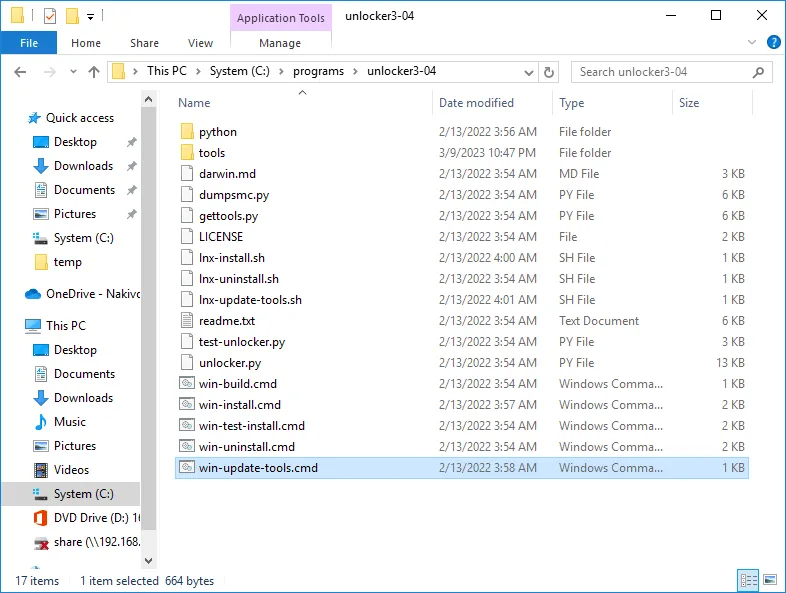
There is an alternative way to get VMware Tools for macOS with the unlocker tool. To download VMware Tools for macOS by using the unlocker manually, you need to download the unlocker for VMware Workstation:
- Extract the unlocker files from the archive.
- Run win-update-tools.cmd as administrator.
Note that this unlocker feature requires VMware Workstation to be installed.
Uploading VMware Tools to the datastore
VMware ESXi includes ISO images with VMware Tools in a special service directory – /locker/packages/vmtoolsRepo – for Linux, Windows, and other operating systems supported by default but not for macOS. Once you have the VMware Tools installation media (.iso) for macOS, you need to upload this .iso file to a datastore on the ESXi host where your macOS VM is deployed.
Upload the .iso file to the datastore similarly as you uploaded the macOS Ventura.iso and the unlocker zip archive before. We upload darwin.iso to datastore1 where other installation files used in this tutorial are located.
Mounting the VMware Tools ISO image
You need to mount the darwin.iso CD image to the virtual CD/DVD drive of the macOS VM on the ESXi host. To do so in VMware Host Client, follow the steps below.
- Select your macOS VM in the navigator pane and go to VM settings by right-clicking the VM name > Edit VM settings or click the appropriate pencil icon after selecting the VM.
- Select darwin.iso in the datastore as the virtual DVD drive (make sure that you have ejected the macOS installation ISO).
- Ensure that the checkboxes are selected: Connect and Connect the removable device.
- Click Save and start the macOS VM.
How to install VMware Tools on macOS
When the darwin.iso image file is mounted to the virtual CD/DVD drive of the macOS VM, the icon of the media inserted into the CD/DVD drive is displayed in the top right corner of the macOS desktop.
- Click this VMware Tools icon displayed in the top right corner.
- A window with package contents opens. Click Install VMware Tools.
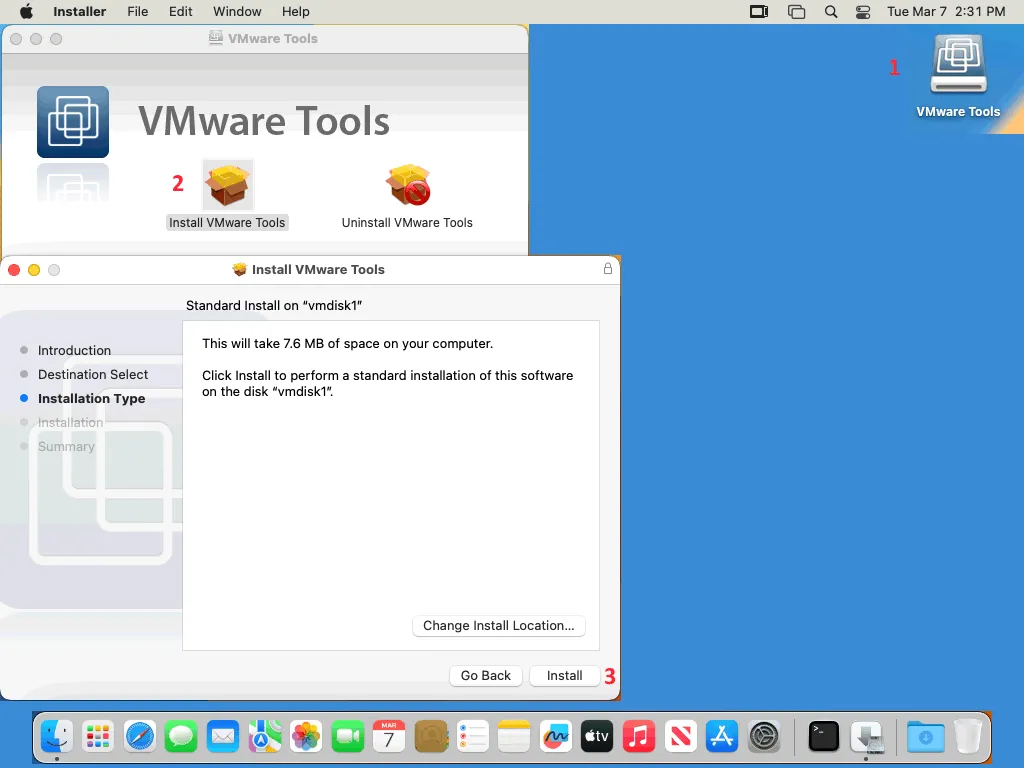
- A VMware Tools installation wizard opens in a new window. Click Continue at the Introduction step.
- Installation type. It is not necessary to edit settings at this step. Click Install.
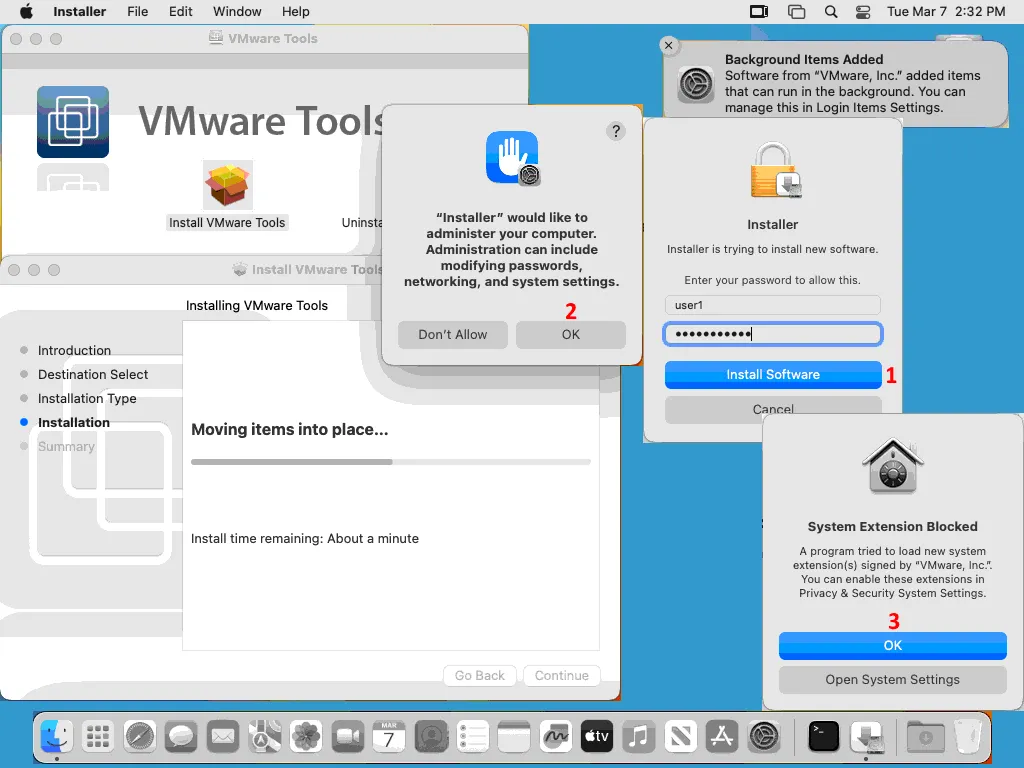
- Installation. Multiple security messages appear at this step when you install VMware Tools on macOS Ventura.
- Enter your password to make it possible for the installer to continue the VMware Tools installation and hit Install Software.
- “Installer” would like to administer your computer. Administration can include modifying passwords, networking, and system settings. Click OK in this dialog window.
- System extension blocked. A program tried to load new system extension(s) signed by “VMware Inc.”. You can enable these extensions in Privacy & Security System Settings. Click Open System Settings.
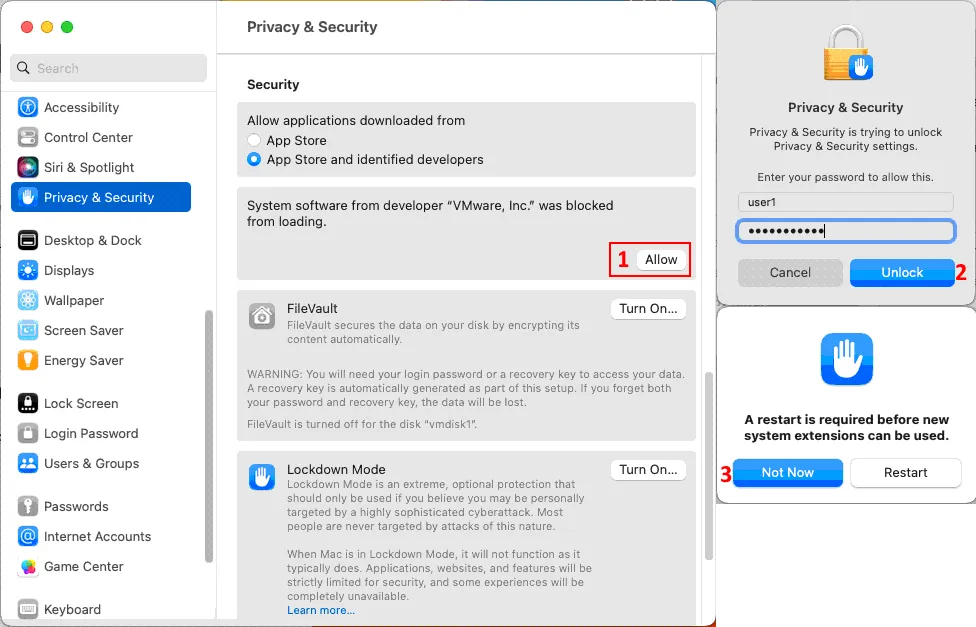
- After clicking Open System Settings, you should see the Privacy & Security window. Click Allow in the Security section to allow applications downloaded from App Store and identified developers because, by default, system software from developer “VMware, Inc.” was blocked from loading.
- Enter your password and click Unlock to confirm changes.
- A restart is required before system extensions can be used. Click Not Now. We will restart the macOS VM later.
- We also need to unlock access and enable running vmware-tools-daemon in the macOS operating system.
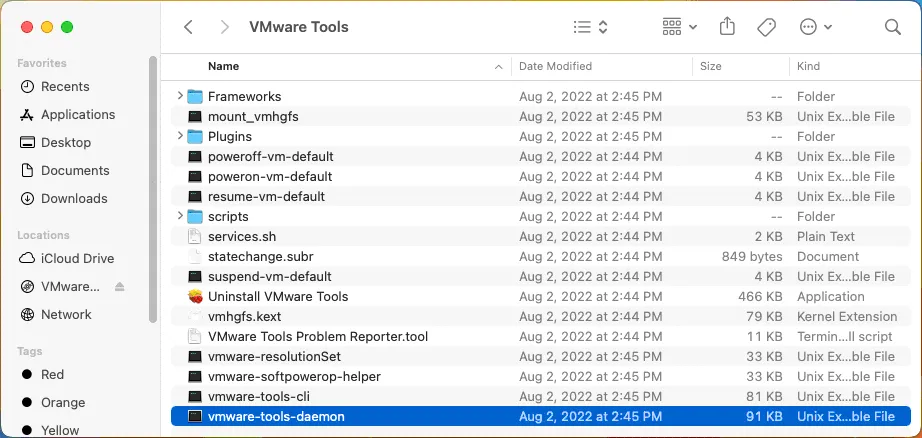
Right-click the Finder icon in the Docker panel and click Go to Folder in the context menu. Enter this path and press the Enter key:
/Library/Application Support/VMware Tools/
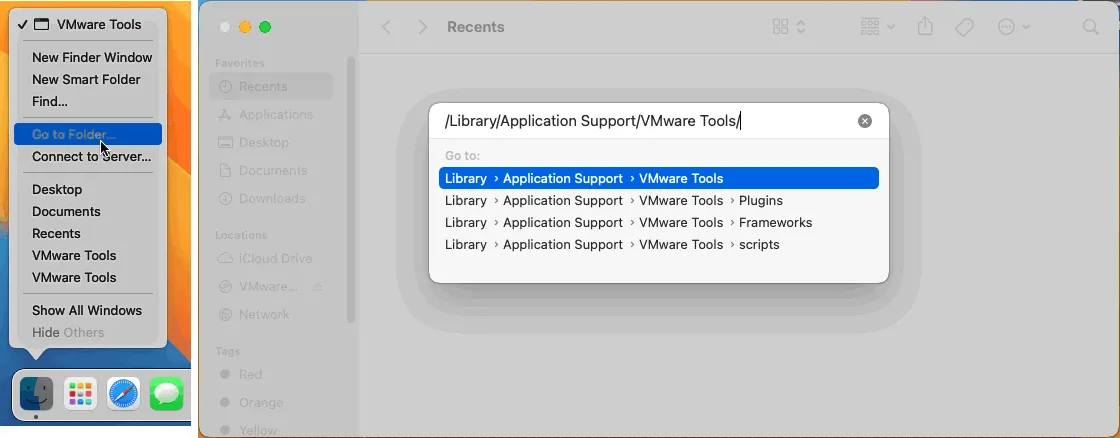
You can see the contents of this folder where vmware-tools-daemon is located.
- Click the System Settings icon in the Dock > Privacy & Security > Accessibility.
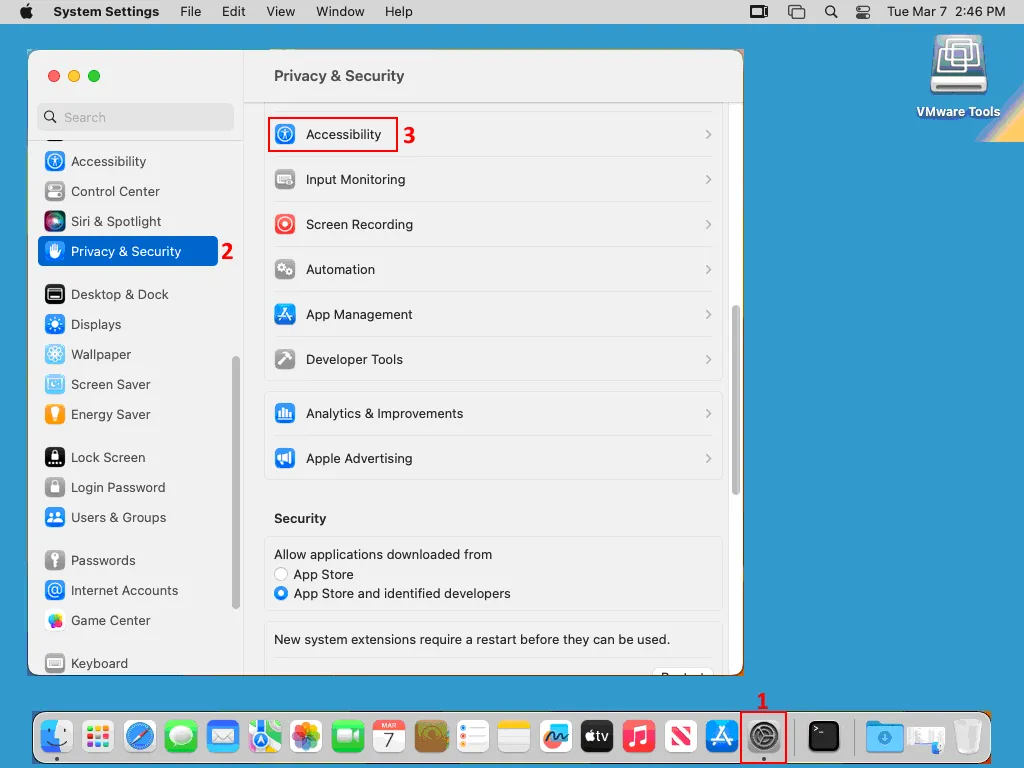
- Click the + button in the Accessibility section of the System Settings window.
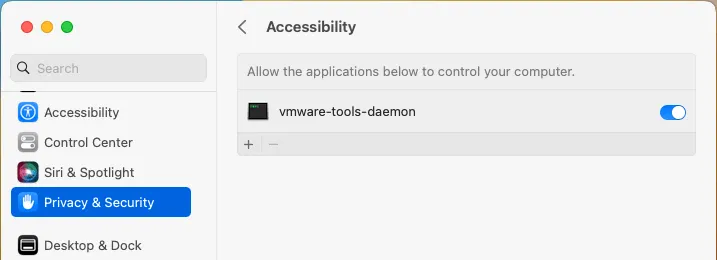
- Browse and select the vmware-tools-daemon file, access to which must be allowed. The path to this file is:
/Library/Application Support/VMware Tools/vmware-tools-daemon

- Close the System Settings window and restart the macOS VM.
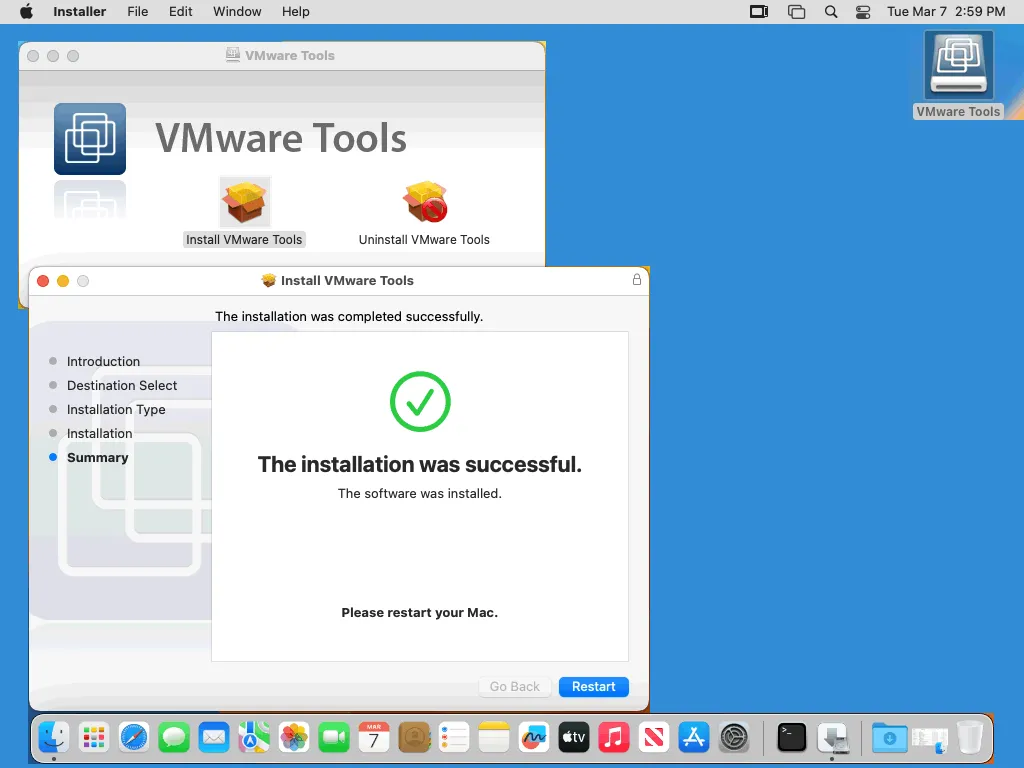
- Once the VM has been restarted, open the VMware Tools installer once again. Pass all steps of the installation wizard (there should be no warnings now). When the VMware Tools installation is completed, the appropriate message is displayed. The installation was successful. Now restart macOS.
- To check the version of VMware Tools installed in macOS, run this command in the macOS terminal:
/Library/Application\ Support/VMware\ Tools/vmware-tools-cli -v
- Another place where you can check whether VMware Tools are installed on a VM is VMware vSphere Client and VMware Host Client. You can select the macOS VM and expand sections with the needed information.
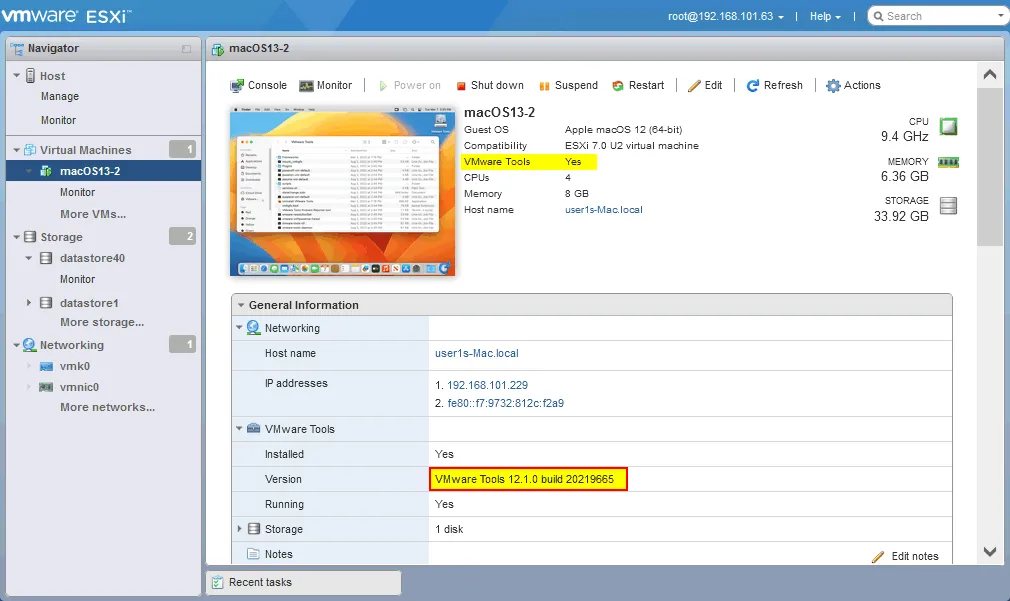
- Right-click the VMware Tools CD icon in the top right corner of your mac desktop and eject the media. Eject the darwin.iso image file from the virtual CD/DVD drive of the macOS VM in VM settings (on ESXi).
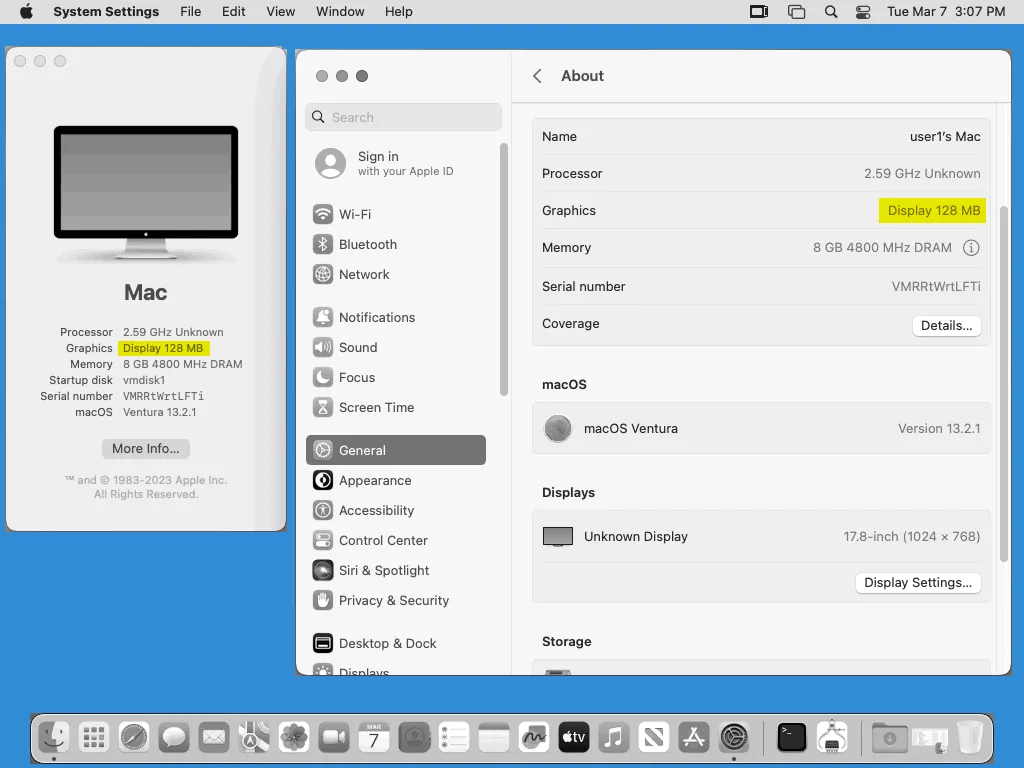
- Click the Apple icon in the top left corner of the VM screen and click About this mac in the menu. After installing VMware Tools, the video memory was increased from 3 MB to 128 MB (you can compare this with the older screenshot made right after finishing the macOS installation on the VM).
The workflow to install macOS on VMware Workstation is similar to this workflow for ESXi. The main difference is the installation of the appropriate version of the unlocker patch.
How To Fix MacOS Screen Resolution on VMware VMs
Installing VMware Tools improves performance and graphics. The first thing you may want to do after that is change the screen resolution from 1024×768 to a higher resolution. However, if you open display settings and click Show all resolutions in the macOS VM, you can see only 1024×768. Other modes are not available in the GUI of macOS on the VM.

Solution 1
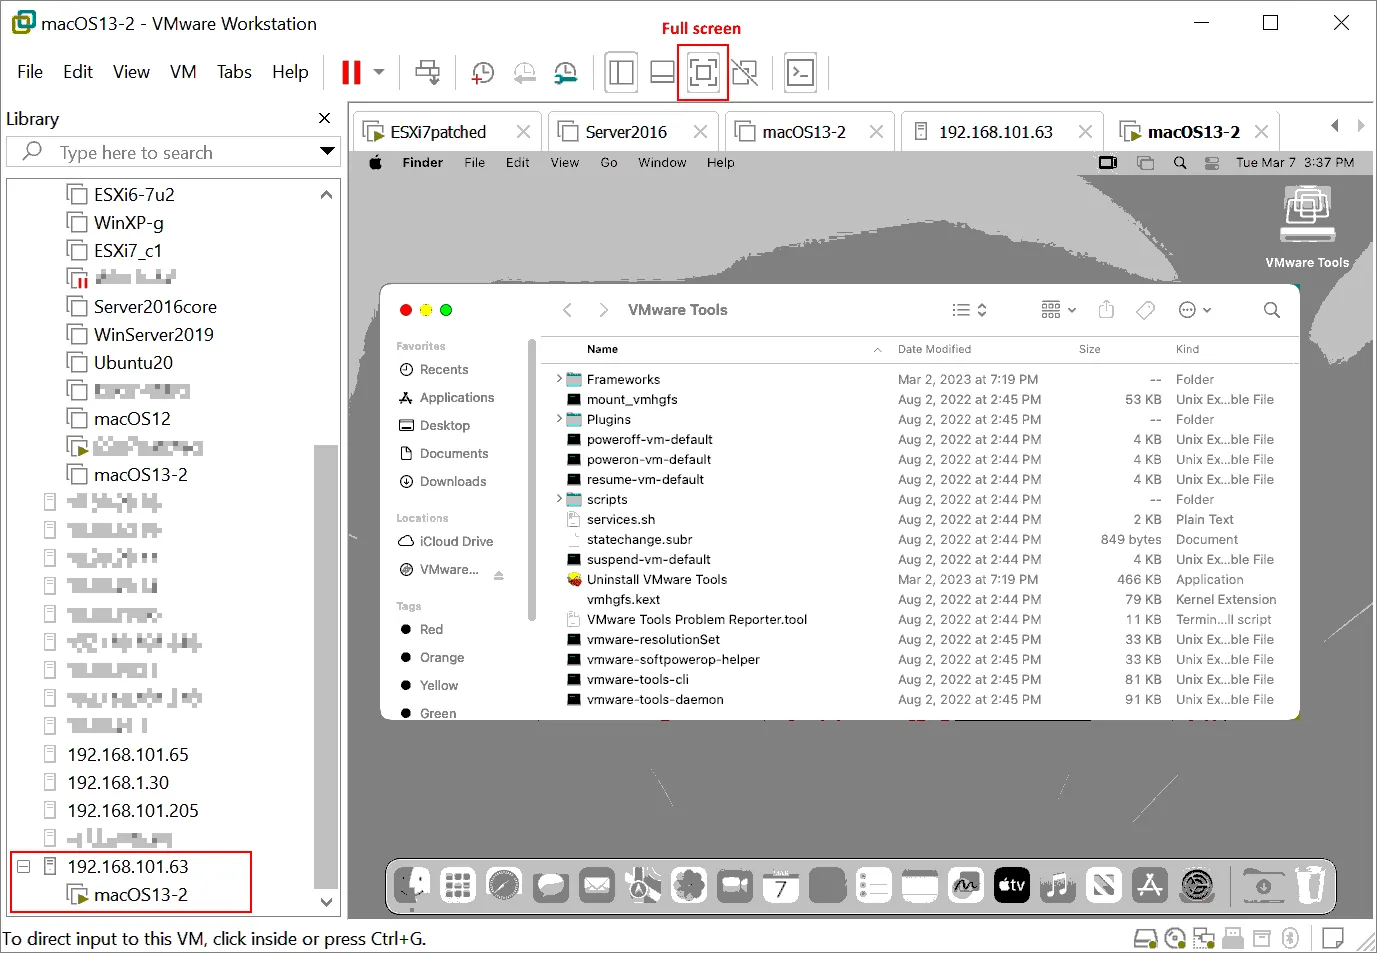
If you have VMware Workstation or VMware Fusion installed on your computer, you can connect to your ESXi server and connect to the macOS VM running on that ESXi host. Alternatively, you can use VMware Remote Console. Click the Full Screen button in the interface of VMware Workstation or Fusion. If the resolution of your monitor is, for example, 1920×1080, the screen resolution of your macOS VM should be changed to 1920×1080 in the full screen mode.
Solution 2
Run the command in the terminal as the current (non-root) user. Open the Launchpad, type terminal in the search field, and run the Terminal. Execute the following command in the terminal to set the Full HD resolution:
sudo /Library/Application\ Support/VMware\ Tools/vmware-resolutionSet 1920 1080
VMware Tools are used to adjust the screen resolution in this case. Configured resolution is preserved after a VM reboot. Note that the maximum displayed resolution in VMware vSphere Web Client and in VMware Host Client is 1176 x 885. Use VMware Workstation or VMware Remote Console (VMRC) to connect to a VM that is running on an ESXi host for working with higher resolution.
The following command can also be useful to change resolution:
sudo defaults write /Library/Preferences/com.apple.windowserver.plist DisplayResolutionEnabled -bool true
Disabling a Screen Saver and Sleep Mode
Running a screen saver can consume computing resources when a virtual machine is idle. We also don’t want our macOS to enter a sleep mode, which can affect availability. It is recommended that you disable any screen savers and hibernation on the VM on which macOS is installed.
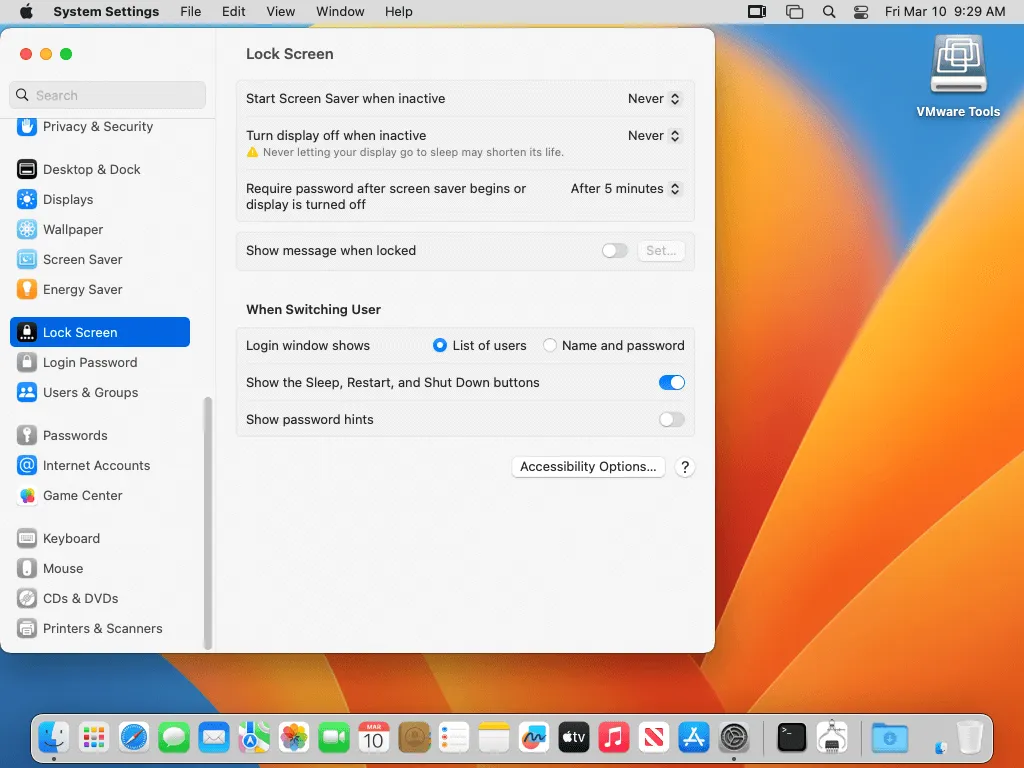
You disable a screen saver in the GUI:
- Open System Preferences > Lock Screen.
- Tune the following parameters:
- Start Screen Saver when inactive
- Turn display off when inactive
You can set them to Never to completely disable the lock screen with a screen saver.
Furthermore, it is recommended that you disable sleep mode to prevent any possible issues and disadvantages (for example, if a time-consuming process such as copying files is running in the background). Open the terminal and disable sleep mode when idle by using the following commands:
Change the directory to /Applications/Utilities/
cd /Applications/Utilities/
Set the idle period to enter a sleep mode to 0:
sudo systemsetup -setcomputersleep 0
Now screen savers are disabled on your macOS.
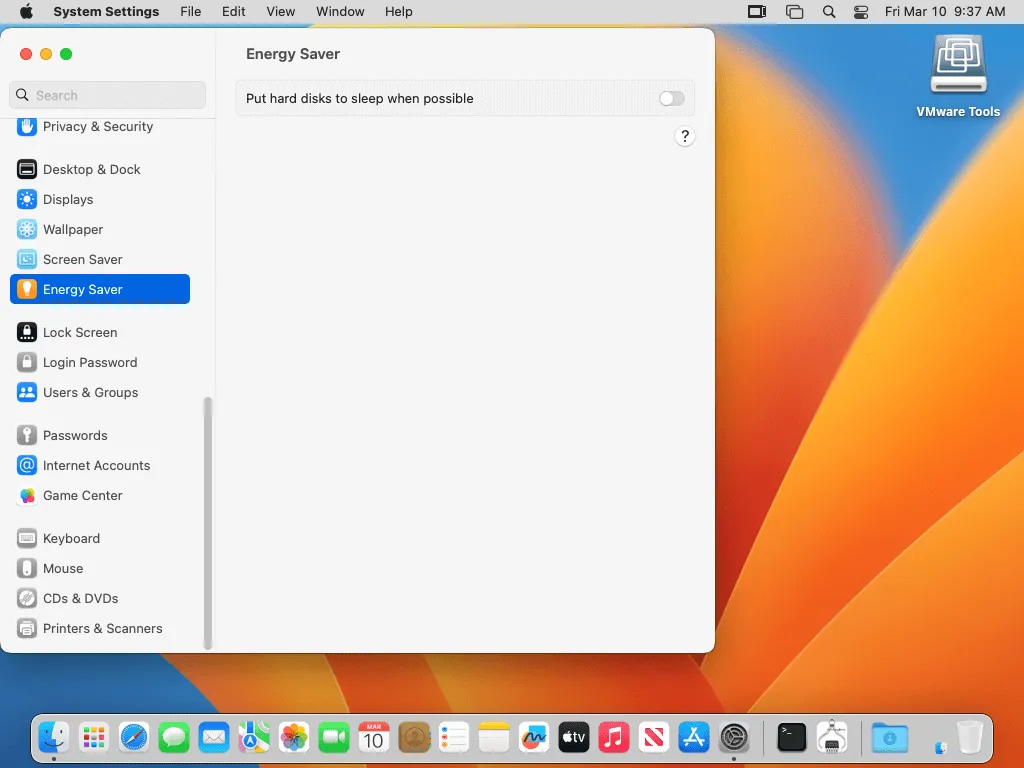
Go to System Settings > Energy Saver.
Turn off the Put hard disks to sleep when possible switcher.
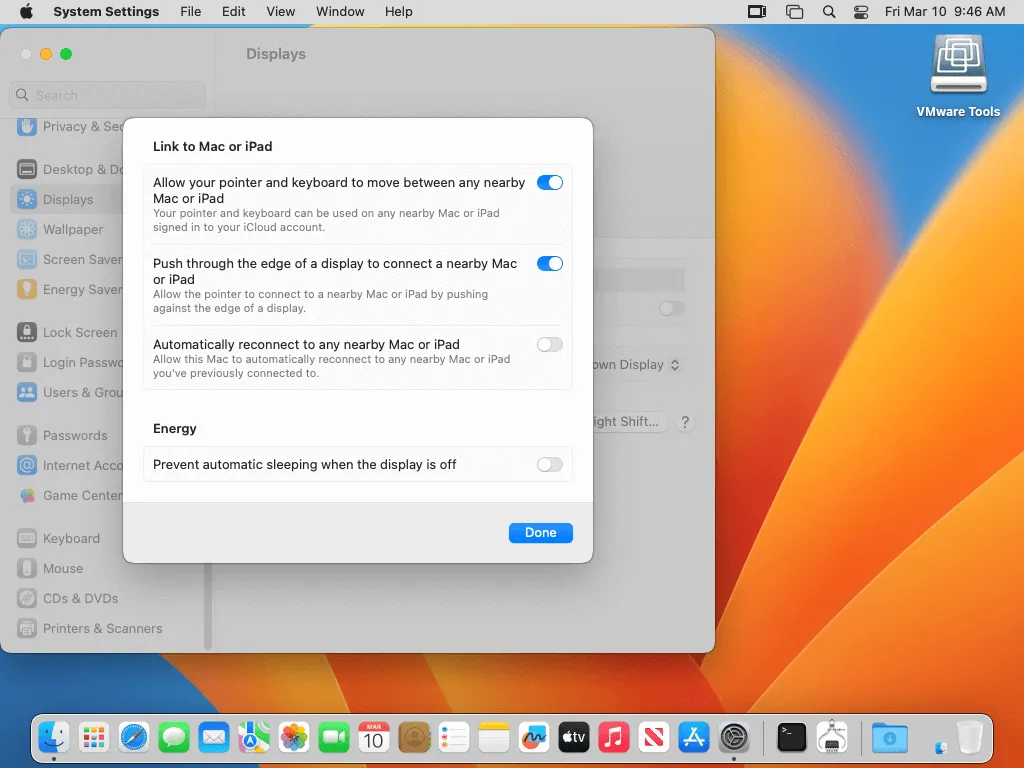
Go to System Settings > Displays and click Advanced.
Ensure that the Prevent automatic sleeping when the display is off setting is set to disabled.
We have finished installing and configuring macOS on a VMware VM.
Conclusion
Installing macOS on VMware ESXi virtual machines requires some additional actions and configuration compared to installing Windows and Linux. It is highly recommended that you install VMware Tools on a macOS VM.
Whatever guest OS you use, you should be using an imaged-based backup and recovery solution like NAKIVO Backup & Replication, which captures data at the virtualization level rather than the guest level. This type of backup captures entire VMs regardless of their OS together with their virtual disk contents and configuration files.