How to Recover Deleted Active Directory Objects: The Ultimate Guide
As a global authentication directory service that provides centralized management of IT infrastructure resources, Active Directory (AD) is one of the most critical business applications. This means that during a disruption, swift recovery is essential to reducing service downtime. AD usually contains a multitude of objects that are hierarchically organized, with some objects depending on others. The recovery process can be time-consuming as you need to recover a complex hierarchical structure and recreate some data manually. This blog post explains how to recover Active Directory objects that have been deleted.
Active Directory Objects Recovery Basics
You can start the AD recovery process using the integrated Windows Server backup utility or another supported third-party utility. Active Directory provides two main recovery methods:
- Non-Authoritative Recovery is the default method to recover Active Directory. This method simply returns the domain to its state at the time the backup was made and allows regular replication to overwrite any object and container changes made afterward.
- Authoritative Recovery consists of two parts: non-authoritative recovery from backup followed by authoritative recovery. The main difference is that this method can make authoritative changes to objects and their attributes in the entire directory. This type of recovery can affect computer accounts, trusts, and group membership.
To select the right AD recovery method, consider the following:
- The cause of the failure: Is the cause accidental or malicious deletion or modification of objects, which was replicated to all domain controllers or complete failure of the entire VM? In case it is deletion/modification, you need an authoritative recovery.
- Roles and functions of the failed Active Directory server.
Native Tools to Restore Deleted AD Objects
Deleted AD objects are not always shown in the Active Directory Users and Computers snap-in. You can see the Deleted Objects container with the deleted AD objects and restore them only using special tools.
There are two approaches to be able to restore deleted objects in Active Directory (AD) by using native Microsoft tools, including built-in tools in Windows Server: with the Active Directory Recycle Bin and without it. There is a big difference between the two approaches.
Recovery without the AD Recycle Bin
When the AD Recycle Bin is disabled, the process of deleting and restoring AD objects is as follows:
- When an object is deleted, this object becomes a tombstone.
- The tombstone object is stored in the Deleted Objects container for the period set in tombstoneLifetime for the current domain. Most of the attributes are lost when the object becomes a tombstone, which is also called a deleted object.
- During the tombstone lifetime period, you can recover the AD object but without any additional information recorded in its attributes.
- When the tombstone lifetime expires, the object is physically deleted without the possibility to recover it.
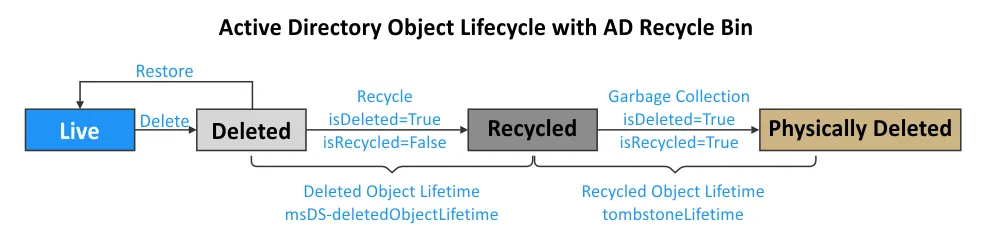
The Active Directory object lifecycle is shown in the diagram below to illustrate the principle of restoring AD objects without the AD Recycle Bin.

Recovery from the AD Recycle Bin
The situation changes when you turn on Active Directory Recycle Bin:
- When an AD object is deleted, the object’s state is changed to the “logically deleted” state. The object attributes are preserved for the time period set in the Deleted Object Lifetime attribute (msDS-deletedObjectLifetime), which is equal to the Recycled Object Lifetime period by default (180 days). You can restore deleted objects in Active Directory during this period.
- The isDeleted attribute is set to True. The isRecycled attribute is False.
- After the Deleted Object Lifetime period expires, the object state is changed from logically deleted to recycled object. The recycled object is similar to the tombstone object when the AD Recycle Bin is disabled.
- This recycled object is still located in the Deleted Objects container until the Recycled Object Lifetime defined in the tombstoneLifetime attribute expires. By default, this period is 180 days. The isRecycled attribute is set to True. Most of the object attributes, which are still preserved in the logically deleted state, are deleted.
- When the Recycled Object Lifetime (tombstoneLifetime) expires, the Active Directory garbage collection mechanism completely cleans up the recycled object, and this object is physically deleted. Object recovery is now impossible.
Active Directory Recycle Bin: what you need to know
The Active Directory Recycle Bin was first made available in Windows Server 2008 R2 to be used in PowerShell only. The graphical user interface (GUI) for the AD Recycle Bin has been available since Windows Server 2012. By default, the AD Recycle Bin is disabled.
Note the following before you enable AD Recycle Bin:
- Once you turn on Active Directory Recycle Bin, all tombstones in the domain forest are deleted. This means that if you delete Active Directory objects and then enable the AD Recycle Bin, it is impossible to restore those objects. To recover deleted Active Directory objects, use other methods without relying on the Recycle Bin and only after that enable the Recycle Bin.
- Enabling the AD Recycle Bin allows you to restore AD objects deleted after the AD Recycle Bin was enabled. Enable AD Recycle Bin before you delete AD objects.
- Once the AD Recycle Bin is enabled, you cannot disable it. This option is irreversible. Back up your AD domain controller before enabling the AD Recycle Bin if you are not sure you need this feature permanently.
- Enabling the AD Recycle Bin changes the Active Directory schema.
- Active Directory grows in size because objects with their attributes are temporarily preserved in Active Directory after changing their state.
How to Restore Deleted AD Objects with Native Tools
We are going to delete objects in Active Directory and then go over how to restore them with and without the AD Recycle Bin. We will cover 4 native methods:
- Example 1: Using PowerShell
- Example 2: Using ADRestore
- Example 3: Using Ldp.exe
- Example 4: Restoring from AD Recycle Bin
The first three examples involve restoring AD objects without the AD Recycle Bin. In the fourth example, we should turn on Active Directory Recycle Bin, delete some objects, and then restore them.
The environment used in the examples:
- A domain controller running on Windows Server 2019 that is the only domain controller in the domain forest.
- A domain name is ID.TEST
- We have multiple users – user1, user2, user3, etc. that are members of Group-A in this AD domain.
Note that the native methods explained below don’t require shutting down a domain controller and putting it offline to restore deleted AD users.
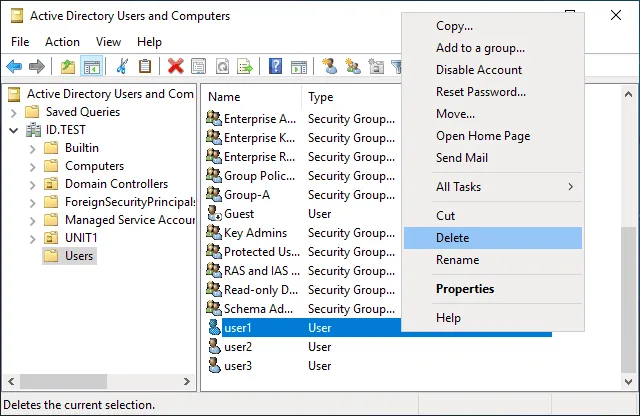
Example 1: Restoring AD Objects in PowerShell (Restore-ADObject)
Let’s delete user1 in Active Directory and then try to restore the user1 object. We perform these operations on the domain controller.
Perform the following steps to restore deleted AD user:
- Open PowerShell with administrative privileges (elevated PowerShell).
- The deleted objects are located in the DeletedObjects container and have the isDeleted flag. View the deleted AD objects with the command:
Get-ADObject -IncludeDeletedObjects -Filter {IsDeleted -eq $true}
- To restore an object, we should remove the isDeleted flag from this object. We need to restore user1. Enter the command to display all objects whose names start with user. For this purpose, we add these options to the filter: {Isdeleted -eq $true -and Name -like “user*“}
The following command is true for displaying other users such as user2, user3, etc. if they have been deleted:
Get-ADObject -IncludeDeletedObjects -Filter {Isdeleted -eq $true -and Name -like "user*"}
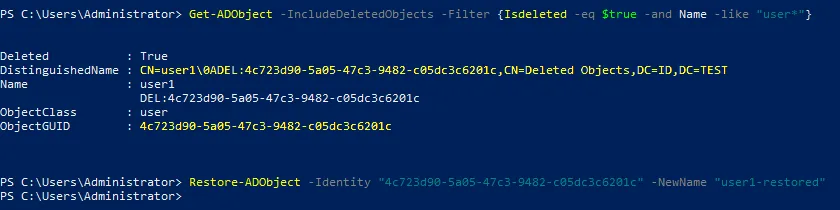
- Note the ObjectGUID or DistinguishedName for the needed object. We use the ObjectGUID for user1 in our case:
4c723d90-5a05-47c3-9482-c05dc3c6201c
- To restore the deleted object run the command like:
Restore-ADObject -Identity "GUID or DistingushedName here" -NewName "new_restore_name"
In our case:
Restore-ADObject -Identity "4c723d90-5a05-47c3-9482-c05dc3c6201c" -NewName "user1-restored"
- Optionally, you can define an alternative location where to restore the current object by using the
-TargetPathkey and setting a distinguished name (DN) to the new location, for example:
CN=Users,DC=domain,DC=net
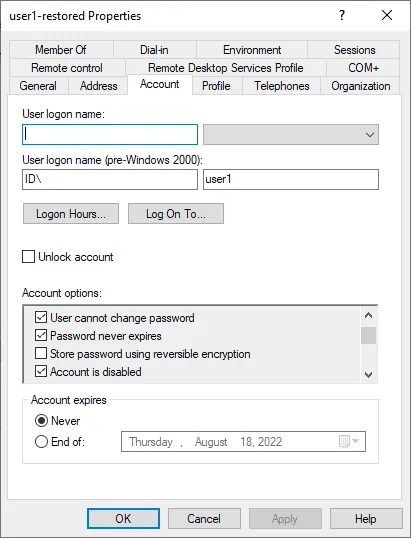
After running the command and restoring the Active Directory object, we don’t see user1 in the Users catalog and in Group-A where this user was before.
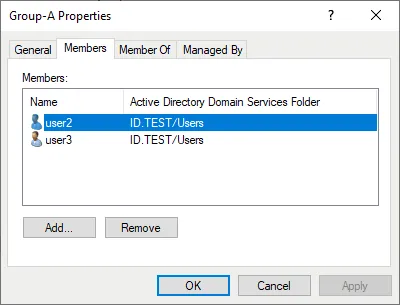
This is because nearly all object attributes are lost after deleting an Active Directory object without using the AD Recycle Bin even if the object itself has been restored.

We can find the restored AD object user1-restored in the Domain Users group. The user logon name is saved only in the pre-Windows 2000 format. The user1-restored account is in the disabled state. The point is that the original SID is preserved, and any NTFS permissions for files and folders associated with this user remain valid.
Note: If you recreate a new AD object instead of restoring a deleted object from a tombstone, then new values for objectGUID and objectSID attributes are assigned, and they require updating references to this object.
We need to edit the logon name, enable the account, update the password, and add this user to Group-A. There is a lot of manual work to do to restore all attributes and membership correctly.
Example 2: Using ADRestore to Restore Deleted AD Users
The Active Directory Recycle Bin is still disabled in our second example.
User2, which is a member of Group-A, is deleted.
We are about to use the free ADRestore tool to restore deleted objects in Active Directory. This tool is available on the Microsoft website:
https://docs.microsoft.com/en-us/sysinternals/downloads/adrestore
- Download the tool and extract content from the zip archive to a specific folder, for example, C:\programs\adrestore
- Go to this directory in PowerShell:
cd c:\programs\adrestore
We run PowerShell as administrator.
- View the information about the deleted user2 by specifying the exact user name in elevated PowerShell:
Get-ADObject -Filter 'SAMAccountName -eq "user2"' -IncludeDeletedObjects
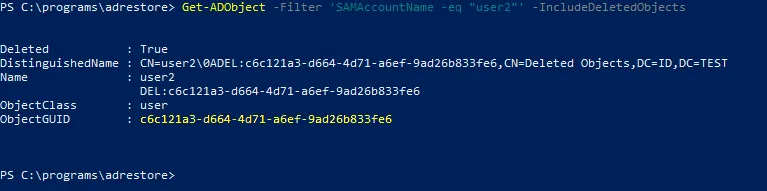
Deleted: True confirms that this user is deleted.
CN=Deleted Objects means that the object (user account) is moved to the Deleted Objects container.
- Note the ObjectGUID of user2:
c6c121a3-d664-4d71-a6ef-9ad26b833fe6
- Enter the command to restore the object with adrestore by specifying the ObjectGUID of the needed user:
.\adrestore -r c6c121a3-d664-4d71-a6ef-9ad26b833fe6
Type y and press Enter to confirm and proceed.
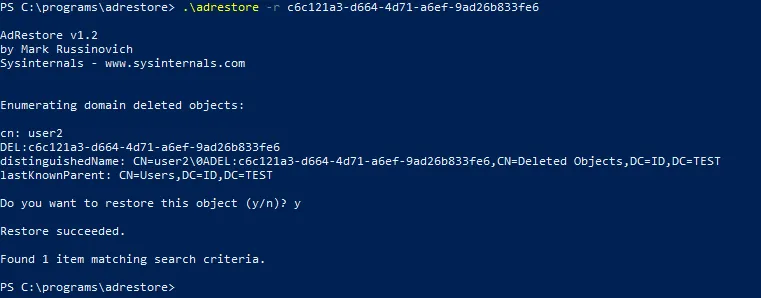
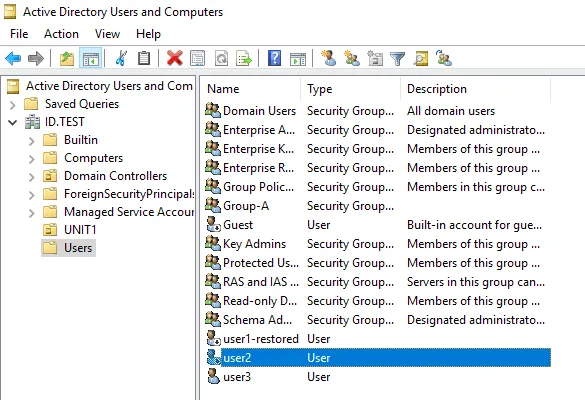
- Once the deleted object (user2) has been restored, check this user in the Active Directory Users and Computers window.
The result is similar to the one in the first example. The user2 is restored without any additional data such as attributes and group membership.
Example 3: Restore Deleted AD Users with Ldp.exe
The third method in our walkthrough to restore deleted AD user3 doesn’t require the AD Recycle Bin. In this method, we use a free ldp.exe LDAP utility.
The Ldp tool is a native Microsoft tool that comes with Windows Server operating systems such as Windows Server 2008, 2012, etc. This tool is a lightweight LDAP client with a graphical user interface (GUI) in the Windows Explorer style, allowing you to view and edit Active Directory entries.
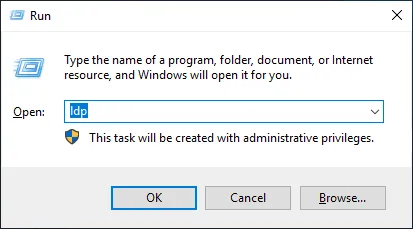
- Click Start > Run (or press Win+R).
- Type ldp in the Run prompt and hit Enter.
- Click Connection > Connect in the main Ldp window.

- Set the required parameters in the Connect window.
Server: Enter the IP address or the name of your AD DC server.
Port: 389 or 636 is used by default.
Click OK.

- Click Connection > Bind in the main Ldp window.
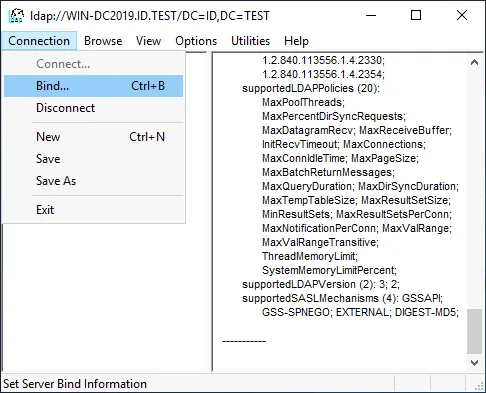
- Given that we are logged in as domain administrator on the domain controller, we select the first option:
- Bind as currently logged on user.
You can use the second option (Bind with credentials) and set a user name, password, and domain to which you want to connect.
Hit OK to continue.

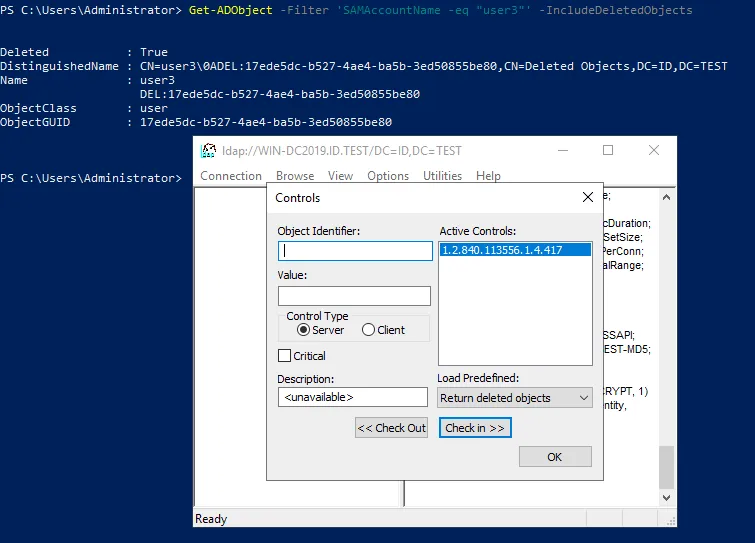
- Click Options > Controls in the main Ldp window.
In the elevated PowerShell, you can run the command to view the information about the deleted user.
Get-ADObject -Filter 'SAMAccountName -eq "user3"' -IncludeDeletedObjects
The objectGUI of user3 is:
17ede5dc-b527-4ae4-ba5b-3ed50855be80
Select Return deleted objects in the Load Predefined drop-down menu of the Controls window. Hit OK.
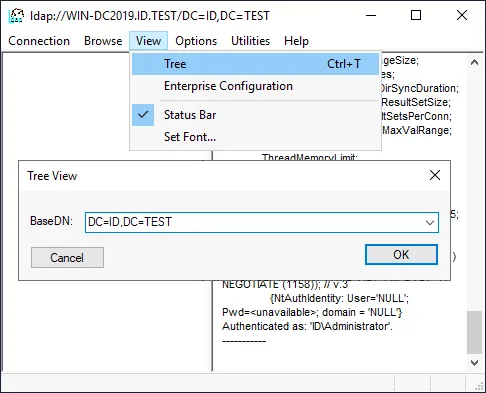
- Click View > Tree in the main Ldp window.
Enter a BaseDN. The name of our domain is ID.TEST and our BaseDN is DC=ID,DC=TEST
Hit OK to proceed.
- Navigate in the tree to the deleted object you need to recover (user3 is the object we want to restore from AD Recycle Bin in our case). Expand a domain and expand the Deleted Objects container.
Note: You can see the results of performed operations in the right pane of the window.
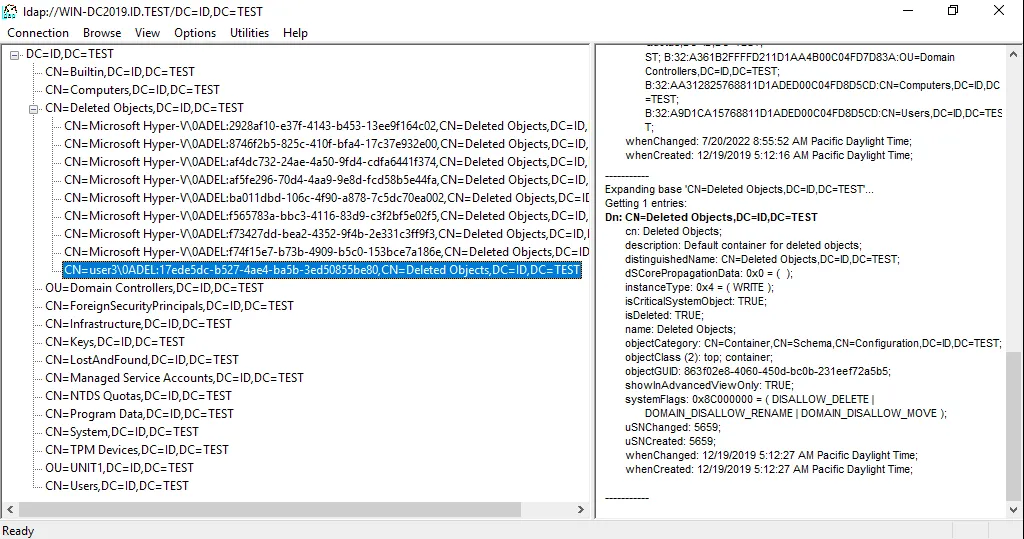
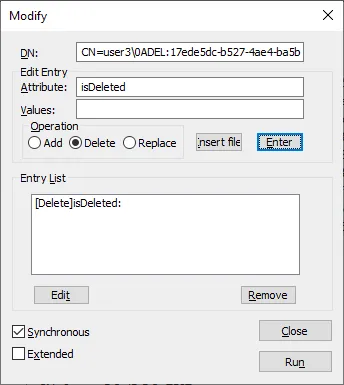
- Right-click the object (user3 in our case) and click Modify in the context menu.
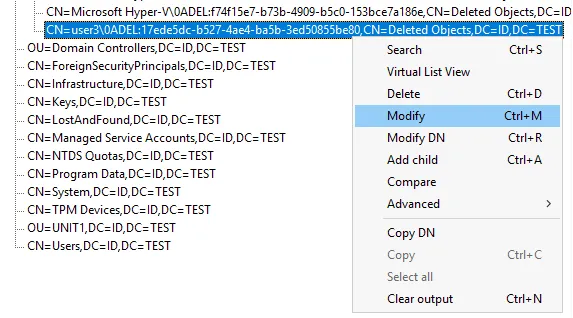
- The DN has already been selected automatically.
Type isDeleted in the Edit Entry Attribute field.
Select Delete in the Operation options.
Click the Enter button in this window.
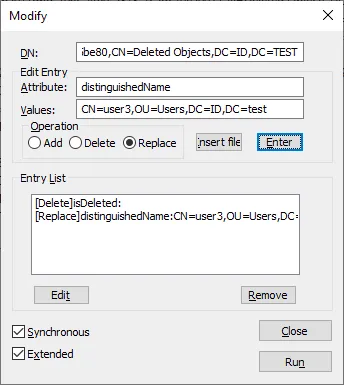
- Type distinguishedName in the Values field.
Enter the values to restore objects, for example: CN=user3,OU=Users,DC=ID,DC=test
You can enter values for a custom DN location for restoration.
Select the Replace operation.
Click the Enter button in the interface of this Modify window.
Select the Synchronous and Extended checkbox. Then click Run.
After you restore the AD object to the selected location with this method using the Ldp (LDAP) tool, additional data with attributes is not restored (password, group membership, etc.). You need to configure these parameters manually.
In general, the result is similar to the result achieved with the other two methods, which also don’t use the AD Recycle Bin.
Let’s enable the Active Directory Recycle Bin and see a different result when you restore deleted objects in Active Directory.
Example 4: How to Restore from Active Directory Recycle Bin
Before we proceed with recovery, let’s take a look at how to enable the AD Recycle Bin.
How to Enable Active Directory Recycle Bin
It’s recommended that you back up your Active Directory domain controller before enabling the AD Recycle Bin. This would allow you to roll back if needed to the state with the disabled AD Recycle Bin and with existing tombstones.
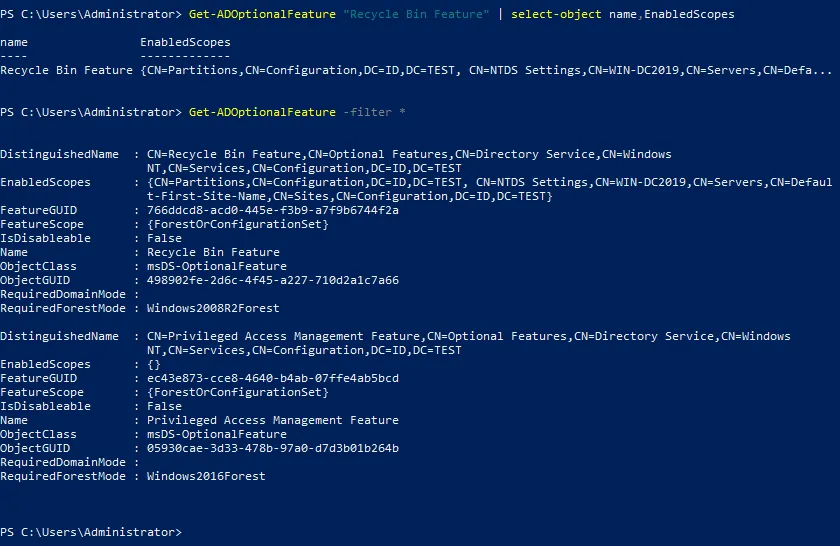
Run the command to check whether the Active Directory Recycle Bin is enabled:
Get-ADOptionalFeature "Recycle Bin Feature" | select-object name,EnabledScopes
If you see empty brackets {} in the output, the AD Recycle Bin is disabled.

Here are the requirements to enable AD Recycle Bin.
- You must be logged in to Windows Server as a domain administrator or a user that is a member of the Enterprise Admins or Schema Admins group.
- The forest functional level must be Windows Server 2008 or higher to enable the Active Directory Recycle Bin.
There are two main methods to enable AD Recycle Bin: in PowerShell and in Server Manager.
1. Enabling AD Recycle Bin in PowerShell
Run the following commands to turn on Active Directory Recycle Bin in elevated PowerShell:
Import-Module ActiveDirectory
Generally, the command to enable AD Recycle Bin is like this:
Enable-ADOptionalFeature 'Recycle Bin Feature' -Scope ForestOrConfigurationSet -Target <your forest root domain name>
In our case, the exact command with our domain name specified is:
Enable-ADOptionalFeature -Identity 'CN=Recycle Bin Feature,CN=Optional Features,CN=Directory Service,CN=Windows NT,CN=Services,CN=ConfigurationDC=id,DC=test' -Scope ForestOrConfigurationSet -Target 'id.test'Enter the name of your domain instead of id.test used in our example.
2. Enabling AD Recycle Bin in Server Manager
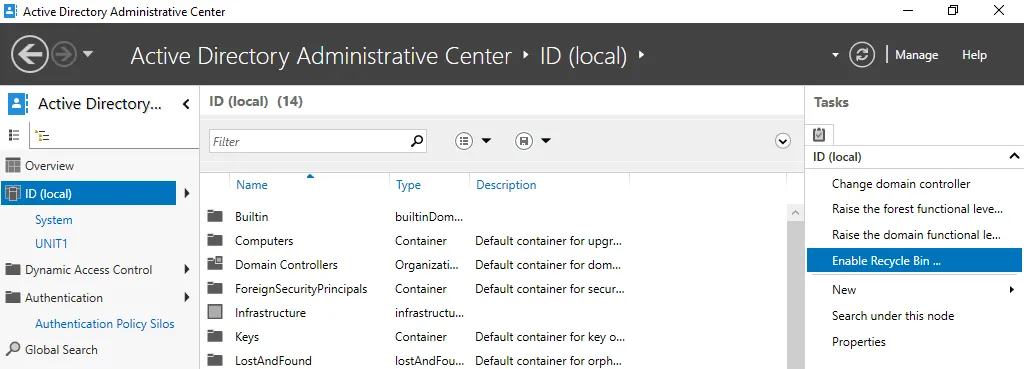
- Open Server Manager. Click Start and type server manager or press Win+R. In the Run window, type dsac.exe and hit Enter.
- Go to Tools > Active Directory Administrative Center in the Server Manager window.

- Select your forest root domain in the left pane. We select ID (local) in our case.
- Click Enable Recycle Bin in the right pane.
- Read the warning and click OK in the Enable Recycle Bin Confirmation window to continue.

- You need to refresh the Active Directory Administrative Center Window. Click the Refresh button in the top right corner of the Administrative Center window.
- After that, the Enable Recycle Bin option becomes grayed out (inactive).
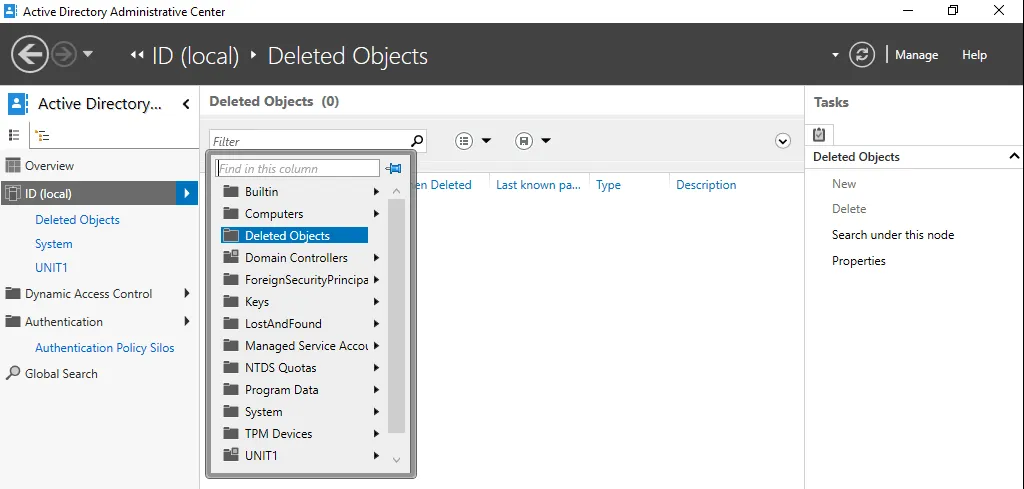
- The Deleted Objects container appears in the menu when you click your domain to expand contents.
- Ensure that the Active Directory Recycle Bin is enabled by running the command in PowerShell:
Get-ADOptionalFeature "Recycle Bin Feature" | select-object name,EnabledScopes
To see more information about features, use this command:
Get-ADOptionalFeature -filter *
Restoring users from Active Directory Recycle Bin
Let’s delete user4, which is a member of Group-A in our id.test domain, like we did in the previous examples with the other users.
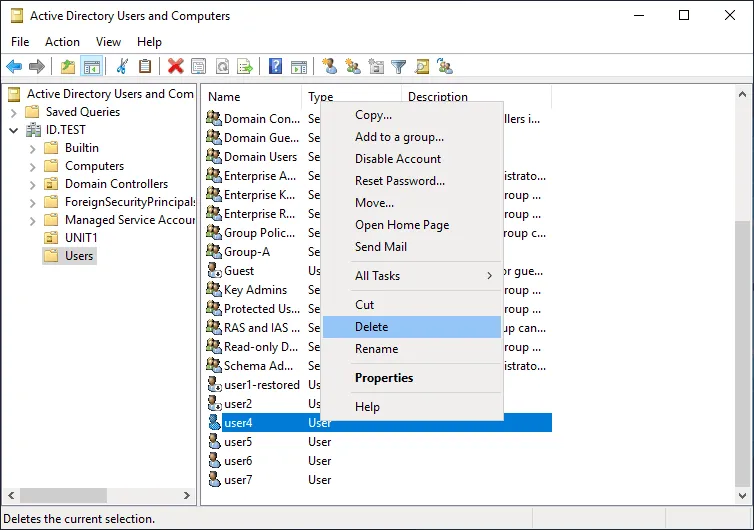
Open the AD Recycle Bin in Server Manager > Active Directory Administrative Center and select a deleted user. User4 is the object we want to restore from Active Directory Recycle Bin in our case.
There are four main options for a deleted Active Directory object in the Recycle Bin:
- Restore – restore deleted AD objects to the original organization unit
- Restore To – select a different organization unit as the destination to restore a deleted AD object
- Locate Parent – open the original organization unit where a deleted object was stored
- Properties – view some properties of the deleted object such as Created, Modified, Canonical Name, Object Class or Update Sequence Numbers
To restore a user to the original location, click Restore in the menu located on the left side of the window.
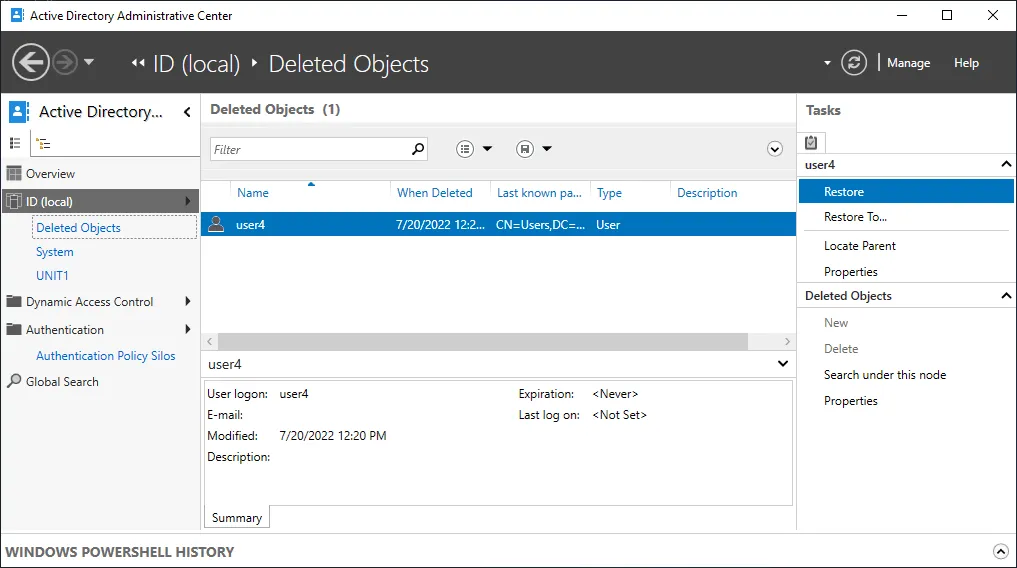
User4 has been restored as an Active Directory object to the same location with all related data and attributes preserved. The group membership is preserved, and user4 is a member of Group-A after being restored.

The command to restore deleted AD user from the Active Directory Recycle Bin in PowerShell is as follows:
Get-ADObject -Filter {displayName -eq "user4"} -IncludeDeletedObjects | Restore-ADObject
Change user4 to the object you want to restore on your server.
Thus, the Active Directory Recycle Bin is useful if you don’t perform an Active Directory backup.
How to Change Retention Time in AD Recycle Bin
You can change some Active Directory Recycle Bin settings to have the ability to restore deleted objects in Active Directory for a longer time. We will go over changing the following two settings:
- Tombstone Lifetime (tombstoneLifetime)
- How to check the current tombstone lifetime in PowerShell
- How to edit tombstone lifetime in PowerShell
- Deleted Object Lifetime (msDS-DeletedObjectLifetime)
Note: Increasing the values for these two parameters may affect Active Directory performance.
How to check the current tombstone lifetime in PowerShell
View the current tombstone lifetime in elevated PowerShell with this set of commands:
Import-Module ActiveDirectory
$ADForestconfigurationNamingContext = (Get-ADRootDSE).configurationNamingContext
$DirectoryServicesConfigPartition = Get-ADObject -Identity "CN=Directory Service,CN=Windows NT,CN=Services,$ADForestconfigurationNamingContext" -Partition $ADForestconfigurationNamingContext -Properties *
$TombstoneLifetime = $DirectoryServicesConfigPartition.tombstoneLifetime
Write-Output "Active Directory’s Tombstone Lifetime is set to $TombstoneLifetime days `r "

- Open ADSI Edit tool that is a standard pre-installed tool in Windows Server 2019.
You can find this tool in
“C:\ProgramData\Microsoft\Windows\Start Menu\Programs\Administrative Tools“
or by using this path:
%SystemRoot%\system32\adsiedit.msc
You can click Start and type ASDI Edit to run the tool quickly.
- Right-click ADSI Edit in the window and click Connect to in the context menu.
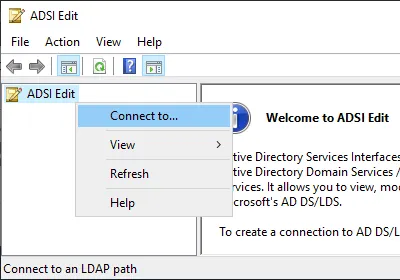
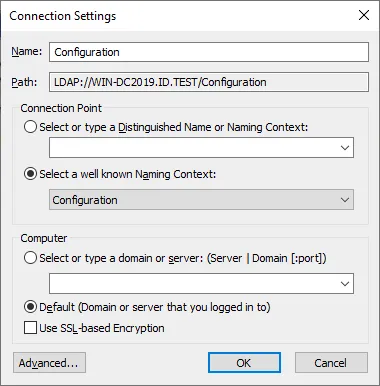
- In the Connection Settings window, set the following parameters:
- Name: Configuration
- Connection Point: Select a well known Naming Context > Configuration
- Computer: Default
Hit OK to apply these settings.
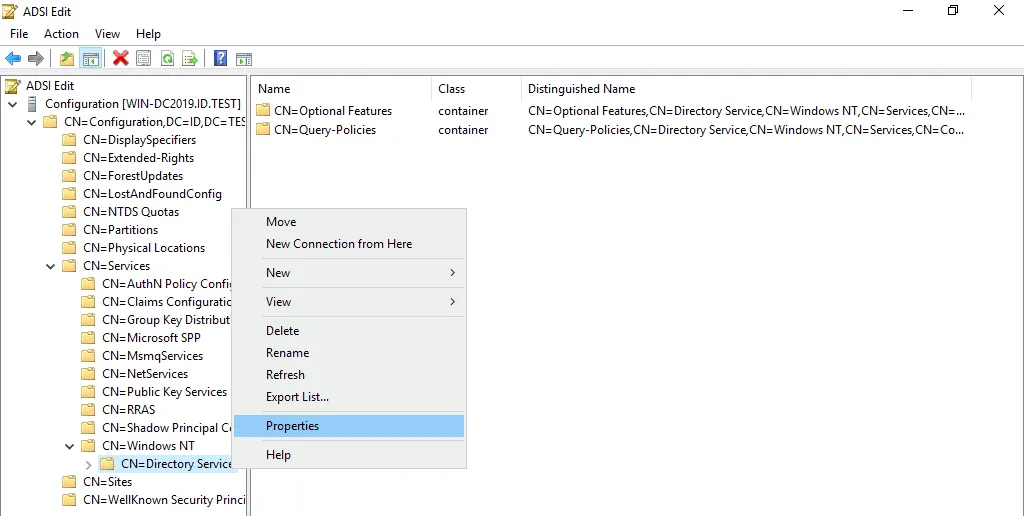
- The tree with Active Directory configuration parameters is now displayed in the main window of the ADSI Edit tool.
- Go to Configuration > CN=Configuration > CN=Services > CN=Windows NT > CN=Directory Service
- Right-click CN=Directory Service and in the context menu, click Properties.
- Scroll down the list of properties and find tombstoneLifetime. As we have checked before, the default value is 180 days.
- Double-click tombstoneLifetime to edit the set value.
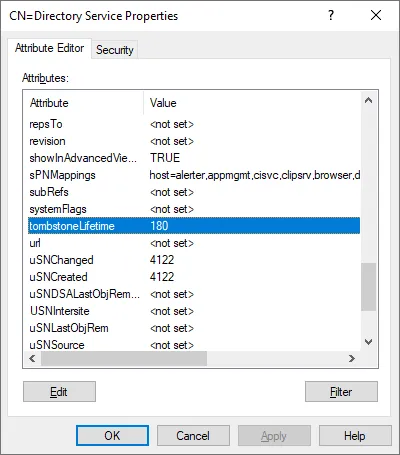
- Enter a new value, for example, 365 and hit OK to save settings.
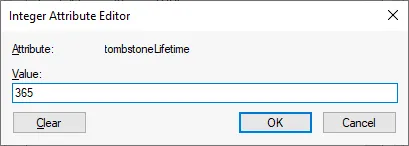
Note: If you set the value to null <not set>, then the tombstone lifetime is automatically set to 60 days as this period is hard-coded into the system configuration for the null value.
- The new value is set.
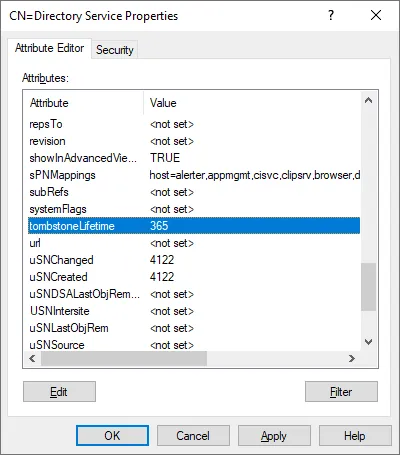
- Click OK to save settings and close the Properties window.
You can make sure that the value has been set in PowerShell by using the set of commands explained above.

How to edit tombstone lifetime in PowerShell
Open PowerShell as administrator.
Run a set of commands to set a new tombstone lifetime value in elevated PowerShell:
Import-Module ActiveDirectory
$ADForestconfigurationNamingContext = (Get-ADRootDSE).configurationNamingContext
Set-ADObject -Identity "CN=Directory Service,CN=Windows NT,CN=Services,$ADForestconfigurationNamingContext" -Partition $ADForestconfigurationNamingContext -Replace @{tombstonelifetime='366'}
Check the updated tombstone lifetime by using the appropriate set of commands explained in the previous section.

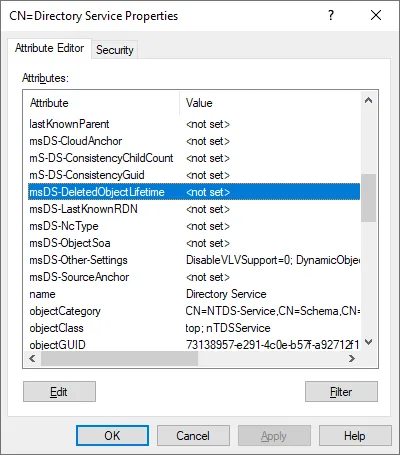
How to change the Deleted Object lifetime
The msDS-deletedObjectLifetime attribute determines the deleted object lifetime. You can edit this parameter with the ASDI Edit tool just as we did when editing the tombstone lifetime parameter.
Go to:
Configuration > CN=Configuration,DC=ID,DC=TEST > CN=Services > CN = Windows NT > CN=Directory Service
In the CN=Directory Service, locate the msDS-deletedObjectLifetime attribute and edit the value. The value is set to null <not set> by default. This means that the deleted object lifetime period is equal to the tombstone lifetime.
The minimum value you can set is 2 (that is, 2 days).
The Limitations of Native AD Recovery Tools
Let’s sum up the limitations of using native AD Recovery tools and methods:
- There is a lot of manual work involved, such as running commands or configuring the needed parameters in the GUI of provided utilities.
- The searching and recovery processes can be time-consuming.
- User passwords are not preserved after recovery. You need to reset the password for each user.
- You need to manually add some objects or attributes for the restored objects manually.
- The Active Directory Recycle Bin improves the process of restoring AD objects and restores most object attributes. However, this feature doesn’t help if not enabled before the objects are deleted.
- When you turn on Active Directory Recycle Bin, the size of the Directory Information Tree (DIT) is increased.
- You cannot recover deleted Active Directory objects if the time since their deletion exceeds the tombstone lifetime.
Luckily, you can bypass the time limitations of the AD Recycle Bin with Active Directory backup.
Restoring AD Objects from a Backup
Restoring deleted Active Directory objects from a backup is the most reliable method and allows you to restore deleted AD objects regardless of whether the AD Recycle Bin is enabled or not. The backup method involves backing up Active Directory or the entire domain controller running on a physical server or a virtual machine.
We will explain how to recover deleted Active Directory objects from a backup using the universal data protection solution NAKIVO Backup & Replication:
- We have already run a backup of the Active Directory Domain controller. In our example, the domain controller is installed on a virtual machine (VM) in VMware vSphere, and we have backed up the entire VM.
- The operating system is Windows Server 2019, as in the previous examples in this post.
- The domain name is domain1.local in this example, but the rest of the settings for the domain are identical to the previous one.
Requirements
The requirements for the server to which you restore deleted AD objects are:
- Visual C++ Redistributable for Visual Studio 2015 must be installed. The vc_redist.x86.exe (v.2015) installer is available on the Microsoft website.
- The iSCSI initiator service must be started.
- Port TCP 5000 must be opened.
- Active Directory Module for PowerShell must be installed.
Deleting AD objects
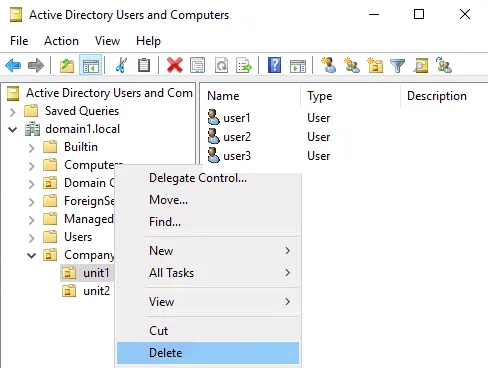
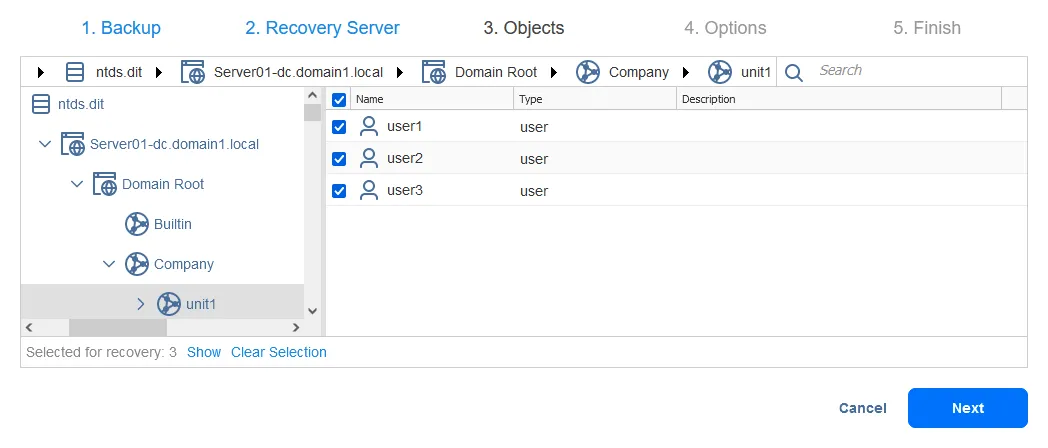
Let’s delete the organization unit unit1 in our domain, which is domain1.local. The organization unit contains three users: user1, user2 and user3.
Restoring deleted AD objects from a backup
Open the web interface of the NAKIVO backup solution.
Select the VMware vSphere VM backup job that contains the Active Directory domain controller backup.
Click Recover > Microsoft Active Directory objects.
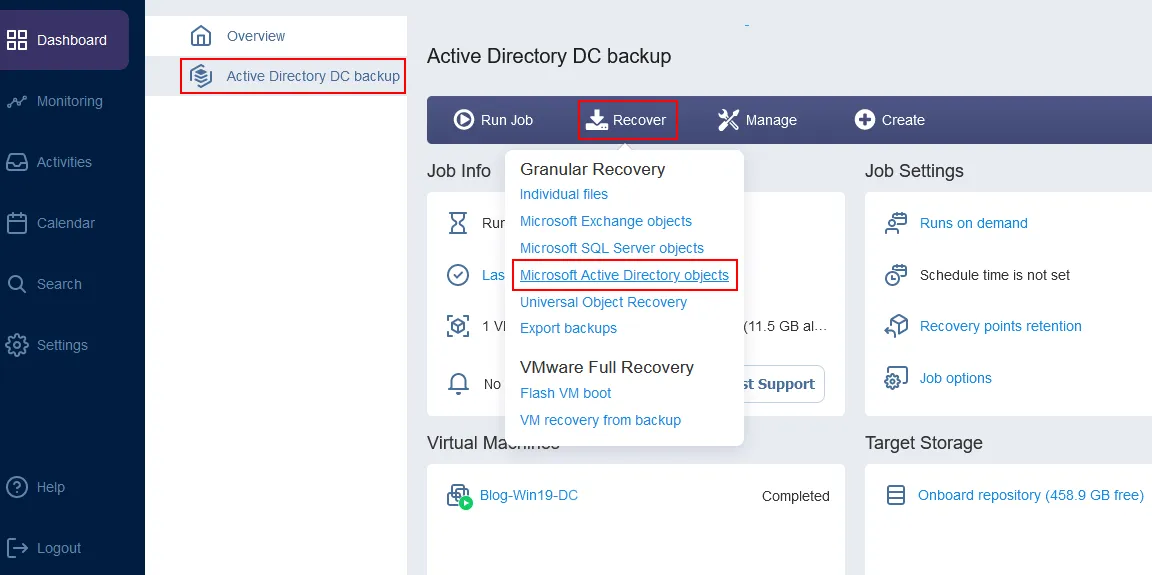
The object recovery wizard for Microsoft AD server opens.
- Backup. Select the needed virtual machine from the selected backup. Then select a recovery point. In our case, the backup contains one VM with an AD server (the VM name is Blog-Win19-DC) and we select the latest recovery point.
Click Next at each step to continue.

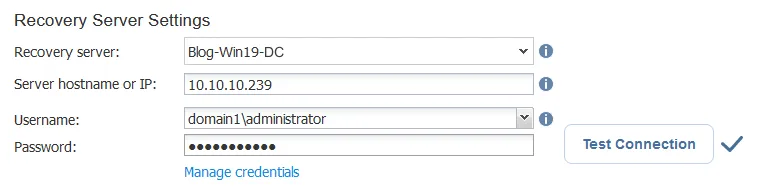
- Recovery Server. Select recovery server settings:
- Recovery Server: Select a recovery server as the destination to restore deleted AD objects. We recover these objects to the same VM. You can expand the list and select a server or VM from your inventory.
- Server hostname or IP: Enter the hostname or IP address of the selected VM or server.
- Username: Enter the user name of a domain administrator or other users who have the appropriate permissions in a domain. In our example, the username is domain1\administrator
- Password: Enter the password of the defined user.
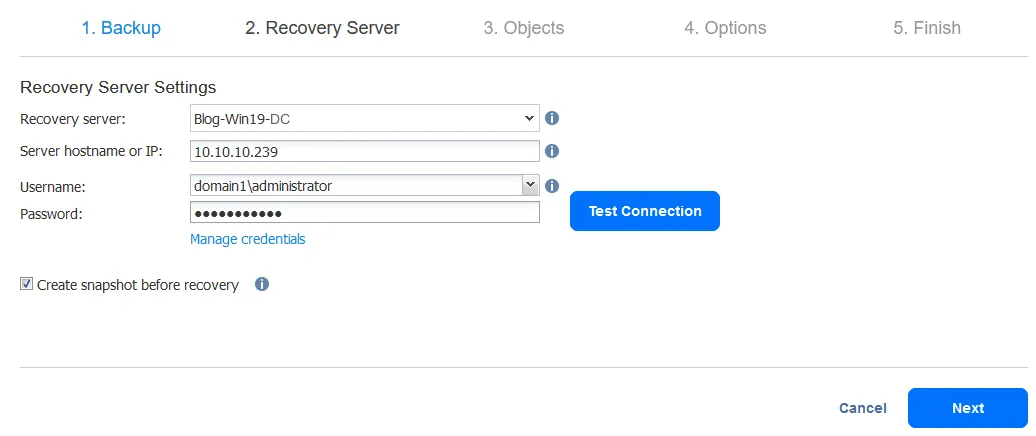
Click Test Connection. If you have passed the test, click Next.
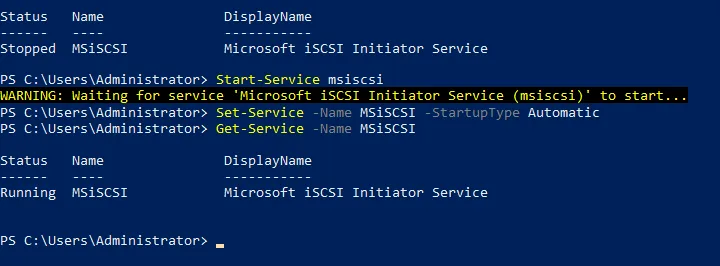
Note: Ensure the iSCSI initiator service is running on the target Windows Server machine (to which you restore AD objects). Otherwise, you will get the error: The “iSCSI Initiator” service is not running on the recovery server. The connection test will fail in this case.
You can start Microsoft iSCSI initiator service in the Computer Management window (Computer Management > Services and Applications > Services).
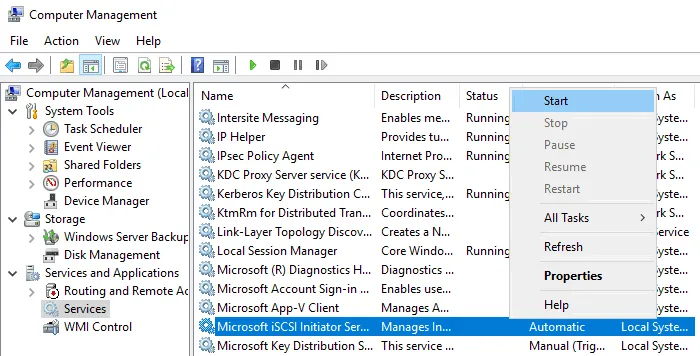
As an alternative, you can start the service in PowerShell:
- Check the iSCSI initiator service status:
Get-Service -Name MSiSCSI
- Start the iSCSI service:
Start-Service msiscsi
- Set the service startup type to automatic:
Set-Service -Name MSiSCSI -StartupType Automatic
- Check whether the iSCSI initiator service has been started:
Get-Service -Name MSiSCSI
- Objects. Select AD objects you want to restore. It is possible to recover multiple objects at once with a high level of automation. We want to recover deleted AD accounts.
Note: You can see the Recovery point cannot be loaded message if the iSCSI service is not started. To start an iSCSI service on a Linux machine, for example, on a machine with a backup repository or Transporter, run the command:
/etc/init.d/iscsid start
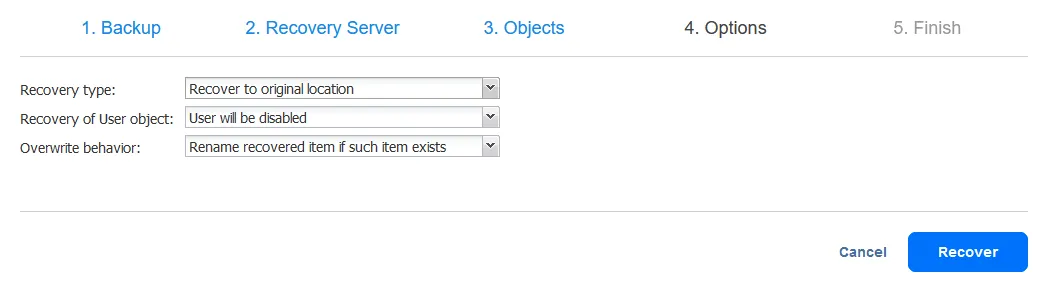
- Options. Select AD recovery options at this step. All possible options are listed below.
- Recovery type:
- Recover to original location
- Export
- Recovery of user object:
- User will be disabled
- User must change password at next logon
- Overwrite behavior:
- Rename recovered item if such item exists
- Skip recovered item if such item exists
- Overwrite the original item if such item exists
In this AD recovery example, we are recovering items to the original location and select options, as you can see in the screenshot below.
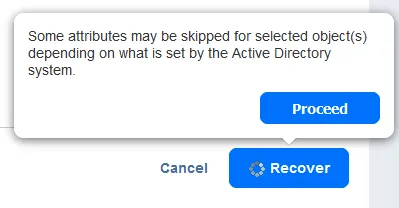
Click Recover, read the notification and hit Proceed.
- Finish. Active Directory object recovery has started. Wait until the recovery process is finished.
Once the process of restoring AD objects has finished by using this method, we can open Active Directory Users and Computers on our Windows Server 2019 and check whether a deleted AD organizational unit (unit1) has been recovered with child objects.
As you can see in the screenshot below, all users stored in unit1 have been recovered. Most of their attributes, including group membership, are preserved. We just need to reset passwords and enable these user accounts.

Advanced AD Recovery from a Backup
You may need to perform advanced Active Directory recovery and recover deleted Active Directory objects from a backup with highly customized settings. For example, you can export AD objects from a backup to a custom server, edit their parameters, and import them to the needed location.
NAKIVO’s universal data protection solution allows you to carry out such tasks. Let’s look at an example.
Exporting AD objects from a backup
The first steps of the workflow in the web interface are the same as explained in the previous section of this article. Let’s go straight to the third step of the object recovery wizard. The difference in the advanced AD recovery workflow begins from this step.
- Objects. Let’s select other Active Directory objects to recover in this example. We want to restore deleted AD users. Let’s browse to find Users and select user10. We can select multiple AD objects in the Users directory to recover from a backup.
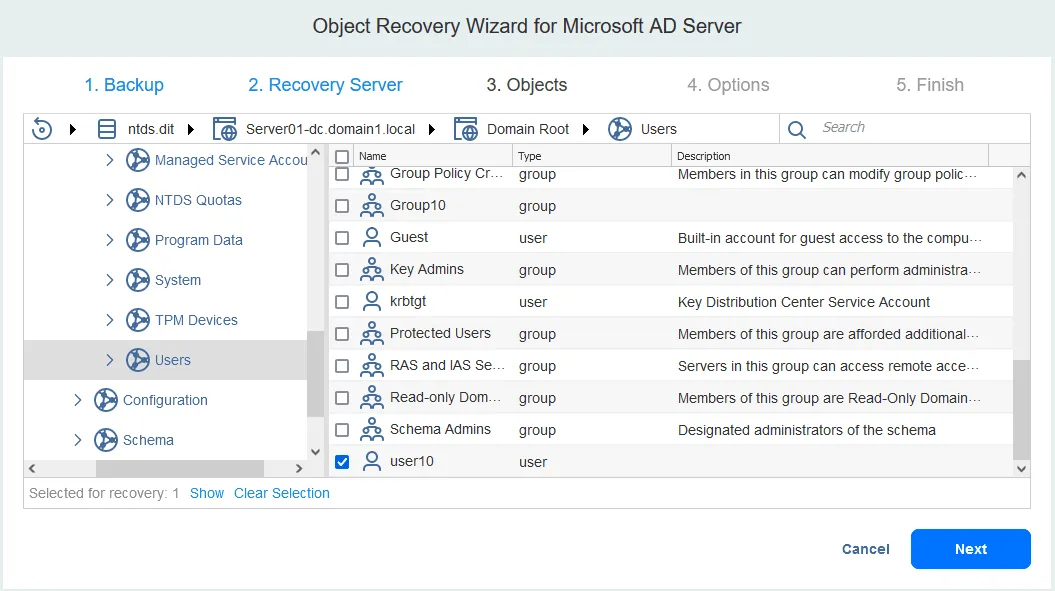
- Options. We select to Export the selected Active Directory objects we want to restore. We want to export objects to the local folder on the recovery server and all our settings on this step are as follows.
- Recovery type: Export
- Export location: Local folder on recovery server
- Local path: C:\Temp\AD-Recovery
- Overwrite behavior: Rename recovered item if such item exists
Click Recover and Proceed to continue.

Wait until a recovery job is finished and the selected Active Directory objects are exported to the destination location.
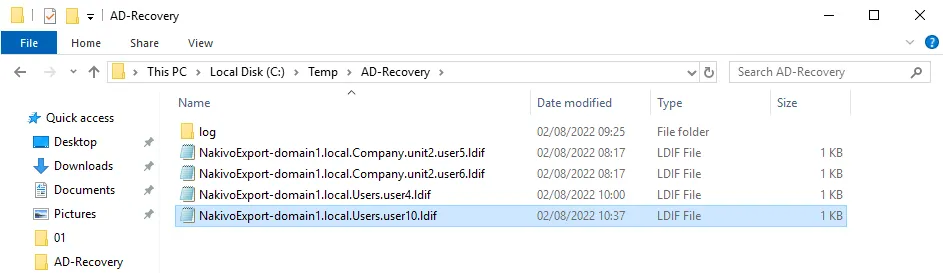
Once the export process has finished, we can see our Active Directory objects in the C:\Temp\AD-Recovery folder. Each AD object is exported as a separate LDIF file.
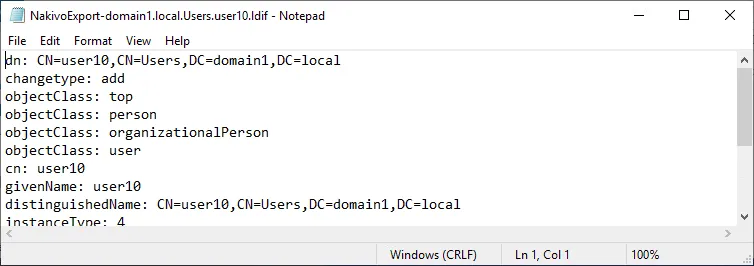
An LDIF file is an editable text file that contains the information about the exported Active Directory object. Let’s try to restore deleted AD user, which is user10 in our case. You can see an example of the LDIF file content in the screenshot below.
Ldifde is the native Windows Server utility that can export/import Active Directory objects to/from .LDIF files. However, you must meet some requirements to use this tool, such as installing a Certification Authority (CA) server role.
Preparing Windows Server for restoring AD objects
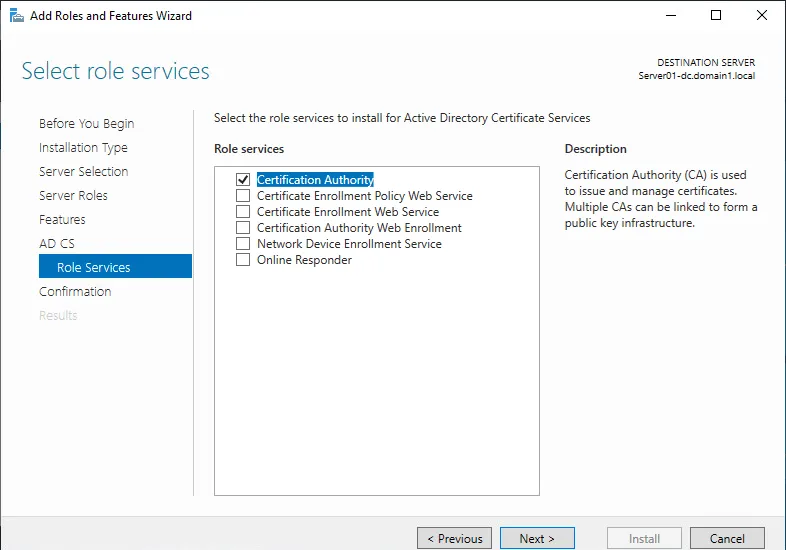
Before you start, make sure that the Active Directory server has a CA role. It will be necessary for a secure LDAP connection. You can enable this Role in Server Manager by using the Add roles and features wizard. The workflow of adding this role is standard and we will focus only on the main steps of adding this role.
Select the Active Directory Certificate Services checkbox at the Server Roles step of the Add roles and features wizard.

Select Certification Authority in the Role Services step.
After completing all steps of the wizard, you need to perform a post-deployment configuration for the installed role.
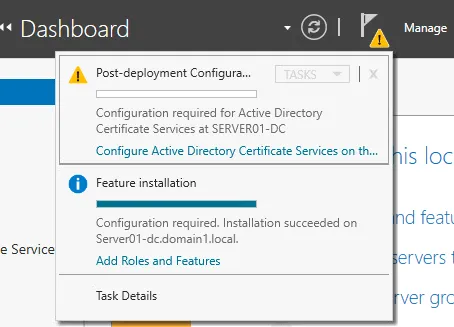
Follow the standard steps of the AD CS configuration wizard:
- Credentials. Enter the credentials of a domain administrator (domain1\administrator in our case)
- Role Services. Make sure that Certification Authority is selected.
- Setup type. Select Enterprise CA.
- CA type. Select Root CA.
- Private key. Select Create a new private key.
- Cryptography. You can use default settings.
- CA name. Ensure that the name of CA is correct for your domain.
- Validity period. Set a period, for example, 5 years.
- Certificate database. Use default settings.
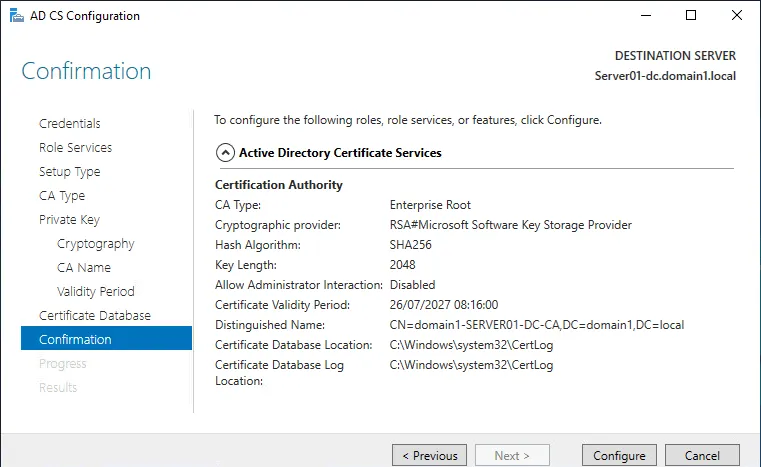
Reboot the Windows server for the changes to take effect after finishing the AD CS configuration wizard.
Finishing AD recovery
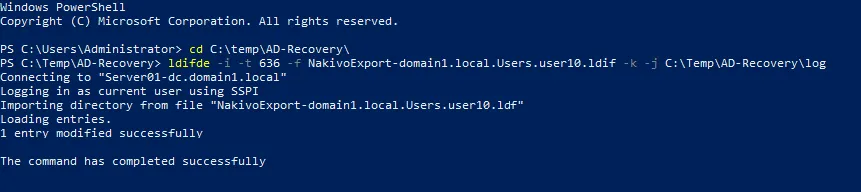
Now we can use the command-line Ldifde tool in Windows PowerShell to restore deleted objects in Active Directory by importing them. We have exported them from a backup before, as you remember.
- Open PowerShell as administrator.
- Go to the directory where LDIF files of recovered items are located:
cd C:\Temp\AD-Recovery
- The command to import the AD objects from the LDIF file to restore them is as follows:
ldifde -i -t 636 -f filename.ldif -k -j logfolder
Where filename.ldif is the path to ldif file, and logfolder is the path to the folder where process logs will be saved. The -t 636 option means the TCP port 636 that is used for secured connection with the AD server. In our case, the command to restore deleted AD objects by importing them is:
ldifde -i -t 636 -f NakivoExport-domain1.local.Users.user10.ldif -k -j C:\Temp\AD-Recovery\Log
We are restoring user10. The example of PowerShell console output if the import is successful is displayed in the screenshot below.
Note: If you use the ldifde tool to export Active Directory objects manually, use filters. Not all attributes for AD objects can be imported by the administrator. Some attributes are protected and the rights to import these attributes belong only to the system. In this case, you can see error messages such as The attribute is owned by Security Account Manager (SAM), problem 5003 (WILL_NOT_PERFORM) and others when trying to import objects from LDIF files.
If you export an object such as a user or group with all attributes, you may need to manually remove some attributes such as objectGUID, objectSid, sAMAccountType, and others in the .LDIF file by deleting the appropriate lines before importing. Otherwise, you cannot import the object with the ldifde tool.
Keep in mind these aspects when using the export/import functionality of the ldifde tool for backup and recovery without a dedicated backup solution. It is better to use a specialized backup solution to protect the entire Active Directory server or virtual machine with the ability to perform full recovery and granular recovery of AD objects quickly and easily.
Conclusion
The reliable way to protect data and applications, including Active Directory with all the items it contains, is performing proper data backup regularly and storing backups using a rational retention policy. A specialized backup solution helps in this case. NAKIVO Backup & Replication is the universal data protection solution that is application-aware and supports full restore and granular recovery of files and objects, including in Active Directory.