Performing Hyper-V USB Passthrough: A Step-By-Step Guide
Virtualization technology enables the abstraction of computing, storage, and networking resources, meaning that you can create a virtual version of your physical hardware. However, in some cases, you might need to connect to physical resources, such as USB devices, from inside a virtual machine (VM). In today’s blog post, we’re going to discuss how to perform Hyper-V USB passthrough in order to enable VM access to any local resources of your choice.
Hyper-V USB passthrough is generally used when you need to copy and paste critical files to and from a VM. However, when transferring data from one location to another, you need to be sure that sensitive information is securely protected and can be restored in case the Hyper-V USB passthrough operation fails. For this purpose, you can use NAKIVO Backup & Replication, which is a fast, reliable and cost-effective data protection solution capable of protecting your entire virtual infrastructure with minimum input on your part.

What Is Hyper-V USB Passthrough?
The USB passthrough functionality allows you to access the USB device from within a VM. Unfortunately, USB passthrough is not natively supported in Hyper-V environments, but you can still perform Hyper-V USB passthrough using the following approaches:
- Enable Enhanced Session Mode
- Run the Remote Desktop Protocol (RDP) session
- Install network-based USB solutions
- Install software-based USB solutions
Below, I am going to describe how the first two approaches work, since they do not require the installation of a third-party software, and can be manually configured in a few steps.
Requirements for Hyper-V USB passthrough
In a nutshell, to enable the VM access to a local resource, you need to meet the following requirements:
- The Enhanced session mode policy and Enhanced session mode settings should be enabled. Enhanced Session Mode is only supported on generation 2 VMs.
- For Virtual Machine Connection (VMConnect) to work, your computer should run Windows Server 2016, Windows 10, Windows 8.1, Windows Server 2012 R2, Windows Server 2012, Windows 8.
- The VM from which we want to connect to a USB drive must run Windows Server 2016, Windows Server 2012 R2, Windows 10, or Windows 8.1.
- Remote Desktop Services must be enabled on the VM which you would like to connect to.
Hyper-V USB Passthrough with Remote Desktop Connection
To perform Hyper-V USB passthrough with Remote Desktop Connection, you should do the following:
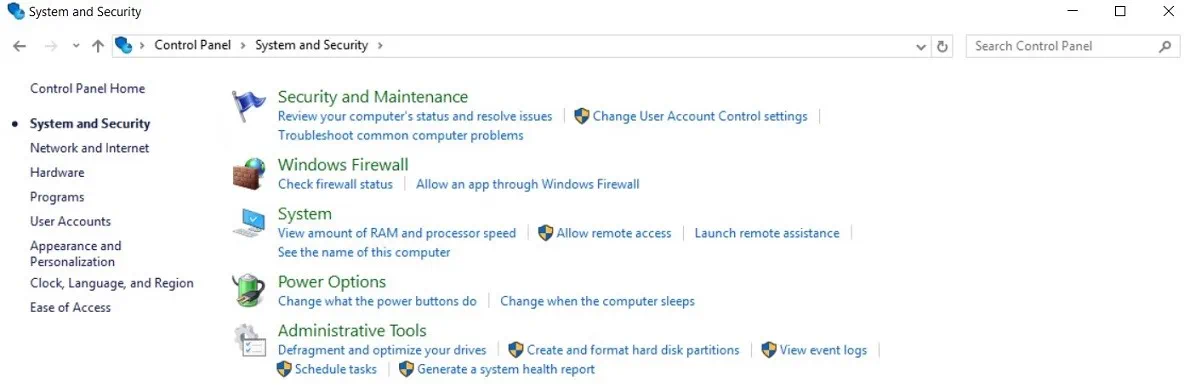
- Start by enabling remote desktop connections on your VM. For this purpose, connect to the VM and open Remote System Settings in the Control Panel (Control Panel> System and Security> Allow remote access).
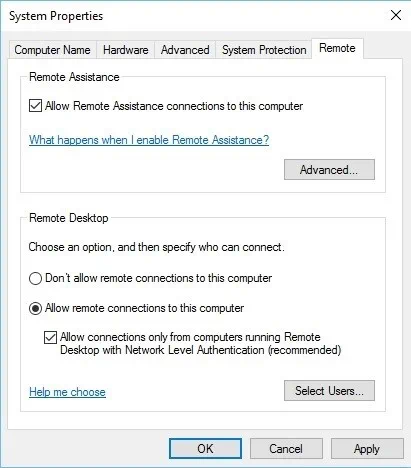
- The System Properties menu will open. Check the Allow Remote Assistance connections to this computer Ensure that the Allow remote connections to this computer box is also checked. Click OK.
- Now, we can connect to this machine remotely. Connect to a USB device through enabling a RDP session.
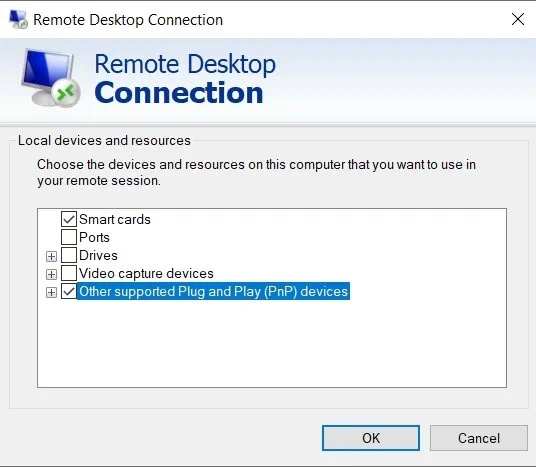
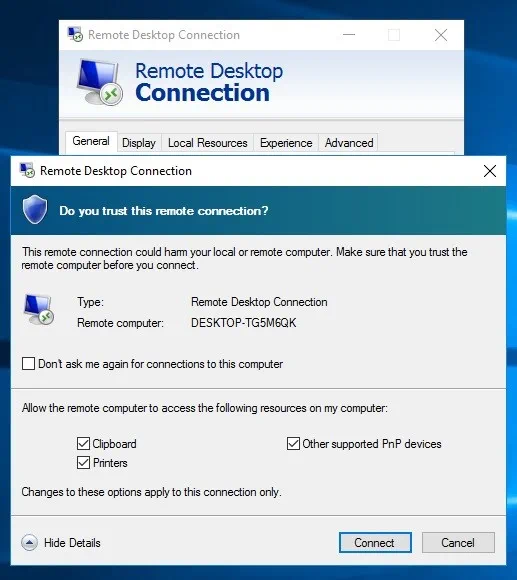
- Run the mstsc.exe command to open the Remote Desktop Connection window. Click Show Options, select the Local Resources tab and press the More button.

- In the new menu that opens, you can choose which devices and resources on this computer you wish to use in a remote session. USB devices fall under the Plug and Play devices category. Check the corresponding box and click OK.
- Lastly, click Connect to initiate a RDP session. Here, you will be asked to confirm your selection once again. Click Connect if everything is OK and you trust the remote computer.
- Note that this approach requires network connectivity between the computer to which a USB device is connected and the guest OS.
Hyper-V USB Passthrough with Enhanced Session Mode
Enhanced Session Mode enables redirection of local devices and resources to a virtual machine session using the Virtual Machine Connection tool. If your computer runs Windows 10 or Windows 8.1, Enhanced Session Mode will be available by default. However, if your Hyper-V host runs Windows Server 2012 R2 or Windows Server 2016, you have to manually enable the Enhanced Session Mode functionality. Note that using this approach, you don’t need to ensure network connectivity to the guest OS, only to the host.
To perform Hyper-V USB passthrough with Enhanced Session Mode, you need to take the following steps:
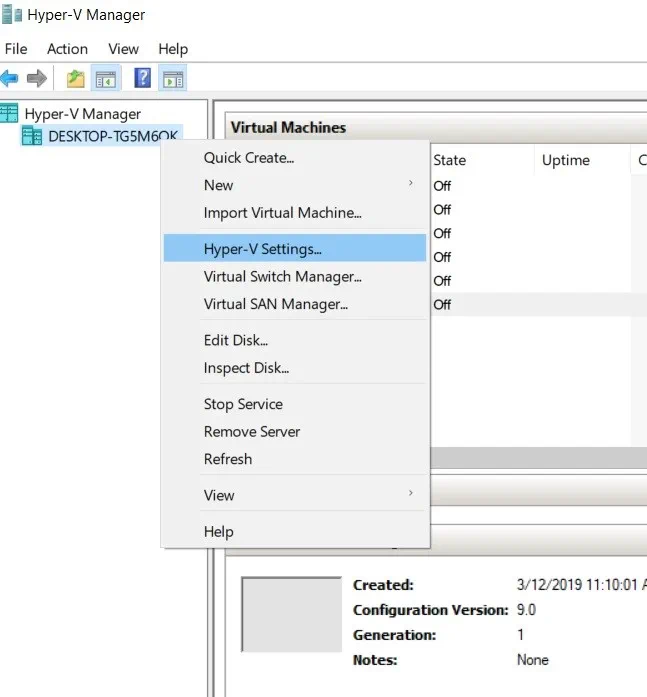
- Connect to a computer hosting the VM.
- Open Hyper-V Manager. Right-click the host’s name and select Hyper-V Settings.
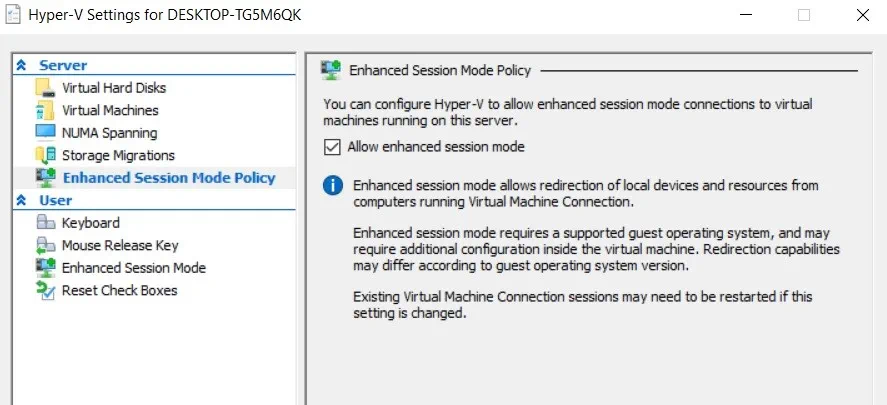
- In the Server section, click Enhanced Session Mode Policy and check the box Allow enhanced session mode.
- In the User section, click Enhanced Session Mode and check the box Use enhanced session mode.

- Click OK to save changes.
- The next stage is to choose the local resource you would like to connect to. Local resources include printers, local drives, audio devices, and USB drives, which constitute the main topic of our blog post. For this purpose, you should do the following:
- Open Hyper-V Manager and start the VM by double-clicking its name.
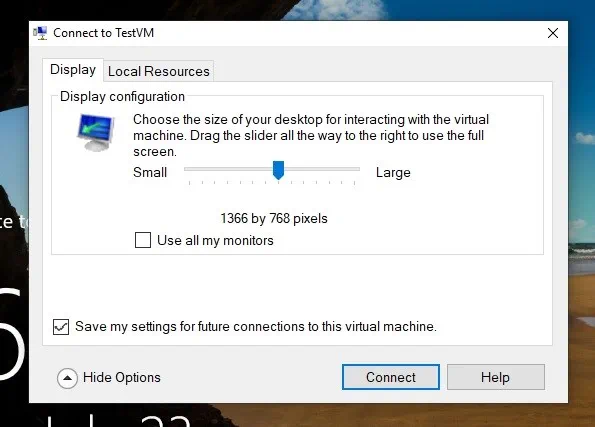
- Before you can log into your VM, a configuration window will pop up. Click Show Options to extend the set of configurations for future connections to this VM.

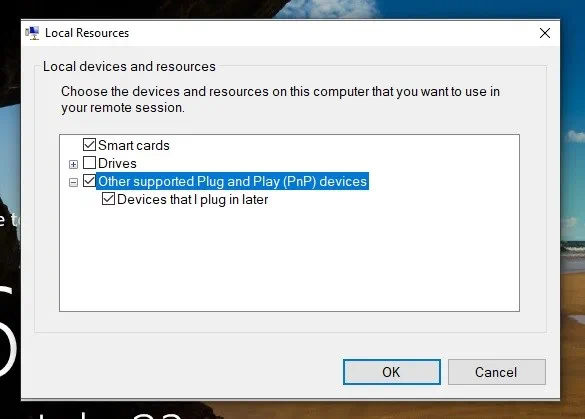
- Select the Local Resources section. Under Local devices and resources, click More.
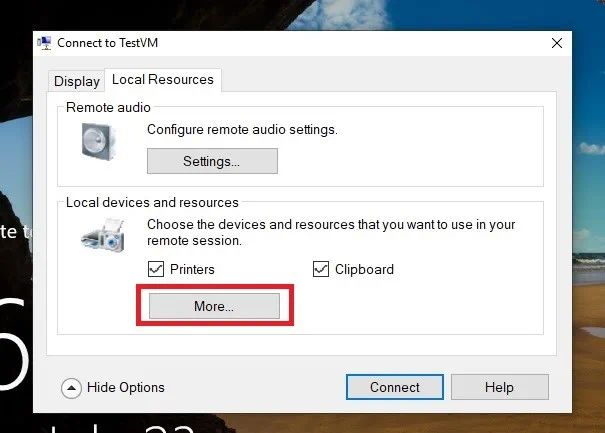
- If you want to enable VM access to a local USB device, check the box Other supported Plug and Play (PnP) devices, as well as the box Devices that I plug in later beneath it. Click OK.
- In the Display section, you can also select Save my settings for future connections to this virtual machine. Click Connect if you wish to implement any changes.
With these two approaches, you can make a USB device available for use within any Hyper-V VM that you choose.
Data Protection with NAKIVO Backup & Replication
NAKIVO Backup & Replication is among the best backup software for virtual, physical, and cloud environments. The solution can provide you with the following data protection options:
- Create agentless, image-based, incremental, and application-aware backups and replicas of running Hyper-V, VMware, AWS EC2, and Nutanix AHV VMs.
- Save up to 1,000 recovery points for each VM backup and rotate them on a daily, weekly, monthly, and yearly basis using the GFS retention scheme.
- Swap data is automatically excluded from VM backups, backed-up data also gets deduplicated and compressed, which can significantly reduce storage space requirements.
- Create copies of VM backups and store these copies offsite or in the Cloud (Azure or AWS), eliminating a single point of failure.
- Automate and orchestrate disaster recovery activities by creating Site Recovery (SR) workflows, each of which is designed to address a specific DR scenario.
- Run non-disruptive recovery testing of existing SR jobs, allowing you to verify that your DR plan is effective and that expected recovery objectives can be met. If any issues have been detected, you can easily update a SR job to meet your demands.
- Put data protection activities on autopilot by setting up policies that can regularly scan your virtual infrastructure and automatically add/remove the VMs which match the established policy rules.