Installing Windows 10 as a Guest Operating System in VMware Fusion
Mac owners often need to run their favorite Windows applications that are not supported on macOS. However, it is possible to do so if Windows is installed on the Mac computer. There are three common methods to run Windows on a Mac computer: use Parallels Desktop, install Windows on the Boot Camp partition, or install Windows on a VirtualBox VM or VMware Fusion VM.
This blog post explains how to install Windows 10 as a guest OS on a macOS virtual machine using VMware Fusion and combine the advantages of both Windows and macOS operating systems.

Requirements
Before proceeding with installing VMware Fusion, check system requirements. In this section, I list the requirements for VMware Fusion 12, the latest version at the time of writing this blog post. If your macOS version is older than 10.5 Catalina, install an older VMware Fusion version supported by your macOS.
Requirements for VMware Fusion 12:
- A Mac computer manufactured in 2011 or later (except 2012 Mac Pro Quad Core with the Intel Xeon W3565 Processor); 2010 Mac Pro Six Core, Eight Core, and Twelve Core with a graphics card that supports Metal.
- Processor (CPU) architecture must be Intel x86-64
- 4 GB of memory, but we recommend at least 8 GB of memory to install VMware Fusion on macOS. Keep in mind that you need more RAM to run VMware guest operating systems. Windows 10 running as a guest OS requires at least 4 GB of RAM.
- 750 MB of free disk space to install VMware Fusion and additional disk space to store virtual machine files.
- Your macOS must be compatible with the VMware Fusion version you are going to install. VMware Fusion 12 can be installed on macOS 10.15 Catalina and macOS 11.0 Big Sur.
- The ISO installation image of Windows 10.
Preparing the Environment
I’m using macOS 10.15 Catalina as the host operating system and Windows 10 20H2 Professional x64 as the guest operating system in the tutorial.
What is a guest operating system? The difference between host and guest operating systems is that a host OS is installed on the hardware, and a guest OS is running on a virtual machine that uses virtualized hardware. I’m using VMware Fusion 12.1.0 as a VMware hypervisor to run a Windows 10 VM on macOS.
You can download the VMware Fusion 12 installer from the official VMware website.
You can download the installation ISO image of Windows 10 from the Microsoft website.
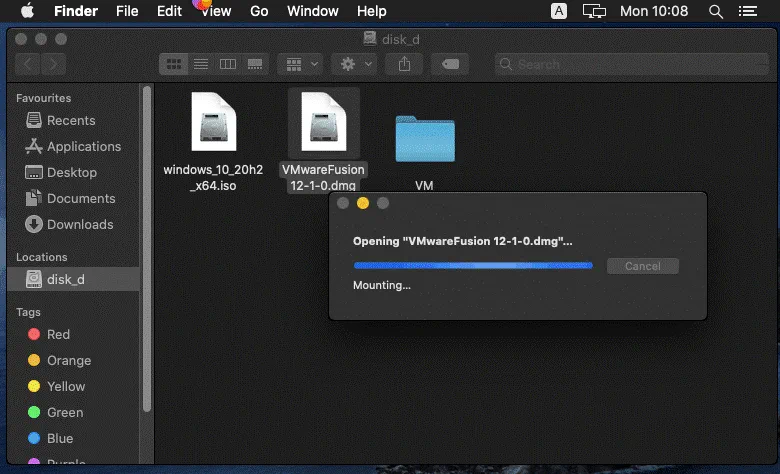
In my case, I have a separate disk partition to store installation files and virtual machines on Mac. The name of this disk partition is disk_d. You can create a separate partition or create custom folders in your home user folder to store installation files and virtual machines.
For convenience, I’ve renamed installation files to avoid using long names. In my tutorial, the names of the installation files are:
VMware Fusion: VMwareFusion12-1-0.dmg
Windows 10: windows_10_20h2_x64.iso
Now we are ready to start installation and configuration.
Installing VMware Fusion
Boot macOS on your Mac. Locate the VMware Fusion installation file in Finder, and double click this file to open the installer (in my case – VMwareFusion12-1-0.dmg). Wait until the installer opens.
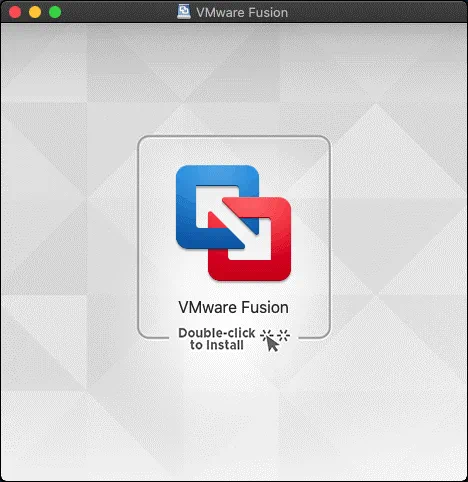
When you see the VMware Fusion installer window, double click the corresponding icon to install VMware Fusion.
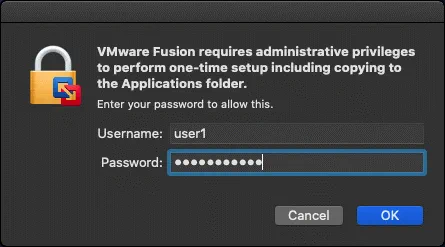
Enter the credentials of your macOS user account to grant administrative privileges to the installer, and hit OK to continue.
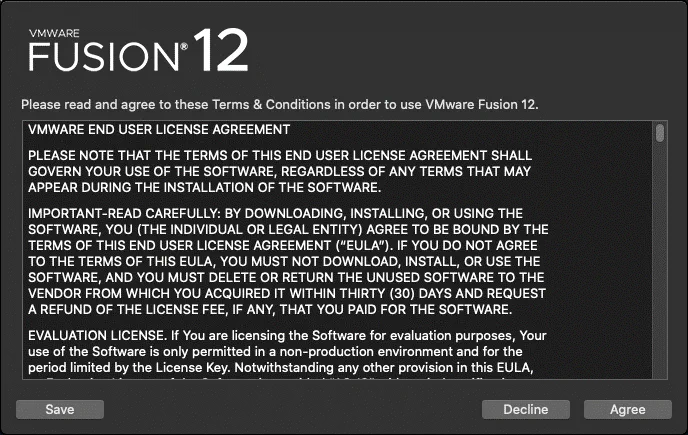
Read the End User License Agreement (EULA), and click Agree to continue.
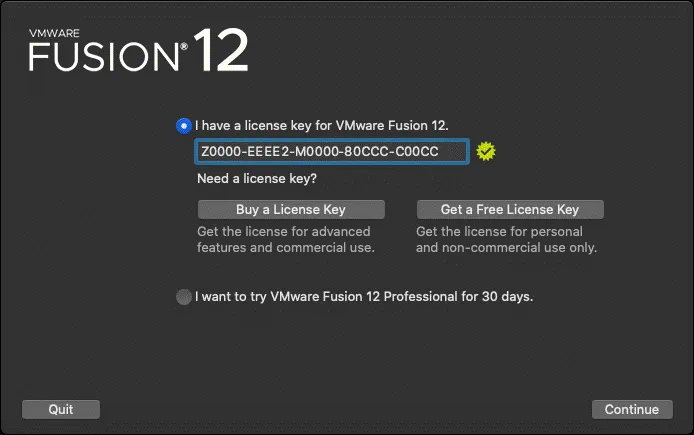
Define the license options to install VMware Fusion on macOS. If you don’t have a license key, select the second option: I want to try VMware Fusion 12 Professional for 30 days.
If you have a license key for VMware Fusion or VMware Fusion Pro, select the option I have a license key for VMware Fusion 12 and enter your license key. If the key is valid, the corresponding green icon appears. You can also enter a license key after finishing the installation in the graphical VMware Fusion user interface. In my case, I’m using a license key for VMware Fusion Pro.
Click Continue to proceed.
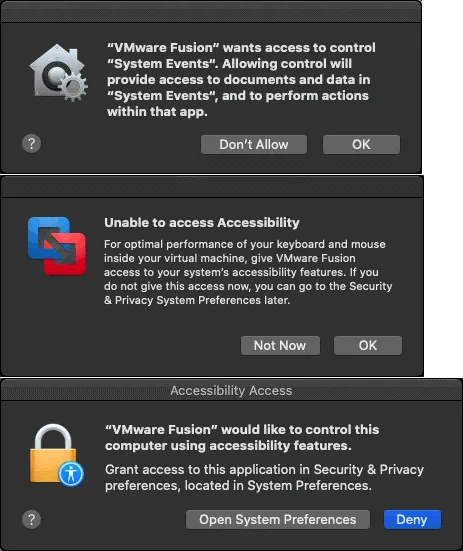
The macOS security notification messages pop up. You have to allow all access needed for macOS VMware Fusion to work properly.
“VMware Fusion” wants access to control “System Events”. Allowing control will provide access to documents and data in “System Events”, and to perform actions with that app.
Click OK.
Unable to access Accessibility. For optimal performance of your keyboard and mouse inside your virtual machine, give VMware Fusion access to your system’s accessibility features. If you do not give this access now, you can go to the Security & Privacy System Preferences later.
Click OK.
“VMware Fusion” would like to control this computer using accessibility features. Grant access to this application in Security & Privacy preferences, located in System Preferences.
Click Open System Preferences.
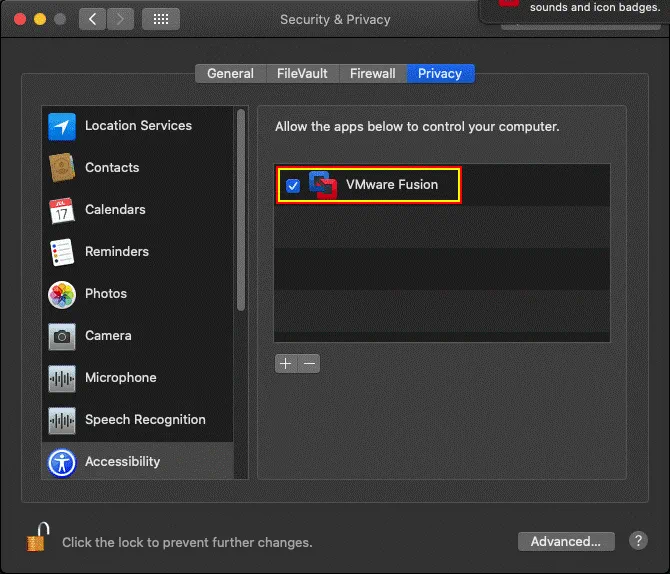
Once the Security & Privacy window opens, in the Privacy tab you can see that VMware Fusion is not selected in the list of allowed apps and is inactive. You should also see a request to enable VMware Fusion notifications. Click Allow because important information may be displayed in notifications when you work with VMware Fusion. In order to provide VMware Fusion with access, click the lock to make changes in the privacy settings (this icon is located in the bottom left corner of the window).
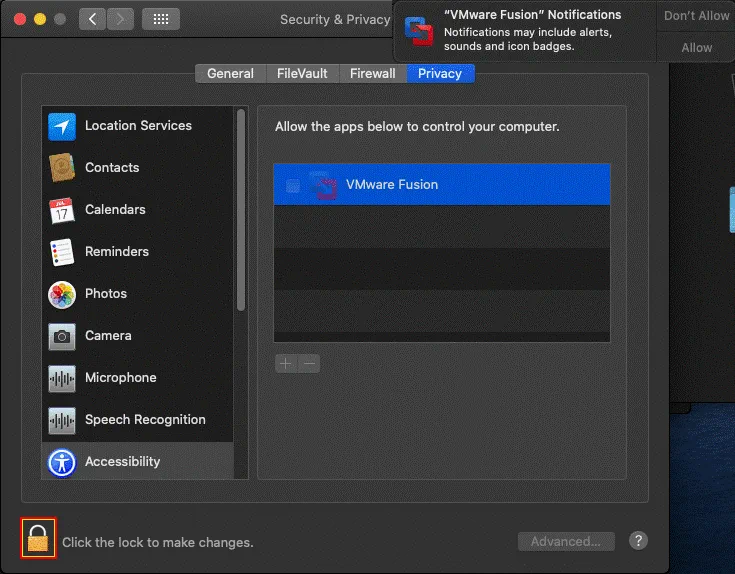
Now the privacy settings are unlocked. Select VMware Fusion in the list of allowed apps (select the corresponding checkbox). Now you can close the Security & Privacy settings window.
VMware Fusion is now installed, and you can run the application.
Creating a VM and Installing a VM Guest OS
Open VMware Fusion in the Launchpad or click the icon in the Dock. In the main window of VMware Fusion, you can see a big area with the text: Install from disc or image. This is what you need to start creating a virtual machine and installing a guest operating system. Open the folder containing the Windows 10 installation image in Finder, then drag and drop the Windows 10 ISO image to this area of the VMware Fusion window.
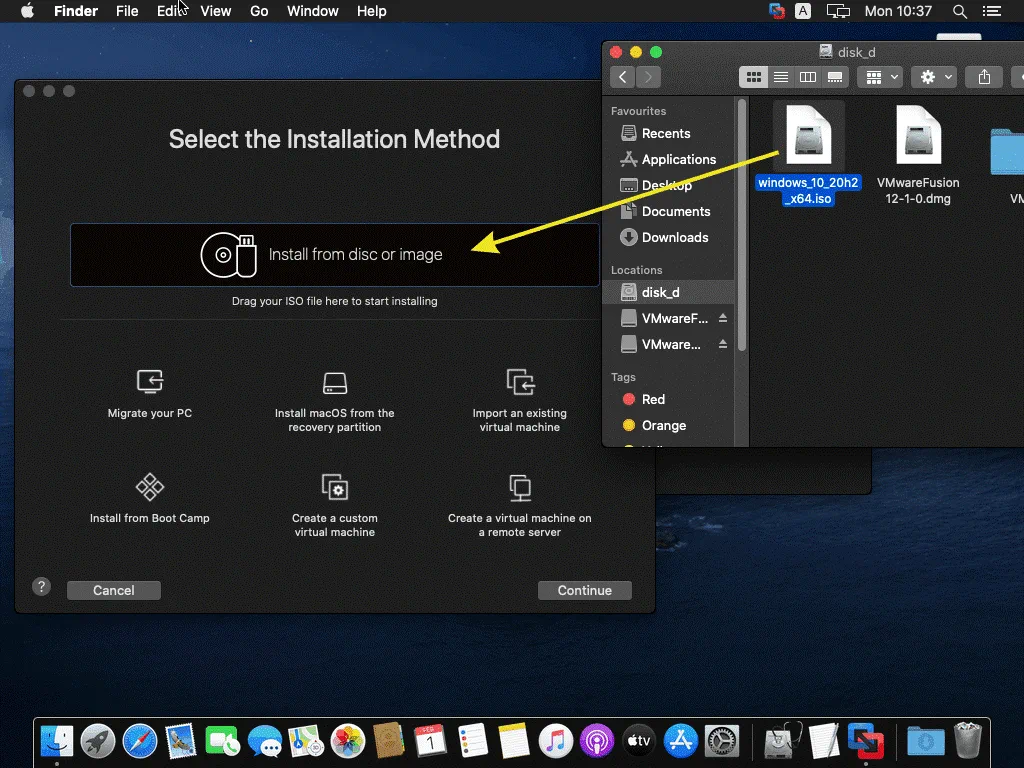
Create a New Virtual Machine. A new VM installation wizard opens in VMware Fusion. The ISO installation image is already selected after the drag and drop.

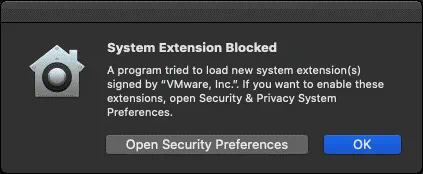
System Extension Blocked. The alert message is displayed.
A program tried to load new system extension(s) signed by “VMware, Inc.”. If you want to enable these extensions, open Security & Privacy System Preferences.
Click Open Security Preferences to allow access for VMware Fusion. Otherwise, you cannot continue the configuration of a new VM.
Click the lock icon to unlock access to the settings just as you did before.
Enter your credentials to unlock Security & Privacy preferences, and click Unlock.
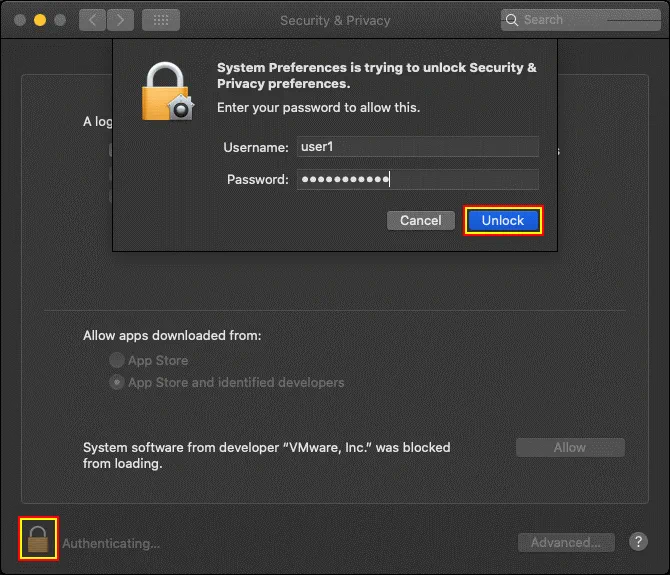
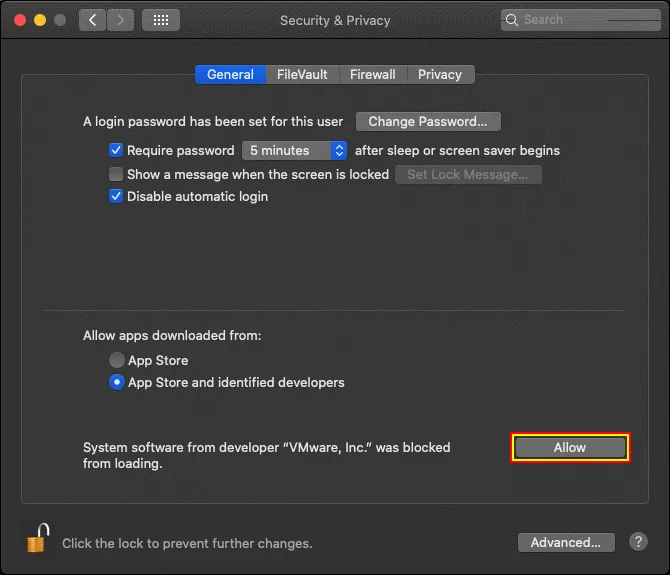
The following message is displayed: System software from developer “VMware, Inc.” was blocked from loading. Click the Allow button near this message to unlock VMware Fusion and allow the required access. Then you can close the Security & Privacy window.
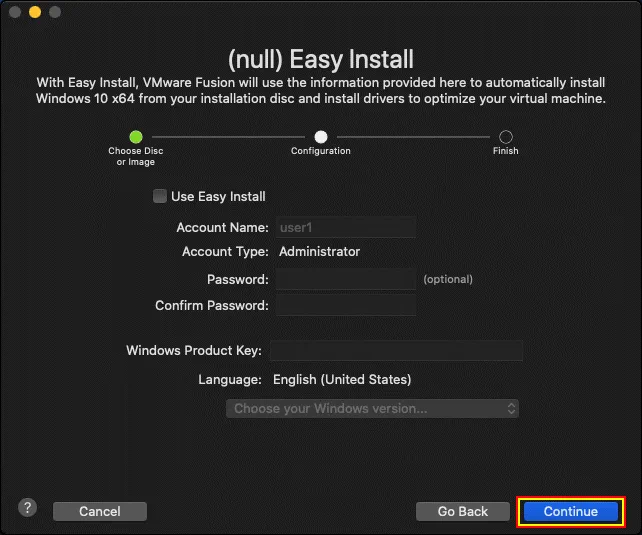
Now you can go back to the VMware Fusion window and the new VM installation wizard. By default, VMware Fusion suggests using Easy Install to create a VM and install a guest operating system. Easy Install requires minimum user interaction during the installation process, but in this case, a user has the lowest level of control. You can enter some settings such as a user name, password, the Windows product key, select the needed language. Then the entire process of VM creation and guest operating system installation is completed automatically by VMware Fusion.
In my example, I’m not using Easy Install to fully control the VM creation and guest operating system installation process (and for a better understanding of configuration). Once the needed option is selected (we unselect the Use Easy Install checkbox), click Continue.
If you use Easy Install, then you can select one of the two provided options:
More Seamless. If you use this option, Mac user folders such as Desktop, Documents, and Downloads are shared between the host OS and guest OS with write permissions for guest Windows users. The Seamless option provides more convenience, including the ability to use the Unity mode. You should use antivirus software because if a guest OS is infected, the shared files can be corrupted on the host OS (and vice versa). Read about ransomware to learn more.
More Isolated. This option is better from the security point of view. User folders are not shared automatically, but you can drag and drop files between the host OS and guest OS without violating the isolation.
You can select one of these two options of Mac integration settings only at the step of creating a virtual machine. As I’m not using Easy Install, I explain how to configure a VM created with the More Isolated option.
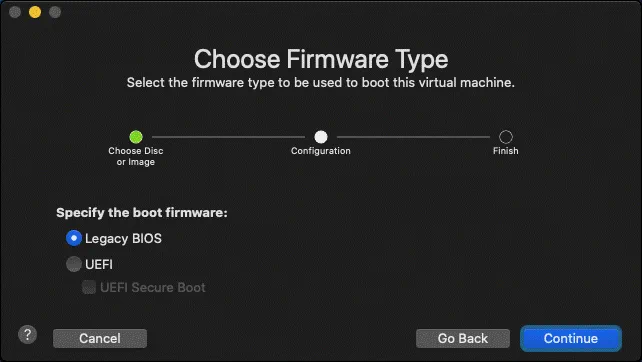
Choose Firmware Type. Select Legacy BIOS or UEFI depending on your needs. Select BIOS to use MBR (Master Boot Record) or select UEFI to use GPT (GUID Partition Table) for disk partitioning. We use BIOS for our Windows 10 VM we are creating now. Hit Continue.
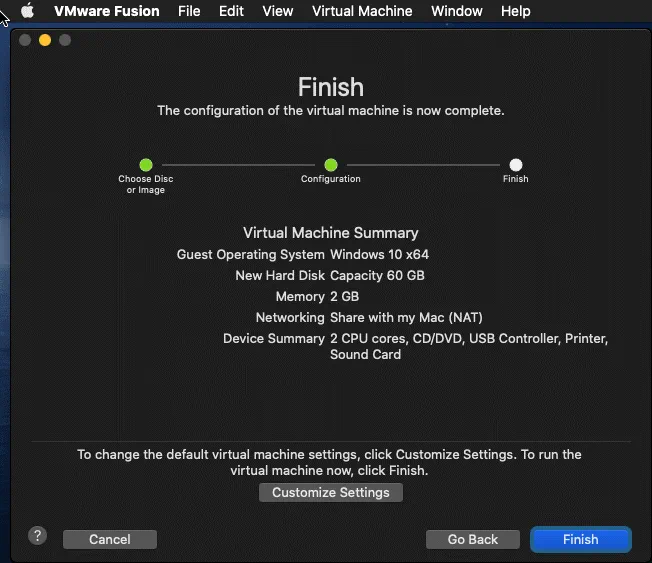
Finish. The configuration of the virtual machine is now complete. Click Customize settings to define the path to store VM files before you click the Finish button.
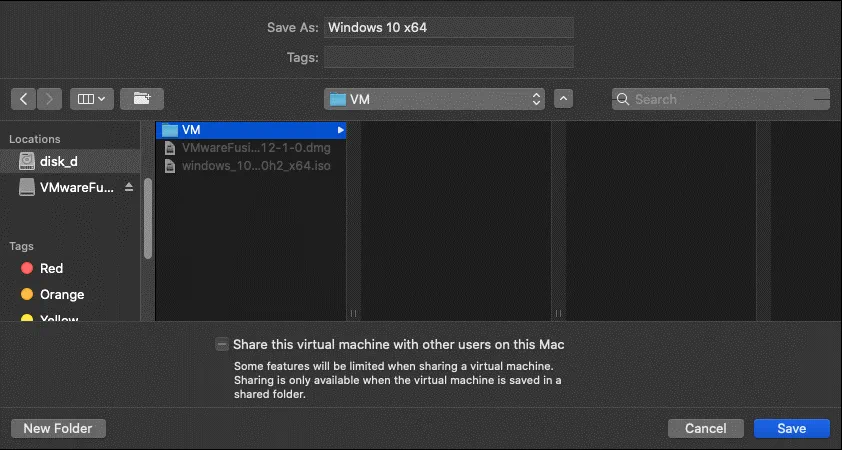
Select a folder to store your VM files. In my case, I will store VM files in /Volumes/disk_d/VM/
Note: In VMware Workstation, you can select a folder to store VM configuration files and virtual disk files at different steps of the new VM wizard with the ability to use different folders to store these files. However, in VMware Fusion, all VM files and virtual disks are automatically stored in one selected folder. The default location to store VM files in macOS is your_home_directory/Virtual Machines/
Hit Save to save VM location, and then click Finish to finish VM creation and close the wizard.
Probably you have noticed that unlike VMware Workstation and VMware ESXi, there were no virtual hardware configuration options in the new VM creation wizard. In order to configure VM settings, including virtual hardware, click Virtual Machine > Settings in VMware Fusion right after creating a new VM and closing the New VM wizard.
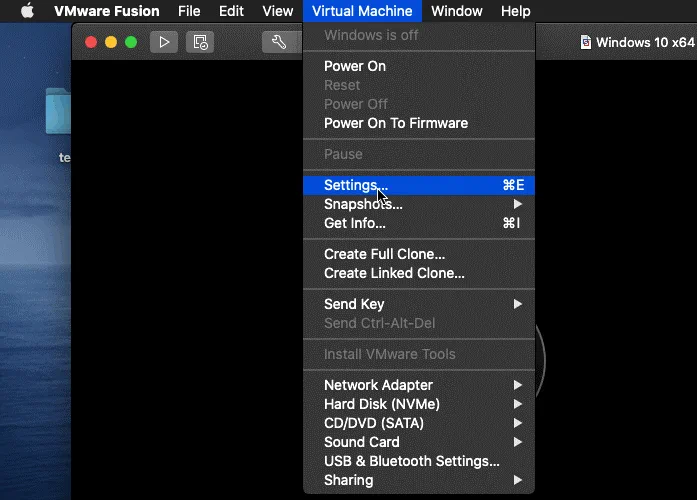
VM settings are displayed in a separate window. You can configure the virtual disk size (60 GB are provisioned for a Windows 10 VM by default). Let’s configure processor and memory settings for our Windows 10 VM by clicking the Processors & Memory icon.
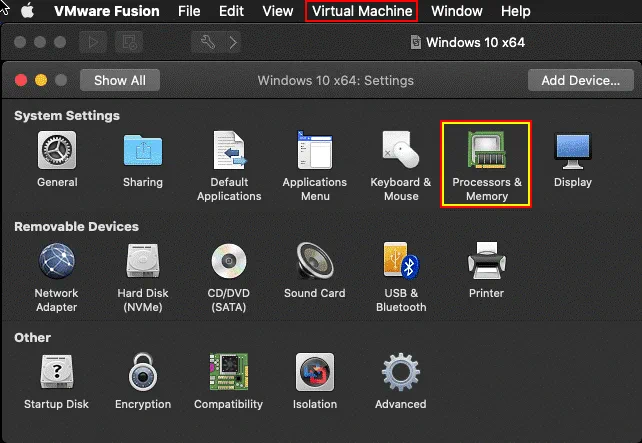
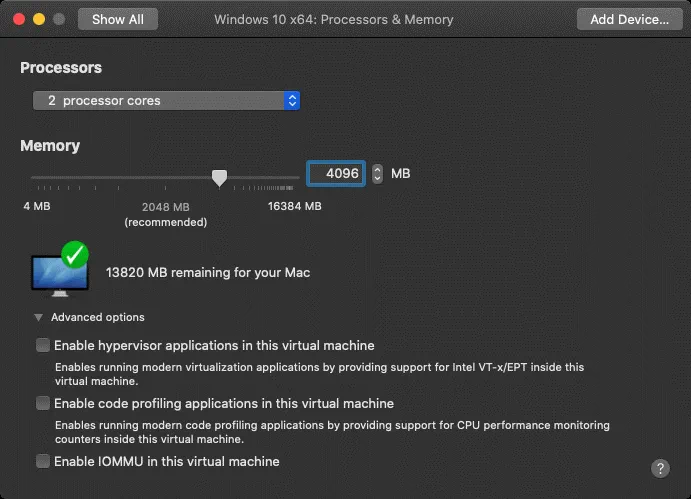
Select 4096 MB of memory and 2 processor cores for a VM to run Windows 10 (this configuration may vary). You can expand advanced options to enable nested virtualization and other useful features for your VM. Close the window after finishing configuration.
Once you have finished configuring a virtual machine, including virtual hardware, start the VM, boot from the Windows 10 installation ISO image selected automatically with the current configuration, and install Windows 10 as a guest operating system on the VM. Click the Play button to start a virtual machine.

You can see error messages after an attempt to start a VM.
Could not open /dev/vmmon: Broken pipe. Please make sure that the kernel module ‘vmmon’ is loaded.
Transport (VMDB) error – 14: Pipe connection has been broken.

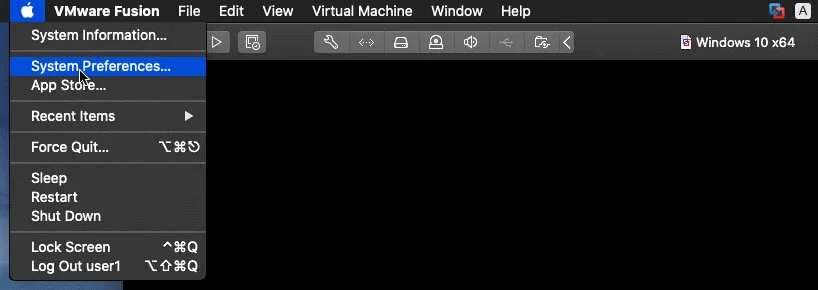
These errors are displayed due to the security configuration of macOS. Issues related to macOS security settings require manual configuration. In order to fix this issue and avoid these errors when starting a VM, go to Security & Privacy settings once again. Click the Apple button, and click System Preferences.
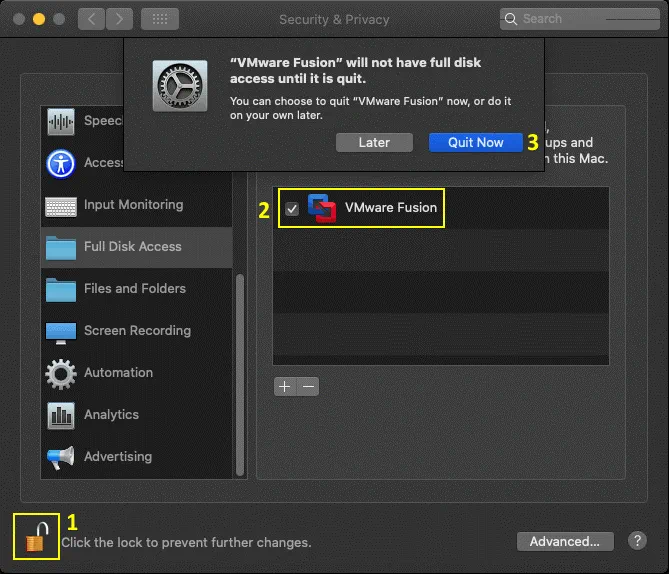
In the Security & Privacy window, select the Privacy tab, then select Full Disk access in the left pane of the window. Click the lock icon to unlock settings (similarly as you did multiple times before).
Once settings become active, select the checkbox near VMware Fusion to allow full disk access for this virtualization application. If VMware Fusion is running now, a notification message is displayed:
“VMware Fusion” will not have full disk access until it is quit.
You can choose to quit “VMware Fusion” now or do it on your own later.
Click Quit Now to close VMware Fusion and apply security settings when running VMware Fusion next time.
Open VMware Fusion, and start your new VM once again. Now the VM should start correctly without displaying any errors.
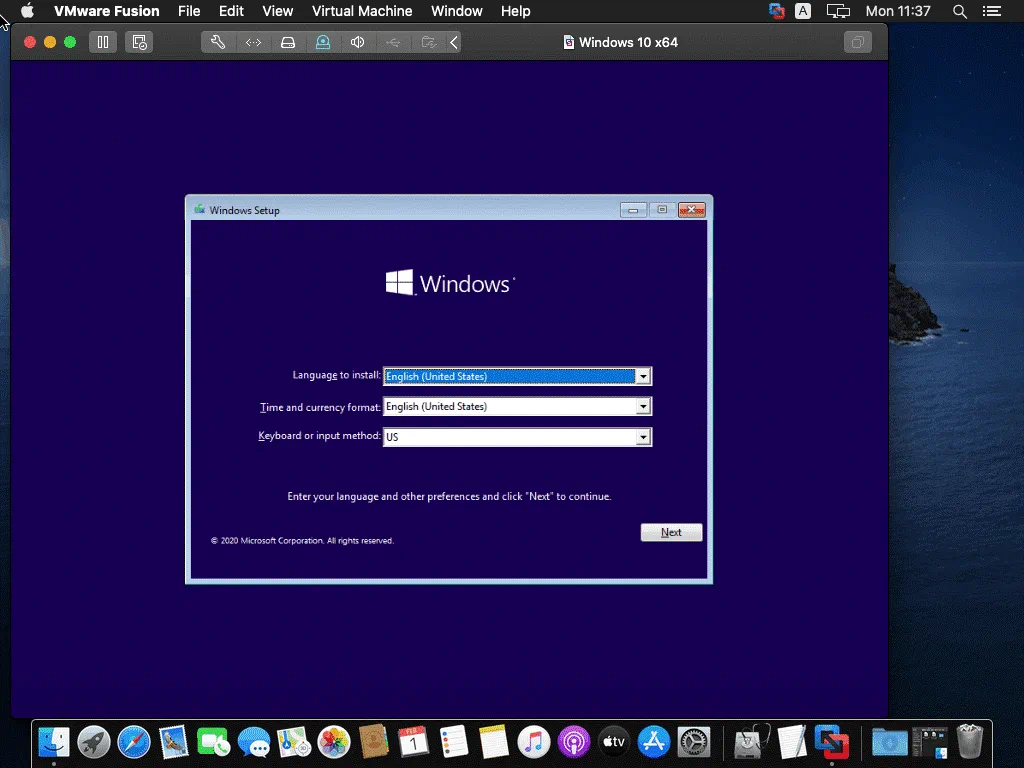
Once the VM is booted from the Windows 10 installation ISO image, you should see the Windows setup GUI (graphical user interface). Installation of Windows 10 as a guest operating system on VMware Fusion is similar to the installation of Windows 10 on a physical machine. We disconnect the machine from the internet until finishing the installation of Windows 10.
Select a language to install, time and currency format, and keyboard or input method. We use English (United States) in this example. Click Next at each step to continue.
Activate Windows. If you have bought the Windows 10 license, you can enter the product key now. If you don’t have a license key, click I don’t have a product key to select the trial mode and continue.
Select the Operating system you want to install. Select the needed Windows 10 edition. I select Windows 10 Pro in my case.
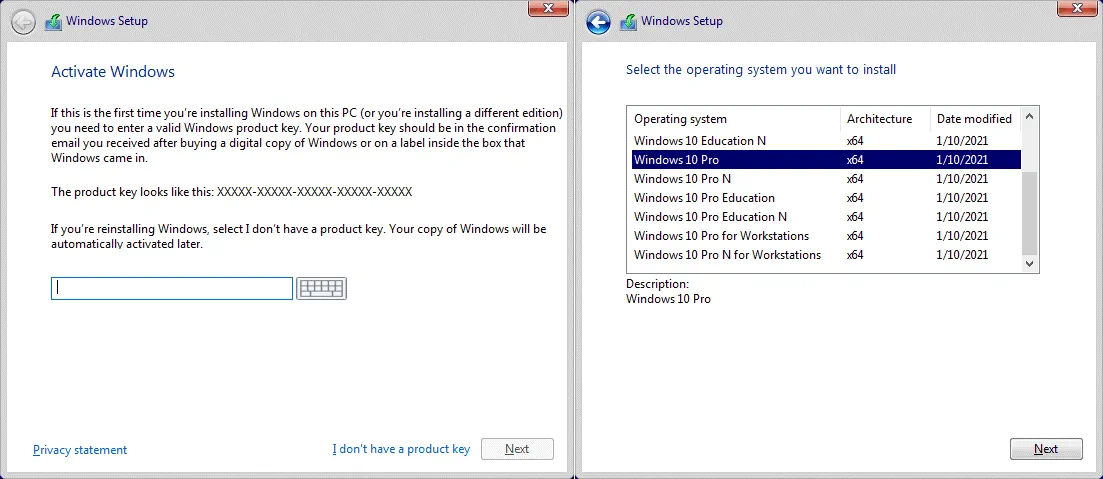
There is a difference between Windows 10 editions and Windows 10 N or KN editions (N – Europe, KN – Korea). Due to the European anti-competitive practices, Microsoft released special Windows 10 N editions for Europe marked with the N letter. These Windows 10 N editions don’t include Windows Media Player and related features. Windows 10 editions (without N in the name) include Windows Media Player, Voice Recorder, Music, Video, and Skype.
Windows 10 N and KN editions are provided without media technologies. You can download and install these multimedia components from the Microsoft website manually (a special Media Feature Pack is provided) after installing Windows 10 on your computer or virtual machine.
The product keys for Windows 10 Pro and Windows 10 Pro N are different (this rule is true for other Windows 10 and Windows 10 N editions).
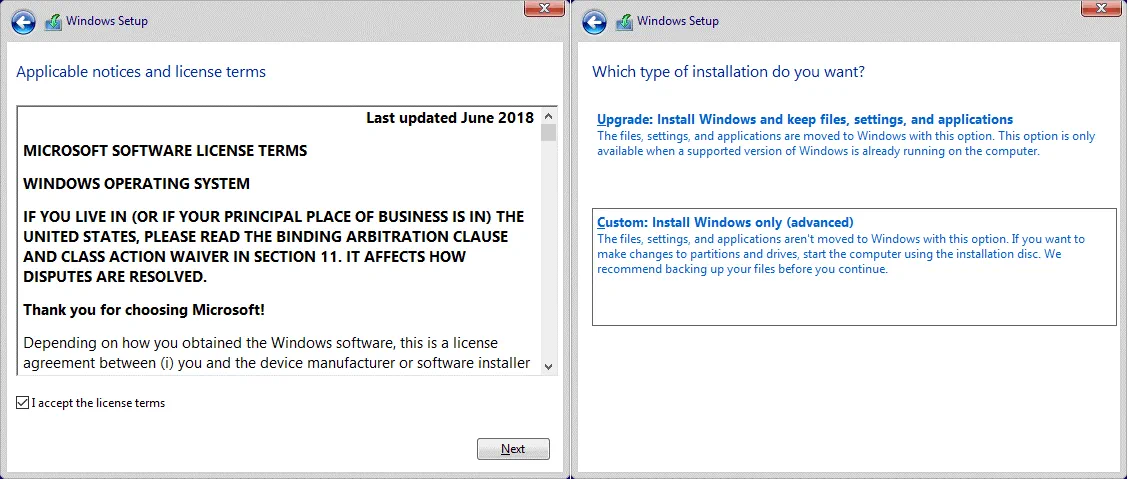
Applicable notices and license terms. Read the license agreement and select the I accept the license terms checkbox.
Which type of installation do you want? Select Custom: Install Windows only (advanced) to perform a clean installation.
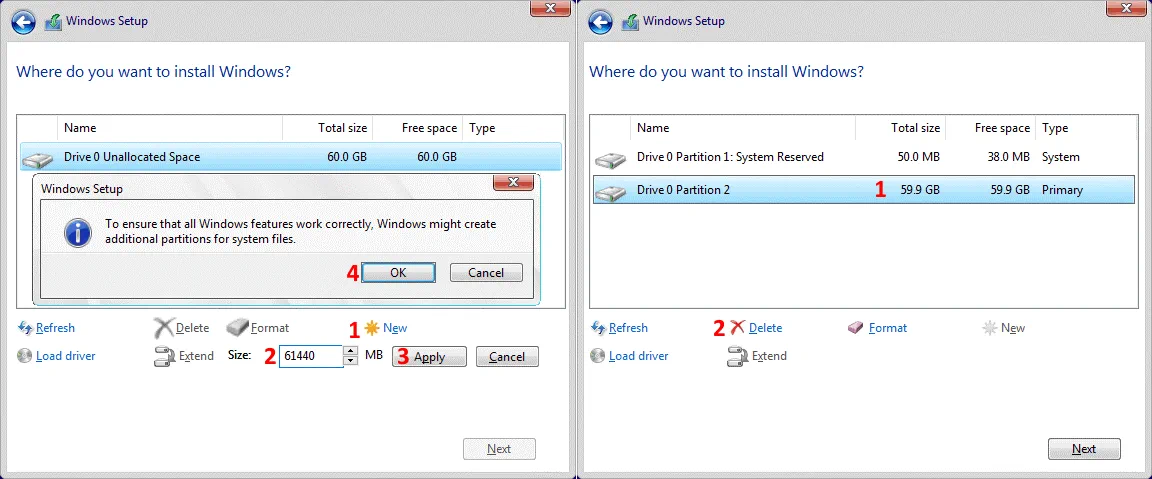
Where do you want to install Windows? Now you should create a partition table with the configuration that is suitable for you. You can see the 60 GB empty virtual hard disk (or another size virtual disk if you configured that in VM settings). Click New to create a new partition and enter the partition size, then click Apply. Windows automatically creates the first 50 MB service partition prior to your custom partition. If you don’t want to have this additional service partition on your disk, you can delete the service partition. It is especially useful when you use the MBR partition table with a limit of four partitions, but you need to use the same amount for your work without wasting one as the service partition. However, you cannot simply select the 50 MB partition and click Delete.
In order to delete the 50 MB partition, first, delete your custom partition (the size of my partition to install Windows 10 is 59.9 GB). The name of my custom partition is Drive 0 Partition 2.
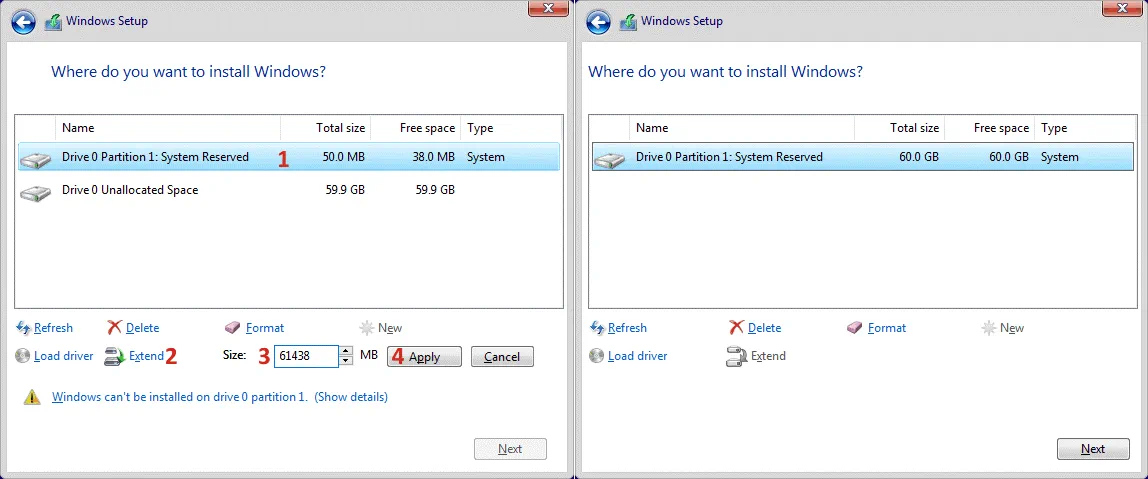
Then select the service partition (Drive 0 Partition 1: System Reserved) and click Extend. We extend the first partition to the maximum possible size. Click Apply to save settings.
Now we have one 60 GB partition on our virtual disk to install Windows 10. Later you can create new virtual disks for a VM in VMware Fusion, create partitions, and format them in a guest operating system after finishing Windows 10 installation. Select the partition where Windows 10 must be installed, and hit Next. Wait until the installer copies all the needed files and installs Windows.
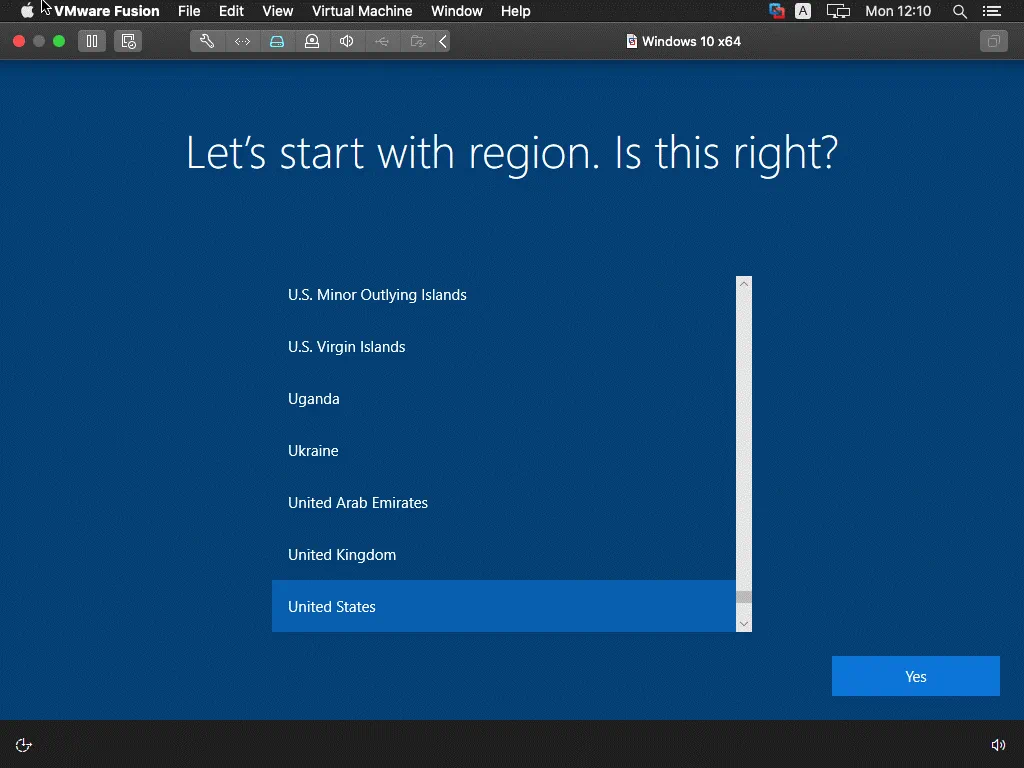
Let’s start with region. Select your location. I choose the United States.
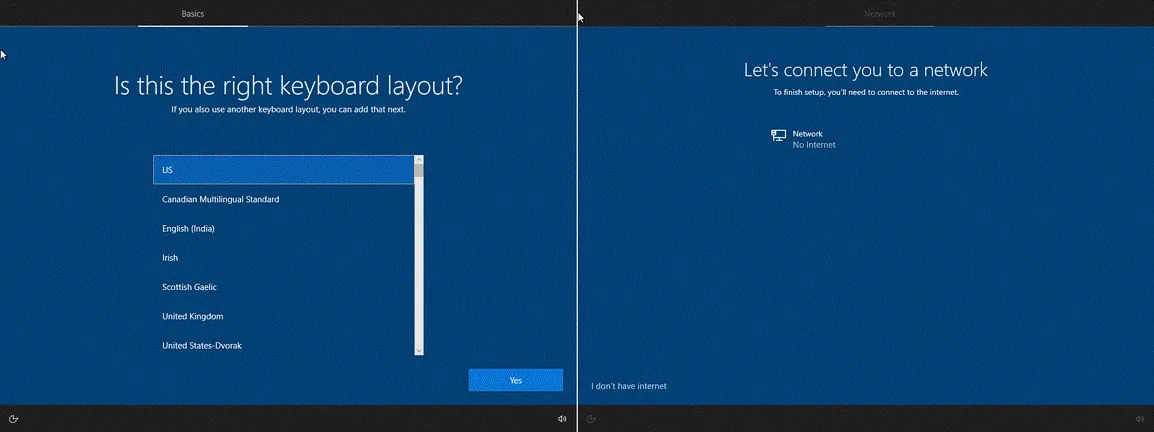
Is this the right keyboard layout? Select the needed keyboard layout. I use the US keyboard layout for my Windows 10 installation.
Let’s connect you to a network. I disable the internet connection until I finish Windows 10 installation and click I don’t have internet. We can configure the internet connection and download needed updates later after completing the installation.
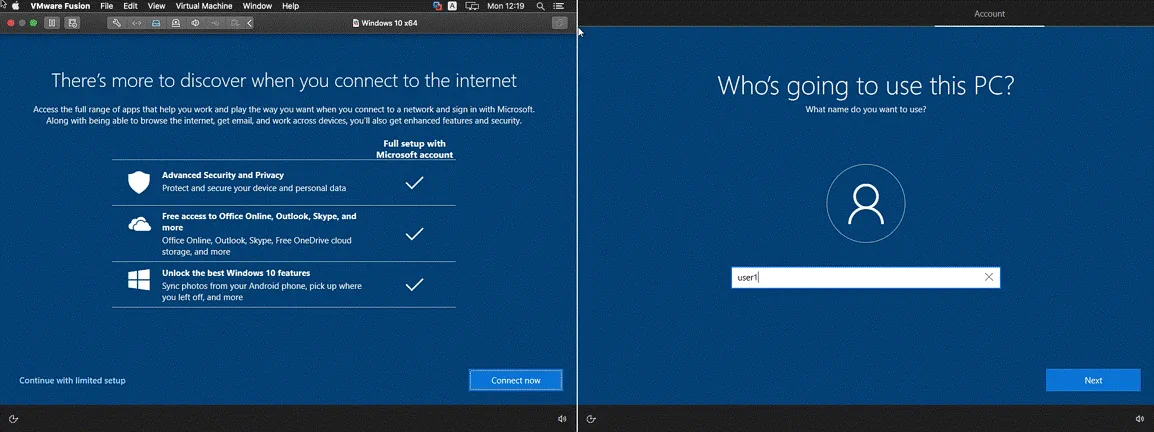
There’s more to discover when you connect to the internet. Windows 10 persistently asks you to enable an internet connection. However, we are not going to turn on the internet until finishing installing the VMware guest operating system. Click Continue with limited setup.
Who’s going to use this PC? Enter a name for your local user account on the Windows machine, for example, user1. We disconnected the internet and are not using the Microsoft account.
Create a super memorable password. Enter a strong password and remember the password. It is recommended that you use a password that contains at least 8 characters, including uppercase, lowercase letters, digits, and special characters.
Confirm your password. Enter your password once again. Then Windows 10 asks you to create three security questions for the user account.

Choose privacy settings for your device. Deselect all settings that collect your data and send the data to Microsoft.
Let Cortana help you get things done. Select Not now to disable Cortana.

Windows 10 is now installed as the VMware guest operating system. You can see Windows desktop and other elements of the graphical user interface of Windows 10 in the window of VMware Fusion running on macOS. Now you have to install VMware Tools for higher performance and better guest OS user experience.
Installing VMware Tools
VMware Tools is a set of drivers and tools developed to improve VM performance and provide better user experience. Read more about VMware Tools in this blog post.
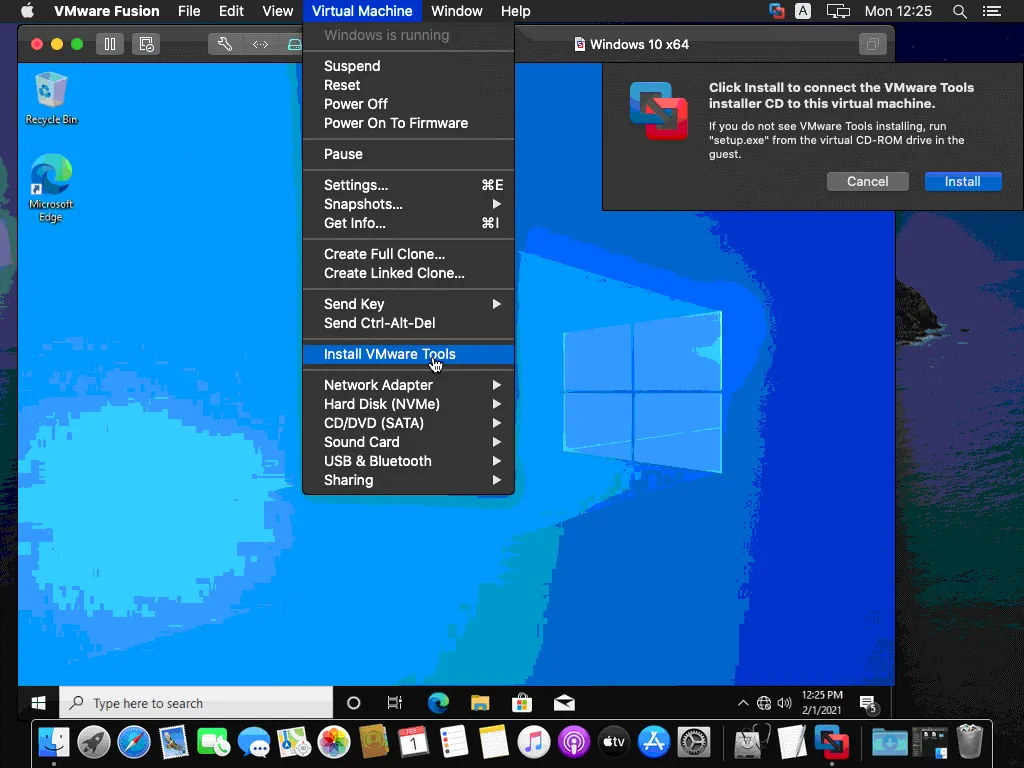
While the VM is powered on and Windows 10 is running as a guest OS in VMware Fusion, click Virtual Machine > Install VMware Tools.
The following message is displayed: Click Install to connect the VMware Tools installer CD to this virtual machine.
Click Install.
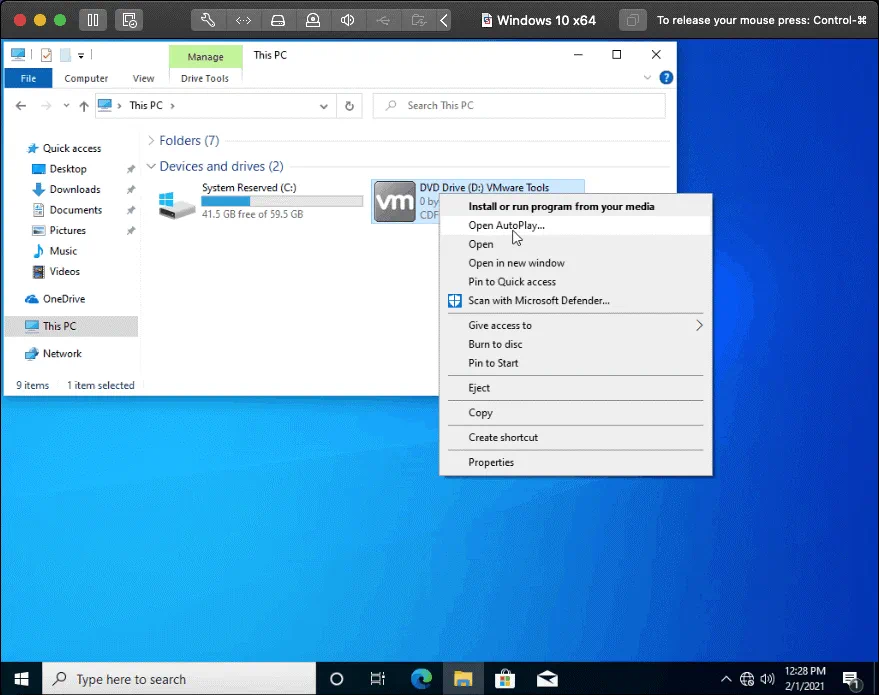
A virtual ISO CD image is mounted in a guest OS. Open the autorun or run setup64.exe on a virtual CD to launch the VMware Tools installer.
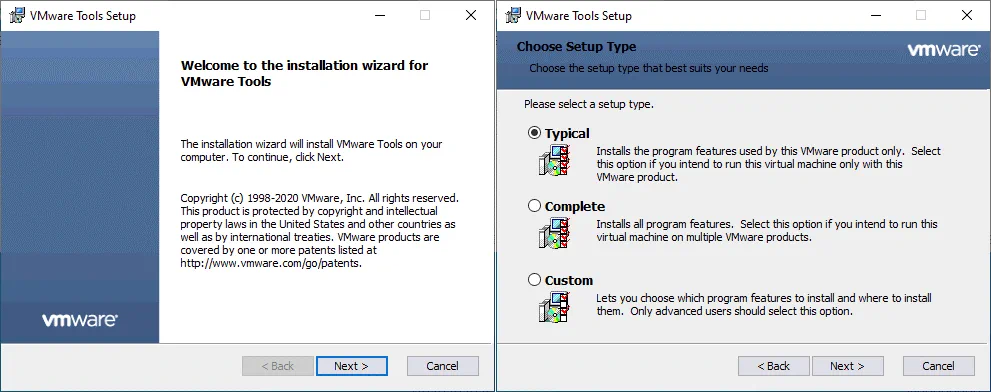
The installation wizard for VMware Tools opens. The welcome screen is displayed first. Hit Next at each step of the wizard to continue.
Choose Setup Type. Select Typical (the default option) that is suitable for most cases. You can perform the complete installation to install all program features of VMware Tools.
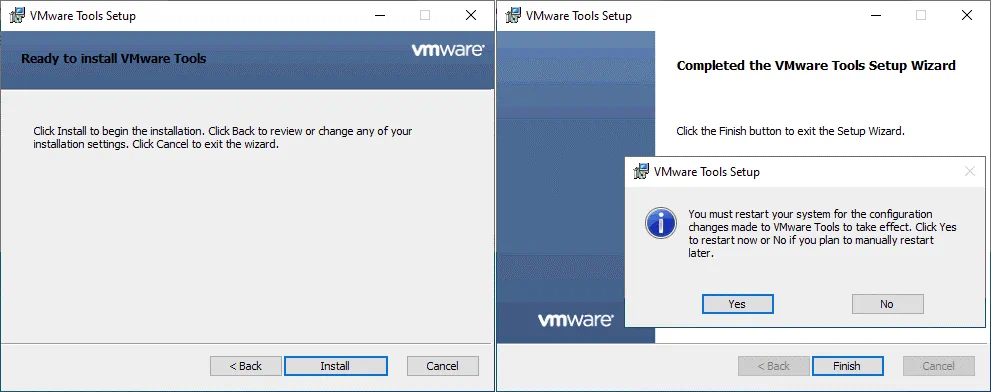
Ready to install VMware Tools. Click Install to start the process of VMware Tools installation.
Completed the VMware Tools Setup Wizard. You must restart your system for the VMware Tools configuration changes made to take effect. Click Finish, then click Yes to restart your Windows 10 guest OS now.
Configuring Shared Folders
Let’s configure Shared Folders to better integrate a host OS and guest OS in case we use the More Seamless mode of Easy Install. Shared Folders allow you to copy files from a host OS to a guest OS and vice versa more conveniently. In addition, you can use drag and drop without the need to share folders and configure permissions manually in the operating system.
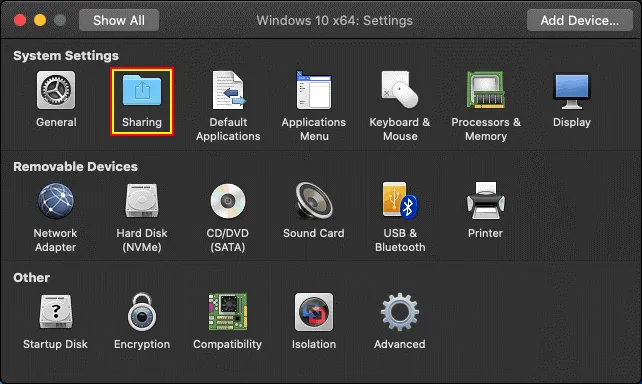
In VMware Fusion, go to Virtual Machine > Settings, then click Sharing to open the configuration of Shared Folders.
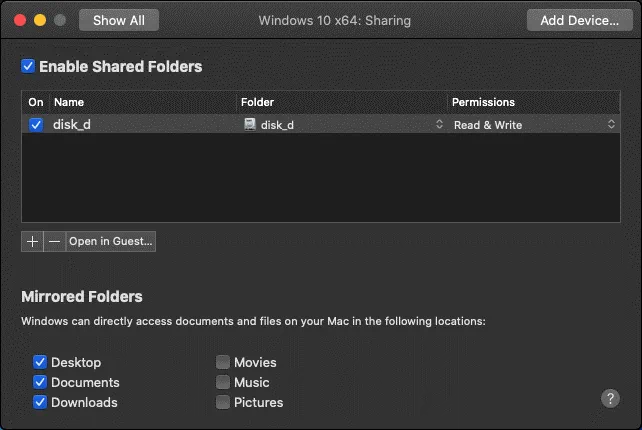
Select the Enable Shared Folders checkbox. Click + and select a folder that is accessible from your Mac and that you want to share with your Windows guest. In the bottom of the window, go to a Mirrored Folders section. Here select the checkboxes near macOS user folders that you want to share and provide write access in your guest Windows system.
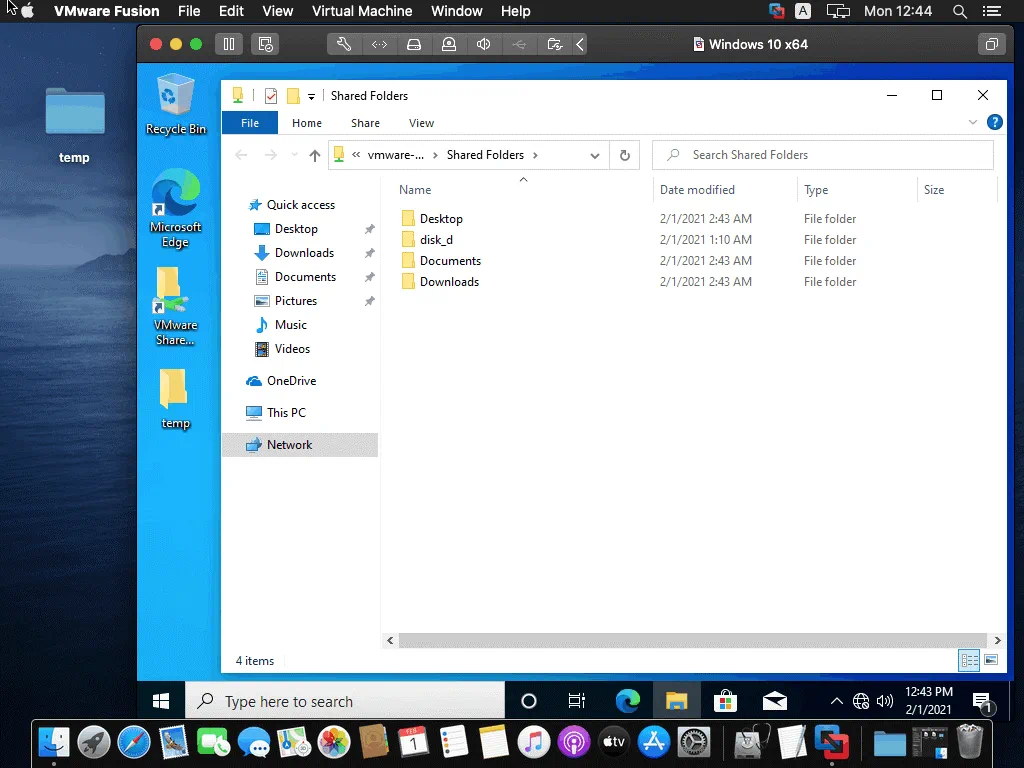
After configuring Shared Folders, you can see a shortcut to the VMware Shared Folders directory created on the Windows desktop of the guest operating system. The folders stored on the Mac desktop are now displayed on the Windows desktop of the guest OS.
You can expand the guest OS window to the Full Screen mode (View > Full Screen) or enter the Unity mode (View > Unity) to see Windows 10 application windows in the macOS GUI as if you were using one common desktop environment. Suspend or shut down a VM when you want to close the VM and VMware Fusion. VMware Fusion is a powerful virtualization application. It also supports running Windows 10 installed on a Boot Camp partition as a virtual machine when you work in macOS as a host OS. VMware Fusion supports nested virtualization allowing you to run a VM inside a VM.
Another advantage of VMs in VMware Fusion is the ability to copy VM files and run VMs on other Mac computers with VMware Fusion; Windows and Linux computers – with VMware Workstation or Player installed. With VM snapshots, you can test applications and roll back changes to one of the previous snapshots. You can use VMware Fusion to connect to ESXi hosts and vCenter Servers by clicking File > Connect to Server. VMware Fusion supports many guest operating systems, including different versions of Windows, Linux, and FreeBSD.
If you use Windows or Linux as a host OS, you can use VirtualBox or VMware Workstation to run macOS as a VM on your computer. If you run virtual machines on VMware ESXi, don’t forget to back them up. To ensure comprehensive protection for your VMware vSphere VMs, download the Free Edition of NAKIVO Backup & Replication that includes licenses for 10 workloads and 5 Microsoft 365 accounts and is absolutely FREE for one year!

Conclusion
This blog post covers the installation of Windows 10 as a guest operating system running in VMware Fusion on Mac OS X. For this, you have to check system requirements, download installation images of VMware Fusion and Windows 10, install VMware Fusion, create a virtual machine, and install Windows 10 as a guest OS in VMware Fusion. If you want to use the default VM configuration for a Windows 10 VM, you can use Easy Install, which requires minimum user interaction, and automatically installs a guest OS. If you want full control over the installation process and to be able to configure everything manually, don’t use Easy Install. VMware Fusion is a powerful virtualization application that provides you with a lot of configurable features.