Hyper-V Network Adapters: What, Why, and How
The previous blog post covered how to create a Hyper-V virtual machine (VM). However, creating a Hyper-V VM is merely the first step of building a large-scale virtual environment; thereafter, you have to ensure that VMs that are running on a Hyper-V host are able to communicate with one another. For this purpose, you need to have knowledge on Hyper-V network adapters, the technology behind Hyper-V networking, as well as how Hyper-V networking can be configured.

About Hyper-V Networking
A virtual network adapter (also known as virtual NIC) can be regarded as a virtualized version of a physical network adapter. It is used in Hyper-V environments to connect a physical server with other servers, VMs, or any other networking devices over a LAN connection. In short, vNIC enables and manages all network communications.
Each VM has one or more vNICs, which provide connection to a single subnet. However, you can assign additional IP addresses to that NIC in order to gain access to multiple subnets.
When you install the Hyper-V role on your computer and start creating new VMs, you need to be aware of the networking configurations that are present by default.
- Earlier Windows versions (before Windows 10) had no virtual switches. However, when you enable Hyper-V on Windows 10, you can use a Default Switch for seamless networking, as it provides access to the host’s network.
- Hyper-V virtual network adapters enable communications between VMs through a virtual switch. However, newly created VMs do not have any virtual switches assigned to them. Each new VM has a network adapter, which can be configured by assigning a single virtual switch, or you can leave it disconnected. Thus, to enable network connectivity, you need to create a virtual switch and configure a virtual network adapter.
There are three virtual switches that provide different levels of network connectivity:
- An external virtual switch can connect to the physical network adapter, which allows VMs to access a physical network. An external virtual switch enables communications between VMs on the same physical computer, VMs and the physical computer, as well as enables VMs to access physical network.
- An internal virtual switch enables communications between the VMs running on the same Hyper-V server, as well as between those VMs and the management OS. However, this type of switch does not provide access to a physical network.
- A private virtual switch only ensures connectivity between the VMs that run on the same Hyper-V host. This type of network provides an isolated mode of network connectivity.
Another point worth mentioning is VLAN tagging, which is a method of assigning a specific tag (VLAN ID) to each packet running on the network. VLAN tagging simplifies the process of identifying which information packet belongs to a particular VLAN. As a result, this method allows you to isolate network traffic, and ensures that network communications are performed without disruption.
Virtual network adapters in Hyper-V can be of two types:
- Legacy network adapters emulate a physical network adapter and only work with Generation 1 VMs. This type of network adapter is used for unenlightened guest VMs that do not support Hyper-V Integration Services or Linux Integration Services. Up to 4 legacy vNiCs can be deployed on a single VM. Moreover, a legacy network adapter is applied for enabling communication between guest OSes that are not supported by Hyper-V. Legacy vNiCs can perform a network-based installation of the guest OSes.
- Synthetic network adapters are used for enlightened guest VMs that provide support for Hyper-V Integration Services or Linux Integration Services. Up to 8 synthetic vNICs can be deployed on a single VM. They generally provide better performance than legacy vNICs. In this case, network connectivity is enabled by VMBus, which provides and controls communication between separate partitions. Furthermore, with this type of a network adapter, you are able to use VLAN tagging.
How to Set Up Virtual Network Adapter in Hyper-V Manager
There are two ways through which you can enable and configure a Hyper-V network adapter: in Hyper-V Manager by using graphical user interface (GUI), or in PowerShell by running PowerShell scripts. We will discuss them both in detail. Now, let’s start with the former method:
- Open Hyper-V Manager.
- Find the VM for which you want to add a Hyper-V network adapter and right-click the VM name. Select Settings.
- The new menu will open, providing information about the VM settings. In the Hardware Section, select Add Hardware to see the list of devices that you can add to your VM.
In our case, we are only interested in two options: Network Adapter and Legacy Network Adapter (which is only available for Generation 1 VMs). Select the network adapter that you need and click Add.

- You will be redirected to the Network Adapter section where you can configure a new Hyper-V network adapter by choosing a virtual switch to connect to, by enabling VLAN identification and specifying VLAN ID, and by specifying the maximum and minimum amount of bandwidth usage.
You are also able to remove the Hyper-V network adapter by clicking Remove.
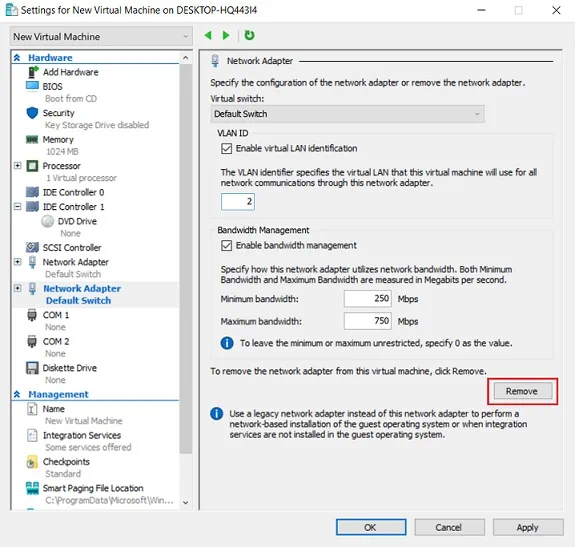
- Click Apply to save changes.
Moreover, in Hyper-V Manager, you can modify hardware acceleration settings and enable more advanced features.
- Double-click Network Adapter under the Hardware section. Select Hardware Acceleration. Here, you can enable Virtual Machine Queue (VMQ) and IPsec task offloading, as well as specify the maximum number of Offloaded SA (security associations).
Hyper-V Virtual Machine Queue is a hardware virtualization technology that ensures direct network data transfer to the VM shared memory. IPsec is the security protocol used for encrypting network data exchange.
With IPsec task offloading enabled, you can offload IPsec-related tasks to a network adapter so as not to overuse hardware resources.
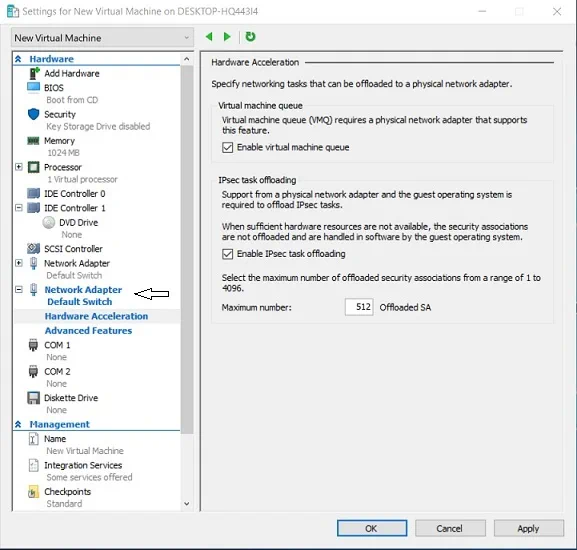
- Click Apply to save changes.
- Then, select Advanced Features to set up the advanced features on the virtual network adapter. They include MAC address, DHCP guard, Router guard, Protected network, Port mirroring, and NIC teaming. Each feature is accompanied by a short description of how it can be used. Read them and decide which features should be enabled.
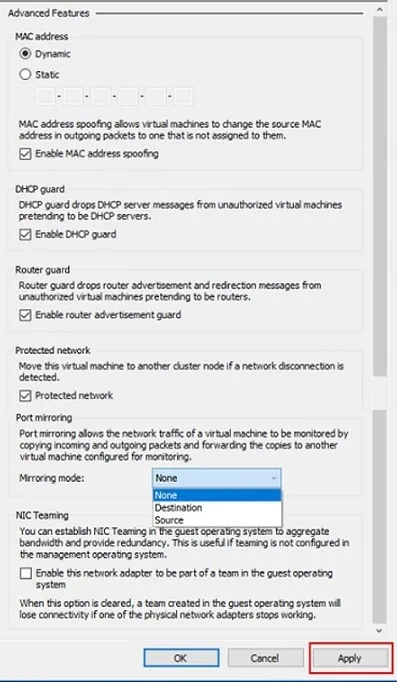
- Check the required boxes and click Apply to save changes.
Managing Hyper-V Network Adapters with PowerShell
As can be seen, configuration options in Hyper-V Manager are quite limited. Moreover, by using the GUI you are only able to set up Hyper-V network adapters for guest VMs, and not for the management OS. For this reason, PowerShell can be used to provide more advanced functionality and multiple configuration options. Let’s look at how Hyper-V network adapters can be managed in PowerShell.
Create Hyper-V network adapters
Note that in order for the PowerShell cmdlets to work, you need to run PowerShell in administrator mode. To do this, type PowerShell in a search bar, right-click the PowerShell icon, and select Run as Administrator.
Insert the Add-VMNetworkAdapter cmdlet to add a new virtual network adapter to a Hyper-V VM. Below is an example of how you can use this cmdlet:
Add-VMNetworkAdapter -VMName DemoVM -SwitchName DemoVSwitch –Name ‘Demo Network Adapter’
The following example demonstrates how you can add a second virtual network adapter in the management OS:
Add-VMNetworkAdapter -ManagementOS -Name ‘Second Network Adapter’
Connect or disconnect Hyper-V network adapters
The Connect-VMNetworkAdapter cmdlet allows you to connect a virtual network adapter to a virtual switch of your choice. The example below demonstrates how you can add one virtual switch (Default switch) to two VMs (DemoVM and New Virtual Machine) at the same time. Ensure that neither of the VMs is in a running state.
Connect-VMNetworkAdapter -VMName DemoVM, ‘New Virtual Machine’ -SwitchName ‘Default Switch’
To disconnect Hyper-V network adapter from a virtual switch or Ethernet resource pool, the Disconnect-VMNetworkAdapter cmdlet can be used. The following script allows you to disconnect all network adapters from a single VM named DemoVM:
Disconnect-VMNetworkAdapter -VMName DemoVM
This PowerShell script can be used to disconnect all virtual network adapters that are connected to a virtual switch Default Switch in all VMs in Hyper-V environment.
Get-VMNetworkAdapter -VMName *| Where-Object {$_.SwitchName -eq 'Default Switch'} | Disconnect-VMNetworkAdapter
With PowerShell, you can be even more precise in your configurations. If you want to disconnect all network adapters that are connected to a particular virtual switch (Default Switch) that are running on a certain VM (DemoVM), use the cmdlet below:
Get-VMNetworkAdapter -VMName DemoVM | Where-Object {$_.SwitchName -eq 'Default Switch'} | Disconnect-VMNetworkAdapter
Get Hyper-V network adapters
These PowerShell scripts can be used to access information about the virtual network adapters that are present on a particular VM, on the management OS, or on all VMs as well as the management OS running in the virtual environment. All of the cmdlets are presented below:
- For a single VM:
Get-VMNetworkAdapter –VMName DemoVM
- For the management OS:
Get-VMNetworkAdapter -ManagementOS
- For all VMs in Hyper-V environment, including the management OS:
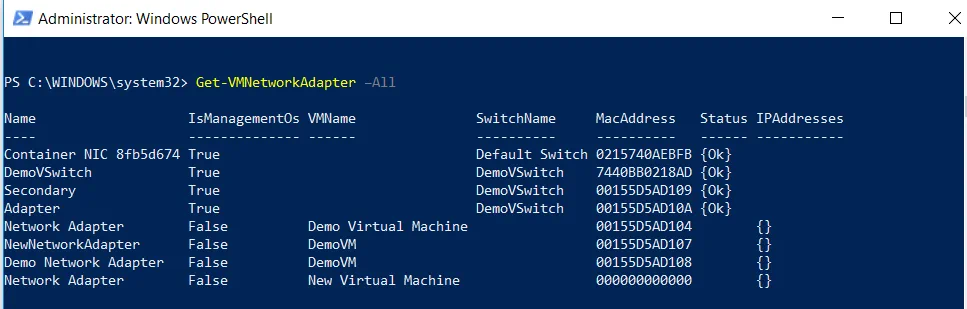
Get-VMNetworkAdapter -All
If the final script is properly implemented, you will see the following screen containing information about your Hyper-V network adapters:
Remove Hyper-V network adapters
This cmdlet is used to remove one or more virtual network adapters from a VM, as well as from the management OS.
In the next example, the network adapter NewNetworkAdapter is removed from a VM named DemoVM:
Remove-VMNetworkAdapter -VMName DemoVM -VMNetworkAdapterName NewNetworkAdapter
The example below shows how you can remove the network adapter Secondary from the management OS:
Remove-VMNetworkAdapter -ManagementOs -Name Secondary
Rename Hyper-V network adapters
You can also rename a Hyper-V network adapter of a particular VM or on the management OS:
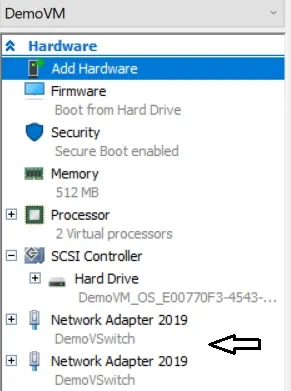
Rename-VMNetworkAdapter -VMName DemoVM -NewName ‘Network Adapter 2019’
In Hyper-V Manager you can verify that all network adapters of a VM named DemoVM have been successfully renamed.
To give a new name to a network adapter (Network Adapter 2019) of a particular VM (DemoVM), run the following script:
Rename-VMNetworkAdapter -VMName DemoVM -Name ‘Network Adapter 2019’ -NewName ‘Hyper-V network adapter’
The next cmdlet can help you to rename a network adapter of the management OS.
Rename-VMNetworkAdapter -ManagementOs -Name Adapter -NewName ‘Communications Channel’
Set Hyper-V network adapters
This section lists various cmdlets, which can be used for configuring the features of the Hyper-V network adapter in a Hyper-V VM or the management OS. Exploring all configuration options to their full extent can take a lot of time. Therefore, we will only discuss a few features that can be enabled through PowerShell.
For example, you can enable DHCP Guard by running the script below. DHCP Guard is used for protecting the system against unauthorized access from the side of the guest OS.
Set-VMNetworkAdapter -VMName DemoVM -DhcpGuard On
Additionally, you can enable Port Mirroring, which allows you to copy the network packets of one virtual network adapter and send them to another one. There are two mirroring modes: Source and Destination. By selecting Source mode, we agree that the network traffic of this particular network adapter will be copied and sent to the monitoring VM. The network adapter of that VM will be assigned a Destination mirroring mode. Note that each Source network adapter should be assigned a Destination network adapter in order for this feature to work.
To enable Port Mirroring in a Source mode, run the following script:
Set-VMNetworkAdapter -VMName DemoVM –Name ‘Hyper-V network adapter’-PortMirroring Source
This cmdlet will enable the Port Mirroring feature on the VM named DemoVM, and will assign its virtual network adapter the role of a source.
In the following example, the virtual network adapter named Monitoring is configured as the destination point for port mirroring. As a result, a VM named DemoVM (‘Source’) will monitor all network traffic of the VM named ‘New Virtual Machine’ (Destination).
Set-VMNetworkAdapter -VMName ‘New Virtual Machine’-Name Monitoring -PortMirroring Destination
The following cmdlet can be used to enable VLAN identification as well as to assign a specific VLAN ID:
Set-VMNetworkAdapterVlan -VMName DemoVM -VMNetworkAdapterName ‘Hyper-V network adapter’ -Access -VlanId 20
In this case, VLAN tagging will be enabled on a particular Hyper-V network adapter (Hyper-V network adapter) that is connected to a certain VM (DemoVM).
Or, if you want to disable VLAN tagging, type this cmdlet:
Set-VMNetworkAdapterVlan -VMName DemoVM -VMNetworkAdapterName ‘Hyper-V network adapter’ -Untagged
The main advantage of the PowerShell cmdlets is that you can arrange them in any way you want, and create comprehensive scripts. With their help, you can considerably optimize the process of managing and configuring your Hyper-V environment.
How to Protect Hyper-V Environment with NAKIVO Backup & Replication
NAKIVO Backup & Replication is a reliable and cost-effective solution which can provide 24/7 protection of your virtual environment, while ensuring that your most sensitive data and mission-critical applications can be rapidly recovered, even in a case of disaster. NAKIVO Backup & Replication includes a comprehensive set of tools, which enable fast and efficient backup, replication, and system recovery.
With this solution, you can significantly improve the performance of your backup and replication jobs, particularly by optimizing network operations within your infrastructure. For this purpose, NAKIVO Backup & Replication provides the following features:
- Network acceleration applies traffic reduction and data compression tools, which allow you to significantly decrease the amount of data transferred over the WAN. Such results are achieved by the use of two Transporters, which are installed at both sites (source and target). The Transporter in the source site compresses VM data before it is sent over the network, whereas the Transporter in the target site decompresses the received data. As a result, the speed of VM backup and replication jobs can be considerably increased and the network load can be reduced.
- Advanced bandwidth throttling allows you to set data transfer speed limits so as to define how much bandwidth can be used by particular data protection jobs. For this purpose, you need to create global or per-job rules that would control how much bandwidth is consumed during backup operations. These rules can be applied to different data protection jobs and on different schedules. With this feature, you can ensure that your networks are not be overloaded, even during business hours.
- Network Mapping and Re-IP are used in replication, failover, and site recovery jobs when the source site and the target site are connected to different networks and have different IP addresses. To avoid any issues during disaster recovery, you need to create network mapping and Re-IP rules. These rules ensure that source virtual networks can be mapped to appropriate target virtual networks, while source IP addresses can be mapped to target IP addresses during a DR event. These features allow you to efficiently optimize and automate the process of network configuration.