How to Use Remote Desktop Connection in Ubuntu Linux: Complete Walkthrough
Remote desktop protocol is a popular network protocol that is widely used for connecting to computers remotely in Windows environments to manage them. This protocol can be used for connecting to physical and virtual machines that are running on Windows.
However, if Linux with a graphical user interface (GUI) is installed on your machine, you can use the remote desktop protocol and configure remote desktop connection from Linux machines to Windows machines via RDP as well as configuring access from Windows machines to your Linux machines by using this protocol. You can also use RDP to connect from Linux machines to Linux machines if needed. It is convenient to use RDP for Ubuntu so as to connect to virtual machines running in public clouds such as Azure, Amazon EC2, and Google Cloud.
There are three the most used network protocols to manage Ubuntu remotely:
- SSH (Secure Shell)
- RDP (Remote Desktop Protocol)
- VNC (Virtual Network Computing)
Today’s blog post explains Ubuntu remote desktop configuration which can also be applied to other Linux distributions.

How to Use Remote Desktop Connection in Ubuntu
In the majority of cases, you need to install the Ubuntu remote desktop client manually on your Ubuntu Linux. In today’s blog post, Ubuntu 18.04.2 is installed on the VMware virtual machine. Some packages are already installed in our Ubuntu before going to configuring Ubuntu remote desktop: the text editor vim, net-tools and the SSH server (which allows you to connect via SSH to the Linux console remotely). These packages can be installed with the single command:
sudo apt-get install -y vim net-tools openssh-server
In order to configure Ubuntu RDP connections, you need to install the RDP client or/and the RDP server, depending on the connection direction.
Note: In Windows systems, the remote desktop client is known as Remote Desktop Connection or Terminal Services Client.
Windows XP uses RDP version 5.1, Windows Server 2003 – version 5.2, Windows Server 2008 – version 6.1, Windows 7 – version 7, Windows 8 and Windows Server 2012 – version 8, Windows 8.1, Windows 10 – RDP version 10, and Windows Server 2012R2 – version 8.1.
Using Remmina – Ubuntu Remote Desktop Client
Remmina is a free open-source software that is intended to make life easier for system administrators who need to establish Ubuntu remote desktop connections. Remmina supports not only RDP for Ubuntu but also other remote desktop protocols such as VNC, SSH and SPICE. You can learn how to install and configure Remmina as the Ubuntu remote desktop client in this remote desktop protocol tutorial. You can install Remmina using one of two methods below.
How to install Remmina in the GUI
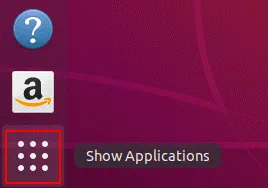
Click the button in the left bottom corner of the Ubuntu Desktop to open the Main Menu (Show Applications).
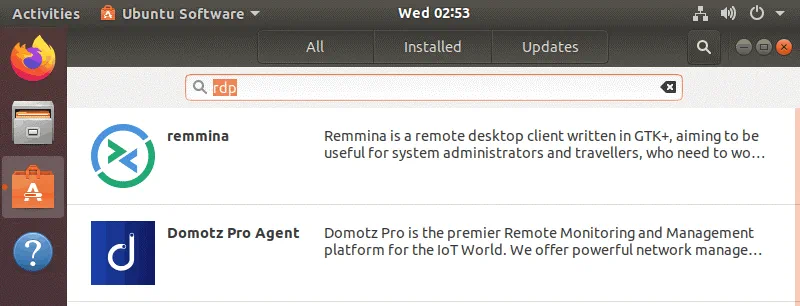
Type rdp in the search bar.
You can see that Remmina has been found as the remote desktop client.
Click Remmina on this screen.

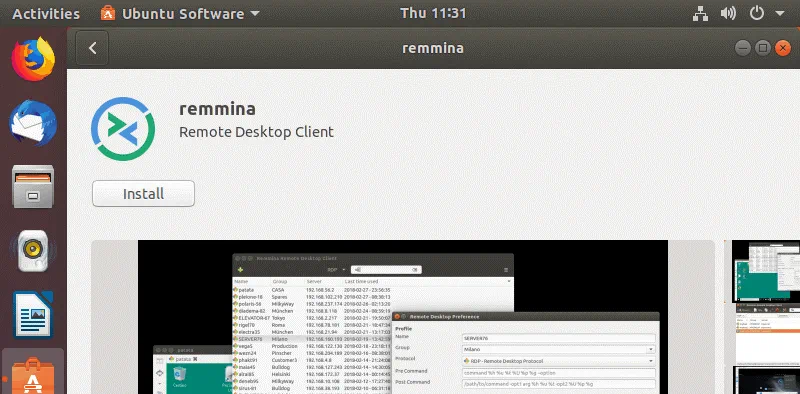
You are redirected to the Ubuntu software page. Click Remmina to see details about this software.
Click Install to install Remmina the remote desktop client.
Enter your password which is required to install packages.
Wait until the necessary packages are installed.
How to install Remmina in the console
As an alternative, you can install Remmina in the Ubuntu console with just a few commands.
First, add the necessary software repository to the repository list of your Ubuntu system:
sudo add-apt-repository ppa:remmina-ppa-team/remmina-next
Update the repositories and available packages list:
sudo apt-get update
Install Remmina and related plugins:
sudo apt-get install remmina
sudo apt-get install remmina-plugin-*
sudo apt-get install libfreerdp-plugins-standard
Post-installation configuration
After installation is finished, launch Remmina.
Click the Main Menu button in the GNOME interface of Ubuntu, find the Remmina icon in the menu or type Remmina to locate the application. You can also open the console (terminal) and enter remmina to execute the application.
Once you launch Remmina for the first time, the application will ask you to install certain packages; install the packages with these commands:
sudo snap connect remmina:avahi-observe :avahi-observe
sudo snap connect remmina:cups-control :cups-control
sudo snap connect remmina:mount-observe :mount-observe
sudo snap connect remmina:password-manager-service :password-manager-service
Let’s connect to the remote Windows machine running on another VM from the Ubuntu machine on which Remmina is installed. Make sure that Remote Desktop is enabled on the remote machine you are going to connect to. In the current example, Windows Server 2008 R2 is installed on the remote Windows virtual machine.
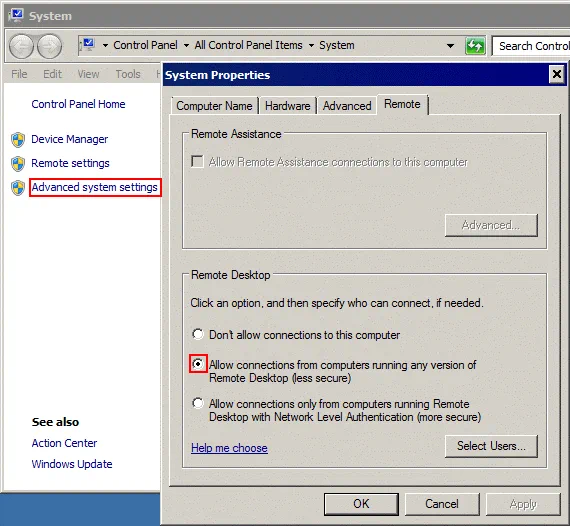
Right click My Computer and in the context menu, select Properties. In the System Properties, hit Advanced system settings. In the System Properties window, select the Remote tab and click Allow connections from computers running any version of Remote Desktop. Hit OK to save settings. Notice that Windows Firewall will be tuned automatically to allow inbound connections (TCP port 3389 by default).
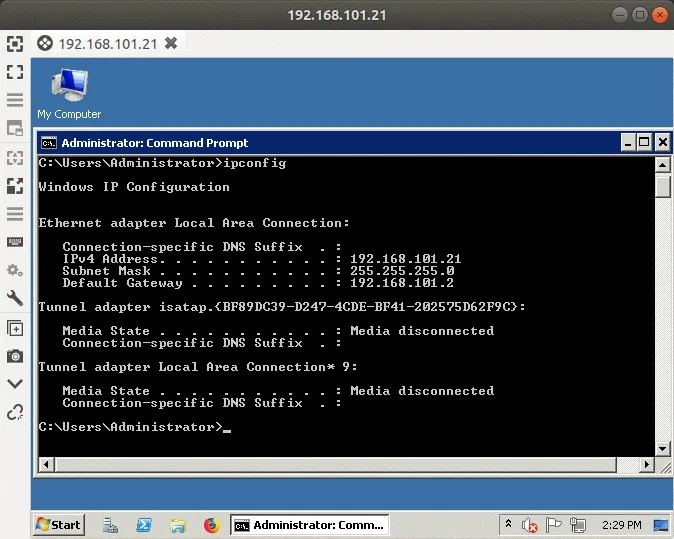
Run CMD and execute the ipconfig command to check the IP address of your Windows system on which you have enabled remote desktop connections. In this example, the IP address of the Windows machine is 192.168.101.21.
Now go back to your Linux machine where you have installed Remmina as the remote desktop client.
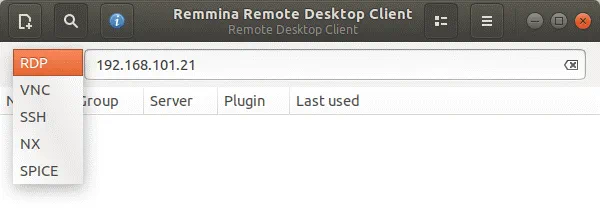
In the opened Remmina window, select RDP in the drop-down list.
Enter the IP address of the remote host (192.168.101.21 in this case) and hit Enter.
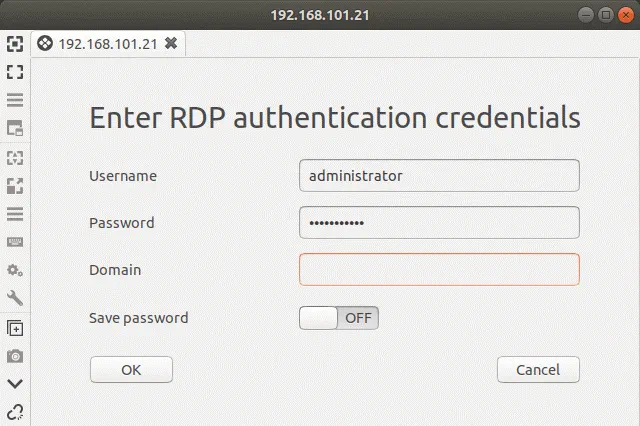
If the certificate details are displayed, hit Yes to accept the certificate and connect to the remote host. Enter the RDP authentication credentials and click OK to log in to the remote host via RDP. Make sure that a user on a Windows machine has permissions to use RDP.
The RDP session is established. However, by default, resolution is about 640×480, and that is too low.
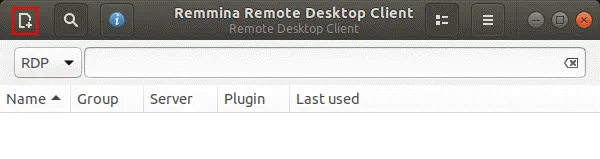
You can set the custom resolution for your Ubuntu RDP session when using Remmina for connecting to remote Windows or Linux machines. Click the + icon in the top left corner of the Remmina window to create a new connection preset.
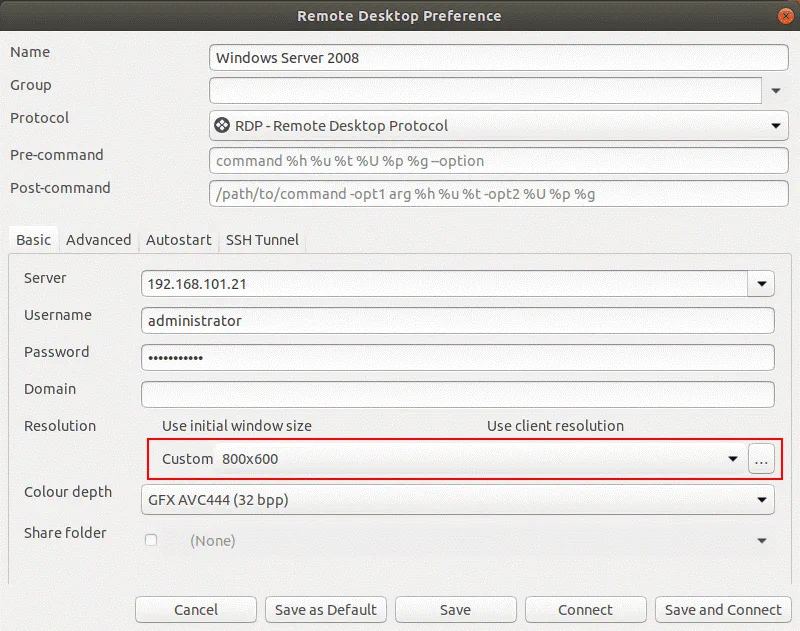
In the opened window, enter the name of your remote desktop Linux to Windows connection and select RDP as the protocol. In the Basic tab, enter the IP address of the remote host (192.168.101.21 in this case), the username (user must be allowed to connect remotely on the target host) and the password of the selected user. Below in the Resolution section, expand the drop-down menu and select the custom resolution, for example, 800×600. When you have configured all necessary connection options, hit Save.
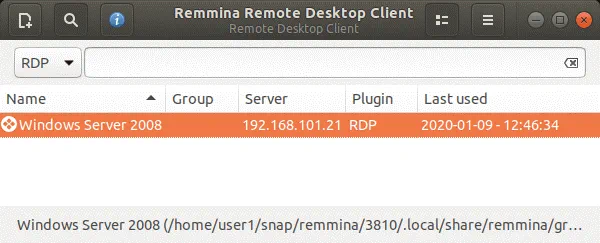
Now in the main window of Remmina, you can see the added connection preset named Windows Server 2008. Double click the preset for connecting to the selected remote host from Ubuntu via RDP. Notice that you don’t need to enter credentials because they are saved in the preset.
Now your remote desktop Linux to Windows session has been established with the selected resolution.
Using Xrdp – Ubuntu Remote Desktop Server
You can also configure a Remote Desktop server on your Linux system and connect to that Linux remotely from Windows machines by using a standard Windows Remote Desktop client. Popular Linux distributions don’t have the Remote Desktop server installed but it is possible to install and configure the Remote Desktop server on Linux manually, so as to enable managing a Linux machine remotely in the graphical mode. In this section, we will explain how to configure access via Remote Desktop Protocol to Ubuntu 18.04.2. The main component you need for this purpose is xrdp.
Xrdp is an implementation of Microsoft RDP that allows non-Windows operating systems to provide functionality of the RDP server. Xrdp is free and open source software. The X Window system is required to use xrdp. Let’s find out how to configure a remote desktop server on Ubuntu.
First, update the software repository tree:
sudo apt-get update
Install xrdp from online software repositories:
sudo apt-get install xrdp
You need to install the XFCE desktop environment. By default, Ubuntu 18 is installed with GNOME 3 but xrdp works better with XFCE, which is a lightweight desktop environment. After installing XFCE and configuring RDP for Ubuntu, you will still have the ability to log in to your Ubuntu Linux locally by using GNOME.
Hence, install XFCE:
sudo apt-get install xfce4
In the home directory of your user, create the .xsession file and write the xfce4-session string into that file. Thus, you configure the xrdp server to use xfce as the default graphical environment.
echo xfce4-session > ~/.xsession
Make xrdp start automatically when your Linux is booted.
sudo systemctl enable xrdp
Restart the xrdp service to make changes take effect.
sudo service xrdp restart
Clear the configuration stored in the startwm.sh shell script file that is needed to start xrdp:
sudo sh -c ‘cat /dev/null > /etc/xrdp/startwm.sh’
(Before running the command above, you may create a copy of that file if needed by using the command cp /etc/xrdp/startwm.sh /etc/xrdp/startwm.sh1 )
Edit the startwm.sh shell script configuration file with vim:
sudo vim /etc/xrdp/startwm.sh
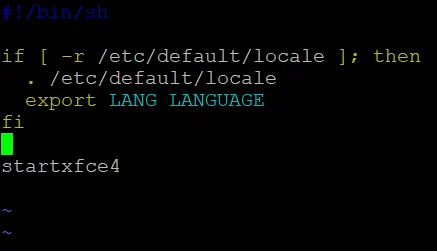
The startwm.sh shell script file must contain the following lines:
#!/bin/sh
if [ -r /etc/default/locale ]; then
. /etc/default/locale
export LANG LANGUAGE
fi
startxfce4
Keep one empty line in the end of file.
Save the startwm.sh configuration file and quit: Press Esc and type :wq
Restart the xrdp service:
sudo service xrdp restart
Check the IP address of your Ubuntu Linux:
ifconfig
or
hostname -I
In this example, the IP address of the Linux machine is 192.168.101.208.
By default, the firewall in Ubuntu is disabled. If the firewall is enabled, allow inbound connections to the TCP port 3389.
sudo ufw allow 3389
For more security, you can specify the allowed IP addresses or custom networks:
sudo ufw allow from 192.168.101.0/24 to any port 3389
Note: If a remote Linux machine on a remote site is in the local network behind the NAT and you need to access that machine via RDP from an external IP address, you can configure port forwarding or VPN connection on a router/firewall on a remote site.
Try to connect to your Ubuntu Linux from Windows via RDP.
Open CMD in Windows (Start > Run > CMD).
Run the command to open the Remote Desktop client and connect to the required host:
mstsc /v:192.168.101.208
Select Xorg as the session type and enter your login and password.
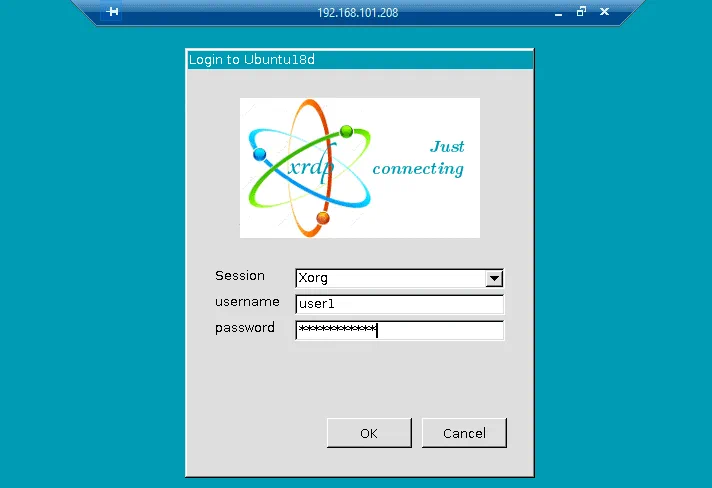
If you see an empty blue screen and after a few minutes of waiting, the error is displayed, it means that something is not configured properly. Let’s find out how to fix the empty blue screen issue for xrdp.
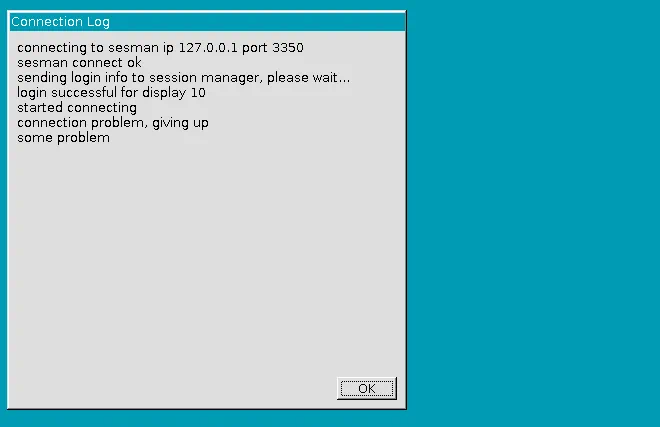
This issue is related to the xorgxrdp package and certain changes implemented to Ubuntu 18.04 compared to the previous Ubuntu versions that have broken the xrdp capability. As you recall, Ubuntu 18.04.2 is used in the current example for configuring xrdp. In order to fix an empty blue screen, run the command and install the actual version of xorgxrdp-hwe:
sudo apt-get install xorgxrdp-hwe-18.04
You can check the Ubuntu version with the command:
lsb_release -a
Restart the xrdp service (daemon):
sudo /etc/init.d/xrdp restart
After installing the necessary package, open the RDP client and try to connect to your Ubuntu via RDP once again.
In Windows CMD run:
mstsc /v:192.168.101.208
In the login window select Xorg and enter your login and password.
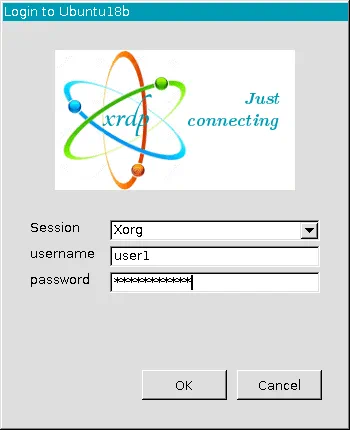
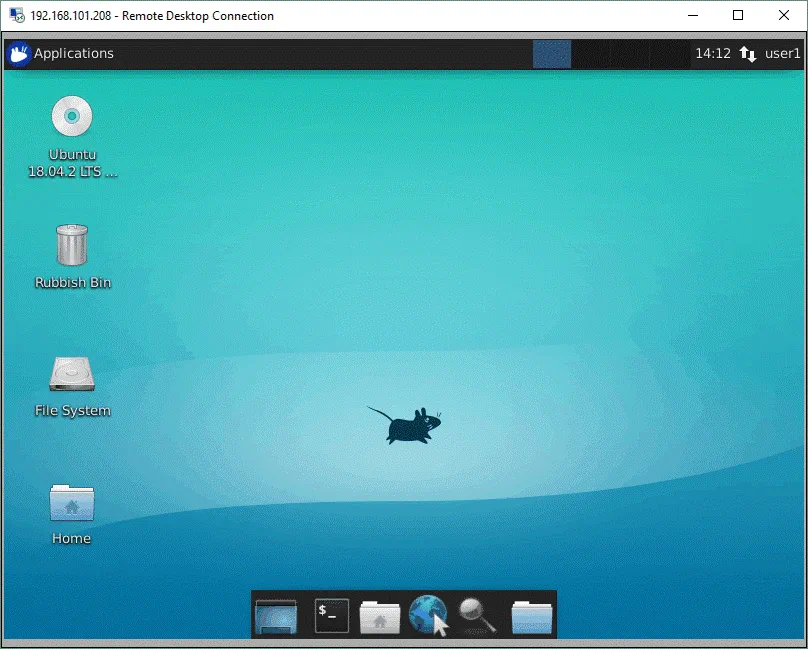
Now you have connected successfully. In the dialog window that is displayed after connecting to Ubuntu RDP (Welcome to the first start of the panel), select Use default config.
If you need to set the custom resolution in the Windows CMD, run:
mstsc
Enter the IP address of the remote Ubuntu machine manually.
Click Show Options and select the needed resolution on the Display tab.

Now you can connect to Ubuntu from Windows via RDP and use the needed remote desktop screen resolution. This means that RDP for Ubuntu has been configured successfully and is, thus, the end of today’s remote desktop protocol tutorial.
Conclusion
Today’s blog post has explained how to use remote desktop connection in Ubuntu Linux. Configuring inbound and outbound remote desktop connections in Ubuntu is affordable for the majority of users. You need to install a remote desktop client for connecting from Ubuntu to Windows machines and other machines. To connect to your Ubuntu Linux machine, you need to install and configure a remote desktop server on your Linux machine. Xrdp and XFCE must be installed for this purpose.
If for some reason you cannot use RDP for Ubuntu, consider using VNC, which is the protocol alternative to RDP. Using RDP and VNC allows you to connect to your physical and virtual machines remotely with the graphical user interface. Don’t forget to back up your Linux servers and virtual machines to protect your data. Download NAKIVO Backup & Replication and back up your virtual machines and physical servers.