How to Upgrade to VMware vCenter 7 and vSAN 7
VMware’s flagship virtualization product has been significantly “rearchitected” for the vSphere 7 release. If you decide to upgrade to version 7 from vSphere 6.7, you first need to upgrade vCenter which is the main component in vSphere used for managing ESXi hosts, clusters, VMs, and other components centrally. Therefore, before upgrading ESXi hosts and vSAN, you should first upgrade your vCenter to version 7.
Read on to learn the steps for upgrading from vSphere 6.7 to vSphere 7.0 as well as tips for upgrading from earlier versions than 6.0.

Requirements and Compatibility
Be aware that you can upgrade only vCenter 6.5 and vCenter 6.7 directly to vCenter 7.0. If you use vCenter 6.0 or older versions, consider upgrading to vCenter 6.5 or 6.7 and only then upgrade to vCenter 7.0. As an alternative, you can perform a clean installation of vCenter 7.0 and configure that vCenter instance as you configured your old vCenter. Check vCenter Server upgrade compatibility before you upgrade vCenter. vCenter 7 can manage ESXi 6.5, ESXi 6.7, and ESXi 7.0 in the same cluster.
Installing vCenter 7.0 on Windows is not supported. VMware vCenter 7.0 can be deployed only as vCenter Server Appliance (VCSA) that is a virtual machine running on an ESXi host.
If there are distributed virtual switches of versions older than v.6.5 that are managed by your vCenter Server before upgrade, you have to upgrade the distributed virtual switches to v.6.5 or later. Otherwise you will get an error:
Source vCenter Server has an instance of Distributed Virtual Switch at unsupported version.
Turn off Fault Tolerance for VMs that use this feature before upgrading vCenter. After the upgrade, you can enable Fault Tolerance again.
VMware vCenter 7 memory requirements are slightly higher than the memory requirements for vCenter 6.7. For example, requirements for a tiny deployment size are 10 GB of memory for vCenter 6.7 and 12 GB for vCenter 7.
The Upgrade Process
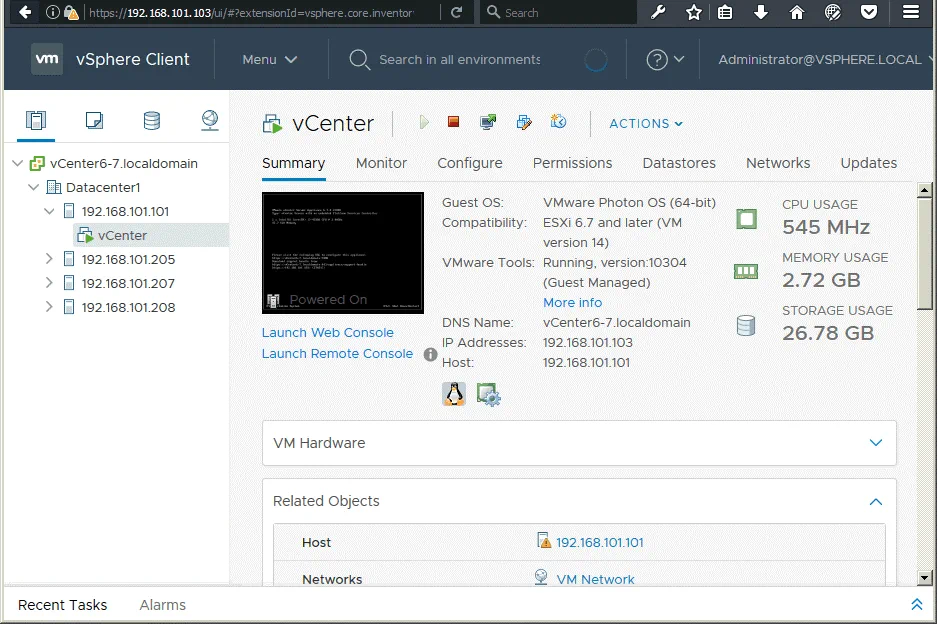
Open your VMware vSphere Client 6.5 or 6.7 and make sure that all the requirements for the upgrade to vCenter 7 are met. In our case, we are going to upgrade vCenter 6.7 to vCenter 7.
The IP addresses used for the vSphere components in our test environment:
vCenter 6.7: 192.168.101.103 (vCenter Server Appliance is used)
ESXi hosts: 192.168.101.101, 192.168.101.205, 192.168.101.207, 192.168.101.208
Network: 192.168.101.0/24
Gateway and DNS server: 192.168.101.2
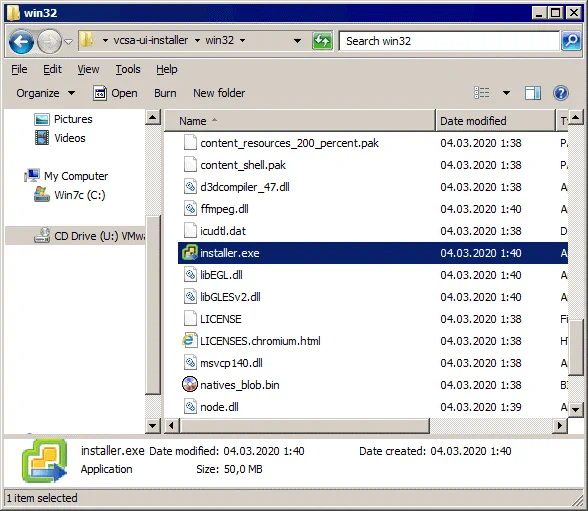
Download the ISO installation image of vCenter 7 from the VMware website if you have not downloaded this image yet.
The name of the installation image is VMware-VCSA-all-7.0.0-16189094.iso in our case. Mount the ISO image to a virtual DVD drive or extract files from the ISO image to a custom directory. After mounting the ISO image to a virtual drive (for example, U:), go to the U:\vcsa-ui-installer\win32\ directory and run installer.exe if you use Windows on your computer. If you use Linux, go to vcsa-ui-installer/lin64/ and run ./installer.
A standalone installer application is executed and provides four options.
Install – install a new instance of vCenter 7 (from scratch).
Upgrade – upgrade an existing vCenter Server appliance that is based on a Linux-like Photon OS.
Migrate – migrate from vCenter installed on Windows to vCenter Server Appliance 7.0.
Restore – restore vCenter from an existing vCenter backup.
Click Upgrade and upgrade vCenter (VCSA) to vCenter 7.
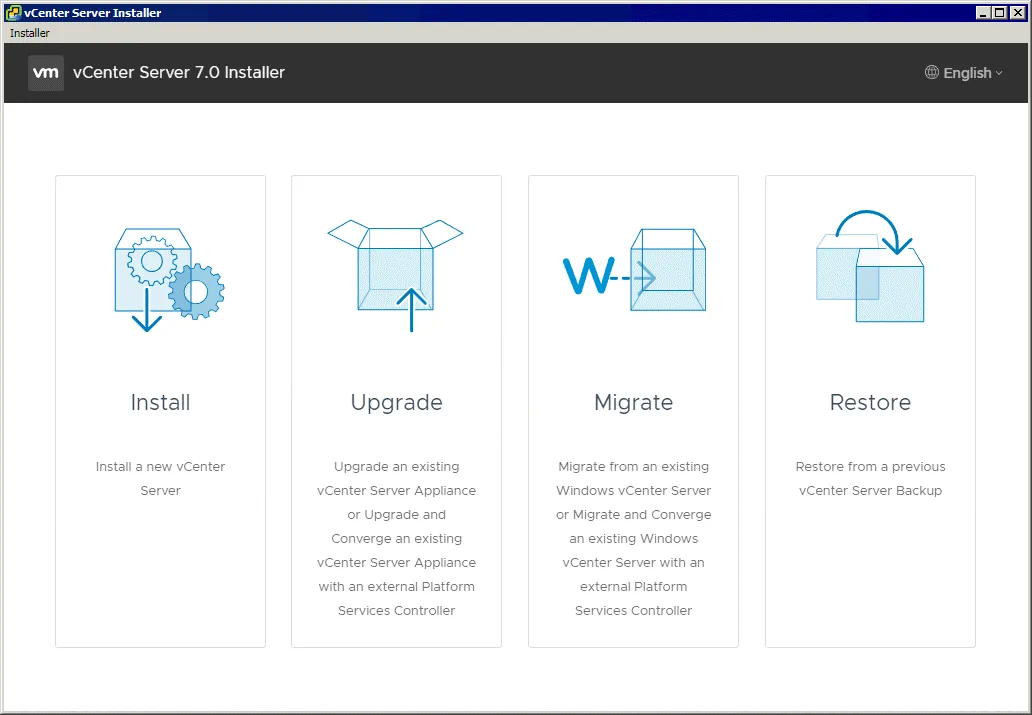
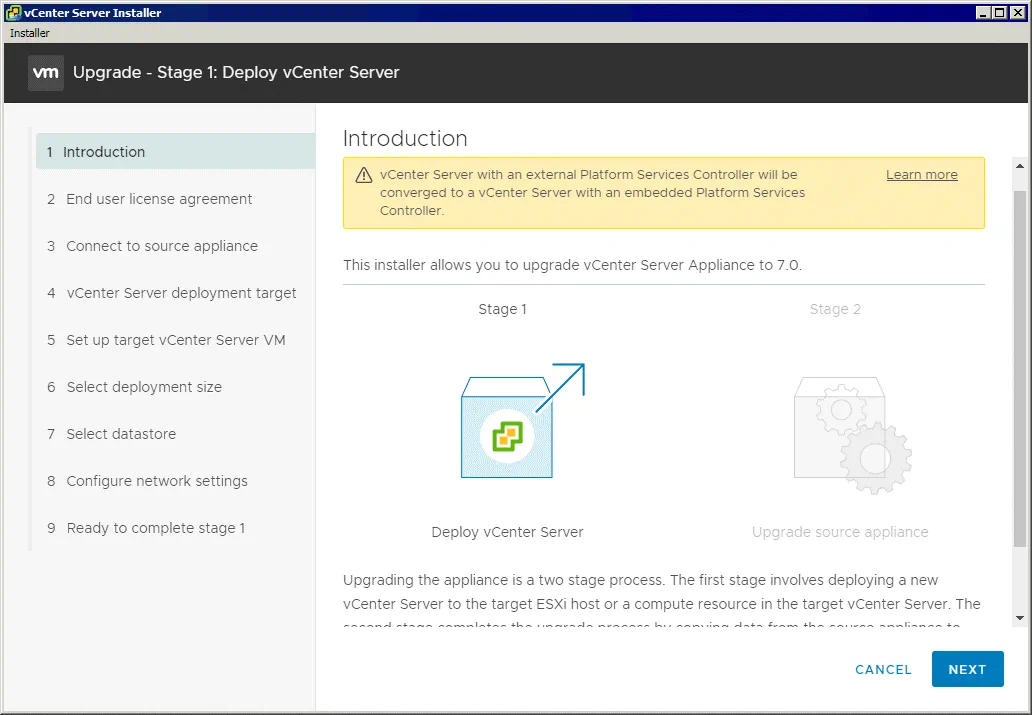
The Deploy vCenter Server wizard opens. The upgrade process consists of two stages just as the install process for a new vCenter instance.
Stage 1
1. Introduction. Read the information about upgrade to vCenter 7 and note that vCenter 7 is provided with an embedded Platform Services Controller only. Click Next at each step of the wizard to continue.
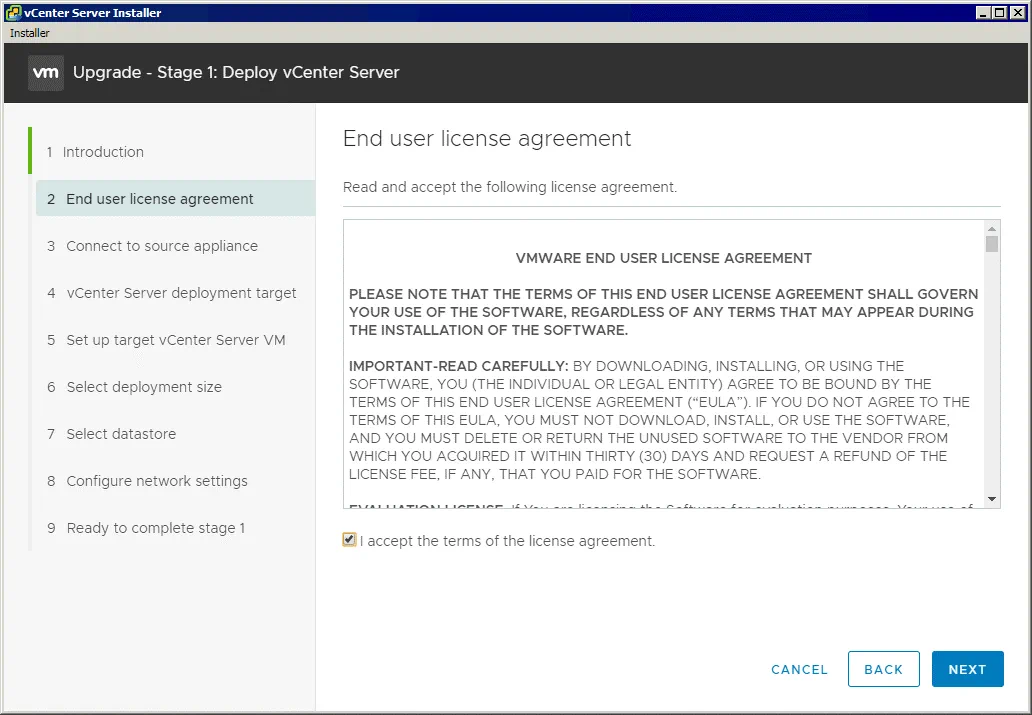
2. End user license agreement. Read the license agreement (EULA) and select the checkbox to accept the EULA.
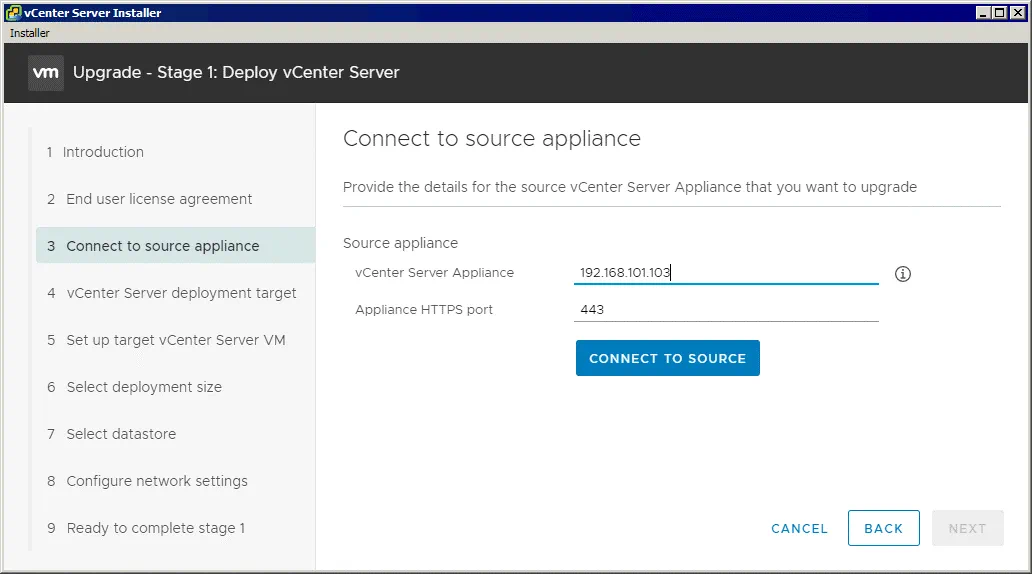
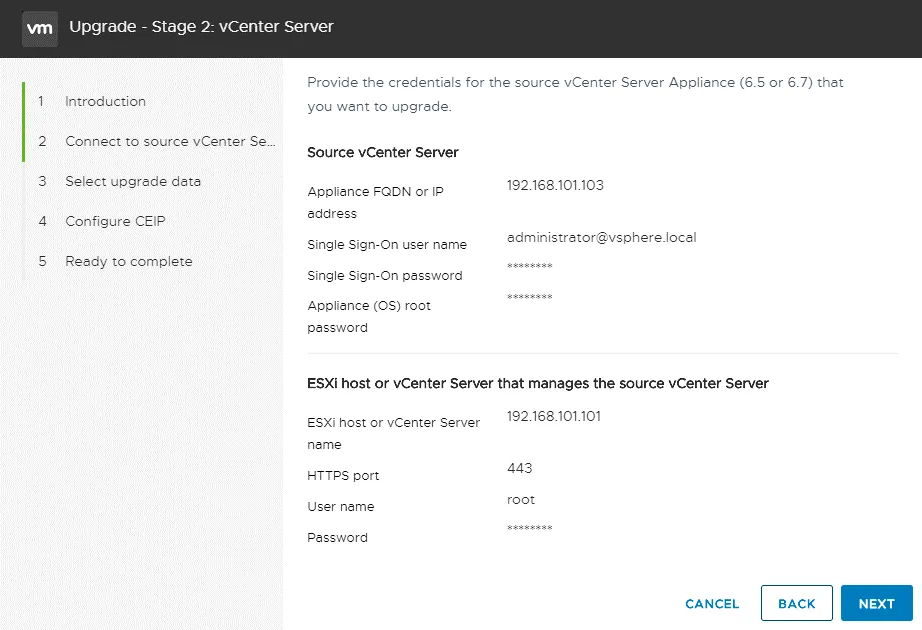
3. Connect to source appliance. Enter the IP address of the source (existing) vCenter Server Appliance (192.168.101.103 in this case) and define the appliance HTTPS port (443 by default). Click Connect to source.
We have successfully connected to the existing vCenter Server Appliance. Provide the details for vCenter Server Appliance that you want to upgrade.
SSO user name: administrator@vsphere.local
SSO password: Enter the password for administrator@vsphere.local
Appliance (OS) root password: Enter the password of the root account of the Photon OS on which VCSA is running.
ESXi host or vCenter Server that manages the source appliance
ESXi host or vCenter Server name: 192.168.101.101 (we enter the IP address of the ESXi host on which VCSA resides).
HTTPS port: 443
User name: root (the user name of the ESXi host on which the existing (source) VCSA is running)
Password: Enter the password for the ESXi root account
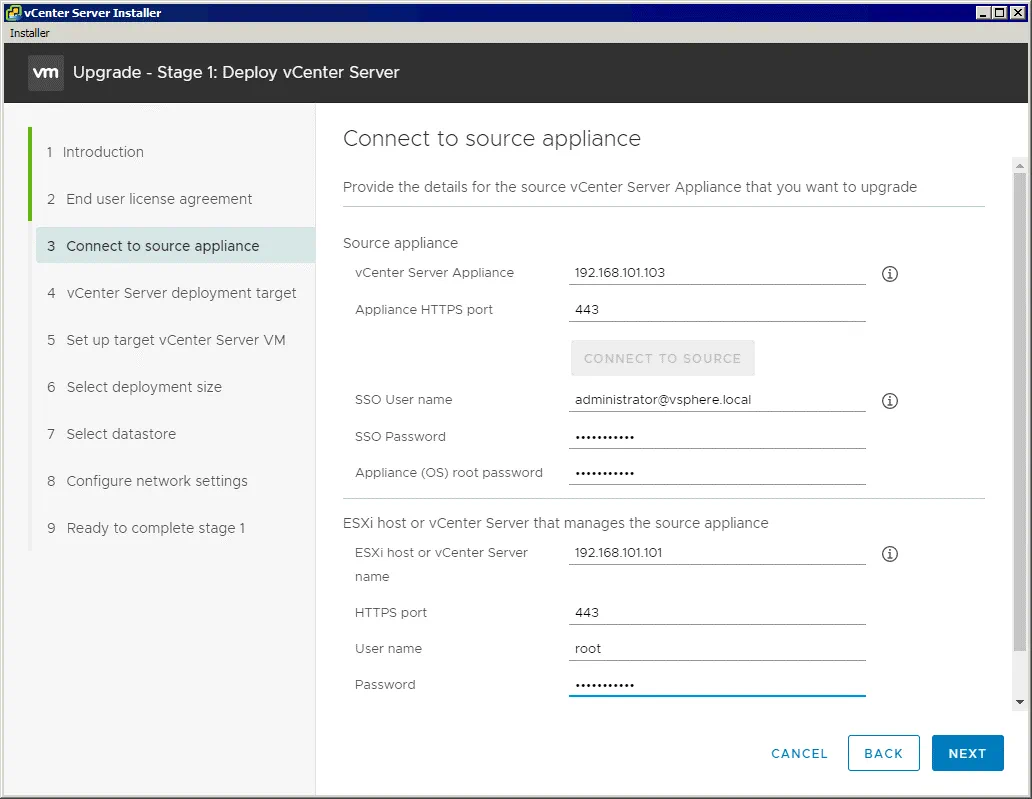
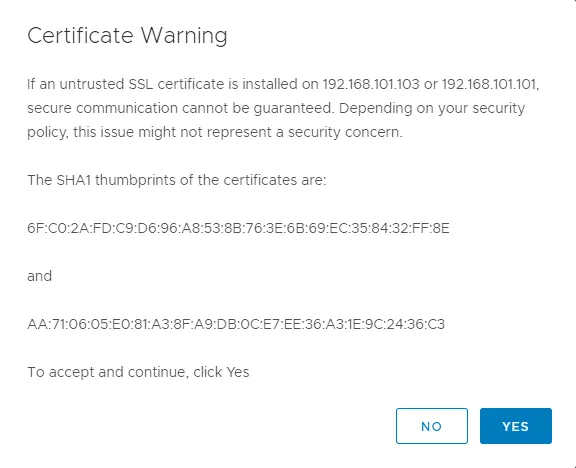
When a certificate warning is displayed, hit Yes to continue.
If you have entered the correct credentials at step three of the wizard, the next step is displayed.
4. vCenter Server deployment target. Specify the vCenter Server deployment target settings. Enter the IP address of an ESXi host on which you want to run vCenter 7 after upgrade, the port number and root credentials for this ESXi host.
ESXi host or vCenter Server: 192.168.101.101
HTTPS port: 443
User name: root
Password: ********

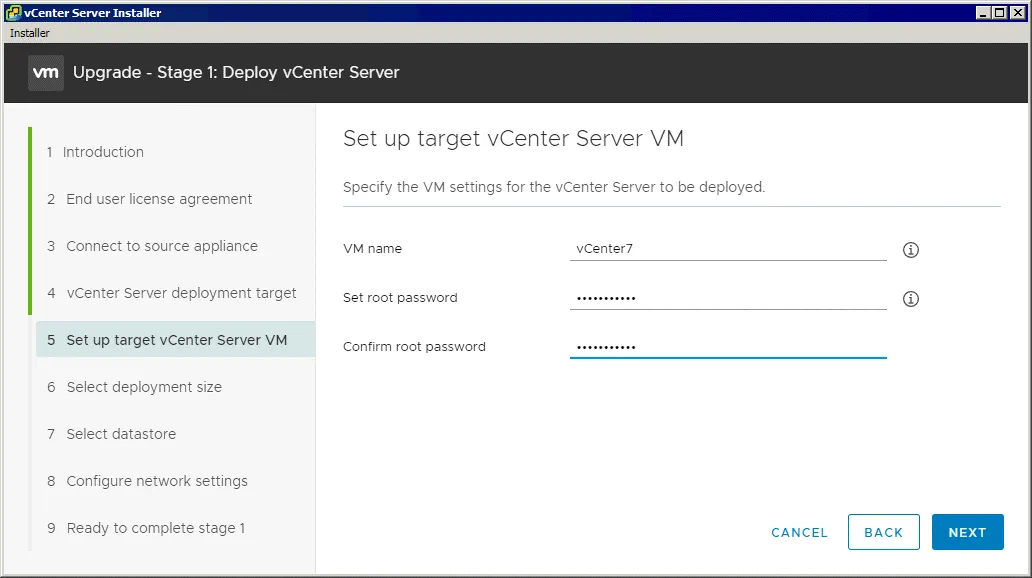
5. Set up target vCenter Server VM. Specify the VM settings for the vCenter Server to be deployed.
VM name: vCenter7 (please select a name that differs from an existing vCenter VM name).
Set root password: ******** (enter a password for the root user for the vCenter Server Appliance that will run on a Linux-based Photon OS).
Confirm root password: ******** (confirm the password).
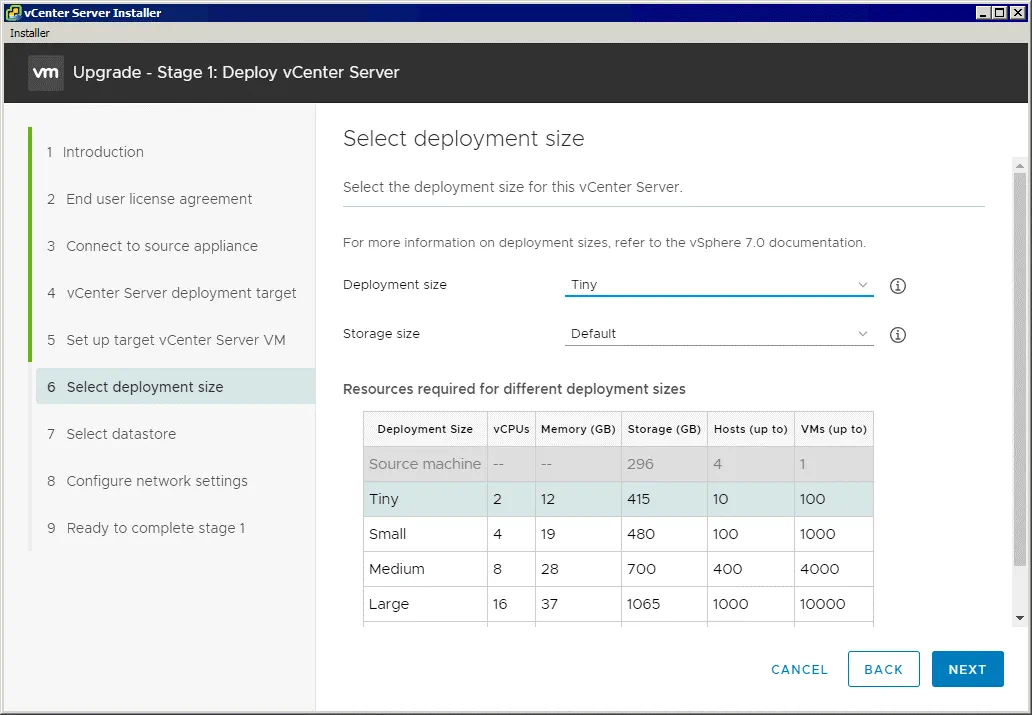
6. Select deployment size. Select the deployment size for your vCenter 7. You can select the same size as the one used for your current vCenter instance that you want to upgrade. As we use vCenter to manage a small environment in this example, we select Tiny in the deployment size options.
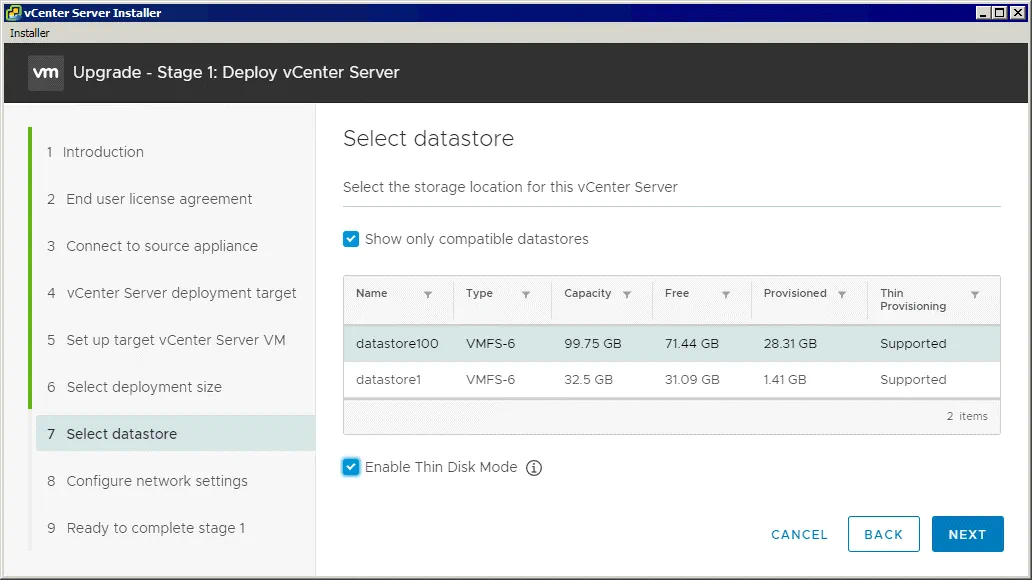
7. Select datastore. Select a datastore that has enough free space on the target ESXi host. Select the Enable Thin Disk Mode checkbox to use thin provisioning for virtual disks of VCSA.
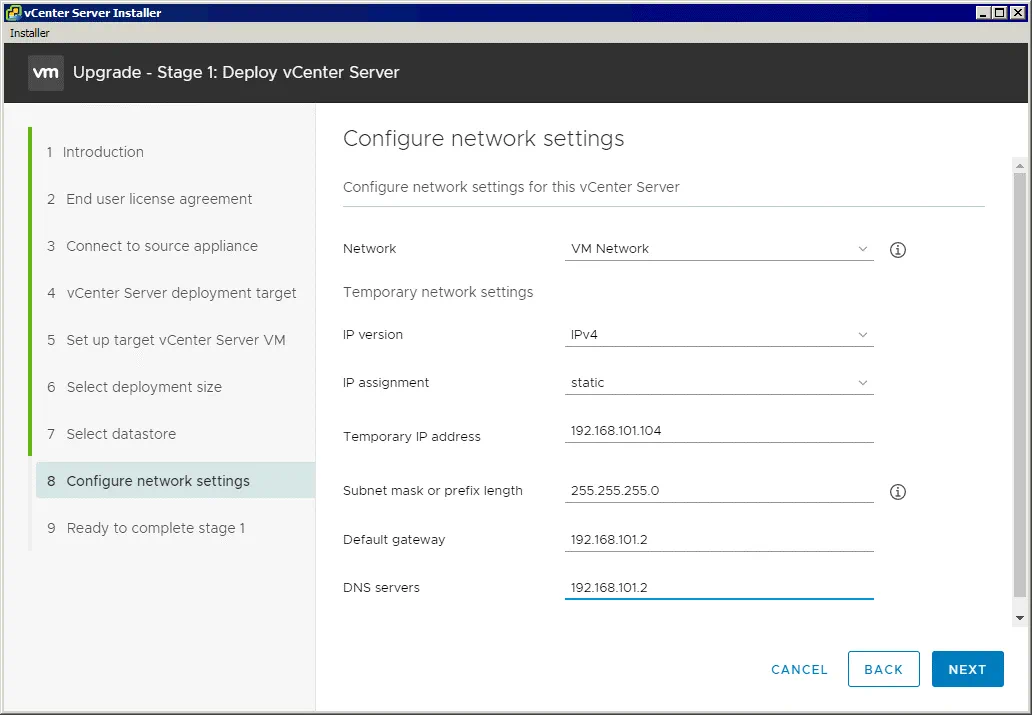
8. Configure network settings. Define network settings for vCenter Server Appliance 7.0. After finishing the vCenter upgrade process, network settings of your current vCenter 6.x instance will be applied to vCenter 7.
Network: VM Network (select a network to which you want to connect the vCenter 7 VM by using the appropriate virtual switch).
Temporary network settings
IP version: IPv4
IP assignment: static
Temporary IP address: 192.168.101.104 (a new vCenter 7 VM will be deployed during the vCenter upgrade process and a temporary IP address will be used for this VM until the upgrade process is finished and the vCenter 6 VM is not used).
Subnet mask or prefix length: 255.255.255.0 (/24 is the equivalent of this value)
Default gateway: 192.168.101.2
DNS servers: 192.168.101.2
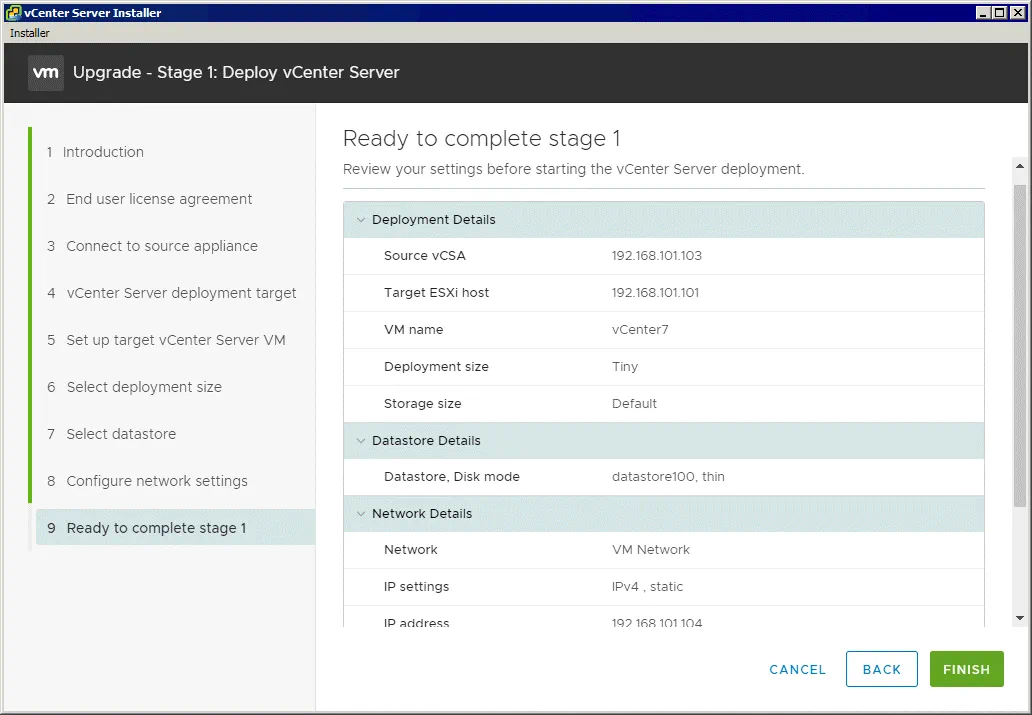
9. Ready to complete stage 1. Review your settings before starting the vCenter Server deployment. If everything is correct, hit Finish.
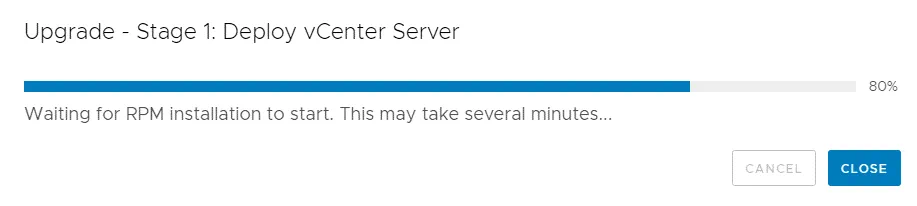
The vCenter 7 deployment process (stage 1) is started. Wait until the installation process is finished. Note that you shouldn’t interrupt this operation because you cannot resume installation after interruption. Be patient as it may take some time.
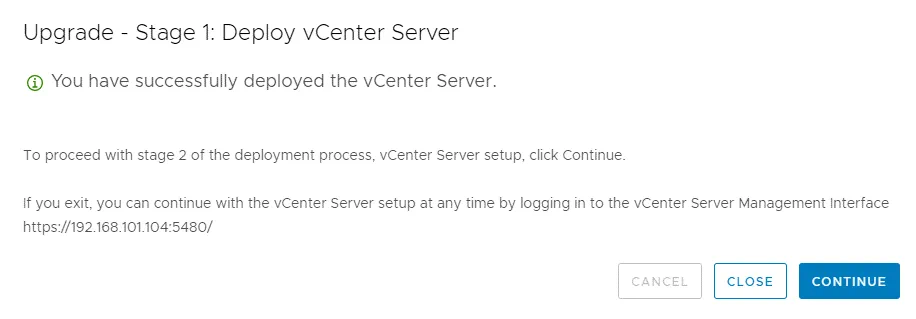
When stage 1 is finished, the appropriate message is displayed:
You have successfully deployed the vCenter Server.
Remember the link that can be used to continue installation and run stage 2. The link consists of the temporary IP address you have set before and the port used, that is, 5480.
http://192.168.101.104:5480
Similar links are used to perform basic configuration of VCSA after finishing upgrade/installation. Click Continue and go to stage 2.
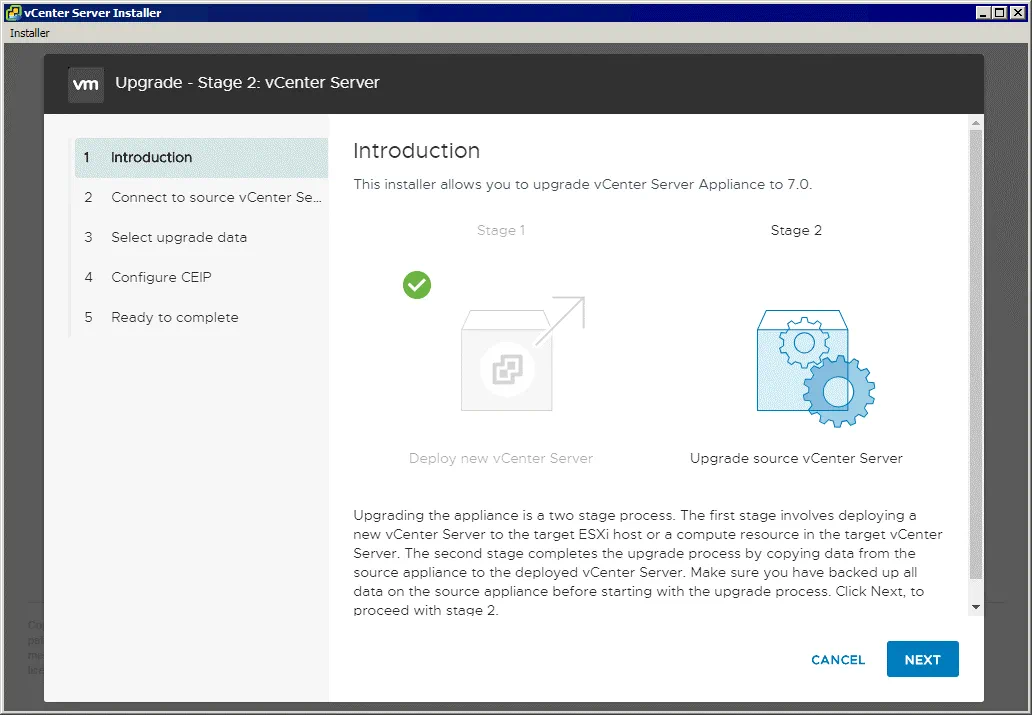
Stage 2
The vCenter Server upgrade wizard for stage 2 opens.
1. Introduction. Read the comments about the second stage. Hit Next at each step of the wizard to continue.
2. Connect to source vCenter Server. Review settings you have set in the first stage of upgrade to vCenter 7.
Pre-upgrade checks are in progress. Wait until these checks are finished.

If there are non-critical warnings, you can skip them.
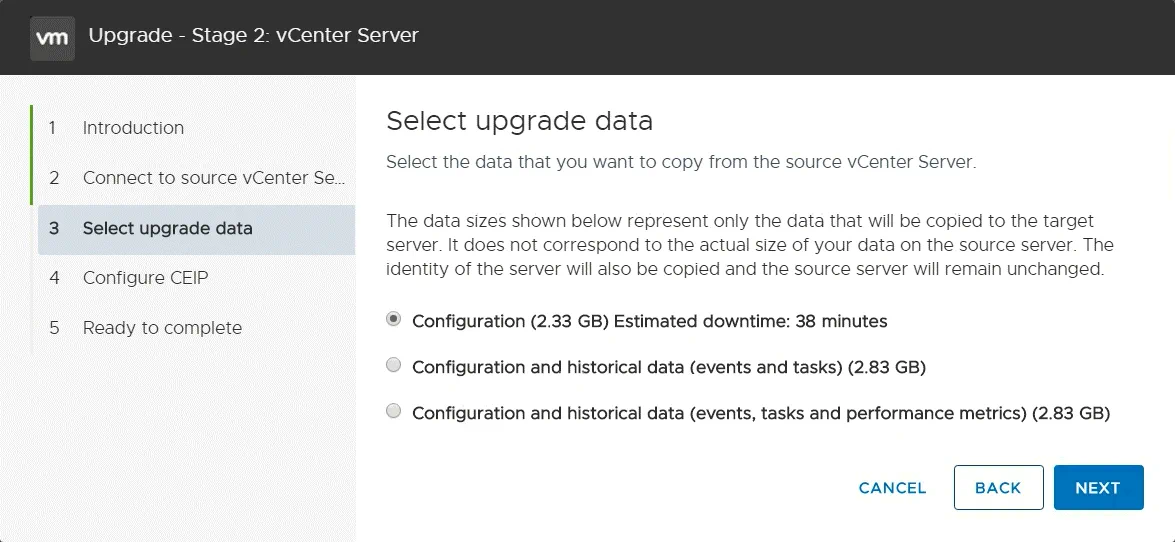
3. Select upgrade data. Select the first option to copy configuration from the source vCenter Server.
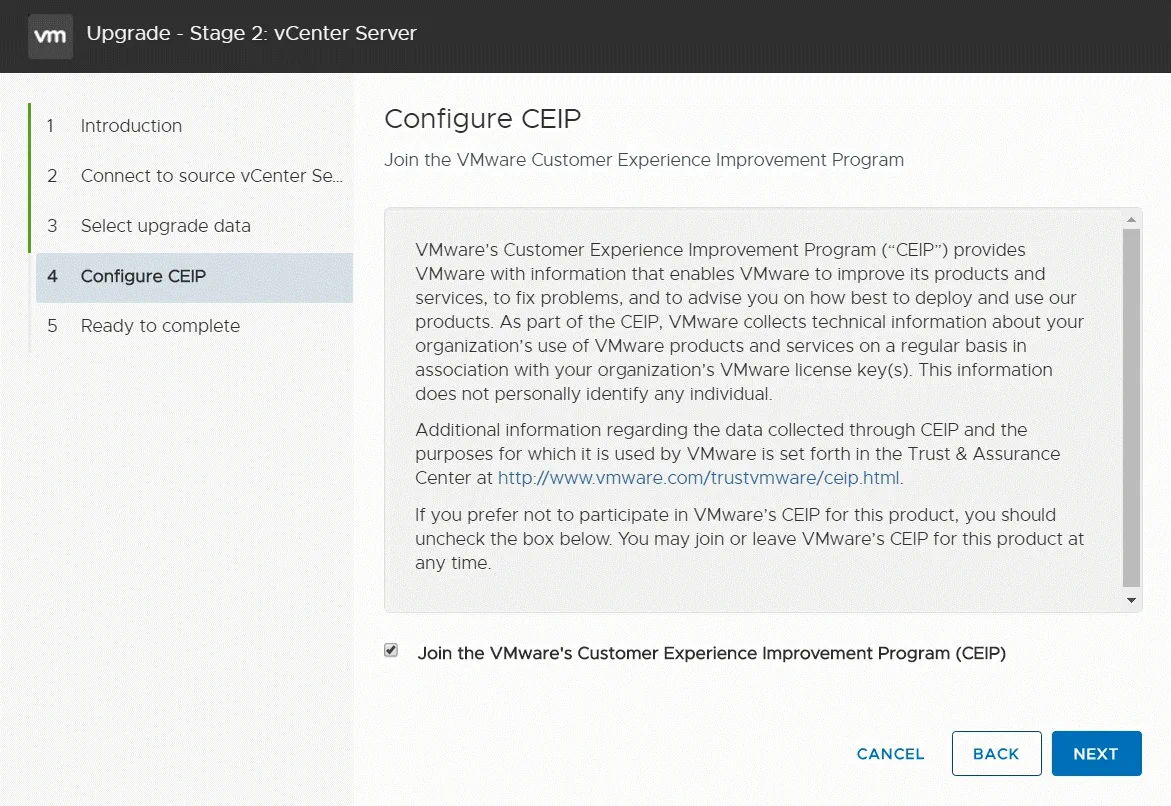
4. Configure CEIP (Customer Experience Improvement Program). You can leave the checkbox unselected if you don’t want to send statistics and other information about using vSphere to VMware.
5. Ready to complete. Check your settings and hit Finish to complete stage 2.
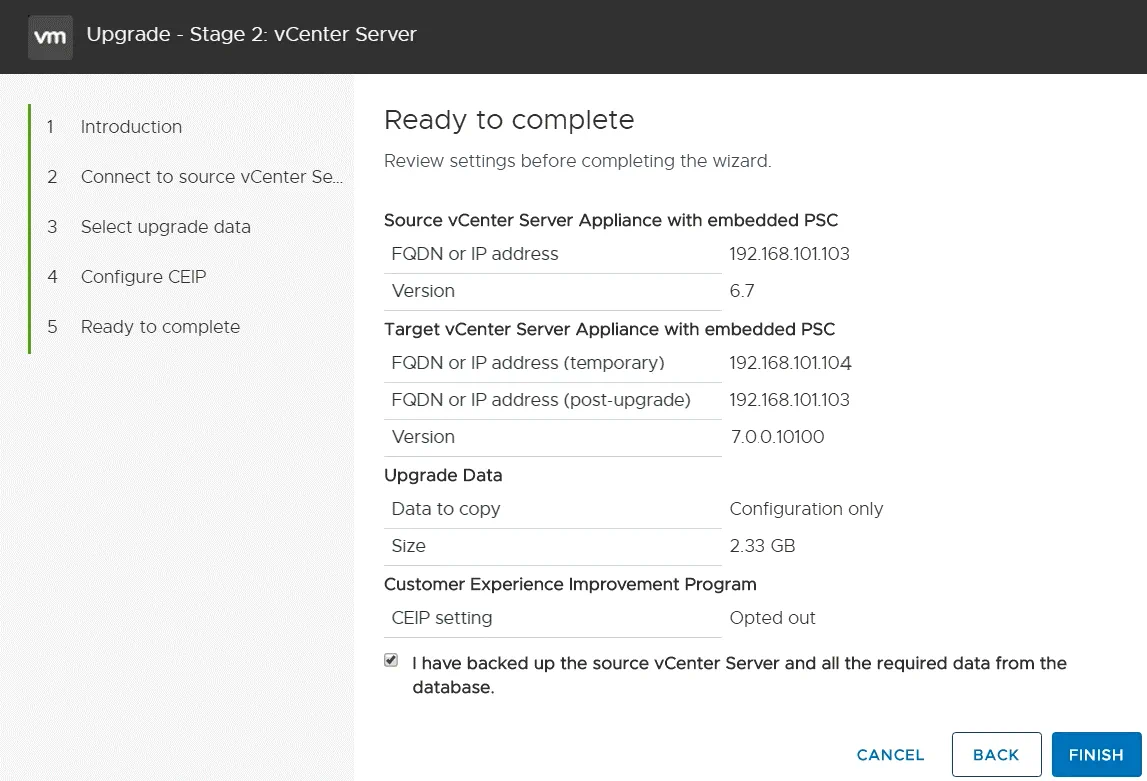
There will be downtime until the new vCenter 7 is configured and a network connection is established.

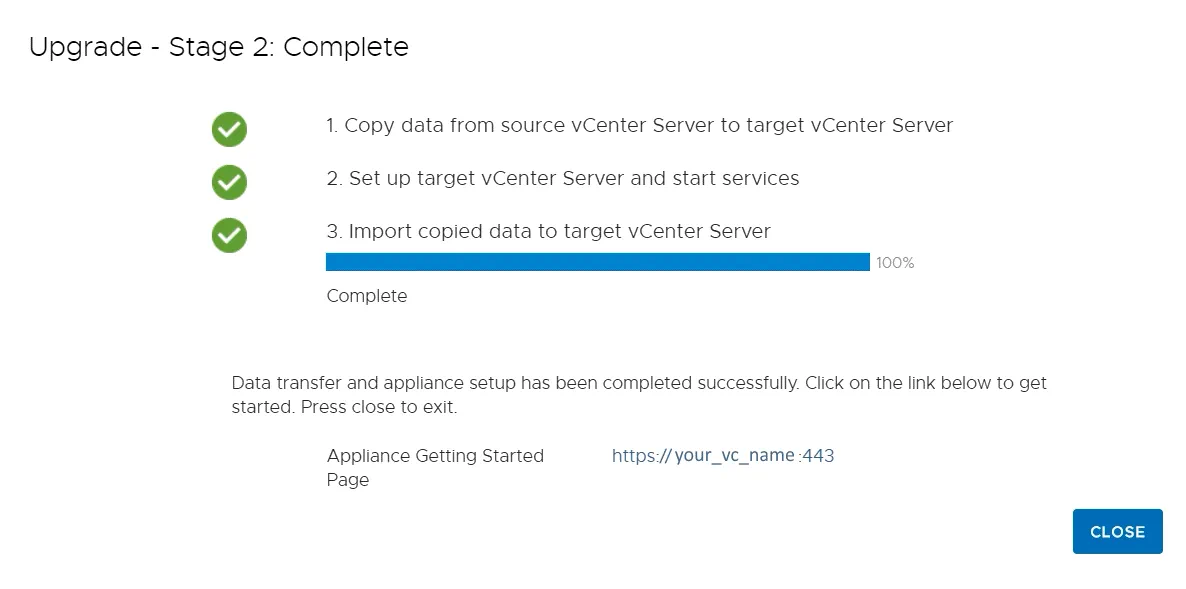
Wait until all needed data is copied to vCenter 7. If your upgrade to vCenter 7 is finished successfully, you will see the link to start using your vCenter 7 virtual appliance that contains the DNS name of your VCSA and port 443 (if you selected this port by default).
Enter a serial number to activate the vCenter 7 license. License keys from vCenter 6 are not compatible with vCenter 7.
Issues that May Occur
Not each attempt to upgrade vCenter is completed without issues. You may encounter issues when upgrading vCenter to vCenter 7. Let’s look at some common issues and find out how to fix errors during the vCenter upgrade process.
The VCSA installer opens a white blank window
The white window of the vCenter Server Appliance (VCSA) installer opens when you run the VCSA installer application in Windows. You cannot choose any options. This issue may occur when you run the installer multiple times on the same computer.
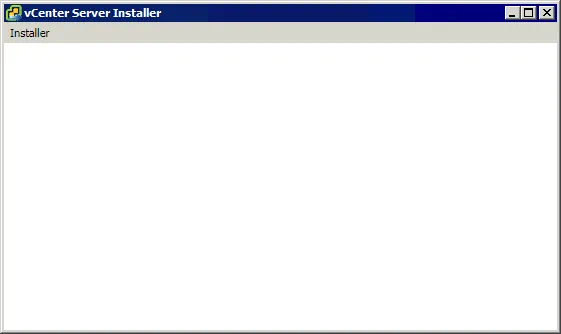
Possible solution
Go to the directory used by the VCSA installer:
C:\Users\user_name\AppData\Roaming\installer
Where user_name is the name of your Windows user account from which you execute the VCSA installer.
Delete the installer directory mentioned above.
Run the VCSA installer again. The installer should work and display the interface elements correctly.
The root password is expired
The root password is expired on the VCSA that must be upgraded. You enter the root password for connecting to VCSA, but the password doesn’t work and you cannot connect. By default, a root password expires after 90 days.
Possible solution
Connect to vCenter Server Appliance via SSH or open the command line interface directly on VCSA.
Open shell:
Command> shell
You can check the current status of the root password:
chage -l root
Change the root password:
passwd
Enter a new password.
Disable expiration for passwords to avoid this issue in future.
The first method is to enter the command:
chage -M -1 root
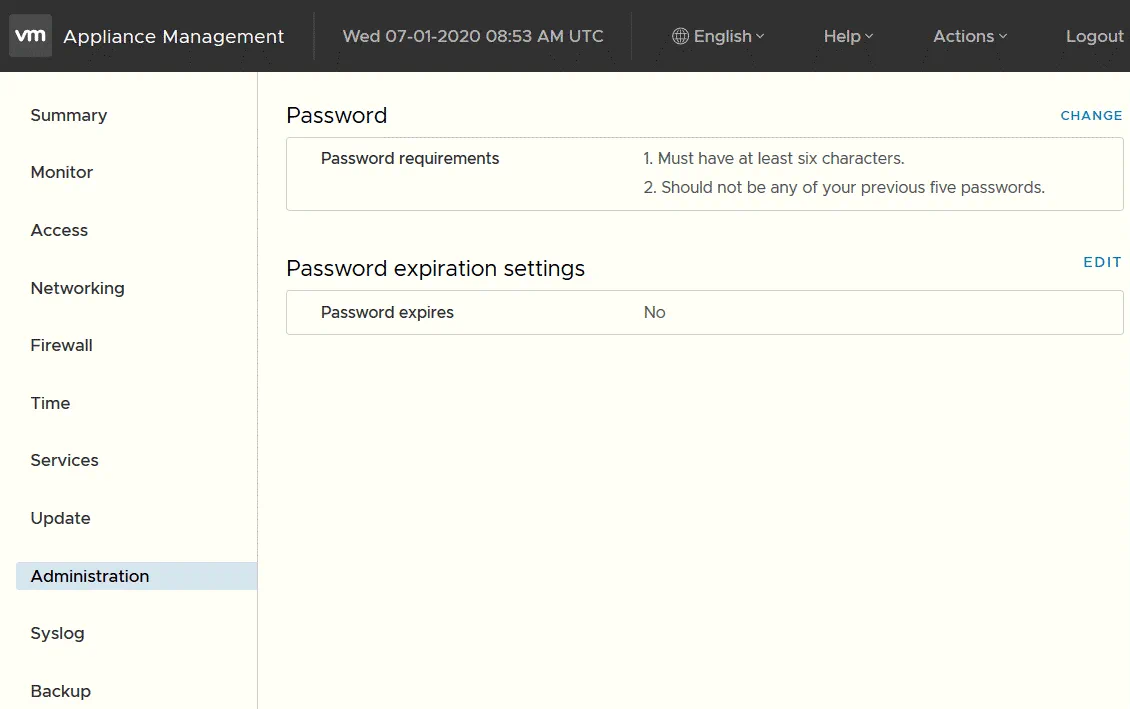
The second method is to use the web interface of VCSA.
https://your_vcsa_name_or_ip_address:5480
Login to the web interface of VCSA by using a new root password.
In the left pane click Administration.
In the Password Expiration Settings section of the Administration page select the needed option.
Root password expires: No
Check the expiration settings for the root user in the VCSA shell:
passwd -s root
or
chage -l root
Pre-upgrade check fails at stage 2
This error occurs at stage two when the upgrade is almost finished.
Pre-upgrade check result:
Internal error occurs during VMware vSphere Update manager pre-upgrade checks.
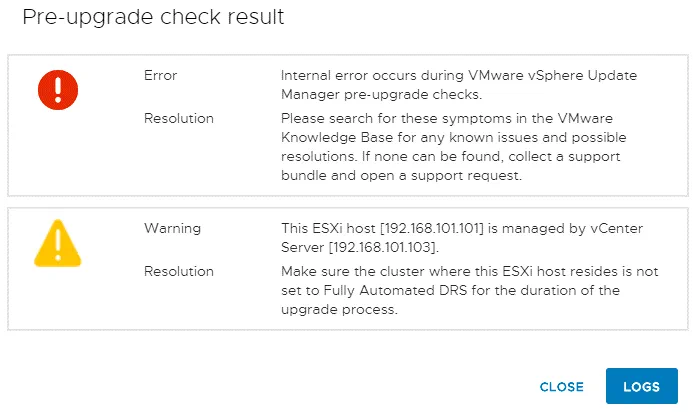
Possible solution.
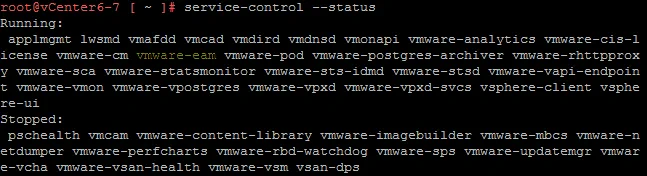
Log in to your source vCenter Server Appliance (the Photon OS) via SSH and open the console (that is also called terminal or Linux shell).
Check the status of services:
service-control --status
Make sure that vmware-eam (VMware ESX Agent Manager) is running.
Go to the vmware-eam directory:
cd /etc/vmware-eam
Copy the eam.properties file to back up this file:
cp eam.properties eam.properties.bak
Check the contents of the sca.hostid file:
cat /etc/vmware/install-defaults/sca.hostid
![]()
Save the displayed id after running the command. In our case the value is:
0b094c28-f5c2-4a61-8a90-7460ea7e5453
Edit the eam.properties file:
vim eam.properties
If your file is empty or almost empty on the source vCenter Server Appliance, add the text to the file:
See fix.txt
Change the hostid to your hostid value and change the IP address or FQDN (Fully Qualified Domain Name) of your vCenter Server accordingly.
Set the permissions for the file:
chmod 0644 eam.properties
Start the EAM service with the command:
service-control --start vmware-eam
You can delete the eam.properties.bak file.
If this configuration didn’t help you resolve the issue, perform a fresh installation of vCenter 7 instead of performing upgrade to vCenter 7 from earlier versions.
How to Upgrade VMware vSAN to Version 7.0
VMware vSAN 7 provides new useful features, improved efficiency and enhancements for 2-node stretched clusters. Let’s find out how to upgrade VMware vSAN to version 7.
VMware vSAN 7 requirements
Before upgrading vSAN to version 7.0 you should familiarize yourself with vSAN requirements. The main requirements are to upgrade vCenter to vCenter 7 and upgrade ESXi to ESXi 7 on all hosts used in a vSAN cluster. After upgrading to vCenter 7 and ESXi 7 (on all vSphere hosts used for a vSAN cluster) you can upgrade to vSAN 7.
Three ESXi hosts are required for standard vSAN 7 deployments (you can use more than three hosts). You can use two ESXi hosts in a vSAN cluster for deployment in a remote office/branch office.
Upgrade to VMware vSAN 7
For a vSAN upgrade, you have to upgrade a vSAN disk version, because other components are built in ESXi 7 and ESXi was upgraded when you performed upgrade of ESXi hosts.
Open VMware vSphere Client 7 and log into vCenter 7. Make sure that all ESXi hosts in an existing cluster are upgraded to ESXi 7.0.
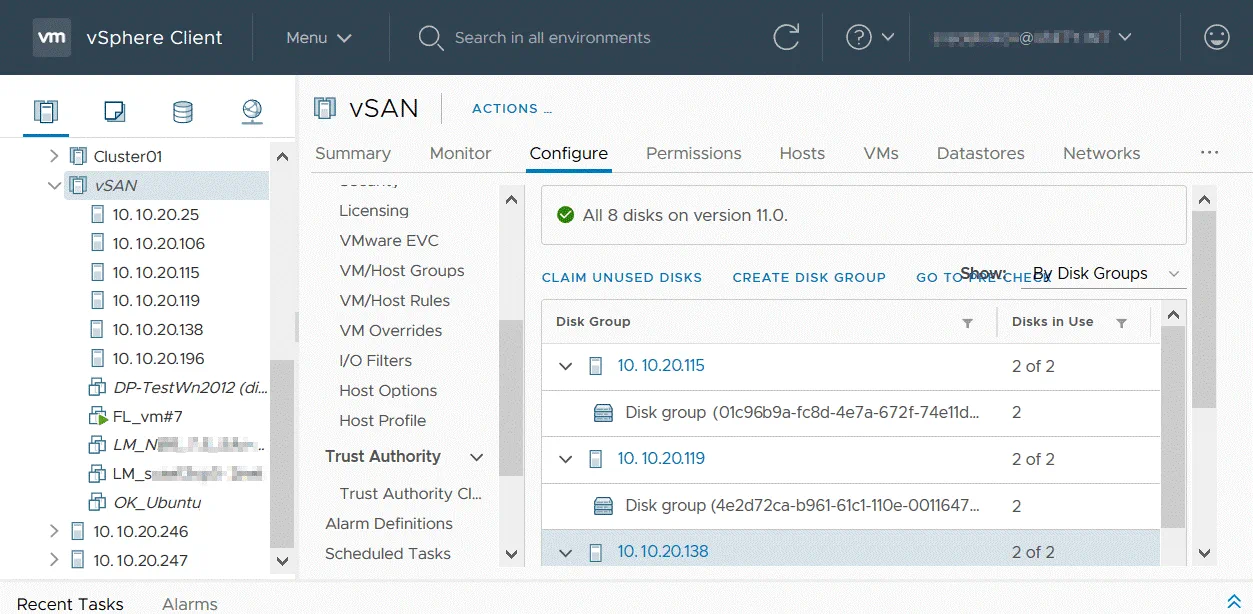
Perform an upgrade pre-check. In order to do that, go to Hosts and Clusters, click your vSAN cluster name, select the Configure tab. In the vSAN section, select Disk Management and click Pre-check upgrade (in the top right corner).
It is recommended that you perform a backup of virtual machines and other data located on vSAN storage before starting VMware vSAN upgrade. Use NAKIVO Backup & Replication to perform a vSphere backup.
If the pre-check upgrade is completed successfully and its status is Ready to Upgrade, you can start the VMware vSAN upgrade process. Click the Upgrade button in the top right corner (near the Pre-check upgrade button).
VMware vSAN upgrade is a long running operation. You will not be able to add older hosts (ESXi hosts whose version is older than 7.0) to a vSAN 7 cluster. One disk group is upgraded at a time. Wait until the VMware vSAN upgrade process is finished. When upgrade to VMware vSAN 7 is completed, you will see the message: All n disks are on version 11.0.
Native file services such as NFS v.3.1 and 4.1 are available for vSAN after upgrading to VMware vSAN 7.
Conclusion
The upgrade to vCenter 7 is not a difficult operation, but it requires attention and time. The upgrade process consists of two stages. During stage 1, a new instance of vCenter Server Appliance 7.0 is deployed on an ESXi host. During stage 2, configuration is transferred from vCenter 6 to vCenter 7. Then vCenter 6.x is disconnected. A VMware vSAN upgrade can be performed after upgrading vCenter and all ESXi hosts in a vSAN cluster to version 7.0. If upgrade is successful, you get the advantages of using vSphere 7.