How to Upgrade from VMware vSphere ESXi 6.7 to 7.0
With the launch of a major new vSphere release, it’s time to consider upgrading your infrastructure. The latest VMware vSphere 7 adds a number of new features, and many organizations will be looking forward to upgrading from vSphere 6.7 to vSphere 7.0. There are two steps for a vSphere upgrade:
- Upgrade VMware vCenter to version 7, the centralized management component of ESXi hosts, clusters, etc.
- Upgrade VMware ESXi, the hypervisor.
For ESXi 6.0 or earlier, the upgrade process to 7.0 can be done in several ways. You can upgrade first to ESXi 6.5 and then to 7.0 or simply opt for a clean installation of ESXi 7. However, for servers running ESXI 6.5 or 6.7, you can simply upgrade to ESXi 7 without the need for a clean installation. Learn how to upgrade from ESXI 6.7 to ESXi 7.0 Update 2 in this walkthrough.

ESXi Upgrade Requirements
- The hardware of the server running ESXi 6.7 must be compatible with ESXi 7.0, that is, it must meet the hardware requirements for ESXi 7.0. If an unsupported device is present, such as an old unsupported CPU or disk controller, the ESXi upgrade will not be applied to the server.
See VMware Hardware Compatibility Guide. - There must be no running VMs on an ESXi host when you start the ESXi upgrade process.
- There must be enough free storage space for the ESXi upgrade.
- If an ESXi host is managed by vCenter Server, the vCenter version must be the same as the target version of ESXi after the upgrade or higher. VMware vCenter 7.0 can manage ESXi 7.0, ESXi 6.7 and ESXi 6.5, but vCenter 6.7 cannot manage ESXi 7.0 hosts. Thus, you have to upgrade vCenter first and only then proceed to the ESXi upgrade if you want to upgrade vSphere 6.7 to 7.0. If you need to update ESXi to ESXi 7.0 Update 2 in vCenter, you need to update vCenter or deploy vCenter 7.0 Update 2 first. Follow this vSphere upgrade order, otherwise you can lose the connection between an ESXi host and vCenter.
- If there are any VMware add-ons or plugins installed, check their compatibility by using the VMware Compatibility Matrix.
ESXi Upgrade Methods
This blog post covers two main methods for a VMware ESXi upgrade:
- Upgrade by using ESXCLI, the command line interface. This method can be used for VMware ESXi 6.7 to 7.0 upgrade for standalone ESXi hosts and ESXi hosts managed by vCenter.
- Upgrade by using Lifecycle Manager. This method is applicable only for ESXi hosts managed by vCenter Server. VMware Lifecycle Manager for VMware vSphere 7.0 is a modified VMware Update Manager that was used in vSphere 6.7. This is the preferred method for upgrading ESXi hosts managed by vCenter and allows you to upgrade multiple ESXi hosts at once by using the same image.
The workflow of upgrading ESXi 6.7 to ESXi 7.0, ESXi 7.0 Update 1, ESXi 7.0 Update 2, and other versions/builds of ESXi 7 is similar. This approach is also true for upgrading ESXi 7.0 to ESXi 7.0 Update 2, ESXi 7.0 Update 2a, etc. Keep in mind that the names of installation files and update profiles differ in this case.
How long does an ESXi upgrade take? An ESXi upgrade takes a few minutes if there are no compatibility issues or other problems.
ESXi Upgrade by Using ESXCLI
Upgrading ESXi 6.7 to ESXi 7.0 Update 2 by using ESXCLI is straightforward, but you should still have an ESXi backup before upgrading. This way, if anything goes wrong, you can roll back to the last version using the backup. For more information on backups, read how to back up an ESXi configuration.
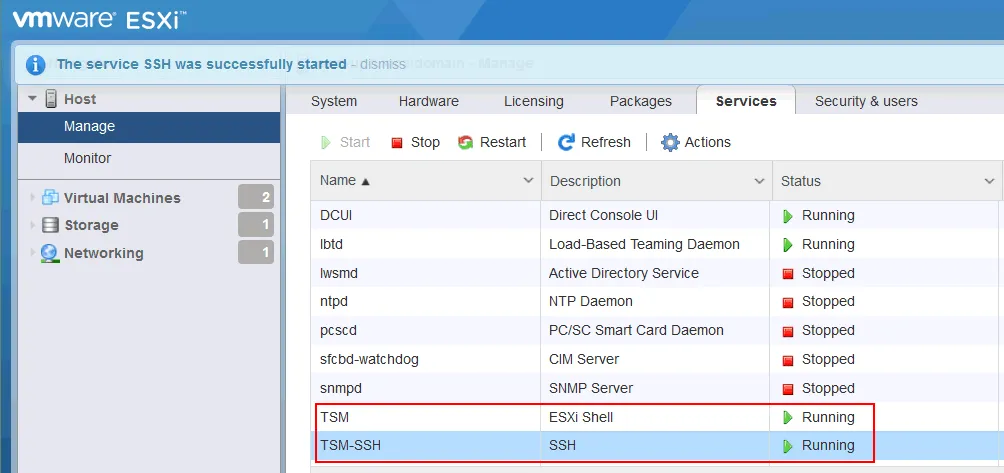
Enable ESXi Shell and SSH to access the command line interface on the ESXi host. You can do this by using one of two methods:
- In the ESXi direct console (DCUI), open System customization and in Troubleshooting options, hit Enable ESXi Shell and Enable SSH. This configuration enables SSH and ESXi Shell permanently until you manually disable them.
- Enter the IP address of your ESXi host in a web browser. Log in to the VMware Host Client by using your ESXi root credentials. In the web interface of the VMware Host Client go to Manage > Services.
Start the services:
- TSM
- TSM-SSH
These services will be enabled until ESXi reboot if you started the services in VMware Host Client.
Check the current version of ESXi in the ESXi Direct Console or ESXi Shell by using the vmware -v command or in VMware Host Client by going to Help > About.
Shut down all VMs running on the ESXi host.
ESXi upgrade by using ESXCLI is divided into two types:
- Offline method: you have to download the offline bundle from the VMware website manually, upload the file to the ESXi datastore, and use this bundle for the ESXi upgrade.
- Online method: you should use VMware online repositories to download and install new packages for an ESXi profile update.
Offline method for ESXi upgrade
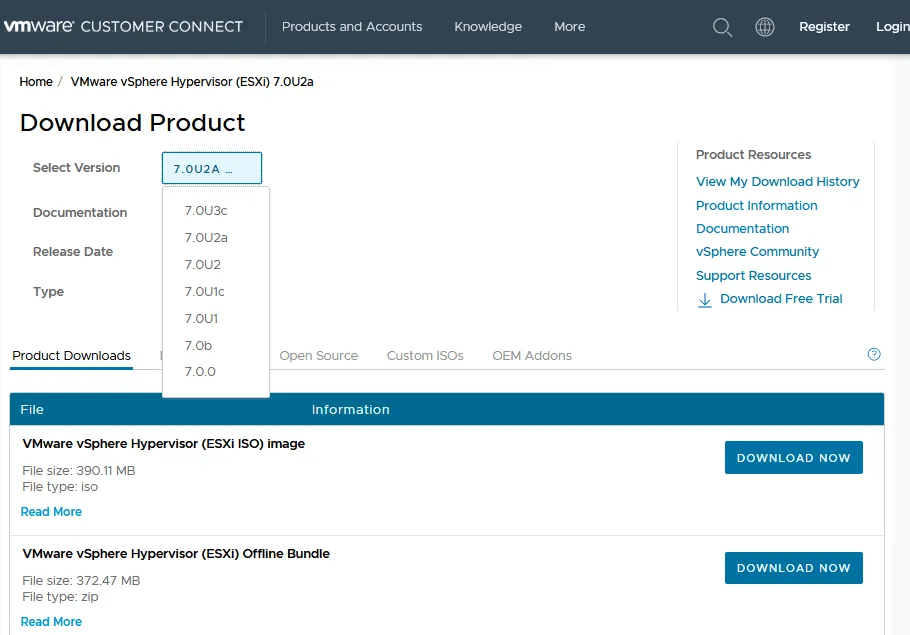
- Download the ESXi 7.0 Update 2 offline bundle from the VMware website. The zip archive of the offline bundle is available along with the ESXi ISO installation image. You can select the needed version in the drop-down list which contains ESXi 7.0, ESXi 7.0 Update 1, ESXi 7.0 Update 2, and other versions. In this example, the name of the downloaded VMware vSphere Hypervisor (ESXi) offline bundle file is: VMware-ESXi-7.0U2d-18538813-depot.zip
- Upload the downloaded zip file to the ESXi datastore. You can use VMware Host Client or any SFTP client (if you want to upload a file via SSH). Let’s use VMware Host Client to upload the file.
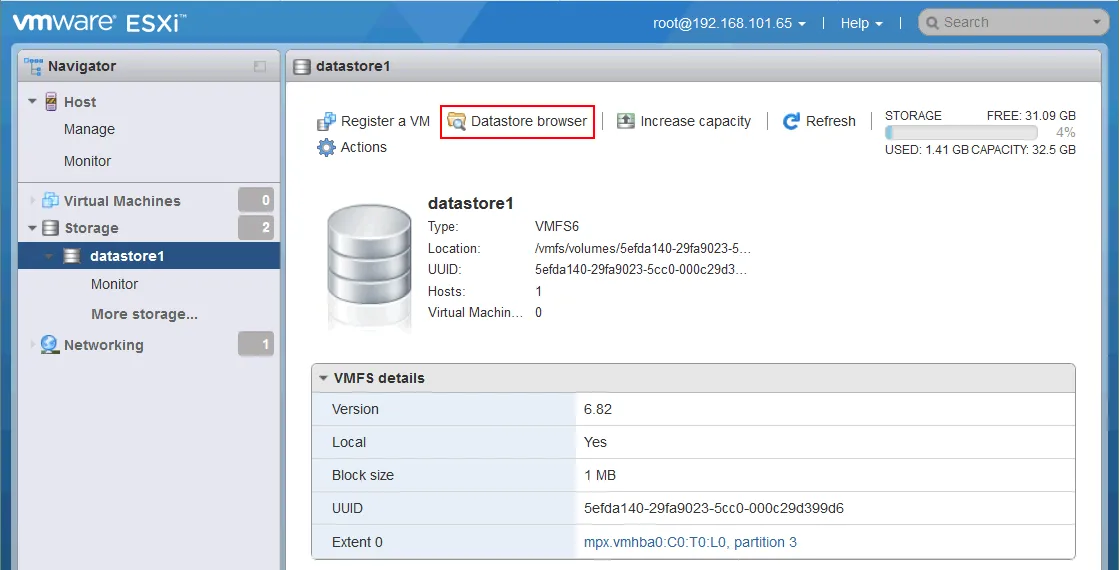
- Go to Storage > Datastores, select the datastore (datastore1 in this example), and click Datastore Browser.
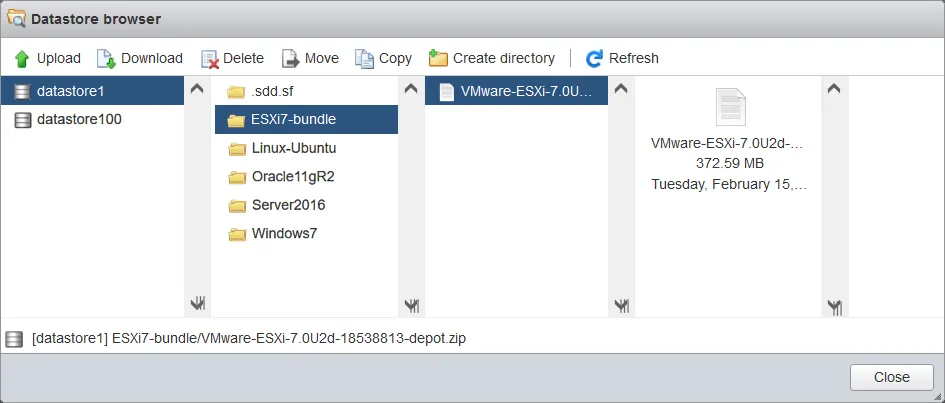
- Select a directory to store bundle files or create a new directory in the datastore browser. We create the ESXi7-bundle directory to store the VMware-ESXi-7.0U2d-18538813-depot.zip file. Click Upload to browse a zip bundle file and upload the file to the selected directory in the datastore.
- Make sure that there are no VMs in the running state on this ESXi host before starting the ESXi upgrade process.
vmware -vis the command that allows you to check the current version of ESXi running on your server in the console. -
Run the update command to upgrade ESXi 6.7 to 7.0 Update 2:
esxcli software profile update -p ESXi-7.0U2d-18538813-standard -d /vmfs/volumes/datastore1/ESXi7-bundle/VMware-ESXi-7.0U2d-18538813-depot.zipwhere
ESXi-7.0U2d-18538813-standardis the ESXi profile name that contains the version and build number that is equal to the ESXi version and build number defined in the name of theVMware-ESXi-7.0U2d-18538813-depot.zipfile used for the ESXi upgrade. A profile consists of VIBs and defines an ESXi image. A VIB is an ESXi software package. - Wait until you see the command output.

- After the successful execution of the command you can see a list of updated packages (VIBs – VMware installation bundles) in the console output.

- Reboot the ESXi host to finish the ESXi upgrade:
reboot
Don’t forget to assign a serial number for ESXi 7.0 because the serial number for ESXi 6.7 doesn’t work for ESXi 7.0 or for ESXi 7.0 Update 2. Since the vSphere 6 license is not valid, the upgraded ESXi 7.0 host starts to work in the full-featured evaluation mode for a 60-day period. Thus, you have 60 days after the upgrade to enter a valid vSphere 7 serial number otherwise the functionality of ESXi 7.0 will be limited.
Online method for an ESXi upgrade
When using the online method, you should configure internet access for the ESXi host that you want to upgrade and manually place the host in maintenance mode.
-
List the current image profile and contained packages:
esxcli software profile get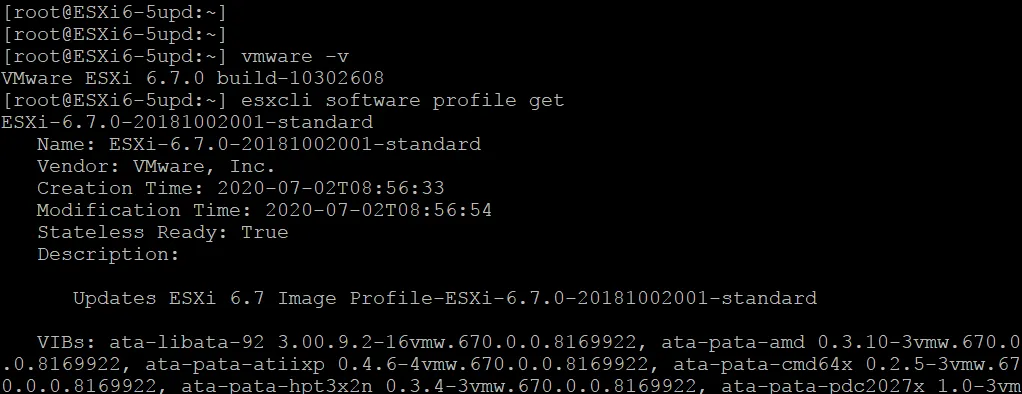
-
Enter ESXi into maintenance mode:
vim-cmd /hostsvc/maintenance_mode_enter
or
esxcli system maintenanceMode set --enable true
-
Allow HTTP traffic by editing the settings in the built-in firewall on the ESXi host:
esxcli network firewall ruleset set -e true -r httpClient
-
List profiles provided by VMware for ESXi 7.0 Update 2 in VMware repositories:
esxcli software sources profile list -d https://hostupdate.vmware.com/software/VUM/PRODUCTION/main/vmw-depot-index.xml | grep ESXi-7.0U2A software depot is a collection of VIBs and image profiles. It has a hierarchy of files and directories that can be accessed via HTTPS. Companies that have large VMware vSphere environments can create own depots and use vSphere auto-deploy to install updates on a number of ESXi hosts.
Let’s use this profile: ESXi-7.0U2d-18538813-standard
-
You can check which packages will be installed before running the ESXi upgrade command:
esxcli software profile update -d https://hostupdate.vmware.com/software/VUM/PRODUCTION/main/vmw-depot-index.xml -p ESXi-7.0U2d-18538813-standard --dry-run
-
Run the update process:
esxcli software profile update -d https://hostupdate.vmware.com/software/VUM/PRODUCTION/main/vmw-depot-index.xml -p ESXi-7.0U2d-18538813-standard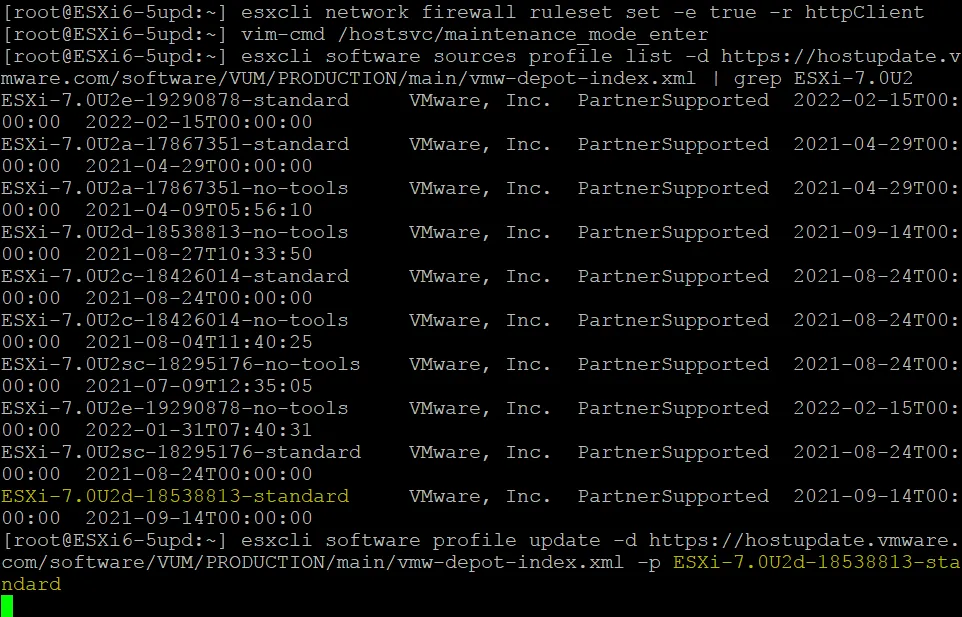 Wait for a few minutes until the upgrade process is finished.
-
Choose esxcli software profile update instead of esxcli software profile install to prevent overwriting existing packages, drivers, and configuration.
Note: If you see the error message:
Got no data from process: LANG=en_US.UTF-8 /usr/lib/vmware/esxcli-software profile.update -d “https://hostupdate.vmware.com/software/VUM/PRODUCTION/main/vmw-depot-index.xml” -p “ESXi-7.0.0-15843807-standard”,
check whether there is a persistent scratch partition. There may not be a persistent scratch partition if you’re running ESXi from a USB flash drive. Read the blog post about running ESXi from a USB flash drive to learn more about ESXi partitions.
-
If everything is correct, reboot the ESXi host for the changes to take effect.
reboot
-
Exit maintenance mode with the command:
vim-cmd /hostsvc/maintenance_mode_enter
or
esxcli system maintenanceMode set --enable false
ESXi Host Upgrade in vCenter
Open VMware vSphere Client in your web browser to access vCenter.
There are two ESXi 6.7 hosts in this example, and these hosts are managed by vCenter 7.0.2. Shut down virtual machines on the ESXi hosts that you want to upgrade or migrate those VMs to other ESXi hosts. You can practice upgrading ESXi hosts in a virtual environment by running ESXi hosts and vCenter as virtual machines.
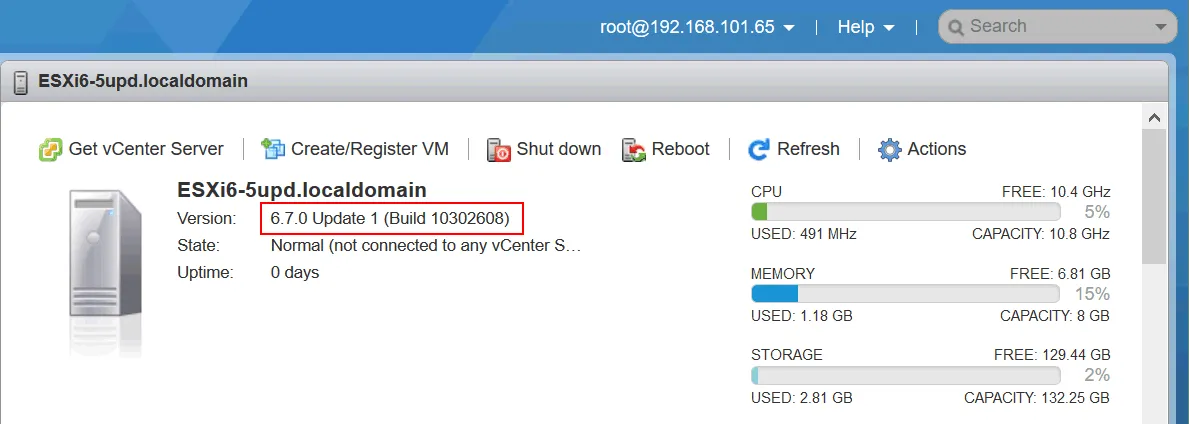
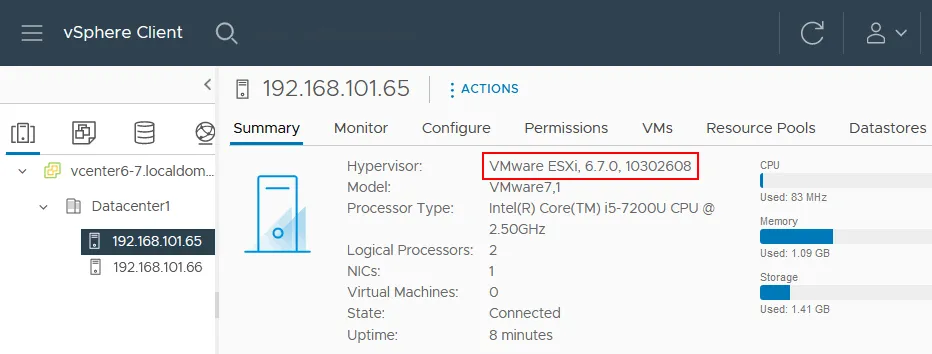
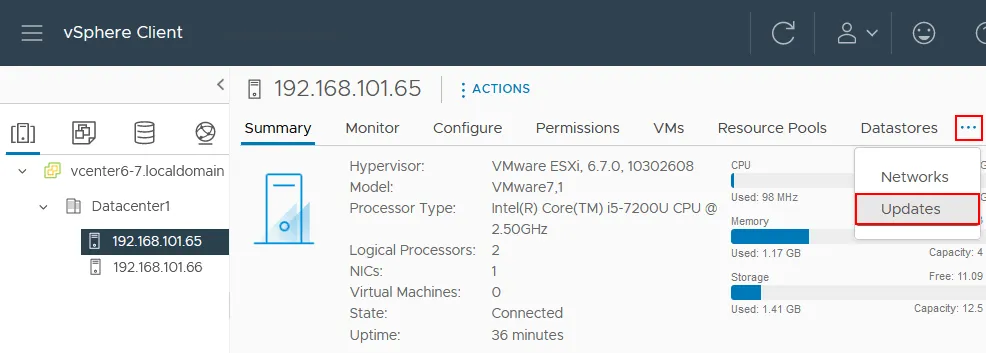
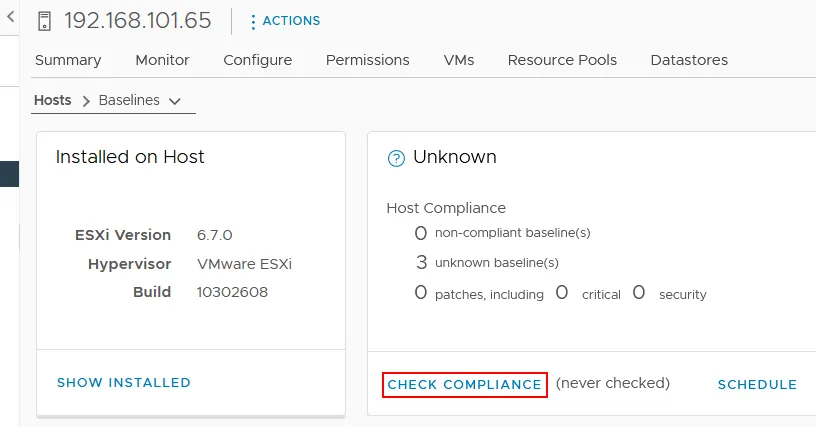
Let’s upgrade the ESXi host with IP address is 192.168.101.65. Select the needed ESXi host and check the current hypervisor version. As you can see in the screenshot below, the current version of our ESXi host before upgrade is 6.7.0 build 10302608. If you want to upgrade multiple ESXi hosts, you can select a cluster or a datacenter.
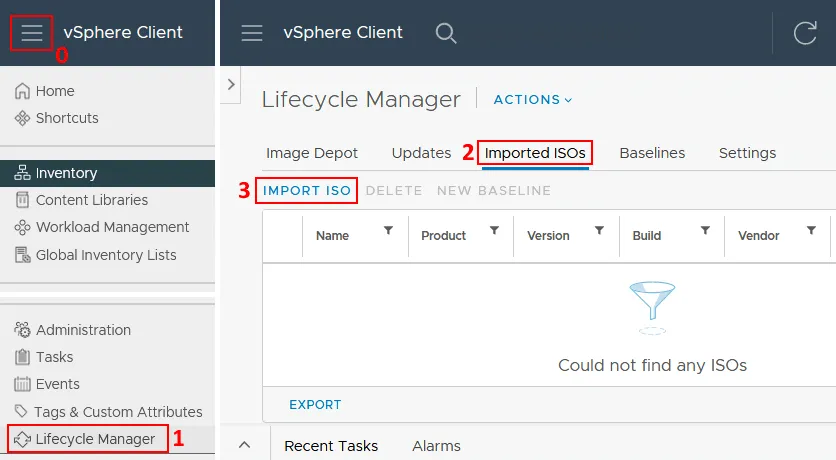
- Open Lifecycle Manager. You can do it by using different methods:
- Click Home and in the left pane (navigation pane) click Lifecycle Manager, OR
- Click Menu in the top of the vSphere Client window, and hit Lifecycle Manager.
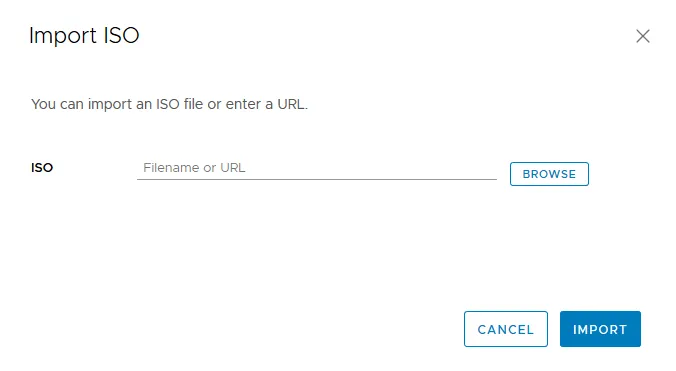
- Once you have opened VMware Lifecycle Manager in vSphere Client, select the Imported ISOs tab and click Import ISO.
- Hit Browse and select the ESXi 7 Update 2 installation ISO image file. You can download the ESXi installation image from the VMware website after registration (a VMware account is required).
 Once you have selected the ISO file, the importing process starts. In this example, the VMware-VMvisor-Installer-7.0U2-17630552.x86_64.iso file is used.
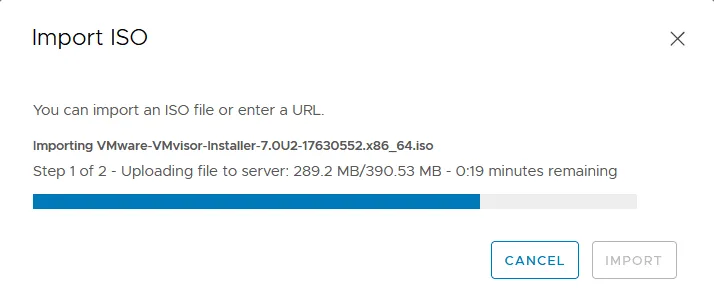
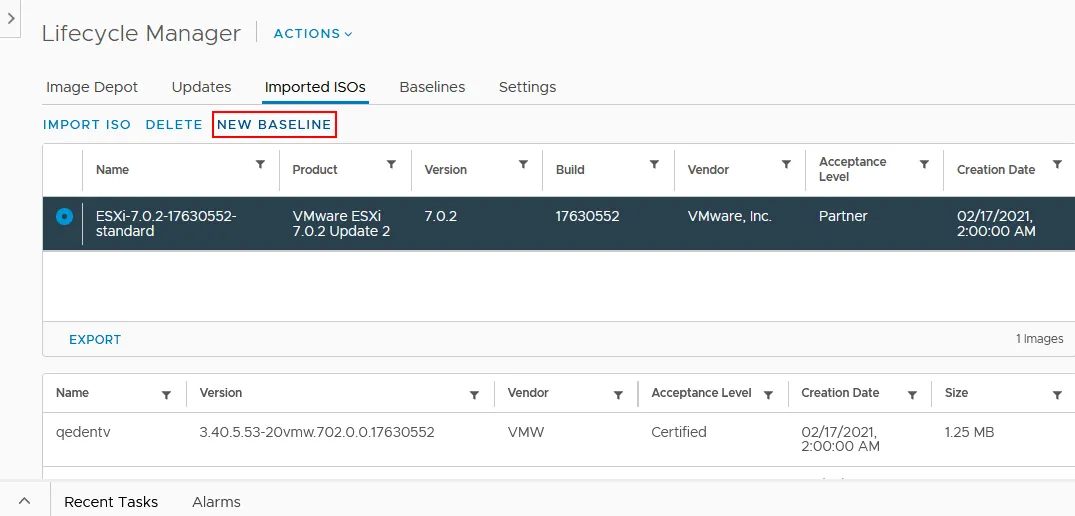
After importing the ISO file, you can see the ESXi 7.0 Update 2 installation image in the Imported ISOs tab.
- Click New baseline to create a new baseline.
Name and Description. Enter the baseline name and description, for example, ESXi 7.0 Update 2 and ESXi 7.0 Update 2 baseline.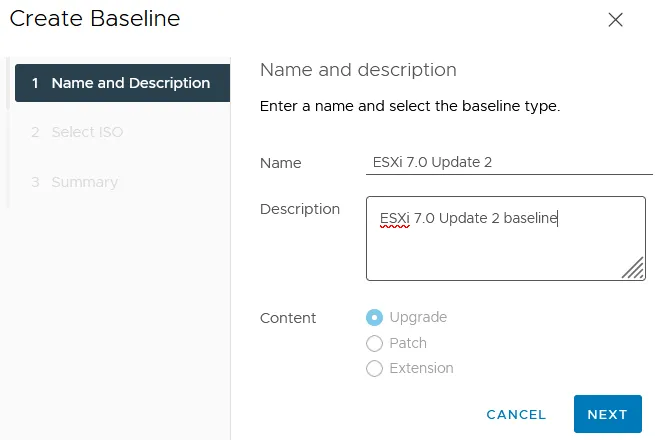
Select ISO. Select the ESXi 7 ISO image you have uploaded before (VMware-VMvisor-Installer-7.0U2-17630552.x86_64.iso). The displayed name is based on the corresponding ESXi profile (ESXi-7.0.2-17630552-standard).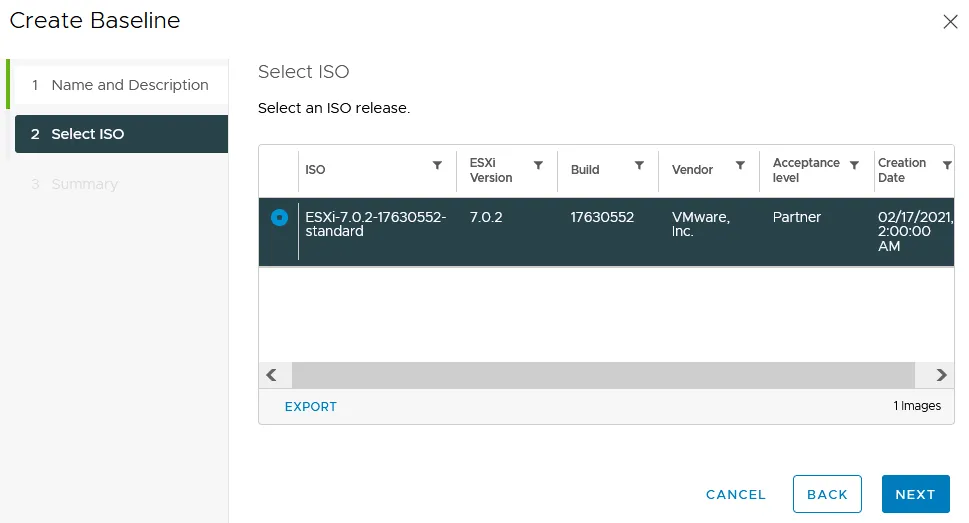
Summary. Review your selections before finishing creating the baseline.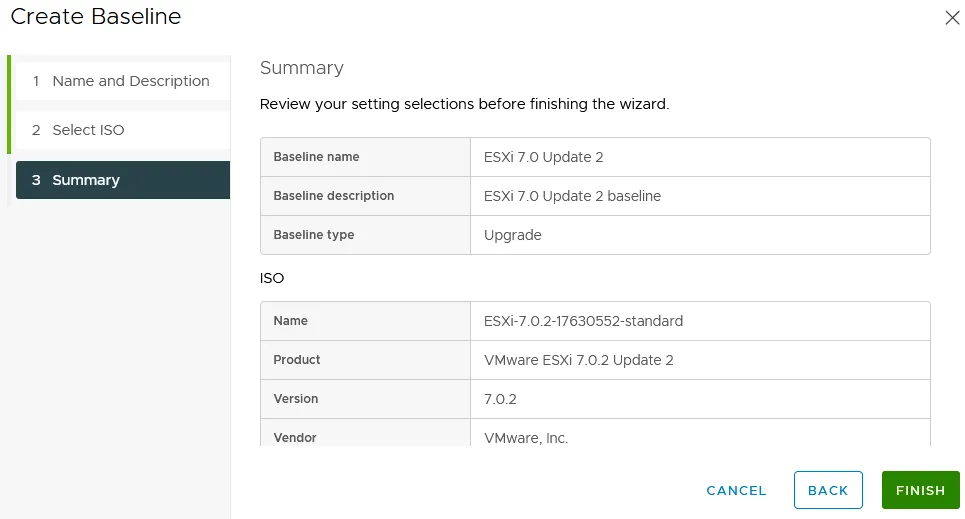
A baseline has now been created.
- Go back to the Hosts and clusters screen, select the ESXi host that must be updated (192.168.101.65 in our case), and in the top right corner of the interface, click the Updates tab.
 When the baseline has been created, you have to attach that baseline to ESXi hosts you want to update. As you remember, we are going to update a single ESXi host in this walkthrough.
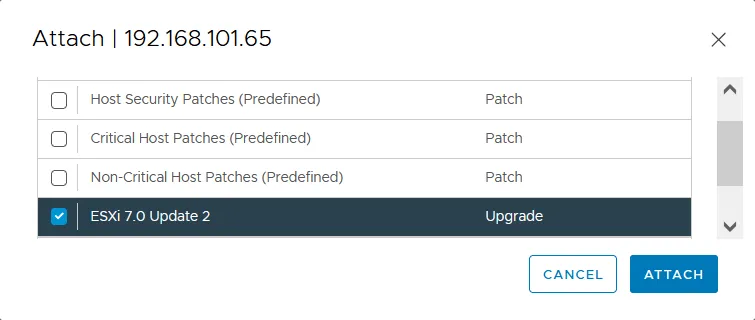
- Hit Baselines, scroll down and find the Attached Baselines section, then click Attach and in the menu that opens, click Attach Baseline or Baseline Group.
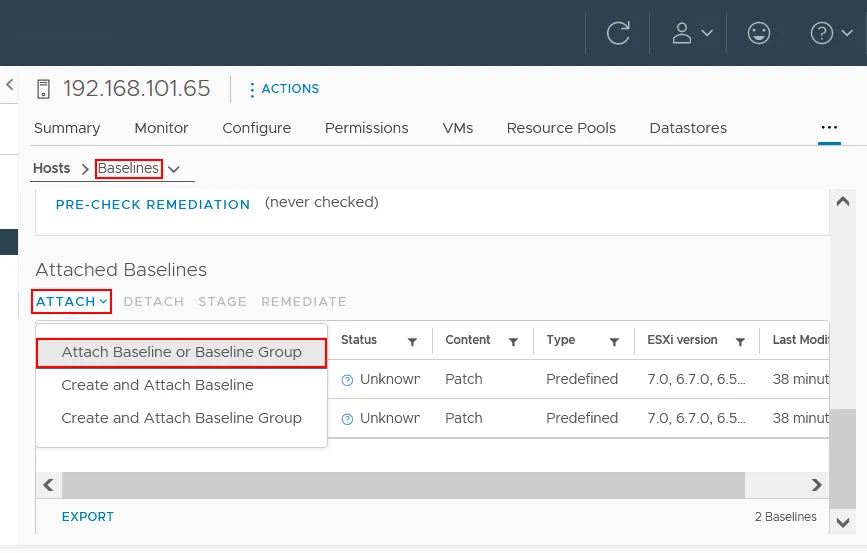
Select the ESXi7.0 Update 2 baseline you have created before and click Attach. If there are any other baselines attached, remove those baselines by selecting them and clicking Detach.
- Now you have to check compliance. This step is needed to check whether the ESXi host has already the update installed. If you see the non-compliant status, it means that the update is not installed on your ESXi host. Click Check Compliance.
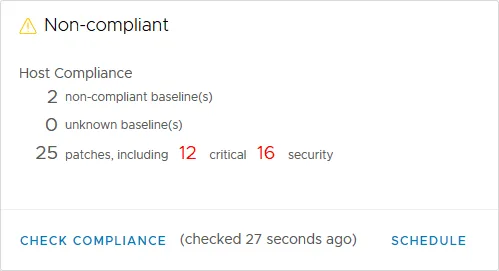
As you can see on the next screenshot, the ESXi status after checking is non-compliant and it means that you can install the needed update and upgrade ESXi 6.7 to ESXi 7.0 Update 2.
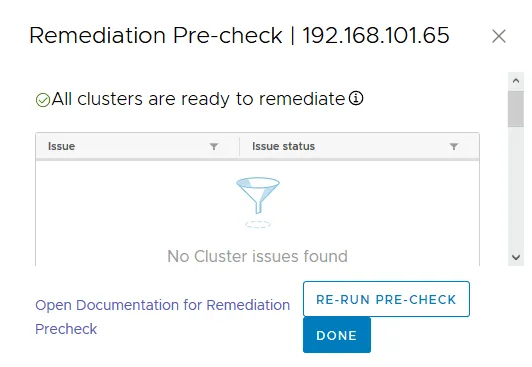
 Pre-check remediation checks for any compliance issues that may occur after installing updates and the ESXi upgrade.
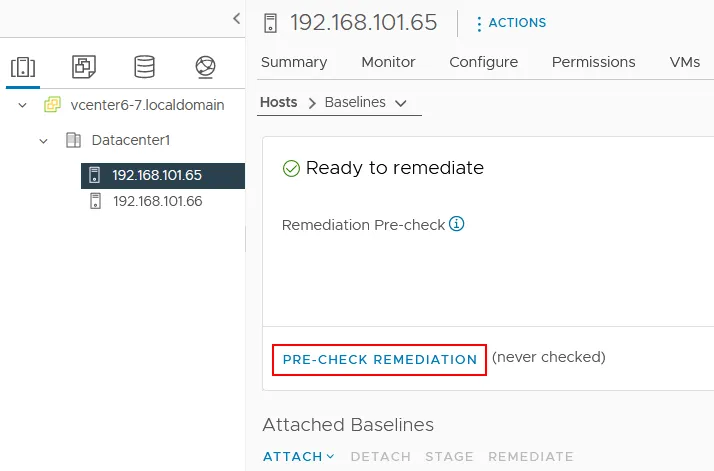
As you can see in the screenshot below, there are no issues after running remediation pre-check. Hit Done and go to upgrade the ESXi host.
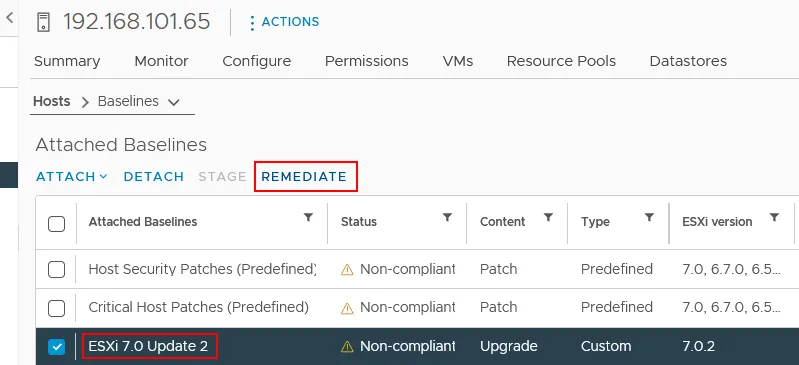
- In the Attached Baselines section, select your ESXi 7.0 Update 2 baseline created before and click Remediate to start the ESXi 6.7 to 7.0 upgrade process.
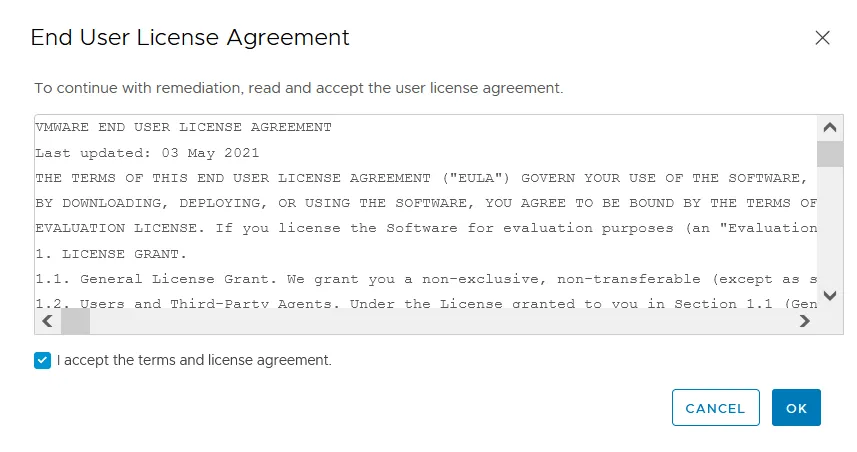
- A pop-up screen appears. Read the End User License Agreement (EULA) and select the I accept the terms and license agreement checkbox. Hit OK to continue.
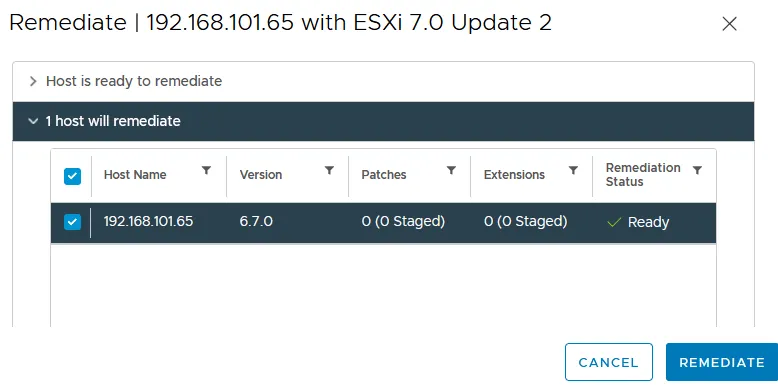
- Make sure that your ESXi host is selected and hit Remediate to upgrade ESXi 6.7 to 7.0. Don’t forget that virtual machines must be powered off or migrated from the ESXi host that is being upgraded.
 You can see the ESXi upgrade progress in the Recent task toolbar that can be expanded at the bottom of the VMware vSphere Client interface. The ESXi host is automatically entered into maintenance mode to install the upgrade.
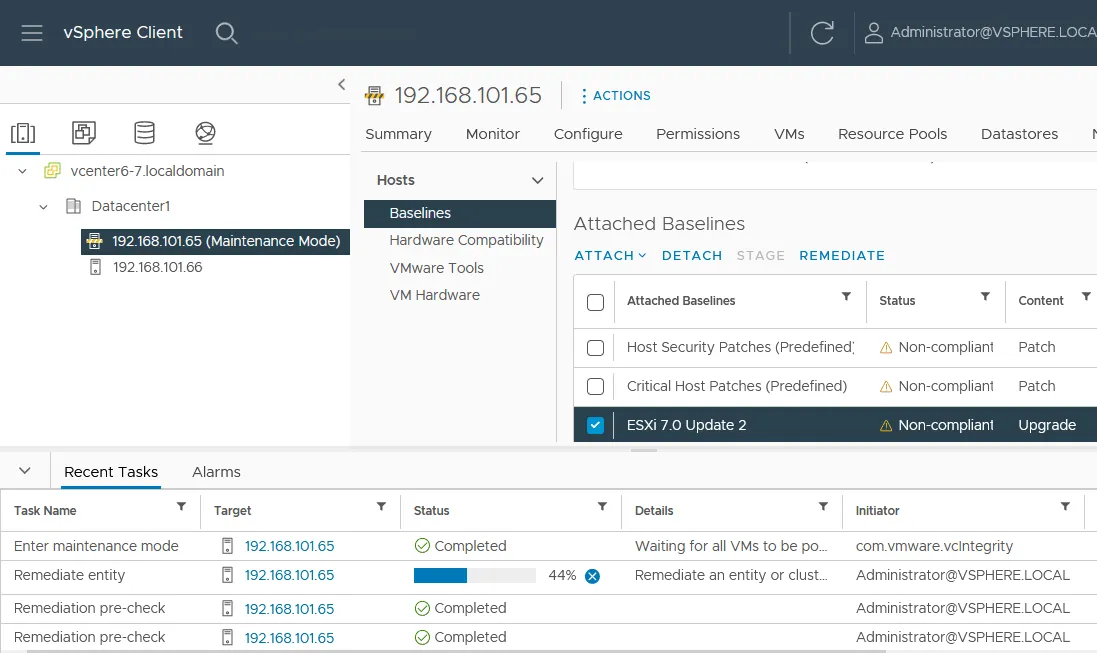
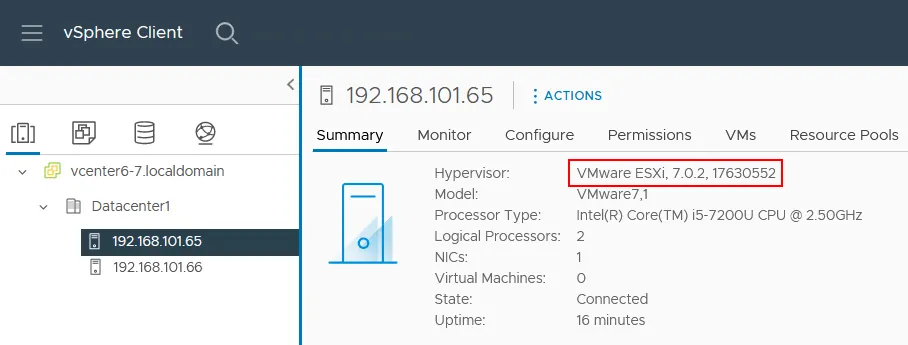
- When the ESXi upgrade process is finished, maintenance mode is turned off for the host, and the upgraded ESXi host is ready to work. You can select the ESXi host in the Hosts and Clusters view and check the version after the ESXi upgrade. As you can see in the screenshot below, the version is now ESXi 7.0.2, 17630552.
If you see that a license is expired after an ESXi 6.7 to 7.0 upgrade on the upgraded host, you should apply a vSphere 7.0 license.
If you need to upgrade an ESXi host on which a vCenter VM (a virtual appliance that is also known as VCSA) is running you can use one of the following approaches:
- Migrate the vCenter VM to another ESXi host and upgrade the source ESXi host.
-
Shut down the vCenter VM and other VMs running on the ESXi host and upgrade ESXi by using ESXCLI as explained in the first part of this blog post. Note that SSH access must be enabled, and the lockdown mode must be disabled (you must be able to manage an ESXi host directly without vCenter).
Note: If none of the above ESXi upgrade methods is suitable for your case, you have two other options:
- You can write the ESXi ISO installation image to a DVD disk or USB flash drive, boot from that medium, run the ESXi 7.0 or ESXi 7.0 Update 2 installer, and select the disk where ESXi 6.7 is installed as the destination disk. The upgrade is performed in the interactive mode in this case.
- A more complex ESXi upgrade method, a scripted upgrade relies on a traditional boot medium like DVD and flash drive or the preboot execution environment (PXE) to run the installer. The scripted method allows you to use predefined settings for upgrading multiple ESXi hosts.
What is a VM compatibility upgrade? VM compatibility upgrade is the upgrade of VM hardware version. A VM hardware version defines which emulated devices (virtual hardware) are used by a virtual machine running on a VMware hypervisor.
Should you upgrade VMware hardware version? It is recommended that you upgrade the hardware version of virtual machines after an ESXi upgrade and update VMware Tools.
Conclusion
VMware ESXi upgrade in ESXCLI, which is a command-line interface, is a universal method that can be used to upgrade standalone ESXi hosts and ESXi hosts managed by vCenter if it is not restricted by vCenter configuration. If you use vCenter to manage a large number of ESXi hosts, consider ESXi upgrade by using VMware Lifecycle Manager, which is a component of vCenter 7.0 and is a successor of VMware Update Manager.
It is recommended that you have an ESXi backup before starting a VMware ESXi upgrade and in general, to regularly back up your VMware VMs. NAKIVO Backup & Replication can perform VMware backup and provide comprehensive data protection for virtual, cloud, physical, and SaaS environments.