How to Deploy Graphics Devices Using RemoteFX vGPU
Installing video acceleration and a graphics card on a physical computer for better performance and image quality is a common task. But what do you do when you need to run applications for video rendering or 3D modeling on a VM and need hardware video acceleration and a graphics card?
When it comes to VMs, hardware resources are shared between virtual machines for flexible and rational resource usage. If a VM is running heavy applications, it can consume more CPU and memory resources than other VMs that are idle or running less resource-intensive operations. In addition, VMs use only basic video functionality to display data by default. In a Microsoft Hyper-V environment, you can use Hyper-V RemoteFX to allow VMs to share the resources of a video card and 3D acceleration.
Read this blog post to learn about Hyper-V RemoteFX and how to configure RemoteFX on Windows machines.

What Is RemoteFX
RemoteFX is a feature that allows Hyper-V virtual machines to share a physical GPU (graphics processing unit). The resources of a video card are shared among multiple VMs. This is the optimal scenario for high-burst workloads when the dedicated resources of a video card are not required at all times. Hyper-V RemoteFX can be used to deploy a VDI (virtual desktop infrastructure). A RemoteFX GPU is a virtual device attached to a virtual machine that shares the resources of a physical video card installed on a Hyper-V host (shares the GPU and video memory).
RemoteFX was introduced in Windows 7 and has been available in Windows 8, Windows 10, Windows Server 2008 R2 SP1, Windows Server 2012, and Windows Server 2016. This feature is not present in Hyper-V Manager in the latest version of Windows Server 2019 – you cannot enable Hyper-V RemoteFX in the graphical user interface (GUI). Using RemoteFX decreases CPU (central processing unit) load and increases scalability in a virtual environment. You don’t need to attach a dedicated GPU for each VM when using Hyper-V RemoteFX because virtual machines can dynamically share the GPU for the workload.
Video rendering, processing heavy images, working with CAD applications, and 3D modeling are some of the cases when you may need 3D acceleration and a RemoteFX GPU in a VM. A modern GPU is better adapted for parallel processing than the CPU, handles more threats simultaneously, and has more processing cores. The number of monitors and used resolutions depends on the video memory and the GPU performance of a video card. Use Remote Desktop, not VMConnect (Virtual Machine Connection), to connect to VMs using RemoteFX.
The advantage of RemoteFX is that it can be used on desktop and server Windows versions. While buying a supported video card that is compatible with server hardware may not be easy, most desktop computers that usually run client Windows operating systems have PCI Express graphics adapters installed.
End of Support
There is a vulnerability (CVE-2020-1036) that can be used by cybercriminals for remote code execution. Hackers can execute remote code on a host machine by using specially crafted applications on a VM with RemoteFX GPU to attack video drivers on a Hyper-V host. A host server cannot properly validate input from an authenticated user on a guest OS in this case. Microsoft doesn’t provide a patch to fix this vulnerability and says that this is an architectural issue. Due to these security concerns, Microsoft decided to disable and remove RemoteFX from all Windows versions using automatic updates:
- RemoteFX vGPU was disabled on July 14, 2020, for all Windows versions.
- RemoteFX vGPU was removed on April 13, 2021.
RemoteFX works on Windows 10 version 1803 and earlier Windows versions (can be configured in a few clicks in the GUI of Hyper-V Manager). After the KB4571756 update (a cumulative update released in September 2020), this feature is disabled in the GUI. As a result, Windows 10 RemoteFX configuration is not available in the GUI of the Hyper-V Manager in Windows 10, version 1809, because the feature was disabled. Until the updates in April 2021, RemoteFX GPU had to be enabled in PowerShell with special commands.
RemoteFX Requirements
- A supported Windows version on a Hyper-V host (Windows 7 Ultimate/Enterprise, Windows 8 Ultimate/Enterprise, Windows 10; Windows Server 2008 R2 SP1, Windows Server 2012, Windows Server 2016, Windows Server 2019). Updates removing Hyper-V RemoteFX must not be installed.
- A GPU must be compatible with DirectX 11 on a host machine (DirectX 10 can be used on Windows Server 2008 and Windows 7 installed on a physical machine). If multiple video cards are installed on the Hyper-V host, they must be identical. DirectX 11 is available on Windows 8.1 and newer Windows versions on guest VMs.
- A CPU must support SLAT (Second Level Address Translation). The name of this feature is Extended Page Tables (EPT) for Intel processors and Nested Page Tables (NPT) for AMD processors.
- Supported guest operating systems are Windows 7 SP1, Windows 8 and 8.1, Windows 10 1703 or later, Windows Server 2008 R2, Windows Server 2012, Windows Server 2016 (in a single-session deployment only).
How to Configure RemoteFX
Prepare the physical machine that is the Hyper-V host. Make sure that you have installed graphics drivers for a graphics adapter on the Hyper-V host. It is recommended that you install the latest stable version of drivers provided by your GPU vendor (for example, NVIDIA or AMD).
Prepare a virtual machine that is running a supported version of Windows to use Hyper-V RemoteFX. In my example, the name of the VM is Windows-VM, and the name of the Hyper-V host is Hyper-V-prim.
Installing the needed features
Install the Remote Desktop Virtualization Host service on the Hyper-V host.
Open Server Manager, and click Manage > Add Roles and Features.
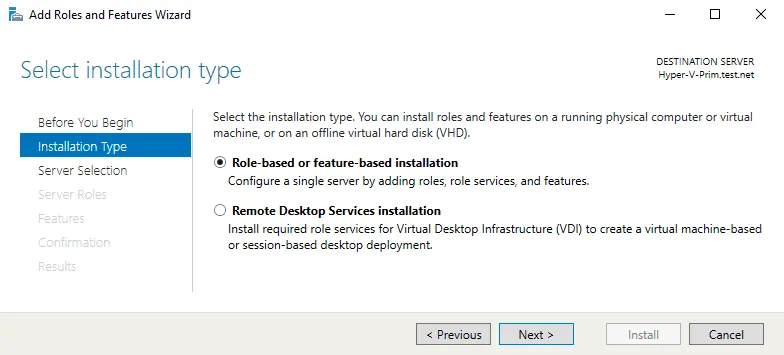
The Add Roles and Features Wizard opens.
Installation Type. Select Role-based or feature-based installation. Hit Next at each step of the wizard to continue.
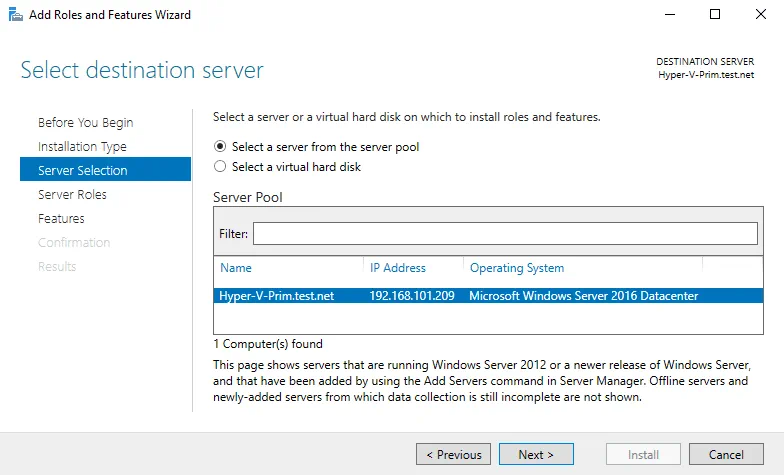
Server Selection. Select a server from the server pool. Make sure that your Hyper-V host is selected.
Server Roles. Select Remote Desktop Services in the list of roles. If the Hyper-V role is not installed, select and install the Hyper-V role.
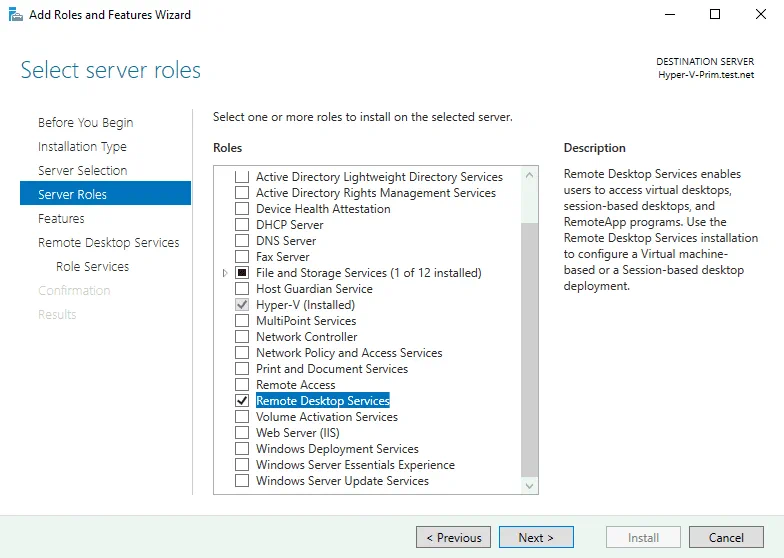
Features. Skip this step.
Remote Desktop Services. Read the explanation, and go to the next step.
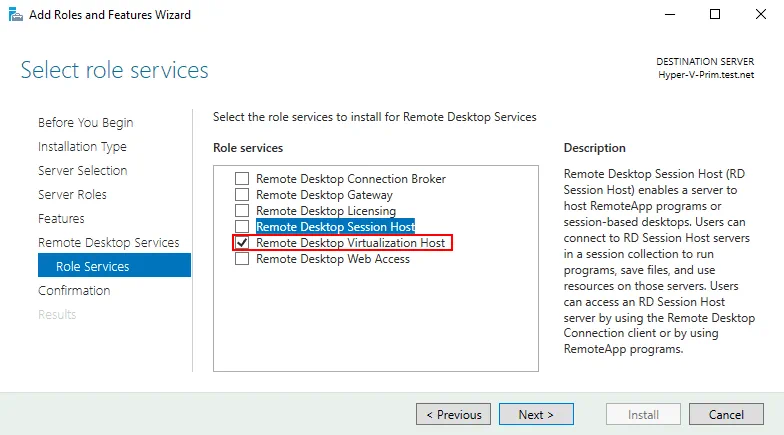
Role Services. Select Remote Desktop Virtualization Host. You can read the description in the right pane.
Reboot the Hyper-V host when the installation of the role is finished.
Configuring Hyper-V Settings
Open Hyper-V Manager by running virtmgmt in the command line or using the Windows GUI. Then open Hyper-V Settings.
In the navigation pane of the Hyper-V Settings window, click Physical GPUs. In the drop-down menu, select your video card, and then select the Use this GPU with RemoteFX checkbox.
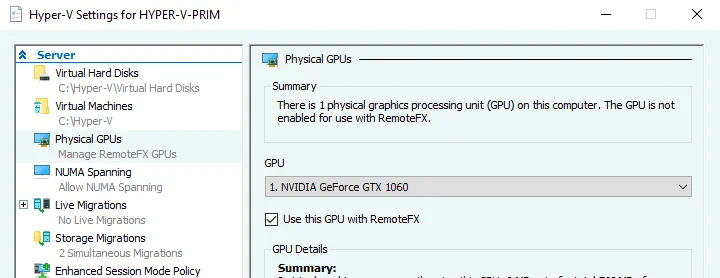
If you cannot select this checkbox, then your video adapter cannot be used for RemoteFX, or RemoteFX is disabled.
Stop the virtual machine.
Open Hyper-V Manager, select your VM, right-click the VM, and open VM Settings.
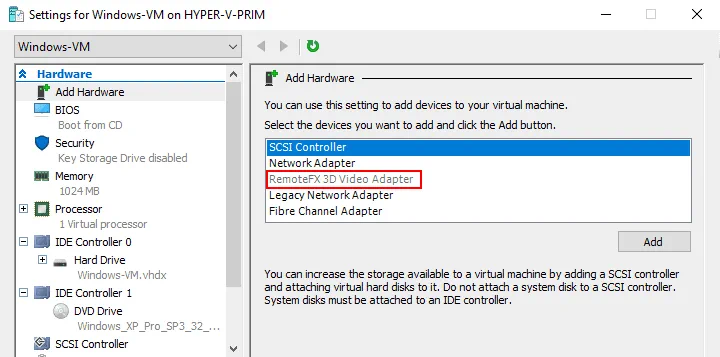
In the VM Settings window, click Add Hardware in the left pane (the navigation pane). In the right pane, you see a list of devices that you can add to a virtual machine. The workflow is similar for Generation 1 and Generation 2 VMs.
If a RemoteFX 3D Video Adapter is active (a black font is used), select this adapter and click Add. This option is active in Windows versions until July 14, 2020, updates are installed.
If your Windows was updated, the RemoteFX 3D Video Adapter option is inactive (a grey font is used), and you cannot add this adapter in the GUI of Hyper-V Manager. At the same time, the Physical GPUs option is no longer displayed in Hyper-V Settings.
You can fix this in PowerShell.
Run the command in PowerShell on the Hyper-V host to add a RemoteFX 3D video adapter to a VM:
Add-VMRemoteFx3dVideoAdapter -VMName your_VM_name
If the command is executed successfully, a warning message is displayed.
WARNING: We no longer support the RemoteFX 3D video adapter. If you are still using this adapter, you may become vulnerable to security risks.
If you see the error: Add-VMRemoteFx3dVideoAdapter: To enable this device, use Server Manager to install the Remote Desktop Virtualization Host role service
The Remote Desktop Virtualization service is not installed on the Hyper-V host. See Installing the needed features earlier in this post.
Enabling Windows 10 RemoteFX after installing updates
As I mentioned earlier, if the Windows updates of July 14, 2020, are installed, Microsoft RemoteFX is disabled. If you have VMs configured to use RemoteFX, they won’t start. The following Windows 10 RemoteFX error for Windows 10 with the July 14, 2020, update is displayed when trying to start a VM:
An error occurred while attempting to start the selected virtual machine(s):
‘VM-name’ failed to start.
Synthetic 3D Display Controller (Instance ID xxxxxxxx-xxxx-xxxx-xxxx-xxxxxxxxxxxx): Failed to Power on with Error ‘Insufficient system resources exist to complete the requested service.’.
The virtual machine cannot be started because all the RemoteFX-capable GPUs are disabled in Hyper-V Manager. You must enable at least one GPU.
Another variant of the error:
The virtual machine cannot be started because the server has insufficient GPU resources.
You can fix this in PowerShell. This method is applicable for Windows 10 and the appropriate Windows Server versions. Use commands in PowerShell to fix this error and enable RemoteFX. Run this command to check information about the video adapter on the Hyper-V host:
Get-VMRemoteFXPhysicalVideoAdapter
Find this string:
Enabled: False
It means that RemoteFX is disabled. Change this value to True.
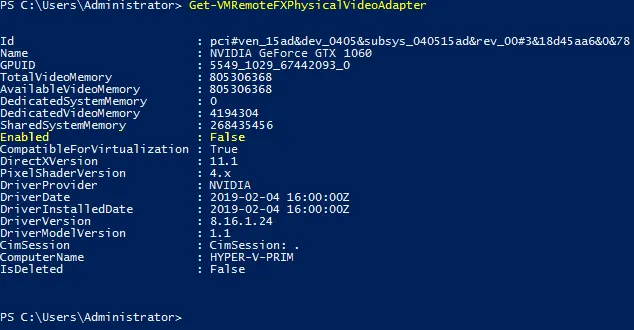
Copy the name of the video card (in my example, NVIDIA GeForce GTX 1060).
Run the command:
Enable-VMRemoteFXPhysicalVideoAdapter -Name "video_card_name"
Enter your graphic card name.
Try to start your VM using RemoteFX again. The VM should start now.
Note also these PowerShell cmdlets to manage a RemoteFX 3D video adapter:
Set-VMRemoteFx3dVideoAdapter
Get-VMRemoteFXPhysicalVideoAdapter
After adding a RemoteFX 3D video adapter to a VM, this adapter should be visible in the list of VM hardware with options to set resolution, the number of monitors, and dedicated video memory.
If you don’t see these options in the GUI of Hyper-V Manager, use additional parameters when adding a RemoteFX video adapter to a VM in PowerShell, for example:
Set-VMRemoteFx3dVideoAdapter -VMName Windows-VM -MaximumResolution 1024x768 -VRAMSizeBytes 536870912
If Microsoft RemoteFX was configured successfully, in the guest Windows that is running on the VM, you see a Microsoft RemoteFX Graphics Device – WDDM device in the Display Adapters section of Device Manager. This RemoteFX 3D video adapter is a virtual device that shares the resources of the physical video card installed on the physical Hyper-V host by using RemoteFX.
Troubleshooting
Sometimes additional errors may occur. Let me explain a common error when a user cannot connect to a running VM using Remote desktop RemoteFX.
Symptoms:
- Video remoting was disconnected and the appropriate message is displayed.
- RDP failed to connect: Your Remote Desktop session has been ended, possibly for one of the following reasons.
If this error occurred on your VM, edit a group policy in the guest Windows on the VM.
Click Start > Run > gpedit.msc to open the Group Policy Editor for a local machine.
In the left pane of the Group Policy Editor window, navigate to
Computer Configuration > Administrative Templates > Windows Components > Remote Desktop Services > Remote Desktop Session Host > Remote Session Environment > RemoteFX for Windows Server. Double-click Configure RemoteFX in the right pane of the window.
A window with Configure RemoteFX properties opens. Select Enabled, and hit OK to save settings.
Double-click Use WDDM graphics display driver for Remote Desktop Connections (available for Windows 10 version 1903 and newer Windows versions).
In the window that opens, select Disabled, and hit OK.
Update configuration of group policies to apply new settings with the command:
gpupdate /force
Reboot your virtual machine. Try to connect to your VM using the Enhanced Session Mode.
How to Prevent Disabling RemoteFX on a Hyper-V host
After the Windows update released in April 2021 is installed, VMs using a RemoteFX 3D video adapter fail to start. You can disable automatic updates on Windows computers at your own risk to continue using RemoteFX. Note that security patches are not installed automatically on Windows machines if Windows updates are disabled. Unpatched vulnerabilities are a threat for your computers, which are then at risk of getting infected with ransomware, viruses, and other malware.
You can download Windows updates (patches) manually from the Microsoft site and install them. Learn which Window updates are intended to remove RemoteFX and don’t install them. Consider deploying WSUS (Windows Server Update Services) in your organization and deselect the updates that you don’t need.
Don’t forget to back up your Windows servers and Hyper-V virtual machines. In case of a disaster or ransomware attack, having a backup allows you to recover your data, restore workloads, and resume operations in a short time. Use NAKIVO Backup & Replication to back up your physical and virtual machines.

Alternatives to Hyper-V RemoteFX
Microsoft recommends that customers use DDA instead of using RemoteFX after April 2021.
DDA (Discrete Device Assignment) is a feature that allows you to attach a device (in my case, a PCI Express device) directly to a VM. In the case of a graphics card, the card should be disconnected from the host machine and connected to a VM. Only one VM can use a video card with DDA at any given time.
A video driver for a GPU must be installed on the guest OS of a VM, not on a host machine. In this case, features such as DirectX 12 and CUDA (Compute Unified Device Architecture) are available on a VM (CUDA is not available on a VM when using RemoteFX). When using Direct Device Assignment, VM migration between Hyper-V hosts is not possible.
Consider using VMware alternatives for servers and desktops running VMs. Use Virtual Shared Graphics Acceleration (vSGA) and Virtual Shared Pass-Through Graphics Acceleration in VMware vSphere to share GPU with multiple VMs. Use compatible video cards that support GPU virtualization and have the appropriate hardware features:
- nVidia GRID vGPU
- AMD Multiuser GPU
You can enable accelerated 3D graphics for a VM in VMware Workstation if you use a desktop machine rather than a server.
Conclusion
Hyper-V RemoteFX is a useful feature that allows VMs to share hardware resources of a physical video adapter installed on a Hyper-V host and use 3D acceleration for applications on virtual machines. To configure RemoteFX on a virtual machine, install the Remote Desktop Virtualization Host service on the Hyper-V host, edit general Hyper-V settings to select the GPU that must be used for video acceleration, and add a RemoteFX 3D video adapter in the virtual hardware options of the VM. Unfortunately, Hyper-V RemoteFX is deprecated by Microsoft, and using RemoteFX is possible only until you install Windows updates of April 2021.