How to Copy Files to Hyper-V Server and VMs: 7 Methods
Hyper-V is a hypervisor, which runs on Windows, and can be managed directly on the machine where it is installed as well as remotely. Often, you need to copy files to Hyper-V Server and from a server to virtual machines. You cannot just drag and drop files to Hyper-V VMs, and you should use other methods to copy files.
For example, when creating a new virtual machine in Hyper-V, you need to install an OS on that VM. Generally, this is done by mounting an ISO installation image of the operating system media. To get the media to the Hyper-V host, you have to copy the ISO file to the host and install the guest operating system on the new VM.
This blog post provides 6 methods for how to copy files to Hyper-V virtual machines and to Hyper-V Server. Note that these methods to copy files to Hyper-V server can also be used in other scenarios, such as copying files from a Hyper-V host to VMs.

Method 1: How to Copy Files Using a File Share on a Hyper-V Host
This method involves creating a file share on a Hyper-V host and copying an ISO image or other files to this SMB file share. The SMB protocol is a native sharing protocol in Windows but is also supported in Linux and other operating systems.
You can also use this method to copy files to Hyper-V server from any physical or virtual machine if a network connection is established.
- Enable a firewall rule to enable inbound SMB connections for a machine running Hyper-V. To enable file and printer sharing in the firewall, run the following command on the Hyper-V host:
netsh advfirewall firewall set rule group="File and Printer Sharing" new enable=Yes
Note: You can configure an SMB file share with the appropriate permissions for the needed users and share only the needed folder.
- If you have the graphical user interface (GUI) on your Windows machine, connect to a remote file share on a Hyper-V host by typing the share path in the address bar of the Windows Explorer window. In this example, we use a hidden system share C$, which is enabled by default on all Windows machines for administration purposes. Similarly, you can connect to other volumes like D$, E$, etc.
\\10.10.10.31\c$\
Note: Files are stored on disk C: for demo purposes. It is recommended that you use another dedicated partition for VM files, ISO images, file shares, and other non-system data.
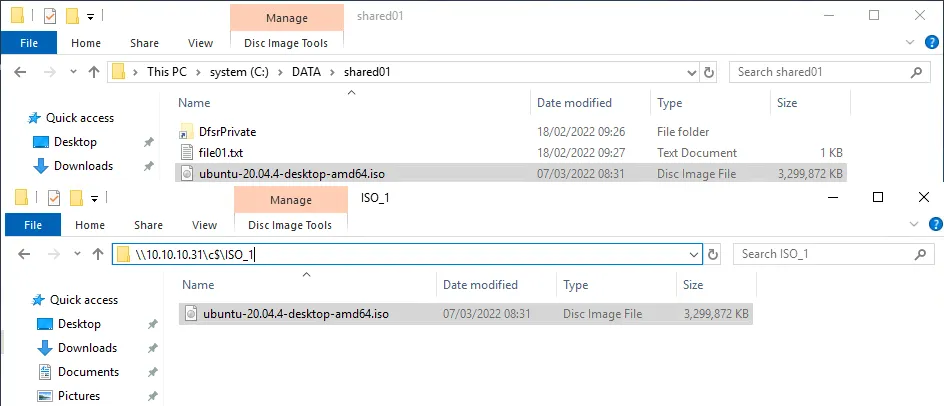
- Browse to the directory where you want to store your ISO images or where the other files that you need to copy are located. You can create this directory now if it has not been created yet. In our case, the ISO files are located in C:\ISO_1\ on our Hyper-V host and the network path is \\10.10.10.31\c$\ISO_1\
If you need to use the command line interface, you can map the SMB file share as a network drive with the command:
Net use * \\〈your hyper-v host〉\d$
For example,
net use S: \\10.10.10.31\d$
Note: You can run this command in CMD or PowerShell on the client or server that has the data that you want to transfer to Hyper-V.
- Copy the needed ISO file (or other files) from your local machine (C:\data\shared01\ in our case) to the Hyper-V host by using this network path.
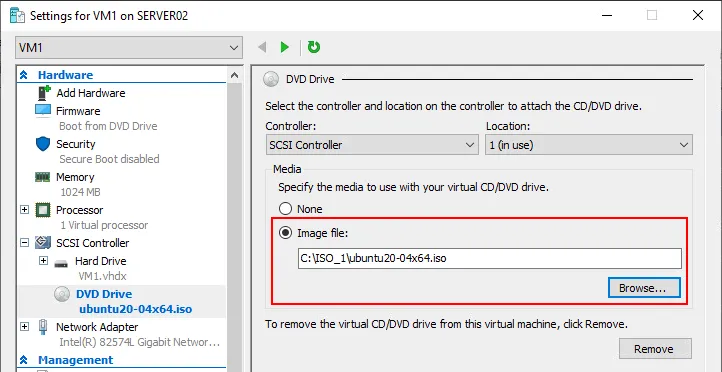
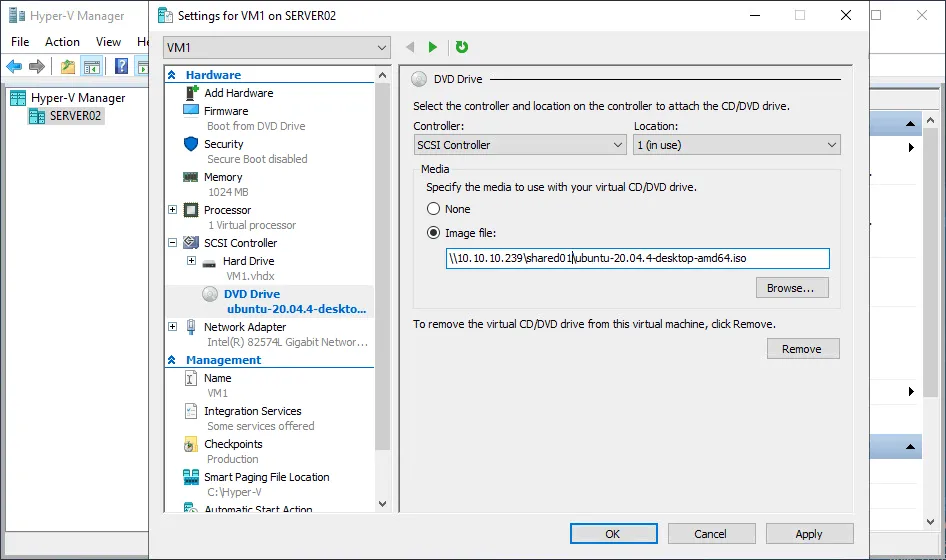
- After copying the ISO image to the server, we can point the DVD drive to the image file and browse to the folder that we created on the root of the (C:) drive.
- After you finish copying all needed files to your Hyper-V host, you can disable inbound connections in the Windows firewall on the Hyper-V host for security purposes. We can disable the file and printer sharing firewall rules we allowed above if we choose to do that by simply changing Yes to No in the PowerShell command.
netsh advfirewall firewall set rule group="File and Printer Sharing" new enable=No
Method 2: How to Copy Files to Hyper-V Servers Using a Single File Share
When you have multiple Hyper-V hosts in your environment, it can be inconvenient to configure a file share on each Hyper-V host and copy ISO images to all these Hyper-V hosts. Moreover, using storage space on multiple hosts for the same ISO images may be not rational.
You can configure a file share on another server, for example, on a file server or NAS and store all the needed ISO images there. Configure a file share once, configure access for Hyper-V hosts, and use the needed ISO images stored in one place for all hosts.
This method is convenient if all used machines are members of an Active Directory domain.
If you want to use this method to transfer files between a Hyper-V host and a virtual machine’s guest operating system, you need to configure a virtual switch in Hyper-V settings and set the needed network mode.
If you need to copy files to a virtual machine with a Linux guest OS, you have another option in addition to using the SMB protocol. You can use SSH for secure Hyper V file transfer over the network.
Method 3: Hyper-V File Transfer via RDP
If your Hyper-V Server is running on a Windows machine with the GUI, you can connect to this host via RDP (Remote Desktop Protocol) and attach the local disks of your local machine to copy the needed files. To do this, you need to enable remote desktop connections on the target server.
You can use this method to copy files to Hyper-V server from another physical or virtual machine running Windows.
- To enable remote desktop connections, go to Start > Settings > System > Remote Desktop and enable Remote Desktop.
- Run the Windows Remote Desktop client, whose location is %windir%\system32\mstsc.exe
Type mstsc in the command line or Run dialog and press Enter.
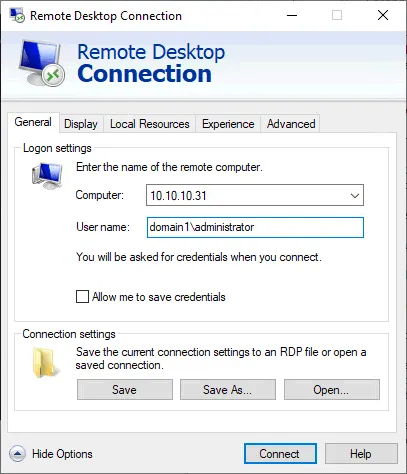
- Enter the IP address or hostname of the remote computer (in our example, it is the Hyper-V host with the IP address 10.10.10.31) and the username. You can enter the username in the full format (domain\user or computer\user).
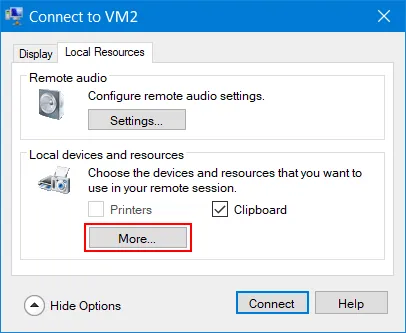
- Go to the Local Resources tab and click More.
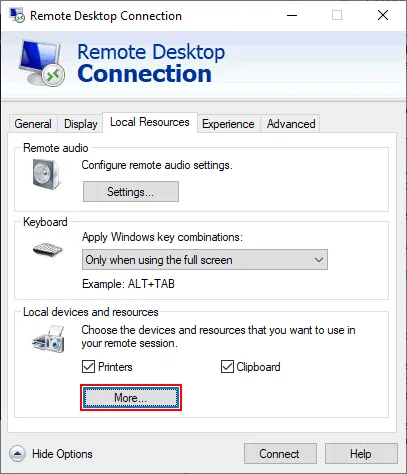
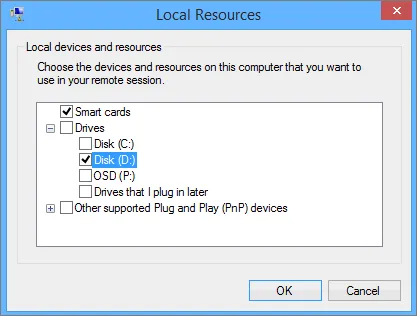
- Select the local resources you want to map from your computer to the remote host (in our example, the remote host is a Hyper-V host). Expand Drives and select the needed disk drive. The needed files are located on disk E:\ on our computer and, for this reason, we select disk E: to be mapped for our RDP connection.
- Click OK to save the settings and then click Connect.

Once a remote desktop session has been established, open My Computer or This PC in Windows Explorer of the remote machine. You should see the mapped disk drive from your local computer that is mapped to the remote machine (E on SERVER01-DC in the screenshot below). Browse to the needed files on this mapped drive and copy them to your Hyper-V host.

This method also works for VMs if they are connected to the network.
Method 4: Hyper-V File Transfer with a PowerShell CMDlet
PowerShell 4.0 and higher has a useful cmdlet that allows you to copy files from a Hyper-V host to a virtual machine without having a network connection between the host and VM guest and without the need to configure the firewall.
So let’s look at how to copy files to a Hyper-V virtual machine in PowerShell without using the network.
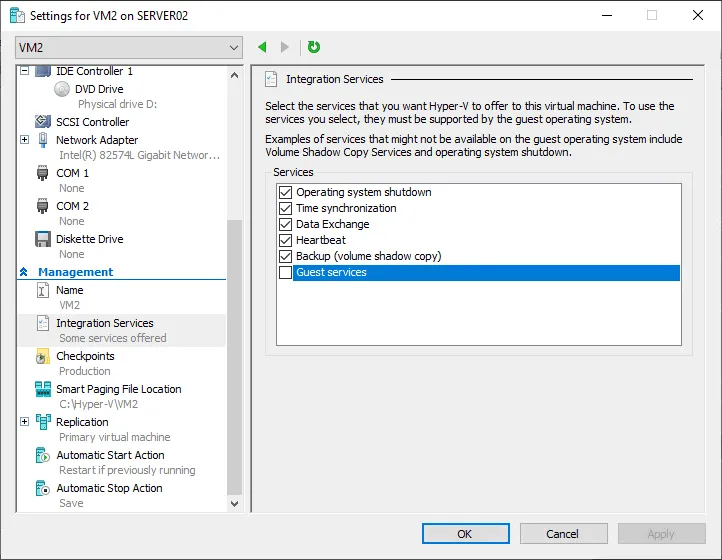
- Enable Guest services on the virtual machine. Integration services must be installed in the guest OS of the VM.
Guest services are a part of Hyper-V Integration services, but they are not enabled by default. To enable Guest services, open VM settings, select Integration Services in the left pane of the VM settings window, and select the Guest services checkbox.
Enable Guest services for the VM in PowerShell:
Enable-VMIntegrationService -VMName VM1 -Name 'Guest Service Interface'
- You can check whether the Guest services feature is enabled in PowerShell:
Get-VMIntegrationService -name Guest* -VMName VM1,VM2
Where VM1,VM2 are the VM names
- If the status is No contact, you need to update the VM and install Integration Services in the guest OS.
- If the status is False, you can enable the needed guest services interface:
Enable-VMIntegrationService -name Guest* -VMName win10preview -Passthru
- Use the command like below for Hyper-V file transfer from the Hyper-V host to VM guest by setting the source path on the Hyper-V host and the destination path on the VM:
Copy-VMFile "VMName" -SourcePath "F:\Test.txt" -DestinationPath "C:\Temp\Test.txt" -CreateFullPath -FileSource Host
Where:
- VMname is the name of the VM to which you’re copying the file (you can see the VM name in Hyper-V Manager; this is not the hostname of the VM displayed in the guest OS).
- SourcePath is the path to the source file on the Hyper-V host (the file you need to copy).
- DestinationPath is the path to the destination file on the VM (where to copy the needed file).
- The -CreateFullPath command is used to create a full path with all needed folders if they don’t exist.
In our example, the exact PowerShell command for Hyper V file transfer from a host to VM guest is:
Copy-VMFile "VM2" -SourcePath "C:\temp\file01.txt" -DestinationPath "C:\Temp1\file01.txt" -CreateFullPath -FileSource Host
Note: the Copy-VMFile cmdlet works only in the direction from a Hyper-V host to VM.
Method 5: Mounting VHDX to a Host and Guest
The idea of this method is to create a VHDX virtual disk that can be mounted to both a Hyper-V host and VM. You can copy the needed files to this virtual disk, mount the disk to the needed machine, and copy files to/from the virtual disk.
We use Windows Server 2019 in our example. Creating a VHDX virtual disk is available in Computer Management, not only in Hyper-V Manager when configuring VMs.
- Open the Computer Management window. You can do it by pressing Win+R to open the Run dialog and running the
compmgmt.msccommand. - Go to Storage > Disk Management in the Computer Management window.
- Right-click Disk Management and in the context menu click Create VHD.
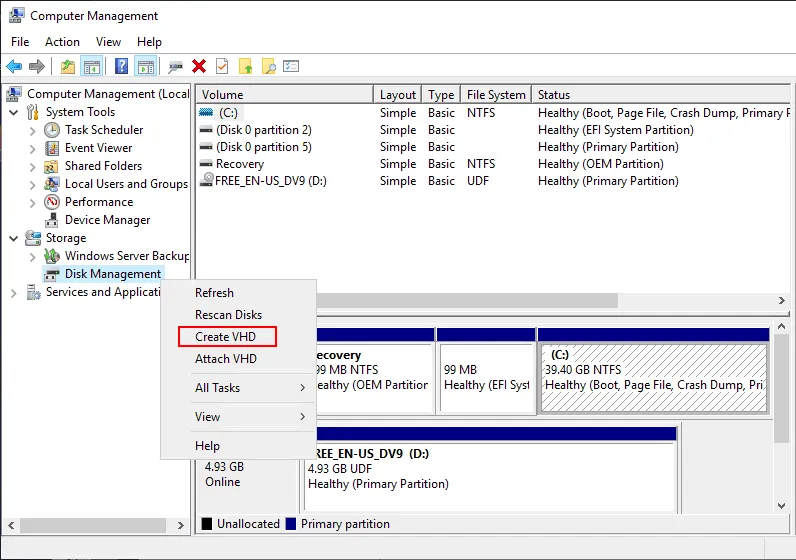
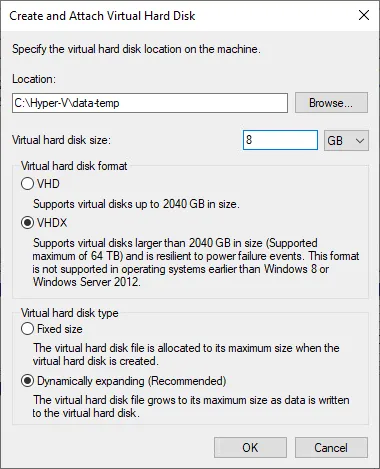
- A new window opens to create a virtual disk.
- Specify the virtual hard disk location on the Hyper-V host, for example, C:\Hyper-V\data-temp\
- Set the virtual hard disk size. We create an 8-GB virtual hard disk for demo purposes.
- Select a virtual hard disk format. We select VHDX as the newer format. Read about VHD vs VHDX to learn more about the differences.
- Select a virtual hard disk type. We select Dynamically expanding to save storage space until the disk is not filled with the data.
- Hit OK to save settings and close the window.
Alternatively, here is an example of the command to create a VHDX virtual disk in PowerShell:
New-VHD -Path C:\Hyper-V\data-temp.vhdx -SizeBytes 8GB -Dynamic -BlockSizeBytes 1MB
The command to mount a VHD virtual disk in PowerShell:
mount-VHD -path C:\Hyper-V\data-temp.vhdx
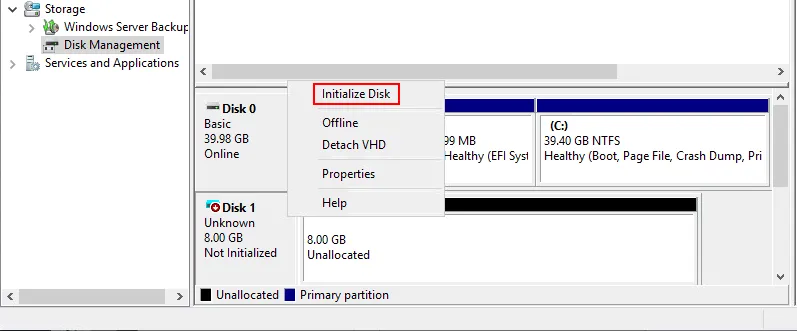
A virtual hard disk has been created on our Hyper-V host.
- Right-click this VHDX virtual hard disk in the Disk Management snap-in and click Initialize Disk.
Alternatively, if you prefer to use PowerShell, then list all mounted disks to identify the number of the needed virtual disk before initialization:
Get-Disk
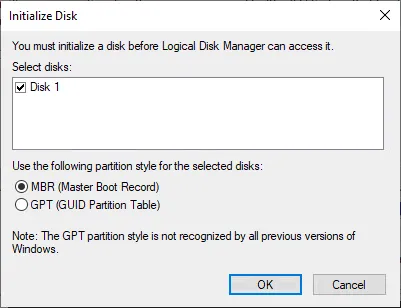
- Your disk is automatically selected. Select the partition style. We use MBR (Master Boot Record) for better compatibility. Click OK.
Alternatively, the command for those who use PowerShell includes the number of a virtual disk and partition style:
Initialize-Disk 1 -PartitionStyle MBR
- Create a new volume (partition) on the virtual disk that has been initialized on the Hyper-V host. This partition will also be visible in a Windows VM (or Linux that can work with NTFS file systems).
Right-click the 8-GB volume and click New Simple Volume in the context menu.
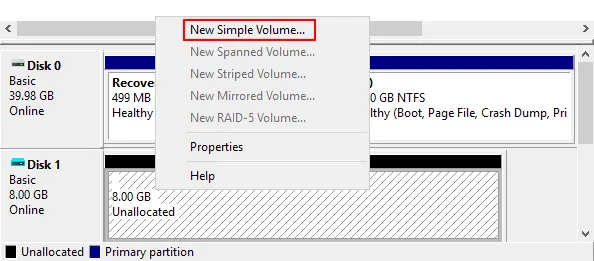
- The New Simple Volume Wizard opens. Click Next.
- Specify the volume size. Use the entire disk size for this volume.

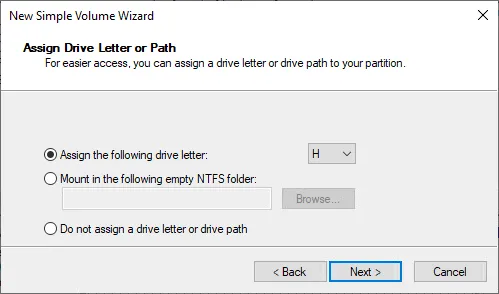
- Assign a drive letter, for example, H:
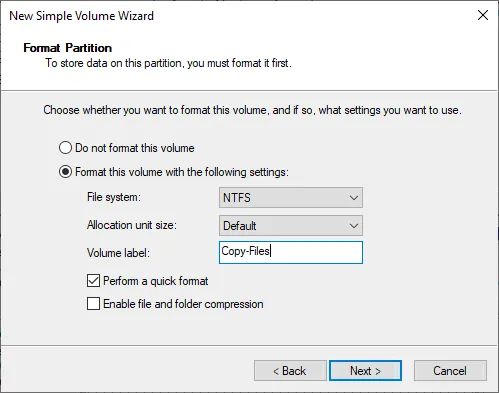
- Format the partition. Select the NTFS file system, leave the default allocation unit size, and enter a volume label (for example, Copy-Files). Select the Perform a quick format checkbox.
Alternatively, you can use these PowerShell commands to create and format a volume:
New-Partition -DiskNumber 1 -UseMaximumsize -AssignDriveLetter
Format-Volume -DriveLetter H -FileSystem NTFS -Full -Force
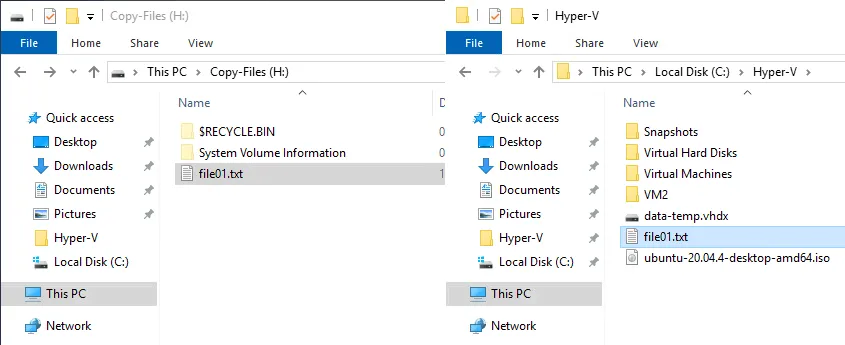
- Once you have completed the wizard, you should see your mounted virtual disk in Windows Explorer of the Hyper-V Host machine.
- Copy the needed files to the partition located on the virtual disk. We copy file01.txt, as shown in the screenshot below.
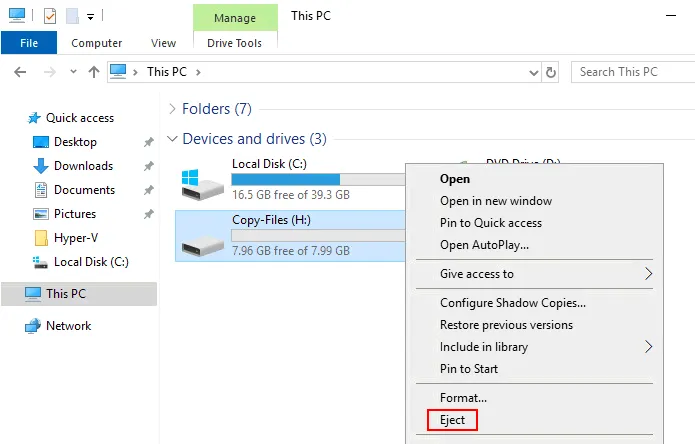
- We must unmount a virtual disk from our Hyper-V host after copying all needed files to the virtual disk.
Right-click the appropriate partition mounted from the VHDX virtual disk and click Eject in the context menu.
Alternatively, the command to dismount a virtual disk from a host machine in PowerShell:
dismount-VHD -path C:\Hyper-V\data-temp.vhdx
- You can mount this virtual disk created for Hyper V file transfer from a Hyper-V host to a guest and vice versa. Let’s mount a virtual disk with written files to the virtual machine.
- Select the needed VM and open VM Settings in Hyper-V Manager.
- Select the needed virtual disk controller in the left pane of the VM settings window.
- Select Hard Drive and click Add.

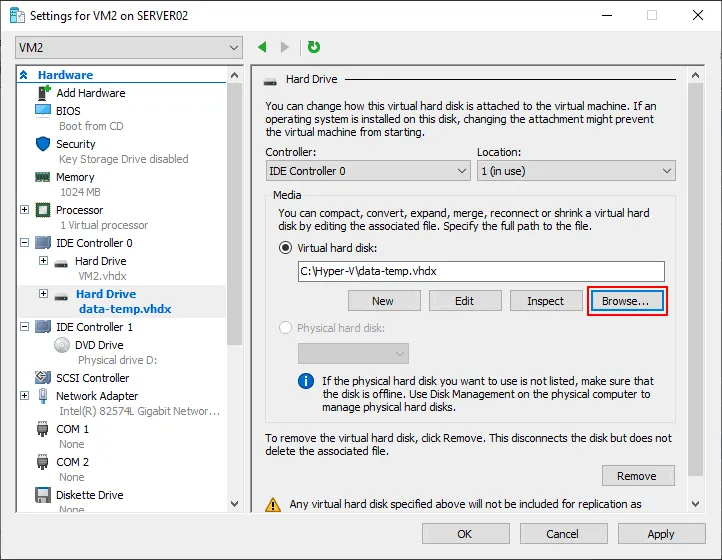
- Select Virtual hard disk and click Browse to add the existing virtual hard disk to the VM.
- Specify the VHDX path. In our case, the path is C:\Hyper-V\data-temp.vhdx
- Hit OK to save settings.
Alternatively, this is PowerShell command to add an existing virtual hard disk to a Hyper-V VM configuration:
Add-VMHardDiskDrive -VMName VM2 -Path C:\Hyper-V\data-temp.vhdx
- Start the virtual machine with the attached virtual disk on your Hyper-V host.
- Log in to a guest operating system and check whether the volume located on the virtual disk has been mounted automatically. Otherwise, go to Computer Management > Disk Management and assign a disk letter to the volume with the files you need to transfer from the Hyper-V host to the VM.
- Copy the needed files from the attached virtual disk to the virtual machine.
Method 6: VMConnect with Enhanced Session Mode
VMConnect, or Virtual Machine Connection, is a built-in Hyper-V tool to manage virtual machines. A screen operating as a monitor for the VM where you can see how you navigate with a keyboard and mouse is a part of the VMConnect tool. Using VMConnect with the enhanced session mode is more convenient and provides more features.
The enhanced session mode allows you to customize screen resolution when connecting to a VM and attach local resources of a host on which you run Hyper-V Manager to manage VMs. The local resources are attached similarly as when using a Remote Desktop connection to access a remote host or VM.
To enable Enhanced session mode:
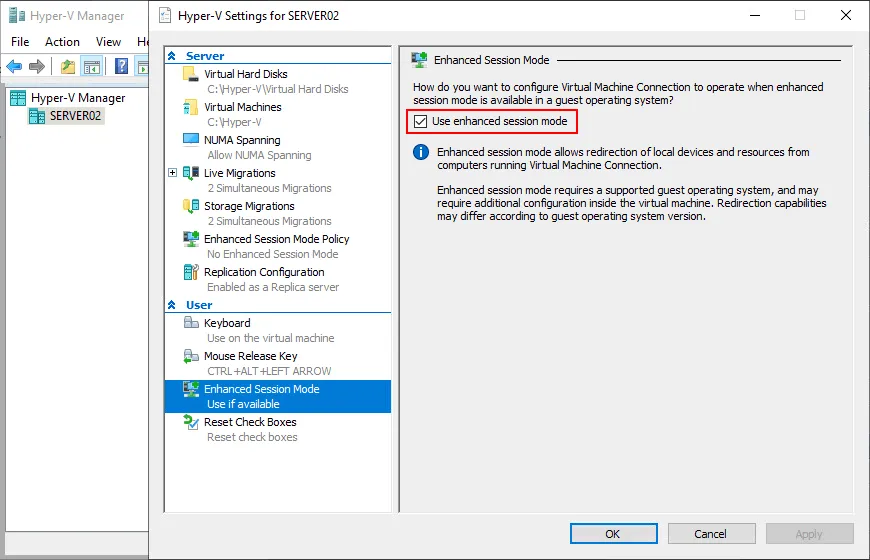
- Right-click the name of your Hyper-V host in Hyper-V Manager and in the context menu, click Hyper-V Settings.
- Click Enhanced session mode in the left panel
- Select the Use enhanced session mode checkbox
Alternatively, enable the Enhanced session mode in PowerShell:
Set-VMHost -EnableEnhancedSessionMode $True
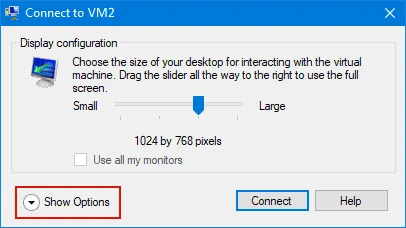
Once the Enhanced session mode is enabled and everything is configured for this in the guest VM and Hyper-V server, you can start the VM and connect to this VM with VMConnect.
You should see the window for selecting display resolution if the Enhanced session mode is enabled. Click Show Options in this window.
Select the Local Resources tab. Click More in the Local devices and resources section.
Select disks available on your Hyper-V host that you want to connect to a VM.
Method 7: Hyper-V File Transfer Using ISO Images
Another method for how to copy files to Hyper-V virtual machine is similar to using a VHDX virtual disk. However, this one is only in one direction (copy Hyper-V files to VM), and access to the files from the VM is read-only.
If you have an application that can edit and write ISO files that are CD/DVD image files, you can write the needed files on your Hyper-V host to the ISO image and insert this ISO image as a virtual DVD medium into the VM.
If you need to copy a bootable ISO image to your virtual machine (for example, when testing nested virtualization), you should create a new empty non-bootable ISO image file and add a bootable ISO image file to this image. Then you can copy the bootable ISO image from the outer ISO file inserted into the virtual DVD drive of the VM.
Conclusion
Whichever method you use to copy files to Hyper-V Server, it is not recommended to use it for backup purposes. These methods are not as efficient and reliable as professional Hyper-V backup solutions. Today’s Hyper-V VM backup solutions, like NAKIVO Backup & Replication, create host-level backups that are small, fast, and easy to recover data from.