SQL Database Backup and Recovery Techniques
Microsoft SQL Server is a professional management system used to manipulate and communicate with data in relational databases. For many organizations, a database is usually a crucial component in an IT infrastructure or in a business project. For this reason, SQL database backup is essential to avoid data loss and downtime for critical services.
This blog post explains how to back up Microsoft SQL Server using different methods, including native tools, and then recover the database data.

Types of Backups in SQL Server
In Microsoft SQL Server, backups are crucial for protecting data and ensuring that you can recover information in case of data loss, hardware failure, or other disasters. SQL Server supports several types of backups, each serving a specific purpose. The main types of backups in MS SQL Server are:
- Full backup
- Differential backup
- Transaction log backup
- File backup
- Copy-only backup
Full backup
A full SQL Server backup creates a copy of the entire MS SQL database. This is the simplest and most straightforward type of backup available since it includes all objects and data available in the relational database. Other types of Microsoft SQL Server backups use the full backup as a foundation for every other kind of backup.
A full SQL backup represents a full copy containing all database elements, such as tables, procedures, functions, views, indexes, and more. In addition, it includes a part of the transaction log. This simplifies database restoration, ensuring the database is precisely recovered to its state at the time of the backup.
This approach provides the simplest form of database recovery since all of the database contents are contained in one single backup.
The main characteristics of a full SQL Server backup are:
- A full backup captures the entire database, including all the data and objects.
- It is the most comprehensive type of backup and forms the basis for other types of backups.
- Full backups are essential for complete database restoration.
Differential backup
A differential backup in SQL Server selectively captures the data of database extents changed since the last full backup, using a full backup as the starting point. This type of backup includes alterations to schema objects, log files, and other data, optimizing time and storage efficiency while ensuring comprehensive server changes are backed up. Special flags are used to mark changed extents for a differential backup.
A differential database backup represents the cumulative changes since the last full backup, potentially resulting in a compact or substantial size depending on recent transaction volumes.
Since a differential backup does not include every element, its execution is generally quicker than that of a full backup. Capturing the state of changed database objects at the time of creation, a differential database backup represents different data in each subsequent backup when creating a series of differentials for a frequently updated database.
As these backups grow in size, the restoration of a differential backup can noticeably extend the time required for recovery. Consequently, it is advisable to periodically initiate a new full backup at predefined intervals to establish a fresh differential base for the data.
In summary, the main characteristics of the SQL Server differential backup are:
- A differential backup captures only the changes made to the database since the last full backup.
- It includes all changes made in a database since the last full backup, not just the changes made since the last differential backup.
- Differential backups can reduce the time required to restore a database compared to restoring from full backups only.
Read more about full, differential, and incremental backup types to better understand their differences.
Transaction log backup
A backup of the transaction log in Microsoft SQL Server comprises all transactions occurring since the last transaction log backup, facilitating database restoration to a specific point in time. As the name suggests, a log backup focuses on backing up transaction logs and applies exclusively to full or bulk-logged recovery models. Transaction log files maintain a series of logs documenting the history of data modifications in a database. The transaction log backup includes all log records not covered in the previous transaction log backup.
In essence, a transaction log backup encompasses all changes made to the database, particularly necessary when using the full or bulk-logged recovery model to truncate the log. It’s important to know that consecutive transaction log backups do not duplicate data, and the performance remains unaffected during the execution of a transaction log backup. Hence, you can perform this operation even during high workload periods.
The main features of transaction log backups in Microsoft SQL Server are:
- Transaction log backups capture the transaction log changes since the last log backup.
- They allow for point-in-time recovery and are crucial for maintaining data consistency.
- Used in conjunction with full and differential backups to create a comprehensive backup strategy.
File and filegroup backup
File backup permits the independent backup of each file rather than requiring the backup of the entire database. This becomes applicable when multiple data files have been established for your database.
One scenario justifying this backup type is when dealing with exceptionally large files that require special attention in terms of backup. The execution of a file backup can be achieved through either T-SQL or SSMS. However, if your database predominantly consists of a single data file, this option may not be suitable.
The main features of MS SQL file backup are:
- This type of backup allows you to back up individual database files or filegroups.
- Useful when you need to selectively back up specific parts of a database.
- You can also use file/filegroup backups for piecemeal restores.
Copy-only backup
A copy-only backup for MS SQL Server operates independently from the conventional backup sequence, creating a backup without influencing original backups, backup sequences, or restoration processes. A copy-only backup is useful for experimenting with changes to backed-up information without affecting the primary dataset, allowing the creation of a backup without disrupting the overall backup and restore protocols for the database. Note that a copy-only backup (for full backups) cannot be used to create differential backups.
The primary advantage of a copy-only backup lies in its non-disruptive nature to the regular backup sequence and standard restoration processes. Typically, most MS SQL Server backup methods impact the database and restoration procedures. By using copy-only backups, IT teams can create backups that remain independent of the original backups and restoration processes. It’s essential to note that copy-only backups do not allow for centrally recording backup history.
Unless using copy-only for the full backup, the subsequent differential backup may be affected. The key distinction between a full and a full copy-only lies in the fact that the latter does not break the differential chain. Importantly, neither of these methods disrupts the log chain, as neither truncates the log file.
As for log backups, applicable to full and bulk-log recovery models, the purpose of a copy-only log backup is to capture the existing log archive point. While infrequently used, a copy-only log backup can be helpful for an online restore in certain situations.
The main features of an MS SQL copy-only backup are:
- A copy-only backup does not affect the normal backup sequence. It is an additional backup taken independently of the regular backup chain.
- Useful for creating backups for specific purposes without disrupting the established backup strategy.
All these Microsoft SQL Server backup types can be combined to create a comprehensive backup strategy that meets the specific requirements of your SQL Server environment. Regularly testing and validating your backup and restore procedures are also essential components of a robust data protection strategy.
How to Back Up SQL Databases
There are a few methods to create an MS SQL database backup with native Microsoft tools:
- MS SQL Server Management Studio (SSMS) is a free native tool with a user-friendly graphical interface. SSMS should be installed manually on the same server or remote machine on which SQL Server is installed.
- Transaction SQL (T-SQL) commands are used to manage MS SQL Server, including database backup and restore operations.
- sqlcmd is a utility in Windows command line (cmd) that allows you to run T-SQL commands on SQL Server.
- PowerShell is an advanced command line environment in Windows that supports SQL Server management after installing the SqlServer PowerShell module.
Backup in MS SQL Server Management Studio
To make an SQL Server database backup, do the following:
- Open MS SQL Server Management Studio (SSMS) and log in to SSMS using the administrative account.
- In Object Explorer, located on the right side of the SSMS window, go to Databases and right-click the database name you want to back up. We use AdventureWorks2022 as a database in this example.
- In the context menu, click Tasks > Backup.

- Set the parameters in the Back Up Database window.
- Source:
- Database: AdventureWorks2022
- Backup type: Select Full or Differential (you need to create a full backup first).
- Backup component: Database
- Destination:
- Backup to: Disk or URL (select disk)
- Deselect the Copy-only backup checkbox if you don’t want to create a copy-only backup.
NOTE: You can edit settings if you want to create a backup of another type.
The path set in general MS SQL database server properties is selected by default. You can change the default path in global settings – right-click the MS SQL Server name in Object Explorer, click Properties, select the Database Settings page, and view/edit Database default locations.
- Source:
- Click Add to select a custom destination location for the current MS SQL backup job and select Delete to delete the unneeded location accordingly. We select “D:\MS SQL Backup DB\AdventureWorks” in this example.
NOTE: To store a backup, use a disk different from the disk where the original database is located. It is recommended that you follow the 3-2-1 backup rule for a robust data protection strategy. You can also configure the overwrite behavior and compression in Media Options and Backup Options accordingly. The Script button creates a T-SQL script based on the selected settings.

- Don’t forget to enter a backup file name. Note that differential backups can use the .dif file extension.

- Hit OK in each window to proceed.
If everything is correct, you should see the message: The backup of database “AdventureWorks2022” completed successfully.
Microsoft SQL backup schedule in SSMS
You can automate MS SQL database backup and schedule backup jobs. To schedule database backups, perform the following steps in Microsoft SQL Server Management Studio.
- In Object Explorer, go to Management, right-click Maintenance Plans, and click New Maintenance Plan.
- Enter a name for a new maintenance plan, for example, MS SQL Backup Plan. Hit OK.

- Click the Calendar icon (Subplan schedule) to configure the MS SQL backup schedule.

- Select the needed MS SQL backup scheduling options:
- Schedule type: Recurring (by default)
- Frequency
- Daily Frequency
- Duration
Hit OK to save the settings.

- Click ToolBox in the top left corner of the SSMS interface.

- Drag Back Up Database Task from Toolbox to the empty area of the MS SQL Backup Plan [Design] tab.
- Double-click Back Up Database Task that you just dragged and dropped in the MS SQL Backup Plan [Design] tab.

- The Back Up Database Task options window opens. Select the connection type, such as Local server connection.
- Configure the needed settings in the General, Destination, and Options tabs:
- Backup type: Full or Differential
- Databases: Specific databases, all databases, system databases, or All user databases.
- Backup up to: Disk

Options in the Destination and Options tabs are displayed in the screenshot below.
Hit OK to save settings for the scheduled MS SQL database backup task.

- You can click View T-SQL to see the commands you can use in T-SQL to run the task you have created in the graphical user interface of SSMS.

- Press Ctrl+S to save changes in SSMS.
- Press F5 to refresh the displayed items in SSMS.
- Go to SQL Server Agent > Jobs in Object Explorer. You can open the Job Activity Monitor and see the MS SQL Backup Plan.Sublan in the job list.

- Refresh the page by right-clicking Jobs or another object and clicking Refresh. In Object Explorer, go to SQL Server Agent > Jobs, select MS SQL Backup Plan.Subplan, right-click this object, and click Start Job at Step to start the scheduled backup job right now.

Alternatively, you can create a scheduled MS SQL backup task by going to Object Explorer > Management > New Maintenance Plan. There are the same options but you have to go through all steps.
MS SQL backup in T-SQL
Use the following main commands to back up an MS SQL database in T-SQL for each backup type:
- Full backup:
BACKUP DATABASE YourDatabaseName TO DISK = 'C:\Backup\YourDatabaseName_Full.bak';Replace YourDatabaseName with the name of your database, and specify the desired backup file path (use another disk, not a system disk (C:) or a disk with the original database).
- Differential backup:
BACKUP DATABASE YourDatabaseName TO DISK = 'C:\Backup\YourDatabaseName_Diff.bak' WITH DIFFERENTIAL;Make sure that you have previously created a full backup before creating the differential backup.
- Transaction log backup:
BACKUP LOG YourDatabaseName TO DISK = 'C:\Backup\YourDatabaseName_Log.bak';Transaction log backups are crucial for point-in-time recovery and maintaining data consistency.
- File backup:
BACKUP DATABASE YourDatabaseName FILE = 'LogicalFileName' TO DISK = 'C:\Backup\YourDatabaseName_File.bak';Replace LogicalFileName with the logical name of the file or file group you want to back up.
- Copy-only backup:
BACKUP DATABASE YourDatabaseName TO DISK = 'C:\Backup\YourDatabaseName_CopyOnly.bak' WITH COPY_ONLY;Copy-only backups don’t disrupt the regular backup sequence.
We explained the basic commands in the examples above. You can use additional parameters to tune advanced backup settings in T-SQL commands. Below are some examples of T-SQL scripts for performing backups in Microsoft SQL Server with advanced options, including compression:
- Full backup with compression:
-- Full Backup with CompressionBACKUP DATABASE YourDatabaseNameTO DISK = 'C:\Backup\YourDatabaseName_Full.bak'WITH COMPRESSION, INIT;Where:
YourDatabaseName must be replaced with the name of your database.
C:\Backup\YourDatabaseName_Full.bak is the path and filename for the backup file that should be changed in your case.
WITH COMPRESSION is the option that enables compression to reduce the backup size.
INIT is the option that initializes a new media set.
–– defines the start of the comment
- Full backup with different options:
-- Full Backup with various optionsBACKUP DATABASE YourDatabaseNameTO DISK = 'C:\Backup\YourDatabaseName_Full.bak'WITHFORMAT,– Overwrites the existing media setNAME = 'FullBackup',– Specifies the backup set nameSTATS = 10,– Prints a message every 10 percent completionCHECKSUM,– Verifies backup integrityCOMPRESSION,– Enables compressionINIT;– Initializes a new media set - Transaction log backup:
-- Transaction Log BackupBACKUP LOG YourDatabaseNameTO DISK = 'C:\Backup\YourDatabaseName_LogBackup.trn'WITHFORMAT,– Overwrites the existing media setNAME = 'LogBackup',– Specifies the backup set nameSTATS = 10,– Prints a message every 10 percent completionINIT;– Initializes a new media set - Backup to multiple files:
-- Full Backup to Multiple FilesBACKUP DATABASE YourDatabaseNameTODISK = 'C:\Backup\YourDatabaseName_Full1.bak',DISK = 'C:\Backup\YourDatabaseName_Full2.bak'WITH INIT;
These examples showcase various advanced options like formatting the media set, specifying backup set names, displaying progress statistics, and verifying checksum. You can customize these sample scripts based on your specific requirements and preferences.
MS SQL Table Backup
To back up a specific table in Microsoft SQL Server, you can use the Generate Scripts feature in MS SQL Server Management Studio (SSMS) to create a backup script for the table’s schema and data or use the bcp (Bulk Copy Program) utility. Consider the steps below for both methods.
Method 1: Generate Scripts in SSMS
Do the following to generate a T-SQL script and back up a particular table of an MS SQL database:
- Launch MS SQL Server Management Studio and connect to the MS SQL Server instance.
- Navigate to a database in Object Explorer and right-click the database name. Click Tasks > Generate Scripts in the context menu.

- Read tips in the Introduction step of the Generate Scripts wizard. You can select the Do not show this page again checkbox. Hit Next at each step of the wizard to continue.
- At the Choose Objects step, click Select specific database objects. Select the needed table(s) to back up. In this example, we select the Person.Address table of the database to back up.

- Specify how scripts should be saved at the Set Scripting Options step. Select Save as script file and select Single script file. Enter a file name for a backup in the appropriate folder. Click … to select a folder and enter an MS SQL table backup name.

- Click Advanced and, in the opened Advanced Scripting Options window, set Types of data to script = Schema and data. Hit OK to save settings and close the window. Then, continue to the next step of the wizard.

- Check the configuration summary and go to the final step of the database table backup.

- At the Save Scripts step, you can see the backup progress. Wait until the MS SQL database backup process is finished.

- Open Windows Explorer and find the created MS SQL table backup file in the selected destination directory. In this example, we have the MS_SQL_Table_Backup.sql file.

- Double-click the MS_SQL_Table_Backup.sql file and open this SQL script file in SSMS. Change the database name in the first line to meet the requirements of your environment.

- Click Execute to run the MS SQL table backup script.
Method 2: Use bcp (Bulk Copy Program)
Use the following workflow to perform MS SQL table backup with bcp:
- Open the command prompt (press Win+R, type cmd and hit Enter) in Windows with administrative privileges.
- Navigate to the bcp utility executable in the MS SQL Server installation directory (160 is used for MS SQL Server 2022). For example:
cd C:\Program Files\Microsoft SQL Server\160\Tools\Binn - Run the
bcpcommand to export the table data to a file. Replace <DatabaseName>, <SchemaName>, <TableName>, and <OutputFilePath> with your actual database, schema, table, and desired output file path.bcp <DatabaseName>.<SchemaName>.<TableName> out <OutputFilePath> -c -S <ServerName> -TWhere:
-c – specifies character data (non-Unicode) to be copied.
-S <ServerName> – specifies the server name.
-T – uses a trusted connection (Windows authentication).
- Check the specified output file for the exported data.
How to Restore SQL Server Database
When using native Microsoft tools for MS SQL database backups, these backups are usually saved as .bak files. For how to open a .bak file, you should generally use MS SQL Server Management Studio (SSMS), a tool provided by Microsoft for managing MS SQL Server databases. Restore data from this backup to a regular state. Only then you can open the data.
NOTE: You can copy a backupname.bak file, rename the copied backupname.bak file to backupname.xls and open the .xls file in Microsoft Excel if you need to view the data from a backup but don’t have MS SQL Server installed at the moment. Copying the file prevents corruption of the main backup file if something goes wrong.
MS SQL database restore in SSMS
Keep in mind that you need the necessary permissions to perform a database restore, and the MS SQL Server instance should be able to access the .bak file.
To restore an MS SQL Server database in MS SQL Server Management Studio from a backup file, do the following:
- Log in to an MS SQL Server in SSMS by using an administrative account.
- Right-click Databases in Object Explorer and click Restore Database in the context menu.

- In the Restore Database window, select Device to restore an MS SQL database from a .bak file and click the … button to select the .bak file.
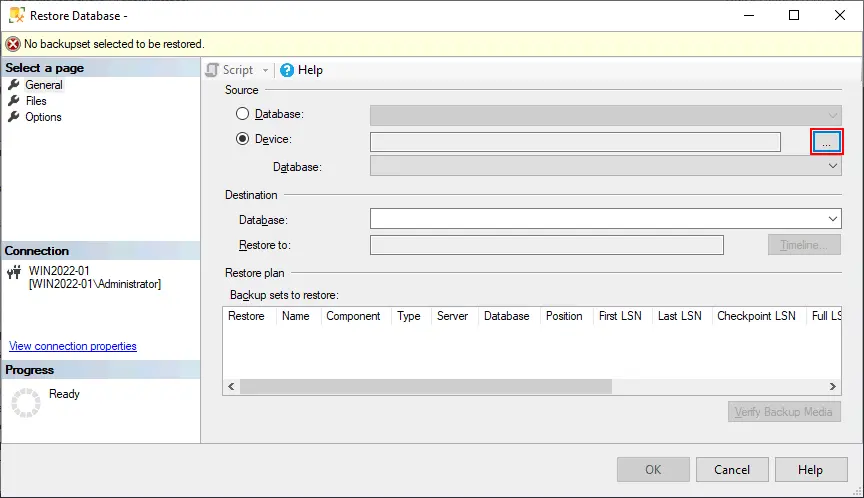
- Select File as a backup media type and hit Add.

- Locate a backup file. By default, the default backup directory is displayed in the window. Browse to the needed directory and select the backup file. The AdventureWorks2022.bak file is selected in this example.

- Click OK twice to save settings and go back to the Restore Database window. SSMS will display the progress of the restore operation. You can monitor the process in the Restore Progress window.

If everything is correct, you should see this message after restoring a database:
Database ‘AdventureWorks2022’ restored successfully.
MS SQL database restore in T-SQL
You can use T-SQL commands to restore a database from a .bak file using the RESTORE DATABASE statement. This can be useful in scripts or scenarios where SSMS is not available. Consider the following commands to restore an MS SQL database in T-SQL.
- Full database restore:
RESTORE DATABASE YourDatabaseName FROM DISK = 'C:\Backup\YourDatabaseName_Full.bak' WITH REPLACE;Replace YourDatabaseName with the name of your database and specify the path to the full backup file. The WITH REPLACE option is required if you are overwriting an existing database.
- Differential database restore:
RESTORE DATABASE YourDatabaseName FROM DISK = 'C:\Backup\YourDatabaseName_Diff.bak' WITH NORECOVERY;After restoring the differential backup, you might need to restore additional transaction log backups to recover the database to the latest point in time.
- To restore a transaction log backup, use the following T-SQL command:
RESTORE LOG YourDatabaseName FROM DISK = 'C:\Backup\YourDatabaseName_Log.bak' WITH NORECOVERY; - Repeat this command for each transaction log backup in sequence. Finally, execute the following command to bring the database online:
RESTORE DATABASE YourDatabaseName WITH RECOVERY; - Ensure that the transaction log backups are applied in the correct order.
- To restore a transaction log backup, use the following T-SQL command:
- File or filegroup restore:
RESTORE DATABASE YourDatabaseName FILE = 'LogicalFileName' FROM DISK = 'C:\Backup\YourDatabaseName_File.bak' WITH REPLACE;Replace LogicalFileName with the logical name of the file or filegroup.
- Copy-only restore:
RESTORE DATABASE YourDatabaseName FROM DISK = 'C:\Backup\YourDatabaseName_CopyOnly.bak' WITH REPLACE, COPY_ONLY;The COPY_ONLY option is required for copy-only restores.
Microsoft SQL Backup & Recovery with NAKIVO
NAKIVO Backup & Replication is a universal data protection solution that supports backing up machines hosting MS SQL databases. Microsoft SQL backup is created when you back up a Windows machine deployed as a physical machine or virtual machine. Thus, you can protect the entire server with Microsoft SQL databases running on the server. The NAKIVO solution allows you to recover the entire physical machine or VM, a particular Microsoft SQL database, or database objects. This approach speeds up the recovery process and allows for more flexibility during recovery.
The advantage of Microsoft SQL Server backup with the NAKIVO solution is the ability to use an incremental approach. Incremental backups speed up the backup process and save storage space. Compression, encryption, and SQL log truncation techniques make storage space consuming more rational as well as making the backup process fast and secure. Backup jobs are scheduled and automated.
Backup of server hosting SQL: step by step with NAKIVO
Do the following to back up a Windows machine with your MS SQL database in NAKIVO Backup & Replication:
- Open the web interface of NAKIVO Backup & Replication in a web browser.
- Ensure that the needed physical Windows server or virtual machine with the Microsoft SQL Server has been added to the NAKIVO inventory. You can add physical machines, VMware vCenter Servers, ESXi hosts and other items to the inventory by going to Settings > Inventory.
Make sure that there is enough free space in a backup repository to store backups.

- Create a new backup job for the machine on which MS SQL Server is installed. With NAKIVO, You can back up the machine with MS SQL Server in a running state. Click Jobs > + (Create a new job) and select the needed job type. We back up a physical machine in this example and select Physical machine backup job.

- Select a machine on which MS SQL Server is installed in the first step of the new backup job wizard. We select our Windows Server 2022 with MS SQL Server 2022 installed. You can select multiple machines in one job. Hit Next at each step of the wizard to continue.

- Select a backup repository where you want to store your backup. You can select a local backup repository or a backup repository in the cloud. It is recommended to use a local repository first and then create a backup copy to the cloud or another repository to satisfy the 3-2-1 backup rule.

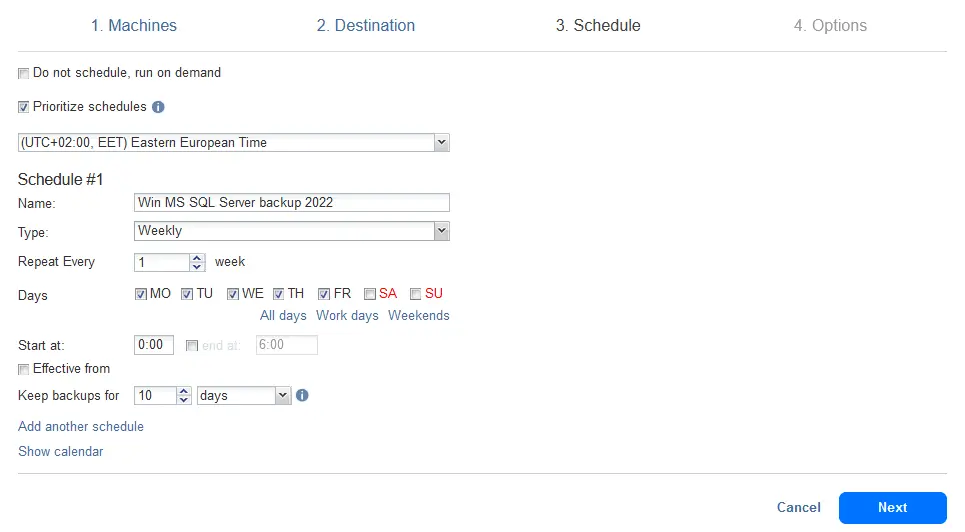
- Select schedule options. The latest versions of the NAKIVO solution use a combined schedule and retention approach. You can configure flexible retention rules for backup jobs, including jobs for MS SQL database backup. Set a name for each schedule.
- Configure backup job options. Enter a job name, for example, MS SQL Server Backup Job 2022. Configure full backup settings. By default, incremental backups are used with periodic full backups. Full backups can be Active full and Synthetic full. Click Finish or Finish & Run to run the job immediately.

- Wait until the backup job is completed.
Note that NAKIVO Backup & Replication supports log truncation for Microsoft SQL Server, Exchange Server, and Oracle Database to save storage space on a source server after backup.
SQL database restore with NAKIVO
The MS SQL database restoring process in NAKIVO Backup & Replication is straightforward. You can restore the entire physical or virtual machine together with a database. Alternatively, you can use the granular recovery functionality and restore only database objects (the entire database, tables, etc.).
Do the following to recover an MS SQL database or particular database objects in NAKIVO Backup & Replication:
- In the web interface of the NAKIVO solution, go to Jobs > Recover > Microsoft SQL Server objects.

- At the first step of the Object Recovery Wizard for Microsoft SQL Server, select a backup of your machine with the MS SQL Server database and select a recovery point. Ensure that the Automatically locate application databases checkbox is selected. Hit Next at each step of the recovery wizard to continue.

- Select a recovery server. A recovery server can be the original server used as the source to create the backup or a new machine without the database that is being restored. We select the original server to recover the database.
- Enter the credentials of the recovery server and click Test Connection.
- Select an SQL instance on this server after establishing a successful connection.

- At the Objects step of the recovery wizard, select the database you want to recover (an .mdf file).

If you don’t need to restore the entire database, click the > icon in the left pane at the database name to expand the database object and select particular database objects to recover.

- Define the recovery job options from the options listed below:
Recovery scope:
- Recover schema and data
- Recover only schema
Recovery type:
- Recover to original location
- Recover to custom location
- Export
Overwrite behavior:
- Rename recovered item if such item exists (default)
- Skip recovered item if such item exists
- Overwrite the original item if such item exists

Hit Recover and wait until the selected database or database objects are recovered.