The Best Way to Reset the ESXi Default Password
Any user who installs the ESXi hypervisor must set the root password, but users and administrators cannot change the ESXi default password if it gets forgotten or lost. This approach may not be the best from security point of view, but sometimes it’s inevitable.
When an ESXi server is set up and configured, everything is working correctly, a system administrator may not log in to the ESXi server for a long time. The ESXi host can be restarted sometimes after power failures or some other issues. However, the password is not required if you are not going to reboot the ESXi host from the ESXi console. But at some point, system administrators may want to make some changes in the ESXi server’s configuration. They try to enter the root password that is required to log in and reconfigure the server, only to discover that the password has been forgotten.
Under these circumstances, how can you log into the ESXi server? Reinstalling ESXi is not a good solution, because creating a new configuration from scratch as well as creating and configuring VMs needs a lot of efforts.
Is there an ESXi default password? How to reset the ESXi default password without reinstalling the server? Keep calm, there is the answer on this question. Today’s blog post explains how to reset the ESXi password for the root user without reinstalling ESXi on the server.
It should first be mentioned that there is no ESXi default password. It is only possible to change or remove a password for a root user by using some tricks. Let’s start!

Recovering an ESXi Default Password by Using VMware Host Profiles
VMware Host Profiles is the enterprise grade feature that helps apply the uniform configuration for multiple ESXi hosts and simplifies the process of deploying a high number of ESXi hosts. Thus, you can avoid configuring each host manually. Create a host profile and apply the profile to all required ESXi hosts in vCenter. This feature can also help to reset the ESXi password for the root user.
VMware Host Profiles can be used to reset your ESXi root password if the following starting conditions are met:
- ESXi hosts are managed by vCenter.
- You use the VMware Enterprise Plus license (Host Profiles is a feature that is available only for the Enterprise Plus edition of vSphere or higher editions).
These are the following machines in the current example:
- An ESXi server whose password is lost – 192.168.101.211
- An ESXi server whose password is known – 192.168.101.215
- vCenter Server – 192.168.101.103
VMware ESXi 6.7 and vCenter Server Appliance 6.7 are used.
Step-by-step instructions
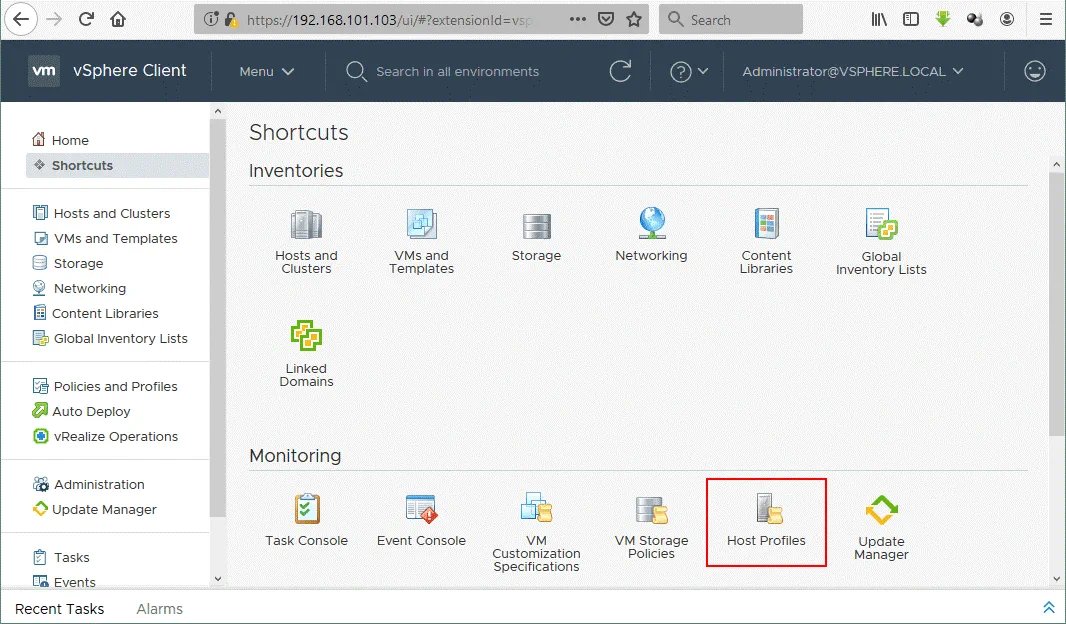
- Open VMware vSphere Web Client (the HTML5 vSphere Web Client is used in this case) by entering the IP address of your vCenter Server in a web browser. In this example, https://192.168.101.103 is the necessary address.
- Go to Host Profiles that you can find in the Shortcuts menu.
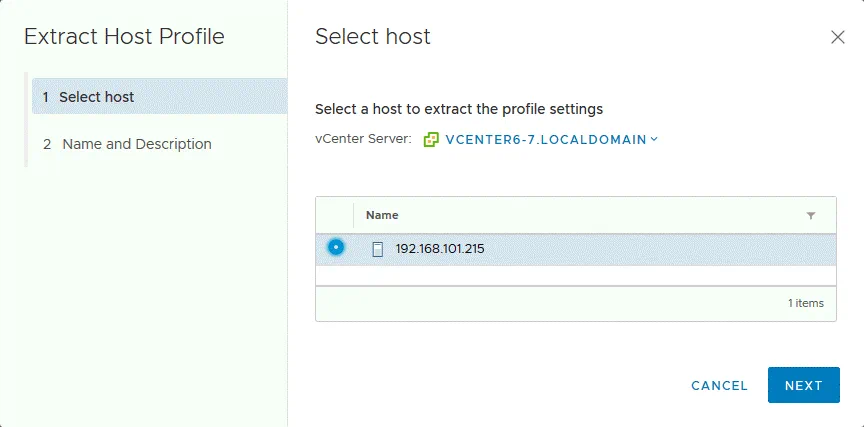
- Click Extract Host Profile.
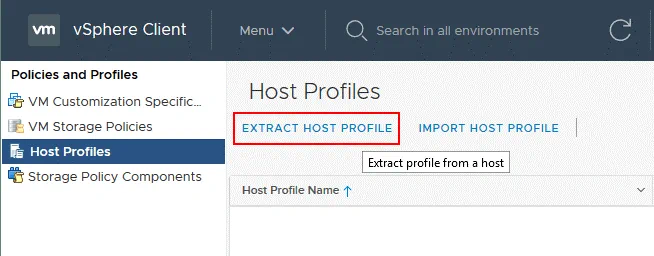
- On the pop-up screen, select the ESXi host you wish to use as a basis for creating a host profile. In this example, 192.168.101.215 has been selected. Hit Next.
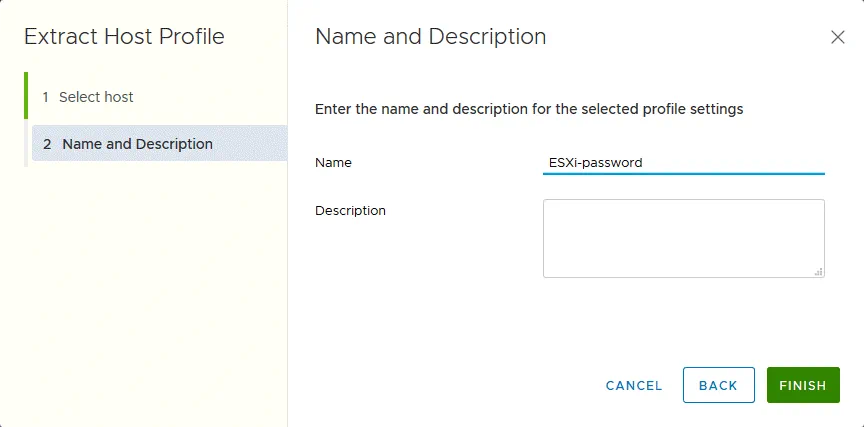
- Enter the name of the new extracted profile, for example, ESXi-password. Type the description if needed. Hit Finish.
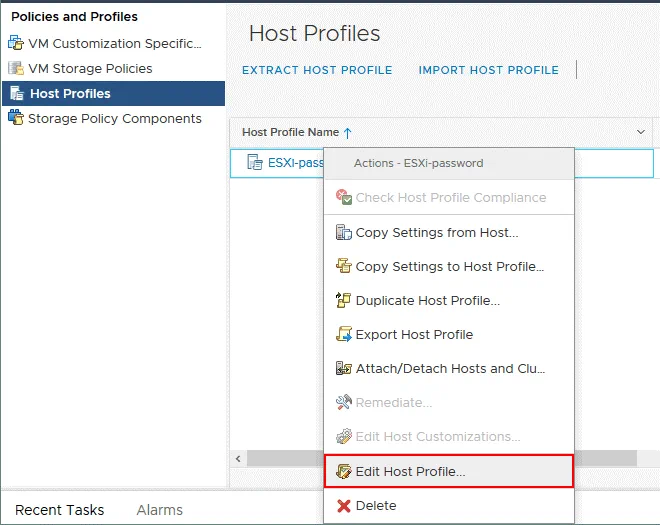
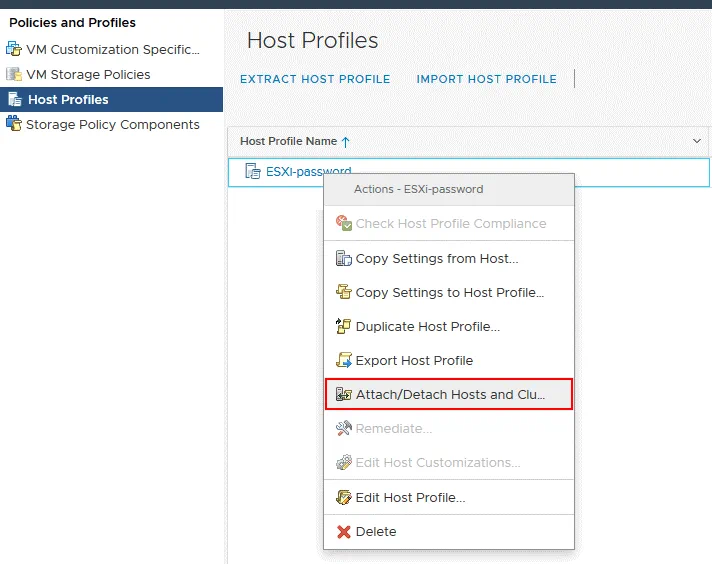
- Then, in the Host Profiles menu, select the host profile you have recently created (ESXi-password in this case). Right click the created host profile and select Edit Host Profile in the context menu.
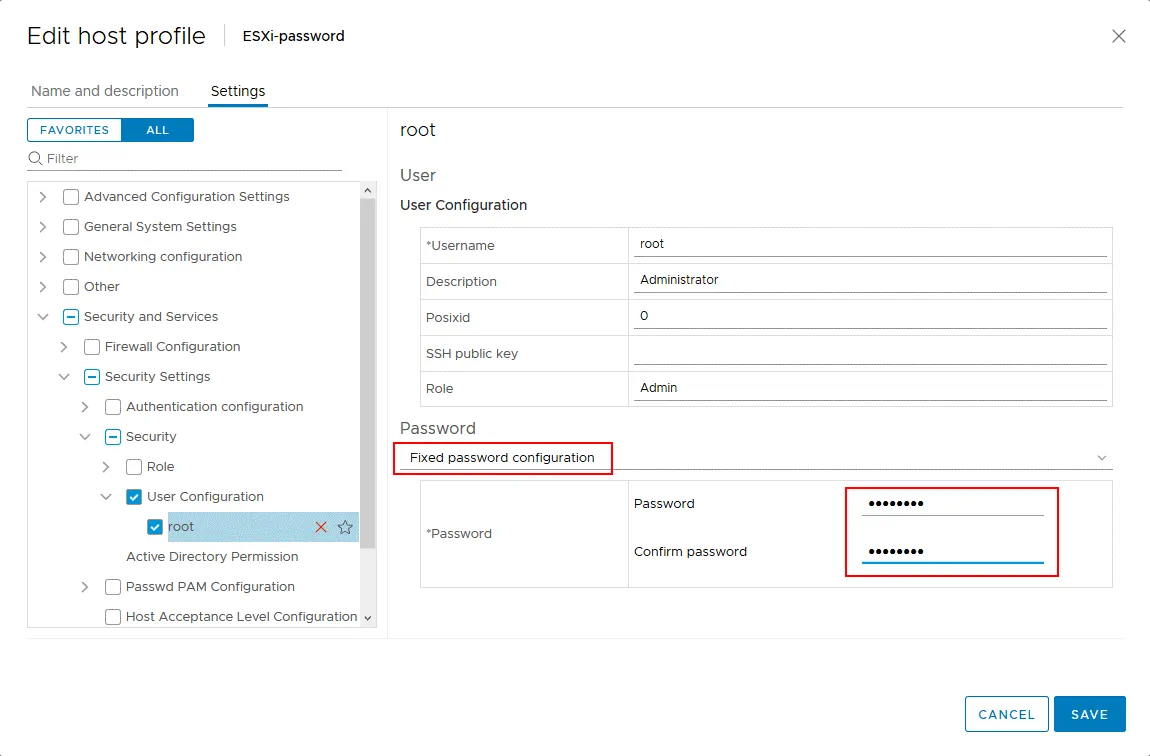
- Expand the menu in the left pane of the new assistant window and go to Security and Services > Security Settings > Security > User Configuration > root.
- Uncheck all unnecessary options.
- Select Fixed password configuration in the drop-down menu.
-
Enter a new ESXi password (for example, ChangeMe_357) for root, confirm the password and hit Save.
Note: If you have extracted a host profile from an ESXi whose password has been forgotten, changing the password at this step is necessary. If you have extracted a host profile from an ESXi host whose password is known, you may leave the password unchanged.
- The ESXi-password host profile has been saved after editing.
Make sure that the ESXi host whose root password must be reset is powered on. - Go to Host Profiles, and right-click the host profile you have edited before (ESXi-password) and select Attach/Detach Hosts and Clusters.
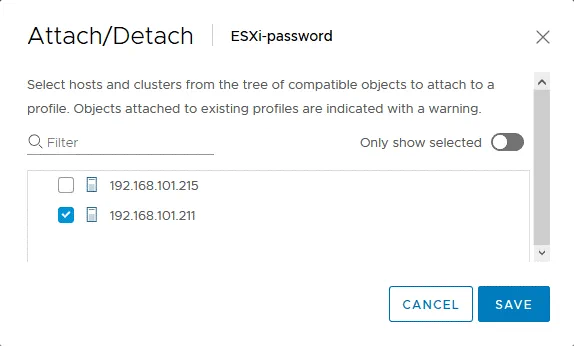
- Select the ESXi host whose root password you don’t know (tick the checkbox). In our case, this is 192.168.101.211. Hit Save.
-
Put your recovered ESXi host into maintenance mode – go to Hosts and Clusters, right click the host and in the context menu click Maintenance Mode > Enter Maintenance Mode. The icon of your ESXi host will be changed after that in the web interface.If there are VMs running on the ESXi host whose password you are going to recover, please shut down all running VMs or migrate the running VMs to other ESXi hosts within vCenter by using VMware vSphere Client.
Note: Maintenance mode is a special mode that must be used for an ESXi host when the host is in service, such as memory installation, software update, applying patches, etc. After entering maintenance mode and migrating or shutting down VMs, an ESXi host can be rebooted or powered off.

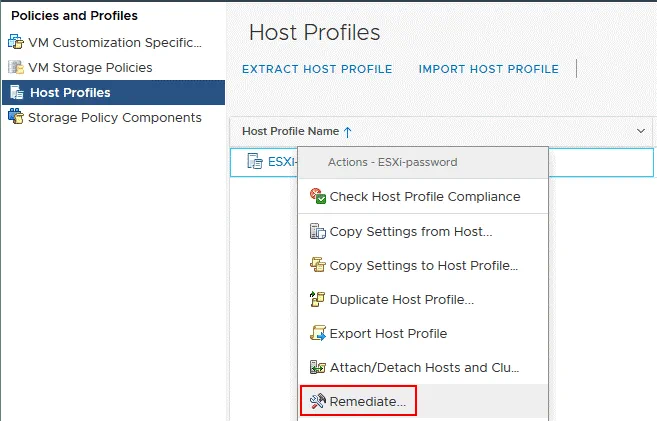
- When the ESXi host whose password must be recovered is in the maintenance mode, go to Host Profiles, right click the host profile and hit Remediate.
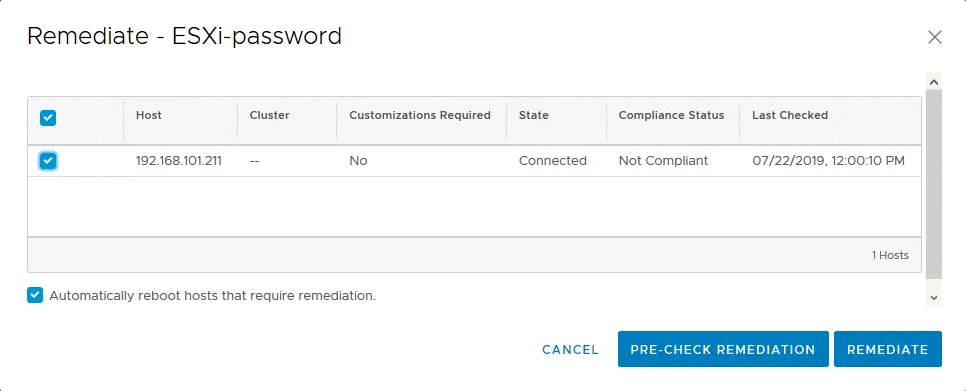
- In the window that appears, select the ESXi host whose password is lost by ticking the checkbox (192.168.101.211 in our case).
- You can click Pre-check remediation to check the target host.
- Finally, click Remediate.
- After successful remediation, exit the maintenance mode (right click the ESXi host and select Exit Maintenance Mode).
- Try to log into the ESXi host console as root with the password you have set in the host profile (ChangeMe_357 was set as the ESXi password for root in this case).
Now everything should work properly – an ESXi password for root is reset and access to the ESXi host is restored. You can set a new complex password for your ESXi host now.
ESXi Password Recovery in Active Directory
If you don’t have the Enterprise Plus license for your vSphere, there’s no reason to be sad. You can reset a forgotten ESXi default password by using Active Directory integration that doesn’t require the top class license.
VMware vSphere can be integrated with Active Directory that is usually used for the centralized management of users and computers. You can join each ESXi host into an Active Directory Domain and then use the account created on the Active Directory Domain Controller to log in to the ESXi host. The Active Directory authentication mechanism can be utilized in vSphere, thanks to the implementation of the PAM (Pluggable Authentication Module) framework for ESXi. This capability can be used to reset the ESXi password for the root user on a host. The ESXi host must be managed by vCenter in order to use this method and you should have an Active Directory Domain controller in your inventory.
Note: In VMware ESXi settings the IP address of the domain controller should be specified as a DNS server since the ESXi server must be able to resolve the domain and domain controller names. As you may recall, the IP address of the DNS server in the network settings of your ESXi server differs from the IP address of your existing domain controller, and you can deploy a temporary machine (physical or virtual) as Active Directory Domain Controller (set the DNS server IP address that is defined in network settings of the ESXi server as the IP address of the domain controller), connecting the ESXi server to that temporary domain controller, and joining the domain.
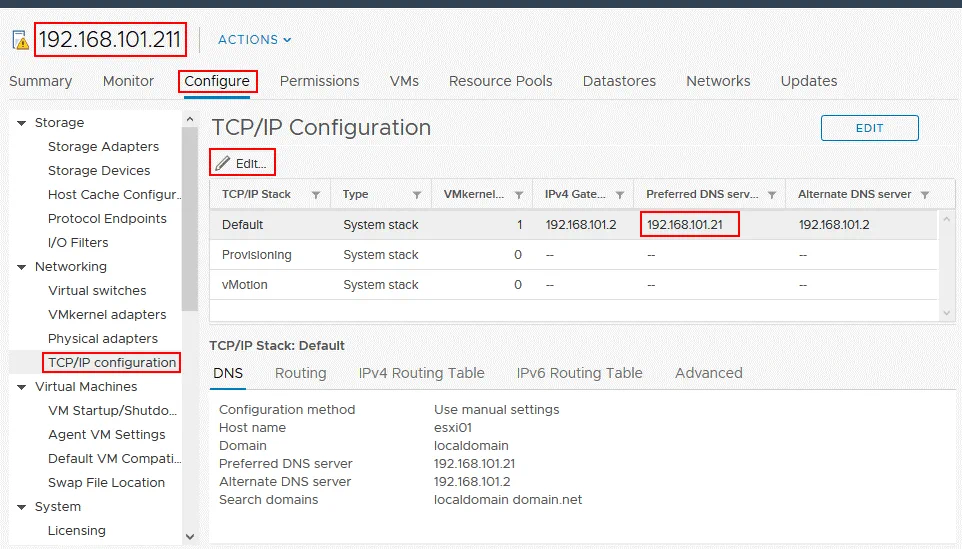
As an alternative, if you have a configured domain controller in your environment, you can open vSphere Client, select the ESXi host whose password must be reset, go to the Configure tab, select Networking > TCP/IP configuration and edit or add the IP address of the appropriate existing domain controller as the DNS server.
Note: You can see how to deploy a domain controller in the eBook about VMware clustering.
Let’s consider using this method step by step. The input data in the current example is the following:
- ESXi with unknown root password: 192.168.101.211
- vCenter: 192.168.101.103
- Domain Controller: 192.168.101.21
The Active Directory Domain Controller (ADDC) is deployed on Windows Server 2008 R2 in this example.
Step-by-step instructions
Create a new user whose name is, for example, esxi01 on the domain controller in Active Directory Users and Computers. In order to do this, open Server Manager, go to Roles > Active Directory Domain Services > Active Directory Users and Computers > [your domain name] > Users.
- Click Action > New > User and enter esxi01 as the user name. Hit Next. In our example, the domain name is domain.net.

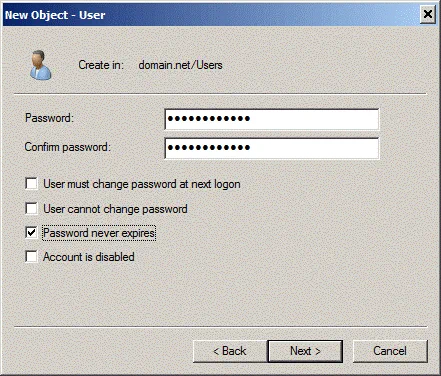
- Now set the password for this esxi01 user, for example, ESXiDomain_777. This password is used as an example only for this demo and it is recommended that you change the password to a strong, unique password after recovering the root access for your ESXi host. Hit the Password never expires checkbox.
- Hit Next and Finish.
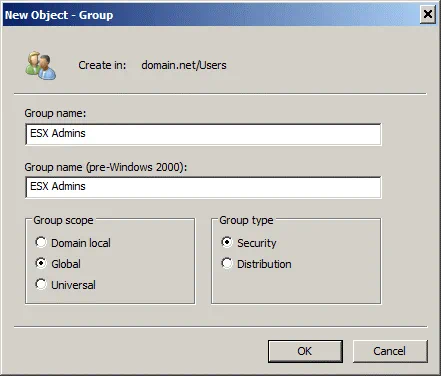
- Now you have to create the ESX Admins group on your Active Directory Domain Controller. The group name must be exactly the same. Users who are members of the ESX Admins global security group automatically get root privileges on an ESXi host after logging in.Later, you should add the esxi01 user to this group. It is preferable to add your user for logging in to the ESXi host into the ESX Admins group instead of adding the user to the Domain Admins group for security reasons.
- In order to create a new group, in the Server Manager go to Action > New > Group. Set ESX Admins as the group name as shown on the screenshot.
- After creating the ESX Admins group, open the group properties and in the Members tab, hit the Add button. Enter the name of your ESXi user account (esxi01 in this case) and hit Check Names. If the name is entered correctly and is underlined, hit OK to finish.
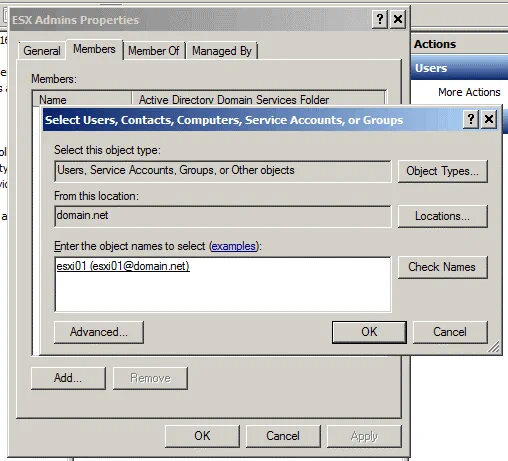
- Now you have the esxi01 user that is a member of the ESX Admins group in your Active Directory domain.
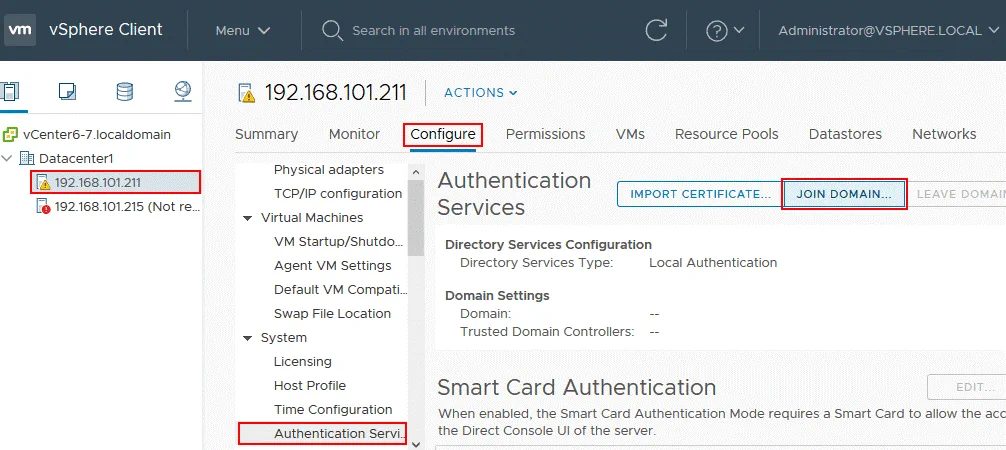
- It’s time for the ESXi server whose root password you cannot remember to join the domain. Open the vSphere HTML5 Web Client in your browser. Open Hosts and Clusters.
- Right-click your ESXi host, switch to the Configure tab and then select Authentication Services in the list. Click the Join Domain button.
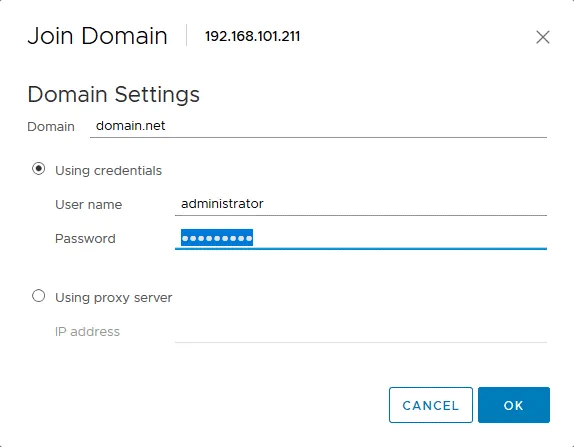
- Use the credentials of the domain administrator to join the domain. By default, Administrator is the member of the Domain Admins group.
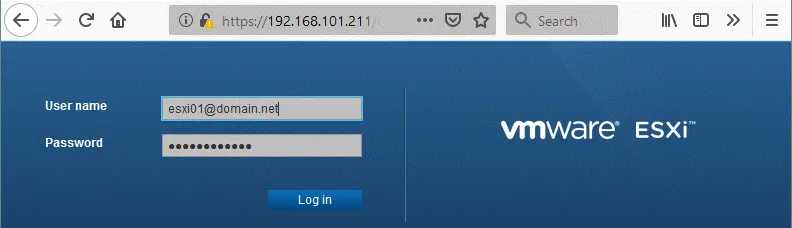
- When your ESXi host is in the domain, use VMware host client to log in to the ESXi host whose root password must be recovered. Enter the IP address of your ESXi host in the browser. In our example, https://192.168.101.211 should be entered.
- Enter esxi01@domain.net (the Active Directory user you created before) as the user name and the password set on the domain controller for this user (ESXiDomain_777 should be used as the ESXi default password in this case).
- Once you have logged in to the ESXi host whose password you have forgotten, you can reset the password for the root user.
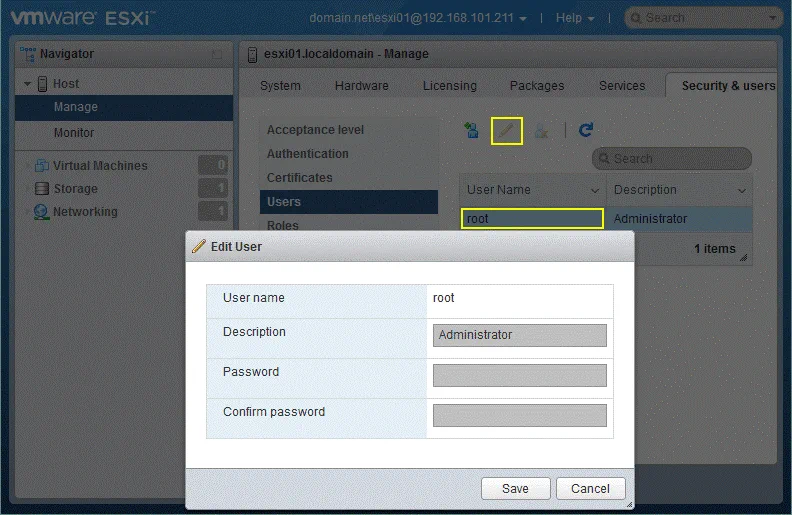
- Go to Manage > Security & Users > Users, select root and click the edit icon.
- Set a new, strong and unique ESXi password for root on the ESXi host. Try not to forget the password again!
Once you have reset the ESXi root password, make the ESXi host leave the Active Directory domain if the domain will not be used for ESXi authentication in the future.
Resetting an ESXi Password by Editing /etc/shadow
If you have a standalone host that is not managed by vCenter, you cannot use the previous two methods to recover an ESXi default password. This method can be used in almost all cases.
Theory
Passwords are not stored as plain text anywhere among ESXi system files. Basically, ESXi, similarly to Linux, stores password hashes in a special /etc/shadow system file that can be assessed only by the root user. Passwords appear encrypted in this case. Special mathematic algorithms such as MD5, Blowfish, SHA-256, SHA-512, etc. are used for transforming the source password to the check hash sum. Algorithms used for calculating a hash sum are not backward compatible (one-way encryption is used), hence it is not possible to do reverse calculations for getting the original password.
Let’s consider an example of the string in /etc/shadow that is related to the root user:
root:$1$xxxx$xxxxxxxx:13355:0:99999:7:::
This string and every other strings in the /etc/shadow file contain the following data:
- A user name (root);
- A password hash that is recorded in the $id$salt$hashed format; where $id$ is the algorithm for calculating a hash sum ($1$ is MD5, $2a$ and $2y$ are Blowfish, $5$ is SHA-256, $6$ is SHA-512).
- The most recent password change date – the number of days since the 1st of January, 1970 (13355);
- How many days are left before a user can change their password (0);
- The number of days left before a user will be forced to change the password (99999);
- The number of days before a password is set to expire where a user must be notified (7);
The fields are separated with the : (colon) character.
When a user enters a password, the entered password is transformed in the computer’s memory to the hash sum by using special algorithms and this hash is compared with the hash stored in the /etc/shadow system file. If the hashes match, then a user is authenticated, and gets the appropriate privileges after authorization (that is the next logical step after authentication).
Practice
First, you should prepare a live DVD. In this example, the Ubuntu 18 installation disk that includes the Ubuntu Live DVD option will be used. Download the ISO image of the Ubuntu distribution from the official web site. You can also use other distributions you like, for example, Kali Linux, BackTrack, Debian, GParted Live CD etc.
- Burn the ISO image on the DVD-R or DVD-RW media or write a bootable USB flash drive.
- Shut down or power off your ESXi host whose password is forgotten.
- Insert the live DVD disc into a DVD drive or insert the bootable flash card/drive into the appropriate slot/port and boot from that drive.
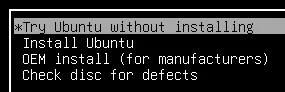
- Hit the Try without installing Ubuntu boot option (which is selected by default).
- Open the Ubuntu terminal (right click the Desktop and hit Open Terminal).
- Get the root privileges:
sudo -i - List partitions of the disk on which ESXi is installed. In our example, ESXi is installed on a separate disk that is partitioned by using the default ESXi partition table:
ls -al /dev/sd*
fdisk -l | grep /dev/sda
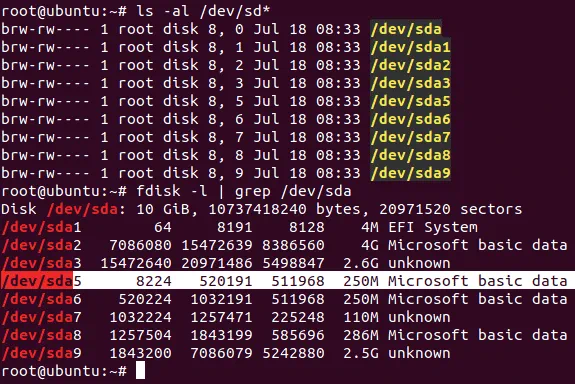
We are interested in the /dev/sda5 partition on which the /etc/shadow file is located. - Create temporary directories in the virtual file system used by Ubuntu running from the live DVD.
mkdir /mnt/sda5-esxiThis directory will be used to mount the partition on which the /etc/shadow file is stored.
- We also need to create a directory to store temporary files:
mkdir /temp - Mount the sda5 partition to the /mnt/sda5-esxi directory created above:
mount /dev/sda5 /mnt/sda5-esxi - Verify that the stage.tgz file that is of interest to us in the framework of ESXi default password recovery is located in the mounted directory:
ls -al /mnt/sda5-esxi/state.tgz

- Extract files from the state.tgz archive to our temporary directory:
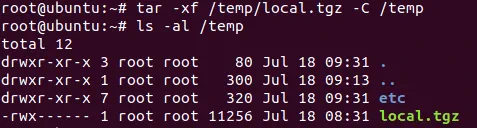
tar -xf /mnt/sda5-esxi/state.tgz -C /temp/ - The local.tgz file has been extracted from the state.tgz file. There is an archive inside another archive.
- Let’s extract files from the local.tgz file:
tar -xf /temp/local.tgz -C /temp/
- The local.tgz file can be deleted now from the temporary directory:
rm /temp/local.tgz - Open the /etc/shadow file in the text editor. Let’s use vi that is pre-installed in Ubuntu:
vi /temp/etc/shadow
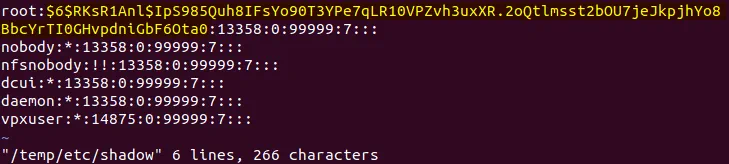
- Edit the content of this file. In order to reset the ESXi root password, edit the string which contains root. $6$ indicates that the SHA-512 algorithm is being used. The password hash is marked with yellow on the screenshot above.
- Delete this text between the first and second : (colon) symbols as following (the numbers may be different in your case). In vi you can navigate to the required character by pressing h, l, j, k and then press x to delete the character. As a result, your string related to the root user should look like:
root::13358:0:99999:7::: - Save changes and quit:
:wq

- Go to the /temp/ directory:
cd /temp - Now you need to add the shadow file back to the archive. Repack the archives:
tar -czf local.tgz etc
tar -czf state.tgz local.tgz - Move the new archive with the deleted root password to its standard location on the sda5 partition that is mounted to the /mnt/sda5-esxi/ directory:
mv state.tgz /mnt/sda5-esxi/ - Unmount the /dev/sda5 partition from the /mnt/sda5-esxi/ directory:
umount /mnt/sda5-esxi - Reboot the server and remove the bootable DVD or flash media:
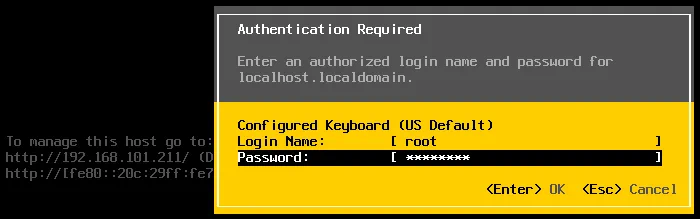
init 6 - Once your ESXi server has booted, press F2 to see the authentication screen.

- Leave the login name as root and leave the password field empty. Then press Enter.
Congratulations! You can log in to the console management interface of the ESXi server without a password. - Now set the new ESXi password and try to remember the password this time. You can configure everything you need on your ESXi host now.

Changing an ESXi Default Password by Replacing the state.tgz Archive
This method is similar to the previously discussed method. If you don’t wish to reset the ESXi default password by performing manipulations with packing/unpacking archives and editing the /etc/shadow file in the Linux console, you can just copy the /etc/shadow file from one ESXi host to another.
If you have more than one ESXi host and you know the password of at least one ESXi host, you can just copy the /etc/shadow file from the ESXi host whose password you know to the ESXi host whose password you have forgotten. If you have only one ESXi host and you cannot remember its ESXi root password, you can also use this method. In this case, you should deploy a virtual machine running ESXi on any available hypervisor, for example, on VMware Player or VMware Workstation. If you have an unused physical computer that is ESXi-compatible, you can also use that. A VM running ESXi on VMware Workstation is used in the current example.
In a brief, the main points of using this method of resetting an ESXi default password are the following:
- Set a new password for ESXi running on a VM (for example, ChangeMe_567);
- Copy the /etc/shadow file from that virtual ESXi to your ESXi, access to which must be restored. You can copy the entire state.tgz archive;
- Reboot your ESXi server and use the password you have set on a virtual ESXi host (ChangeMe_567).
Step-by-step instructions
Let’s review this method in more details.
First, deploy a VM and install ESXi on that VM. The version of ESX should be similar to the version of your physical ESXi, access to which must be restored. For example, 6.7 and 6.7, 6.7 and 6.5, 6.0 and 6.5 etc. The process of installing ESXi on a VM is explained in our blog post about VMware Home Lab. You can also read our blog post about interactive ESXi installation.
Operations performed on the ESXi host which password is known
- Power off the VM running ESXi whose root password you know.
- Insert the Ubuntu installation ISO image to a virtual optical drive of the VM.
- Start the VM and boot from the Ubuntu ISO image. Select Try Ubuntu without installing in the boot loader options.
- Insert a USB flash drive and connect the USB flash drive to a VM (the USB pass-through feature helps to do this).
- On the Ubuntu desktop, right click the icon of your USB flash drive and in the context menu, select Open in Terminal.
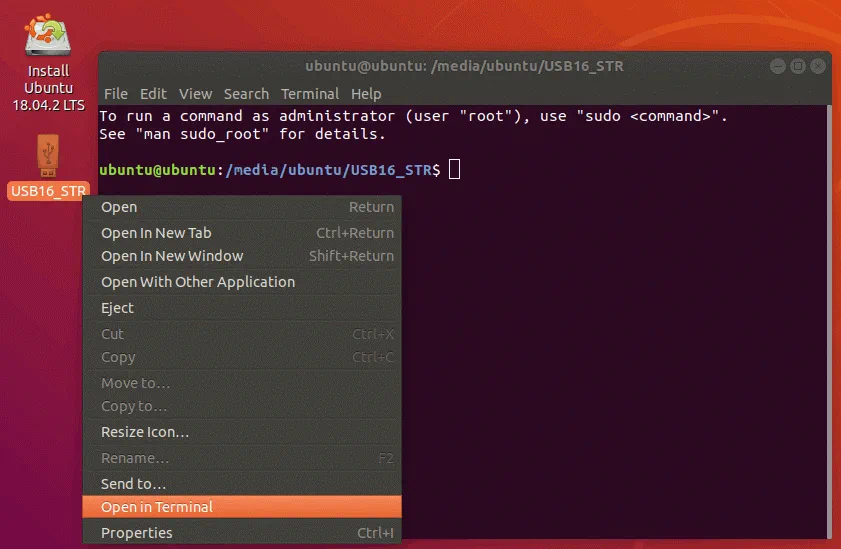
- In our case, the path to the USB flash drive is /media/Ubuntu/USB16_STR
In your case the path may have the following view: /media/Ubuntu/[flash_name]; where [flash_name] is also called a disk label. - Get the root privileges:
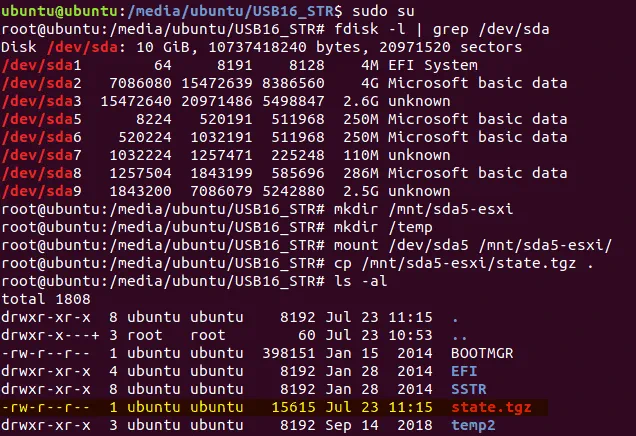
sudo su - Check the available partitions of the ESXi disk drive:
fdisk -l | grep /dev/sda - Create a directory to mount the necessary partition in the virtual environment used by the Ubuntu Live DVD:
mkdir /mnt/sda5-esxi - Mount the partition that contains the state.tgz archive with the packed shadow file:
mount /dev/sda5 /mnt/sda5-esxi/ - Copy the state.tgz archive which contains the /etc/shadow file to the USB flash drive (that is your current directory by the way and is indicated by a dot):
cp /mnt/sda5-esxi/state.tgz . - Verify that the state.tgz file has been copied:
ls -al
- Unmount the partition from the directory you created previously:
umount /mnt/sda5-esxi/ - Shut down the VM:
init 0 - Eject the USB flash drive where the state.tgz file has now been recorded and insert this USB flash drive to the USB port of the ESXi server where you want to reset the ESXi root password.
- Insert the Ubuntu installation DVD disc into the DVD drive of the physical server. If you have created a bootable flash drive, you can use it as bootable media.
Operations performed on the ESXi host whose password is lost
- Power off the ESXi server to which you cannot log in and insert the Ubuntu installation media (insert a DVD disc into a DVD drive or insert a USB flash drive into a USB port). If VMs are running on this ESXi server, don’t forget to shut down the VMs properly before shutting down the hypervisor.
- Power on the ESXi server and boot from the Ubuntu installation media.
- Select Try Ubuntu without installing in the boot loader options.
- Once Ubuntu Live DVD has been loaded, right click the USB flash icon on the Ubuntu desktop and select Open in Terminal.
- Run the commands, similarly as to how you have run them before:
sudo su
fdisk -l | grep /dev/sda
mkdir /mnt/sda5-esxi
mount /dev/sda5 /mnt/sda5-esxi/ - Rename the original state.tgz file that contains the hash of the unknown ESXi root password:
mv /mnt/sda5-esxi/state.tgz /mnt/sda5-esxi/state-old.tgz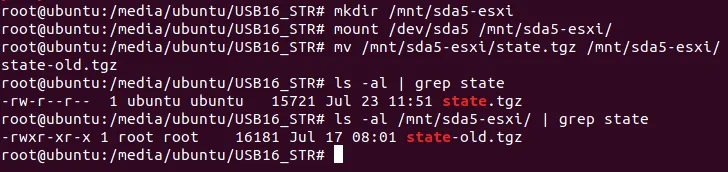
- Copy the state.tgz file from the USB flash drive (this is your current directory) to the directory that is the original location of the state.tgz file:
cp ./state.tgz /mnt/sda5-esxi - Verify that the file has been copied (see the time and date to ensure that everything is OK):
ls -al /mnt/sda5-esxi/state.tgz

- Unmount the disk partition you mounted previously:
umount /mnt/sda5-esxi/ - Shut down the server:
init 0 - Eject the Ubuntu installation media and the USB flash drive to which you have copied state.tgz.
- Power on your ESXi host as usual.
- Log in by using the password of the root user you have set for ESXi running on a VM.
Everything should be OK now. Once you have logged into the ESXi console, set a new strong password in ESXi password settings and do not forget it.
Conclusion
You cannot reset the forgotten root password to an ESXi default password because there is no default password for ESXi root user. Choosing the method which you want to use for changing your forgotten ESXi password depends on a few factors – whether your ESXi host is accessible in vCenter, whether you have the Enterprise Plus license, and whether you have other ESXi hosts with a known root password. Knowing all four methods allows you to restore access to your ESXi hosts in almost all cases.
No matter what password you use on ESXi hosts don’t forget to back up your VMs. Having VM backups can protect your data, save money and time. Learn more about NAKIVO Backup & Replication and test it in your virtual environment.