A Guide to ESXi SNMP Configuration for ESXi Monitoring
Infrastructure monitoring is important for organizations because monitoring allows you to detect issues in time and prevent failures. If a failure occurs, early notifications about the failure allow you to start working on resolving related issues as soon as possible. In a VMware vSphere environment, it is recommended that you configure ESXi monitoring. One of the most affordable methods to monitor ESXi hosts is using built-in functionality and Simple Network Management Protocol (SNMP). A dedicated server with monitoring software must be configured in this case. This blog post covers ESXi SNMP configuration and explains how to enable SNMP on ESXi hosts.

Preparing the Environment
Here’s how to enable SNMP on ESXi:
- Enable Secure Shell (SSH)
- Configure SNMP
- Configure ESXi Firewall
I’m going to explain ESXi SNMP configuration using an example with one ESXi 7.0 host and one Ubuntu Linux machine on which monitoring software is installed.
The IP address of the ESXi host is 192.168.101.208.
The IP address of the Ubuntu Linux machine is 192.168.101.209.
Use your IP addresses and other values for the appropriate parameters when configuring ESXi monitoring via SNMP in your infrastructure to meet your configuration.
Enabling SSH Access on ESXi
SSH access on an ESXi host is needed to run ESXCLI commands on a host remotely. In order to enable SSH access to your ESXi host, you can use VMware Host Client. Open a web browser, enter the IP address of your ESXi host in the address bar, then enter credentials to log in.
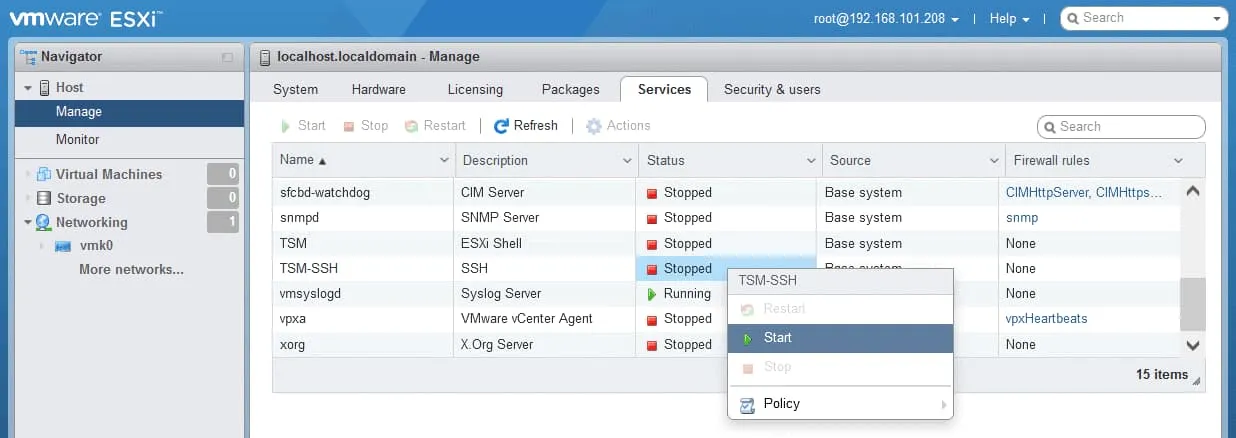
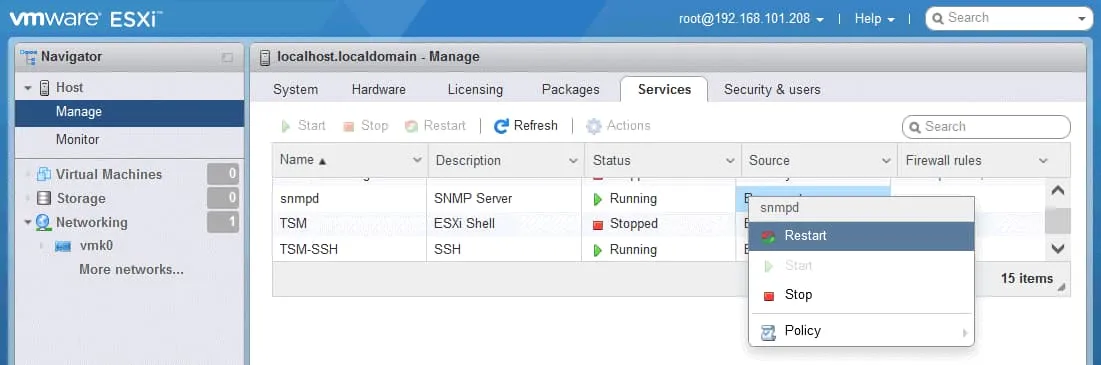
In the Navigator pane, go to Host > Manage and click the Services tab.
Right-click TSM-SSH and, in the context menu, click Start.
On the screenshot below you see the started SSH server service on the ESXi host.
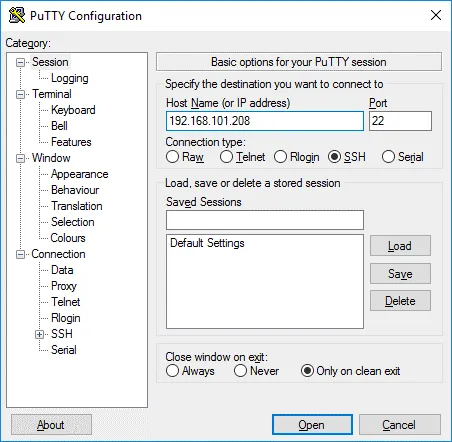
Now you can connect to the ESXi host from a machine with an SSH client installed. If you’re using Windows, you can use PuTTY, a free and convenient SSH client. In Linux, run the SSH client from the command line with the command:
ssh your_username@host_ip_address
Enter the IP address of your ESXi host and port TCP 22 (the default port number) in the session settings of the SSH client to connect to the ESXi host via SSH.
ESXi SNMP Configuration
Once SSH access to the ESXi host is established, you can configure VMware ESXi SNMP options. On ESXi hosts, SNMP can be configured only in the command-line interface. The graphical user interface (GUI) allows you only to start, stop, and restart the SNMP service.
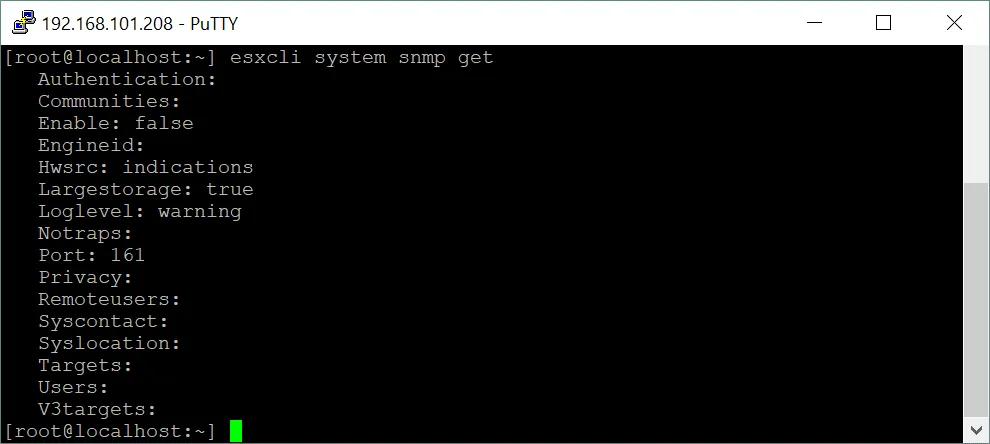
Run the command in the console (terminal) and check the SNMP status on the ESXi host:
esxcli system snmp get
SNMP is disabled by default. The output for disabled SNMP on ESXi is shown on the screenshot. Most of the parameters are empty and or not configured.
Configuring parameters of an SNMP agent
Set SNMP parameters for an SNMP agent on the ESXi host. The SNMP agent is used to send notifications (SNMP traps and informs) to a monitoring server and receive GET, GETNEXT, and GETBULK requests.
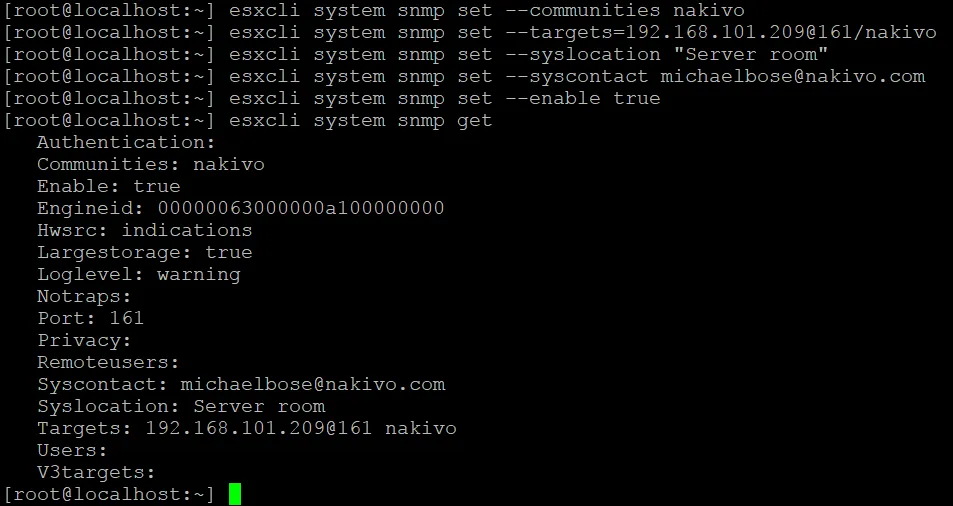
Set the community name (“public” is the community name set by default). The community name in this example is “nakivo”.
esxcli system snmp set –communities nakivo
Set the SNMP target. The SNMP target is a server on which monitoring software is installed to handle SNMP traps and collect monitoring information. In my example, the SNMP target is the machine running Ubuntu Linux (192.168.101.209). UDP 161 is the default port used for SNMP and this port is defined in my ESXi SNMP configuration:
esxcli system snmp set –targets=192.168.101.209@161/nakivo
Specify a location, for example, the geographical location, address, datacenter, or a room where the server is located:
esxcli system snmp set –syslocation “Server room”
Specify contact information. The system administrator’s email address can be defined for this parameter:
esxcli system snmp set –syscontact michaelbose@nakivo.com
Enable SNMP on ESXi:
esxcli system snmp set –enable true
Check the SNMP status on the ESXi host again:
esxcli system snmp get
Now you can see that the parameters are configured.
The Engine ID is the unique identifier for the SNMP agent (used for SNMP v3). The Engine ID can be set with the command (optional):
esxcli system snmp set -engineid 544a33209458
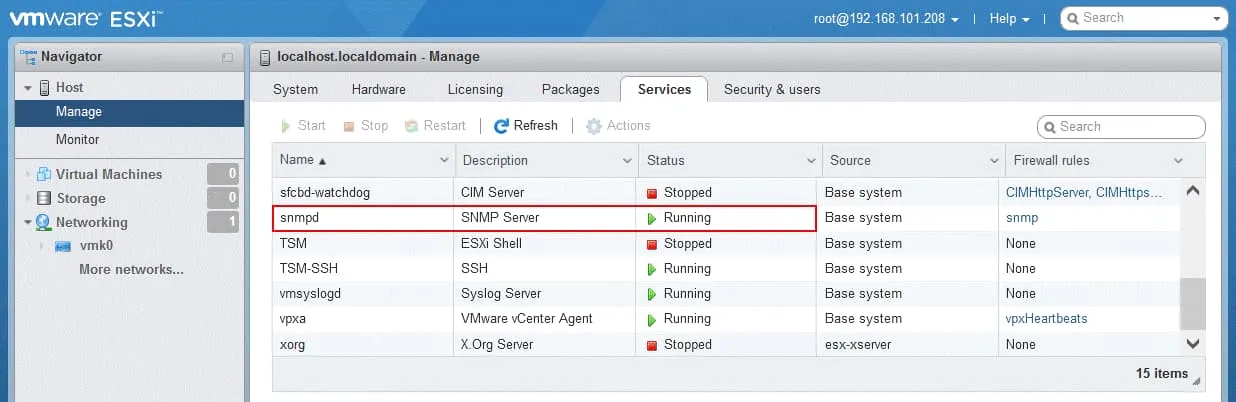
SNMP status is running now. You can also open VMware Host Client, go to Host > Manage > Services, and check the status of the snmpd service.
Test current SNMP configuration.
esxcli system snmp test

If you edit SNMP settings after that, restart the SNMP agent with the command:
/etc/init.d/snmpd restart
As an alternative, you can restart ESXi SNMP in the VMware Host Client GUI in the Services tab. Right-click the service and click Restart in the context menu.
If you need to reset ESXi SNMP settings, use the command:
esxcli system snmp set -r
The command to disable SNMP on an ESXi host is:
esxcli system snmp set –enable false
You can check SNMP availability from a Linux machine if this Linux machine is the SNMP target. We use Ubuntu Linux for this purpose.
Install the required SNMP client on Ubuntu Linux if this client has not been installed yet:
sudo apt-get install snmp
Connect to the ESXi host via SNMP to check the parameters available for monitoring:
snmpwalk -v2c -c nakivo 192.168.101.208
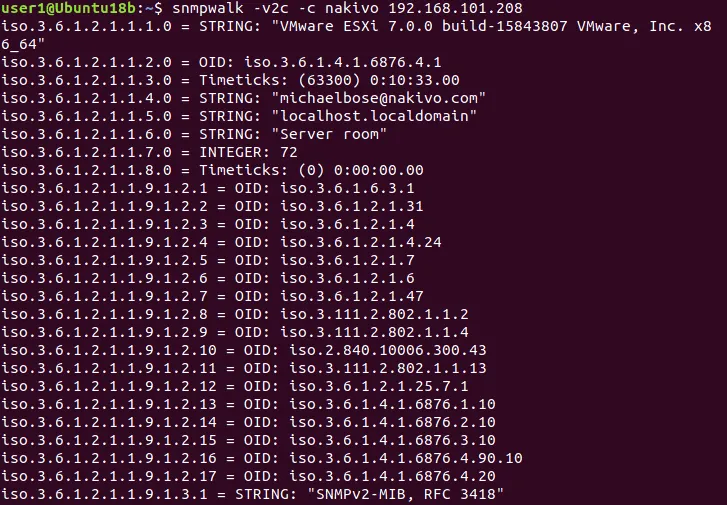
You should see a long list of objects for ESXi monitoring via SNMP in the console output. These objects are management information bases (MIBs) and object identifiers (OIDs), which are elements of the hierarchical structure of monitoring parameters.
An SNMP MIB is a collection of information about objects (parameters and settings) that is organized hierarchically. There are scalar and tabular MIBs. MIBs can be standard and vendor-specific.
An SNMP OID is a uniquely identified managed object in the hierarchical MIB structure. Different levels of the tree are assigned by different organizations. Vendors can define special branches to monitor the parameters of their products.
An object name is a unique value for the entire MIB that is corresponding to the appropriate OID. For example, the object name for the OID 1.3.6.1.2.1.1.5 is sysName.
Configuring ESXi Firewall
You have to configure the firewall and enable SNMP access from monitoring servers to the ESXi host. You can set a subnet or a single IP address of allowed devices in the network.
We run these three commands to allow access from the 192.168.101.0/24 network to monitor ESXi via SNMP:
esxcli network firewall ruleset set –ruleset-id snmp –allowed-all false
esxcli network firewall ruleset allowedip add –ruleset-id snmp –ip-address 192.168.101.0/24
esxcli network firewall ruleset set –ruleset-id snmp –enabled true
Enter the IP address or a network address according to your network configuration.
A less secure configuration is to enable access from any network device:
esxcli network firewall ruleset set –ruleset-id snmp –allowed-all true
esxcli network firewall ruleset set –ruleset-id snmp –enabled true
ESXi SNMP configuration is done. Now you can configure your monitoring software on a monitoring server.
Configuring SNMP v3
SNMP v3 is a more secure version of the protocol providing key authentication and encryption. SNMP v3 configuration is more complicated and is supported since vSphere 5.1. Below is an overview of how to enable SNMP v3 on an ESXi host.
Set authentication protocol and privacy options.
esxcli system snmp set -a SHA1 -x AES128
Where:
SHA1 is the algorithm for cryptographic encryption, the cryptographic hash function (Secure Hash Algorithm 1).
AES128 is the encryption method (Advanced Encryption Standard with a 128-bit encryption key) using the symmetric block cipher.
Generate hashes by using a command like:
esxcli system snmp hash –auth-hash authpass –priv-hash privhash –raw-secret
In my case, the command is:
esxcli system snmp hash –auth-hash PasswordTest1 –priv-hash PasswordTest2 –raw-secret
Avoid using passwords provided in this example in production environments. Use strong unique passwords (the password must be at least 7 characters long). Save the generated hash strings. In my case, the hashes are as follows.
Authhash: 831a798d1cda90ca1a3ab80d38f81a44c0851ada
Privhash: 38cf6f13d09a4651362338eac2c3d62b42514bc9

Use the generated hashes and add a user. Adding up to five users is supported.
esxcli system snmp set -e yes -C user -u snmpuser/authhash/privhash/priv
Where:
user is the contact email for the user
snmpuser is the username (can be up to 32 characters)
authhash is the authentication hash value
privhash is the privacy hash value
We add user1 and use hashes generated in the output of the previous command.
esxcli system snmp set -e yes -C user1@nakivo.com -u user1/831a798d1cda90ca1a3ab80d38f81a44c0851ada/38cf6f13d09a4651362338eac2c3d62b42514bc9/priv
You can create a user without security settings (no authentication and privacy) by using the command:
esxcli system snmp set –user user2/-/-/none
Define the SNMP target address:
esxcli system snmp set –v3targets 192.168.101.209@161/user1/priv/trap
Enable SNMP on ESXi:
esxcli system snmp set –enable true
Test SNMP settings:
esxcli system snmp test
You can use the extended command to test VMware SNMP configuration on ESXi:
esxcli system snmp test -u=user1 -A=PasswordTest1 -X=P2sswordTest2 -r
Where user1 is the name of the SNMP user that has been added to the configuration.
If the test is completed successfully, a message is displayed:
User validated correctly for given engine id and security level: protocols

Try to connect to the ESXi host via SNMP v3 from a monitoring Linux server (from the target side).
This command is used if no authentication parameters have been set:
snmpwalk -v3 -u user1 192.168.101.208
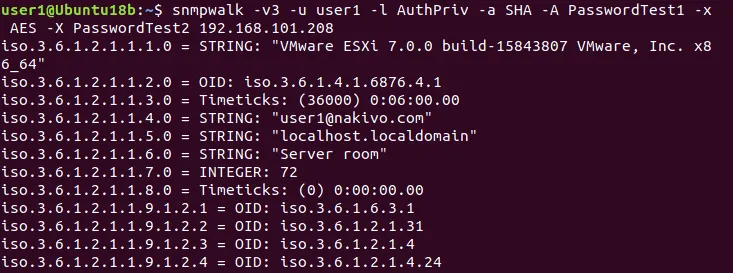
If you have set secure options, define them in the command:
snmpwalk -v3 -u user1 -l AuthPriv -a SHA -A PasswordTest1 -x AES -X PasswordTest2 192.168.101.208
Where user1 is the name of my user added to the ESXi SNMP configuration.
If you see the “Unknown user name” error when you test ESXi SNMP configuration, check whether you have added a user and defined the correct username in the next commands after adding the user. Keep in mind that if you change the agent’s Engine ID, the privacy protocol, or the authentication protocol after configuring users, these users become not valid. You need to reconfigure users in this case.
Also, pay attention to security settings because an incorrect SNMP configuration can constitute a threat and allow a malicious host to get information about an ESXi host. This information can be used to detect vulnerable places and initiate a cyber attack.
SNMP Configuration of Multiple ESXi Hosts
Using VMware host profiles can help you enable SNMP and configure multiple ESXi hosts more rationally if you have a large number of ESXi hosts in your vSphere environment.
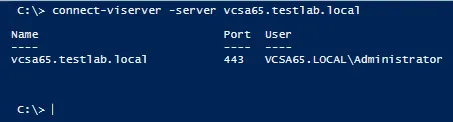
To enable SNMP and configure multiple ESXi hosts, you must have the VMware vSphere Enterprise Plus license to use VMware Host Profiles in VMware vSphere Client. VMware SNMP settings for profiles of ESXi hosts are located in Management > Host Profiles > your Profile > SNMP Agent Configuration. You can also use vSphere PowerCLI to automate the configuration process of a large number of ESXi hosts to set ESXi SNMP configuration on them.
Conclusion
ESXi SNMP configuration requires SSH access to ESXi hosts, configuring SNMP agents, and allowing access in the ESXi firewall. ESXi monitoring allows you to react in time if any issues are detected and improve the overall service availability. Don’t forget to perform VMware vSphere VM backup to avoid data loss and to be able to recover data and restore workloads if a disaster strikes.
NAKIVO Backup & Replication is the universal data protection solution that provides a wide set of options to back up and recover VMware vSphere VMs and other data in a datacenter. Moreover, the latest version of the solution supports ESXi monitoring as a part of VMware vSphere monitoring.